Timex Expedition WS4 Guida utente
- Categoria
- Orologi
- Tipo
- Guida utente

W253 810-095009-NA
TMTM
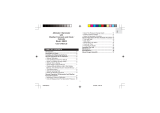
USER MANUAL
TMX_W253_WS4_Cover_NA:Layout 1 8/27/09 12:07 PM Page CVR2

English page 1
Français page 51
Español página 99
TMX_W253_WS4_Cover_NA:Layout 1 8/27/09 12:07 PM Page CVR4

E
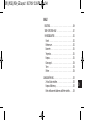
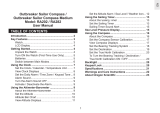
TABLE OF CONTENTS
INTRODUCTION . . . . . . . . . . . . . . . . . . . . . . . . . . . . . . . . . . . . . . . . 5
TIMEX
®
EXPEDITION
®
WS4
™
. . . . . . . . . . . . . . . . . . . . . . . . . . . . . . . 7
WATCH FEATURES. . . . . . . . . . . . . . . . . . . . . . . . . . . . . . . . . . . . . . 8
Time . . . . . . . . . . . . . . . . . . . . . . . . . . . . . . . . . . . . . . . . . . . . . . 8
Altimeter . . . . . . . . . . . . . . . . . . . . . . . . . . . . . . . . . . . . . . . . . . . 8
Barometer. . . . . . . . . . . . . . . . . . . . . . . . . . . . . . . . . . . . . . . . . . 9
Temperature . . . . . . . . . . . . . . . . . . . . . . . . . . . . . . . . . . . . . . . . 9
Compass. . . . . . . . . . . . . . . . . . . . . . . . . . . . . . . . . . . . . . . . . . . 9
Chronograph . . . . . . . . . . . . . . . . . . . . . . . . . . . . . . . . . . . . . . . . 9
Timer . . . . . . . . . . . . . . . . . . . . . . . . . . . . . . . . . . . . . . . . . . . . 10
Alarm . . . . . . . . . . . . . . . . . . . . . . . . . . . . . . . . . . . . . . . . . . . . 10
QUICK START. . . . . . . . . . . . . . . . . . . . . . . . . . . . . . . . . . . . . . . . . . . 11
Setting the Time and Date. . . . . . . . . . . . . . . . . . . . . . . . . . . . . 11
Calibrating the Compass . . . . . . . . . . . . . . . . . . . . . . . . . . . . . . 11
Calibrating Altitude or Barometer and Setting the Weather . . . . 12
TMX_W253_WS4_EN:Layout 1 9/3/09 8:38 AM Page ii

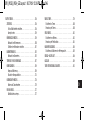
INSTRUCTIONS . . . . . . . . . . . . . . . . . . . . . . . . . . . . . . . . . . . . . . . . . 14
TIME MODE . . . . . . . . . . . . . . . . . . . . . . . . . . . . . . . . . . . . . . . . . . 14
Setting the Time and Measurements . . . . . . . . . . . . . . . . . . . . . 14
Changing the Display . . . . . . . . . . . . . . . . . . . . . . . . . . . . . . . . 14
ALTIMETER MODE . . . . . . . . . . . . . . . . . . . . . . . . . . . . . . . . . . . . . 15
Operating the Altimeter . . . . . . . . . . . . . . . . . . . . . . . . . . . . . . . 15
Setting the Target Altitude or Altitude Alarm . . . . . . . . . . . . . . . 16
BAROMETER MODE . . . . . . . . . . . . . . . . . . . . . . . . . . . . . . . . . . . . 19
Operating the Barometer. . . . . . . . . . . . . . . . . . . . . . . . . . . . . . 19
TEMPERATURE AND FORECAST . . . . . . . . . . . . . . . . . . . . . . . . . . . 21
COMPASS MODE . . . . . . . . . . . . . . . . . . . . . . . . . . . . . . . . . . . . . . 23
Calibrating the Compass . . . . . . . . . . . . . . . . . . . . . . . . . . . . . . 23
Using the Compass . . . . . . . . . . . . . . . . . . . . . . . . . . . . . . . . . . 26
CHRONO MODE . . . . . . . . . . . . . . . . . . . . . . . . . . . . . . . . . . . . . . . 27
Laps and Splits . . . . . . . . . . . . . . . . . . . . . . . . . . . . . . . . . . . . . 29
REVIEW MODE. . . . . . . . . . . . . . . . . . . . . . . . . . . . . . . . . . . . . . . . 30
Reviewing Activity Data . . . . . . . . . . . . . . . . . . . . . . . . . . . . . . . 30
E
TIMER MODE. . . . . . . . . . . . . . . . . . . . . . . . . . . . . . . . . . . . . . . . . 32
Setting the Timer . . . . . . . . . . . . . . . . . . . . . . . . . . . . . . . . . . . 32
Operating the Timer . . . . . . . . . . . . . . . . . . . . . . . . . . . . . . . . . 33
ALARM MODE . . . . . . . . . . . . . . . . . . . . . . . . . . . . . . . . . . . . . . . . 34
Setting an Alarm . . . . . . . . . . . . . . . . . . . . . . . . . . . . . . . . . . . . 34
Operating the Alarm . . . . . . . . . . . . . . . . . . . . . . . . . . . . . . . . . 35
CALIBRATION MODE . . . . . . . . . . . . . . . . . . . . . . . . . . . . . . . . . . . 36
Setting and Calibrating Your Reference Points . . . . . . . . . . . . . . 38
INDIGLO
®
NIGHT-LIGHT . . . . . . . . . . . . . . . . . . . . . . . . . . . . . . . . . 39
GLOSSARY. . . . . . . . . . . . . . . . . . . . . . . . . . . . . . . . . . . . . . . . . . . 40
TIMEX INTERNATIONAL WARRANTY . . . . . . . . . . . . . . . . . . . . . . . . 43
TMX_W253_WS4_EN:Layout 1 9/3/09 8:38 AM Page 2

INTRODUCTION
Some of the best places on the planet are the hardest to get to. Your new
Timex
®
Expedition
®
WS4
™
watch will help you get there.
Equipped with essential outdoor features, the WS4
™
watch takes a fresh
approach to wrist-top adventure instruments. The large, wide-screen dash-
board displays key information at a glance, without flipping through modes.
The WS4
™
watch utilizes advanced sensors that have precision accuracy, and
coupled with the intuitive user-interface, you can rely on it to give you all the
right answers in even the most extreme conditions. The first few pages of the
manual will get you started in minutes, and the rest provides an in-depth
understanding of our most advanced outdoor instrument yet.
So whether you’re taking to the trails, hitting the slopes or racing up
twenty-three flights of stairs to see just how sensitive the altimeter is, get ready
to venture out of bounds.
E
5
TMX_W253_WS4_EN:Layout 1 9/3/09 8:38 AM Page 4

TIMEX
®
EXPEDITION
®
WS4
™
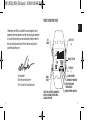
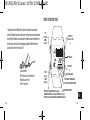
“Remember, your WS4 is no substitute for sound judgment. Sound
judgment comes from experience, and the only way to gain experience
is to put in the time. Enjoy your new instrument, yet keep in mind it is
like a pet dog that needs exercise. Take it outdoors and put it and
yourself through the paces.”
-Conrad Anker
World-Renowned Mountaineer
Timex
®
Expedition
®
Brand Ambassador
7
6
E
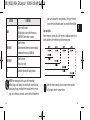
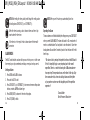
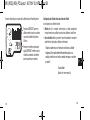
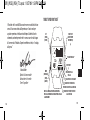
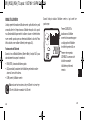
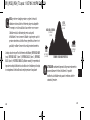
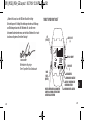
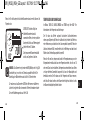
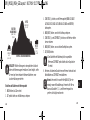
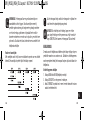
START/SPLIT
(+)
INDIGLO
®
BUTTON
SET
(DONE)
MODE
(NEXT)
STOP/RESET
(-)
TIME OF DAY>ALTIMETER>BAROMETER>
COMPASS>CHRONO>REVIEW>TIMER>
ALARM>CALIBRATION
ALARM INDICATOR
CHRONOGRAPH INDICATOR
REPEAT COUNTDOWN
TIMER INDICATOR
COUNTDOWN TIMER INDICATOR
TMX_W253_WS4_EN:Layout 1 9/3/09 8:38 AM Page 6

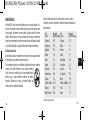
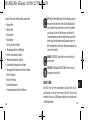
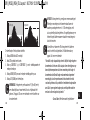
• Altitude alarm.
• Five user-set, customizable altitude reference points.
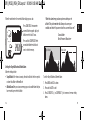
Barometer
• Tracks high, low and current pressure as well as sea level pressure.
• Displays sea level pressure changes in a graph.
• Operating range from 300 to 1100 mbar (9 to 32.5 inHg)
• Displays a weather forecast graphic.
Temperature
• Shows the temperature in either Celsius or Fahrenheit.
• Operating range from 14° to 122° F (-10° to 50°C)
Compass
• Includes the heading in both number format and a digital compass needle.
• Can be calibrated to a declination angle for maximum accuracy.
Chronograph
• Stopwatch feature that will time up to 100 hours and 99 laps.
WATCH FEATURES
Time
• Hours, minutes, and seconds displayed in 12- or 24-hour format.
• Date displayed in MM-DD or DD.MM formats.
• Second time zone, with independent hours, minutes, date, and format
settings.
• Hourly chime (optional).
• Button beep (optional).
• Both a digital and an analog clock.
Altimeter
• Shows measurements in either feet or meters.
• Operating range from -1312 to 29,520 ft (-400 to 9000m)
• Tracks current, peak and accumulated altitude.
• Displays ascent and descent in a graph.
• Tracks time in and above target altitude (in Review Mode).
9
8
E
TMX_W253_WS4_EN:Layout 1 9/3/09 8:38 AM Page 8

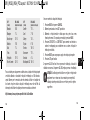
QUICK START
The next three pages will give you the basics you need to get your watch up
and running in under 5 minutes. Continue reading for full instructions.
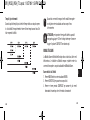
Setting the Time and Date
1. Press MODE until time of day appears.
2. Press and hold SET to start.
3. Press START/SPLIT (+) or STOP/RESET (-) to increase or decrease setting
values for time zone, time, date, sounds, and measurement units.
4. Press MODE (NEXT) to advance to the next setting option.
5. Press SET (DONE) to finish.
Calibrating the Compass
Prior to calibrating, remove the watch from your wrist, hold it in your hand,
and choose a declination angle from the table on pages 24 and 25.
1. Press MODE until COMPASS appears.
2. Press and hold SET to start.
• Option to display lap or split time in larger digits.
• During chronograph use, the WS4
™
watch records key activity statistics that
can be seen in Review Mode.
Timer
Countdown timer works up to 100 hours, with the option to repeat countdown up
to 99 times.
Alarm
• Choose from daily, weekday, weekend, or weekly alarms.
• One-time backup alert if alarm is ignored.
11
10
ENGLISH QUICK START
TMX_W253_WS4_EN:Layout 1 9/3/09 8:38 AM Page 10

5. Press START/SPLIT (+) or STOP/RESET (-) to increase or decrease
setting values.
6. Press MODE (NEXT) to advance to the next setting option.
7. Press SET (DONE).
8. To complete calibration for the selected reference, hold
STOP/RESET until watch beeps.
Once you have set the altitude or barometer, then you will need to synchronize
the weather icon to current weather conditions.
1. In CAL mode, press SET to begin calibration.
2. Press START/SPLIT (+) or STOP/RESET (-) to scroll to WEATHER.
3. Press MODE (NEXT) to begin the setting process.
4. Press START/SPLIT (+) or STOP/RESET (-) to scroll among weather options.
5. Press SET (DONE).
6. To calibrate the weather to the preselected data, hold
STOP/RESET until the watch beeps.
3. Keeping the watch level and facing up, rotate it twice (taking at least
15 seconds per revolution) and then press MODE.
4. Press START/SPLIT (+) or STOP/RESET (-) to increase or decrease setting
values to match your chosen declination angle.
5. Press MODE to advance to the next setting option.
6. Press SET to finish.
If you see CAL OK at the end of the calibration process you have successfully
calibrated the compass. If you see CAL FAIL, repeat the calibration process.
Calibrating Altitude or Barometer and Setting the Weather
You should calibrate either the Altimeter (HOME) or the Barometer (BARO), and the
Weather Icon (WEATHER) prior to first use. You should calibrate the watch to the
most accurate information you have.
1. Press MODE until CAL appears.
2. Press and hold SET to begin the calibration.
3. Press START/SPLIT (+) or STOP/RESET (-) to scroll among the reference point
settings and choose either HOME or BARO.
4. Press MODE (NEXT) to begin the setting process.
13
12
ENGLISH QUICK START
TMX_W253_WS4_EN:Layout 1 9/3/09 8:38 AM Page 12

• When in Time of Day Mode, press STOP/RESET to choose among the
following display options: Date, Altitude, or Barometric Pressure.
ALTIMETER MODE
Your watch allows you to track current, peak, and accumulated altitude as well
as time spent at or above a target altitude. This mode also includes an alarm if
you want to be alerted when you go above an altitude of your choosing. You
should calibrate the altimeter before first use (see page 38).
Operating the Altimeter
Once in Altimeter Mode, the WS4
™
watch automatically scrolls through:
• PEAK: The highest reached altitude.
• ACC (accumulated): The total altitude change, taking both ascent and
descent into account.
• CURR (current): The current altitude.
Note: If during a hike you climb 400 meters and descend 100
meters, then your accumulated altitude is 300 meters.
INSTRUCTIONS
TIME MODE
Your watch shows the time for two time zones. In this mode, you can also choose
measurement units (i.e., feet or meters; Fahrenheit or Celsius) and pick from three
different display options.
Setting the Time and Measurements
1. Press MODE until time of day is displayed.
2. Press and hold SET to start.
3. Press START/SPLIT (+) or STOP/RESET (-) to increase or decrease setting
values for time zone, time, date, sounds, and measurements.
4. Press MODE (NEXT) to advance to the next setting option.
5. Press SET (DONE) to finish.
Changing the Display
• Times Zones: Look at the other time zone by pressing START/SPLIT or switch
time zones by holding START/SPLIT.
14
E
15
TMX_W253_WS4_EN:Layout 1 9/3/09 8:38 AM Page 14

“When the alarm beeps you know you’ve reached your set
altitude. This quick reminder will allow you to assess your
condition and decide if you are on track for a successful ascent.”
-Conrad Anker
World-Renowned Mountaineer
To set the Target Altitude or Altimeter Alarm:
1. Press MODE until ALTI is shown.
2. Press and hold SET to start.
3. Press START/SPLIT (+) or STOP/RESET (-) to increase or decrease setting
values.
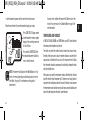
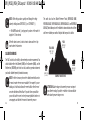
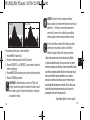
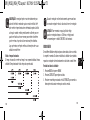
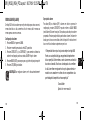
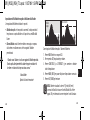
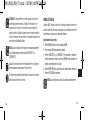
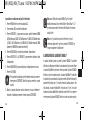
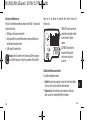
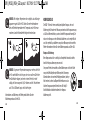
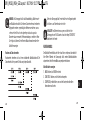
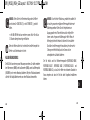
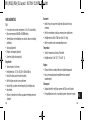
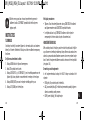
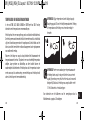
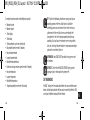
When the watch reaches the current altitude display you can also:
Press START/SPLIT: view numeric
current altitude or graphic display of
altitude over the last 36 hours.
Press and hold STOP/RESET: Reset
accumulated altimeter statistics to
zero to clear the memory.
Setting the Target Altitude or Altitude Alarm
Altimeter settings include:
•
Target Altitude:
If the chrono is running, the watch will track the time spent at
or above this altitude in Review Mode.
•
Altitude Alarm:
Alerts you via an onscreen pop-up and an audible alarm that you
have reached a pre-selected altitude.
17
16
E
Target Altitude
Altitude Alarm
TMX_W253_WS4_EN:Layout 1 9/3/09 8:38 AM Page 16

As it is an inverse relationship between altitude and barometric
pressure, if I wake at the same or lower elevation I can be confident
the atmospheric pressure has remained constant. If I rise to a higher
altitude I need to be aware as there is a chance a low pressure is
moving in.”
-Conrad Anker
World-Renowned Mountaineer
BAROMETER MODE
Your watch includes information about current and sea level pressure, high or
low barometric information, and changes in sea level pressure over the most
recent 36 hours. These features are useful for understanding changes in
weather.
Operating the Barometer
Once in BARO Mode, the watch automatically scrolls through:
• Highest reached barometric pressure.
• Lowest barometric pressure.
4. Press MODE (NEXT) to advance to the next setting option.
5. Press SET (DONE) to finish.
NOTE: The altimeter will display in either FT (feet) or M (meters)
depending on which display unit you chose in Time Mode.
See page 14 for information on setting units of measurement.
ATTENTION: Your altimeter is sensitive to weather changes! Sudden
changes in barometric pressure can change your altimeter reading by
+/- 100 meters even if you have stayed in the same location. If
possible, re-calibrate to a known altitude when drastic pressure
changes occur.
You only need to calibrate barometer OR altimeter, since they rely
on the same pressure. See Calibration Mode on page 36 for more
information.
“Before I curl into my sleeping bag I note the current altitude and baro-
metric pressure. In the few hours I sleep if I see a change in altitude or
barometric pressure I can get an idea of the coming weather patterns.
19
18
E
TMX_W253_WS4_EN:Layout 1 9/3/09 8:38 AM Page 18

You only need to calibrate the barometer OR altimeter, since they
rely on the same pressure. See Calibration Mode on page 36 for
more information.
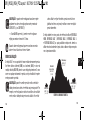
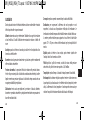
TEMPERATURE AND FORECAST
In TIME, ALTI, BARO, CHRONO, and TIMER Modes, your WS4
™
watch includes
information about temperature and forecast.
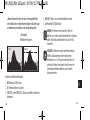
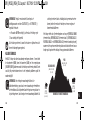
The watch can predict the weather based on historical air pressure trends.
Generally, if the air pressure is rising, the weather situation is considered to be
improving and is indicated by the sun icon. If the air pressure trend is falling,
then the weather situation is worsening and is indicated by showing the clouds
and/or precipitation icons.
When worn on your wrist, the temperature reading is affected by body heat and
may differ from the actual temperature by 10 degrees or more. Long periods of
exposure to direct sunlight may also affect accuracy. The watch can also mea sure
the temperature in water, but make sure you don’t press any watch buttons under
water or this will compromise the watch’s water-resistance.
21
E
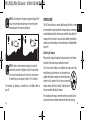
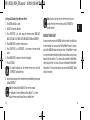
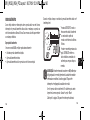
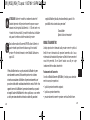
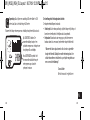
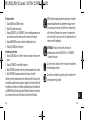
• Current barometric pressure and the corrected sea level pressure.
When the watch reaches the current barometric display you can also:
Press START/SPLIT: Displays numeric
current barometer reading or graphic
display of the sea level pressure over
the last 36 hours.
Press and hold STOP/RESET: Reset
accumulated barometer statistics to
zero to clear the memory.
NOTE: The barometer will display in either MB (millibars) or In Hg
(inches of mercury) depending on which display unit you chose in
Time Mode. See page 14 for information on setting units of
measurement.
20
TMX_W253_WS4_EN:Layout 1 9/3/09 8:38 AM Page 20

23
E
COMPASS MODE
The WS4
™
watch includes an accurate digital compass that takes a reading
every second when engaged and shows the compass reading as a number and
a cardinal heading along with a virtual compass needle. You must calibrate the
compass prior to first use and it’s also a good idea to calibrate it periodically to
maintain more accurate readings. For more information, see Calibration Mode
on page 36.
Calibrating the Compass
When using the compass, it’s important to keep your wrist at a level, horizon-
tal position to help make compass readings more accurate.
For the most accurate readings, avoid calibrating the compass near large
metallic objects (such as electronics, cars, filing cabinets, and
anything else metal) since magnetic force in these objects may
interfere with the magnetic field and give you inaccurate
compass readings. Note that the Indiglo
®
night-light feature
does not work while calibrating the compass.
Prior to calibrating the compass, remove the watch from your wrist, hold it in
your hand and choose a declination angle from the table on the next page.
NOTE: At low temperatures, the display could appear sluggish. Refer
to page 9 for operating temperature range. Increase temperature
surrounding watch to resume normal operation.
NOTE: For more accurate temperature readings, try wearing the
watch outside your jacket or clipping it to your belt or pack (ideally
in an area not constantly exposed to the sun). You can also remove
the watch from your wrist and put in shade for 15 to 30 minutes.
For information on calibrating your weather icon see Calibration Mode on
page 36.
22
P
P
TMX_W253_WS4_EN:Layout 1 9/3/09 8:38 AM Page 22

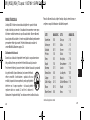
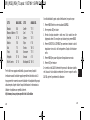
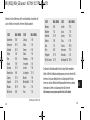
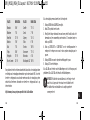
CITY DEC. ANGLE CITY DEC. ANGLE
Oslo 1° E Toronto 10° W
Paris 0° W Vancouver 17° E
Reykjavik 15° W Warsaw 4° E
Rio De Janeiro 22° W Washington DC 10° W
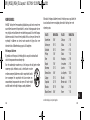
For cities that do not appear on the table above, you can find your declination
angle using the declination angle calculator at the URL listed below. Note that
you will need to know the latitude and longitude of your location before you can
calculate the declination angle at this website. Latitude and longitude informa-
tion can be found on the internet.
http://www.ngdc.noaa.gov/geomagmodels/struts/calcDeclination
Once you know your declination angle:
1. Press MODE until COMPASS is shown.
2. Hold SET to start.
3. Keeping the watch level and facing up, rotate it twice (taking at least
15 seconds per revolution) and then press MODE.
25
E
CITY DEC. ANGLE CITY DEC. ANGLE
Amsterdam 0° W Chicago 3° W
Anchorage 19° E Dallas 3° E
Auckland 18° E Denver 9° E
Beijing 3° W Dubai 1° E
Berne 0° E Hong Kong 2° W
Bogota 5° W Jerusalem 3° E
Bozeman 13° E London 1° W
Buenos Aires 8° W Los Angeles 12° E
Calgary 15° E Madrid 1° W
Capetown 23° W Mexico City 5° W
Moscow 10° W Riyadh 2° E
Mt. Everest 0° W Rome 1° E
Mumbai 0° W Seattle 17° E
Munich 1° E Seoul 7° W
New York 12° W Sydney 12° E
Orlando 5° W Tokyo 6° W
24
TMX_W253_WS4_EN:Layout 1 9/3/09 8:38 AM Page 24

TIP: Your watch would be a great tool for orienteering. You can use
your compass to navigate way points and if you participate in an
orienteering race, you can time yourself using the chronograph
(see next section).
CHRONO MODE
Your watch includes a chronograph, which is a stopwatch function. The chrono
can track up to 100 hours and 99 laps. The data you collect while running the
chronograph can then be used to check your progress in Review Mode.
(See page 30 for more information about Review Mode).
Most watch buttons have multiple functions in Chrono Mode. Use the table
along with your watch to explore the options.
4. Press START/SPLIT or STOP/RESET to increase or decrease setting values to
match your chosen declination angle.
5. Press MODE to advance to the next setting option.
6. Press SET to finish.
If you see CAL OK at the end of the calibration process you have successfully
calibrated the compass. If you see CAL FAIL, repeat the calibration process.
ATTENTION: Calibration may fail if you rotate the watch too quickly or
take longer than one minute to complete. Calibration may also fail if
you are near objects that are magnetic.
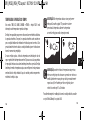
Using the Compass
After you have calibrated your compass, you will see the current compass
heading, cardinal points, and the digital compass needle when you enter Compass
Mode. After 30 seconds the compass reading times out and disappears from the
watch display to preserve battery life. Press START/SPLIT to display the current
heading for another 30 seconds.
27
E
26
TMX_W253_WS4_EN:Layout 1 9/3/09 8:38 AM Page 26

29
E
make sure bad weather is not approaching. Once you’ve finished,
you can check out information about your activity in Review Mode.
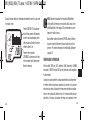
Laps and Splits
When referring to lap times, this is the time for an individual segment of an
activity. Split time is the entire time up to the current segment.
When the chrono is running, a bar is shown in chrono and time
of day modes above the stopwatch icon.
NOTE: Your chronograph can be a good tool for mountain
biking, skiing, or trail running. You can take splits at specified trail
points along the way, periodically check your altimeter to see how
high you’ve climbed or descended, and even check the barometer to
28
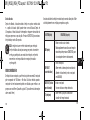
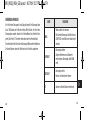
BUTTON FUNCTIONS
MODE
• Enter or exit the mode.
• Quickly display a lap or split after pressing
START/SPLIT when chrono is running.
STOP/RESET
• Stop the chrono.
• Switch between altimeter or barometer display
information (if chrono is at 00:00:00).
START/SPLIT
• Start the chrono.
• Take a lap or split.
SET
• Switch the lap and split display positions.
TMX_W253_WS4_EN:Layout 1 9/3/09 8:38 AM Page 28

31
E
• Time Spent At or Above Target Altitude
• Altitude Graph (most recent 35 minutes)
• Highest Barometric Pressure
• Lowest Barometric Pressure
• Average Barometric Pressure
• Sea Level Pressure Graph (most recent 35 minutes)
• Highest Temperature
• Lowest Temperature
• Average Temperature
• Temperature Graph (most recent 35 minutes)
TIP: You can use Review Mode to relive your hike on the way
home. Scroll through activity stats to let your friends know how
high you climbed, how much time you spent above your target
altitude, and even the temperature changes over the course
of your hike. Even more, you can show them this information
through a series of graphs that show altitude, barometric pressure,
and temperature changes over time.
ATTENTION: To save the life of your watch battery, when the chrono
reaches 100 hours the watch will stop timing and the START/SPLIT
button will not function.
REVIEW MODE
The Activity Review Mode on the watch captures lows, highs and adventure
averages. Activity statistics are recorded while the chronograph is running and are
then visible in Review Mode.
Reviewing Activity Data
1. Press MODE until REVIEW is shown.
2. Press START/SPLIT to scroll through the data.
3. Press and hold STOP/RESET to clear the most recent review information after
you have finished reviewing it.
The following data is tracked in Review Mode:
• Maximum Altitude
• Minimum Altitude
• Total Ascent
• Total Descent
30
TMX_W253_WS4_EN:Layout 1 9/3/09 8:38 AM Page 30

33
E
Operating the Timer
1. Press START/SPLIT to start the timer or restart it after a pause.
2. Press STOP/RESET to stop the countdown.
3. Hold STOP/RESET to reset the timer to the start value.
4. Hold STOP/RESET again to clear the timer to 0.
When the countdown reaches zero the watch will beep. You can press any
button to silence the beep. If you set the timer to repeat at the end of the count-
down, the repeat will continue until you press STOP/RESET. The display will show
R and a number to indicate the timer is repeating and how many times it has
repeated.
TIP: The timer might be useful when you want to be alerted at the
halfway point of an activity. For example, you go out knowing you
only have about two hours to spend on a hike. You set the timer for
60 minutes and when it beeps you know it’s time to turn around
and start heading back to the trail head. Timer information is not
connected to Review Mode.
NOTE: Press and hold START/SPLIT to quickly scroll through
all data.
ATTENTION: You will see the message NO DATA STORED if the
Chrono has never been run.
TIMER MODE
Your WS4
™
watch includes a standard countdown timer that you can use for
both outdoor and indoor activities. It can count down from a fixed time of up to
100 hours and can repeat a countdown up to 99 times.
Setting the Timer
1. Press MODE until TIMER is shown.
2. Press and hold SET to start.
3. Press START/SPLIT (+) or STOP/RESET (-) to increase or decrease setting
values for hours, minutes, seconds, and end action.
4. Press MODE (NEXT) to advance to the next setting option.
5. Press SET (DONE) to finish.
32
TMX_W253_WS4_EN:Layout 1 9/3/09 8:38 AM Page 32

35
E
NOTE: When you set the alarm, you automatically turn it on.
Operating the Alarm
To turn an alarm on or off without initiating the setting process, press START/SPLIT
when you enter ALARM MODE. The alarm will sound for 20 seconds when it
reaches a scheduled alarm. Push any button to turn the alarm off. A one-time
backup alarm will sound after 5 minutes if you don’t turn the alarm off the first
time it rings.
“The alarm clock is perhaps the simplest function on the WS4watch.
Yet in it’s simplicity it plays a very important part in the overall
expedition. There is a comfort in hearing the 2 AM alarm wake me
from my sleep. These predawn hours are the finest of the day. Crisp
firm snow under foot, a few stars fading to dawn and the rhythm
of your partners cadence are the intangible part of the expedition
experience.”
-Conrad Anker
World-Renowned Mountaineer
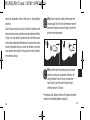
NOTE: While setting the timer, quickly scroll through the setting values
by holding down START/SPLIT (+) or STOP/RESET (-).
When the timer is running, a bar is shown in timer and time of day
modes above the timer icon.
If the timer is set to repeat, the bar is shown above the timer with
arrow icon.
ALARM MODE
The WS4
™
watch includes an alarm that you can set to ring once, or at the same
time every day, or only on weekends, weekdays, or even just one day a week.
Setting an Alarm
1. Press MODE until ALARM is shown.
2. Press and hold SET to start.
3. Press START/SPLIT (+) or STOP/RESET (-) to increase or decrease setting values
for hours, minutes, AM/PM and alarm type.
4. Press MODE (NEXT) to advance to the next setting option.
5. Press SET (DONE) to finish.
34
TMX_W253_WS4_EN:Layout 1 9/3/09 8:38 AM Page 34
La pagina si sta caricando...
La pagina si sta caricando...
La pagina si sta caricando...
La pagina si sta caricando...
La pagina si sta caricando...
La pagina si sta caricando...
La pagina si sta caricando...
La pagina si sta caricando...
La pagina si sta caricando...
La pagina si sta caricando...
La pagina si sta caricando...
La pagina si sta caricando...
La pagina si sta caricando...
La pagina si sta caricando...
La pagina si sta caricando...
La pagina si sta caricando...
La pagina si sta caricando...
La pagina si sta caricando...
La pagina si sta caricando...
La pagina si sta caricando...
La pagina si sta caricando...
La pagina si sta caricando...
La pagina si sta caricando...
La pagina si sta caricando...
La pagina si sta caricando...
La pagina si sta caricando...
La pagina si sta caricando...
La pagina si sta caricando...
La pagina si sta caricando...
La pagina si sta caricando...
La pagina si sta caricando...
La pagina si sta caricando...
La pagina si sta caricando...
La pagina si sta caricando...
La pagina si sta caricando...
La pagina si sta caricando...
La pagina si sta caricando...
La pagina si sta caricando...
La pagina si sta caricando...
La pagina si sta caricando...
La pagina si sta caricando...
La pagina si sta caricando...
La pagina si sta caricando...
La pagina si sta caricando...
La pagina si sta caricando...
La pagina si sta caricando...
La pagina si sta caricando...
La pagina si sta caricando...
La pagina si sta caricando...
La pagina si sta caricando...
La pagina si sta caricando...
La pagina si sta caricando...
La pagina si sta caricando...
La pagina si sta caricando...
La pagina si sta caricando...
La pagina si sta caricando...
La pagina si sta caricando...
La pagina si sta caricando...
La pagina si sta caricando...
La pagina si sta caricando...
La pagina si sta caricando...
La pagina si sta caricando...
La pagina si sta caricando...
La pagina si sta caricando...
La pagina si sta caricando...
La pagina si sta caricando...
La pagina si sta caricando...
La pagina si sta caricando...
La pagina si sta caricando...
La pagina si sta caricando...
La pagina si sta caricando...
La pagina si sta caricando...
La pagina si sta caricando...
La pagina si sta caricando...
La pagina si sta caricando...
La pagina si sta caricando...
La pagina si sta caricando...
La pagina si sta caricando...
La pagina si sta caricando...
La pagina si sta caricando...
La pagina si sta caricando...
La pagina si sta caricando...
La pagina si sta caricando...
La pagina si sta caricando...
La pagina si sta caricando...
La pagina si sta caricando...
La pagina si sta caricando...
La pagina si sta caricando...
La pagina si sta caricando...
La pagina si sta caricando...
La pagina si sta caricando...
La pagina si sta caricando...
La pagina si sta caricando...
La pagina si sta caricando...
La pagina si sta caricando...
La pagina si sta caricando...
La pagina si sta caricando...
La pagina si sta caricando...
La pagina si sta caricando...
La pagina si sta caricando...
La pagina si sta caricando...
La pagina si sta caricando...
La pagina si sta caricando...
La pagina si sta caricando...
La pagina si sta caricando...
-
 1
1
-
 2
2
-
 3
3
-
 4
4
-
 5
5
-
 6
6
-
 7
7
-
 8
8
-
 9
9
-
 10
10
-
 11
11
-
 12
12
-
 13
13
-
 14
14
-
 15
15
-
 16
16
-
 17
17
-
 18
18
-
 19
19
-
 20
20
-
 21
21
-
 22
22
-
 23
23
-
 24
24
-
 25
25
-
 26
26
-
 27
27
-
 28
28
-
 29
29
-
 30
30
-
 31
31
-
 32
32
-
 33
33
-
 34
34
-
 35
35
-
 36
36
-
 37
37
-
 38
38
-
 39
39
-
 40
40
-
 41
41
-
 42
42
-
 43
43
-
 44
44
-
 45
45
-
 46
46
-
 47
47
-
 48
48
-
 49
49
-
 50
50
-
 51
51
-
 52
52
-
 53
53
-
 54
54
-
 55
55
-
 56
56
-
 57
57
-
 58
58
-
 59
59
-
 60
60
-
 61
61
-
 62
62
-
 63
63
-
 64
64
-
 65
65
-
 66
66
-
 67
67
-
 68
68
-
 69
69
-
 70
70
-
 71
71
-
 72
72
-
 73
73
-
 74
74
-
 75
75
-
 76
76
-
 77
77
-
 78
78
-
 79
79
-
 80
80
-
 81
81
-
 82
82
-
 83
83
-
 84
84
-
 85
85
-
 86
86
-
 87
87
-
 88
88
-
 89
89
-
 90
90
-
 91
91
-
 92
92
-
 93
93
-
 94
94
-
 95
95
-
 96
96
-
 97
97
-
 98
98
-
 99
99
-
 100
100
-
 101
101
-
 102
102
-
 103
103
-
 104
104
-
 105
105
-
 106
106
-
 107
107
-
 108
108
-
 109
109
-
 110
110
-
 111
111
-
 112
112
-
 113
113
-
 114
114
-
 115
115
-
 116
116
-
 117
117
-
 118
118
-
 119
119
-
 120
120
-
 121
121
-
 122
122
-
 123
123
-
 124
124
-
 125
125


Timex Expedition WS4 Guida utente
- Categoria
- Orologi
- Tipo
- Guida utente
in altre lingue
- English: Timex Expedition WS4 User guide
- español: Timex Expedition WS4 Guía del usuario
- Deutsch: Timex Expedition WS4 Benutzerhandbuch
- Nederlands: Timex Expedition WS4 Gebruikershandleiding
- português: Timex Expedition WS4 Guia de usuario
Documenti correlati
Altri documenti
-
Freestyle Nomad Manuale utente
-
-
 Oregon Scientific EB833 Manuale utente
-
 Oregon Scientific RA202 Manuale utente
-
Simrad IS20 Graphic Guida Rapida
-
Columbia Ascent CT013 Manuale utente
-
Bushnell Digital Compass 700102 Manuale utente
-
 Hamilton Watch Khaki Field Multi-Touch Manuale utente
-
-
Oregon Scientific GP123 Manuale utente


