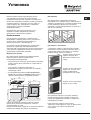
Hotpoint Ariston CISHB 10 A.1 Guida utente
- Categoria
- Piani cottura
- Tipo
- Guida utente
Questo manuale è adatto anche per

Operating Instructions
OVEN
CISHB 10 A.1
CISHB 10 A.1 IX
Contents
Installation, 2-4
Positioning
Electrical connections
Data plate
Description of the appliance, 5
Overall view
Control panel
Start-up and use, 6
Starting the oven
Cooking modes, 7-8
Cooking modes
Practical cooking advice
Cooking advice table
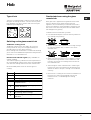
Hob, 9
Type of hob
Switching on the glass ceramic hob
Practical advice on using the glass ceramic hob
Precautions and tips, 10
General safety
Disposal
Respecting and conserving the environment
Maintenance and care, 11
Switching the appliance off
Cleaning the appliance
Cleaning the oven door
Replacing the light bulb
Assistance
GB
Ðóññêèé, 12English,1
RS
GB

2
GB
Before placing your new appliance into operation
please read these operating instructions carefully.
They contain important information for safe use, for
installation and for care of the appliance.
Please keep these operating instructions for future
reference. Pass them on to possible new owners of
the appliance.
Positioning
Keep packaging material out of the reach of
children.It can become a choking or suffocation
hazard (see Precautions and tips).
The appliance must be installed by a qualified
person in compliance with the instructions provided.
Incorrect installation may cause harm to persons,
animals or may damage property.
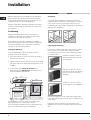
Fitting the appliance
Use the appropriate cabinet to ensure that the
appliance functions properly.
The panels adjacent to the oven must be made of
heat-resistant material.
Cabinets with a veneer exterior must be assembled
with glues which can withstand temperatures of up
to 100°C.
To install the oven under the counter (see
diagram) and in a kitchen unit, the cabinet must
have the following dimensions:
The appliance must not come into contact with
electrical parts once it has been installed.
The consumption indications on the data plate have
been calculated for this type of installation.
Ventilation
To ensure good ventilation, the back panel of the
cabinet must be removed. It is advisable to install the
oven so that it rests on two strips of wood, or on a
completely flat surface with an opening of at least 45 x
560 mm (see diagrams).
Centring and fastening
Position the 4 tabs on the side of the oven according
to the 4 holes of the outer frame. Adjust the tabs
according to the thickness of the cabinet side panel,
as shown below:
thickness of 20 mm: take off
the removable part of the tab
(see diagram)
thickness of 18 mm: use the
first groove, which has already
been set in the factory (see
diagram)
thickness of 16 mm: use the
second groove (see diagram)
Secure the appliance to the cabinet by opening the
oven door and putting 4 screws into the 4 holes of the
outer frame.
All parts which ensure the safe operation of the
appliance must not be removable without the aid of a
tool.
595
558
min
45
min
575-585 min
560
+4 -0
480
+4 -0
555
580
500
39
15
595
23
572
543
543
545
560 mm.
45 mm.
Installation

3
GB
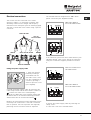
Electrical connections
The cooker must be connected to the mains
electricity supply. It is designed to operate with
alternating current at the voltage and frequency
indicated on the data plate (see the following page).
The hob is connected to the cooker using a special
connector.
BUILT-IN HOB
BUILT-IN COOKER
WHITE RED
YELLOW
BLUE GREEN
Only on
certain models
Fitting the power supply cable
1. Open the terminal
board by inserting a
screwdriver into the
side tabs of the cover.
Use the screwdriver as
a lever by pushing it
down to open the cover
(see diagram).
2. Install the power supply cable by loosening the
cable clamp screw and the wire contact screws L-N-
. Connect the wires to the corresponding
terminals: the Blue wire to the terminal marked (N),
the Brown wire to the terminal marked (L) and the
Yellow Green wire to the terminal marked
.
Replace the metal protection after performing all the
necessary hob connections. If the hob is removed
from its position, the red cap which was originally
protecting the red connector must be replaced.
The terminal board is designed for a 400 V three-
phase connection (see diagrams below).
400V 3N~H05RR-F
5x2.5 CEI-UNEL 35363
If the electrical system has other characteristics (see
diagrams below), carry out the electrical connection
using the connection supports provided in the box
P.
230V 1N~H07RN-F 3x4
CEI-UNEL 35364
400V 2N~H05RR-F
4x2.5 CEI-UNEL 35363
3. Secure the power supply cable by fastening the
clamp screw.
4. Close the cover of the terminal board.
NL3L1L2
1
3
2
4
5
N
L2
L3
L1
P
NL
1
3
2
4
5
NL2L1
1
3
2
4
5

4
GB
Connecting the supply cable to the mains
Install a standardised plug corresponding to the load
indicated on the data plate (see side).
The appliance must be directly connected to the
mains using an omnipolar circuit-breaker with a
minimum contact opening of 3 mm installed between
the appliance and the mains, suitable for the load
indicated and complying with current electrical
regulations (the earthing wire must not be interrupted
by the circuit-breaker). The supply cable must not
come into contact with surfaces with temperatures
higher than 50°C.
The installer must ensure that the correct electrical
connection has been made and that it is compliant
with safety regulations.
Before connecting to the power supply, make sure
that:
The appliance is earthed and the plug is compliant
with the law.
The socket can withstand the maximum power of
the appliance, which is indicated on the data plate
(see below).
The voltage must be in the range between the
values indicated on the data plate (see below).
The socket is compatible with the plug of the
appliance. If the socket is incompatible with the
plug, ask an authorised technician to replace it. Do
not use extension cords or multiple sockets.
Once the appliance has been installed, the power
supply cable and the electrical socket must be easily
accessible.
The cable must not be bent or compressed.
The cable must be checked regularly and replaced
by authorised technicians only (see Assistance).
The manufacturer declines any liability should
these safety meas
ures not be observed.
DATA PLATE
Dimensions
width 43.5 cm
height 32 cm
depth 43,5 cm
Volume
lt. 60
Electrical
connections
voltage: 230V/400V~ 3N 50/60Hz
maximum power absorbed 8400W
ENERGY LABEL
Directive 2002/40/EC on the label
of electric ovens.
Standard EN 50304
Energy consumption Class
certification Natural convection
heating mode: Traditional mode.
This appliance conforms to the
following European Economic
Community directives:
73/23/EEC of 19/02/73 (Low
Voltage) and subsequent
amendments;
- 89/336/EEC of 03/05/89
(Electromagnetic Compatibility) and
subsequent amendments;
- 93/68/EEC of 22/07/93 and
subsequent amendments.
- 2002/96/EC

5
GB
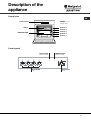
Overall view
Description of the
appliance
Control panel
SELECTOR
knob
THERMOSTAT
indicator light
HOTPLATES
knob
0
1
6
25
3
4
0
1
6
25
3
4
0
1
6
25
3
4
0
1
6
25
3
4
0
MAX
60
10 0
220
18 0
14 0
HOTPLATES
indicator light
Control panel
GRILL
DRIPPING PAN
GUIDES for the
sliding racks
position 5
position 4
position 3
position 2
position 1

6
GB
The first time you use your appliance, heat the empty
oven with its door closed at its maximum temperature
for at least half an hour. Ensure that the room is well
ventilated before switching the oven off and opening
the oven door. The appliance may produce a slightly
unpleasant odour caused by the burning away of
protective substances used during the manufacturing
process.
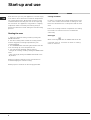
Starting the oven
1. Select the desired cooking mode by turning the
SELECTOR knob.
2. See the Cooking advice table for cooking modes
and the suggested cooking temperatures (see
Cooking Modes).
3. The THERMOSTAT indicator light indicates that the
oven is heating up to the temperature set.
4. You may do the following during cooking:
- change the cooking mode by turning the SELECTOR
knob
- stop cooking by turning the SELECTOR knob to the
0 position
Never put objects directly on the oven bottom to
avoid damaging the enamel coating.
Always place cookware on the rack(s) provided.
Cooling ventilation
In order to cool down the external temperature of the
oven, some models are fitted with a cooling fan that
blows out air between the control panel and the oven
door.
Once the cooking has been completed, the cooling
fan remains on until the oven has cooled down
sufficiently.
Oven light
When selecting
& with the SELECTOR knob the
oven light goes on. It remains on when a cooking
mode is selected.
Start-up and use

7
GB
Cooking modes
TRADITIONAL OVEN mode
Both the top and bottom heating elements will come
on. With this traditional cooking mode, it is best to use
one cooking rack only; if more than one rack is used,
the heat will be distributed unevenly.
The oven will automatically reach the temperature set,
and the thermostat, which is controlled by the
SELECTOR knob, will keep it constant.
? TOP OVEN mode
The top heating element comes on. This mode can be
used to brown food at the end of cooking. Always
cook in this mode with the oven door closed.
Cooking modes
Practical cooking advice
In the GRILL cooking mode, place the dripping pan
in position 1 to collect cooking residues (fat and/or
grease).
GRILL
Insert the rack in position 3 or 4. Place the food in
the centre of the rack.
The top heating element is regulated by a
thermostat and may not always be on.
PIZZA
Use a light aluminium pizza pan. Place it on the
rack provided.
For a crispy crust, do not use the dripping pan
(prevents crust from forming by extending cooking
time).
If the pizza has a lot of toppings, we recommend
adding the mozzarella cheese on top of the pizza
halfway through the cooking process.

8
GB
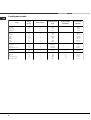
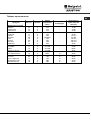
Cooking advice table
Foods
Weight
(in kg)
Rack position
Pre-heating time
(min)
Recommended
temperature
Cooking time
(minutes)
2asta
Lasagne
Cannelloni
Tagliatelle
2.5
2.5
2.5
3
3
3
210
210
210
-
-
-
75-80
75-80
75-80
Meat
Veal
Chicken
Turkey
Duck
Rabbit
Pork
Lamb
1.7
1.5
3.0
1.8
2.0
2.1
1.8
3
3
3
3
3
3
3
220
220
220-Max
220
220
220
220
-
-
-
-
-
-
-
85-90
110-115
95-100
120-125
105-110
100-110
90-95
Fish
Mackerels
Dentex
Trout baked in foil
1.1
1.5
1.0
3
3
3
210-230
210-230
210-230
-
-
-
55-60
60-65
40-45
2izza
Napolitan
1.0 3 Max 15 30-35
2ies
Biscuits
Tart
Chocolate cake
Leavened cake
0.5
1.1
1.0
1.0
3
3
3
3
180
180
200
200
15
15
15
15
30-35
30-35
45-50
50-55

9
GB
Hob
Type of hob
The oven is combined with a hob that can be made up of
two types of heating elements: cast-iron electric plates
(see diagram 1) or glass ceramic hobs, which may be
traditional (see diagram 2).
Switching on the glass ceramic hob
Traditional cooking zones
Traditional cooking zones are made up of circular
heating elements. They turn red approximately ten
seconds after they have been turned on.
Each cooking zone is fitted with a control knob allowing
you to select from 6 different temperature settings from a
minimum of 1 to a maximum of 6.
Residual heat indicator lights (only available on
certain models)
The indicator lights (C) indicate that the temperature of
the corresponding cooking zones have exceeded 60°C,
even after the heating element has been switched off.
Recommended power levels for various types of
cooking:
Setting Normal or Fast Plate
0
Off
1
Cooking vegetables, fish
2
Cooking potatoes (using steam) soups,
chickpeas, beans.
3
Continuing the cooking of large quantities
of food, minestrone
4
For roasting (average)
5
For roasting (above average)
6
For browning and reaching a boil in a
short time.
Practical advice on using the glass
ceramic hob
The glue that is applied on the gaskets leaves some
traces of grease on the glass. Before using the
appliance, we recommend you eliminate these with a
special non-abrasive cleaning product. During the first
few hours of use there may be a smell of rubber which
will disappear very quickly.
To obtain the best results with your hob:
Use flat-bottomed pans to ensure that they adhere to
the cooking zone perfectly.
Always use pans with a diameter that is large enough
to cover the hotplate fully, in order to use all the
available heat.
Make sure that the bottom of the cookware is always
dry and clean to guarantee correct adherence and
long life, not only for the cooking zones but also for
the cookware itself.
Avoid using the same cookware that is used on gas
burners: the heat concentration on gas burners may
deform the base of
the pan, causing it not to adhere
correctly.
Never leave a cooking zone on without cookware on it
because as it heats up and rapidly reaches the
maximum level, it could damage the heating
elements.
C
A
A
A
A
diagram 2
diagram 1

10
GB
Precautions and tips
The appliance was designed and manufactured in
compliance with international safety standards. The
following warnings are provided for safety reasons
and must be read carefully.
General safety
The appliance was designed for domestic use
inside the home and is not intended for commercial
or industrial use.
The appliance must not be installed outdoors,
even
in covered areas. It is extremely dangerous to
leave the appliance exposed to rain and storms.
When handling the appliance, always use the
handles provided on the sides of the oven.
Do not touch the appliance with bare feet or with wet
or moist hands and feet.
The appliance must be used to cook food by adults
only and according to the instructions in this manual.
Do not touch the heating elements and parts of the
oven door when the appliance is in use; these parts
become extremely hot. Keep children well away
from the appliance.
Ensure that the power supply cable of
other electrical
appliances does not come into contact with the hot
parts of the oven.
The openings used for ventilation and dispersion of
heat must never be covered.
Always grip the oven door handle in the centre: the
ends may be hot.
Always use oven gloves to place cookware in the
oven or when
removing it.
Do not use aluminium foil to line the bottom of the
oven.
Do not place flammable materials in the oven: if the
appliance is switched on by mistake, it could catch fire.
Always make sure the knobs are in the l/¡
position when the appliance is not in use.
When
unplugging the appliance always pull the plug
from the mains socket, do not pull on the cable.
Never carry out any cleaning or maintenance work
without having unplugged the plug from the mains.
In the case of a malfunction, under no circumstances
should you attempt to repair the appliance yourself.
Repairs carried out by
inexperienced persons may
cause injury or further malfunctioning of the
appliance. Contact a Service Centre (see
Assistance).
Do not rest heavy objects on the open oven door.
The glass ceramic hob is resistant to mechanical
shocks, but it may crack (or even break) if hit with a
sharp object such as a tool.
If this happens,
disconnect the appliance from the electricity mains
immediately and contact a Service Centre.
Remember that the temperature of the cooking zones
remains relatively high for at least thirty minutes after
they have been switched off.
Keep any object that could melt, away from the hob,
for example plastic and aluminium objects,
or
products
with a high sugar content. Keep plastic
or aluminium objects away from the hob: if you
forget them on surfaces that are still hot, they
may cause serious damage to the hob.
Disposal
Observe local environmental standards when
disposing packaging material for recycling
purposes. Observe existing legislation when
disposing of the old appliance.
The European Directive 2002/96/EC on Waste
Electrical and Electronic Equipment (WEEE),
requires that old household electrical appliances
must not be disposed of in the normal unsorted
municipal waste stream. Old appliances must be
collected separately in order to optimise the
recovery and recycling of the materials they contain
and reduce the impact on human health and the
environment. The crossed out wheeled bin symbol
on the product reminds you of your obligation, that
when you dispose of the appliance it must be
separately collected.
Consumers should contact their local authority or
retailer for information concerning the correct
disposal of their old appliance.
Respecting and conserving the
environment
By using the appliance in the hours between late
afternoon and early morning, you can help reduce
the work load placed on electrical companies.
Always keep the oven door closed when using the
GRILL mode to attain best results and to save
energy (approximately 10%).
Regularly check the door seals and wipe clean to
ensure they are free of debris so that they stick
properly to the door and do not allow heat to
disperse.

11
GB
Switching the appliance off
Disconnect your appliance from the electricity
supply before carrying out any work on it.
Cleaning the appliance
Never use steam cleaners or pressure cleaners on
the appliance.
The stainless-steel or enamel-coated external
parts as well as the rubber seals may be cleaned
using a sponge that has been soaked in
lukewarm water and neutral soap. If these stains
are difficult to remove, use only specialised
products. After cleaning, rinse and dry
thoroughly. Do not use abrasive powders or
corrosive substances.
Ideally, the inside of the oven should be cleaned
after each use, when it is still lukewarm. Use hot
water and detergent, rinse and dry with a soft
cloth. Do not use abrasive products.
The accessories can be washed like everyday
crockery (even in your dishwasher).
Cleaning the oven door
Clean the glass part of the oven door using a
sponge and a non-abrasive cleaning product, then
dry thoroughly with a soft cloth. Do not use rough
abrasive material or sharp metal scrapers as these
could scratch the surface and cause the glass to
crack.
To clean more thoroughly, you can remove the oven
door.
1. Open the oven door fully
(see diagram).
2. Lift up and turn the small
levers located on the two
hinges (see diagram).
3. Grip the door on the two
external sides and close it
approximately half way.
Unlock the door by pressing
on the clamps ., then pull the
door towards you lifting it out
of its seat (see diagram).
To replace the door, reverse
this sequence.
Inspecting the seals
Check the door seals around the oven periodically. If
the seals are damaged, please contact your nearest
After-sales Service Centre (see Assistance). We
recommend not using the oven until the seals have
been replaced.
Replacing the light bulb
To replace the oven light bulb:
1. Remove the glass cover of the lamp-holder.
2. Remove the light bulb and replace it with a similar
one: Wattage 25 W, cap E 14.
3. Replace the glass cover (see diagram).
Assistance
Never use the services of an unauthorised
technician.
Please have the following information to hand:
The type of problem encountered.
The appliance model (Mod.).
The serial number (S/N).
The latter two pieces of information can be found on
the data plate located on the appliance.
F
Maintenance and care

ÄÓÕÎÂÎÈ ØÊÀÔ
Ñîäåðæàíèå
Ìîíòàæ, 13-15
Ðàñïîëîæåíèå
Ýëåêòðè÷åñêîå ïîäêëþ÷åíèå
Ïàñïîðòíàÿ òàáëè÷êà
Îïèñàíèå èçäåëèÿ, 16
Îáùèè âèä
Ïàíåëü óïðàâëåíèÿ
Âêëþ÷åíèå è ýêñïëóàòàöèÿ, 17
Âêëþ÷åíèå äóõîâîãî øêàôà
Ïðîãðàììû, 18 - 19
Ïðîãðàììû ïðèãîòîâëåíèÿ
Ïðàêòè÷åñêèå ñîâåòû ïî ïðèãîòîâëåíèþ
Òàáëèöà ïðèãîòîâëåíèÿ
Âàðî÷íàÿ ïàíåëü, 20
Ìîäåëè âàðî÷íîè ïàíåëè
Âêëþ÷åíèå ñòåêëîêåðàìè÷åñêîè âàðî÷íîè ïàíåëè
Ïðàêòè÷åñêèå ðåêîìåíäàöèè ïî èñïîëüçîâàíèþ
ñòåêëîêåðàìè÷åñêîè âàðî÷íîè ïàíåëè
Ïðåäîñòîðîæíîñòè è ðåêîìåíäàöèè, 21
Îáùèå òðåáîâàíèÿ ê áåçîïàñíîñòè
Óòèëèçàöèÿ
Ýêîíîìèÿ ýëåêòðîýíåðãèè è îõðàíà îêðóæàþùåè ñðåäû
Òåõíè÷åñêîå îáñëóæèâàíèå è óõîä, 22
Îáåñòî÷èâàíèå èçäåëèÿ
×èñòêà èçäåëèÿ
×èñòêà äâåðöû
Çàìåíà ëàìïî÷êè
Ñåðâèñíîå îáñëóæèâàíèå
Ðóêîâîäñòâî ïî
ýêñïëóàòàöèè
RS
CISHB 10 A.1
CISHB 10 A.1 IX
Ðóññêèé, 12English,1
GB
RS

RS
Âàæíî ñîõðàíèòü äàííîå ðóêîâîäñòâî äëÿ åãî
ïîñëåäóþùèõ êîíñóëüòàöèè.  ñëó÷àå ïðîäàæè,
ïåðåäà÷è èçäåëèÿ èëè ïðè ïåðååçäå íà íîâîå ìåñòî
æèòåëüñòâà íåîáõîäèìî ïðîâåðèòü, ÷òîáû ðóêîâîäñòâî
îñòàâàëîñü âìåñòå ñ èçäåëèåì, äëÿ òîãî ÷òîáû åãî
íîâûè âëàäåëåö ìîã îçíàêîìèòüñÿ ñ ïðàâèëàìè
ýêñïëóàòàöèè è ñ ñîîòâåòñòâóþùèìè
ïðåäóïðåæäåíèÿìè.
Âíèìàòåëüíî ïðî÷èòàèòå èíñòðóêöèè: â íèõ
ñîäåðæàòñÿ âàæíûå ñâåäåíèÿ îá óñòàíîâêå,
ýêñïëóàòàöèè è áåçîïàñíîñòè èçäåëèÿ.
Ðàñïîëîæåíèå
Íå ðàçðåøàèòå äåòÿì èãðàòü ñ óïàêîâî÷íûìè
ìàòåðèàëàìè. Óïàêîâêà äîëæíà áûòü óíè÷òîæåíà â
ñîîòâåòñòâèè ñ ïðàâèëàìè ñáîðà ìóñîðà (ñì.
Ïðåäîñòîðîæíîñòè è ðåêîìåíäàöèè).
Óñòàíîâêà èçäåëèÿ ïðîèçâîäèòñÿ â ñîîòâåòñòâèè ñ
äàííûìè èíñòðóêöèÿìè êâàëèôèöèðîâàííûìè
ñïåöèàëèñòàìè. Íåïðàâèëüíûè ìîíòàæ èçäåëèÿ ìîæåò
ñòàòü ïðè÷èíîè ïîâðåæäåíèÿ èìóùåñòâà è ïðè÷èíèòü
óùåðá ëþäÿì è äîìàøíèì æèâîòíûì.
Âñòðîåííûè ìîíòàæ
Äëÿ îáåñïå÷åíèÿ èñïðàâíîãî ôóíêöèîíèðîâàíèÿ
èçäåëèÿ êóõîííûè ýëåìåíò äîëæåí èìåòü
ñîîòâåòñòâóþùèå õàðàêòåðèñòèêè:
ïàíåëè êóõîííûõ ýëåìåíòîâ, ïðèëåãàþùèõ ê äóõîâîìó
øêàôó, äîëæíû áûòü âûïîëíåíû èç òåðìîñòîèêîãî
ìàòåðèàëà;
êëåè êóõîííûõ ýëåìåíòîâ ýëåìåíòîâ èç
ôàíåðîâàííîãî äåðåâà äîëæåí áûòü óñòîè÷èâûì ê
òåìïåðàòóðå 100°C.
äëÿ âñòðàèâàíèÿ äóõîâîãî øêàôà ï
îä êóõîííûì
òîïîì (ñì. ðèñóíîê) èëè â êîëîííó íèøà êóõîííîãî
ýëåìåíòà äîëæíà èìåòü ñëåäóþùèå ðàçìåðû:
Ïîñëå âñòðàèâàíèÿ èçäåëèÿ â êóõîííûè ýëåìåíò
äîëæíà áûòü èñêëþ÷åíà âîçìîæíîñòü êàñàíèÿ ê
ýëåêòðè÷åñêèìè ÷àñòÿìè.
Ðàñõîä ýëåêòðîýíåðãèè, óêàçàííûè íà ïàñïîðòíîè òàáëè÷êå
èçäåëèÿ, áûë çàìåðåí äëÿ äàííîãî òè
ïà ìîíòàæà.
Âåíòèëÿöèÿ
Äëÿ îáåñïå÷åíèÿ íàäëåæàùåè âåíòèëÿöèè
íåîáõîäèìî ñíÿòü çàäíþþ ïàíåëü íèøè êóõîííîãî
ýëåìåíòà. Ðåêîìåíäóåòñÿ óñòàíîâèòü äóõîâîè øêàô
íà äâà äåðåâÿííûõ áðóñêà èëè íà ñïëîøíîå
îñíîâàíèå ñ îòâåðñòèåì äèàìåòðîì íå ìåíåå 45 õ
560 ìì (ñì ÷åðòåæè).
Öåíòðîâêà è êðåïëåíèå
4 êðåïåæíûõ ýëåìåíòà ñ áîêîâ äóõîâîãî øêàôà
äîëæíû áûòü îòðåãóëèðîâàíû â ñîîòâåòñòâèè ñ 4
îòâåðñòèÿìè â ðàìå â çàâèñèìîñòè îò òîëùèíû
áîêîâîè ïàíåëè êóõîííîãî ýëåìåíòà:
òîëùèíà 20 ìì: ïîëíîñòüþ
óäàëèòå ñúåìíóþ ÷àñòü
êðåïåæíîãî ýëåìåíòà (ñì.
ñõåìó);
òîëùèíà 18 ìì: èñïîëüçóèòå
ïåðâûè ïàç, ñîãëàñíî óæå
ãîòîâîè êîíôèãóðàöèè
ïðîèçâîäèòåëÿ (ñì. ñõåìó);
òîëùè
íà 16 ìì: èñïîëüçóèòå
âòîðîè ïàç (ñì. ñõåìó).
Äëÿ êðåïëåíèÿ èçäåëèÿ ê êóõîííîìó ýëåìåíòó:
îòêðîèòå äâåðöó äóõîâîãî øêàôà è çàâèíòèòå 4
øóðóïà äëÿ äåðåâÿííûõ ïàíåëåè â 4 îòâåðñòèÿ â
ïåðèìåòðàëüíîè ðàìå.
Âñå çàùèòíûå ýëåìåíòû äîëæíû áûòü
çàêðåïëåíû òàêèì îáðàçîì, ÷òîáû èõ ìîæíî áûëî
ñíÿòü òîëüêî ïðè ïîìîùè ñïåöèàëüíîãî
èíñòðóìåíòà.
595
558
min
45
min
575-585 min
560
+4 -0
480
+4 -0
555
580
500
39
15
595
23
572
543
543
545
560 mm.
45 mm.
Óñòàíîâêà

14
RS
ÂÑÒÐÎÅÍÍÛÉ ÄÓÕÎÂÎÉ ØÊÀÔ
ÁÅËÛÉ
ÊÐÀÑÍÛÉ
ÆÅËÒÛÉ
ÑÈÍÈÉ
ÇÅËÅÍÛÉ
Èìååòñÿ òîëüêî
â íåêîòîðûõ
ìîäåëÿõ
ÂÑÒÐÎÅÍÍÀß
ÂÀÐÎ×ÍÀß ÏÀÍÅËÜ
Ýëåêòðè÷åñêîå ïîäêëþ÷åíèå
Ýëåêòðè÷åñêîå ïîäñîåäèíåíèå èçäåëèÿ
âûïîëíÿåòüñÿ ñ êóõîííîè ïëèòîè, ðàñ÷èòàííîè íà
ïåðåìåííûè òîê, ñ íàïðÿæåíèåì è ÷àñòîòîè,
óêàçàííûìè íà ïàñïîðòíîè òàáëè÷êå (ñì. ñëåäóþùóþ
ñòðàíèöó).
Âàðî÷íàÿ ïàíåëü ñîåäèíÿåòñÿ ñ êóõîííîè ïëèòîè ïðè
ïîìîùè ñïåöèàëüíîãî ðàçúåìà.
Ïîäñîåäèíåíèå ñåòåâîãî êàáåëÿ
1. Îòêðîèòå çàæèìíóþ êîðîáêó, íàæàâ ïðè ïîìîùè
îòâåðòêè íà âûñòóïû ñ áîêîâ êðûøêè: ïîòÿíèòå è
îòêðîèòå êðûøêó (ñì. ñõåìó).
2. Ïîðÿäîê ïîäñîåäèíåíèÿ ñåòåâîãî êàáåëÿ:
îòâèíòèòå âèíò êàáåëüíîãî ñàëüíèêà è âèíòû
êîíòàêòîâ L-N-
è çàòåì ïðèêðåïèòå ïðîâîäà ïîä
ãîëîâêàìè âèíòîâ, ñîáëþäàÿ öâåòîâóþ ìàðêèðîâêó
Ñèíèè (N) Êîðè÷íåâûè (L) Æåëòî-çåëåíûè (
).
Óñòàíîâèòå íà ìåñòî çàùèòíóþ ìåòàëëè÷åñêóþ
çàãëóøêó ïîñëå ýëåêòðè÷åñêîãî ïîäêëþ÷åíèÿ
âàðî÷íîè ïàíåëè.  ñëó÷àå äåìîíòàæà âàðî÷íîè
ïàíåëè íåîáõîäèìî óñòàíîâèòü íà ñâîå ìåñòî
êðàñíóþ çàãëóøêó íà êðàñíûè ðàçúåì.
Çàæèìíàÿ êîðîáêà ðàñ÷èòàíà íà òðåõôàçíîå
ýëåêòðîïèòàíèå 400 Â (ñì. ñõåìû íèæå).
400Â 3N~H05RR-F 5x2.5
CEI-UNEL 35363
Åñë
è ýëåêòðîïðîâîäêà èìååò äðóãèå õàðàêòåðèñòèêè
(ñì. ñõåìû íèæå), äëÿ ýëåêòðè÷åñêîãî ïîäñîåäèíåíèÿ
èñïîëüçóèòå ñîåäèíèòåëüíûå ïåðåìû÷êè,
ðàñïîëîæåííûå âíóòðè êîðîáêè Ð.
230Â 1N~H07RN-F 3x4 CEI-
UNEL 35364
400Â 2N~H05RR-F 4x2.5
CEI-UNEL 35363
3. Çàêðåïèòå ñåòåâîè øíóð â ñïåöèàëüíîì êàáåëüíîì
ñàëüíèêå.
4. Çàêðîèòå êðûøêó çàæèìíîè êîðîáêè.
NL3L1L2
1
3
2
4
5
N
L2
L3
L1
P
NL
1
3
2
4
5
NL2L1
1
3
2
4
5

RS
Ïîäñîåäèíåíèå ñåòåâîãî êàáåëÿ ê ñåòè
ýëåêòðîïèòàíèÿ
Óñòàíîâèòå íà ñåòåâîè êàáåëü íîðìàëèçîâàííóþ
øòåïñåëüíóþ âèëêó, ðàñ÷èòàííóþ íà íàãðóçêó,
óêàçàííóþ íà ïàñïîðòíîè òàáëè÷êå (ñì. ñáîêó).
 ñëó÷àå ïðÿìîãî ïîäêëþ÷åíèÿ ê ñåòè
ýëåêòðîïèòàíèÿ ìåæäó èçäåëèåì è ñåòüþ
íåîáõîäèìî óñòàíîâèòü ìíîãîïîëþñíûè
âûêëþ÷àòåëü ñ ìèíèìàëüíûì ðàññòîÿíèåì ìåæäó
êîíòàêòàìè 3 ìì, ðàñ÷èòàííûè íà äàííóþ íàãðóçêó è
ñîîòâåòñòâóþùèè äåèñòâóþùèì íîðìàòèâàì
(âûêëþ÷àòåëü íå äîëæåí ðàçìûêàòü ïðîâîä
çàçåìëåíèÿ). Ñåòåâîè êàáåëü äîëæåí áûòü
ðàñïîëîæåí òàêèì îáðàçîì, ÷òîáû íè â îäíîè òî÷êå
åãî òåìïåðàòóðà íå ïðåâûøàëà òåìïåðàòóðó
ïîìåùåíèÿ áîëåå ÷åì íà 50°C.
Ýëåêòðîìîíòåð íåñåò îòâåòñòâåííîñòü çà
ïðàâèëüíîå ïîäêëþ÷åíèå èçäåëèÿ ê ýëåêòðè÷åñêîè
ñåò
è è çà ñîáëþäåíèå ïðàâèë áåçîïàñíîñòè.
Ïåðåä ïîäêëþ÷åíèåì èçäåëèÿ ê ñåòè
ýëåêòðîïèòàíèÿ ïðîâåðüòå ñëåäóþùåå:
ñåòåâàÿ ðîçåòêà äîëæíà áûòü ñîåäèíåíà ñ
çàçåìëåíèåì è ñîîòâåòñòâîâàòü íîðìàòèâàì;
ñåòåâàÿ ðîçåòêà äîëæíà áûòü ðàññ÷èòàíà íà
ìàêñèìàëüíóþ ïîòðåáëÿåìóþ ìîùíîñòü èçäåëèÿ,
óêàçàííóþ íà ïàñïîðòíîè òàáëè÷êå (ñì. íèæå);
íàïðÿæåíèå
ñåòè ýëåêòðîïèòàíèÿ äîëæíî
íàõîäèòüñÿ â ïðåäåëàõ çíà÷åíèè, óêàçàííûõ íà
ïàñïîðòíîè òàáëè÷êå (ñì. íèæå);
ñåòåâàÿ ðîçåòêà äîëæíà áûòü ñîâìåñòèìà ñî
øòåïñåëüíîè âèëêîè èçäåëèÿ.  ïðîòèâíîì ñëó÷àå
çàìåíèòå ðîçåòêó èëè âèëêó; íå èñïîëüçóèòå
óäëèíèòåëè èëè òðîèíèêè.
Èçäåëèå äîëæíî áûòü
óñòàíîâëåíî òàêèì îáðàçîì,
÷òîáû ñåòåâîè êàáåëü è ñåòåâàÿ ðîçåòêà áûëè ëåãêî
äîñòóïíû.
Ñåòåâîè øíóð èçäåëèÿ íå äîëæåí áûòü ñîãíóò èëè
ñæàò.
Ðåãóëÿðíî ïðîâåðÿèòå ñîñòîÿíèå êàáåëÿ
ýëåêòðîïèòàíèÿ è â ñëó÷àå íåîáõîäèìîñòè ïîðó÷èòå
åãî çàìåíó òîëüêî óïîëíîìî÷åííûì òåõíèêàì (ñì.
Òåõíè÷åñêîå îáñëóæèâàíèå).
Ïðîèç
âîäèòåëü íå íåñåò îòâåòñòâåííîñòè çà
ïîñëåäñòâèÿ íåñîáëþäåíèÿ ïåðå÷èñëåííûõ âûøå
òðåáîâàíèè.
ÏÀÑÏÎÐÒÍÀß ÒÀÁËÈ×ÊÀ
Ãàáàðèòíûå ðàçìåðû
øèðèíà 43,5 ñì.
âûñîòà 32 ñì.
ãëóáèíà 43,5 ñì.
Îáúåì
ë 60
Ýëåêòðîïèòàíèå
íàïðÿæåíèå 230Â/400Â~ 3Í
50/60Ãö
ìàêñ. ïîãëîùàåìàÿ
ìîùíîñòü 8400 Âò
ÌÀÐÊÈÐÎÂÊÀ
ÏÎÒÐÅÁËÅÍÈß
ÝËÅÊÒÐÎÝÍÅÐÃÈÈ
Äèðåêòèâà 2002/40/ÑÅ îá
ýòèêåòêàõ ýëåêòðè÷åñêèõ
äóõîâûõ øêàôîâ.
Íîðìàòèâ EN 50304
Ðàñõîä ýëåêòðîýíåðãèè
Çàÿâëåíèå Êëàññà
Íàòóðàëüíàÿ êîíâåêöèÿ –
ðåæèì íàãðåâà:
Òðàäèöèîíàëüíàÿ äóõîâêà.
Äàííîå èçäåëèå
ñîîòâåòñòâóåò ñëåäóþùèì
Äèðåêòèâàì Åâðîïåéñêîãî
Ñîîáùåñòâà: 73/23/CEE îò
19/02/73 (Íèçêîå
íàïðÿæåíèå) ñ
ïîñëåäóþùèìè
èçìåíåíèÿìè – 89/336/ÑÅÅ
îò 03/05/89
(Ýëåêòðîìàãíèòíàÿ
ñîâìåñòèìîñòü) ñ
ïîñëåäóþùèìè
èçìåíåíèÿìè – 93/68/ÑÅÅ
îò 22/07/93 ñ ïîñëåäóþùèìè
èçìåíåíèÿìè.
2002/96/CE

16
RS
Îïèñàíèå èçäåëèÿ
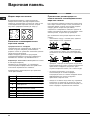
Îáùèè âèä
Ïàíåëü óïðàâëåíèÿ
Рукоятка
ПРОГРАММЫ
Индикатор
ТЕРМОСТАТА
Регулятор
КОНФОРОК
0
1
6
25
3
4
0
1
6
25
3
4
0
1
6
25
3
4
0
1
6
25
3
4
0
MAX
60
100
220
18
0
14
0
Индикатор
КОНФОРОК

RS
Ïðè ïåðâîì âêëþ÷åíèè äóõîâîãî øêàôà
ðåêîìåíäóåì ïðîêàëèòü åãî ïðèìåðíî â òå÷åíèå
÷àñà ïðè ìàêñèìàëüíîè òåìïåðàòóðå ñ çàêðûòîè
äâåðöåè. Çàòåì âûêëþ÷èòå äóõîâîè øêàô, îòêðîèòå
äâåðöó è ïðîâåòðèòå ïîìåùåíèå. Çàïàõ, êîòîðûè âû
ìîæåòå ïî÷óâñòâîâàòü, âûçâàí èñïàðåíèåì âåùåñòâ,
èñïîëüçîâàííûõ äëÿ ïðåäîõðàíåíèÿ äóõîâîãî øêàôà.
Âêëþ÷åíèå äóõîâîãî øêàôà
1. Âûáåðèòå íóæíóþ ïðîãðàììó ïðèãîòîâëåíèÿ ïðè
ïîìîùè ðóêîÿòêè ÏÐÎÃÐÀÌÌÛ.
2.  ñïåöèàëüíîè òàáëèöå ïðèâîäèòñÿ ïåðå÷åíü
òèïîâ ïðèãîòîâëåíèÿ ñ ñîîòâåòñòâóþùèìè
ðåêîìåíäóåìûìè òåìïåðàòóðàìè (ñì. Ïðîãðàììû).
3. Âêëþ÷åííûè èíäèêàòîð ÒÅÐÌÎÑÒÀÒÀ îçíà÷àåò
òåêóùóþ ôàçó íàãðåâà äóõîâêè äî çàäàííîè
òåìïåðàòóðû.
4. Â ïðîöåññå ïðè
ãîòîâëåíèÿ â ëþáîè ìîìåíò ìîæíî:
- èçìåíèòü ïðîãðàììó ïðèãîòîâëåíèÿ ïðè ïîìîùè
ðóêîÿòêè ÏÐÎÃÐÀÌÌÛ;
- ïðåðâàòü ïðèãîòîâëåíèå, ïîâåðíóâ ðóêîÿòêó
ÏÐÎÃÐÀÌÌÛ â ïîëîæåíèå «0».
Íèêîãäà íå ñòàâüòå íèêàêèõ ïðåäìåòîâ íà äíî
äóõîâîãî øêàôà, òàê êàê îíè ìîãóò ïîâðåäèòü
ýìàëèðîâàííîå ïîêðûòèå.
Âñåãäà ñòàâüòå ïîñóäó íà ïðèëàãàþùóþñÿ ðåøåòêó.
Îõëàäèòåëüíàÿ âåíòèëÿöèÿ
Äëÿ ïîíèæåíèÿ òåìïåðàòóðû âîêðóã ðàáîòàþùåãî
äóõîâîãî øêàôà íåêîòîðûå ìîäåëè îñíàùàþòñÿ
îõëàäèòåëüíûì âåíòèëÿòîðîì. Ýòîò âåíòèëÿòîð
íàïðàâëÿåò ñòðóþ âîçäóõà ìåæäó ïàíåëüþ
óïðàâëåíèÿ è äâåðöåè äóõîâîãî øêàôà.
Ïî çàâåðøåíèè ïðèãîòîâëåíèÿ âåíòèëÿòîð
ïðîäîëæàåò ðàáîòàòü âïëîòü äî íàäëåæàùåãî
îõëàæäåíèÿ äóõîâêè.
Îñâåùåíèå äóõîâîãî øêàôà
Çàãîðàåòñÿ ïðè âûáîðå & ïðè ïîìîùè ðóêîÿòêè
ÏÐÎÃÐÀÌÌÛ. Îñòàåòñÿ âêëþ÷åííîè ïðè âûáîðå
ïðîãðàììû ïðèãîòîâëåíèÿ.
Âêë þ÷åíèå è
ýêñïëóàòàöèÿ

18
RS
Ïðîãðàììû ïðèãîòîâëåíèÿ
Programma ÒÐÀÄÈÖÈÎÍÀËÜÍÀß ÄÓÕÎÂÊÀ
Âêëþ÷àþòñÿ äâà íàãðåâàòåëüíûõ ýëåìåíòà: íèæíèè è
âåðõíèè. Â ðåæèìå òðàäèöèîíàëüíîãî ïðèãîòîâëåíèÿ
ðåêîìåíäóåòñÿ èñïîëüçîâàòü òîëüêî îäèí óðîâåíü:
ïðè èñïîëüçîâàíèè íåñêîëüêèõ óðîâíåè
ðàñïðåäåëåíèå òåìïåðàòóðû áóäåò íåîïòèìàëüíûì.
Äóõîâêà àâòîìàòè÷åñêè íàãðåâàåòñÿ äî çàäàííîè
òåìïåðàòóðû, êîòîðàÿ ïîääåðæèâàåòñÿ ñòàáèëüíîè
ïîñðåäñòâîì òåðìîñòàòà, óïðàâëÿåìîãî ðóêîÿòêîè
ÏÐÎÃÐÀÌÌÛ.
? Ïðîãðàììà ÂÅÐÕÍÈÈ ÍÀÃÐÅÂÀÒÅËÜ
Âêëþ÷àåòñÿ âåðõíèè íàãðåâàòåëüíûè ýëåìåíò. Ýòà
ôóíêöèÿ ìîæåò áûòü èñïîëüçîâàíà äëÿ äîâîäêè
ãîòîâûõ áëþä. Ãîòîâüòå áëþäà ñ çàêðûòîè äâåðöåè
äóõîâîãî øêàôà.
Ïðîãðàììû
Ïðàêòè÷åñêèå ñîâåòû ïî
ïðèãîòîâëåíèþ
Ïðè èñïîëüçîâàíèè ðåæèìà ÃÐÈËÜ ïîìåñòèòå
ïðîòèâåíü íà óðîâåíü 1 äëÿ ñáîðà æèäêîñòåè,
âûäåëÿåìîãî ïðè æàðêå (ñîê è/èëè æèð).
ÃÐÈËÜ
Óñòàíîâèòå ðåøåòêó íà óðîâåíü 3 èëè 4, ïîìåñòèòå
ïðîäóêòû â öåíòð ðåøåòêè.
Íå áåñïîêîèòåñü, åñëè âåðõíèè ýëåìåíò íå
îñòàåòñÿ ïîñòîÿííî âêëþ÷åííûì: åãî ðàáîòà
óïðàâëÿåòñÿ òåðìî
ñòàòîì.
ÏÈÖÖÀ
Èñïîëüçóèòå ïðîòèâåíü èç ëåãêîãî àëþìèíèÿ,
óñòàíàâëèâàÿ åãî íà ïðèëàãàþùóþñÿ ðåøåòêó.
Ïðè èñïîëüçîâàíèè ïðîòèâåíÿ âðåìÿ âûïå÷êè
óäëèíÿåòñÿ, ÷òî çàòðóäíÿåò ïîëó÷åíèå õðóñòÿùåè
ïèööû.
 ñëó÷àå âûïå÷êè ïèööû ñ îáèëüíîè íà÷èíêîè
ðåêîìåíäóåòñÿ ïîëîæèòü íà ïèööó ñûð
ìîööàðåëëà â ñåðåäèíå âûïå÷êè.

RS
Òàáëèöà ïðèãîòîâëåíèÿ
Ïðîäóêòû
Âåñ (êã)
Óðîâåíü
Âðåìÿ
íàãðåâàíèÿ
(ìèí.)
Ðåêîìåíäóåìàÿ
òåìïåðàòóðà
Ïðîäîëæèò-òü
ïðèãîòîâëåíèÿ
(ìèíóòû)
Ìàêàðîííûå èçäåëèÿ
Ëàçàí üÿ
Êàííåëëîíè
Òàëüÿòåëëå
2,5
2,5
2,5
3
3
3
210
210
210
-
-
-
75-80
75-80
75-80
Ìÿñî
Òåëÿòèíà
Êóðèöà
Èíäåéêà
Óòêà
Êðîëèê
Ñâèíèíà
Áàðàíèí à
1,7
1,5
3,0
1,8
2,0
2,1
1,8
3
3
3
3
3
3
3
220
220
220-Ìàêñ.
220
220
220
220
-
-
-
-
-
-
-
85-90
110-115
95-100
120-125
105-110
100-110
90-95
Ðûáà
Ñêóìáðèÿ
Çóáàí
Ôîðåëü â ôîëüãå
1,1
1,5
1,0
3
3
3
210-230
210-230
210-230
-
-
-
55-60
60-65
40-45
Ïèööà
ïî-íåàïîëèòàíñêè
1,0
3
Ìàêñ.
15
30-35
Âûïå÷êà
Ïå÷åíüå
Òîðò ñ âàðåíüåì
Øîêîëàäíûé òîðò
Áèñêâèòíûé òîðò
0,5
1,1
1,0
1,0
3
3
3
3
180
180
200
200
15
15
15
15
30-35
30-35
45-50
50-55

20
RS
Âàðî÷íàÿ ïàíåëü
Ìîäåëè âàðî÷íîè ïàíåëè
Äóõîâîè øêàô ñîåäèíåí ñ âàðî÷íîè ïàíåëüþ,
êîòîðàÿ ìîæåò èìåòü äâà âèäà íàãðåâàòåëüíûõ
ýëåìåíòîâ: ýëåêòðè÷åñêèå ÷óãóííûå (ñì. ñõåìó 1) èëè
ñòåêëîêåðàìè÷åñêèå âàðî÷íûå ïàíåëè, êîòîðûå
ìîãóò áûòü òðàäèöèîíàëüíûìè (ñì. ñõåìó 2).
Âêëþ÷åíèå ñòåêëîêåðàìè÷åñêîè
âàðî÷íîè ïàíåëè
Òðàäèöèîíàëüíûå êîíôîðêè
Òðàäèöèîíàëüíûå íàãðåâàòåëüíûå ýëåìåíòû (À)
ñîñòîÿò èç êðóãëûõ ñïèðàëåè, ðàñêàëÿþùèõñÿ
äîêðàñíà òîëüêî ïî ïðîøåñòâèè íåñêîëüêèõ äåñÿòêîâ
ñåêóíä ïîñëå èõ âêëþ÷åíèÿ.
Êàæäàÿ êîíôîðêà óïðàâëÿåòñÿ ðåãóëÿòîðîì,
ïîçâîëÿþùèì âûáðàòü 6 ðàçëè÷íûõ òåìïåðàòóð îò
ìèíèìàëüíîãî çíà÷åíèÿ 1 äî ìàêñèìàëüíîãî 6..
Èíäèêàòîðû îñòàòî÷íîãî òåïëà (èìåþòñÿ òîëüêî
â íåêîòîðûõ ìîäåëÿõ)
Èíäèêàòîðû (Ñ) ïîêàçûâàþò, ÷òî òåìïåðàòóðà
ñîîòâåòñòâóþùåè êîíôîðêè âûøå 60°C äàæå ïîñëå
îòêëþ÷åíèÿ íàãðåâàòåëüíîãî ýëåìåíòà.
Ðåêîìåíäóåìûå óðîâíè ìîùíîñòè äëÿ ðàçëè÷íûõ
òèïîâ ïðèãîòîâëåíèÿ:
C
A
A
A
A
ñõåìà 2
ñõåìà 1
Ïðàêòè÷åñêèå ðåêîìåíäàöèè ïî
èñïîëüçîâàíèþ ñòåêëîêåðàìè÷åñêîè
âàðî÷íîè ïàíåëè
Íà ñòåêëÿííîè ïîâåðõíîñòè âàðî÷íîè ïàíåëè ìîãóò
áûòü âèäíû ñàëüíûå ñëåäû îò êëåÿ, íàíåñåííîãî íà
ïðîêëàäêè Ïåðåä íà÷àëîì ýêñïëóàòàöèè èçäåëèÿ
ñëåäóåò óäàëèòü ñëåäû êëåÿ ïðè ïîìîùè
ñïåöèàëüíîãî íåàáðàçèâíîãî ìîþùåãî ñðåäñòâà. Â
ïåðâûå ÷àñû ðàáîòû âû ìîæåòå ïî÷óâñòâîâàòü çàïàõ
ææåíîè ðåçèíû, êîòîðûè áûñòðî ïðîïàäàåò..
Äëÿ îïòèìàëüíîè ýêñïëóàòàöèè âàðî÷íîè ïàíåëè
ñëåäóåò:
èñïîëüçîâàòü ïîñóäó ñ ïëîñêèì äíîì, èäåàëüíî
ïðèëåãàþùèì ê çîíå íàãðåâàíèÿ;
èñïîëüçîâàòü êàñòðþëè ñ äíîì òàêîãî äèàìåòðà,
÷òîáû ïîëíîñòüþ çàêðûòü çîíó íàãðåâàíèÿ äëÿ
îïòèìàëüíîãî èñïîëüçîâàíèÿ âñåãî âûäåëÿåìîãî
òåïëà;
ïðîâåðèòü, ÷òîáû äíî èñïîëüçóåìîè ïîñóäû áûëî
âñåãäà ñîâåðøåííî ñóõèì è ÷èñòûì äëÿ èäåàëüíîãî
ïðèëåãàíèÿ ê êîíôîðêå è äëÿ äîëãîãî ñðî
êà
ñëóæáû êàê âàðî÷íîè ïàíåëè, òàê è ñàìîè ïîñóäû;
íå ñëåäóåò èñïîëüçîâàòü òó æå ïîñóäó,
èñïîëüçîâàííóþ íà ãàçîâûõ êîíôîðêàõ:
êîíöåíòðàöèÿ òåïëà íà ãàçîâûõ êîíôîðêàõ ìîæåò
äåôîðìèðîâàòü äíî ïîñóäû è íàðóøèòü
ïðèëåãàíèå ê âàðî÷íîè çîíå;
íèêîãäà íå îñòàâëÿòü êàêóþ-ëèáî çîíó íàãðåâàíèÿ
âêëþ÷åííîè, íå ïîìåñòèâ íà íåå ïîñóäó, òà
ê êàê
îíà áûñòðî äîñòèãàåò ìàêñèìàëüíîãî íàãðåâà, ÷òî
ìîæåò ïîâðåäèòü íàãðåâàòåëüíûå ýëåìåíòû.
Ïîçèöèÿ Îáû÷íàÿ èëè áûñòðàÿ êîíôîðêà
0 Âûêëþ÷åíî
1 Ïðèãîòîâëåíèå îâîùåé, ðûáû
2
Ïðèãîòîâëåíèå êàðòîôåëÿ íà ïàðó,
ñóïîâ, ôàñîëè
3
Ïðèãîòîâëåíèå è âûäåðæèâàíèå
áîëüøèõ êîëè÷åñòâ ïèùè
4 Æàðåíüå (ñðåäíåå)
5 Æàðåíüå (óñèëåííîå)
6 Æàðåíüå äî êîðî÷êè, êèïÿ÷åíèå
La pagina sta caricando ...
La pagina sta caricando ...
La pagina sta caricando ...
La pagina sta caricando ...
-
 1
1
-
 2
2
-
 3
3
-
 4
4
-
 5
5
-
 6
6
-
 7
7
-
 8
8
-
 9
9
-
 10
10
-
 11
11
-
 12
12
-
 13
13
-
 14
14
-
 15
15
-
 16
16
-
 17
17
-
 18
18
-
 19
19
-
 20
20
-
 21
21
-
 22
22
-
 23
23
-
 24
24


Hotpoint Ariston CISHB 10 A.1 Guida utente
- Categoria
- Piani cottura
- Tipo
- Guida utente
- Questo manuale è adatto anche per
in altre lingue
Documenti correlati
-
Hotpoint Ariston C 30 N1 (W) R /HA Guida utente
-
-
-
-
Hotpoint Ariston C 3V N1 (X) R /HA Guida utente
-
-
Hotpoint Ariston C 3V N1 (W) R Guida utente