
TT111/TT112/TT113
USER’S MANUAL

Contents
Transmitter (Handheld Type)
On-off operation
The operation of mute function for transmitter
Click one button to turn off all the receivers
The person in charge of the devices needs to know
how to set the channel
Transmitter (Chest Model)
On-off operation
The operation of mute function for transmitter
Click one button to turn off all the receivers
The person in charge of the devices needs to know
how to set the channel
Receiver
On-off operation
Volume adjustment
Battery status
Specification
Warning
EN(01-12)
DE(13-25)
FR(26-38)
IT(39-50)
ES(51-62)
---------------------------------01
---------------------------------------------------------------------01
------------------------------01
---------------------------------01
------------------------------------------------------------01
-------------------------------------03
--------------------------------------------------------------------03
------------------------------03
---------------------------------03
------------------------------------------------------------03
-------------------------------------------------------------05
--------------------------------------------------------------------05
----------------------------------------------------------------05
----------------------------------------------------------------------05
-------------------------------------------------------------------------06
--------------------------------------------------------------08
EU Importer
AddressUetzenacker 29,38176 wendeburg
NameGermany Retevis Technology GmbH

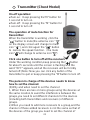
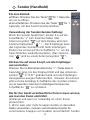
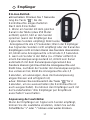
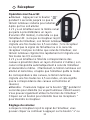
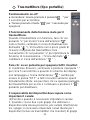
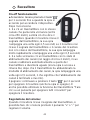
On-off operation:
●Turn onKeep pressing the“ " button for 1
second to turn on.
●Turn offKeep pressing the “ ” button for 1
second to turn off.
The operation of mute function for transmitter:
When the transmitter is working ,click the “+”button
to mute(the antenna icon " " on the display
screen will change to mute icon “ ”), the receiver
can not receive the signal from the transmitter
anymore; and click again the “+”button to restore
the speak function.(the mute icon “ ” will change
to antenna icon " ")
Click one button to turn off all the receivers:
Under the working condition, keep pressing the“-” button for
about 5 seconds until the display screen is flashing and the
antenna icon " " changes to be the word “OFF” ,and all
the receivers will be forcibly turned off.(Note: Now you can
click any button of the transmitter to quit or keep pressing
the " " button to turn off.)
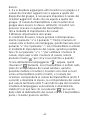
The person in charge of the devices needs to know
how to set the channel:
(1)Why and when need to set the channel:
1, When there are two or more groups using the devices at
the same location, to avoid the interference between the
groups, you need to set different channels for the devices
(including both transmitters and receivers) of different
groups.
2, When you need to add more receivers to a group, and
the channel of these added receivers is not the same as
Transmitter (Handheld Type)
01

that of the devices of the group, you need to set the
channel of these added receivers to be the same as that of
the group. ( The channel of the transmitter and the
receivers in a group must be the sameor the receivers
can not receive the signal from the transmitter)
(2)The way of channel setting:
1Wireless channel setting:
Under the working condition, keep pressing both “+”button
and the“-” button at the same time until the channel number
on the screen is flashing, then release both “+”button and
the“-” button, now the transmitter has entered the channel
setting mode, then you can click the “+”or “-” button to
change the channel number, after you have chosen the
channel number, keep pressing " " button for about 3
seconds until the flashing antenna icon " " appears, then
release the " " button, now the transmitter has entered
the wireless channel matching status, then you can put the
receivers(the receivers have been turned on) closed to the
transmitter(within 2 meters),and the receiver’s channel will
match the transmitter’s channel(within 5 seconds) and
become the same, the channel matching can be finished
within 5 secondsthe receiver’s indicator light will stop
flashing fast and become stable blue),Then you can click
the transmitter’s " " button to quit the channel matching
status, now if the transmitter speaks, the receivers can hear
it.
02

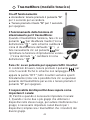
On-off operation:
●Turn onKeep pressing the“M" button for
1 second to turn on.
●Turn offKeep pressing the “M” button for
1 second to turn off.
The operation of mute function for
transmitter:
When the transmitter is working ,click the
" " button to mute(the antenna icon " "
on the display screen will change to mute
icon " " ),and click again the " " button
to restore the speak function.the mute
icon" "will change to antenna icon" ")
Click one button to turn off all the receivers
Under the working condition,keep pressing the" "button
for about 5 seconds until the screen is flashing and the
word “OFF” appears,and all the receivers will be forcibly
turned off.(Note: Now you can click any button of the
transmitter to quit or keep pressing the “M”button to turn off.
The person in charge of the devices needs to know
how to set the channel:
(3)Why and when need to set the channel:
1, When there are two or more groups using the devices at
the same location,to avoid the interference between the
groups,you need to set different channels for the devices
(including both transmitters and receivers) of different
groups.
2,When you need to add more receivers to a group,and the
channel of these added receivers is not the same as that of
the devices of the group,you need to set the channel of
Transmitter (Chest Model)
03

these added receivers to be the same as that of the
group.(The channel of the transmitter and the receivers in a
group must be the sameor the receivers can not receive
the signal from the transmitter)
(4)The way of channel setting:
1.Wireless channel setting:
Under the working condition,keep pressing both" "button
and the" "button at the same time until the channel
number on the screen is flashing,then release both" "
button and the" "button,now the transmitter has entered
the channel setting mode,then you can click the " "or" "
button to change the channel number, after you have
chosen the channel number,keep pressing “M" button for
about 3 seconds until the flashing antenna icon " "
appears,then release the “M" button,now the transmitter
has entered the wireless channel matching status,then you
can put the receivers(the receivers have been turned on)
closed to the transmitter(within 2 meters),and the
receivers’channel will match the transmitter’s channel(with-
in 5 seconds) and become the same,the channel matching
can be finished within 5 seconds,Then you can click the
transmitter’s “M" button to quit the channel matching
status,now if the transmitter speaks,the receivers can hear
it.
04

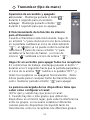
On-off operation:
●Turn on:Keep pressing the" "button for
1 second until the indicator light lights
up to turn on.
After it turns on
1.if there’s a transmitter with the same
channel speaking nearby(within about 250
meters),it will hear what the transmitter
says(When the receiver receives the
signal from the transmitter, its indicator light
will flash one time every 2.5 seconds; If the receiver does
not receive the signal from the transmitter or the receiver’s
channel is not the same as that of the transmitter , its
indicator light will flash very quickly and it flashes one time
every 0.5 second;
2.if there’s a transmitter at the status of channel matching
nearby (within about 2 meters),its channel will match the
transmitter’s channel automatically and become the same.
Now the indicator light is on and stays blue, and after the
transmitter quits the channel matching mode, the indicator
light will flash one time every 2.5 seconds, and it means the
channel matching is finished and successful.)
●Turn off:Keep pressing the" "button for 2 seconds to
turn off (The indicator light turns off too). You can also use
the transmitter’s function “ Click one button to turn off all the
receivers” to turn off the receiver.
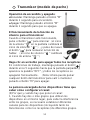
Volume adjustment:
When the receiver is receiving the signal from the
transmitter, you can click or keep pressing the “+”or“-”but-
ton to adjust the volume.
Battery status:
Receiver
05

The indicator light will be flashing as soon as the receiver is
turned on, the battery level is full if the indicator light
flashes 5 times, the battery level has only 80% left if the
indicator light flashes 4 times, and the battery level has only
20% left if the indicator light flashes only once.
Attention:
When the transmitters and receivers are not used for a long
time, please charge them once every 3 months, so that the
batteries can be protected. (There is lithium battery inside
the device, if it was not used or charged for a long time, the
battery would be damaged.) In one word, make sure that
the batteries inside the transmitters and receivers always
have power.
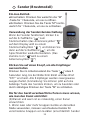
User manual of Charging case
1Power supply AC 90V--250V
2When it is going to be charged, take the foam out, and
keep the cover open in case it gets hot .
3When it is charging, the battery level on the display
screen of the transmitters shows going up, and it stops
when the battery level is full. The indicator light of the
receiver is red when it is being charged, and the indicator
light will turn to be blue when the battery level is full.
4Normally it takes about 2 hours to charge the receivers
full, and takes about 5 hours to charge the transmitters full.
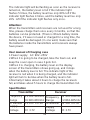
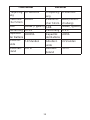
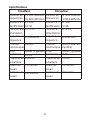
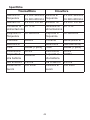
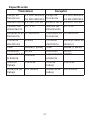
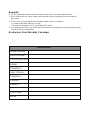
Specification
Transmitter Receiver
Frequency
Range
ID Number
Supply
Voltage
Frequency
Range
ID Number
Supply
Voltage
US:902-928mhz
EU:863-865mhz
US:100 EU:36
DC 3.7V
US:902-928mhz
EU:863-865mhz
US:100 EU:36
DC 3.7V
06

Transmitter Receiver
Frequency
Response
Electronical
current
SNR
Distortion
Battery
capacity
working
hour
Working
distance
Frequency
Response
Electronical
current
SNR
Distortion
Battery
capacity
working
hour
Working
distance
50-18000Hz
300MA
≥90dB (Typical)
<0.3%
2000MA
7-8hours
250 meters
50-18000Hz
68MA
(Mute status)
≥90dB (Typical)
<0.2%
520MA
8-9hours
250 meters
07

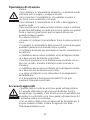
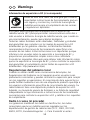
RF ENERGY EXPOSURE AND PRODUCT SAFETY GUIDE
This radio uses electromagnetic energy in the radio frequency (RF)
spectrum to provide communications between two or more users over
a distance. RF energy, which when used improperly, can cause
biological damage.
All Retekess radios are designed, manufactured, and tested to ensure
they meet government-established RF exposure levels. In addition,
manufacturers also recommend specific operating instructions to users
of the radios. These instructions are important because they inform
users about RF energy exposure and provide simple procedures on
how to control it.
Please refer to the following websites for more information on what RF
energy exposure is and how to control your exposure to assure
compliance with established RF exposure limits: http://www.who.int/en/
Local Government Regulations
When radios are used as a consequence of employment, the Local
Government Regulations requires users to be fully aware of and able to
control their exposure to meet occupational requirements. Exposure
awareness can be facilitated by the use of a product label directing
users to specific user awareness information. Your Retekess radio has
a RF Exposure Product Label. Also, your Retekess user manual, or
separate safety booklet includes information and operating instructions
required to control your RF exposure and to satisfy compliance
requirements.
Radio License (if appropriate)
Governments keep the radios in classification, business radios operate
on radio frequencies that are regulated by the local radio management
departments (FCC, ISED, OFCOM, ANFR, BFTK, Bundesnetzagentur...
).To transmit on these frequencies, you are required to have a license
issued by them. The detailed classification and the use of your radios,
please contact the local government radio management departments.
Use of this radio outside the country where it was intended to be
distributed is subject to government regulations and may be prohibited
Warnings
Before using this radio, read this guide which
contains important operating instructions for safe
usage and rf energy awareness and control for
compliance with applicable standards and
regulations.
08

Unauthorized modification and adjustment
Changes or modifications not expressly approved by the party responsi
ble for compliance may void the user’s authority granted by the local
government radio management departments to operate this radio and
should not be made. To comply with the corresponding requirements,
transmitter adjustments should be made only by or under the
supervision of a person certified as technically qualified to perform
transmitter maintenance and repairs in the private land mobile and fixed
services as certified by an organization representative of the user of
those services.Replacement of any transmitter component (crystal,
semiconductor, etc.)
not authorized by the local government radio management departments
equipment authorization for this radio could violate the rules.
FCC Requirements:
•This device complies with part 15 of the FCC Rules. Operation is
subject to the following two conditions:
(1) This device may not cause harmful interference, and
(2) this device must accept any interference received, including
interference that may cause undesired operation.
•(If applicable) This equipment has been tested and found to comply
with the limits for a Class B digital device, pursuant to Part 15 of the
FCC Rules. These limits are designed to provide reasonable protection
against harmful interference in a residential installation.This equipment
generates uses and can radiate radio frequency energy and, if not
installed and used in accordance with the instructions, may cause
harmful interference to radio communications. However, there is no
guarantee that interference will not occur in a particular installation. If
this equipment does cause harmful interference to radio or television
reception, which can be determined by turning the equipment off and
on, the user is encouraged to try to correct the interference by one or
more of the following measures:
-- Reorient or relocate the receiving antenna.
-- Increase the separation between the equipment and receiver.
-- Connect the equipment into an outlet on a circuit different from that to
which the receiver is connected.
-- Consult the dealer or an experienced radio/TV technician for help.
CE Requirements:
•(Simple EU declaration of conformity) Henan Eshow Electronic
Commerce Co.,Ltd declares that the radio equipment type is in
compliance with the essential requirements and other relevant
provisions of RED Directive 2014/53/EU and the ROHS Directive
2011/65/EU and the WEEE Directive 2012/19/EU; the full text of the
09

EU declaration of conformity is available at the following internet
address: www.retekess.com.
•Disposal
The crossed-out wheeled-bin symbol on your product, literature,or
packaging reminds you that in the European Union, all electrical and
electronic products,batteries,and accumulators(rechargeable batteries)
must be taken to designated collection locations at the end of
their working life. Do not dispose of these products as unsorted
municipal waste. Dispose of them according to the laws in your
area.
IC Requirements:
Licence-exempt radio apparatus
This device contains licence-exempt transmitter(s)/receiver(s) that
comply with Innovation, Science and Economic Development Canada’s
licence-exempt RSS(s). Operation is subject to the following two
conditions:
(1) This device may not cause interference.
(2) This device must accept any interference, including interference that
may cause undesired operation of the device.
Le présent appareil est conforme aux CNR d’Industrie Canada applicab
les aux appareils radio exempts de licence. L’exploitation est autorisée
aux deux conditions suivantes :
(1) l’appareil ne doit pas produire de brouillage;
(2) l’utilisateur de l’appareil doit accepter tout brouillage radioélectrique
subi, même si le brouillage est susceptible d’en compromettre le
fonctionnement.
RF Exposure Information (if appropriate)
•DO NOT operate the radio without a proper antenna attached, as this
may damage the radio and may also cause you to exceed RF exposure
limits. A proper antenna is the antenna supplied with this radio by the
manufacturer or an antenna specifically authorized by the manufacturer
for use with this radio, and the antenna gain shall not exceed the
specified gain by the manufacturer declared.
•DO NOT transmit for more than 50% of total radio use time, more than
50% of the time can cause RF exposure compliance requirements to be
exceeded.
•During transmissions, your radio generates RF energy that can
possibly cause interference with other devices or systems. To avoid
such interference, turn off the radio in areas where signs are posted to
do so.
•The device complies with RF specifications when the device used at
5mm from your body. Third-party belt-clips, holsters, and similar
10

accessories used by this device should not contain any metallic
components. Body-worn accessories that do not meet these
requirements may not comply with RF exposure requirements and
should be avoided.
•DO NOT operate the transmitter in areas that are sensitive to
electromagnetic radiation such as hospitals, aircraft, and blasting sites.
WARNING
WARNING
• Use the lowest volume necessary to do your job.
• Turn up the volume only if you are in noisy surroundings.
• Turn down the volume before adding headset or earpiece.
• Limit the amount of time you use headsets or earpieces at
high volume.
• When using the radio without a headset or earpiece, do not
place the radio's speaker directly against your ear
• Use careful with the earphone maybe possible excessive
sound pressure from earphones and headphones
can cause hearing loss
Note: Exposure to loud noises from any source for
extended periods of time may temporarily or permanently
affect your hearing. The louder the radio's volume, the less
time is required before your hearing could be affected.
Hearing damage from loud noise is sometimes undetectable
at first and can have a cumulative effect.
Antennas
•Do not use any portable radio that has a damaged antenna.
If a damaged antenna comes into contact with the skin when
the radio is in use, a minor burn can result.
Batteries (If appropriate)
•When the conductive material such as jewelry, keys or
chains touch exposed terminals of the batteries, may
complete an electrical circuit (short circuit the battery) and
become hot to cause bodily injury such as burns. Exercise
care in handling any battery, particularly when placing it
inside a pocket, purse or other container with metal objects
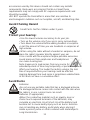
Long transmission
Avoid Choking Hazard
Small Parts. Not for children under 3 years.
Protect your hearing:
Avoid Burns
11

WARNING
WARNING
•When the transceiver is used for long transmissions, the
radiator and chassis will become hot.
Forbid
•Do not use charger outdoors or in moist environments, use
only in dry locations/conditions.
•Do not disassemble the charger, that may result in risk of
electrical shock or fire.
•Do not operate the charger if it has been broken or damaged
in any way.
•Do not place a portable radio in the area over an air bag or
in the air bag deployment area. The radio may be propelled
with great force and cause serious injury to occupants of the
vehicle when the air bag inflates.
To reduce risk
•Pull by the plug rather than the cord when disconnecting the
charger.
•Unplug the charger from the AC outlet before attempting any
maintenance or cleaning.
•Contact Retekess for assistance regarding repairs and
service.
•The adapter shall be installed near the equipment and shall
be easily accessible
•Risk of explosion if battery is replaced by an incorrect type.
Dispose of used batteries according to the instructions.
•Adapter shall be installed near the equipment and shall be
easily accessible.
•The plug considered as disconnect device of adapter.
•The operating temperature of the EUT can’t exceed the
specified range.
•This radio meets the RF exposure guidelines when used
with the Retekess accessories supplied or designated for the
product. Use of other accessories may not ensure
compliance with the RF exposure guidelines and may violate
regulations.
•For a list of Retekess-approved accessories for your radio
model, visit the following website: http://www.Retekess.com
Safety Operation
Approved Accessories
12

Ein-Aus-Betrieb
●Öffnen: Drücken Sie die Taste" "für 1 Sekunde,
um sie zu öffnen.
●Herunterfahren: Drücken Sie die Taste " " für 1
Sekunde, um das Gerät herunterzufahren.
Verwendung der Senderstummschaltung:
Wenn der Sender funktioniert, klicken Sie auf die
Schaltfläche "+" zum Stummschalten (das
Antennensymbol " " auf dem Display wird zum
Stummschaltsymbol " " , Der Empfänger kann
das Signal des Senders nicht mehr empfangen;
Klicken Sie erneut auf die Schaltfläche "+", um die
Sprechfunktion wiederherzustellen. (Das stumme
Icon " " wird zu einem Antennensymbol " ")
Klicken Sie auf einen Knopf, um alle Empfänger
auszuschalten
Drücken Sie im Betriebszustand die "-" -Taste etwa 5
Sekunden lang, bis das Display blinkt und das Antennen-
symbol " " in "OFF" geändert wird und alle Empfänger
zwangsweise ausgeschaltet werden. (Hinweis: Sie können
jetzt auf eine beliebige Schaltfläche des Senders klicken,
um zu beenden oder durch ständiges Drücken der
Schaltfläche " " zu schließen.
Die für das Gerät verantwortliche Person muss wissen,
wie man den Kanal einrichtet:
(1)Warum und wann es notwendig ist, einen Kanal
einzurichten:
1. Wenn zwei oder mehr Gruppen Geräte an derselben
Stelle verwenden, müssen verschiedene Kanäle für
verschiedene Gruppen von Geräten (einschließlich Sender
Sender (Handheld)
13

und Empfänger) eingestellt werden, um Störungen
zwischen den Gruppen zu vermeiden.
2. Wenn Sie weitere Empfänger zu einer Gruppe
hinzufügen müssen und die Kanäle dieser zusätzlichen
Empfänger nicht mit denen dieser Gruppe von Geräten
übereinstimmen, müssen Sie die Kanäle dieser
zusätzlichen Empfänger auf die gleichen Kanäle wie die
der Gruppe einstellen. (Die Kanäle von Sender und
Empfänger in einer Gruppe müssen identisch sein, sonst
kann der Empfänger das Signal des Senders nicht
empfangen)
(2) Wie die Kanäle eingestellt werden:
1. Wireless Channel Setup:
Drücken Sie im Arbeitszustand die Taste "+" und die Taste
"-" gleichzeitig, bis die Kanalnummer auf dem Bildschirm
blinkt, und lassen Sie dann die Taste "+" und die Taste "-"
gleichzeitig los. Wenn der Sender in den Kanaleinstellungs-
modus eingetreten ist, können Sie auf die Taste "+" oder "-"
klicken, um die Kanalnummer zu ändern, Drücken Sie die
Taste " " für etwa 3 Sekunden, Bis das blinkende
Antennensymbol " " erscheint, Dann lassen Sie den
Knopf " " los, Jetzt ist der Sender in den drahtlosen
Kanalanpassungszustand eingetreten. Dann können Sie
den Empfänger (der Empfänger ist eingeschaltet) auf den
Sender (innerhalb von 2 Metern) ausschalten, Der Kanal
des Empfängers wird mit dem Kanal des Senders
übereinstimmen (innerhalb von 5 Sekunden) wird derselbe,
die Kanalanpassung kann in 5 Sekunden abgeschlossen
werden (die Anzeigeleuchte des Empfängers stoppt das
schnelle Blinken und wird stabil blau), dann können Sie den
Kanalanpassungsstatus beenden, indem Sie auf die
Schaltfläche " " des Senders klicken, jetzt kann der
Empfänger hören, wenn der Sender spricht.
14

Ein-Aus-Betrieb
●Einschalten: Drücken Sie weiterhin die "M"
-Taste für 1 Sekunde, um sie zu öffnen.
●Schließen: Drücken Sie die Taste "M" kontin-
uierlich für 1 Sekunde, um sie zu schließen.
Verwendung der Senderstummschaltung:
Wenn der Sender funktioniert, klicken Sie
auf die Schaltfläche " " zum
Stummschalten (das Antennensymbol " "
auf dem Display wird zu einem
Stummschaltsymbol " "), und klicken Sie
dann auf die Schaltfläche" ", um die
Sprechfunktion wiederherzustellen. (Das
stumme Icon " "wird zu einem
Antennensymbol" ")
Klicken Sie auf einen Knopf, um alle Empfänger
auszuschalten
Drücken Sie im Arbeitszustand die Taste " " etwa 5
Sekunden lang, bis der Bildschirm blinkt und das Wort
"OFF" erscheint. Alle Empfänger werden zwangsweise
ausgeschaltet. (Anmerkung: Sie können jetzt auf eine
beliebige Taste des Senders klicken, um zu beenden oder
durch ständiges Drücken der Taste "M" zu schließen.
Die für das Gerät verantwortliche Person muss wissen,
wie man den Kanal einrichtet:
(3)Warum und wann ist es notwendig, einen Kanal
einzurichten:
1. Wenn zwei oder mehr Gruppen Geräte an derselben
Stelle verwenden, müssen verschiedene Kanäle für
verschiedene Gruppen von Geräten (einschließlich Sender
Sender (Brustmodell)
15

und Empfänger) eingestellt werden, um Störungen
zwischen den Gruppen zu vermeiden.
2. Wenn weitere Empfänger zu einer Gruppe hinzugefügt
werden müssen und die Kanäle dieser zusätzlichen
Empfänger nicht mit denen der Gruppe von Geräten
übereinstimmen, müssen die Kanäle dieser zusätzlichen
Empfänger auf die gleichen Kanäle wie die der Gruppe
eingestellt werden (die Kanäle des Senders und der
Empfänger in der Gruppe müssen die gleichen sein, sonst
kann der Empfänger das Signal des Senders nicht
empfangen).
(4)Kanaleinstellung:
1Drahtlose Kanaleinstellungen:
Im Arbeitszustand, Drücken Sie gleichzeitig die Taste " "
und die Taste " ", Bis die Kanalnummer auf dem
Bildschirm blinkt, Dann lassen Sie die Schaltflächen " "
und " "los, wenn der Sender in den Channel Setup
Modus gegangen ist und Sie dann auf die Schaltfläche
" "oder" " klicken können, um die Kanalnummer zu
ändern, Wenn Sie die Kanalnummer ausgewählt haben,
drücken Sie die "M"-Taste für ca. 3 Sekunden, bis das
Antennensymbol “ ” blinkt, und lassen Sie die "M"-Taste
los, wenn der Sender in den Funkkanal-Matching-Status
eingetreten ist.Zu diesem Zeitpunkt können Sie die
"M"-Taste verwenden, um die Kanalnummer zu ändern. Es
ist möglich, den Empfänger (der bereits eingeschaltet ist)
auf den Sender (innerhalb von 2 Metern) auszuschalten,
der Kanal des Empfängers wird identisch mit dem Kanal
des Senders (innerhalb von 5 Sekunden), die Kanalan-
passung kann in 5 Sekunden abgeschlossen werden, dann
können Sie den Kanalanpassungsstatus beenden, indem
Sie auf die "M" Taste des Senders klicken, jetzt kann der
Empfänger ihn hören, wenn der Sender spricht.
16

Ein-Aus-Betrieb
●Einschalten: Drücken Sie 1 Sekunde
lang die Taste " ", bis die
Kontrollleuchte eingeschaltet ist.
Nach dem Einschalten
1. Wenn ein Sender mit dem gleichen
Kanal in der Nähe (etwa 250 Meter
entfernt) spricht, hört er den Sender
sprechen (wenn der Empfänger das
Signal des Senders empfängt, blinkt seine
Anzeigeleuchte alle 2,5 Sekunden; Wenn der Empfänger
das Signal des Senders nicht empfängt oder der Kanal des
Empfängers nicht mit dem Kanal des Senders übereinstim-
mt, blinkt seine Anzeigeleuchte schnell alle 0,5 Sekunden.
2. wenn ein Sender in der Nähe (ca. 2 Meter entfernt) in
einem Kanalanpassungszustand ist, stimmt sein Kanal
automatisch mit dem Kanalanpassungszustand des
Senders überein (jetzt leuchtet die Anzeigeleuchte und
bleibt blau, nachdem der Sender den Kanalanpassungsmo-
dus verlassen hat, blinkt die Anzeigeleuchte alle 2,5
Sekunden, um anzuzeigen, dass die Kanalanpassung
abgeschlossen und erfolgreich ist)
●Aus: Drücken Sie kontinuierlich die Taste " " für 2
Sekunden, um sie auszuschalten (die Kontrollleuchte ist
auch ausgeschaltet). Sie können den Empfänger auch mit
der Senderfunktion "Alle Empfänger per Knopfdruck
ausschalten" ausschalten.
Anpassung der Lautstärke:
Wenn der Empfänger ein Signal vom Sender empfängt,
können Sie die Lautstärke einstellen, indem Sie auf die
Schaltfläche "+" oder "-" klicken oder weiter drücken.
Empfänger
17

Status der Batterie:
Der Empfänger blinkt, sobald die Kontrollleuchte
eingeschaltet wird, die Kontrollleuchte blinkt 5 mal, die
Batterie ist voll, die Kontrollleuchte blinkt 4 mal, die Batterie
ist nur noch 80%, die Kontrollleuchte blinkt nur einmal, die
Batterie ist nur noch 20%.
Hinweis:
1Wenn Sender und Empfänger für längere Zeit nicht
verwendet werden, laden Sie sie bitte alle 3 Monate auf,
um den Akku zu schützen. (Im Gerät befindet sich eine
Lithium-Batterie, die beschädigt werden kann, wenn sie
nicht benutzt oder für längere Zeit aufgeladen wird.) Kurz
gesagt, stellen Sie sicher, dass die Batterien im Inneren
von Sender und Empfänger immer elektrisch sind.
Bedienungsanleitung für die Ladebox
1Stromversorgung: AC 90V-250V
2Wenn es aufgeladen werden soll, nehmen Sie den
Schaum heraus und halten Sie die Abdeckung offen, falls
es heiß wird.
3Beim Laden steigt die Batterieladeanzeige auf dem
Senderdisplay an und stoppt, wenn die Batterie voll ist. Die
Anzeige ist rot, wenn der Empfänger geladen wird, und
blau, wenn der Akku voll ist.
4Normalerweise dauert es etwa 2 Stunden, bis der
Empfänger voll ist, und 5 Stunden, bis der Sender voll ist.
Specifikation
Der Sender Der Empfänger
Frequenzb-
ereich
ID-Nummer
Versorgun-
gsspannung
Frequenzb-
ereich
ID-Nummer
Versorgun-
gsspannung
US902-928mhz
EU863-865mhz
US:100 EU:36
DC 3.7V
US902-928mhz
EU863-865mhz
US:100 EU:36
DC 3.7V
18
La pagina si sta caricando...
La pagina si sta caricando...
La pagina si sta caricando...
La pagina si sta caricando...
La pagina si sta caricando...
La pagina si sta caricando...
La pagina si sta caricando...
La pagina si sta caricando...
La pagina si sta caricando...
La pagina si sta caricando...
La pagina si sta caricando...
La pagina si sta caricando...
La pagina si sta caricando...
La pagina si sta caricando...
La pagina si sta caricando...
La pagina si sta caricando...
La pagina si sta caricando...
La pagina si sta caricando...
La pagina si sta caricando...
La pagina si sta caricando...
La pagina si sta caricando...
La pagina si sta caricando...
La pagina si sta caricando...
La pagina si sta caricando...
La pagina si sta caricando...
La pagina si sta caricando...
La pagina si sta caricando...
La pagina si sta caricando...
La pagina si sta caricando...
La pagina si sta caricando...
La pagina si sta caricando...
La pagina si sta caricando...
La pagina si sta caricando...
La pagina si sta caricando...
La pagina si sta caricando...
La pagina si sta caricando...
La pagina si sta caricando...
La pagina si sta caricando...
La pagina si sta caricando...
La pagina si sta caricando...
La pagina si sta caricando...
La pagina si sta caricando...
La pagina si sta caricando...
La pagina si sta caricando...
La pagina si sta caricando...
La pagina si sta caricando...
La pagina si sta caricando...
-
 1
1
-
 2
2
-
 3
3
-
 4
4
-
 5
5
-
 6
6
-
 7
7
-
 8
8
-
 9
9
-
 10
10
-
 11
11
-
 12
12
-
 13
13
-
 14
14
-
 15
15
-
 16
16
-
 17
17
-
 18
18
-
 19
19
-
 20
20
-
 21
21
-
 22
22
-
 23
23
-
 24
24
-
 25
25
-
 26
26
-
 27
27
-
 28
28
-
 29
29
-
 30
30
-
 31
31
-
 32
32
-
 33
33
-
 34
34
-
 35
35
-
 36
36
-
 37
37
-
 38
38
-
 39
39
-
 40
40
-
 41
41
-
 42
42
-
 43
43
-
 44
44
-
 45
45
-
 46
46
-
 47
47
-
 48
48
-
 49
49
-
 50
50
-
 51
51
-
 52
52
-
 53
53
-
 54
54
-
 55
55
-
 56
56
-
 57
57
-
 58
58
-
 59
59
-
 60
60
-
 61
61
-
 62
62
-
 63
63
-
 64
64
-
 65
65
-
 66
66
-
 67
67


in altre lingue
- English: Retekess TT111 User manual
- français: Retekess TT111 Manuel utilisateur
- español: Retekess TT111 Manual de usuario
- Deutsch: Retekess TT111 Benutzerhandbuch
Documenti correlati

Altri documenti
-
Alto Professional Stealth Wireless MKII Guida utente
-
IMG STAGELINE TXS-1820 Manuale utente
-
Samson Concert 288 Manuale utente
-
-
dBTechnologies MOVING D series Manuale utente
-
Sennheiser EVOLUTION WIRELESS EW 100 Manuale del proprietario
-
Spektrum SPMR5200G Guida utente
-
Shure SLX Wireless System Quick Setup Manual