
??/1522A
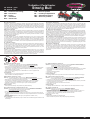
Trettraktor | Pedal tractor
Strong Bull
No. 460795 - green
No. 460796 - red
DE - Gebrauchsanleitung
GB - Instruction
FR - Notice
IT - Istruzione
ES - Instrucción
CZ - Návodkpoužití
PL -Instrukcjaużytkowania
NL -Gebruiksaanwijzing
SK -Návodnapoužitie
DE - AllgemeineHinweise
JAMARA e.K. übernimmt keine Haftung für Schäden, die an dem Produkt selbst oder durch dieses
entstehen, sofern diese auf falsche Bedienung oder Handhabungsfehler zurückzuführen sind. Der
Kunde allein trägt die volle Verantwortung für die richtige Bedienung und Handhabung; dies umfasst
insbesondere die Montage, den Ladevorgang, die Verwendung bis hin zur Wahl des Einsatzberei-
ches. Bitte beachten Sie hierzu die Bedienungs- und Gebrauchsanleitung, diese enthält wichtige
Informationen und Warnhinweise.
GB - General information
JAMARA e.K. is not liable for any damage caused to the product itself or through this, provided this
is due to improper operation or handling errors. The Customer alone bears the full responsibility for
the proper use and handling, including without limitation, the assembly, the charging process, the
use and choice of the operation area. Please refer to the operating and user instructions, it contains
important information and warnings.
FR - Remarques générales
La société JAMARA e.K. n’est pas responsable de dommages, que ce soit au niveau du modèle
ou causé par celui-ci, résultant d’une utilisation non appropriée. Seul le client est responsable con-
cernant la mise en oeuvre et l’utilisation conforme du matériel; cela va de l’assemblage, en passant
par la charge des accus et allant jusqu’au domaine d’utilisation. Pour cela, veillez lire attentivement
la notice d’assemblage et d’utilisation, celle-ci contient d’importantes informations ainsi que les con-
signes de sécurités.
IT - Informazioni generali
JAMARA e.K. non e´responsabile per danni, sostenute al prodotto stesso o attraverso questo, do-
vuti ad una gestione non corretta del articolo. Solo il cliente si assume la piena responsabilità per
la manutenzione e l´utilizzo corretto dello stesso; questo include il montaggio, la ricarica, l´utilizzo,
contengono informazioni e avvertimenti molto importanti.
ES - Información general
JAMARA e.K. no se hace responsable de los daños causados al producto en sí o por medio de
esto, a menos que esto se debe al mal funcionamiento o errores de manejo. El cliente solo tiene la
responsabilidad completa para el uso y manejo adecuado, incluyendo, sin limitaciones, el montaje,
el proceso de carga, el uso de hasta la elección de la zona de aplicación. Por favor, consulte las
instrucciones de uso y funcionamiento, contiene información y avisos importantes.
CZ-Vyloučeníodpovědnosti
PL -Wykluczenieodpowiedzialności
-
NL - Uitsluiting van de aansprakelijkheid
ervan indien deze schade voortvloeit van onjuiste bediening of foutief gebruik van het product. De
het omvat met name de montage, het ladingproces, het gebruik en de keuze van het toepassings-
gebied. Wij vragen gaarne kennis te nemen van de bedienings- en gebruiksaanwijzing die cruciale
gegevens en waarschuwing omvat.
SK-Vylúčeniezodpovednosti
-
upozornenia.
DE - Geeignet für Kinder ab 3 Jahren.
Achtung: Für Kinder unter 36 Monaten nicht geeignet. ERSTICKUNGSGEFAHR!
Enthält verschluckbare Kleinteile. Von Kleinkindern unbedingt fernhalten
• Entfernen Sie vor dem Spielbetrieb alle Schutzfolien von sämtlichen Teilen
• Dieses Gerät ist nicht dafür bestimmt, durch Personen (einschließlich Kinder) mit eingeschränk-
ten physischen, sensorischen oder geistigen Fähigkeiten oder mangels Erfahrung und/oder
mangels Wissen benutzt zu werden.
• Alters- und entwicklungsbedingt kann ein Mindestalter von 4 Jahren angebracht sein
•
Vor der Montage
• Die Montage darf nur von einem Erwachsenen vorgenommen werden.
Halten Sie während der Montage Kinder fern.
GB - Suitableforchildrenover3years.
Warning: Not suitable for children under 36 months. RISK OF SUFFOCATION!
Contains small parts which can be swallowed. Keep away necessarily from children
•
• This product is not intended for use by individuals (including children) with reduced
physical, sensory or mental capabilities or lack of experience and / or knowledge.
• Depending on development, a minimum age of 4 years could be appropriate
•
Beforeassembly
• Adult required for assembly. Keep children away while assembling.
FR - Produit à utiliser par les enfants de plus de 3 ans.
Attention: Ne convient pas aux enfants de moins de 36 mois. DANGER D‘ETOUFFEMENT!
Contient des pièces petites qui peuvent être avalées.
Ne pas laisser à la portée de petits enfants.
•
• Ce dispositif n‘est pas destiné à être utilisé par des personnes (y compris les enfants) dont les
capacités physiques, sensorielles ou mentales ou manque d‘expérience et/ou les connais sances
pour être.
• En fonction du développement ou de l‘âge on peut également considérer 4 ans)
•
Avant le montage
•
l’assemblage
IT - Adatto ai bambini dal 3 anno di vita.
Attenzione: Non adatto a bambini di età inferiore a 36 mesi. RISCHIO DI SOFFOCAMENTO!
Contiene piccoli pezzi che possono essere ingeriti.
Tenere sempre fuori dalla portata dei bambini.
• Prima di giocare, rimuovere tutte le pellicole protettive presenti su tutte le parti
• Questo prodotto non è destinato ad essere utilizzato da persone (bambini compresi) con capacità
conoscenza.
• Dipende del sviluppo del bimbo
•
Prima del montaggio
• Il montaggio deve essere eseguito solo da un adulto. Tenere lontano i bambini dal montaggio.
ES - Aptoparaniñosmayoresde3años.
Atención: No es recomendable para los niños menores de 36 meses. RIESGO DE ASFIXIA!
Contiene piezas pequeñas. Mantenga necesariamente lejosde los niños.
• Antes de jugar, quite todas las películas protectoras de todas las partes
• Es producto no es para personas (incluidos niños) con discapacidad física, mental y sensonriais.
• Edad y desarrollo puede ser una edad minima de 4 años
•
Antes del montaje
• El Montaje debe ser realizado por un adulto. Mantener los niños alejado durante el montaje.
CZ -Určenoprodětiod3let.
VAROVÁNÍ: NEBEZPEČÍUDUŠENÍ!
•
•
•
•
Předmontáží
•
max. kg
60

2
DE - Konformitätserklärung
Der vollständige Text der EU-Konformitätserklärung ist unter der folgenden
www.jamara-shop.com/Konformitaet
GB-CerticateofConformity
The full text of the EU Declaration of Conformity is available at the following
www.jamara-shop.com/Conformity
FR - Déclaration de conformité
Le texte intégral de la déclaration de conformité CE est disponible via l‘adresse suivanteAdresse
www.jamara-shop.com/Conformity
IT - Dichiarazione di conformità
www.jamara-shop.com/Conformity
ES - Declaración de conformidad
www.jamara-shop.com/Conformity
CZ-Osvědčeníoshodě
www.jamara-shop.com/Conformity
PL-Deklaracjazgodności
www.jamara-shop.com/Conformity
NL - Conformiteitsverklaring
www.jamara-shop.com/Conformity
SK-Vyhlásenieozhode
www.jamara-shop.com/Conformity
DE - Lesen Sie die komplette Bedienungsanleitung und Sicherheitshinweise sorgfältig
durch bevor Sie das Modell in Betrieb nehmen.
GB - Read the complete instructions and security instructions carefully before using the
model.
FR - Veuillez lire attentivement et entièrement la notice et les consignes de sécurités
avant tout utilisation de ce produit!
IT - Vi preghiamo di leggere attentamente la istruzione completa e Istruzoni per la
sicurezza prima di usare il modello.
ES - Lea atentamente la instruccion completa y seguridad antes de poner el modelo en
funcionamiento
CZ -
pokyny.
PL -
NL - Lees zorgvuldig de volledige handleiding en de veiligheidsinstructie voordat het
model wordt gestart.
SK -
DE - Um Unfälle und Verletzungen zu vermeiden lassen Sie Ihr Kind NIE unbeaufsichtigt
das Fahrzeug betreiben. Lassen Sie Ihr Kind während es mit dem Modell fährt nicht
aus den Augen.
GB -
operation of the vehicle. Never let your Child out of your sight while the driving a
vehicle .
FR - Pour prévenir les accidents et les blessures ne laissez JAMAIS votre enfant
conduire sans surveillance. Ne laissez pas votre enfant conduire le model hors de
votre vue.
IT - Per evitare incidenti e infortuni, non lasciare MAI il suo bambino incustodito usare il
veicolo. Non lasciate il suo bambino durante la guida del Modello fuori dalla sua
vista.
ES - Para evitar accidentes y lesiones NUNCA deje su niño desantendido a operar el
vehículo. No deje su niño mienteras conduce con el vehículo de su vista.
CZ -
PL -
bez nadzoru. Nie spuszczaj dziecka z oczu podczas jazdy modelem.
NL -
toezicht besturen. Verlies het kind nooit uit het oog wanneer het aan het spelen
met een model is.
SK -
PL-Wolnoużywaćosobomod3lat!
Uwaga: MOŻNASIĘZADŁAWIĆ!
Absolutnie
Przedmontażem
NL - Geschikt voor kinderen vanaf 3 jaar.
Opgelet: Niet bestemd voor kinderen jinger dan 3jaar. GEVAAR VOOR VERTIKKING!
Bevat kleine elementen, die geslikt kunnen worden.
Buiten bereik houden van kleine kinderen.
• Voordat het wordt gespeld, moet de beschermfolie van alle onderdelen worden verwijderd.
• Dit toestel is niet bestemd voor gebruik door personen (inclusief kinderen) met beperkte fysische,
sensorische, cognitieve, onbekwame vaardigheden
• Afhankelijk van leeftijd en ontwikkeling is de minimale leeftijd voor het spelen met dit speelgoed
4 jaar.
Vóór de installatie
• De installatie mag enkel door een volwassene worden uitgevoerd.
Tijdens de installatie mogen de kinderen niet in de buurt van het speelgoed verblijven.
SK-Vhodnépreosobyod3rokov!
Pozor: NEBEZPEČENSTVOZADUSENIA!
Predmontážou

3
DE -
z. B. private Parkplätze, Privatgrundstücke oder an sonstigen ungefährlichen
Plätzen. Achten Sie darauf, das keine Menschen oder Tiere gefährdet sind.
GB -
other safe locations. Make sure that no person or animal is endangered.
FR - Il n’est pas autorisé avec le véhicule de se déplacer sue les voies ou des places pu
bliques, des pentes ou autres endroits dangereux. Manoeuvrez le véhicule que dans
des endroits tels que des parkings ou terrains privés ou autre emplacement pas
dangereux. Assurez-vous qu’aucune personne ou animal soient menacés.
IT - È proibito guidare il modello su strade pubbliche, aere pubbliche, in discesa o altri
luoghi pericolosi. Usare il modello solo in posti come parcheggio privato, terreno
privato oppure luoghi non pericolosi. Fare attenzion e di non mettere in pericolo viti
umane oppure animali.
ES - No usar el modelo en las vías pública o sitios, declive o sitios peligrosos. Usar el
modelo solo en puestos como aparcamiento privados, terreno privado o otros sitios
no peligrosos. Asegúrese, de no poner en riesgo personas o animales.
CZ -
PL
NL - Het model mag NIET op wegen of op openbare plaatsen of op andere gevaarlijke
plaatsen worden gebruikt. Het is enkel toegestaan het model op plaatsen zoals
privéparkeerterreinen, privépercelen of andere beveiligde plekken te gebruiken.
SK
DE - Das Fahrzeug besitzt keine Bremse, oder Feststellbremse. Betreiben Sie das
Fahrzeug deshalb nicht an Steigungen oder Gefällen und sichern Sie es beim
Abstellen gegen selbstständiges Wegrollen.
GB - The vehicle has no brake or parking brake. Do not operate the vehicle uphill
or downhill, and secure it when parking.
FR - La voiture n’est pas équipée de freins ou frein à main. De ce fait n’utilisez pas ce
modèle aux endroits pentus, ascendant ou descendant, et assurez-vous que une fois
votre voiture parquée, celle-ci ne peut pas roulée par elle-même.
IT - La vettura non è dotata né di freno manuale né freno di sicurezza. Non usare il
modello in salita oppure discesa, si rischia di perdere e/o danneggiare sia il veicolo
che altre cose/persone. Inoltre, assicurarsi che non possa muoversi o scivolare
mentre è fermo.
ES - El vehículo no tiene frenos separados. No usar el modelo en subidas o declive, riesgo
de perder o dañar el modelo. Asegurarse de que el vehículo no se mueve.
CZ
PL - Model nie posiada dodatkowego hamulca ani hamulca postojowego. Dlatego nie
zabezpieczony przed spontaniczny start podczas parkowania.
NL - Het model is voorzien van geen aanvullende remmen of parkeerrem. Het voertuig
mag dus niet op hellingen worden gebruikt en moet het tijdens het parkeren tegen
wegrollen worden beveiligd.
SK -
DE - ACHTUNG
Für ein sicheres Fahren stellen Sie zunächst sicher, dass Kinder zusätzlich die
- Immer gut festhalten.
- Niemals ohne Schuhe fahren.
- Niemals bei Dunkelheit fahren.
GB - DANGER
For safe driving, you should make sure that your Child understand and adheres to the
- Hold tight.
- Never drive without shoes.
- Never drive in the dark.
FR - ATTENTION
- Toujours bien se tenir.
- Ne jamais rouler sans chaussures.
- Ne jamais rouler la nuit.
IT - ATTENZIONE
Per una guida sicura si dovrebbe fare in modo che il bambino comprende e segue
- Sempre tenersi bene.
- Non guidare mai senza scarpe.
- Non guidare mai al buio.
ES - ATENCIÓN
Para una conducion segura debe asegurarse de que los niños entienden y obedezcan
- Siempre tener bien.
- Nunca conduzca sin zapatos.
- Nunca conducir en la oscuridad
CZ - POZOR
- Nikdy nejezdíme bez bot.
PL - UWAGA
NL - LET OP
- Houd altijd vast.
- Rijd nooit zonder schoenen.
- Rijd nooit in het donker.
SK - UPOZORNENIE
- Nikdy nejazdíme po zotmení.
DE - Achtung!
Der Bausatz in unmontiertem Zustand darf nicht in die Hände von Kleinkindern ge-
langen, da dieser verschluckbare Kleinteile enthält. Die Montage sollte ausschließ-
lichvoneinemErwachsenendurchgeführtwerden.
GB - Attention!
Keepthenotmountedkitawayfromsmallchildrenasitcontainsswallowableparts.
Itmustbeassembledorcheckedbyadulttomakesurethecarisassembledonthe
rightwaybeforeplaying.
FR - Attention!
Le kit à l’état non assemblé ne doit en aucun cas être à la portée des enfants, puisqu’il
contient des pièces susceptibles d’être avalées. L´assemblage doit impérativement
êtreeectuéparunadulte.
IT - Attenzione!
Il Kit in stato non montato, non deve cadere nelle mani di bambini piccoli, in quanto
contienepiccolepartichesipossonoinghiottire.Ilmontaggiodeveessereeettuato
solo da un adulto.
ES - ¡Atención!
El Kit en el estado no montado, no debe caer en las manos de los niños pequeños,
yaquecontienepiezaspequeñasquepuedensertragadas.Elmontajesólodebeser
realizado por un adulto.
CZ -Upozornění!
Nesestavenýmodelmějtezdosahumalýchdětí,obsahujemaléčásti,kterélzespol-
knout.Sestaveníakontrolabymělabýtprovedenadospělouosobou,abybyl
automobilsestavensprávnýmzpůsobem.
PL -Uwaga!
Zestaw w stanie niezmontowanym nie może dostać się do rąk małych dzieci,
ponieważzawieramałeczęści, któremogązostaćpołknięte.Montażpowinienbyć
wykonywanywyłącznieprzezosobędorosłą.
NL - Let op!
Debouwdoosmaginniet-gemonteerdestaatnietinhandenvankleinekinderenval-
len,aangeziendezekleineonderdelenbevatdiekunnenwordeningeslikt.Montage
magalleendooreenvolwassenewordenuitgevoerd.
SK - Pozor!
Súpravasavnezmontovanomstavenesmiedostaťdorúkmalýmdeťom, pretože
obsahuje malé časti, ktoré môžu prehltnúť. Montáž môže vykonávať len dospelá
osoba.

4
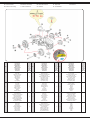
No.
Bezeichnung
Description
Désignation
Designazione
Designació
Popissoučástí
Oznaczenie
Aanduiding
Označenie
Stück
Pieces
Pièces
Pezzi
Piezas
Část
Sztuka
Stuk
Kúsok
No.
Bezeichnung
Description
Désignation
Designazione
Designació
Popissoučástí
Oznaczenie
Aanduiding
Označenie
Stück
Pieces
Pièces
Pezzi
Piezas
Část
Sztuka
Stuk
Kúsok
No.
Bezeichnung
Description
Désignation
Designazione
Designació
Popissoučástí
Oznaczenie
Aanduiding
Označenie
Stück
Pieces
Pièces
Pezzi
Piezas
Část
Sztuka
Stuk
Kúsok
1
Achskappe
Axle cover
Capuchon d‘essieu
Coperchio asse
Tapa del eje
Asdop
1 6
Achsabdeckung klein
Small axle cover
Couverture d‘essieu petite
Copriasse piccolo
Tapas de tablas pequeñas
Asafdekking klein
211
Achsabdeckung groß
big axle cover
Couverture d‘essieu grand
Copriasse grande
Tapas de tablas grandes
Asbedekking groot
2
2
Vorderachse
Front axle
Axe avant
Asse anteriore
Eje delantero
Vooras
1
Hinterrad
Rear wheel
Roue arrière
Ruote posteriori
Ruedas traseras
Kolo
Achterwiel
2 12
Lenkrad
Steering wheel
Volant directionnel
Sterzo
Volante
Volant
Kierownica
Stuurwiel
Volant
1
3
Radabdeckung vorne
Front wheel cap
Protection de roue avant
Copriruota anteriori
Llanta delanteras
Voorwielafdekking
Kryt predného kolesa
2
Hinterachse
Rear axle
Axe arrière
Asse posteriore
Eje posterior
Achteras
1 13
Lenkradfassung
Steering wheel wedge
Support de volant
Supporto per volante
Soporte para el volante
Gniazdo kierownicy
Stopcontact aan het stuur
1
4
Vorderrad
Front wheel
Roue avant
Ruote anteriori
Ruedas delanteras
Wiel vooraan
Predné koleso
2
Radabdeckung hinten
Rear wheel cap
Protection de roue arrière
Copriruota posteriori
Llanta traseras
Poklice na kolo zadní
Achterwielafdekking
Kryt zadného kolesa
2 14
Sitz
Seat
Siége
Sedile
Asiento
Siedzenie
Seat
Sídlo
1
DE - Teile Karrosserie
GB - Parts for vehiclebody
FR - Pièces du carrosserie
IT - Parti del carrozzeria
ES - Partes del carrocería
CZ-Částitěla
PL-Częściciała
NL - Lichaamsdelen
SK-Častitela

5
Achssicherung klein
Small axle lock
Verrouillage d‘essieu petit
Blocco asse piccolo
Bloque de eje pequeño
Asblokkering klein
2
Achssicherung groß
big axle lock
Verrouillage d‘essieu grand
Blocco asse grande
Bloque de eje grande
Asblokkering groot
2
1 2
4
3
5
DE - Montage
GB-Assembly
FR - Assemblée
IT - Assemblea
ES - Asamblea
CZ -Montáž
PL-Montaż
NL - Montage
SK-Montáž

DE
1. Montage der Vorderräder
Bringen Sie die Achskappe (1) an die Vorderseite an (siehe Abbildung). Schieben Sie die
Vorderachse (2) durch die Karosserie und stecken Sie das Vorderrad (4) auf. Drücken Sie eine
die Achsabdeckung (6) auf das Ende der Vorderachse stecken. Wiederholen Sie diesen
Vorgang auf der anderen Seite.
2. Montage der Hinterräder
stecken. Wiederholen Sie diesen Vorgang auf der anderen Seite.
3. Montage des Lenkrads
Platzieren Sie das Lenkrad (12) auf der Lenkradfassung (13) und drücken Sie das Lenkrad in
diese bis es einrastet.
4. Montage des Sitzes
nach hinten bis er fest sitzt.
5. SchwierigkeitenbeimTreten:
Entfernen Sie die Schrauben auf beiden Seiten und drehen Sie die roten Platten nach links um
die Kette wieder zu spannen. Um die Kette zu lockern drehen Sie die roten Platten nach rechts.
Achten Sie darauf das die Platten auf beiden Seiten gleich weit gedreht wurden. Anschließend
ziehen Sie die Schrauben wieder an.
BenutzungunterunmittelbarerAufsichtvonErwachsenen.
Das Modell zu steuern erfordert ein gewisses Mindestmaß an Geschick und Vorsicht.
Machen Sie sich deshalb unbedingt vor dem Betreiben des Modells mit seinen Eigen-
schaften und seiner Steuerung vertraut. Das Modell hat ein hohes Eigengewicht. Dadurch
besteht ein erhöhtes Schadens und Verletzungsrisiko im Falle eines Kontrollverlustes.
stößen mit Gegenständen oder die Gefährdung von Personen.
GB
1. Mountingthefrontwheels
Attach the axle cap (1) to the front (see illustration). Push the front axle (2) through the body
on the other side.
2. Mountingtherearwheels
3. Assemblyofthesteeringwheel
Place the steering wheel (12) on the steering wheel socket (13) and press the steering wheel
into the recess until it engages.
4. Assemblyoftheseat
5. Dicultyinpedalling:
Remove the screws on both sides and turn the red plates to the left to tighten the chain again.
To loosen the chain, turn the red plates to the right. Make sure that the plates on both sides are
turned the same distance. Then tighten the screws again.
Onlyuseindirectsupervisionofanadult!
To control the vehicle a minimum skill level and caution is needed. Make sure you are
familiar with the operation of the model and its characteristics. The model is heavy. This is
an increased risk of injury and damage in the event of loss of control. Avoid any kind of
intentional or unintentional collisions with objects or hazards to persons
FR
1. Montage des roues avant
2. Montage des roues arrière
3. Montage du volant
Placez le volant (12) sur la douille (13) et enfoncez le volant dans la douille jusqu‘à ce qu‘il
s‘enclenche.
4. Montage du siège
qu‘il soit bien en place.
5. Dicultyinpedalling:
chaîne. Pour desserrer la chaîne, tournez les plaques rouges vers la droite. Veillez à ce que les
Utiliser uniquement sous la surveillance d’un adulte!
Le pilotage du modèle demande une certaine dose d’adresse et de prudence. De ce
fait familiarisez-vous avec le modèle, surtout au niveau des caractéristiques et ses
commandes avant toute utilisation. Le modèle a un poids propre élevé. De ce fait le
Evitez tout type de collision, accidentelle ou voulue, avec d’autres véhicules, objets ou
personnes.
6
IT
1. Montaggio delle ruote anteriori
Fissare la copertura dell‘assale (1) alla parte anteriore (vedi immagine). Spingere l‘asse
anteriore (2) attraverso la carrozzeria e montare la ruota anteriore (4). Premere un cerchio (3)
sull‘estremità dell‘asse anteriore. Ripetere questa procedura dall‘altro lato.
2. Montaggio delle ruote posteriori
dall‘altro lato.
3. Montaggio dello sterzo
incastra.
4. Montaggio del sedile
quando non è saldamente incastrato in posizione di seduta
5. Dicoltàapedalare:
Rimuovere le viti su entrambi i lati e girare le piastre rosse a sinistra per stringere di nuovo la
catena. Per allentare la catena, girare le piastre rosse verso destra. Assicurati che le piastre su
entrambi i lati siano girate alla stessa distanza. Poi stringere di nuovo le viti.
Utilizzare solo sotto la diretta sorveglianza di un adulto!
Per manovrare il modello è indispensabile una certa abilità e cautela. Consigliamo in
comandi. Il modelle ha un peso proprio ab bastanza elevato. Per mezzo di ciò è
aumentato il rischio di danno e lesioni in caso di una perdita del controllo. Evitare
qualsiasi forma d‘impatti con oggetti e/o messa in pericolo di persone.
ES
1. Montar las ruedas delanteras
Coloca la tapa del eje (1) en la parte delantera (ver imagen). Empuja el eje delantero (2) a
través de la carrocería y coloca la rueda delantera (4). Presiona una llanta (3) en la rueda
extremo del eje delantero. Repita este procedimiento en el otro lado.
2. Montaje de las ruedas traseras
las ruedas hasta que se enganchen. Asegure las ruedas colocando primero el gran bloqueo del
procedimiento en el otro lado.
3. Montaje del volante
Coloca el volante (12) en la posición (13) y empújalo hasta que se enganche.
4. Montaje del asiento
5. Dicultaddepedaleo:
Retire los tornillos de ambos lados y gire las placas rojas hacia la izquierda para volver a
apretar los tornillos.
Usado bajo la supervisión directa de un adulto!
Maniobrar el modelo requieres un cierto nivel mínimo de habilidad y prudencia. Se
conduccion y la emisora. El modelo tiene un peso bastante alto, por eso se aumenta el
riesgo de daños y lesiones en el caso de una pérdida de control. Evitar cualquier tipo de
impacto con objetos y/o peligro de personas.
CZ
1. Sestavenípředníchkol
2. Montážzadníchkol
3. Montážvolantu
4. Montážsedadla
5. Obtížnostpřišlapání:
Použitíjenpoddohledemdospěléosoby!

7
PL
1. Zespółkołaprzedniego
2. Mocowanietylnegokoła
3. Montażkołakierownicy
4. Montażsiedzenia
dobrze osadzona.
5. Trudnościwpedałowaniu:
Stosowaćpodbezpośrednimnadzoremosobydorosłej.
NL
1. Montagevandevoorwielen
Bevestig het asdeksel (1) aan de voorkant (zie illustratie). Duw de vooras (2) door de
carrosserie en monteer het voorwiel (4) erop. Schuif een velg (3) op het voorwiel en zet hem
Herhaal deze procedure aan de andere kant.
2. Montagevandeachterwielen
3. Montagevanhetstuurwiel
Plaats het stuurwiel (12) op de stuurwielaansluiting (13) en druk het stuurwiel erin tot het
vastklikt.
4. Montage van de stoel
achteren totdat het stevig vastzit.
5. Moeite met trappen:
Verwijder de bouten aan beide zijden en draai de rode plaatjes naar links om de ketting weer
dat de platen op beide kanten zijn evenveel gedraaid. Draai vervolgens de schroeven weer
vast.
Gebruikonderdirecttoezichtvaneenvolwassene.
Het besturen van het model vereist een bepaald minimum aan vaardigheden en
voorzorgsmaatregelen. Daarom is het nodig voor het gebruik van het model kennis met
zijn met de functies en het stuursysteem te nemen. Het model wordt door zijn hoge eigen
gewicht gekenmerkt. Dit kenmerk verhoogt het risico op schade en letsel bij verloren
controle. Vermijd elke, opzettelijke of onopzettelijke botsing of aanrijding tegen
voorwerpen of enige vorm van het in gevaar brengen van andere personen.
SK
1. Zostava predného kolesa
2. Montážzadnýchkolies
3. Montážvolantu
svoje miesto.
4. Montážsedadla
nezaistí.
5. Obtiažnosťšliapania:
Používajtepodpriamymdohľadomdospelejosoby.

Kopie und Nachdruck, auch auszugsweise, nur mit Genehmigung von JAMARA e.K.
Copying or reproduction in whole or part, only with the expressed permission of JAMARA e.K.
JAMARA e.K.
Inh. Manuel Natterer
Am Lauerbühl 5 - DE-88317 Aichstetten
Tel. +49 (0) 75 65/94 12-0 - Fax +49 (0) 75 65/94 12-23
[email protected] ●www.jamara.com
Service - Tel. +49 (0) 75 65/94 12-777
service@ jamara.com
Reitter Modellbau Versand
Patricia Reitter
Degerfeldstrasse 11
Mail [email protected]
Web www.modellbauversand.de
Modellbau Zentral
Peter Hofer
Bresteneggstrasse 2
Mail [email protected]
Web www.modellbau-zentral.ch
PenTec s.r.o.
Distributor Jamara for Czech Republic and Slovakia
Mail servis@topdrony.cz
Web www.topdrony.cz
Viva-net d.o.o.
Distributor Jamara for Croatia
Mail [email protected]
Web www.viva-net.hr
Nettrade Kft.
Distributor Jamara for Hungary
Mail [email protected]
Janus Trade D.O.O.
Distributor Jamara for Slovenia
Mail [email protected]
Web www.janustrade.si
DE
SI
JAMARA e.K.
Manuel Natterer
Mail [email protected]
Web www.jamara.com EU
CH CZ
HR
HU
DE - Servicehändler
GB - Service centre
FR - Revendeur de service
IT - Centro assistenza
ES - Servicio asistencia
CZ-Servisnícentrum
PL-Partnerserwisowy
NL - Servicepartner
SK - Servisný partner
-
 1
1
-
 2
2
-
 3
3
-
 4
4
-
 5
5
-
 6
6
-
 7
7
-
 8
8


in altre lingue
- français: Jamara 460795 Mode d'emploi
- español: Jamara 460795 Instrucciones de operación
- Deutsch: Jamara 460795 Bedienungsanleitung
- Nederlands: Jamara 460795 Handleiding
- slovenčina: Jamara 460795 Návod na používanie
- polski: Jamara 460795 Instrukcja obsługi
Documenti correlati
-
Jamara 460203 Istruzioni per l'uso
-
Jamara 460361 Istruzioni per l'uso
-
Jamara Mercedes-Benz Antos Feuerwehr Polizei Manuale del proprietario
-
-
-
-
-
Jamara 460288 Istruzioni per l'uso
-
Jamara 460587 Manuale utente
-