
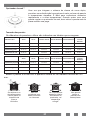
BUILT-IN COOKTOP
USER MANUAL
GB
Gas and electric cooktop

2
Dear User,
Our objective is to make this product provide you with the best output
which is manufactured in our modern facilities in a careful working
environment, in compliance with total quality concept.
Therefore, we suggest you to read the user manual carefully before using
the product and, keep it permanently at your disposal.
Note: This user manual is prepared for more than one model. Some of
the features specied in the Manual may not be available in your appliance.
All our appliances are only for domestic use, not for commercial use.
Products marked with (*) are optional.
By placing the mark on this product, we are conrming compliance
to all relavant European safety, health and evironmental requirements
which are applicable in legislation for this product.
“Conforms with the WEEE Regulations.”

3
Contens
Important warnings 4
Electrical connection 13
Gas connection 14
Introduction of the appliance 17
Technical features 18
Installation of cooktop 20
Counter cutting sizes 23
Control panel 24
Usage of your cooktop 25
Maintenance and cleaning 28
Troubleshooting 29
Handling rules 30
Environmentally-friendly disposal 30
Package information 30

4
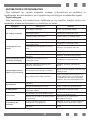
IMPORTANT WARNINGS
1. Installation and repair should always be performed
by “AUTHORIZED SERVICE”. Manufacturer shall not be
held responsible for operations performed by unauthorized
persons.
2. Please read this operating instructions carefully.
Only by this way you can use the appliance safely and
in a correct manner.
3. The cooker should be used according to operating
instructions.
4. Keep children below the age of 8 and pets away
when operating.
5. WARNING: Fire hazard; do not store the materials on
the cooking surface.
6. WARNING: The appliance and its accessible parts are
hot during operation.
7. Setting conditions of this device are specied on
the label. (Or on the data plate)
8. The accessible parts may be hot when the grill is
used. Small children should be kept away.
9. WARNING: This appliance is intended for cooking. It
should not be used for other purposes like heating a room.
10. To clean the appliance, do not use steam cleaners.
11. NEVER try to put out the re with water. Only shut
down the device circuit and then cover the ame with
a cover or a re blanket.

5
12. Children under 8 years of age should be kept away,
if they cannot be monitored continuously.
13. Touching the heating elements should be avoided.
14. CAUTION: Cooking process shall be supervised.
Cooking process shall always be supervised.
15. The appliance is not suitable for use with an external
timer or a separate remote control system.
16. This device can be used by children over 8 years of
age, people with physical, hearing or mental challenges
or people with lack of experience or knowledge; as long
as control is ensured or information is provided regarding
the dangers.
17. This device has been designed for household use
only.
18. Children must not play with the appliance. Cleaning
or user maintenance of the appliance shall not be
performed by children unless they are older than 8
years and supervised by adults.
19. Keep the appliance and its power cord away from
children less than 8 years old.
20. Put curtains, tulles, paper or any flammable
(ignitable) material away from the appliance before
starting to use the appliance. Do not put ignitable or
ammable materials on or in the appliance.
21. Keep the ventilation channels open.
22. Do not heat closed cans and glass jars. The pressure
may lead jars to explode.

6
23. Do not use the product in states like medicated
and/or under inuence of alcohol which may affect your
ability of judgement.
24. After each use, check if the unit is turned off.
25. Be careful when using alcohol in your foods. Alcohol
will evaporate at high temperatures and may catch re
to cause a re if it comes in contact with hot surfaces.
26. If the appliance is faulty or has a visible damage,
do not operate the appliance.
27. Do not put objects that children may reach on the
appliance.
28. The packaging materials are dangerous for children.
Keep packaging materials away from the reach of
children.
29. Cooker supply can be disconnected during any
construction work at home. After completing the work,
re-connecting the cooker shall be done by authorized
service.
30. Do not place metal utensils such as knife, fork,
spoon on the surface of the appliance, since they will
get hot.
31. To prevent overheating, the appliance should not
be installed behind of a decorative cover.
32. Turn off the appliance before removing the
safeguards. After cleaning, install the safeguards
according to instructions.

7
33. Cable xing point shall be protected.
34. CAUTION: If the glass of the stove is broken, turn
off any heating element immediately and disconnect the
appliance from power source, do not touch the surface of
the appliance and do not use the appliance.
35. User should not handle the cooker by himself.
36.Use shall be careful when cleaning gas burners. It
may cause personal injuries.
37. Since the hob is hot during cooking or right after
cooking, scalding may occur due to extreme temperature
and steam.
38. When not turning of the cooker during cooking,
user can touch hot surfaces causing burns.
39. If heavier loads are places on the cooker, these
loads can trip over. It may cause personal injuries.
40. Allow disconnection of the appliance after installation,
by accessible plug or a switch in the xed wiring,
unless.

8
Electrical Safety
1. Plug the appliance in a grounded socket protected by
a fuse conforming to the values specied in the technical
specications chart.
2. Have an authorized electrician set grounding
equipment. Our company shall not be responsible for
the damages that shall be incurred due to using the
product without grounding according to local regulations.
3. WARNING: If the surface is cracked, turn off the
appliance to avoid risk of electric shock.
4. Never wash the appliance by spraying or pouring
water on it. There is a risk of electrocution.
5. Do not touch the plug with wet hands. Do not pull
the cord to plug off, always hold the plug.
6. Unplug the unit during installation, maintenance,
cleaning and repair.
7. Make sure the plug is inserted rmly into wall socket
to avoid sparks.
8. If the power supply cord (the cord with plug) is
damaged, this cord shall be replaced by the manufacturer
or its service agent or an equally qualied personnel to
prevent a hazardous situation.
9. Do not use cut or damaged cords or extension cords
other than the original cord.
10. Do not use steam cleaners for cleaning the appliance,
otherwise electric shock may occur.

9
11. Make sure there is no liquid or humidity in the
outlet where the product plug is installed.
12. An omnipolar switch capable to disconnect power
supply is required for installation. Disconnection from
power supply shall be provided with a switch or an
integrated fuse installed on xed power supply according
to building code.
13. The power supply cord (the cord with plug) shall
not contact the hot parts of the appliance.
14. Unplug the unit during installation, maintenance,
cleaning and repair.
15. Appliance is equipped with a type ‘’Y’’ cord cable.
16. The circuit breaker switches of the cooker shall
be placed so that end user can reach them when the
cooker is installed.
17. Fixed connections shall be connected to a
power supply enabling omnipolar disconnection.
For appliances with over voltage category below III,
disconnection device shall be connected to xed power
supply according to wiring code.
18. Do not remove ignition switches from the appliance.
Otherwise, live electric cables can be accessed. It may
cause an electric shock.

10
Gas Safety
1. This appliance is not connected to burning products
evacuation apparatus. This appliance must be connected
and installed according to the installation regulations
in force. Conditions regarding ventilation must be
considered.
2. When a gas cooking appliance is used; humidity,
heat and burning products are generated in the room.
First of all, make sure the kitchen is well ventilated
when operating the appliance and maintain natural
ventilation openings or install a mechanical ventilation
equipment.
3. After using the appliance heavily for en extended
period of time, additional ventilation may be required.
For example open a window or adjust a higher speed for
mechanical ventilation, if any.
4. This appliance must be used only in well ventilated
locations in accordance with the regulations in force.
Please read the manual before installing or using this
product.
5. Before positioning the appliance, make sure local
network conditions (gas type and gas pressure) meets
appliance requirements.
6. The mechanism cannot be run for longer than 15
seconds. If the burner is not on after 15 seconds, stop
the mechanism and wait for at least one minute before
trying to ignite the burner again.

11
7. All kinds of operations to be performed on gas
installation must be performed by authorized and
competent people.
8. This appliance is adjusted for natural gas (NG). If
you have to use your product with a different gas type,
you have to apply to authorized service for the conversion.
9. For proper operation, hood, gas pipe and clamp
should be replaced periodically accordint to manufacturer
recommendations and when required.
10. Gas should burn well in gas products. Well
burning gas can be understood from blue ame and
continuous burning. If gas does not burn sufciently,
carbon monoxide (CO) can be generated. Carbon monoxide
is a colourless, odourless and very toxic gas; even small
amounts have lethal effect.
11. Ask your local gas supplies about the phone
numbers for emergencies related to gas and the
measures to be taken upon gas odour is detected.

12
What To Do When Gas Odour Is Detected
1. Do not use naked ame, and do not smoke.
2. Do not operate any electrical switch.
(For example: lamp switch or doorbell)
3. Do not use telephone or mobile phone.
4. Open the doors and windows.
5. Close all valves on the appliances that utilize gas
and the gas counters.
6. Check all hoses and their connections against
leaks. If you still smell gas, leave the house and warn
your neighbours.
7. Call re brigade from a telephone outside the home.
8. Do not enter into the house until authorities clarify
it is safe.
Intended Use
1. This product is designed for home use. Commercial
use of the appliance is not permitted.
2. This appliance may only be used for cooking
purposes. It shall not be used for other purposes like
heating a room.
3. The manufacturer assumes no responsibility for any
damage due to misuse or mishandling.
4. Operational life of the product you have purchased
is 10 years. This is the period for which the spare parts
required for the operation of this product as dened is
provided by the manufacturer.

13
Electrical Connection
1. Setting conditions of this appliance is indicated in tag or data plate.
2. Your appliance should be plugged in a fuse appropriate for electric
power. If necessary, it is recommended that installation is done by
authorized service.
3. Your appliance is congured in accordance with electrical supply of
220-240V 50/60Hz.
4. If main electrical network is different from these values, contact with
your authorized service.
5. Electrical connections of your appliance should only be made to the
fuses having suitably wired grounding (grounded) system. If no convenient
fuse is available in the place where your appliance is to be installed,
contact with authorized service immediately. Manufacturing rm is not
responsible denitely for the damages that fuses whose grounding is not
made and connected to the appliance can cause.
6. Plug of the appliance should be close to be accessed easily to the
fuse whose grounding is made without use of extension cord.
7. Do not allow contacting the power cable of your appliance with hot
regions. Similarly, keep away it from sharp edges and corners.
8. If feeder cord is damaged, this cord should be replaced either by
manufacturer or its service agency or same degree qualied personnel in
order to hinder a dangerous situation.
9. Wrong electrical connection may give damage to the appliance.In
this case, your appliance will remain out of guarantee scope. Electrical
connection of your appliance should be done by authorized service.
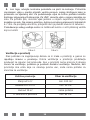
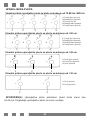
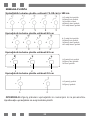
Electrical connection scheme
Get electrical connection of your appliance done to authorized person in
line with the following scheme.
L1
220-240 V ~ 50/60 Hz
H05 VV-F 3G 1.5 mm²
Earth
Terre
Erdung
Neutral
Neutre

14
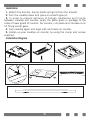
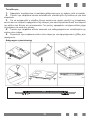
Gas Connection
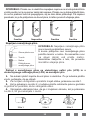
WARNING: Before starting any work related with gas installation, turn off
gas supply. Risk of explosion.
1. Connect your appliance to gas cock from the shortest way and in a
manner to prevent any leakage. For safety, the hose used should be maximum
125 cm and minimum 40 cm.
2. While making gas leakage control; never use lighter, match, glowing
cigarette or similar inammable matter.
3. Apply soap bubble on connection point. If any leak/leakage exists,
foaming will occur on soaped region.
4. If the cooktop is to be mounted on a cabinet or openable drawer, a
heat protection panel having 15 mm minimum opening should be mounted
under the cooktop.
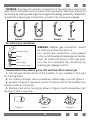
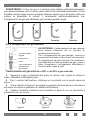
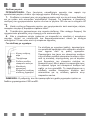
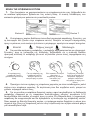
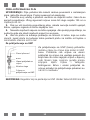
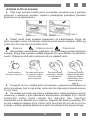
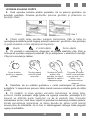
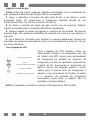
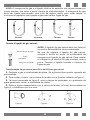
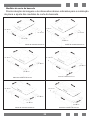
For LPG connection;
For LPG (cylinder) connection, afx metal
clamp on the hose coming from LPG
cylinder. Afx an edge of the hose on hose
inlet connector behind the appliance by
pushing to end through heating the hose
in boiled water. Afterward, bring the clamp
towards end section of the hose and tighten
it with screwdriver. The gasket and hose inlet
connector required for connection is as the
picture shown below.
NOTE: The regulator to be afxed on LPG cylinder should have 300
mmSS feature.
Main gas pipe
Gasket
Hose inlet connector
Metal clamp
Lpg connection hose

15
WARNING: Gas hose and electric connection of the appliance should not
pass next to hot areas such as back of the appliance. Gas hose should be
connected by making wide angle turns against breaking possibility. Movement
of appliance whose gas connection is made may cause gas leakage.
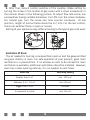
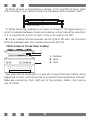
For natural gas connection;
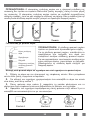
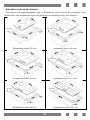
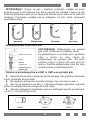
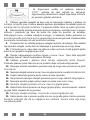
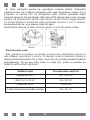
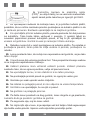
Transformation from natural gas to LPG and from LPG to natural gas
1. Turn off gas and electricity of the cooktop. If your cooktop is hot, wait
for cooling down.
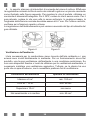
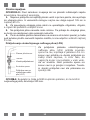
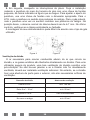
2. For injector change, use a screwdriver whose edge is as the gure 1.
3. As seen in gure 2, demount burner lid and burner of the cooktop and
ensure visibility of injector.
4. Remove injector by turning as shown in gure 3 with screwdriver and
replace it with a new one.
Correct Incorrect Correct Correct
Main gas pipe
Gasket
Nut
Natural gas
Connection hose
WARNING: Natural gas connection should
be done by authorized service.
For natural gas connection, place gasket
in the nut at the edge of natural gas connection
hose. To install the hose on main gas pipe,
turn the nut. Complete the connection by
making gas leakage control.
Figure 1
Figure 2
Figure 3

16
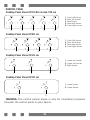
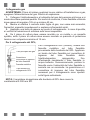
5. After that, detach control switches of the cooktop. Make setting by
turning the screw in the middle of gas cocks with a small screwdriver in
the manner shown in the following picture. To adjust ow rate screw, use
a screwdriver having suitable dimension. For LPG, turn the screw clockwise.
For natural gas, turn the screw one time counter clockwise. At low
position, length of normal ame should be 6-7 mm. For the last control,
check out whether ame is open or closed.
Setting of your appliance may differ according to the type of gas cock used.
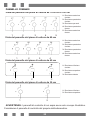
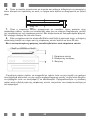
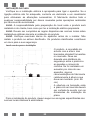
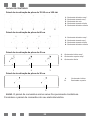
Ventilation Of Room
The air needed for burning is received from room air and the gases emitted
are given directly in room. For safe operation of your product, good room
ventilation is a precondition. If no window or room to be utilized for room
ventilation is available, additional ventilation should be installed. However,
room has a door opening outside, it is no needed to vent holes.
Room size Ventilating opening
Smaller than 5 m³ min. 100 cm²
Between 5 m³ - 10 m³ min. 50 cm²
Bigger than 10 m³ no need
In basement or cellar min. 65 cm²
Figure 4 Figure 5

17
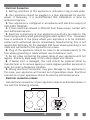
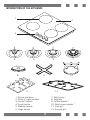
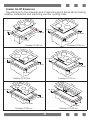
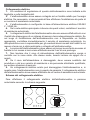
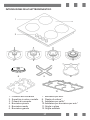
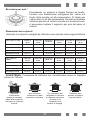
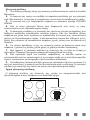
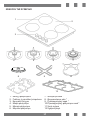
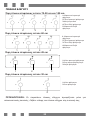
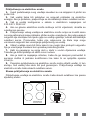
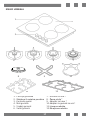
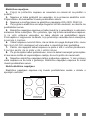
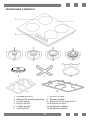
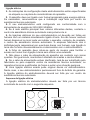
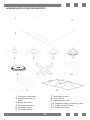
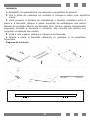
INTRODUCTION OF THE APPLIANCE
1
2
3
8
4 5 6 7
12
11
9 10
1. Burner positions
2. Glass or metal surface
3. Control buttons
4. Small burner
5. Medium burner
6. Large burner
7. Wok burner *
8. Hotplate *
9. Coffee adaptor *
10. Wok burner adaptor *
11. Cast grill
12. Enamel grill

18
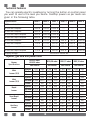
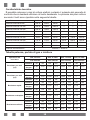
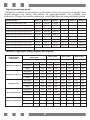
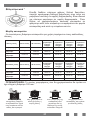
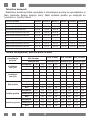
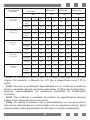
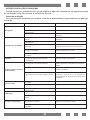
Technical Features
You can operate electric cooktops by turning the button on control panel
you want to use to the level you desire. Cooktop powers as per levels are
given in the following table.
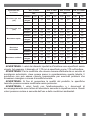
Specications Level 1 Level 2 Level 3 Level 4 Level 5 Level 6
Ø80 mm hotplate 200 W 250 W 450 W --- --- ---
Ø145 mm hotplate 250 W 750 W 1000 W --- --- ---
Ø180 mm hotplate 500 W 750 W 1500 W --- --- ---
Ø145 mm rapid hotplate 500 W 1000 W 1500 W --- --- ---
Ø180 mm rapid hotplate 850 W 1150 W 2000 W --- --- ---
Ø145 mm hotplate 95 W 155 W 250 W 400 W 750 W 1000 W
Ø180 mm hotplate 115 W 175 W 250 W 600 W 850 W 1500 W
Ø145 mm rapid hotplate 135 W 165 W 250 W 500 W 750 W 1500 W
Ø180 mm rapid hotplate 175 W 220 W 300 W 850 W 1150 W 2000 W
Supply voltage 220-240 V 50/60 Hz.
Injector, gas ow and power table
Burner
Specications
G20,20 mbar
G25,25 mbar
G20,25 mbar G20,13 mbar G20,10 mbar
Gas natural Gas natural Gas natural Gas natural
Wok
burner (3,5)
Injector 1,40 mm 1,28 mm 1,60 mm 1,68 mm
Gas ow 0,333 m³/h 0,333 m³/h 0,333 m³/h 0,333 m³/h
Power 3,50 kW 3,50 kW 3,50 kW 3,50 kW
Wok
burner (2,5)
Injector 1,15 mm 1,06 mm 1,35 mm --- mm
Gas ow 0,243 m³/h 0,243 m³/h 0,243 m³/h --- m³/h
Power 2,50 kW 2,50 kW 2,50 kW --- kW
Rapid
burner
Injector 1,15 mm 1,10 mm 1,45 mm 1,55 mm
Gas ow 0,276 m³/h 0,276 m³/h 0,276 m³/h 0,318 m³/h
Power 2,90 kW 2,90 kW 2,90 kW 3,33 kW
Semi-Rapid
burner
Injector 0,97 mm 0,92 mm 1,10 mm 1,18 mm
Gas ow 0,162 m³/h 0,162 m³/h 0,162 m³/h 0,185 m³/h
Power 1,70 kW 1,70 kW 1,70 kW 1,95 kW
Auxiliary
burner
Injector 0,72 mm 0,70 mm 0,85 mm 0,90 mm
Gas ow 0,96 m³/h 0,96 m³/h 0,96 m³/h 0,105 m³/h
Power 0,95 kW 0,95 kW 0,95 kW 1,10 kW

19
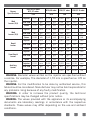
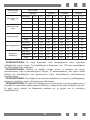
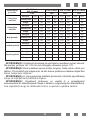
Burner
Specications
G30,28-30 mbar
G31,37 mbar
G30,50 mbar G30,37 mbar G30,27.5 mbar
LPG LPG LPG LPG
Wok
burner (3,5)
Injector 0,96 mm 0,76 mm 0,96 mm 0,96 mm
Gas ow 254 g/h 254 g/h 254 g/h 254 g/h
Power 3,50 kW 3,50 kW 3,50 kW 3,50 kW
Wok
burner (2,5)
Injector 0,82 mm 0,73 mm 0,78 mm --- mm
Gas ow 182 g/h 182 g/h 182 g/h --- g/h
Power 2,50 kW 2,50 kW 2,50 kW --- kW
Rapid
burner
Injector 0,85 mm 0,75 mm 0,85 mm 0,85 mm
Gas ow 211 g/h 211 g/h 211 g/h 201 g/h
Power 2,90 kW 2,90 kW 2,90 kW 2,77 kW
Semi-Rapid
burner
Injector 0,65 mm 0,60 mm 0,65 mm 0,65 mm
Gas ow 124 g/h 124 g/h 124 g/h 110,5 g/h
Power 1,70 kW 1,70 kW 1,70 kW 1,50 kW
Auxiliary
burner
Injector 0,50 mm 0,43 mm 0,50 mm 0,50 mm
Gas ow 69 g/h 69 g/h 69 g/h 66,9 g/h
Power 0,95 kW 0,95 kW 0,95 kW 0,92 kW
WARNING: Diameter values written on the injector are specied without
a comma. For example; The diameter of 1,70 mm is specied as 170 on
the injector.
WARNING: For the modication to be done by authorized service, this
table should be considered. Manufacturer may not be held responsible for
any problems rising because of any faulty modication.
WARNING: In order to increase the product quality, the technical
specications may be changed without prior notice.
WARNING: The values provided with the appliance or its accompanying
documents are laboratory readings in accordance with the respective
standards. These values may differ depending on the use and ambient
conditions.

20
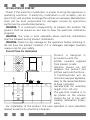
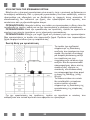
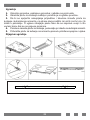
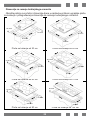
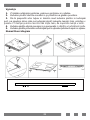
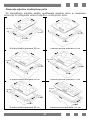
INSTALLATION OF COOKTOP
Check if the electrical installation is proper to bring the appliance in
operating condition. If electricity installation is not suitable, call an
electrician and plumber to arrange the utilities as necessary. Manufacturer
shall not be held responsible for damages caused by operations
performed by unauthorized persons.
WARNING: It is customer’s responsibility to prepare the location the
product shall be placed on and also to have the electrical installation
prepared.
WARNING: The rules in local standards about electrical installations
shall be followed during product installation.
WARNING: Check for any damage on the appliance before installing it.
Do not have the product installed if it is damaged. Damaged products
cause a risk for your safety.
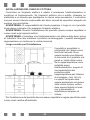
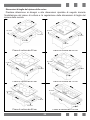
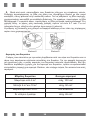
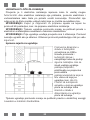
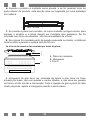
Correct Place For Installation
Product is designed in
accordance with the
kitchen counters supplied
from market. A safe
distance should be left
between the product and
kitchen walls and furniture.
If hood/aspirator will be
installed over your appliance,
obey to the recommendation
of hood / aspirator
manufacturer for assembly
height. (min. 65 cm)
The gap that cooktop is to
be placed on the counter
should be cut in line with
cooktop installation dimen-
sions.
For installation of the product, the rules specied in local standards
related to electricity should be complied.
650 mm min.
La pagina si sta caricando...
La pagina si sta caricando...
La pagina si sta caricando...
La pagina si sta caricando...
La pagina si sta caricando...
La pagina si sta caricando...
La pagina si sta caricando...
La pagina si sta caricando...
La pagina si sta caricando...
La pagina si sta caricando...
La pagina si sta caricando...
La pagina si sta caricando...
La pagina si sta caricando...
La pagina si sta caricando...
La pagina si sta caricando...
La pagina si sta caricando...
La pagina si sta caricando...
La pagina si sta caricando...
La pagina si sta caricando...
La pagina si sta caricando...
La pagina si sta caricando...
La pagina si sta caricando...
La pagina si sta caricando...
La pagina si sta caricando...
La pagina si sta caricando...
La pagina si sta caricando...
La pagina si sta caricando...
La pagina si sta caricando...
La pagina si sta caricando...
La pagina si sta caricando...
La pagina si sta caricando...
La pagina si sta caricando...
La pagina si sta caricando...
La pagina si sta caricando...
La pagina si sta caricando...
La pagina si sta caricando...
La pagina si sta caricando...
La pagina si sta caricando...
La pagina si sta caricando...
La pagina si sta caricando...
La pagina si sta caricando...
La pagina si sta caricando...
La pagina si sta caricando...
La pagina si sta caricando...
La pagina si sta caricando...
La pagina si sta caricando...
La pagina si sta caricando...
La pagina si sta caricando...
La pagina si sta caricando...
La pagina si sta caricando...
La pagina si sta caricando...
La pagina si sta caricando...
La pagina si sta caricando...
La pagina si sta caricando...
La pagina si sta caricando...
La pagina si sta caricando...
La pagina si sta caricando...
La pagina si sta caricando...
La pagina si sta caricando...
La pagina si sta caricando...
La pagina si sta caricando...
La pagina si sta caricando...
La pagina si sta caricando...
La pagina si sta caricando...
La pagina si sta caricando...
La pagina si sta caricando...
La pagina si sta caricando...
La pagina si sta caricando...
La pagina si sta caricando...
La pagina si sta caricando...
La pagina si sta caricando...
La pagina si sta caricando...
La pagina si sta caricando...
La pagina si sta caricando...
La pagina si sta caricando...
La pagina si sta caricando...
La pagina si sta caricando...
La pagina si sta caricando...
La pagina si sta caricando...
La pagina si sta caricando...
La pagina si sta caricando...
La pagina si sta caricando...
La pagina si sta caricando...
La pagina si sta caricando...
La pagina si sta caricando...
La pagina si sta caricando...
La pagina si sta caricando...
La pagina si sta caricando...
La pagina si sta caricando...
La pagina si sta caricando...
La pagina si sta caricando...
La pagina si sta caricando...
La pagina si sta caricando...
La pagina si sta caricando...
La pagina si sta caricando...
La pagina si sta caricando...
La pagina si sta caricando...
La pagina si sta caricando...
La pagina si sta caricando...
La pagina si sta caricando...
La pagina si sta caricando...
La pagina si sta caricando...
La pagina si sta caricando...
La pagina si sta caricando...
La pagina si sta caricando...
La pagina si sta caricando...
La pagina si sta caricando...
La pagina si sta caricando...
La pagina si sta caricando...
La pagina si sta caricando...
La pagina si sta caricando...
La pagina si sta caricando...
La pagina si sta caricando...
La pagina si sta caricando...
La pagina si sta caricando...
La pagina si sta caricando...
La pagina si sta caricando...
La pagina si sta caricando...
La pagina si sta caricando...
La pagina si sta caricando...
La pagina si sta caricando...
La pagina si sta caricando...
La pagina si sta caricando...
La pagina si sta caricando...
La pagina si sta caricando...
La pagina si sta caricando...
La pagina si sta caricando...
La pagina si sta caricando...
La pagina si sta caricando...
La pagina si sta caricando...
La pagina si sta caricando...
La pagina si sta caricando...
La pagina si sta caricando...
La pagina si sta caricando...
La pagina si sta caricando...
La pagina si sta caricando...
La pagina si sta caricando...
La pagina si sta caricando...
La pagina si sta caricando...
La pagina si sta caricando...
La pagina si sta caricando...
La pagina si sta caricando...
La pagina si sta caricando...
La pagina si sta caricando...
La pagina si sta caricando...
La pagina si sta caricando...
La pagina si sta caricando...
La pagina si sta caricando...
La pagina si sta caricando...
La pagina si sta caricando...
La pagina si sta caricando...
La pagina si sta caricando...
La pagina si sta caricando...
La pagina si sta caricando...
La pagina si sta caricando...
La pagina si sta caricando...
La pagina si sta caricando...
La pagina si sta caricando...
La pagina si sta caricando...
La pagina si sta caricando...
-
 1
1
-
 2
2
-
 3
3
-
 4
4
-
 5
5
-
 6
6
-
 7
7
-
 8
8
-
 9
9
-
 10
10
-
 11
11
-
 12
12
-
 13
13
-
 14
14
-
 15
15
-
 16
16
-
 17
17
-
 18
18
-
 19
19
-
 20
20
-
 21
21
-
 22
22
-
 23
23
-
 24
24
-
 25
25
-
 26
26
-
 27
27
-
 28
28
-
 29
29
-
 30
30
-
 31
31
-
 32
32
-
 33
33
-
 34
34
-
 35
35
-
 36
36
-
 37
37
-
 38
38
-
 39
39
-
 40
40
-
 41
41
-
 42
42
-
 43
43
-
 44
44
-
 45
45
-
 46
46
-
 47
47
-
 48
48
-
 49
49
-
 50
50
-
 51
51
-
 52
52
-
 53
53
-
 54
54
-
 55
55
-
 56
56
-
 57
57
-
 58
58
-
 59
59
-
 60
60
-
 61
61
-
 62
62
-
 63
63
-
 64
64
-
 65
65
-
 66
66
-
 67
67
-
 68
68
-
 69
69
-
 70
70
-
 71
71
-
 72
72
-
 73
73
-
 74
74
-
 75
75
-
 76
76
-
 77
77
-
 78
78
-
 79
79
-
 80
80
-
 81
81
-
 82
82
-
 83
83
-
 84
84
-
 85
85
-
 86
86
-
 87
87
-
 88
88
-
 89
89
-
 90
90
-
 91
91
-
 92
92
-
 93
93
-
 94
94
-
 95
95
-
 96
96
-
 97
97
-
 98
98
-
 99
99
-
 100
100
-
 101
101
-
 102
102
-
 103
103
-
 104
104
-
 105
105
-
 106
106
-
 107
107
-
 108
108
-
 109
109
-
 110
110
-
 111
111
-
 112
112
-
 113
113
-
 114
114
-
 115
115
-
 116
116
-
 117
117
-
 118
118
-
 119
119
-
 120
120
-
 121
121
-
 122
122
-
 123
123
-
 124
124
-
 125
125
-
 126
126
-
 127
127
-
 128
128
-
 129
129
-
 130
130
-
 131
131
-
 132
132
-
 133
133
-
 134
134
-
 135
135
-
 136
136
-
 137
137
-
 138
138
-
 139
139
-
 140
140
-
 141
141
-
 142
142
-
 143
143
-
 144
144
-
 145
145
-
 146
146
-
 147
147
-
 148
148
-
 149
149
-
 150
150
-
 151
151
-
 152
152
-
 153
153
-
 154
154
-
 155
155
-
 156
156
-
 157
157
-
 158
158
-
 159
159
-
 160
160
-
 161
161
-
 162
162
-
 163
163
-
 164
164
-
 165
165
-
 166
166
-
 167
167
-
 168
168
-
 169
169
-
 170
170
-
 171
171
-
 172
172
-
 173
173
-
 174
174
-
 175
175
-
 176
176
-
 177
177
-
 178
178
-
 179
179
-
 180
180


ROSIERES CMG3H1X Manuale utente
- Tipo
- Manuale utente
Documenti correlati
Altri documenti
-
Candy CHG93WX/1 Manuale utente
-
-
Hoover HGT 765 XGH Manuale utente
-
Whirlpool A9GG1FC (X)/EX.1 Guida utente
-
CDA HCC360SS Scheda dati
-
CONTINENTAL EDISON CECM6065S Manuale utente
-
Candy MULTIPURPOSE BUILT-IN HOBS Manuale utente
-
Scholtes PPF 73 G Operating Instructions Manual
-
-
OK OSP 113 Manuale utente