
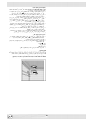
I95T1C(X)EX
Cooker with gas oven and gas grill
Instructions for installation and use
GB
BIM951EGSS
ARAR

2
IMPORTANT
1
.This owner’s manual is for a class 1 appliance (installed
independently) or class 2 - sub-class 1 appliances (installed
between two cabinets).
2.
This appliance is intended for non-professional use within
the home.
3.
These instructions are only for those countries whose symbols
appear in the booklet and on the matriculation plate of the
appliance.
4.
Before using your appliance, read the instructions in this
owner’s manual carefully since you will fi nd all the instruction
you require to ensure safe installation, use and maintenance.
Always keep this owner’s manual close to hand since you may
need to refer to it in the future.
5
.
When you have removed the packing, check that the ap-
pliance is not damaged. If you have any doubts, do not use
the appliance, contact your nearest Ariston Service Centre.
Never leave the packing components (plastic bags, foamed
polystyrene, nails, etc.) within the reach of children since they
are a source of potential danger.
6.
The appliance must be installed only by a qualifi ed person in
compliance with the instructions provided. The manufacturer
declines all responsibility for improper installation which may
harm persons and animals and damage property.
7.
The electrical safety of this appliance can only be guaranteed
if the cooker is correctly and effi ciently earthed, in compliance
with regulations on electrical safety. Always ensure that the
earthing is effi cient; if you have any doubts call in a qualifi ed
technician to check the system. The manufacturer declines all
responsibility for damage resulting from a system which has
not been earthed.
8.
Before plugging the appliance into the mains, check that the
specifi cations indicated on the date plate (on the appliance
and/or packaging) correspond to those of the electrical and
gas mains system of your home.
9
. Check that the electrical capacity of the system and sockets
will support the maximum power of the hob, as indicated on
the data plate. If you have any doubts, call in a qualifi ed te-
chnician.
10.
An omnipolar switch with a contact opening of at least 3 mm
or more, is required for the installation.
11.
If the socket and hob plug are not compatible, have the soc-
ket replaced with a suitable model by a qualifi ed technician
who should also check that the cross-section of the socket
cable is suited to the power absorbed by the appliance. The
use of adaptors, multiple sockets and/or extensions, is not
recommended. If their use can not be avoided, remember
to use only single or multiple adapters and extensions which
comply with current safety regulations. In these cases, never
exceed the maximum current capacity indicated on the single
adaptor or extension and the maximum power indicated on
the multiple adapter.
12.
Do not leave the appliance plugged in if it is not in use.
Switch off the main switch and gas supply when you are not
using the cooker.
13
.
The openings and slots used for ventilation and dispersion
of heat on the rear and below the control panel must never
be covered.
14.
The user must not replace the supply cable of this appliance.
Always call an after-sales servicing centre authorised by the
manufacturer in the case of cable damage or replacement.
15.
This appliance must be used for the purpose for which it was
expressly designed. Any other use (e.g. heating rooms) is
considered to be improper and consequently dangerous. The
manufacturer declines all responsibility for damage resulting
from improper and irresponsible use.
16.
A number of fundamental rules must be followed when
using electrical appliances. The following are of particular
importance:
•
do not touch the appliance when your hands or feet are wet
•
do not use the appliance barefooted
•
do not use extensions, but if these are necessary caution must
be exercised.
•
never pull the power supply cable or the appliance to unplug
the appliance plug from the mains.
•
never leave the appliance exposed to atmospheric agents
(rain, sun etc.)
•
do not allow children or persons who are not familiar with the
appliance to use it, without supervision.
17
. Always unplug the hob from the mains or switch off the
main switch before cleaning or carrying out maintenance
operations.
18.
In the case of faults and/or faulty operation, switch of
the appliance, close the gas cock and do not tamper with
the cooker. For repairs call only an authorised after-sales
servicing centre and request the use of original spare parts
only. Failure to copmly wjth the above may compromise the
safety appliance.
19.
If you are no longer using an appliance of this type, remember
to make it unserviceable by unplugging the appliance from the
mains and cutting the supply cable. Also make all potentially
dangerous parts of the appliance, safe, above all for children
who could play with the appliance.
20.
To avoid accidental spillage do not use cookware with uneven
or deformed bottoms on the burners or on the electric plates.
Turn the handles of pots and pans inwards to avoid knocking
them over accidentally.
21.
Some parts of the appliance, in particular the hot plates,
remain heated for a long time after use. Make sure not to
touch them.
22.
Never use fl ammable liquids such as alcohol or gasoline,
etc. near the appliance when it is in use.
23.
When using small electric appliances near the hob, keep the
supply cord away from the hot parts.
24.
Make sure the knobs are in the “ ”
•
”
o
” position when the
appliance is not in use.
25.
Gas appliances require regular air exchange to ensure
trouble-free performance. When installing the cooker, follow
the instructions provided in the paragraph on “Positioning”
the appliance.
26.
Remember to keep children away from the appliance when
you use the grill or oven, since these parts become very
hot.
27.
Some of the models have a glass hob cover. This could
crack if overheated so make sure all the burners or electric
hot plates are off before closing it.
28.
Do not clean steam cleaners, the cooker must not be installed
on a stand
.
29.
Never move the cooker by means of the handle.
30.
This appliance must not be used by those with reduced
mental or motor capacities (including children), or by those
who are not experienced or know how to work it, unless
supervised or instructed on its use by safety personnel.
Children must be supervised to ensure that they do not play
with the appliance.

3
INSTRUCTIONS FOR INSTALLATION
The following instructions should be read by a qualifi ed technician
to ensure that the appliance is installed, regulated and serviced
correctly in compliance with current standards.
Important: Remember to unplug the appliance from the
mains before making adjustments or doing maintenance.
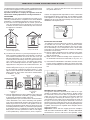
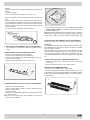
POSITIONING
Important:
This unit may be installed and used only in per-
manently ventilated rooms in compliance with current National
Regulations. The following requirements must be observed:
a)
The room must be equipped with an exhaust system that
vents the combustion fumes to the outside. It may consist of
a hood or an electric fan that automatically starts each time
the appliance is turned on.
Flue or Branched Flue System Directly to the Outside
(only for cooking appliances)
b)
The room must also have a system to permit proper air circu-
lation, needed for combustion to occur normally. The fl ow of
air needed for combustion must not be less than 2 m
3
/h per
kW of installed power. The air circulation system may take
air directly from the outside by means of a pipe with an inner
cross section of at least 100 cm
2
; the opening must not be
able to be accidentally blocked. For those appliances not
equipped with a safety device for accidental fl ame loss, the
ventilation apertures must be increased by 100%, with the
minimum being 200cm
2
(Fig. A). The system can also provide
the air needed for combustion by indirect means, i.e. from
adjacent rooms fi tted with air circulation tubes as described
above. However, these rooms must not be common rooms
or bedrooms. (Fig. B).
Detail A Adjacent Room to
Room be Ventilated
A
Examples of Ventilation Openings Increased Opening Between
Comburent Air Door and Floor
Fig. A Fig. B
c)
Intensive and prolonged use of the appliance may result in the
need for supplemental air circulation, e.g. opening windows
or increasing mechanical venting (if present).
d)
Liquifi ed petroleum gas is heavier than the air and, therefore,
settles downwards. Thus, rooms containing LPG cylinders
must also be equipped with apertures to the outside for ven-
tilation of gas in the case of leaks. LPG cylinders must not,
therefore, be installed or stored in rooms or storage areas that
are below ground level (cellars, etc.) whether they are partially
or completely full. It is a good idea to keep only the cylinder
being used in the room, positioned so that it is not subject
to heat produced by external sources (ovens, fi replaces,
stoves, etc. ) which are able to increase the temperature of
the cylinder above 50°C.
FITTING THE FEET
Cookers are equipped whith adjustable feet to be screwed into
their front and rear corners respectively. The feet allow the height
of the appliance to be adjusted, in order to set it fl ush whith the
adjoining unit, to level it whith other worktops ans to ensure even
distribution of the liquids in pans.
INSTALLING THE COOKER
The appliance can be installed next to cabinets, provided they
are not taller than the hob. If the cooker is placed in contact
with walls or the sides of adjacent cabinets, they must be capa-
ble of withstanding a rise in temperature of 50°C above room
temperature. For proper installation of the cooker, the following
precautions must be taken:
a)
Kitchen cabinets installed next to the cooker that are higher
than the top of the hob, must be at least 200 mm from the
edge of the hob itself.
b)
Hoods must be installed according to the requirements in
the installation manual for the hood and, in any case, at a
minimum height of 650 mm.
c)
If the hood is installed below a wall cabinet, the latter must be
at least 700 mm (millimetres) above the surface of the hob.
Cabinets installed adjacent to the hood must be at least 420
mm.
MAKING THE GAS CONNECTION
The appliance should be connected to the mains or to a gas
cylinder in compliance with current directives. Before making
the connection, check that the cooker is regulated for the gas
supply you are using. If not, follow the instructions indicated
in the paragraph “Converting to Different Types of Gas." On
some models the gas supply can be connected on the left or on
the right, as necessary; to change the connection, reverse the
position of the hose holder with that of the cap and replace the
gasket (supplied with the appliance). When using liquid gas from
a cylinder, install a pressure regulator which complies with the
National Regulations.
Important:
Check that the supply pressure complies
with the values indicated in table 1 “Burner and Nozzle
Char
acteristics” since this will ensure safe operation, correct

4
consumption and ensure a longer life for your appliance.
CONNECTION WITH A HOSE
Make the connection using a gas hose that complies with require-
ments set forth by the current standards. The inner diameters of
the pipe are as follows:
- 8 mm for liquid gas;
- 13 mm for methane.
When installing the hose, remember to take the following pre-
cautions:
•
No part of the hose must come into contact with parts whose
temperature exceeds 50°C;
•
The length of the hose should be less than 1500 mm;
•
The hose should not be subject to twisting or pulling, and
should not have bends or kinks;
•
The hose should not touch objects with sharp edges, corners
or moving parts, and it should not be crushed;
•
The full length of the hose should be easy to inspect in order
to check its condition.
Check that the hose fi ts fi rmly into place at the two ends and
fi x it with clamps complying with current standards. If any of the
above recommendations can not be followed, fl exible metal
pipes should be used.
If the cooker is installed in compliance with the require-
ments for class 2, subclass 1, it is highly recommended
that the gas connection be made with a fl exible metal pipe
in compliance with current safety standards.
CONNECTING A FLEXIBLE, JOINTLESS, STAINLESS
STEEL PIPE TO A THREADED ATTACHMENT
Remove the hose holder fi tted on the appliance. The gas supply
pipe fi tting is a threaded 1/2 gas cylindrical male attachment. Use
only pipes and seals that comply with
current National Regulations. The full length of the pipe when
installed must not exceed 2000 mm. After the connection has
been made, make sure that the fl exible metal pipe does not come
into contact with moveable parts and that it is not crushed.
CHECKING THE SEAL
Important:
Once the installation has been completed, check to
make sure that the seals on all the connections are tight, using
a soapy solution (never a fl ame).
CONNECTING THE POWER SUPPLY CORD TO THE
MAINS
Install a normalised plug corresponding to the load indicated on
the data plate. When connecting the cable directly to the mains,
install an omnipolar circuit-breaker with a minimum contact open-
ing of 3 mm between the appliance and the mains. The omnipolar
circuit breaker should be sized according to the load and should
comply with current regulations (the earth wire should not be
interrupted by the circuit breaker). The supply cable should be
positioned so that it does not reach a temperature of more than
50°C with respect to the room temperature, along its length.
Before making the connection, check that:
•
The limiter valve and the home system can support the ap-
pliance load (see data plate);
•
The mains are properly earthed in compliance with current
safety standards and regulations;
•
There is easy access to the socket and omnipolar circuit
breaker, once the hob has been installed.
N.B
.: Never use reducers, adaptor
s or shunts since they can
cause heating or burning.
CONVERTING THE COOKER TO DIFFERENT TYPES OF
GAS
In order to convert the cooker for use with a type of gas different
than the one for which it was factory set (indicated on the label
attached to the lid), the following steps must be taken:
A)
REPLACE THE HOSE HOLDER
•
Replace the hose holder mounted on the appliance with that
supplied in the bag of “cooker accessories.”
Important: The hose holder for liquid gas is marked 8, the hose
holder for methane is marked 13. In any case, always use a
new sealing gasket.
B
)
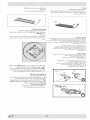
REPLACING THE BURNER NOZZLES ON THE HOB
•
Remove the grids, the burner caps (A) and the burner
bodies (B).
•
Unscrew and remove the nozzles in the bottom of each
nozzles holder (C), using a 7 mm socket wrench.
•
Replace the nozzles in accordance with table 1
“Specifi cations of burners and nozzles”), tighten and screw
right down.Check that the system is gas-tight.
•
Replace the burners, the burner caps and the grids.
A
B
C
C)
SETTING HOB BURNER MINIMUM LEVELS
If the cooker is to work on bottled gas (butane/propane), the
tap by-pass must be screwed right down.The cooker may be
equipped with type A taps, with by-pass inside (accessed by
inserting a small screwdriver into the rod) or type B taps, with
by-pass on the outside on the right (accessed directly). See
fi gure 9.
If the cooker is to work on natural gas, proceed as follows for
both types of tap:
- Ignite the burner at maximum fl ame;
- pull off the knob, without using a lever against the control panel,
which might be damaged;
- access the by-pass with a small screwdriver and back off by
about 3 turns (turning the screwdriver anti-clockwise);
- turn the tap rod anti-clockwise again until it stops: the burner
will be at maximum fl ame;
- screw the by-pass slowly back in, without pushing the screw-
driver, until the fl ame has apparently shrunk to 1/4 of the
maximum size, checking that it is suffi ciently stable even in
quite strong draughts.
9
A
A
B
B
B
D
)
SETTING OVEN BURNER MINIMUM LEVELS
If the cooker is to work on bottled gas (butane/propane), the
thermostat by-pass must be screwed right down.
If the cooker is to work on natural gas, proceed as follows:
- Remove the oven bottom (loosen the screw to remove the

5
bottom);
- ignite the oven burner, turning the knob pointer to the maximum
setting;
- shut the oven door;
- access the thermostat or tap by-pass (see fi g. 10);
- back off the thermostat by-pass by about 3 turns;
- after 5 or 6 minutes, turn the knob pointer to the minimum set-
ting;
- slowly re-tighten the by-pass, watching the fl ame decrease
in size through the window in the closed oven door until the
tongue of the fl ame is about 4 mm long. Never keep the fl ame
too low. It must be stable even when the oven door is opened
or closed quickly;
- turn off the burner and replace the oven bottom.
10
BY PASS
BY PASS
E
)
REGULATING THE PRIMARY AIR OF THE BURNERS
The primary air of the burners does not need to be regu-
lated.
F
) REPLACING THE OVEN BURNER INJECTOR
•
Loose the screw securing the oven bottom;
•
remove the oven bottom (push back and raise);
•
remove the oven burner, after taking out its fi xing screw (a) ;
•
remove the oven burner;
• replace the injector using a 7 mm socket wrench.
a
a
G
) MINIMUM REGULATION OF THE GAS OVEN BURNER
•
light the burner as described in the paragraph “the oven
knob”of the instruction booklet.
•
turn the knob to Max for about 10 minutes and then turn the
knob to the Min setting;
•
remove the knob;
•
regulate the screw positioned outside the tap pin until the fl ame
is small but steady.
N.B.
: in the case of liquid gas, the regulation screw must be
screwed in to the bottom.
•
check that the burner does not turn off
when you turn the
knob from Max to Min
and and when you open and close
the oven door quickly.
Note:
When disassembling the oven burner it is not necessary to
disconnect the support which fi xes the ignition plug (if present)
to the burner , being careful not to fold the thermocouple and
ignition plug connection (if present).
H
) REGULATING THE PRIMARY AIR OF THE BURNERS
The primary air of the burners does not need to be regulated.
Important
On completion of this operation, replace the old rating sticker with
one indicating the new type of gas used. This sticker is available
from our Service Centres.
Note.Should the pressure of the gas used be different (or vary)
from the recommended pressure, it is necessary to fi t a suitable
pressure regulator onto the inlet pipe in compliance with cur-
rent National Regulations relative to “regulators for channelled
gas”.
I
) REPLACING THE GRILL BURNER GAS INJECTOR
•
Remove the burner after taking out the two screws which
secure it (b) ;
•
replace the injector using a 7 mm. socket wrench.
IMPORTANT RECOMMENDATIONS:
•
Do not screw the injectors with exaggeration.
•
When the component has been replaced, verify the gas seals
of all the injectors with a leak fi nder product. If air bubbles appear
with the open valve and clogged injectors it means that there is
a gas leakage.
b
b

6
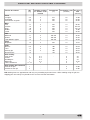
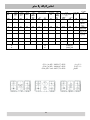
BURNER AND NOZZLE CHARACTERISTICS
* At 15°C and 1013 mbar-dry gas
** Propane P.C.S. = 50,37 MJ/Kg G 31
*** Butane P.C.S. = 49,47 MJ/Kg G 30
Natural P.C.S. = 37,78 MJ/m³ G 20
City P.C.S. = 15,87 MJ/m³ G 110
110 2.80 0.80 45 83 204
200
123
267
86 1,65 0.58 35 65 120 118 97
157
66 1.00 0.40 32 50 73 71 77 95
145 4.00 1.70 70 98 291 286 145 381
- 3,70 1.00 54 95 270 265 140 353
- 2,50 2,00
70
80 182 179 120 238
28-30
20
35
20
17
25
! ""
#! $%
&% '
'( )(
) %$
'( "$
$!
- 1.50 0.70 42 60 109 107 88 143
(R)
h
v
Table 1
L
iquid Gas G30-G31
N
atural Gas G20
1/100
1/100
215
130
70
290
270
185

7
TECHNICAL CHARACTERISTICS
Nominal external dimensions
Height at hob cm. 85
Height with lid raised cm. 141
Depth with door closed cm. 59
Depth with door open cm. 100
Width cm. 90
Usable dimensions
Width cm. 75
Depth cm. 48
Height cm. 33
Volume Lit. 119
Voltage and frequency of electric supply;
see date plate
Burners:
suitable for any type of gas indicated in the rating pla
te
APPLIANCE COMPLYNG WITH THE FOLLOWING DIREC-
TIVES:
- SSA 167/2000
- SSA 168/2000
- SSA 84/1997
- SSA 1062/1995
- IEC 60335-2-6:1997
HEATING ELEMENT POWERS
(provided on some models only
)
oven light
40 W
roaster motor 6 W
ELECTRIC HOTPLATES
(provided on some models only
)
ø 145 mm 1,0 kW - Front hotplate
ø 180 mm 1,5 kW - Rear hotplate
EQUIPMENT
All models are equipped with safety device for oven and grill
burners.
Depending on the models, cooker may also have:
- Safety device for one or more hob burners
- Electric ignition on top burners
- Electric ignition on oven and grill burners
- Oven thermostat (or tap)
- Electric oven lighting
- Rotisserie
- Grill burner
- One or more electric plate
- Mechanical timer
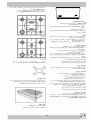
A
B
H
G
F
D
D
E
E
A
Tray for catching any overfl ows
B
Gas burner
C
Instant electronic lighting device (only on a few models)
D
Top grate
E
Control panel
F
Adjustable feet
G
Drip pan or cooking plate
H
Oven grat shelf
K
Flame failure device of the cook-top gas burners (only on a
few models)
I
The selection knob oven
L
The control knobs for the electric plate (only on a few mo-
dels)
M
Bottom oven light ( and rotisserie )
N
The timer knob
O
The grill knob
P
The oven knob and grill
Q
Ignition button
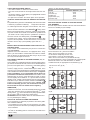
THE MAXI OVEN COOKER
(1)
(2)
P
L
N
5
10
15
20
25
30
35
40
45
50
55
max
220
180
150
min
M
Q
I
L
N
5
10
15
20
25
30
35
40
45
50
55
O
max
220
180
150
min
max
min
M
Q

8
THE DIFFERENT FUNCTIONS OF THE COOKER
The various functions featured with the oven are controlled using
the knobs and buttons on the control panel..
THE OVEN KNOB AND GAS GRIL
L
In some models you will fi nd a knob for the ignition of the gas oven
(I) and a knob for the ignition of the gas grill (O) (drawing 1).
While on other models only one knob (P) exists which starts
either the gas oven or the gas grill (drawing 2). In this case by
pressing and turning the knob towards the left the oven gas will
start and by pressing and turning the knob towards the right the
gas grill will start. The knobs are the devices which permit you to
select the different functions of the oven and of the gas grill and
to chose the cooking temperatures most suitable for the foods
between the ones indicated on the knobs (included between
min
and
max
). To turn on the oven burner, approach the hole “F” with
a fl ame or a lighter (see drawing below). Press down and turn
the oven knob counterclockwise until the max position.
F
To turn on the gas grill burner it is necessary to approach a
match to the burner. Press down and turn the grill knob counter-
clockwise until the
max
position. The use of the gas grill permits
to golden the foods such as sausages, roasts, chops,etc.
.
Since the cooker is equipped with a safety device on oven
burner, the knob must be kept pressed in for about 6
seconds to activate the fl ame failure device.( For the models
provided with electronic lighting see the relative paragraph).
The cooking temperature is selected by matching the desidered
temperature with the permanent reference on the panel; the
complete range of temperatures is shown below. The selected
temperature is reached automatically and it is kept constant by
the knob-controlled thermostat.
Min • 165 180 190 210 240 Max
Min.= 130°C.
Max.= 250°C.
Important: should the burner fl ames accidentally go out,
turn off the control knob and wait at least 1 minute before
trying to re-light.
Attention
: before using the oven and grill for the fi rst time, turn
the oven on for approximately one half hour. Make sure that
the oven is empty, the thermostat on high, the door open, and
the room properly ventilated. The odor which can be detected
at times is due to the evaporation off the substances used to
protect the oven and the grill during the period between the time
of production and installation of the appliance.
WARNING:
Do not use grill burner and oven burner together.
Due to technical and security reasons the use grill and oven
burner
at same time is forbidden
.
Usage of both together can lead
to breakage of oven glass for which manufacturer or distributor
will not be responsible.
ELECTRONIC IGNITION OF THE OVEN BURNER
(present only in a few models)
To
light the oven burne
r, press the button marked with the
symbol
and, at the same time, turn the oven control knob
in the anticlockwise direction to the
Max
setting.
Once the burner lights, release the button but keep the knob
pressed in for about 6 seconds in order to allow the gas to
pass freely
.
In the event of a power outage, the oven can be
lighted manually following the instructions provided in the section
entitled “
The Oven and Grill Gas Knob
.” The electronic lighting
device for the oven burner must not be activated for more than
15 seconds. If after 15 seconds the burner has not been lighted,
release the button, open the oven door and wait for at least one
minute before trying to light the burner again.
HOW TO USE THE ROASTER
(present only in a few models)
•
Insert the meat on the spit and place it in between the two
forks;
•
Insert the end of the spit on the wheel hub situated on the
frame;
•
Deprive the spit from its handle
•
Place the spit frame support along the central running of the
oven while inserting contemporarily the shaft ( in the frame)
in the motor hub.
•
Place the drip tray on a lower runner in the oven and pour
some water in the pan.
•
Turn on the grill burner selecting the grill function and by
pressing the (
);
•
Slowly close the door;
•
Start the motor by pressing the (M) button placed on the
control panel;
•
Baste the meat from time to time. When the meat is cooked,
withdraw the frame from the hub of the motor and retighten the
handle on the hub of the spit.
WARNING:
The forks of the spit can have sharp ends. Please
handle with caution.
Correct positioning of the oven wire shelf

9
OVEN LIGHT/ROTISSERIE SWITCH
- Gas cooker models are fi tted with a round switch;
- press this to turn on both the oven light and the rotisserie mo-
tor;
- gas-electric cookers ( electric plates) are equipped with a round
switch with a red pilot light;
- this light comes on while the electric plates are in operation.
CONTROL KNOBS FOR THE GAS BURNERS ON THE HOB
(L)
The position of the gas burner controlled by each one of the knobs
is shown by a symbol of a solid ring:
•
. To light one of the burn-
ers, hold a lighted match or lighter near the burner and, at the
same time, press down and turn the corresponding knob in the
counter-clockwise direction to the
maximum
setting. Each
burner can be operated at its maximum, minimum or intermedi-
ate power. Shown on the knob are the different symbols for off
•
(the knob is on this setting when the symbol lines up with the
reference mark on the control panel), for
maximum
.
To obtain these settings, turn the knob counter-clockwise with
respect to the off position. To turn off the burner, turn the knob
clockwise until it stops (corresponding again with the
•
sym-
bol).
MODELS WITH HOB GAS BURNER SAFETY DEVICES TO
PREVENT LEAKS
These models can be identifi ed by the presence of the device
itself
(see detail K
).
Important: Since the hob burners are equipped with a safety
device, you must hold the control knob in for about 6 seconds
after the burner has been lighted to allow the gas to pass until
the safety thermocouple has heated.
ELECTRONIC LIGHTING OF THE HOB BURNERS
(only on
certain models)
Some models are equipped with instant electronic lighting of the
gas burners located on the hob, which can be identifi ed by the
presence of an igniter device . This device is activated by lighting
pressing on the button, identifi ed by the
symbol. To turn on
a burner, simply press the button and then press while, at the
same time, pressing in and turning the control knob for the burner
in the anticlockwise direction until the burner lights.
To light the
burner immediately, it is recommended that the button be
pressed fi rst and then the knob turned.
Some models come
equipped with an electric starter built into the knob, in which
case the lighting device labelled “
C
” is present while the button
labelled is not. To light a specifi c burner push the corresponding
knob all the way in and turn it counter-clockwise to
maximum
keeping it pressed down until the burner lights.
Caution: If the
burner accidentally goes out, turn off the burner using the
knob and wait at least one minute before relighting.
TIMER KNOB
(N)
In order to use the timer, it must be wound by turning the "N" knob
almost one complete turn in the clockwise direction
almost one complete turn in the clockwise direction
. Then,
turning it back
, set the desired time by lining up the number
for the minutes with the mark on the control panel.
ATTENTION
:
Avoid the children touch the oven door because
it is very hot during the cooking.
PRACTICAL ADVICE ON USING THE BURNERS
To use the burners as effi ciently as possible, some basic guide-
lines should be followed:
• Use cookware that is the right size for each burner (see table)
in order to prevent the fl ame from spreading beyond the bottom
of the cookware.
• Only use cookware with fl at bottoms.
• As soon as the boiling point is reached, turn the knob to the
lowest setting.
• Always use lids with pots and pans.
Burner
Cookware Diameter ( cm )
Fast (R)
Semi Fast (S)
Auxiliary (A)
Triple Crown (TC)
Semi-fi sh /SP)
24-26
16-20
10-14
24-26
16-20
PRACTICAL ADVICE ON HOW TO USE THE CENTER
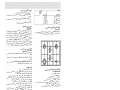
OVAL BURNERS
The oval shape and 90° rotation of the two central oval burners
increase the fl exibility of your cooktop.
To turn the burners 90°, proceed as follows:
• Make sure that the burners are not hot.
• Lift the burner completely out of its seat.
• Refi t it into its seat in the desired position.
• Make sure that the burners are positioned correctly.
The two central burners can be used together or separately with
cookware of various sizes and dimensions, as follows:
• Double burner for the appropriate oval cookware (fi g. A)
• Double burner for grills, rectangular or square cookware at least
28 x 28 cm in size (fi g. B)
Fig. A
Fig. B

10
Double burner for large cookware (26-28 cm in diameter) (fi g.
C).
• Single burner for medium sized cookware (16-20 cm in dia-
meter) (fi g. D).
Fig. C
Fig. D
The hob is equipped with a small accessory grid for small pots
which is only used on the small burner
"A"
.
HOW TO ASSEMBLE THE OVEN HANDLE
In the inside part of one of the sides of the handle you will fi nd
an inscription “UP” which indicates the exact position where to
assemble the handle.
Fix the handle with the screws that are provided.
EXTRACTION OF THE LID
To facilitate the cleaning of the lid the lid can be removed sim-
ply by opening it completely and pulling it upwards.
FOR COOKERS EQUIPPED WITH ELECTRIC HOTPLATES
The different heat settings are obtained as follows:
• 1 = minimum setting for all hotplates;
• 6 = maximum setting for normal and rapid hotplates (with red
disc);
• 0 = off.
Pans must never be smaller in diameter than the hotplates and
their bottoms must be as fl at as possible.
IMPORTANT:
• Never leave hotplates on without pans, except when fi rst used;
leave for about 10 minutes to dry oil or moisture residues;
• if the hotplate is to be out of use for a long time, apply a little
grease to its painted surface;
• do not allow spills to burn onto the hotplate, requiring the use
of abrasive cleaners.
a per non essere costretti all’uso di abrasivi per pulirla.
HOW TO USE THE GAS OVEN
• After igniting the burner, leave the oven to heat up for about
10 minutes;
• place the food for cooking in an ordinary oven dish and place
it on the chrome-plated shelf;
• place in the oven on the highest possible runners, and turn the
knob pointer to the setting required;
• cooking can be observed through the window in the door with
the oven light on. This will avoid opening and closing the door
frequently, unless oil or fat has to be added to the dish.
IMPORTANT
:
The drip pan under the grill is used to collect
juices, which drip from the food that is cooked directly on the
grill. The drip pan can also be used for cooking.
VENTILATION OF FOOD WARMER WITH GAS OVEN
Dripping pans, saucepans and other large items which may
interfere with the ventilation required by the oven burner should
not be placed in the food warming section.
OVENS WITH THERMOSTAT
If cooking temperatures are not as set, call in an engineer to
check the thermostat.
HOW TO USE THE GAS GRILL
• ignite the burner and wait a few minutes to allow it to warm up,
or switch on the heating element;
• place the foods on the chrome-plated shelf;
• insert on the highest runner;
• insert the drip tray on the bottom runner;
• gently close the oven door;
• after a few minutes, turn the food to expose the other side to
the infrared radiation (the cooking time depends on the type of
food and personal taste).
NB for gas grill models only: if after cooking with the oven, the
grill must be used, pls ignite the grill burner with closed door.

11
N.B
.: the fi rst time the grill is used smoke will come out of the
oven. Before inserting foods for cooking, wait until any oil resi-
dues on the burner have completely burnt away.
The grill must only be used at its full rated heat.
ATTENTION:
Accessible parts may be hot when the heating
element is in use.Keep children well away.
FOR COOKERS WITH MECHANICAL SPRING CLOCK ( N )
The spring clock can be set for a maximum time of one hour by
turning the regulator knob clockwise to the time required. After
the pre-set time, a buzzer sounds and will stop automatically.
When the buzzer sounds, the spring clock does not cut out
operation of the oven.
COOKER ROUTINE MAINTENANCE AND CLEANING
Before each operation, disconnect the cooker from the electri-
city.To assure the long life of the cooker, it must be thoroughly
cleaned frequently, keeping in mind that:
• the enamelled parts and the self-cleaning panels are washed
with warm water without using any abrasive powders or corro-
sive substances which could ruin them;
• the inside of the oven should be cleaned fairly often while it is
still warm using warm water and detergent, followed by careful
rinsing and drying;
• the fl ame spreaders should be washed frequently with hot water
and detergent taking care to eliminate any scale;
• in cookers equipped with automatic lighting, the terminal part
of the electronic instant lighting devices should be cleaned fre-
quently and the gas outlet holes of the fl ame spreaders should
be checked to make sure they are free of any obstructions;
• the electric plates are cleaned with a damp cloth and they should
be lubricated with a little oil while they still warm;
• stainless steel may become marked if it comes into contact with
very hard water or harsh detergents (containing phosphorous)
for long periods of time. After cleaning, it is advisable to rinse
thoroughly and dry. It is also recommended to dry any water
drops;
•
in models with glass covers, the covers are cleaned with hot
water and use of rough cloths or abrasives is to
be
avoided
.
•
d
o not clean the glass doors of the oven with rough, abrasive
materials or sharp metal scrapers, since they may scratch the
surface and cause the glass to shatter.
N.B: avoid closing the cover while the gas burners and
electric plates are still warm.
Important:
periodically check the wear of the gas hose and
substitute it if there are any defects; we recommended changing
it every year.
REPLACING THE OVEN LAMP
• Unplug
the oven from the mains;
• Remove the glass cover of the lamp-holder;
• Remove the lamp and replace with a lamp resistant to high
temperatures (300°C) with the following characteristics:
- Voltage 230V
- Wattage 40W
- Type E14
• Replace the glass over and connect the oven to the mains.
NB for gas grill models only: if after cooking with the oven, the
grill must be used, pls ignite the grill burner with closed door.

12
PRATICAL ADVICE FOR OVEN COOKING
NB: cooking times are approximate and may vary according to personal taste. When cooking using the grill, the
dripping-pan must always be placed on the 1st oven rack from the bottom.
Food to be cooked
Wt.
(Kg)
Cooking position
of shelves from
bottom
Temperature
(°C)
Pre-heating time
(minutes)
C o o
k i
n g
time
(minutes)
Pasta
Lasagne
Cannelloni
Pasta bakes au gratin
2.5
2.5
2.5
2
2
2
210
200
200
20
20
20
70-85
50-60
50-60
Meat
Veal
Chicken
Duck
Rabbit
Lamb
1.7
1.5
1.8
2.0
1.8
2
2
2
2
2
200
220
200
200
200
10
10
10
10
10
85-90
90-100
100-110
70-80
90-95
Fish
Mackerel
Dentex
Trout baked in paper
1.1
1.5
1.0
2
2
2
180-200
180-200
180-200
10
10
10
35-40
40-50
40-45
Pizza
Napolitan 1.0 2 220 15 15-20
Cake
Biscuits
Tarts
Savoury pie
Raised Cakes
0.5
1.1
1.0
1.0
2
2
2
180
180
180
165
15
15
15
15
30-35
30-35
45-50
35-40
Grill cooking
Veal steaks
Cutlets
Hamburgers
Mackerels
Toast sandwiches
1
1,5
1
1
n.° 12
3-2
3-2
3-2
3-2
2
-
-
-
-
-
5
5
5
5
5
30
20
20
15-20
7
Grill cooking with rotisserie
Veal on the spit
Chicken on the spit
1
2
-
-
-
-
5
5
70-80
70-80

;1�14
(&)
I.O
i
13
lj
�
�_)J
I
·
�
-
�
-
.
�
'I
•
t
e-
.

J
J
J
:
J
·e�'
J
1
4

28X28
15
-

16
@
-
t
b
t
L
�
i
1
·L
[
_t
[�
{ t
c
i
�t
t:f
t r
�t.
[
b
C
'
1·
-
.
t·
'
�
J.
Il
V
•
• •
\
t
f.
,
É
�[.(i
L
t
't
.
(
E
E
�
E
t
L \ 1
t"�
F
f
!
1
�
i
r
:
I·
�·.
r
t-
- 1
N
?
1
i·

F
J �
ì
. ( 2
Ì)
j
17

J
J
J
18

)))
)
)
**نﺎﺑوﺮﺒﻟا PCS =50,37 MJ / ماﺮﻏﻮﻠﻴﻜﻟاG31
*** نﺎﺗﻮﺒﻟا PCS =49,47 MJ / ماﺮﻏﻮﻠﻴﻜﻟاG30
ﻲﻌﻴﺒﻄﻟا PCS =37,78 MJ ﺐﻌﻜﻣ /ﻴﻜﻟا ﻮﻠG20
19
20 ﻲﺟ ﻲﻌﯾﺑط زﺎﻏ 31ﻲﺟ -30ﻲﺟ لﺋﺎﺳ زﺎﻏ 1 ﺔﻣﺋﺎﻘﻟا
بﺎﯾﺳﻧا
شﺗإ/1
تﺎھوﻓ
100/1
(م م
بﺎﯾﺳﻧا
شﺗإ/ﻲﺟ
***
تﺎھوﻓ
100/1
ىرﺟﻣ
ﻲﺑﻧﺎﺟ
100/1
(م م )
شﺗإ / ﻲﺟ بﺎﯾﺳﻧا
** ***
1/1 تﺎھوﻓ
00
ىرﺟﻣ
ﻲﺑﻧﺎﺟ
100/1
(م م
يرارﺣ
ﻲﺳ ﻲﺑ) وﯾﻠﺑد ﮫﯾﻛ ةوﻗ
(سإ
ضﻔﺧﻧﻣ ﻲﻣﺳا
ةرﺋادﻟا رطﻗ
(م م)
قرﺎﺣ
267 123 215 77 40 200 204 83 45
0.80
2.80 110
(رﯾﺑﻛ) ﻊﯾرﺳ
(رآ
157 97 130 58 30 118 120 65 35
0.58
1,65 86
ﻊﯾرﺳ ﮫﺑﺷ
(طﺳوﺗﻣ
(سإ
95 77 70 46 28 71 73 50 32 0.40 1.00 66
ﻲﻓﺎﺿإ
(ﮫﯾإ) (رﯾﻐﺻ)
381 145 290
61
286 291 98 70 1.70 4.00 145
ﺔﯾﺛﻼﺛ ةرﺋاد
(يإ ﻲﺳ ﻲﺗ
143 88 107 109 60 42 0.70 1.50
ﮫﯾﻛ وأ وﯾﻠﺑد
)
-
(ﻲﺑ سإ
353 140
270
85
49
265 270 95 54 1.00 3,70
)
نرﻓ
-
238 120 185 75
61
179 182 80
70
2,00 2,50
-
ةاوﺷﻣ
20
17
25
50
(رﺎﺑﯾﻠﻣ) ﻲﻣﺳا
(رﺎﺑﯾﻠﻣ) ﻲﻧدأ
(رﺎﺑﯾﻠﻣ) ﻰﺻﻗأ
طﻐﺿﻟا دوزﻣ
30-28
20
35
91

ﺔﻟوﺎﻄﻟا قرﺎﺤﻣ ﺊﻄﺒﻣ ﻂﻴﺒﻀﺗ:
ﻞﺋﺎﺴﻟا زﺎﻐﻟا ﺔﻄﺳاﻮﺑ ﻞﻐﺘﺸﻴﺳ زﺎﻬﺠﻟا نﺎآ اذإ)نﺎﺗﻮﺑ/نﺎﺑوﺮﺑ( لا ﺪﺷ ﻢﺘﻳ نأ ﺐﺠﻳ ،by-passﺎﻣﺎﺗ اﺪﺷ ﺔﻴﻔﻨﺤﻟﺎﺑ صﺎﺨﻟا .
عﻮﻨﻟا ﻦﻣ ﺔﻴﻔﻨﺣ ﻰﻠﻋ ،تﻼﻳدﻮﻤﻟا ﺐﺴﺣ ،زﺎﻬﺠﻟا ﺮﻓﻮﺘﻳوA عﻮﻨﻟا ﻦﻣ وأ B) ﻞﻜﺸﻟا ﻰﻟإ عﻮﺟﺮﻟا ﻰﺟﺮﻳ9 .(
- عﻮﻨﻟا A : لا ﺪﺟﻮﻳby-passا ﺮﻴﻐﺻ ﻲﻏاﺮﺑ حﺎﺘﻔﻣ ﺔﻄﺳاﻮﺑ ﻪﻴﻟإ لﻮﺻﻮﻟا ﻦﻜﻤﻳو ،ـﻃوﺮﺨﻤﻟا ﻞﺧاد ﺊﻄﺒﻤﻟا ﻂﻴﺒﻀﺘﺑ صﺎﺨﻟ .
- عﻮﻨﻟا B : لا ﺪﺟﻮﻳby-passةﺮﺷﺎﺒﻣ ﻪﻴﻟإ لﻮﺻﻮﻟا ﻦﻜﻤﻳو ﺔﻴﻔﻨﺤﻟا ﻦﻣ بﺮﻘﻟﺎﺑ .
ﻣ ﻦﻴﺘﻴﻔﻨﺤﻟا ﻲﻋﻮﻧ ﺔﺒﺴﻨﻟﺎﺑ ﺔﻴﻟﺎﺘﻟا تاﻮﻄﺨﻟا ﺞﻬﻧ ﺐﺠﻴﻓ ،ﻲﻌﻴﺒﻄﻟا زﺎﻐﻟا ﺔﻄﺳاﻮﺑ ﺪﻗﻮﻤﻟا ﻞﻐﺘﺸﻳ نأ يروﺮﻀﻟا ﻦﻣ نﺎآ اذإﺎﻌ :
-ﺐﻴﺒﺻ ﻰﺼﻗﺄﺑ قﺮﺤﻤﻟا رﺎﻌﺷﺈﺑ اﻮﻣﻮﻗ .
-رﺮﺿ يأ ﻪﺑ ﻖﺤﻠﻳ ﻻ ﻲآ ﺔﺑﺎﺼﻌﻟا ﻰﻠﻋ ﻂﻐﻀﻟا نود ،ﺾﺒﻘﻤﻟا عاﺰﺘﻧﺎﺑ اﻮﻣﻮﻗ .
- ﻚﻔﺑ اﻮﻣﻮﻗ لاby-pass ﻲﻏاﺮﺑ حﺎﺘﻔﻣ ﺔﻄﺳاﻮﺑ ﻞﻗﻷا ﻰﻠﻋ تارود ثﻼﺛ ﻩﺮﻳوﺪﺗو )رﺎﺴﻴﻟا ﻮﺤﻧ(
-ﻒﻗﻮﺘﻳ نأ ﻰﻟإ ﻚﻟﺬآ رﺎﺴﻴﻟا ﻮﺤﻧ ﺔﻴﻔﻨﺤﻟا حﺎﺘﻔﻣ ﺮﻳوﺪﺘﺑ اﻮﻣﻮﻗ :ﻮﻜﺘﺳﻰﺼﻗﻷا ﺎهاﺪﻣ ﻲﻓ ﺔﻠﻌﺸﻟا ن.
- ﺪﺳ ةدﺎﻋﺈﺑ اﻮﻣﻮﻗ لاby-passﻰﻟإ ﺔﻠﻌﺸﻟا ﺺﻠﻘﺘﺗ نأ ﻰﻟإ ﻲﻏاﺮﺒﻟا حﺎﺘﻔﻣ ﻰﻠﻋ ﻂﻐﻀﻟا نودو ءﻂﺒﺑ بر
ﻞﻣﺎﻜﻟا ﺐﻴﺒﺼﻟا .دﻮﺟو ﻲﻓ ﻰﺘﺣ ﺔﺘﺑﺎﺛ ﺔﻠﻌﺸﻟا نأ ﻦﻣ ﻚﻟذ ﺪﻌﺑ اوﺪآﺄﺗ
ﺔﻟﺪﺘﻌﻣ ﺔﻴﺋاﻮه تارﺎﻴﺗ .
نﺮﻔﻟا ﺔﻗﺮﺤﻣ ﺊﻄﺒﻣ ﻂﻴﺒﻀﺗ:
ﻞﺋﺎﺴﻟا زﺎﻐﻟا ﺔﻄﺳاﻮﺑ ﻞﻐﺘﺸﻴﺳ زﺎﻬﺠﻟا نﺎآ اذإ)نﺎﺗﻮﺑ/نﺎﺑوﺮﺑ( لا ﺪﺴﺑ اﻮﻣﻮﻘﺗ نأ ﻲﻔﻜﻳ ،by-passﺎﻣﺎﻤﺗ .
ﺔﻴﻟﺎﺘﻟا تاﻮﻄﺨﻟا ﺞﻬﻧ ﺐﺠﻴﻓ ،ﻲﻌﻴﺒﻄﻟا زﺎﻐﻟﺎﺑ ﻞﻐﺘﺸﻴﺳ نﺎآ اذإ ﺎﻣأ :
-ﻲﻏاﺮﺒﻟا ﻚﻓ ﺪﻌﺑ نﺮﻔﻟا ﺔﻴﺿرأ عاﺰﺘﻧﺎﺑ اﻮﻣﻮﻗ .
-ﻟا غﻮﻠﺑ ﻰﺘﺣ ﺾﺒﻘﻤﻟا اوﺮﻳدأو نﺮﻔﻟا ﺔﻗﺮﺤﻣ لﺎﻌﺷﺈﺑ اﻮﻣﻮﻗ ﻰﺼﻗﻷا ﻊﺿﻮ .
-نﺮﻔﻟا بﺎﺑ قﻼﻏﺈﺑ اﻮﻣﻮﻗ .
- لا ﻰﻟإ لﻮﺻﻮﻟا ﻰﻠﻋ اﻮﻠﻤﻋا by-pass ﺔﻴﻔﻨﺤﻟﺎﺑ وأ ةراﺮﺤﻟا ﺖﺒﺜﻤﺑ صﺎﺨﻟا ) ﻞﻜﺸﻟا10(
- لا ﺮﻳوﺪﺘﺑ اﻮﻣﻮﻗ by-passﻞﻗﻷا ﻰﻠﻋ تارود ثﻼﺛ .
-ﻰﻧدﻷا ﻊﺿﻮﻟا ﻮﺤﻧ ﺾﺒﻘﻤﻟا ﺮﻳوﺪﺗ ﻞﺒﻗ ﻖﺋﺎﻗد ﺖﺳ وأ ﺲﻤﺧ اوﺮﻈﺘﻧا .
- لا ﺖﻴﺒﺜﺗ ةدﺎﻋﺈﺑ اﻮﻣﻮﻗ by-pass بﺎﺒﻟا ةﻮآ ﺮﺒﻋ ﺔﻠﻌﺸﻟا ﻲﻓ ﻢﻜﺤﺘﻟا ﻊﻣ ﺔﻳوﺮﺑ )ﻖﻠﻐﻣ ﻮهو (
ﺔﻠﻌﺸﻟا عﺎﻔﺗرا ﺮﻴﺼﻳ ﻰﺘﺣ4ﺎﺒﻳﺮﻘﺗ ﻢﻠﻣ .اﺮﻴﺜآ ﺔﻠﻌﺸﻟا ﺾﻔﺧ ﺐﺠﻳ ﻻ . ﺪﻌﺑ اوﺪآﺄﺗ
ﺔﻋﺮﺴﺑ نﺮﻔﻟا بﺎﺑ ﺢﺘﻓ ﺪﻨﻋ ﻰﺘﺣ ﺔﺘﺑﺎﺛ ﺔﻠﻌﺸﻟا نأ ﻦﻣ ﻚﻟذ .
-ﺪﻳﺪﺟ ﻦﻣ نﺮﻔﻟا ﺔﻴﺿرأ ﺐﻴآﺮﺗو قﺮﺤﻤﻟا ءﺎﻔﻃﺈﺑ اﻮﻣﻮﻗ .
9
A
A
B
B
B
10
BY PASS
BY PASS
19
La pagina si sta caricando...
La pagina si sta caricando...
La pagina si sta caricando...
La pagina si sta caricando...
-
 1
1
-
 2
2
-
 3
3
-
 4
4
-
 5
5
-
 6
6
-
 7
7
-
 8
8
-
 9
9
-
 10
10
-
 11
11
-
 12
12
-
 13
13
-
 14
14
-
 15
15
-
 16
16
-
 17
17
-
 18
18
-
 19
19
-
 20
20
-
 21
21
-
 22
22
-
 23
23
-
 24
24


Whirlpool BIM 951 EGS S Guida utente
- Tipo
- Guida utente
- Questo manuale è adatto anche per
in altre lingue
- English: Whirlpool BIM 951 EGS S User guide
Documenti correlati
Altri documenti
-
Indesit K3G10/CZ Installation and Use Manual
-
-
Groupe Brandt KG791X Manuale del proprietario
-
-
-
-
-
-
-
Indesit K1G21(X)/R Guida utente