Electrolux SB323N14 Guida utente
- Categoria
- Frigo-congelatori
- Tipo
- Guida utente

user manual
notice d'utilisation
benutzerinformation
istruzioni per l’uso
Fridge-Freezer
Réfrigérateur-congélateur
Kühl - Gefrierschrank
Frigorifero-Congelatore
SB323N14

Electrolux. Thinking of you.
Share more of our thinking at www.electrolux.com
Safety information
In the interest of your safety and to ensure the cor-
rect use, before installing and first using the appli-
ance, read this user manual carefully, including its
hints and warnings. To avoid unnecessary mis-
takes and accidents, it is important to ensure that
all people using the appliance are thoroughly fa-
miliar with its operation and safety features. Save
these instructions and make sure that they remain
with the appliance if it is moved or sold, so that
everyone using it through its life will be properly in-
formed on appliance use and safety.
For the safety of life and property keep the pre-
cautions of these user's instructions as the man-
ufacturer is not responsible for damages caused
by omission.
Children and vulnerable people safety
• This appliance is not intended for use by per-
sons (including children) with reduced physical,
sensory or mental capabilities, or lack of expe-
rience and knowledge, unless they have been
given supervision or instruction concerning use
of the appliance by a person responsible for their
safety.
Children should be supervised to ensure that
they do not play with the appliance.
• Keep all packaging well away from children.
There is risk of suffocation.
• If you are discarding the appliance pull the plug
out of the socket, cut the connection cable (as
close to the appliance as you can) and remove
the door to prevent playing children to suffer
electric shock or to close themselves into it.
• If this appliance featuring magnetic door seals is
to replace an older appliance having a spring
lock (latch) on the door or lid, be sure to make
that spring lock unusable before you discard the
old appliance. This will prevent it from becoming
a death trap for a child.
General safety
Caution! Keep ventilation openings clear of
obstruction.
• The appliance is designed exclusively for do-
mestic use.
• The appliance is intended for keeping foodstuff
and/or beverages in a normal household as ex-
plained in this instruction booklet.
• Do not use a mechanical device or any artificial
means to speed up the thawing process.
• Do not use other electrical appliances (such as
ice cream makers) inside of refrigerating appli-
ances, unless they are approved for this pur-
pose by the manufacturer.
• Do not damage the refrigerant circuit.
• The refrigerant isobutane (R600a) is contained
within the refrigerant circuit of the appliance, a
natural gas with a high level of environmental
compatibility, which is nevertheless flammable.
During transportation and installation of the ap-
pliance, be certain that none of the components
of the refrigerant circuit become damaged.
If the refrigerant circuit should become dam-
aged:
– avoid open flames and sources of ignition
– thoroughly ventilate the room in which the ap-
pliance is situated
• It is dangerous to alter the specifications or mod-
ify this product in any way. Any damage to the
cord may cause a short-circuit, fire and/or elec-
tric shock.
Warning! Any electrical component (power
cord, plug, compressor) must be replaced by
a certified service agent or qualified service per-
sonnel.
1. Power cord must not be lengthened.
2. Make sure that the power plug is not squash-
ed or damaged by the back of the appliance.
A squashed or damaged power plug may
overheat and cause a fire.
3. Make sure that you can come to the mains
plug of the appliance.
4. Do not pull the mains cable.
5. If the power plug socket is loose, do not in-
sert the power plug. There is a risk of electric
shock or fire.
6. You must not operate the appliance without
the lamp cover
1)
of interior lighting.
• This appliance is heavy. Care should be taken
when moving it.
• Do not remove nor touch items from the freezer
compartment if your hands are damp/wet, as
this could cause skin abrasions or frost/freezer
burns.
• Avoid prolonged exposure of the appliance to
direct sunlight.
•
Bulb lamps
2)
used in this appliance are special
purpose lamps selected for household applian-
ces use only. They are not suitable for household
room illumination.
1) If the lamp cover is foreseen
2) If the lamp is foreseen
2 electrolux

Daily Use
• Do not put hot pot on the plastic parts in the
appliance.
• Do not store flammable gas and liquid in the ap-
pliance, because they may explode.
• Do not place food products directly against the
air outlet on the rear wall.
3)
• Frozen food must not be re-frozen once it has
been thawed out.
• Store pre-packed frozen food in accordance
with the frozen food manufacturer's instruc-
tions.
• Appliance's manufacturers storage recommen-
dations should be strictly adhered to.
• Do not place carbonated or fizzy drinks in the
freezer compartment as it creates pressure on
the container, which may cause it to explode,
resulting in damage to the appliance.
• Ice lollies can cause frost burns if consumed
straight from the appliance.
Care and cleaning
• Before maintenance, switch off the appliance
and disconnect the mains plug from the mains
socket.
• Before using the appliance for the first time,
wash the interior and all internal accessories with
lukewarm water and some neutral soap so as to
remove the typical smell of a brand-new prod-
uct, then dry thoroughly.
• Do not clean the appliance with metal objects.
• Do not use sharp objects to remove frost from
the appliance. Use a plastic scraper.
• Never use a hair drier or other heating applian-
ces to speed up defrosting. Excessive heat may
damage the plastic interior, and humidity could
enter the electric system making it live.
• Regularly examine the drain in the refrigerator for
defrosted water. If necessary, clean the drain. If
the drain is blocked, water will collect in the bot-
tom of the appliance.
Installation
Important! For electrical connection carefully
follow the instructions given in specific paragraphs.
• Unpack the appliance and check if there are
damages on it. Do not connect the appliance if
it is damaged. Report possible damages imme-
diately to the place you bought it. In that case
retain packing.
• It is advisable to wait at least four hours before
connecting the appliance to allow the oil to flow
back in the compressor.
• Adequate air circulation should be around the
appliance, lacking this leads to overheating. To
achieve sufficient ventilation follow the instruc-
tions relevant to installation.
• Wherever possible the back of the product
should be against a wall to avoid touching or
catching warm parts (compressor, condenser)
to prevent possible burn.
• The appliance must not be located close to ra-
diators or cookers.
• Make sure that the mains plug is accessible after
the installation of the appliance.
•
Connect to potable water supply only.
4)
Service
• Any electrical work required to do the servicing
of the appliance should be carried out by a quali-
fied electrician or competent person.
• This product must be serviced by an authorized
Service Centre, and only genuine spare parts
must be used.
Environment Protection
This appliance does not contain gasses
which could damage the ozone layer, in either
its refrigerant circuit or insulation materials. The
appliance shall not be discarded together with the
urban refuse and rubbish. The insulation foam con-
tains flammable gases: the appliance shall be dis-
posed according to the applicable regulations to
obtain from your local authorities. Avoid damaging
the cooling unit, especially at the rear near the heat
exchanger. The materials used on this appliance
marked by the symbol
are recyclable.
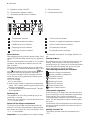
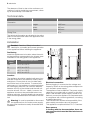
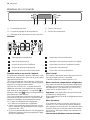
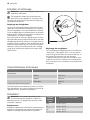
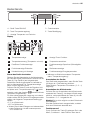
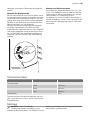
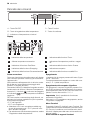
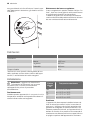
Control panel
BDE
AC
3) If the appliance is Frost Free
4) If a water connection is foreseen
electrolux 3

A - Appliance button ON/OFF D - Function button
B - Temperature regulation button E - Confirmation button
C - Temperature and function indicator
Display
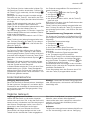
10 1 2 3 4
56789
1
Temperature indicator.
6
Timer function indicator.
2
Excessive temperature alarm.
7
Positive or negative temperature indicator.
3
FreeStore funcion indicator.
8
Action Freeze function indicator.
4
Shopping function indicator.
9
Compartment indicator.
5
Child Lock function indicator.
10
Eco Mode function indicator.
First switch on
After plugging the plug into the power outlet, if the
display is not illuminated, press key (A), appliance
on.
As soon as the appliance is turned on, it is in alarm
condition, the temperature flashes and you will
hear a buzzer.
Press key (E) and the buzzer will go off (also see
the section on "excessive temperature alarm" ) the
icon
still flashes and on the indicator will
appear the warmest temperature reached.
For a correct storage of the food select the Eco
mode function that guarantee the following tem-
peratures are set:
+5°C in the fridge
-18°C in the freezer
• Wait until the inside compartment temperature
reach -18°C, before introducing the goods in the
freezer compartment.
• To select a different temperature see "Temper-
ature regulation".
Switching off
The appliance is shut off by pressing key (A) for
more than 1 second.
During this, a countdown of the temperature from
-3 -2 -1 will be shown.
Switch off the fridge compartment
To switch off the fridge compartment press the
button (D) until this compartment is selected and
then press the button (A), until a countdown from
-3 -2 -1 is completed.
Important! It is not possible to run only the fridge.
If the freezer is turned off, the fridge will also turn
off.
Functions Menu
By activating the key (D) the functions menu is op-
erating. Each function could be confirmed by
pressing button (E). If there is no confirmation after
some seconds the display will go out from the
menu and return in normal condition.
The following functions are indicated:
Select the fridge compartment
Select the freezer compartment
Eco Mode function
FreeStore function
Shopping function
Child Lock function
Drinks Chill function
Action Freeze function
Temperature regulation
Press the key (D) to select the compartment and
than the key (B) to set the necessary temperature.
Press the key (E) to confirm the selection.
The temperature indicator shows the set temper-
ature. The set temperature will be reached within
24 hours.
Fluctuations of some degrees around set temper-
ature are normal and does not mean any fault in
the appliance.
Holiday Function "H"
The holiday function sets the temperature at +
15°C.
4 electrolux

This function allows you to keep the refrigerator
shut and empty during a long holiday period ( e. g.
the summer holidays) without the formation of a
bad smell.
To turn on the holiday function operate as per
modift the selected temperature. The temperature
indicator can modify the displayed temperature up
to + 8 °C, 1 °at a tim. + 2 °C will be followed by the
letter "H ". Press key E to confirm.
Now the refrigerator is in the "holiday "function in
the energy- saving mode.
Important! The fridge compartment must be
empty with holiday function on.
Child Lock Function
The Child Lock function is activated by pressing
key (D) (several times if necessary) until the corre-
sponding icon appears
.
You must confirm the choice by pressing key (E)
within few seconds. You will hear the buzzer and
the icon remains lighted. In this condition any pos-
sible operation through the keys does not cause
any change as long as this function is activated.
It is possible to de-activate the function at any time
by pressing key (D) until the corresponding icon will
flash and then key (E).
Shopping Function
If you need to insert a large amount of warm food,
for example after doing the grocery shopping, we
suggest activating the Shopping function to chill
the products more rapidly and to avoid warming
the other food which is already in the refrigerator.
The Shopping function is activated by pressing key
(D) (several times if necessary) until the corre-
sponding icon appears
. You must confirm the
choise by pressing key (E) within few seconds. You
will hear the buzzer and the icon remains lighted.
The Shopping function shuts off automatically after
approximately 6 hours. It is possible to de-activate
the function at any time by pressing key (D) until
the corresponding icon will flash and then key (E).
Eco Mode Function
Press the key (D) (several times if necessary) until
the corresponding icon appears
.
Press the key (E) to confirm the selection. You will
hear the buzzer and the icon remains lighted.
In this condition the temperatures are automati-
cally set (+ 5°C and - 18°C), in the best conditions
for storing food.
Set a different temperature in one of the compart-
ment to switch off the function.
FreeStore Function
Press the key (D) (several times if necessary) until
the corresponding icon appears
Press the key (E) to confirm the selection. You will
hear the buzzer and the icon remains lighted.
Important! If the function is activated
automatically the FreeStore icon is not shown
(refer to "Daily use").
The activation of the FreeStore function increase
the energy consumption.
Action Freeze Function
The freezer compartment is suitable for long term
storage of commercially frozen and deep-frozen
food, and for freezing fresh food.
The maximum quantity of foods to freeze in 24
hours is shown on the rating plate.
To freeze the amount of food indicated on the rat-
ing plate, place the food directly in touch with the
cooling surface (remove the drawer or basket). In
case the food is frozen inside the drawers or bas-
kets, the maximum quantity is slightly reduced.
To freeze fresh foods, you will need to activate the
Action Freeze function. Press key (D) (several times
if necessary) until
indicator appears.
You must confirm the choice by pressing key (E)
within few seconds. You will hear the buzzer and
on the display will appear some animation with
lines.
After a pre-cooling period of 24 hours, place the
foods in the freezer.
Place the food to be frozen in the
compart-
ment, as this is the coldest point.
The freezing process takes 24 hours. During this
period do not put other foods in the freezer.
This function stops automatically after 52 hours.
It is possible to deactivate the function at any time
by pressing key (D) until
indicator will flash and
then press key (E).
Drinks Chill Function
The Drinks Chill function is to be used as a safety
warning when placing bottles in the freezer com-
partment. It is activated by pressing key (D) (several
times if necessary) until the corresponding icon
appears
.
You must confirm the choice by pressing key (E)
within few seconds. You will hear the buzzer and
the icon remains lighted.
In this condition it operates a timer with a default
value of 30 min. and it could change from 1 to 90
min., by pressing key (B) you select the minutes
needed.
At the end of the selected time there are the fol-
lowing indications:
•
on the indicator
the symbol flashing
•
the icon flashing
•
the icon
flashing
• sounding of an acoustic alarm until key (E) is
pressed
At this point bear in mind to remove the drinks
contained in the freezer compartment.
electrolux 5

It is possible to deactivate the function at any time
by pressing key (D) until the corresponding icon will
flash and then key (E).
Excessive temperature alarm
An increase in the temperature in a compartment
(for example due to an power failure) is indicated
by:
• flashing temperature
•
freezer compartment
flashing
•
flashing of the icon
• sounding of buzzer
When normal conditions are restored:
• the acoustic signal shuts off
• the temperature value continues to flash
When you press key (E) to de-activate the alarm,
the highest temperature reached in the compart-
ment appears on indicator
for some seconds.
Then it returns on the normal operation showing
the temperature of the selected compartment.
During the alarm phase, the buzzer can be switch-
ed off by pressing key (E).
First use
Cleaning the interior
Before using the appliance for the first time, wash
the interior and all internal accessories with luke-
warm water and some neutral soap so as to re-
move the typical smell of a brand-new product,
then dry thoroughly.
Important! Do not use detergents or abrasive
powders, as these will damage the finish.
Daily use
Storage of frozen food
When first starting-up or after a period out of use,
before putting the products in the compartment let
the appliance run at least 2 hours on the higher
settings.
Important! In the event of accidental defrosting,
for example due to a power failure, if the power has
been off for longer than the value shown in the
technical characteristics chart under "rising time",
the defrosted food must be consumed quickly or
cooked immediately and then re-frozen (after
cooling).
Thawing
Deep-frozen or frozen food, prior to being used,
can be thawed in the refrigerator compartment or
at room temperature, depending on the time avail-
able for this operation.
Small pieces may even be cooked still frozen, di-
rectly from the freezer: in this case, cooking will
take longer.
FreeStore
The refrigerator compartment is equipped with a
device that allows for rapid cooling of foods and
more uniform temperature in the compartment.
This device activates by itself when needed, for
example for a quick temperature recovering after
door opening or when the ambient temperature is
high.
Allows you to switch on the device manually when
needed (refer to "FreeStore Function").
Important! The FreeStore device stops when the
door is open and restarts immediately after the
door closing.
Vegetable Drawer
The drawer is suitable for storing fruit and vegeta-
bles.
There is a separator inside the drawer that can be
placed in different positions to allow for the subdi-
vision best suited to personal needs.
There is a grille (if foreseen) on the bottom of the
drawer to separate the fruit and vegetables from
any humidity that may form on the bottom surface.
All parts inside the drawer can be removed for
cleaning purposes
6 electrolux

FreshZone drawer
TheFreshZonedrawer is suitable for storing fresh
food like fish, meat, seafood, because the temper-
ature is lower here than in the rest of the fridge.
Helpful hints and tips
Normal Operating Sounds
• You may hear a faint gurgling and a bubbling
sound when the refrigerant is pumped through
the coils or tubing. This is correct.
• When the compressor is on, the refrigerant is
being pumped around and you will hear a whir-
ring sound and a pulsating noise from the com-
pressor. This is correct.
• The thermic dilatation might cause a sudden
cracking noise. It is natural, not dangerous phys-
ical phenomenon. This is correct.
Care and cleaning
Caution! Unplug the appliance before
carrying out any maintenance operation.
This appliance contains hydrocarbons in its
cooling unit; maintenance and recharging
must therefore only be carried out by authorized
technicians.
Defrosting of the refrigerator
Frost is automatically eliminated from the evapo-
rator of the refrigerator compartment every time
the motor compressor stops, during normal use.
The defrost water drains out through a trough into
a special container at the back of the appliance,
over the motor compressor, where it evaporates.
It is important to periodically clean the defrost wa-
ter drain hole in the middle of the refrigerator com-
partment channel to prevent the water overflowing
and dripping onto the food inside. Use the special
cleaner provided, which you will find already inser-
ted into the drain hole.
Defrosting of the freezer
The freezer compartment of this model, on the
other hand, is a "no frost" type. This means that
there is no buildup of frost when it is in operation,
neither on the internal walls nor on the foods.
electrolux 7

The absence of frost is due to the continuous cir-
culation of cold air inside the compartment, driven
by an automatically controlled fan.
Technical data
Dimension
Height 1850 mm
Width 595 mm
Depth 648 mm
Rising Time 20 h
The technical information are situated in the rating
plate on the internal left side of the appliance and
in the energy label.
Installation
Caution! Read the "Safety Information"
carefully for your safety and correct operation
of the appliance before installing the appliance.
Positioning
Install this appliance at a location where the ambi-
ent temperature corresponds to the climate class
indicated on the rating plate of the appliance:
Climate
class
Ambient temperature
SN +10°C to + 32°C
N +16°C to + 32°C
ST +16°C to + 38°C
T +16°C to + 43°C
Location
The appliance should be installed well away from
sources of heat such as radiators, boilers, direct
sunlight etc. Ensure that air can circulate freely
around the back of the cabinet. To ensure best
performance, if the appliance is positioned below
an overhanging wall unit, the minimum distance
between the top of the cabinet and the wall unit
must be at least 100 mm . Ideally, however, the
appliance should not be positioned below over-
hanging wall units. Accurate levelling is ensured by
one or more adjustable feet at the base of the cab-
inet.
Warning! It must be possible to disconnect
the appliance from the mains power supply;
the plug must therefore be easily accessible after
installation.
A
B
mm
mm
min
100
20
Electrical connection
Before plugging in, ensure that the voltage and
frequency shown on the rating plate correspond to
your domestic power supply.
The appliance must be earthed. The power supply
cable plug is provided with a contact for this pur-
pose. If the domestic power supply socket is not
earthed, connect the appliance to a separate earth
in compliance with current regulations, consulting
a qualified electrician.
The manufacturer declines all responsibility if the
above safety precautions are not observed.
This appliance complies with the E.E.C. Directives.
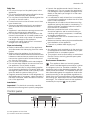
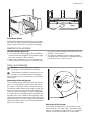
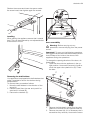
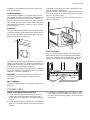
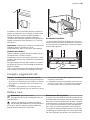
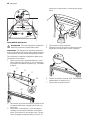
Rear spacers
In the bag with the documentation, there are
two spacers which must be fitted as shown in
the figure.
8 electrolux

Slacken the screws and insert the spacer under
the screw head, then tighten again the screws.
1
2
3
Levelling
When placing the appliance ensure that it stands
level. This can be achieved by two adjustable feet
at the bottom in front.
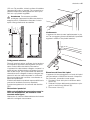
Removing the shelf holders
Your appliance is equipped with shelf retainers that
make it possible to secure the shelves during
transportation.
To remove them proceed as follows:
1. Move the shelf holders in the direction of the
arrow (A).
2. Raise the shelf from the rear and push it for-
ward until it is freed (B).
3. Remove the retainers (C).
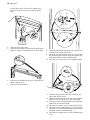
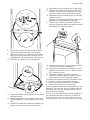
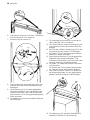
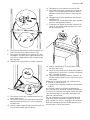
Door reversibility
Warning! Before carrying out any
operations, remove the plug from the power
socket.
Important! To carry out the following operations,
we suggest that this be made with another person
that will keep a firm hold on the doors of the
appliance during the operations.
To change the opening direction of the door, do
these steps:
1. Open the door with the appliance in the up-
right position. Unscrew the screws (t1) and re-
move the upper door plastic trim (t2). Close
the door.
t1
d7
t1
t1
t2
t3
2. Remove the little plastic cover from the door
plastic trim and refit on the opposite side (t3).
3. Remove the panel (t4). If it is necessary use a
screwdriver very carefully. Unscrew the screw
electrolux 9

on the other side. Remove the upper door
mount (t5). Place them in an empty plastic
bag.
t5
t4
4. Remove the upper door.
5. Unscrew the screw and remove the door stop-
per (d1). Attach it reversed on the other side.
d1
6. Unscrew the middle hinge (m2). Remove the
plastic spacer (m1).
7. Remove the lower door.
m1
m2
m3
m4
m5
m6
8. Remove the spacer (m6) and move to the oth-
er side of the hinge pivot (m5).
9. Remove using a tool the cover (b1). Unscrew
the lower hinge pivot (b2) and the spacer (b3)
and place them on the opposite side.
10. Re-insert the cover (b1) on the opposite side.
b1
b2
b3
11. Remove the stoppers (d1) and move to the
other side of the doors.
12. Remove the left-hand cover pin of the middle
hinge (m3,m4) and move to the other side.
13. Fit the pin of the middle hinge (m5) into the left-
hand hole of the lower door.
14. Re-insert the lower door on the pivot pin (b2).
15. Re-screw the middle hinge (m1) on the oppo-
site side . Do not forget the plastic spacer (m2)
inserted under the middle hinge.
16. Re-insert the upper door on the middle hinge
(m5).
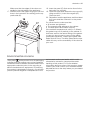
10 electrolux

Make sure that the edges of the doors run
parallel to the side edge of the appliance.
17. Position and fix the upper hinge (you can find
them in the instruction for use bag) on the op-
posite side (t6).
t6
t7
18. Insert the panel (t7) (that can be found in the
instruction for use bag).
19. Open the upper door, attach the top cover (t2)
using screws (t1). Insert the magnet (d7).
Close the door.
20. Reposition, level the appliance, wait for at least
four hours and then connect it to the power
socket.
Do a final check to make sure that:
• All screws are tightened.
• The magnetic seal adheres to the cabinet.
• The door opens and closes correctly.
If the ambient temperature is cold (i.e. in Winter),
the gasket may not fit perfectly to the cabinet. In
that case, wait for the natural fitting of the gasket.
In case you do not want to carry out the above
mentioned operations, contact the nearest After
Sales Service Force. The After Sales Service spe-
cialist will carry out the reversibility of the doors at
your cost.
Environmental concerns
The symbol on the product or on its packaging
indicates that this product may not be treated as
household waste. Instead it should be taken to the
appropriate collection point for the recycling of
electrical and electronic equipment. By ensuring
this product is disposed of correctly, you will help
prevent potential negative consequences for the
environment and human health, which could
otherwise be caused by inappropriate waste
handling of this product. For more detailed
information about recycling of this product, please
contact your local council, your household waste
disposal service or the shop where you purchased
the product.
electrolux 11

Electrolux. Thinking of you.
Partagez notre imagination sur www.electrolux.com
Consignes de sécurité
Pour votre sécurité et garantir une utilisation cor-
recte de l'appareil, lisez attentivement cette notice,
y compris les conseils et avertissements, avant
d'installer et d'utiliser l'appareil pour la première
fois. Pour éviter toute erreur ou accident, veillez à
ce que toute personne qui utilise l'appareil con-
naisse bien son fonctionnement et ses fonctions
de sécurité. Conservez cette notice avec l'appa-
reil. Si l'appareil doit être vendu ou cédé à une au-
tre personne, veillez à remettre cette notice au
nouveau propriétaire, afin qu'il puisse se familiari-
ser avec son fonctionnement et sa sécurité.
Pour la sécurité des personnes et des biens, con-
servez et respectez les consignes de sécurité fi-
gurant dans cette notice. Le fabricant décline toute
responsabilité en cas de dommages dus au non-
respect de ces instructions.
Sécurité des enfants et des personnes
vulnérables
• Cet appareil n'est pas destiné à être utilisé par
des enfants ou des personnes dont les capaci-
tés physiques, sensorielles ou mentales, ou le
manque d'expérience et de connaissance les
empêchent d'utiliser l'appareil sans risque lors-
qu'ils sont sans surveillance ou en l'absence
d'instruction d'une personne responsable qui
puisse leur assurer une utilisation de l'appareil
sans danger.
Empêchez les enfants de jouer avec l'appareil.
• Ne laissez pas les différents emballages à portée
des enfants. Ils pourraient s'asphyxier.
• Si l'appareil doit être mis au rebut, veillez à cou-
per le câble d'alimentation électrique au ras de
l'appareil pour éviter les risques d'électrocution.
Démontez la porte pour éviter que des enfants
ne restent enfermés à l'intérieur.
• Cet appareil est muni de fermetures magnéti-
ques. S'il remplace un appareil équipé d'une
fermeture à ressort, nous vous conseillons de
rendre celle-ci inutilisable avant de vous en dé-
barrasser. Ceci afin d'éviter aux enfants de s'en-
fermer dans l'appareil et de mettre ainsi leur vie
en danger.
Sécurité générale
Attention Veillez à ce que les orifices de
ventilation ne soient pas obstrués.
• Cet appareil est exclusivement destiné à un usa-
ge domestique.
• Cet appareil est destiné uniquement à la con-
servation d'aliments et/ou de boissons dans le
cadre d'un usage domestique normal, tel que
celui décrit dans la présente notice.
• N'utilisez pas de dispositifs mécaniques ou au-
tres moyens artificiels pour accélérer le dégivra-
ge de l'appareil.
• N'utilisez pas d'autres appareils électriques (par
exemple, sorbetières) à l'intérieur d'appareils ré-
frigérants sauf s'ils sont homologués pour cet
usage par leur fabricant.
• N'endommagez pas le circuit de refroidisse-
ment.
• Le circuit de refroidissement de l'appareil con-
tient de l'isobutane (R600a), un gaz naturel of-
frant un haut niveau de compatibilité avec l'en-
vironnement mais qui est néanmoins inflamma-
ble.
Pendant le transport et l'installation de l'appareil,
assurez-vous qu'aucune pièce du circuit de re-
froidissement n'est endommagée.
Si tel est le cas :
– évitez les flammes vives et les sources d'igni-
tion
– aérez soigneusement la pièce où se trouve
l'appareil
• Il est dangereux de modifier de quelque manière
que ce soit les caractéristiques de l’appareil. Un
cordon d'alimentation endommagé peut être la
cause de courts-circuits, d'incendies et/ou de
décharges électriques.
Avertissement Les composants électri-
ques (cordon d'alimentation, prise, compres-
seur) doivent être remplacés par un technicien
d’entretien agréé ou par un électricien spécialisé.
1. Ne branchez pas le cordon d'alimentation à
une rallonge.
2. Assurez-vous que la prise n'est pas écrasée
ou endommagée par l'arrière de l'appareil.
Une prise de courant endommagée peut
s'échauffer et provoquer un incendie.
3. Assurez-vous de pouvoir accéder à la prise
secteur de l'appareil.
4. Ne tirez pas sur le cordon d'alimentation.
5. Si la fiche du cordon d'alimentation est des-
serrée, ne la branchez pas dans la prise mu-
rale. Risque d'électrocution ou d'incendie.
6. N'utilisez pas l'appareil si le diffuseur de
l'ampoule d'éclairage n'est pas présent.
5)
pour l'éclairage intérieur.
• Cet appareil est lourd. Faites attention en le dé-
plaçant.
• Ne touchez pas les produits congelés sortant du
congélateur avec les mains humides car ceci
5) Si le diffuseur est prévu
12 electrolux

peut provoquer des abrasions ou des brûlures
cutanées.
• Évitez les expositions prolongées de l'appareil
aux rayons solaires.
Utilisation quotidienne
• Ne posez pas d'éléments chauds sur les parties
en plastique de l'appareil.
• Ne stockez pas de gaz et de liquides inflamma-
bles dans l'appareil (risque d'explosion).
• Ne placez pas d'aliments directement contre la
sortie d'air sur la paroi arrière de l'appareil.
6)
• Un produit décongelé ne doit jamais être recon-
gelé.
• Conservez les aliments préemballés conformé-
ment aux instructions de leur fabricant.
• Respectez scrupuleusement les conseils de
conservation donnés par le fabricant de l'appa-
reil.
• Ne mettez pas de bouteilles ni de boîtes de
boissons gazeuses dans le compartiment con-
gélateur, car la pression se formant à l'intérieur
du contenant pourrait le faire éclater et endom-
mager ainsi l'appareil.
• Ne consommez pas certains produits tels que
les bâtonnets glacés dès leur sortie de l'appareil
car ils peuvent provoquer des brûlures.
Entretien et nettoyage
• Avant toute opération d'entretien, mettez l'ap-
pareil à l'arrêt et débranchez-le.
• Avant d'utiliser l'appareil pour la première fois,
nettoyez l'intérieur et tous les accessoires inter-
nes avec de l'eau tiède savonneuse pour sup-
primer l'odeur caractéristique du " ;neuf ;", puis
séchez soigneusement.
• N'utilisez pas d'objets métalliques pour nettoyer
l'appareil.
• N'utilisez pas d'objet tranchant pour gratter la
couche de givre. Utilisez une spatule en plasti-
que.
• N'utilisez pas d'appareils électriques ou agents
chimiques pour dégivrer l'appareil. La chaleur
excessive pourrait endommager le revêtement
plastique interne et l'humidité pourrait s'intro-
duire dans le système électrique.
• Contrôlez régulièrement l'orifice d'évacuation
de l'eau de dégivrage dans le compartiment ré-
frigérateur. Nettoyez-le, le cas échéant. Si l'ori-
fice est bouché, l'eau s'écoulera en bas de l'ap-
pareil.
Installation
Important Avant de procéder au branchement
électrique, respectez scrupuleusement les
instructions fournies dans cette notice.
• Déballez l'appareil et vérifiez qu'il n'est pas en-
dommagé. Ne branchez pas l'appareil s'il est
endommagé. Signalez immédiatement au re-
vendeur de l'appareil les dommages constatés.
Dans ce cas, gardez l'emballage.
• Il est conseillé d'attendre au moins quatre heu-
res avant de brancher l'appareil pour que le cir-
cuit frigorifique soit stabilisé.
• Veillez à ce que l'air circule librement autour de
l'appareil pour éviter qu'il ne surchauffe. Pour
assurer une ventilation suffisante, respectez les
instructions de la notice (chapitre Installation).
• Placez l'appareil dos au mur pour éviter tout
contact avec le compresseur et le condenseur
(risque de brûlure).
• Placez de préférence votre appareil loin d'une
source de chaleur (chauffage, cuisson ou rayons
solaires trop intenses).
• Assurez-vous que la prise murale reste acces-
sible après l'installation de l'appareil.
• Branchez à l'alimentation en eau potable uni-
quement.
7)
Maintenance
• Les branchements électriques nécessaires à
l'entretien de l'appareil doivent être réalisés par
un électricien qualifié ou une personne compé-
tente.
• Cet appareil ne doit être entretenu et réparé que
par un Service après-vente autorisé, exclusive-
ment avec des pièces d'origine.
Protection de l'environnement
Le système frigorifique et l'isolation de votre
appareil ne contiennent pas de C.F.C. con-
tribuant ainsi à préserver l'environnement. L'appa-
reil ne doit pas être mis au rebut avec les ordures
ménagères et les déchets urbains. La mousse
d'isolation contient des gaz inflammables : l'appa-
reil sera mis au rebut conformément aux règle-
ments applicables disponibles auprès des autori-
tés locales. Veillez à ne pas détériorer les circuits
frigorifiques, notamment au niveau du conden-
seur. Les matériaux utilisés dans cet appareil iden-
tifiés par le symbole
sont recyclables.
6) Si l'appareil est sans givre
7) Si un branchement sur le réseau d'eau est prévu
electrolux 13

Bandeau de commande
B
DEAC
A - Touche Marche/Arrêt D - Touche Fonctions
B - Touche de réglage de la température E - Touche de confirmation
C - Affichage de la température et de la fonction
Afficheur
10 1 2 3 4
56789
1
Affichage de la température
6
Voyant de la fonction Minuteur
2
Alarme de température
7
Indicateur de température positif ou négatif
3
Voyant de la fonction FreeStore
8
Voyant de la fonction Congélation rapide
4
Voyant de la fonction Shopping
9
Voyant du compartiment
5
Voyant de la fonction Sécurité enfants
10
Voyant de la fonction Mode Éco.
Première mise en service de l'appareil
Si, après avoir branché l'appareil, l'afficheur n'est
pas allumé, appuyez sur la touche (A) pour mettre
l'appareil sous tension.
Dès que l'appareil est mis en service, il se trouve
en condition d'alarme : l'afficheur de température
clignote et un signal sonore retentit.
Appuyez sur la touche (E) : le signal sonore se
désactive (reportez-vous également au paragra-
phe "Alarme de température" ), le symbole
cli-
gnote et l'affichage
indique la température la
plus élevée qui a été atteinte.
Pour une conservation correcte des aliments, sé-
lectionnez la fonction Mode Eco, qui permet de
garantir les réglages de température suivants :
+5 °C dans le compartiment réfrigérateur
-18°C dans le compartiment congélateur
• Avant d'introduire des aliments dans le congé-
lateur, attendez que la température du compar-
timent soit de -18°C.
• Si vous souhaitez sélectionner une température
différente, reportez-vous au paragraphe "Régla-
ge de la température".
Mise à l'arrêt
Pour mettre l'appareil à l'arrêt, appuyez sur la tou-
che (A) pendant plus de 1 seconde.
L'afficheur effectue un décompte de 3 à 1.
Mise à l'arrêt du compartiment réfrigérateur
Pour mettre à l'arrêt le compartiment réfrigérateur,
appuyez sur la touche (D) jusqu'à ce que celui-ci
soit sélectionné, puis appuyez sur la touche (A),
jusqu'à la fin du décompte -3 -2 -1.
Important Il est impossible de faire fonctionner
uniquement le réfrigérateur.
Si le congélateur est à l'arrêt, le réfrigérateur le sera
également.
Menu Fonctions
Pour activer le menu Fonctions, appuyez sur la
touche (D). Pour confirmer la fonction sélection-
née, appuyez sur la touche (E). Si la sélection de la
fonction n'est pas confirmée dans les secondes
qui suivent, l'affichage s'éteint puis reprend son
aspect initial.
Les fonctions affichées sont les suivantes :
14 electrolux

Sélection du compartiment réfrigérateur
Sélection du compartiment congélateur
Fonction Mode Éco
Fonction FreeStore
Fonction Shopping
Fonction Sécurité enfants
Fonction Refroidissement des boissons
Fonction Congélation Rapide
Réglage de la température
Appuyez sur la touche (D) pour sélectionner le
compartiment, puis sur la touche (B) pour régler la
température nécessaire.
Appuyez sur la touche (E) pour confirmer votre sé-
lection.
L'indicateur de température indique la températu-
re programmée. La température programmée sera
atteinte au bout de 24 heures.
Une fluctuation de quelques degrés par rapport à
la température réglée est normale et ne signifie pas
que l'appareil ne fonctionne pas correctement.
Fonction Vacances "H"
La fonction Vacances règle la température à +15
°C dans le compartiment réfrigérateur.
Cette fonction vous permet de garder le compar-
timent réfrigérateur vide et fermé pendant une lon-
gue période (par exemple, les vacances d'été),
sans formation de mauvaises odeurs.
Pour activer la fonction Vacances, procédez com-
me pour modifier la température sélectionnée.
L'afficheur de température peut modifier la tem-
pérature indiquée jusqu'à + 8 °C, par paliers de
1°C. + 2 °C est suivi de la lettre "H ". Appuyez sur
la touche E pour confirmer votre sélection.
Le réfrigérateur est à présent en fonction "Vacan-
ces" et en mode économie d'énergie.
Important Le compartiment réfrigérateur doit être
vide quand la fonction Vacances est activée. Vous
ne devez pas conserver de marchandises dans ce
compartiment !
Fonction Sécurité enfants
Pour activer la fonction Sécurité enfants, appuyez
sur la touche (D) (plusieurs fois, si nécessaire), jus-
qu'à ce que le symbole correspondant apparaisse
Vous devez valider votre sélection en appuyant sur
la touche (E) dans les secondes qui suivent. Un
signal sonore retentit et le symbole reste allumé.
Dans ce cas, aucune modification n'est possible
en appuyant sur l'une des touches tant que la
fonction est activée.
Il est possible de désactiver la fonction à tout mo-
ment en appuyant sur la touche (D) jusqu'à ce que
le symbole correspondant clignote, puis sur la tou-
che (E).
Fonction Shopping
Si vous avez besoin de stocker une grande quan-
tité d'aliments dans votre réfrigérateur, par exem-
ple après avoir fait vos courses, nous vous suggé-
rons d'activer la fonction Shopping : elle permet de
refroidir rapidement les aliments tout en évitant le
réchauffement des denrées déjà stockées dans le
compartiment.
Pour activer la fonction Shopping, appuyez sur la
touche (D) (plusieurs fois, si nécessaire), jusqu'à ce
que le symbole correspondant apparaisse
Vous devez valider votre sélection en appuyant sur
la touche (E) dans les secondes qui suivent. Un
signal sonore retentit et le symbole reste allumé.
La fonction Shopping se désactive automatique-
ment au bout de 6 heures. Il est possible de dés-
activer la fonction à tout moment en appuyant sur
la touche (D) jusqu'à ce que le symbole corres-
pondant clignote, puis sur la touche (E).
Fonction Mode Éco
Appuyez sur la touche (D) (plusieurs fois si néces-
saire) jusqu'à ce que le symbole correspondant
apparaisse.
.
Appuyez sur la touche (E) pour confirmer votre sé-
lection. Un signal sonore retentit et le symbole res-
te allumé.
Dans ce cas, les températures sont automatique-
ment programmées (+ 5 °C et -18 °C), assurant
des conditions optimales de conservation des ali-
ments.
Pour désactiver la fonction, réglez une températu-
re différente dans l'un des compartiments.
Fonction FreeStore
Appuyez sur la touche (D) (plusieurs fois si néces-
saire) jusqu'à ce que le symbole correspondant
apparaisse.
Appuyez sur la touche (E) pour confirmer votre sé-
lection. Un signal sonore retentit et le symbole res-
te allumé.
Important Si la fonction est activée de manière
automatique, le symbole de la fonction FreeStore
n'apparaît pas (voir « Utilisation quotidienne »).
L'activation de la fonction FreeStore augmente la
consommation d'énergie.
Fonction Congélation Rapide
Le compartiment congélateur est idéal pour con-
geler des denrées fraîches et conserver des ali-
ments surgelés ou congelés pendant une longue
période.
La quantité maximale de denrées que vous pouvez
congeler par 24 heures est indiquée sur la plaque
signalétique.
Pour congeler la quantité d'aliments indiquée sur
la plaque signalétique, placez les denrées directe-
ment en contact avec la surface de refroidisse-
electrolux 15

ment (retirez les tiroirs ou les compartiments de
rangement). Si vous souhaitez congeler les ali-
ments en les plaçant directement dans les tiroirs/
compartiments de rangement, la quantité maxi-
male sera légèrement inférieure.
Pour congeler des aliments frais, vous devez acti-
ver la fonction Congélation rapide. Appuyez sur la
touche (D) (plusieurs fois, si nécessaire), jusqu'à ce
que le symbole
apparaisse.
Vous devez valider votre sélection en appuyant sur
la touche (E) dans les secondes qui suivent. Un
signal sonore retentit et une animation sous forme
de petits traits apparaît sur l'afficheur.
Placez les aliments à congeler dans le congélateur
dès que la période de pré-refroidissement de 24
heures est écoulée.
Placez les aliments à congeler dans le comparti-
ment marqué du symbole
, car il s'agit du point
le plus froid.
Le temps de congélation est de 24 heures. Vous
ne devez ajouter aucune autre denrée à congeler
au cours de cette période.
Cette fonction s'arrête automatiquement au bout
de 52 heures.
Il est possible de désactiver la fonction à tout mo-
ment en appuyant sur la touche (D), jusqu'à ce que
le symbole
clignote, puis sur la touche (E).
Fonction Refroidissement des boissons
Une alarme sonore retentit pour rappeler que des
boissons ont été placées dans le compartiment
congélateur. Pour activer la fonction, appuyez sur
la touche (D) (plusieurs fois, si nécessaire), jusqu'à
ce que le symbole correspondant apparaisse
.
Vous devez valider votre sélection en appuyant sur
la touche (E) dans les secondes qui suivent. Un
signal sonore retentit et le symbole reste allumé.
Dans ce cas, une minuterie est réglée par défaut
sur 30 minutes. Il vous est possible de sélectionner
une durée différente (de 1 à 90 minutes) en ap-
puyant sur la touche (B).
Dès que le temps réglé est écoulé, les indications
suivantes s'affichent :
•
sur l'afficheur de température
, le symbole
clignote
•
le symbole clignote
•
le symbole
clignote
• un signal sonore retentit jusqu'à ce que la tou-
che (E) soit activée
À ce stade, n'oubliez pas de retirer les boissons
qui sont à l'intérieur du compartiment congélateur.
Il est possible de désactiver la fonction à tout mo-
ment en appuyant sur la touche (D) jusqu'à ce que
le symbole correspondant clignote, puis sur la tou-
che (E).
Alarme de température
Une augmentation de la température dans un
compartiment (par exemple, à cause d'une cou-
pure de courant) est indiquée par :
• le clignotement de la température
• le clignotement du symbole du compartiment
congélateur
•
Le clignotement du symbole
• le déclenchement d'une alarme sonore
Dès que les conditions normales de fonctionne-
ment sont rétablies, vous constaterez ce qui suit :
• le signal sonore s'éteint
• la température clignote
Lorsque vous appuyez sur la touche (E) pour dés-
activer le signal sonore, l'afficheur
indique
pendant quelques secondes la température la plus
élevée atteinte dans le compartiment.
Il retourne ensuite en condition de fonctionnement
normal et indique la température du compartiment
sélectionné.
Pendant la phase d'alarme, l'alarme sonore peut
être désactivée en appuyant sur la touche (E).
Première utilisation
Nettoyage intérieur
Avant d'utiliser l'appareil pour la première fois, net-
toyez l'intérieur et tous les accessoires internes
avec de l'eau tiède savonneuse pour supprimer
l'odeur caractéristique du "neuf" puis séchez soi-
gneusement.
Important N'utilisez pas de produits abrasifs,
poudre à récurer, éponge métallique pour ne pas
abîmer la finition.
Utilisation quotidienne
Conservation des aliments congelés
À la mise en service ou après un arrêt prolongé,
placez le thermostat sur la position Max pendant
2 heures environ, avant d'introduire les produits
dans le compartiment.
Important En cas de dégivrage accidentel, dû par
exemple à une panne de courant, si la panne doit
se prolonger plus longtemps qu'il n'est indiqué à
la rubrique "temps d'augmentation" dans la
section Caractéristiques techniques, consommez
les aliments décongelés le plus rapidement
16 electrolux

possible ou recongelez-les après les avoir cuits
(une fois refroidis).
La décongélation
Les aliments surgelés ou congelés peuvent être
décongelés dans le compartiment réfrigérateur ou
à température ambiante, avant d'être utilisés, en
fonction du temps disponible pour cette opération.
Les petites pièces peuvent même être cuites sans
décongélation préalable : dans ce cas, la cuisson
est plus longue.
FreeStore
Le compartiment réfrigérateur est équipé d'un dis-
positif qui permet le refroidissement rapide des ali-
ments et qui maintient une température plus ho-
mogène dans le compartiment.
Ce dispositif s'active automatiquement en cas de
besoin, par exemple pour rafraîchir rapidement le
réfrigérateur lorsque la porte est restée ouverte ou
si la température ambiante est élevée.
Vous permet de mettre manuellement le dispositif
en fonctionnement si nécessaire (reportez-vous au
chapitre « Fonction FreeStore »).
Important Le dispositif FreeStore s'arrête si la
porte est ouverte et redémarre sitôt la porte
refermée.
Bac à légumes
Ce bac est adapté pour la conservation de fruits et
légumes.
Il possède une cloison qui, selon vos besoins, per-
met de séparer les aliments.
Selon le modèle, une grille permet de préserver les
fruits et légumes de toute humidité pouvant s'ac-
cumuler au fond du bac.
Tous les éléments du bac sont amovibles pour fa-
ciliter le nettoyage.
Tiroir FreshZone
Le tiroir FreshZone est adapté à la conservation
des denrées fraîches et hautement périssables
(poissons, viandes), car la température y est infé-
rieure à celle des autres zones du réfrigérateur.
Conseils utiles
Bruits de fonctionnement normaux
• Il n'est pas anormal d'entendre le bruit de cir-
culation du fluide frigorigène selon son état li-
quide, gazeux ou vaporeux. Ce phénomène est
normal.
• Le compresseur peut produire un ronronnement
aigu ou un bruit de pulsation. Ce phénomène est
normal.
• La dilatation thermique peut provoquer un sou-
dain, léger bruit de craquement. C'est un phé-
nomène normal et sans gravité. Ce phénomène
est normal.
electrolux 17

Entretien et nettoyage
Attention débrancher l'appareil avant toute
opération d'entretien.
Cet appareil contient des hydrocarbures
dans son circuit réfrigérant : l'entretien et la
recharge ne doivent donc être effectués que par
du personnel autorisé.
Dégivrage du réfrigérateur
Le givre est automatiquement éliminé de l'évapo-
rateur du compartiment réfrigérateur à chaque ar-
rêt du compresseur, en cours d'utilisation normale.
L'eau de dégivrage est collectée dans un récipient
spécial situé à l'arrière de l'appareil, au-dessus du
compresseur, d'où elle s'évapore.
Il est important de nettoyer régulièrement l'orifice
d'écoulement de la gouttière d'évacuation de l'eau
de dégivrage située au milieu du compartiment ré-
frigérateur pour empêcher l'eau de déborder et de
couler sur les aliments qui se trouvent à l'intérieur.
Nettoyez l'orifice d'écoulement de l'eau de dégi-
vrage avec le bâtonnet spécial se trouvant déjà
dans l'orifice.
Dégivrage du congélateur
Le compartiment congélateur de ce modèle est
"sans givre". Cela signifie qu'il n'y a aucune for-
mation de givre pendant son fonctionnement, ni
sur les parois internes si sur les aliments.
L'absence de givre est due à la circulation conti-
nuelle de l'air froid à l'intérieur du compartiment,
sous l'impulsion d'un ventilateur à commande au-
tomatique.
Caractéristiques techniques
Dimensions
Hauteur 1850 mm
Largeur 595 mm
Profondeur 648 mm
Autonomie de fonctionnement 20 h
Les informations techniques se trouvent sur la pla-
que signalétique sur la paroi intérieure gauche de
l'appareil et sur l'étiquette énergétique.
Installation
Attention Pour votre sécurité et le bon
fonctionnement de l'appareil, veuillez lire
attentivement les "Consignes de sécurité" avant
d'installer l'appareil.
Emplacement
Installez cet appareil à un endroit où la température
ambiante correspond à la classe climatique indi-
quée sur la plaque signalétique de l'appareil :
Classe
climati-
que
Température ambiante
SN +10 à + 32 °C
N +16 à + 32 °C
ST +16 à + 38 °C
T +16 à + 43 °C
18 electrolux

Emplacement
Placez de préférence votre appareil loin d'une
source de chaleur (chauffage, cuisson aux rayons
solaires trop intenses). Veillez à ce que l'air circule
librement tout autour de l'appareil. Pour obtenir les
meilleures performances possibles, si vous sou-
haitez placer l'appareil sous un élément, il est in-
dispensable de laisser un espace d'au moins 100
mm entre le dessus de l'appareil et l'élément su-
périeur. Théoriquement, l'appareil ne doit pas être
placé sous un élément. Calez soigneusement l'ap-
pareil en agissant sur le(s) pied(s) réglable(s).
Avertissement L'appareil doit pouvoir être
débranché à tout moment. Il est donc
nécessaire que la prise murale reste accessible
une fois que l'installation est terminée.
A
B
mm
mm
min
100
20
Branchement électrique
Contrôlez, avant de brancher l'appareil, si la ten-
sion et la fréquence indiquées sur la plaque signa-
létique correspondent à celles de votre réseau.
L'appareil doit être relié à la terre. La fiche du câble
d'alimentation comporte un logement pour mise à
la terre. Si la prise de courant murale n'est pas mi-
se à la terre, branchez l'appareil sur une prise de
terre conformément aux normes en vigueur, en
demandant conseil à un électricien qualifié.
Le fabricant décline toute responsabilité en cas
d'incident suite au non-respect des consignes de
sécurité sus-mentionnées.
Cet appareil est conforme aux directives commu-
nautaires.
Entretoises arrière
Le sachet avec la documentation contient
deux entretoises, qui doivent être mises en
place comme le montre l'illustration.
Dévissez les vis et insérez l'entretoise sous la tête
de la vis, puis resserrez la vis.
1
2
3
Mise à niveau
Veillez à caler soigneusement l'appareil en agis-
sant sur les deux pieds réglables de devant.
Retrait des supports de clayette
Votre appareil est équipé de dispositifs de retenue
qui permettent d'immobiliser les clayettes au cours
du transport.
Pour les enlever, procédez comme suit :
1. Déplacez les supports de clayette dans le sens
de la flèche (A).
2. Soulevez la clayette de l'arrière et poussez-la
vers l'avant pour la dégager (B).
3. Enlevez les dispositifs de retenue (C).
electrolux 19

Réversibilité de la porte
Avertissement Avant toute opération,
débranchez la fiche de la prise de courant.
Important Pour effectuer les opérations
suivantes, il est conseillé de se faire aider par une
autre personne pour maintenir fermement les
portes de l'appareil pendant les opérations.
Pour changer le sens d'ouverture de la porte, sui-
vez les étapes suivantes :
1. Ouvrez la porte quand l'appareil est debout.
Dévissez les vis (t1) et retirez la moulure en
plastique de la porte supérieure (t2). Fermez la
porte.
t1
d7
t1
t1
t2
t3
2. Retirez le petit cache en plastique de la mou-
lure en plastique de la porte et remettez-le en
place du côté opposé (t3).
3. Retirez le panneau (t4). Au besoin, utilisez un
tournevis avec précaution. Dévissez la vis de
l'autre côté. Retirez la charnière de la porte
supérieure (t5). Placez ces éléments dans un
sac en plastique vide.
t5
t4
4. Enlevez la porte supérieure.
5. Dévissez la vis et retirez la butée de porte (d1).
Fixez-la dans le sens inverse de l'autre côté.
d1
6. Dévissez la charnière du milieu (m2). Déposez
l'entretoise en plastique (m1).
7. Enlevez la porte inférieure.
20 electrolux
La pagina si sta caricando...
La pagina si sta caricando...
La pagina si sta caricando...
La pagina si sta caricando...
La pagina si sta caricando...
La pagina si sta caricando...
La pagina si sta caricando...
La pagina si sta caricando...
La pagina si sta caricando...
La pagina si sta caricando...
La pagina si sta caricando...
La pagina si sta caricando...
La pagina si sta caricando...
La pagina si sta caricando...
La pagina si sta caricando...
La pagina si sta caricando...
La pagina si sta caricando...
La pagina si sta caricando...
La pagina si sta caricando...
La pagina si sta caricando...
La pagina si sta caricando...
La pagina si sta caricando...
La pagina si sta caricando...
La pagina si sta caricando...
La pagina si sta caricando...
La pagina si sta caricando...
La pagina si sta caricando...
La pagina si sta caricando...
-
 1
1
-
 2
2
-
 3
3
-
 4
4
-
 5
5
-
 6
6
-
 7
7
-
 8
8
-
 9
9
-
 10
10
-
 11
11
-
 12
12
-
 13
13
-
 14
14
-
 15
15
-
 16
16
-
 17
17
-
 18
18
-
 19
19
-
 20
20
-
 21
21
-
 22
22
-
 23
23
-
 24
24
-
 25
25
-
 26
26
-
 27
27
-
 28
28
-
 29
29
-
 30
30
-
 31
31
-
 32
32
-
 33
33
-
 34
34
-
 35
35
-
 36
36
-
 37
37
-
 38
38
-
 39
39
-
 40
40
-
 41
41
-
 42
42
-
 43
43
-
 44
44
-
 45
45
-
 46
46
-
 47
47
-
 48
48


Electrolux SB323N14 Guida utente
- Categoria
- Frigo-congelatori
- Tipo
- Guida utente
in altre lingue
- English: Electrolux SB323N14 User guide
- français: Electrolux SB323N14 Mode d'emploi
- Deutsch: Electrolux SB323N14 Benutzerhandbuch
Documenti correlati
-
Electrolux ENA34733X Manuale utente
-
-
-
-
-
-
-
-
-