

UK • 2
PB80 USER MANUAL • UK
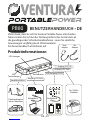
Thank you for choosing Ventura Portable Power. Always follow
basic safety precautions when using electrical appliances. Read all
instructions carefully, Please keep this instruction manual for easy
reference.
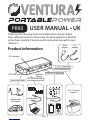
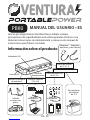
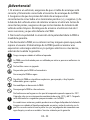
Product Information
LED Flash Light
Jumper cable
with clamps
Switch cable A Switch cable B
For 12V vehicle
products
Home
adaptor Car
adaptor
Jump start socket 19V 3.5A output port
LED indicators
Operation
button
USB 5V 2A output port
12V 10A output port
12V 1A input port

UK • 3
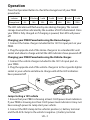
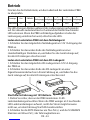
Operation
Press the Operation Button to check the storage level of your PB80
powerbank.
Indicator Unlit 5 Flashing 1 solid 2 solid 3 solid 4 solid 5 solid
Storage level 0% 10% 20% 40% 60% 80% 100%
The LED indicators will flash one by one during charging. The current
storage level will be indicated by the number of LED’s illuminated. Once
your PB80 is fully charged or if charging is paused, the LED’s will power
off.
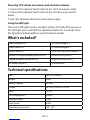
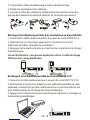
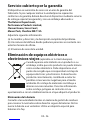
Charging your PB80 Powerbank using the Home charger.
1. Connect the home charger included to the 12V 1A input port on your
PB80.
2. Plug the opposite end of the Home charger in to a standard AC wall
socket and allow to charge until all the LED indicators have powered off.
Charging your PB80 Powerbank using the Vehicle charger.
1. Connect the vehicle charger included to the 12V 1A input port on
your PB80.
2. Plug the opposite end of the vehicle charger in to the cigarette lighter
socket in your vehicle and allow to charge until all the LED indicators
have powered off.
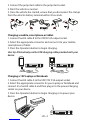
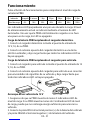
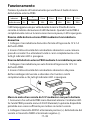
Jump starting a 12V vehicle
1. Ensure that your PB80 is showing at least 3 LED power level indicators.
If your PB80 is showing less than 3 LED power level indicators it may not
have enough power to Jump start your vehicle.
2. Connect the RED clamp to the vehicle’s positive (+) battery terminal
and the BLACK clamp to the vehicle’s negative (-) battery terminal.

UK • 4
1 2 3 4 5
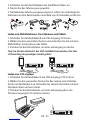
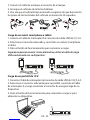
3. Connect the jump start cable to the jump start socket.
4. Start the vehicle as normal.
5. Once the vehicle has started, ensure that you disconnect the clamps
from the vehicles battery terminal within 30 seconds.
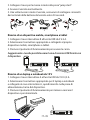
Charging a mobile, smart phone or tablet.
1. Connect Switch cable B to the USB 5V 2A output socket.
2. Select the appropriate connector and connect it to your mobile,
smart phone or Tablet.
3. Press the Operation button to begin charging.
User tip: Alternatively use the USB charging cable provided with your
device.
Charging a 19V Laptop or Notebook.
1. Connect Switch cable A to the USB 19V 3.5A output socket.
2. Select the appropriate connector for your Laptop or Notebook and
connect it to Switch cable A and then plug in to the power/charging
socket on your device.
3. Press the Operation button to begin charging or to power your
device.

UK • 5
Powering 12V vehicle accessories and electronic devices.
1. Connect the optional Switch cable to the 12V 10A output socket.
2. Connect the optional Switch cable to the 12V device you wish to
power.
3. Press the Operation button to start power supply.
Using the LED light.
There are 4 LED light modes, standard, strobe, SOS and off. To power on
the LED light, press and hold the Operation button for 3 seconds. Press
the Operation button lightly to switch between modes.
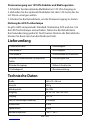
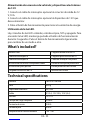
What’s included?
PB80 Powerbank x 1 AC Home charger x 1
Switch cable A x 1 DC Vehicle charger x 1
Switch cable B x 1 Jump start cable with clamps x 1
Mobile/Smart phone/tablet connectors x 8 Protective carry case x 1
Laptop/Notebook connectors x 8 Protective silicon case x 1
AC Home charger x 1 User manual x 1
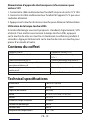
Technical specifications
Size 160 x 75 x 28mm
Weight 420g
Battery Capacity 44.4Wh
Output 5V 2 A; 12V 10A; 19V 3 .5A;
Input 12V 1A
Full charging time 3 hours
Starting current 2 00A
Peak current 4 00A
Operating temperature -20° ~ 60°

UK • 6
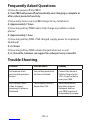
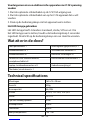
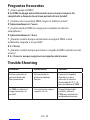
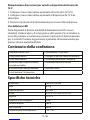
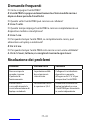
Frequently Asked Questions
Q: How do I power off my PB80?
A: Your PB80 will power off automatically once charging is complete or
after a short period of inactivity.
Q: How many times can my PB80 charge for my cell phone?
A: Approximately 7 times.
Q: How long will my PB80 take to fully charge my mobile or smart
phone?
A: Approximately 1 hour.
Q: How long will my PB80, if full charged, supply power to a Laptop or
Notebook?
A: 2-3 hours
Q: How long will my PB80 remain charged when not in use?
A. 6-12 months, however, we suggest to recharge it every 6 months.
Trouble Shooting
Problem Possible cause Remedy
No response when
pressing the operation
button.
Low voltage protection
has been activated.
Connect the Home or
Vehicle charger to the
12V 1A input socket to
reset your PB80.
My PB80 gets warm
when charging/
powering a Laptop or
Notebook.
The charging current is
higher than 3.5A
Remove the battery
from the Laptop or
Notebook and use
your PB80 to power it
independently instead.

UK • 7
!
!
!
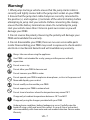
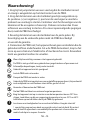
Warning!
1. When jump starting a vehicle ensure that the jump starter cable is
correctly and tightly connected to the jump start socket on your PB80.
2. Ensure that the jump start cable clamps are correctly connected to
the positive (+) and negative (-) terminals of the vehicle’s battery before
attempting to jump start your vehicle. Before connecting the clamps,
ensure that the battery terminals are clean. Do not attempt to jump
start your vehicle more than 3 times in quick succession as you will
damage your PB80.
3. Do not reverse the polarity. Reversing the polarity will damage your
PB80 and invalidate the warranty.
4. Do not disassemble your PB80; there are no user-serviceable parts
inside. Disassembling your PB80 may result in exposure to shock and/or
electrical or mechanical hazards and will invalidate any warranty.
Always take care when using the appliance
Your PB80 is not intended for use by young or infirm persons without
supervision
Do not use as a toy
Do not allow your PB80 to become wet
Do not immerse your PB80 in water
Do not operate your PB80 in explosive atmospheres, such as in the presence of
flammable liquids, gases or dust
Do not modify or disassemble your PB80
Do not expose your PB80 to extreme heat.
Do not store in locations where the temperature may exceed 70°C
Charge only at ambient temperatures between -20°C and 60°C
Charge only using the chargers provided with your PB80.
Under extreme conditions, battery leakage may occur. Carefully wipe the
liquid off using a cloth and avoid skin contact. In case of skin or eye contact,
rinse immediately with clean water and seek medical attention. Service under
Warranty

UK • 8
Service under Warranty
Your device comes with a standard one year manufacturer’s warranty.
If, for some reason, your unit requires service under warranty return
your device, via special delivery (insured) and in suitable packaging to:
The Returns Department,
Performance Products Limited,
Cleaver House, Sarus Court,
Manor Park, Cheshire WA7 1UL
Enclose the following information:
(a) Your name, address and a full description of the problem.
(b) A telephone number where you can be reached during business
hours.
(c) Your units’ serial number.
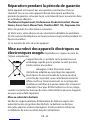
Disposal of Old Electrical & Electronic
Equipment (applicable in the European Union).
This symbol on a product or its packaging indicates
that this product shall not be treated as household
waste. It should be handed over to an applicable
collection point for the recycling of electrical
equipment. By ensuring that this product is disposed
of correctly you will help/prevent potential negative
impact on the environment. The recycling of materials
will help to conserve natural resources. For further
details about recycling please contact your local civic
office or the shop where it was originally purchased.
Disposing of the Battery
Please check with your local waste management service authority
regarding regulations for the safe disposal of the battery. The battery
should never be placed in municipal waste. Use a battery disposal
facility if available

NL • 9
PB80 GEBRUIKSAANWIJZING • NL
Gefeliciteerd met de aanschaf van de Ventura Portable Power. Houd
u bij het gebruik van elektrische apparaten altijd aan elementaire
veiligheidsvoorschriften. Lees alle instructies zorgvuldig door, Houd
deze gebruiksaanwijzing bij de hand zodat u er
gemakkelijk dingen in kunt opzoeken.
Productgegevens
LED-knipperlicht
Startkabel met
klemmen
Schakelaarkabel
ASchakelaarkabel
B
Voor
12V-voertuig-
producten
Thuis-
adapter Auto-
adapter
Startcontact 19V/3,5A-uitgang
LED-indicators
Bedieningsknop USB 5V/2A-uitgang
12V/10A-uitgang
12V/1A-ingang

NL • 10
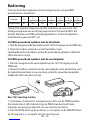
Bediening
Druk op de bedieningsknop om het energieniveau van uw PB80-
powerbank te controleren.
Indicator Uit 5
knipperend 1
onafgebr. 2
onafgebr. 3
onafgebr. 4
onafgebr. 5
onafgebr.
Energieniveau 0% 10% 20% 40% 60% 80% 100%
Tijdens het opladen knipperen de LED-indicators een voor een. Het
huidige energieniveau wordt aangegeven door het aantal LED’s dat
brandt. Wanneer uw PB80 volledig opgeladen is of als het opladen is
onderbroken, gaan de LED’s uit.
De PB80-powerbank opladen met de thuislader
1. Sluit de meegeleverde thuislader op de 12V/1A-ingang van de PB80 aan.
2. Steek het andere uiteinde van de thuislader in een
standaardwandcontactdoos en laat de powerbank opladen totdat alle
LED-indicators uit zijn.
De PB80-powerbank opladen met de voertuiglader
1. Sluit de meegeleverde voertuiglader op de 12V/1A-ingang van de
PB80 aan.
2. Steek het andere uiteinde van de voertuiglader in de aansluiting voor
de sigarettenaansteker in uw voertuig en laat de powerbank opladen
totdat alle LED-indicators uit zijn.
Een 12V-voertuig starten
1. Controleer of minstens 3 energieniveau-LED’s van de PB80 branden.
Als minder dan 3 LED-indicators op de PB80 branden, heeft deze
mogelijk niet genoeg capaciteit om uw voertuig te starten.
2. Sluit de RODE klem op de positieve (+) accupool, en de ZWARTE klem
op de negatieve (-) accupool van het voertuig aan.

NL • 11
1 2 3 4 5
3. Sluit de startkabel aan op het startcontact.
4. Start het voertuig op de gebruikelijke manier.
5. Zorg na het starten van het voertuig dat u de klemmen binnen 30
seconden van de accupolen van het voertuig verwijdert.
Een mobiele telefoon, smartphone of tablet opladen
1. Sluit schakelaarkabel B aan op de USB 5V/2A-uitgang.
2. Selecteer de juiste connector en sluit deze aan op uw mobiele
telefoon, smartphone of tablet.
3. Druk op de bedieningsknop om te beginnen met opladen.
Tip: U kunt ook de USB-oplaadkabel bij uw apparaat gebruiken.
Een 19V-laptop of -notebook opladen
1. Sluit schakelaarkabel A aan op de USB 19V/3,5A-uitgang.
2. Selecteer de juiste connector voor uw laptop of notebook, bevestig
deze aan schakelaarkabel A en sluit de kabel op de voedings-/
oplaadingang van uw apparaat aan.
3. Druk op de bedieningsknop om uw apparaat op te laden of te
voeden.

NL • 12
Voertuigaccessoires en elektronische apparaten met 12V-spanning
voeden
1. Sluit de optionele schakelkabel op de 12V/10A-uitgang aan.
2. Sluit de optionele schakelkabel aan op het 12V-apparaat dat u wilt
voeden.
3. Druk op de bedieningsknop om het apparaat aan te zetten.
Het LED-lampje gebruiken
Het LED-lampje heeft 4 standen: standaard, strobe, SOS en uit. Om
het LED-lampje aan te zetten, houdt u de bedieningsknop 3 seconden
ingedrukt. Druk licht op de bedieningsknop om van stand te wisselen.
Wat zit er in de doos?
PB80-powerbank x 1 Voertuiglader (gelijkstroom) x 1
Schakelaarkabel A x 1 Startkabel met klemmen x 1
Schakelaarkabel B x 1 Bescherm- en draagtas x 1
Connectors voor mobiele telefoon/
smartphone/tablet x 8
Beschermende siliconenhoes x 1
Laptop-/notebookconnectors x 8 Gebruiksaanwijzing x 1
Thuislader (wisselstroom) x 1
Technical specifications
Afmetingen 160 x 75 x 28mm
Gewicht 420g
Accucapaciteit 44,4 Wh
Uitvoer 5 V 2 A; 12 V 10 A; 19 V 3,5 A
Invoer 12 V 1 A
Tijd voor volledig opladen 3 uur
Aanloopstroom 2,00 A
Piekstroom 4,00 A
Bedrijfstemperatuur -20° ~ 60°

NL • 13
Vragen en antwoorden
V: Hoe zet ik mijn PB80 uit?
A: De PB80 wordt automatisch uitgezet wanneer het laadproces is
voltooid of na een korte periode van inactiviteit.
V: Hoe vaak kan de PB80 mijn mobiele telefoon opladen?
A: Ongeveer 7 keer.
V: Hoelang duurt het om mijn mobiele telefoon of smartphone met de
PB80 op te laden?
A: Ongeveer 1 uur.
V: Hoelang kan ik een laptop of notebook gebruiken via een volledig
opgeladen PB80?
A: 2 à 3 uur
V: Hoelang behoudt de PB80 zijn lading als er geen gebruik van wordt
gemaakt?
A. 6 à 12 maanden; het is echter raadzaam het apparaat elke 6
maanden op te laden.
Probleemoplossing
Probleem Mogelijke oorzaak Oplossing
Er gebeurt niets
wanneer ik op de
bedieningsknop druk.
Onderspanningsbeveiliging
is geactiveerd.
Sluit de thuis- of
voertuiglader op de
12V/1A-ingang aan om
de PB80 te resetten.
Mijn PB80 wordt warm
tijdens opladen of het
voeden van een laptop
of notebook.
De laadstroom is hoger
dan 3,5 A.
Verwijder de accu
uit de laptop of
notebook en gebruik
in plaats hiervan de
PB80 om het systeem
afzonderlijk te voeden.

NL • 14
!
!
!
Waarschuwing!
1. Zorg bij het jumpstarten van een voertuig dat de startkabel correct
en stevig is aangesloten op het startcontact van de PB80.
2. Zorg dat de klemmen van de startkabel goed zijn aangesloten op
de positieve (+) en negatieve (-) pool van de voertuigaccu voordat u
probeert uw voertuig te starten. Controleer vóór het bevestigen van de
klemmen of de accupolen schoon zijn. Probeer niet vaker dan 3 keer
achtereen uw voertuig te starten. Als u meer opeenvolgende pogingen
doet, raakt de PB80 beschadigd.
3. Bevestig de klemmen van de startkabel aan de juiste polen. Bij
bevestiging aan de verkeerde polen raakt de PB80 beschadigd
en vervalt de garantie.
4. Demonteer de PB80 niet; het apparaat bevat geen onderdelen die de
gebruiker zelf kan onderhouden. Als u de PB80 demonteert, loopt u het
risico op een schok en/of elektrische of mechanische risico’s. Bovendien
komt uw garantie hierdoor te vervallen.
Wees altijd voorzichtig wanneer u het apparaat gebruikt.
De PB80 is niet geschikt voor gebruik door jonge kinderen of personen met
lichamelijke beperkingen, tenzij onder toezicht.
Gebruik het apparaat niet als speelgoed.
Laat de PB80 niet nat worden.
Dompel de PB80 niet onder in water.
Gebruik de PB80 niet op plaatsen waar ontploffingsgevaar heerst, bijvoorbeeld
in de nabijheid van ontvlambare vloeistoffen, gassen of stof.
Verander of demonteer de PB80 niet.
Stel de PB80 niet bloot aan extreem hoge temperaturen.
Berg het apparaat niet op in ruimten waar de temperatuur boven 70°C kan
stijgen. Laad alleen op bij een omgevingstemperatuur tussen -20°C en 60°C.
Laad alleen op met de laders die bij de PB80 zijn geleverd.
In extreme omstandigheden kan accuvloeistof lekken. Veeg de vloeistof
! voorzichtig weg met een doek en vermijd contact met de huid. Bij contact
met de huid of ogen dient u onmiddellijk te spoelen met schoon water en
medische hulp in te roepen. Garantie

NL • 15
Garantie
U hebt standaard één jaar fabrieksgarantie op dit apparaat. Mocht u
om een of andere reden in de garantieperiode service aan uw apparaat
nodig hebben, stuurt u het dan aangetekend en goed verpakt naar:
The Returns Department,
Performance Products Limited,
Cleaver House, Sarus Court,
Manor Park, Cheshire WA7 1UL,
Engeland
Voegt u a.u.b. de volgende informatie bij:
(a) Uw naam, adres en een uitgebreide beschrijving van het probleem.
(b) Een telefoonnummer waarop u tijdens kantooruren bereikbaar bent.
(c) Het serienummer van het apparaat.
Afdanken van oude elektrische of
elektronische apparatuur (geldig in de Europese Unie)
Dit symbool op het product of de verpakking geeft
aan dat het product niet als huishoudelijk afval mag
worden behandeld. Het moet worden afgegeven bij
een geschikt inzamelingspunt voor het recyclen van
elektrische apparatuur. Door dit product op de juiste
wijze af te voeren, helpt u een mogelijke negatieve
impact op het milieu voorkomen. Het recyclen van
materiaal helpt natuurlijke bronnen te behouden.
Neem voor meer informatie over recycling contact op
met uw gemeente of de winkel waar u het product
hebt gekocht.
De accu/batterij weggooien
Vraag uw gemeentelijke afvaldienst naar de regels voor het afdanken
van accu’s en batterijen. Accu’s/batterijen mogen nooit bij het huisvuil
worden gegooid. Gebruik een batterij-inzamelingspunt indien
beschikbaar.

FR • 16
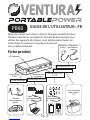
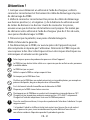
PB80 GUIDE DE L’UTILISATEUR • FR
Nous vous remercions d’avoir choisi le chargeur portable Ventura.
Veuillez respecter les consignes de sécurité de base lorsque vous
utilisez des appareils électriques. Lisez attentivement toutes les
instructions et conservez ce guide pour pouvoir
vous y référer aisément.
Fiche produit
Lampe torche
à DEL
Câble de
démarrage avec
pinces
Câble
multiconnecteur
B
Câble
multiconnecteur
A
Pour accessoires
pour voiture
12 V
Adaptateur
secteur
Adaptateur
pour allume-
cigare
Prise de démarrage Port de sortie 19 V 3,5 A
LED indicators
Touche de mise
en marche
Port de sortie USB
5 V 2 A
Port de sortie 12 V 10 A
Port d’entrée 12 V 1 A

FR • 17
Utilisation
Appuyez sur la touche de mise en marche pour vérifier le niveau de
charge de votre chargeur PB80.
Voyant Eteint 5 voyants
qui
clignotent
1 voyant
fixe 2 voyants
fixes 3 voyants
fixes 4 voyants
fixes 5 voyants
fixes
Niveau de
charge 0 % 10 % 20 % 40 % 60 % 80 % 100 %
Les voyants à DEL clignotent l’un après l’autre pendant le chargement.
Le niveau de charge actuel est indiqué par le nombre de voyants
allumés. Une fois le PB80 complètement chargé ou si la charge est
interrompue, les voyants s’éteignent.
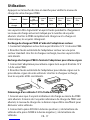
Recharge du chargeur PB80 à l’aide de l’adaptateur secteur
1. Connectez l’adaptateur secteur livré au port d’entrée 12 V 1 A de votre PB80.
2. Branchez l’autre extrémité de l’adaptateur secteur sur une prise
secteur standard. Une fois le chargeur rechargé, tous les voyants à DEL
sont éteints.
Recharge du chargeur PB80 à l’aide de l’adaptateur pour allume-cigare
1. Connectez l’adaptateur pour allume-cigare livré au port d’entrée 12 V
1 A de votre PB80.
2. Branchez l’autre extrémité de l’adaptateur pour allume-cigare sur la
prise allume-cigare de votre véhicule. Une fois le chargeur rechargé,
tous les voyants à DEL sont éteints.
Démarrage d’un véhicule 12 V à l’aide du chargeur
1. Assurez-vous que 3 voyants indicateurs de charge au moins du PB80
sont allumés. Si moins de 3 voyants indicateurs de charge du PB80 sont
allumés, le niveau de charge de ce dernier risque d’être insuffisant pour
démarrer votre véhicule.
2. Connectez la pince ROUGE à la borne positive (+) de la batterie du
véhicule et la pince NOIRE à la borne négative (-) de la batterie du
véhicule.

FR • 18
1 2 3 4 5
3. Connectez le câble de démarrage à la prise de démarrage.
4. Démarrez normalement le véhicule.
5. Lorsque le véhicule a démarré, veillez à déconnecter les pinces des
bornes de la batterie du véhicule dans les 30 secondes qui suivent.
Recharge d’un téléphone portable, d’un smartphone ou d’une tablette
1. Connectez le câble multiconnecteur B au port de sortie USB 5 V 2 A.
2. Sélectionnez le connecteur approprié et connectez-le à votre
téléphone portable, smartphone ou tablette.
3. Appuyez sur la touche de mise en marche pour commencer à charger
le périphérique.
Conseil d’utilisation : vous pouvez également utiliser le câble de charge
USB livré avec votre périphérique.
Recharge d’un ordinateur portable ou d’un notebook 19 V
1. Connectez le câble multiconnecteur A au port de sortie USB 19 V 3,5 A.
2. Sélectionnez le connecteur adapté à votre ordinateur portable ou votre
notebook, connectez-le au câble multiconnecteur A, puis raccordez-le à la
prise d’alimentation ou de charge de votre périphérique.
3. Appuyez sur la touche de mise en marche pour commencer à charger ou
à alimenter le périphérique.

FR • 19
Alimentation d’appareils électroniques et d’accessoires pour
voiture 12 V
1. Connectez le câble multiconnecteur facultatif à la prise de sortie 12 V 10 A.
2. Connectez le câble multiconnecteur facultatif à l’appareil 12 V que vous
souhaitez alimenter.
3. Appuyez sur la touche de mise en marche pour démarrer l’alimentation.
Utilisation de la lampe torche à DEL
4 modes d’éclairage vous sont proposés : standard, clignotement, SOS
et éteint. Pour mettre sous tension la lampe torche à DEL, appuyez
sur la touche de mise en marche et maintenez-la enfoncée pendant 3
secondes. Appuyez brièvement sur la touche de mise en marche pour
passer d’un mode à l’autre.
Contenu du coffret
Chargeur PB80 x 1 Adaptateur secteur CA x 1
Câble multiconnecteur A x 1 Adaptateur pour allume-cigare
DC x 1
Câble multiconnecteur B x 1 Câble de démarrage avec pinces x 1
Connecteurs pour téléphone portable/
smartphone/tablette x 8
Housse de protection x 1
Connecteurs pour ordinateurs portables/
notebook x 8
Housse de protection en silicone x 1
Guide de l'utilisateur x 1
Technical specifications
Dimensions 160 x 75 x 28 mm
Poids 420 g
Capacité de batterie 44,4 Wh
Sortie 5 V 2 A ; 12 V 10 A ; 19 V 3,5 A
Entrée 12 V 1 A
Durée de charge complète 3 heures
Courant de démarrage 200 A
Courant max. 400 A
Température d'exploitation -20° ~ 60°

FR • 20
Foire aux questions
Q : Que dois-je faire pour mettre hors tension le PB80 ?
R : Le PB80 s’arrête automatiquement une fois la charge terminée ou
après une courte période d’inactivité.
Q : Combien de fois le PB80 peut-il charger mon téléphone portable ?
R : Environ 7 fois
Q : Combien de temps prend le PB80 pour charger complètement mon
téléphone portable ou mon smartphone ?
R : Environ 1 heure
Q : Combien de temps le PB80 pourra-t-il alimenter un ordinateur
portable ou un notebook s’il est complètement chargé ?
R : Entre 2 et 3 heures
Q : Combien de temps le PB80 reste-t-il chargé lorsqu’il n’est pas utilisé ?
R : Entre 6 et 12 mois. Il est toutefois recommandé de le recharger tous
les 6 mois.
Résolution de problèmes
Problème Cause potentielle Solution
Il ne se passe rien
lorsque j’appuie sur
la touche de mise en
marche.
La protection contre
la sous-tension a été
activée.
Connectez l’adaptateur
secteur ou pour
allume-cigare à la prise
d’entrée 12 V 1 A pour
réinitialiser le PB80.
Le PB80 chauffe
lorsque je charge ou
que j’alimente un
ordinateur portable ou
un notebook.
Le courant de charge est
supérieur à 3,5 A.
Déconnectez la batterie
de l’ordinateur portable
ou du notebook et
utilisez le PB80 pour
l’alimenter
indépendamment.
La pagina sta caricando ...
La pagina sta caricando ...
La pagina sta caricando ...
La pagina sta caricando ...
La pagina sta caricando ...
La pagina sta caricando ...
La pagina sta caricando ...
La pagina sta caricando ...
La pagina sta caricando ...
La pagina sta caricando ...
La pagina sta caricando ...
La pagina sta caricando ...
La pagina sta caricando ...
La pagina sta caricando ...
La pagina sta caricando ...
La pagina sta caricando ...
La pagina sta caricando ...
La pagina sta caricando ...
La pagina sta caricando ...
La pagina sta caricando ...
La pagina sta caricando ...
La pagina sta caricando ...
La pagina sta caricando ...
La pagina sta caricando ...
-
 1
1
-
 2
2
-
 3
3
-
 4
4
-
 5
5
-
 6
6
-
 7
7
-
 8
8
-
 9
9
-
 10
10
-
 11
11
-
 12
12
-
 13
13
-
 14
14
-
 15
15
-
 16
16
-
 17
17
-
 18
18
-
 19
19
-
 20
20
-
 21
21
-
 22
22
-
 23
23
-
 24
24
-
 25
25
-
 26
26
-
 27
27
-
 28
28
-
 29
29
-
 30
30
-
 31
31
-
 32
32
-
 33
33
-
 34
34
-
 35
35
-
 36
36
-
 37
37
-
 38
38
-
 39
39
-
 40
40
-
 41
41
-
 42
42
-
 43
43
-
 44
44


Ventura PB80 Manuale utente
- Tipo
- Manuale utente
- Questo manuale è adatto anche per
in altre lingue
- français: Ventura PB80 Manuel utilisateur
- español: Ventura PB80 Manual de usuario
- Deutsch: Ventura PB80 Benutzerhandbuch
Altri documenti
-
BUTURE BR600 Manuale utente
-
BUTURE BR400 Manuale utente
-
Topdon Jumpsurge 3000 Manuale utente
-
GYS NOMAD POWER 10 Manuale del proprietario
-
Goalzero Venture Jump Guida utente
-
GYS NOMAD POWER 15 Manuale del proprietario
-
-
-
-