
CE2A1
Mini-note
User Guide

User Guide
2
Copyright©2008
All Rights Reserved - Printed in Taiwan
CE2A1 Mini-note User Guide
Original Issue: 2008/07
This manual guides you in setting up and using your new Mini-note.
Information in this manual has been carefully checked for accuracy and is
subject to change without notice.
No part of this manual may be reproduced, stored in a retrieval system, or
transmitted, in any form or by any means, electronic, mechanical, photocopy,
recording, or otherwise, without prior written permission.
Trademarks
Product names used herein are for identification purposes only and may be the
trademarks of their respective companies.
Microsoft, Windows XP, Windows Vista, and Windows Sound System are
trademarks of Microsoft Corporation.
VIA C7
TM
M is registered trademark of VIA Technologies, Inc.
Sound Blaster, Sound Blaster Pro are trademarks of Creative Technology.
All other brands or product names mentioned in this manual are trademarks or
registered trademarks of their respective companies.

Notebouide
3
FCC Information to User
Safety and Care Instructions
No matter what your level of experience with computers, please make sure you
read the safety and care instructions. This information can help protect you
and your computer from possible harm.
Radio and television interference
Warning: Use the specified shielded power cord and shielded signal cables
with this computer, so as not to interfere with radio and television reception. If
you use other cables, it may cause interference with radio and television
reception.
This equipment has been tested and found to comply with the limits for a
Class B digital device, pursuant to Part 15 of the FCC Rules. These limits are
designed to provide reasonable protection against harmful interference in a
residential installation. This equipment generates, uses and can radiate radio
frequency energy and, if not installed and used in accordance with the
instructions, may cause harmful interference to radio communications.
However, there is no guarantee that interference will not occur in a particular
installation. If this equipment does not cause harmful interference to radio or
television reception, which can be determined by turning the equipment off
and on, the user is encourage to try to correct the interference by one or more
of the following measures:
• Reorient or relocate the receiving antenna
• Increase the separation between the device and receiver
• Connect the device into an outlet on a circuit different from that to
which the receiver is connected.
• Consult the dealer or an experienced radio/television technician for help.

User Guide
4
You may find helpful the following booklet, prepared by the Federal
Communications Commission: Interference Handbook (stock number 004-
000-00345-4). This booklet is available from the U.S. Government Printing
Office, Washington, DC20402.
Warning: The user must not modify or change this computer without
approval. Modification could void authority to this equipment.
FCC RF Exposure
FCC RF Radiation Exposure Statement:
This Transmitter must not be co-located or operating in conjunction with any
other antenna or transmitter.
This equipment complies with FCC RF radiation exposure limits set forth for
an uncontrolled environment. This equipment should be installed and operated
with a minimum distance of 20 centimeters between the radiator and your
body.
15.247 (b)(4), the EUT meets the requirement that it be operated in a manner
that ensures the public is not exposed to radio frequency energy levels in
excess of the Commission’s guidelines (1.1307, 1.1310, 2.1091 and 2.1093)
5.105 Federal Communications Commission (FCC) Requirements, Part
15
This equipment has been tested and found to comply with the limits for a class
B digital device, pursuant to part 15 of the FCC Rules. These limits are
designed to provide reasonable protection against harmful interference in a
residential installation.
This equipment generates, uses and can radiate radio frequency energy and, if
not installed and used in accordance with the instructions, may cause harmful
interference to radio communications. However, there is no guarantee that

Notebouide
5
interference will not occur in a particular installation. If this equipment does
cause harmful interference to radio or television reception, which can be
determined by turning the equipment off and on, the user is encouraged to try
to correct the interference by one or more of the following measures:
---Reorient or relocate the receiving antenna.
---Increase the separation between the equipment and receiver.
---Connect the equipment into an outlet on a circuit different from that to
which the receiver is connected.
---Consult the dealer or an experienced radio/TV technician for help.
5.21 Regulatory information/Disclaimers
Installation and use of this Wireless LAN and Bluetooth devices must be in
strict accordance with the instructions included in the user documentation
provided with the product. Any changes or modifications (including the
antennas) made to this device that are not expressly approved by the
manufacturer may void the user’s authority to operate the equipment. The
manufacturer is not responsible for any radio or television interference caused
by unauthorized modification of this device, or the substitution of the
connecting cables and equipment other than manufacturer specified. It is the
responsibility of the user to correct any interference caused by such
unauthorized modification, substitution or attachment. Manufacturer and its
authorized resellers or distributors will assume no liability for any damage or
violation of government regulations arising from failing to comply with these
guidelines.

User Guide
Canadian Department of Communications Compliance
Statement
交通部電信總局
低功率電波輻射性電機管理辦法 (930322)
根據交通部 低功率管理辦法 規定:
第十二條 經型式認證合格之低功率射頻電機,非經許可,公司、商號或使用
者均不得擅自變更頻率、加大功率或變更原設計之特性及功能。
第十四條 低功率射頻電機之使用不得影響飛航安全及干擾合法通信;經發現
有干擾現象時,應立即停用,並改善至無干擾時方得繼續使用。前項合法通
信,指依電信法規定作業之無線電通信。低功率射頻電機須忍受合法通信或工
業、科學及醫療用電波輻射性電機設備之干擾。
低功率射頻電機技術規範 (920808)
4.7無線資訊傳輸設備(UNII):
4.7.5. 在5.25-5.35 秭赫頻帶內操作之無線資訊傳輸設備,限於室內使用。
4.7.6. 無線資訊傳輸設備須忍受合法通信之干擾且不得干擾合法通信;如造成
干擾,應立即停用,俟無干擾之虞,始得繼續使用。
4.7.7. 無線資訊傳輸設備的製造廠商應確保頻率穩定性,如依製造廠商使用手
冊上所述正常操作,發射的信號應維持於操作頻帶中。
6

Notebouide
7
電波障害自主規制について
この装置は、情報処理装置等電波障害自主規制協議会(VCCI)の基準に基
づくクラスB情報技術装置です。この装置は、家庭環境で使用することを目
的としていますが、この装置がラジオやテレビジョン受信機に近接して使用
されると、受信障害を引き起こすことがあります。取扱説明書に従って正し
い取り扱いをしてください。
Shielded Cables Notice
All connections to other computing devices must be made using shielded
cables to maintain compliance with FCC regulations.
Peripheral Devices Notice
Only peripherals (input/output devices, terminals, printers, etc) certified to
comply with Class B limits may be attached to this equipment. Operation with
non-certified peripherals is likely to result in interference to radio and TV
reception.
Optical Disk Drive Notice
The optical disk drive is Class 1 Laser Product.
Caution
Changes or modifications not expressly approved by the manufacturer may
void the user’s authority, which is granted by the Federal Communications
Commission, to operate this computer.
Use Conditions
This part complies with Part 15 of the FCC Rules. Operation is subject to the
following conditions: (1) this device may not cause harmful interference, and
(2) this device must accept any interference received, including interference
that may cause undesired operation.

User Guide
European Notice
For the following equipment: Notebook PC
Is herewith confirmed to comply with the requirements set out in the
Council Directive on the Approximation of the Laws of the Member
States relating to Electromagnetic Compatibility (89/336/EEC), Lowvoltage
Directive (73/23/EEC) and the Amendment Directive
(93/68/EEC), the procedures given in European Council Directive
99/5/EC and 89/3360EEC.
The equipment was passed. The test was performed according to the
following European standards:
EN 300 328-2 V.1.2.1 (2001-12)
EN 301 489-1 V.1.3.1 (2001-09) / EN 301 489-17 V.1.1.1 (2000-09)
EN 50371: 2002
EN 55022: 2006
EN 55024: 2001
EN 60950: 2000
EN 61000-3-2: 2000
EN 61000-3-3: 1995 + A1: 2001
8

Notebouide
9
802.11b and 802.11g Restrictions:
- European standards dictate maximum radiated transmit power of 100mW
EIRP and frequency range 2.400-2.4835GHz;
- In France, the equipment must be restricted to the 2.4465-2.4835GHz
frequency range and must be restricted to indoor use."

User Guide
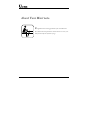
About Your Mini-note
Congratulation for having purchased your new Mini-note.
This Mini-note incorporates the newest features to serve your
daily needs easily for anywhere you go.
10

Notebouide
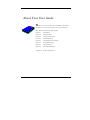
About Your User Guide
Welcome to your New Mini-note User Guide. This manual
introduces you to the basic concepts of your new Mini-note.
This manual is divided into eight chapters.
Chapter 1 Introduction
Chapter 2 Getting Started
Chapter 3 Using Your Mini-note
Chapter 4 Multimedia Setup
Chapter 5 Connecting External devices
Chapter 6 System BIOS Setup
Chapter 7 Upgrade Options
Chapter 8 Care and Maintenance
Appendix A System Specifications
11

User Guide
12
Table of Contents
ABOUT YOUR MINI-NOTE................................................................. 10
ABOUT YOUR USER GUIDE............................................................... 11
1 INTRODUCTION............................................................................. 17
1.1 FEATURE HIGHLIGHT .................................................................... 18
1.2 UNPACKING THE MINI-NOTE ......................................................... 19
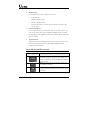
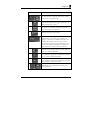
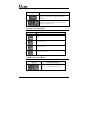
1.3 THE INSIDE OF THE MINI-NOTE...................................................... 20
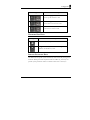
Mini-note Status Icons.................................................................. 23
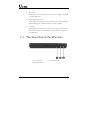
1.4 T
HE FRONT SIDE OF THE MINI-NOTE ............................................. 24
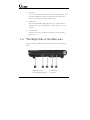
1.5 T
HE LEFT SIDE OF THE MINI-NOTE................................................ 25
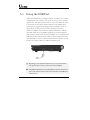
1.6 THE RIGHT SIDE OF THE MINI-NOTE.............................................. 26
1.7 THE UNDERSIDE OF THE MINI-NOTE.............................................. 28
1.8 MINI-NOTE ACCESSORIES.............................................................. 29
2 GETTING STARTED...................................................................... 31
2.1 USING THE BATTERY PACK ........................................................... 32
Extending Battery Life.................................................................. 34
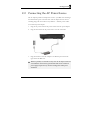
2.2 CONNECTING THE AC POWER SOURCE.......................................... 35
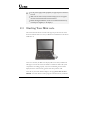
2.3 STARTING YOUR MINI-NOTE......................................................... 36
2.4 ADJUSTING THE DISPLAY CONTROLS ............................................ 37
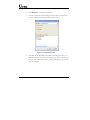
2.5 DEVICE DRIVERS INSTALLATION................................................... 37
Installing Windows XP from Optical Disk Drive............................ 38
Installing the Chipset Driver........................................................ 38
Installing the VGA Device Driver................................................ 39
Installing the Audio Device Driver .............................................. 39
Installing the Glide Pad Device Driver........................................ 40
Installing the Wireless LAN Device Driver.................................. 40
Installing Bluetooth Device Driver.............................................. 41

Notebouide
13
Installing the LAN Device Driver................................................. 41
Installing the Care Reader Device Driver.................................... 42
2.6 T
URNING OFF YOUR MINI-NOTE.................................................... 42
3 USING YOUR MINI-NOTE............................................................ 45
3.1 STARTING YOUR OPERATING SYSTEM........................................... 46
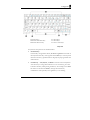
3.2 UNDERSTANDING THE KEYBOARD FUNCTIONS..............................46
Basic Keyboard Functions ...........................................................48
Cursor Control Keys..................................................................... 50
Screen Control Keys.....................................................................50
Windows Hot Keys........................................................................51
Special Function Keys.................................................................. 51
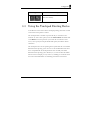
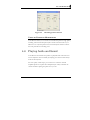
3.3 USING THE TOUCHPAD POINTING DEVICE ....................................... 53
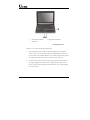
3.4 CONFIGURING YOUR SCREEN DISPLAY ......................................... 55
Possible Display Configurations.................................................. 55
Changing the Display Properties under Windows.................................. 56
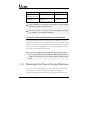
3.5 KNOWING THE POWER SAVING FEATURES .................................... 56
3.6 WORKING WITH THE BUILT-IN HDD............................................... 58
3.7 USING FLASH MEMORY CARDS..................................................... 58
Flash Memory Card .....................................................................58
4 FUN WITH MULTIMEDIA .................................................................. 61
4.1 MULTIMEDIA FEATURES............................................................... 62
4.2 AUDIO SOUND SYSTEM FEATURES ................................................62
4.3 SETTING UP THE AUDIO DRIVER PROPERTIES ................................ 63
4.4 WINDOWS MULTIMEDIA PROGRAMS .............................................63
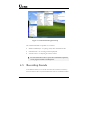
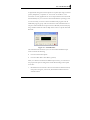
4.5 RECORDING SOUNDS .....................................................................64
Using an External Microphone.................................................... 67
4.6 PLAYING AUDIO AND SOUND ........................................................ 67
Using the Windows Media Player................................................ 68
4.7 P
LAYING VIDEO AND MPEG FILES ............................................... 68

User Guide
14
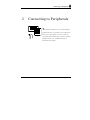
5 CONNECTING TO PERIPHERALS............................................. 71
5.1 USING THE USB PORT................................................................... 72
5.2 USING THE EXTERNAL MONITOR PORT................................................. 73
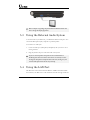
5.3 USING THE EXTERNAL AUDIO SYSTEM ......................................... 74
5.4 USING THE LAN PORT .................................................................. 74
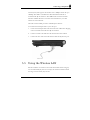
5.5 USING THE WIRELESS LAN........................................................... 75
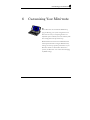
6 CUSTOMIZING YOUR MINI-NOTE.............................................. 77
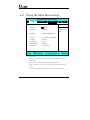
6.1 RUNNING THE BIOS SETUP PROGRAM .......................................... 78
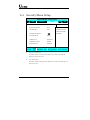
6.2 USING THE MAIN MENU SETUP..................................................... 80
6.2.1 Internal HDD Sub-Menu................................................... 82
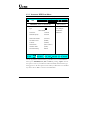
6.3 U
SING THE ADVANCED CMOS SETUP........................................... 83
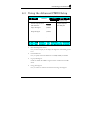
6.4 S
ECURITY MENU SETUP ................................................................ 84
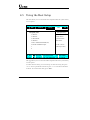
6.5 USING THE BOOT SETUP................................................................ 86
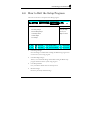
6.6 HOW TO EXIT THE SETUP PROGRAM.............................................. 87
6.7 HOW TO UPGRADE THE BIOS........................................................ 88
7 USING OPTIONS............................................................................. 89
SYSTEM UPGRADE................................................................................... 90
7.1 HARD DISK UPGRADE ................................................................... 90
7.2 WIRELESS MODULE INSTALLATION............................................... 91
8 CARING FOR YOUR MINI-NOTE............................................... 93
8.1 IMPORTANT SAFETY INSTRUCTIONS .............................................. 94
8.2 CLEANING YOUR MINI-NOTE ........................................................ 96
8.3 MAINTAINING THE LCD QUALITY ................................................ 97
8.4 MAINTAINING YOUR HARD DISK .................................................. 97
8.5 BATTERY CARE GUIDELINES......................................................... 98
8.6 WHEN YOU TRAVEL...................................................................... 99
APPENDIX A SYSTEM SPECIFICATION...................................... 101

Notebouide
15
SYSTEM SPECIFICATION......................................................................... 102
Processor Unit............................................................................102
System Memory...........................................................................102
LCD Display............................................................................... 102
VGA System ................................................................................ 102
Storage........................................................................................103
Audio System ..............................................................................103
Touchpad.................................................................................... 103
Keyboard .................................................................................... 103
Flash BIOS ................................................................................. 103
I/O Ports..................................................................................... 103
Wireless devices.......................................................................... 104
AC/DC Power Supply Adapter................................................... 104
Battery ........................................................................................ 104
Weight and Dimension ...............................................................104

User Guide
16
This page is intended to be blank.

Introduction1
1 Introduction
Your Mini-note is a fully Windows® compatible
portable computer. Slim, sleek ultra-portable
computer. This device matches all the demands for
high performance computing and multimedia
technology.
Your Mini-note runs a wide variety to customize your
special requirements, personal productivity,
entertainment, professional applications and
especially ideal for use on the road.
17

User Guide
18
1.1 Feature Highlight
Before we identify each part of your Mini-note, we will first introduce you to
other notable features of your Mini-note.
Processing Unit
• Your Mini-note runs on VIA C7
TM
- M microprocessor that is integrated
with 128KB L2 Cache. Check with your dealer on the CPU type and
speed.
• Fully compatible with an entire library of PC software based on operating
systems such as Windows XP.
Memory
This Mini-note provides one memory slot for installing DDRII SDRAM 200-
pin SODIMM modules up to 2GB using 512MB, 1024MB, 2048MB DDRII
SDRAM modules.
Wide Screen LCD Display
Provides 8.9" 1024 x 600 (16:10) wide screen LCD display.
Wireless LAN
IEEE 802.11b/g, Mini PCI card.
USB 2.0
Provides two USB2.0 ports for fastest I/O data transmission.
Graphic System
Provides blazing graphics controller embedded in VIA VX800 chipset

Introduction1
19
PCI Local Bus Architecture
32-bit PCI Enhanced IDE optimizes the data transfer between the CPU and
PATA hard disk drives. Support ultra DMA ATA-66 PIO Mode up to PIO
Mode 4, bus mastering for LBA Scheme.
Audio System
Full-duplex 16-bit stereo audio system output. Sound Blaster compatible.
Flash BIOS
Flash BIOS allows you to easily upgrade the System BIOS using the Phoenix
Flash utility program.
Power and System Management
• Integrated SMM (System Management Mode) on system chipset that shuts
down components not in use to reduce power consumption. To execute
power management, you can set up the parameter in Power Options
properties by pointing your mouse to Control Panel of Windows.
• Closing the Mini-note (lowering the cover) allows you to suspend the
system operation instantly and resume at the press of the power button.
• System Password for User and Supervisor included on the BIOS SETUP
Program to protect unauthorized use of your Mini-note.
1.2 Unpacking the Mini-note
Your Mini-note comes securely packaged in a sturdy cardboard shipping
carton. Upon receiving your Mini-note, open the carton and carefully remove
the contents. In addition to this User Guide, the shipping carton should also
contain the following items:

User Guide
20
; The Mini-note
; An AC Adapter and AC Power Cord
; Li-Ion Battery Pack
; CD Driver Utility and User Guide
Carefully inspect each component to make sure that nothing is missing and/or
damaged. Be sure to save the shipping materials and the carton in case you
need to ship the Mini-note or store for an extended period of time.
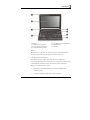
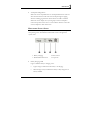
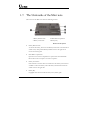
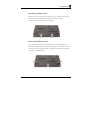
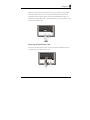
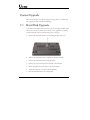
1.3 The Inside of the Mini-note
The Mini-note is compact with features on every side. First, look at the
inside of the system. The following sections describe inside features.
La pagina si sta caricando...
La pagina si sta caricando...
La pagina si sta caricando...
La pagina si sta caricando...
La pagina si sta caricando...
La pagina si sta caricando...
La pagina si sta caricando...
La pagina si sta caricando...
La pagina si sta caricando...
La pagina si sta caricando...
La pagina si sta caricando...
La pagina si sta caricando...
La pagina si sta caricando...
La pagina si sta caricando...
La pagina si sta caricando...
La pagina si sta caricando...
La pagina si sta caricando...
La pagina si sta caricando...
La pagina si sta caricando...
La pagina si sta caricando...
La pagina si sta caricando...
La pagina si sta caricando...
La pagina si sta caricando...
La pagina si sta caricando...
La pagina si sta caricando...
La pagina si sta caricando...
La pagina si sta caricando...
La pagina si sta caricando...
La pagina si sta caricando...
La pagina si sta caricando...
La pagina si sta caricando...
La pagina si sta caricando...
La pagina si sta caricando...
La pagina si sta caricando...
La pagina si sta caricando...
La pagina si sta caricando...
La pagina si sta caricando...
La pagina si sta caricando...
La pagina si sta caricando...
La pagina si sta caricando...
La pagina si sta caricando...
La pagina si sta caricando...
La pagina si sta caricando...
La pagina si sta caricando...
La pagina si sta caricando...
La pagina si sta caricando...
La pagina si sta caricando...
La pagina si sta caricando...
La pagina si sta caricando...
La pagina si sta caricando...
La pagina si sta caricando...
La pagina si sta caricando...
La pagina si sta caricando...
La pagina si sta caricando...
La pagina si sta caricando...
La pagina si sta caricando...
La pagina si sta caricando...
La pagina si sta caricando...
La pagina si sta caricando...
La pagina si sta caricando...
La pagina si sta caricando...
La pagina si sta caricando...
La pagina si sta caricando...
La pagina si sta caricando...
La pagina si sta caricando...
La pagina si sta caricando...
La pagina si sta caricando...
La pagina si sta caricando...
La pagina si sta caricando...
La pagina si sta caricando...
La pagina si sta caricando...
La pagina si sta caricando...
La pagina si sta caricando...
La pagina si sta caricando...
La pagina si sta caricando...
La pagina si sta caricando...
La pagina si sta caricando...
La pagina si sta caricando...
La pagina si sta caricando...
La pagina si sta caricando...
La pagina si sta caricando...
La pagina si sta caricando...
La pagina si sta caricando...
La pagina si sta caricando...
-
 1
1
-
 2
2
-
 3
3
-
 4
4
-
 5
5
-
 6
6
-
 7
7
-
 8
8
-
 9
9
-
 10
10
-
 11
11
-
 12
12
-
 13
13
-
 14
14
-
 15
15
-
 16
16
-
 17
17
-
 18
18
-
 19
19
-
 20
20
-
 21
21
-
 22
22
-
 23
23
-
 24
24
-
 25
25
-
 26
26
-
 27
27
-
 28
28
-
 29
29
-
 30
30
-
 31
31
-
 32
32
-
 33
33
-
 34
34
-
 35
35
-
 36
36
-
 37
37
-
 38
38
-
 39
39
-
 40
40
-
 41
41
-
 42
42
-
 43
43
-
 44
44
-
 45
45
-
 46
46
-
 47
47
-
 48
48
-
 49
49
-
 50
50
-
 51
51
-
 52
52
-
 53
53
-
 54
54
-
 55
55
-
 56
56
-
 57
57
-
 58
58
-
 59
59
-
 60
60
-
 61
61
-
 62
62
-
 63
63
-
 64
64
-
 65
65
-
 66
66
-
 67
67
-
 68
68
-
 69
69
-
 70
70
-
 71
71
-
 72
72
-
 73
73
-
 74
74
-
 75
75
-
 76
76
-
 77
77
-
 78
78
-
 79
79
-
 80
80
-
 81
81
-
 82
82
-
 83
83
-
 84
84
-
 85
85
-
 86
86
-
 87
87
-
 88
88
-
 89
89
-
 90
90
-
 91
91
-
 92
92
-
 93
93
-
 94
94
-
 95
95
-
 96
96
-
 97
97
-
 98
98
-
 99
99
-
 100
100
-
 101
101
-
 102
102
-
 103
103
-
 104
104


First International Computer EUNCE2A1A Manuale utente
- Tipo
- Manuale utente
- Questo manuale è adatto anche per
in altre lingue
Documenti correlati
Altri documenti
-
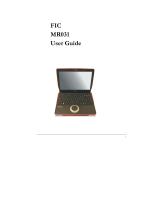 FIC MR031 Manuale utente
-
Optima Centoris V470 Manuale utente
-
Lenovo 06774CU Manuale utente
-
Lenovo G555 Manuale utente
-
Lenovo G550G Manuale utente
-
-
Gigabyte G-MAX N203 Manuale utente
-
Medion E 1311 Netbook Manuale utente
-
 Shintek FHUB16205 Scheda dati
-
Creative SB0100 Manuale utente

