
EN
USER AND SAFETY GUIDE
1 button 4 actions
ShellyBLU Button1
Read before use
This document contains important technical
and safety information about the device, its
safety use and installation.
⚠CAUTION! Before beginning the installa-
tion, please read carefully and entirely this
guide and any other documents accompany-
ing the device. Failure to follow the installation
procedures could lead to malfunction, danger
to your health and life, violation of law or re-
fusal of legal and/or commercial guarantee (if
any). Allterco Robotics EOOD is not responsi-
ble for any loss or damage in case of incor-
rect installation or improper operation of this
device due to failure of following the user and
safety instructions in this guide.
Shelly® devices are delivered with factory-in-
stalled rmware. If rmware updates are
necessary to keep the devices in conformity,
including security updates, Allterco Robotics
EOOD will provide the updates free of charge
through the device Embedded Web Interface
or the Shelly mobile application, where the
information about the current rmware ver-
sion is available. The choice to install or not
the device rmware updates is the user’s sole
responsibility. Allterco Robotics EOOD shall
not be liable for any lack of conformity of the
device caused by failure of the user to install
the provided updates in a timely manner.
Product Introduction
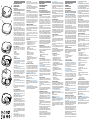
ShellyBLU Button1 (the Device) is a Bluetooth
button, which helps you easily activate and
deactivate any device or scene with just a
click. (g.1)
• A: Button
• B: LED indication ring
• C: Key ring bracket
• D: Buzzer
• E: Back cover
Installation Instructions
⚠CAUTION! Keep device away from liquids
and moisture. The device shouldn’t be used in
places with high humidity.
⚠CAUTION! Do not use if the Device has
been damaged!
⚠CAUTION! Do not attempt to service or re-
pair the Device yourself!
⚠CAUTION! The Device may be connected
wirelessly and may control electric circuits and
appliances. Proceed with caution! Irresponsi-
ble use of the Device may lead to malfunction,
danger to your life or violation of the law.
Inserting the battery
1. Open gently the Device back cover using
your thumb nail, screwdriver or another at
object as shown on g. 2.
2. Slide in the supplied battery as shown on
g. 2.
⚠CAUTION! Pay attention to the battery po-
larity!
3. Replace the back cover by pressing it to
the Device as shown on g. 2 until you hear
a clicking sound.
Using ShellyBLU Button1
Pressing the button will cause the Device to
start transmitting signals for one second in
compliance with the BT Home format. Learn
more at https://bthome.io.
ShellyBLU Button1 has advanced security fea-
ture and supports encrypted mode.
ShellyBLU Button1 supports multi-click - sin-
gle, double, triple and long press.
The LED indication will emit the same num-
ber of ashes as the button presses and the
buzzer - the corresponding number of beeps.
To pair ShellyBLU Button1 with another Blue-
tooth device press and hold the Device button
for 10 sec.
The device will await connection for the next
one minute. The available Bluetooth charac-
teristics are described in the ocial Shelly API
documentation at:
https://shelly.link/ble
ShellyBLU Button1 features beacon mode. If
enabled, the Device will emit beacons every
8 second, and can be discovered or used for
DE
BENUTZER- UND
SICHERHEITSHANDBUCH
1 Taste 4 Aktionen
ShellyBLU Button1
Bitte vor Gebrauch durchlesen
Dieses Dokument enthält wichtige technische
und sicherheitstechnische Informationen über
das Gerät und seine sichere Verwendung und
Installation.
⚠ACHTUNG! Bevor Sie mit der Installation
beginnen, lesen Sie bitte die Begleitdokumen-
tation sorgfältig und vollständig durch. Die
Nichtbeachtung der empfohlenen Verfahren
kann zu Fehlfunktionen, Lebensgefahr oder
Gesetzesverstößen führen. Allterco Robotics
EOOD haftet nicht für Verluste oder Schäden im
Falle einer falschen Installation oder Bedienung
dieses Geräts.
Shelly® Geräte werden mit werkseitig instal-
lierter Firmware ausgeliefert. Um die Geräte
konform zu halten, stellt Allterco Robotics
EOOD die notwendigen Firmware-Updates, ein-
schließlich der Sicherheitsupdates, kostenlos
über die im Gerät eingebettete Web-Schnitt-
stelle sowie über die Shelly-App zur Verfügung.
Die Entscheidung, die Firmware-Updates des
Geräts zu installieren oder nicht, obliegt der al-
leinigen Verantwortung des Benutzers. Allterco
Robotics EOOD haftet nicht für Konformitäts-
mängel des Geräts, die darauf zurückzuführen
sind, dass der Benutzer die bereitgestellten
Updates nicht rechtzeitig installiert hat.
Produktvorstellung
ShellyBLU Button1 (das Gerät) ist ein Bluetooth-
Taster, mit dem jedes Gerät oder jede Szene mit
nur einem Klick einfach aktiviert oder deakti-
viert werden kann. (Abb. 1)
• A: Taste
• B: LED-Anzeigering
• C: Halterung für Schlüsselanhänger
• D: Buzzer
• E: Hintere Abdeckung
Installationsanleitung
⚠VORSICHT! Halten Sie das Gerät von Flüs-
sigkeit und Feuchtigkeit fern. Das Gerät sollte
nicht in Umgebung mit hoher Feuchtigkeit ver-
wendet werden.
⚠VORSICHT! Verwenden Sie das Gerät nicht,
wenn es beschädigt ist!
⚠VORSICHT! Versuchen Sie nicht, das Gerät
selbst zu warten oder reparieren!
⚠VORSICHT! Das Gerät kann drahtlos verbun-
den werden und dabei elektrische Schaltkreise
und Geräte steuern. Mit Vorsicht fortfahren! Un-
verantwortlicher Umgang mit dem Gerät kann
zu Fehlfunktionen, Lebensgefahr oder Gesetz-
verstoß führen
Einlegen der Batterie
1. Öffnen Sie vorsichtig die Abdeckung der
Geräterückseite mit einem achen, stumpfen
Gegenstand, wie in Abb. 2 dargestellt.
2. Schieben Sie die mitgelieferte Batterie wie in
Abb. 2 gezeigt ein.
⚠CAUTION! Achten Sie auf die Polarität der
Batterie!
3. Bringen Sie die hintere Abdeckung wieder an,
indem Sie sie auf das Gerät drücken, bis Sie ein
Klickgeräusch hören (siehe Abb. 2).
ShellyBLU Button1 verwenden
Durch Drücken der Taste beginnt das Gerät mit
der Übertragung von Signalen für eine Sekunde
in Übereinstimmung mit dem BT Home-For-
mat. Erfahren Sie mehr unter https://bthome.io.
ShellyBLU Button1 verfügt über erweiterte
Sicherheitsfunktionen und unterstützt den ver-
schlüsselten Modus.
ShellyBLU Button1 unterstützt Mehrfachklicks
- einfaches, doppeltes, dreifaches und langes
Drücken.
Die LED-Anzeige blinkt so oft, wie die Taste ge-
drückt wurde, und der Buzzer gibt die entspre-
chende Anzahl von Signaltönen aus.
Um den ShellyBLU Button1 mit einem anderen
Bluetooth-Gerät zu koppeln, halten Sie die Gerä-
tetaste für 10 Sekunden gedrückt.
Das Gerät wartet eine Minute lang auf die
Verbindung. Die verfügbaren Bluetooth-Eigen-
schaften sind in der oziellen Shelly-API-Doku-
mentation beschrieben unter:
IT
GUIDA ALL‘USO E ALLA
SICUREZZA
1 pulsante 4 azioni
ShellyBLU Button1
Leggere prima dell‘uso
Questo documento contiene importanti infor-
mazioni tecniche e di sicurezza sul dispositivo
e sul suo uso e installazione in sicurezza.
⚠ATTENZIONE! Prima di iniziare l’installazio-
ne leggere attentamente e completamente la
documentazione allegata. La mancata osser-
vanza delle procedure consigliate potrebbe
portare a malfunzionamenti, pericolo per la
vita o violazione della legge. Allterco Robotics
EOOD non è responsabile per eventuali perdite
o danni in caso di installazione o funzionamen-
to errati di questo dispositivo.
I dispositivi Shelly® vengono consegnati con
un rmware installato in fabbrica. Se sono
necessari aggiornamenti del rmware per man-
tenere i dispositivi in conformità, compresi gli
aggiornamenti di sicurezza, Allterco Robotics
EOOD fornirà gli aggiornamenti gratuitamente
attraverso l‘interfaccia web incorporata del di-
spositivo o l‘applicazione mobile Shelly, dove
sono disponibili le informazioni sulla versione
corrente del rmware. La scelta di installare o
meno gli aggiornamenti del rmware del dispo-
sitivo è di esclusiva responsabilità dell‘utente.
Allterco Robotics EOOD non è responsabile
per qualsiasi mancanza di conformità del di-
spositivo causata dalla mancata installazione
degli aggiornamenti forniti dall‘utente in modo
tempestivo.
Introduzione al prodotto
ShellyBLU Button1 (il Dispositivo) è un pulsante
Bluetooth, che ti aiuta ad attivare e disattivare
facilmente qualsiasi dispositivo o scena con un
semplice clic. (g. 1)
• A: Pulsante
• B: Anello di indicazione LED
• C: Supporto portachiavi
• D: Buzzer
• E: Copertina posteriore
Istruzioni per l‘installazione
⚠ATTENZIONE! Pericolo di folgorazione. Te-
nere il dispositivo lontano da liquidi e umidità.
Il dispositivo non deve essere utilizzato in luo-
ghi con elevata umidità.
⚠ATTENZIONE! Non utilizzare se il Dispositi-
vo è stato danneggiato!
⚠ATTENZIONE! Non tentare di riparare o ri-
parare il Dispositivo da soli!
⚠ATTENZIONE! Il Dispositivo può essere
connesso in modalità wireless e può controlla-
re circuiti elettrici ed elettrodomestici. Procedi
con cautela! L‘uso irresponsabile del Disposi-
tivo può causare malfunzionamenti, pericolo
per la vita o violazione della legge.
Inserimento della batteria
1. Aprire delicatamente il coperchio posteriore
del dispositivo utilizzando l‘unghia del pollice,
un cacciavite o un altro oggetto piatto come
mostrato in g. 2.
2. Inserire la batteria in dotazione come mo-
strato in g. 2.
⚠ATTENZIONE! Prestare attenzione alla po-
larità della batteria!
3. Riposizionare il coperchio posteriore pre-
mendolo contro il dispositivo nché non si sen-
te un clic come mostrato in g. 2.
Utilizzo del pulsante Shelly Blu 1
Premendo il pulsante, il Dispositivo inizierà a
trasmettere segnali per un secondo in confor-
mità con il formato BT Home. Scopri di più su
https://bthome.io.
ShellyBLU Button1 ha funzionalità di sicurezza
avanzate e supporta la modalità crittografata.
ShellyBLU Button1 supporta il multi-clic: pres-
sione singola, doppia, tripla e lunga.
L‘indicazione LED emetterà lo stesso numero
di lampeggi delle pressioni del pulsante e del
cicalino - il numero corrispondente di bip.
Per accoppiare ShellyBLU Button1 con un altro
dispositivo Bluetooth, tieni premuto il pulsante
del dispositivo per 10 secondi.
Il dispositivo attenderà la connessione per il
prossimo minuto. Le caratteristiche Bluetooth
disponibili sono descritte nella documentazio-
presence detection.
This mode allows also remote activating of
the Device buzzer for 30 seconds (e.g. to nd
a lost Device nearby).
To restore the device conguration to factory
settings, press and hold the button for 30 sec-
onds short after inserting the battery.
Initial Inclusion
If you choose to use the Device with the Shelly
Cloud mobile application and Shelly Cloud
service, instructions on how to connect the
Device to the Cloud and control it through the
Shelly App can be found in the “App Guide”.
The Shelly mobile application and Shelly
Cloud service are not conditions for the De-
vice to function properly. This Device can be
used standalone or with various other home
automation platforms and protocols.
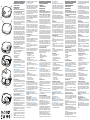
Replacing the battery
1. Open the back cover as shown on g. 2.
2. Extract the exhausted battery using your
thumb nail, screwdriver or another at object.
as shown on g. 3.
3. Slide in a new battery as shown on g. 2
⚠CAUTION! Use only 3 V CR2032 or com-
patible battery! Pay attention to the battery
polarity!
3. Replace the back cover by pressing it to
the Device until you hear a clicking sound as
shown on g. 2.
Specications
• Dimensions: 36x36x6 mm / 1.44х1.44х0.25 in
• Weight with battery: 9 g / 0.3 oz
• Working temperature: -20°C to 40°C
• Humidity 30 % to 70 % RH
• Power supply: 1x 3 V CR2032 battery
(included)
• Battery life: up to 2 years
• Multi-click support: Up to 4 possible
actions
• Radio protocol: Bluetooth
• RF band: 2400 - 2483.5 MHz
• Max. RF power: < 4 dBm
• Beacon function: Yes
• Encryption: AES encryption (CCM mode)
• Operational range (depending on local
conditions):
-up to 30 m outdoors
-up to 10 m indoors
Declaration of conformity
Hereby, Allterco Robotics EOOD declares that
the radio equipment type ShellyBLU Button1
in compliance with Directive 2014/53/EU,
2014/35/EU, 2014/30/EU, 2011/65/EU. The
full text of the EU declaration of conformity
is available at the following internet address:
https://shelly.link/blu-button-1_DoC
Manufacturer: Allterco Robotics EOOD
Address: 103 Cherni vrah Blvd., 1407 Soa,
Bulgaria
Tel.: +359 2 988 7435
E-mail: support@shelly.cloud
Ocial website: https://www.shelly.cloud
Changes in the contact information data are
published by the Manufacturer on the ocial
website.
https://www.shelly.cloud
All rights to the trademark Shelly® and other
intellectual rights associated with this Device
belong to Allterco Robotics EOOD.
https://shelly.link/ble
ShellyBLU Button1 verfügt über einen Beacon-
Modus. Wenn er aktiviert ist, sendet das Gerät
alle 8 Sekunden ein Beacon aus und kann so
entdeckt oder zur Anwesenheitserkennung ver-
wendet werden.
In diesem Modus kann auch der Buzzer des
Geräts aus der Ferne für 30 Sekunden aktiviert
werden (z. B. um ein verlorenes Gerät in der
Nähe zu nden).
Um die Gerätekonguration auf die Werksein-
stellungen zurückzusetzen, halten Sie die Taste
nach dem Einlegen der Batterie kurz 30 Sekun-
den lang gedrückt.
Erstmalige Einbindung
Wenn Sie sich dafür entscheiden, das Gerät
mit der Shelly Cloud App und dem Shelly Cloud
Service zu verwenden, nden Sie Anweisungen
zur Verbindung des Geräts mit der Cloud und
zur Steuerung über die Shelly App im “App
Guide”. Die Shelly Mobile App und der Shelly
Cloud Service sind keine Voraussetzung für das
ordnungsgemäße Funktionieren des Geräts.
Dieses Gerät kann alleine, sowie mit verschie-
denen anderen Hausautomatisierungsdiensten
und -anwendungen verwendet werden.
Austausch der Batterie
1. Öffnen Sie die hintere Abdeckung wie in Abb.
2 gezeigt.
2. Nehmen Sie die leere Batterie mit dem Dau-
mennagel, einem Schraubendreher oder einem
anderen achen Gegenstand heraus, wie in
Abb. 3 gezeigt.
3. Schieben Sie eine neue Batterie ein, wie in
Abb. 2 gezeigt.
⚠CAUTION! Verwenden Sie nur 3 V CR2032
oder eine kompatible Batterie! Achten Sie auf
die Polarität der Batterie!
3. Bringen Sie die hintere Abdeckung wieder an,
indem Sie sie auf das Gerät drücken, bis Sie ein
Klickgeräusch hören (siehe Abb. 2).
Technische Daten
• Abmessungen: 36x36x6 mm /
1.44х1.44х0.25 in
• Gewicht mit Batterie: 9 g / 0.3 oz
• Arbeitstemperatur -20°C bis 40°C
• Luftfeuchtigkeit 30 % bis 70 % RH
• Stromversorgung: 1x 3 V CR2032-Batterie
(im Lieferumfang enthalten)
• Lebensdauer der Batterie: bis zu 2 Jahre
• Unterstützung von Mehrfachklicks: Bis zu 4
mögliche Aktionen
• Funkprotokoll: Bluetooth
• Frequenzband: 2400 - 2483.5 MHz
• Max. Sendeleistung in Frequenzband:
< 4 dBm
• Beacon-Funktion: Ja
• Verschlüsselung: AES-Verschlüsselung
(CCM-Modus)
• Reichweite (abhängig von den baulichen
Gegebenheiten):
-bis zu 30 m im Freien,
-bis zu 10 m in Innenräumen
Konformitätserklärung
Hiermit erklärt Allterco Robotics EOOD, dass
die Funkanlage Typ ShellyBLU Button1 der
Richtlinie 2014/53/EU, 2014/35/EU, 2014/30/
EU, 2011/65/EU entspricht. Den vollständigen
Text der EU-Konformitätserklärung nden Sie
unter folgender Internetadresse:
https://shelly.link/blu-button-1_DoC
Hersteller: Allterco Robotics EOOD
Adresse: 103 Cherni vrah Blvd., 1407 Soa,
Bulgarien
Tel.: +359 2 988 7435
E-Mail: support@shelly.cloud
Ozielle Website: https://www.shelly.cloud
Änderungen der Kontaktdaten werden vom
Hersteller auf dessen oziellen Website ver-
öffentlicht https://www.shelly.cloud
Alle Rechte an der Marke Shelly® und anderen
geistigen Eigentumsrechten im Zusammen-
hang mit diesem Gerät gehören Allterco Robo-
tics EOOD.
ne uciale dell‘API Shelly all‘indirizzo:
https://shelly.link/ble
ShellyBLU Button1 dispone della modalità bea-
con. Se abilitato, il dispositivo emetterà beacon
ogni 8 secondi e potrà essere rilevato o utilizza-
to per il rilevamento della presenza.
Questa modalità consente anche l‘attivazione
da remoto del buzzer del Dispositivo per 30 se-
condi (es. per ritrovare un Dispositivo smarrito
nelle vicinanze).
Per ripristinare la congurazione del dispositivo
alle impostazioni di fabbrica, tenere premuto il
pulsante per 30 secondi poco dopo aver inse-
rito la batteria.
Inclusione iniziale
Se si sceglie di utilizzare il dispositivo con
l‘applicazione mobile Shelly Cloud e il servizio
Shelly Cloud, le istruzioni su come collegare il
dispositivo al Cloud e controllarlo attraverso
l‘App Shelly si trovano nella „Guida App“. L‘appli-
cazione mobile Shelly e il servizio Shelly Cloud
non sono condizioni per il corretto funziona-
mento del Dispositivo. Questo Dispositivo può
essere utilizzato con vari altri servizi e applica-
zioni di automazione domestica.
Sostituzione della batteria
1. Aprire il coperchio posteriore come mostrato
in g. 2.
2. Estrarre la batteria scarica utilizzando l‘un-
ghia del pollice, un cacciavite o un altro oggetto
piatto. come mostrato in g. 3.
3. Inserire una nuova batteria come mostrato
in g. 2
⚠ATTENZIONE! Utilizzare solo batterie
CR2032 da 3 V o compatibili! Prestare atten-
zione alla polarità della batteria!
3. Riposizionare il coperchio posteriore pre-
mendolo contro il dispositivo nché non si sen-
te un clic come mostrato in g. 2.
Speciche
• Dimensioni: 36x36x6 mm /
1.44х1.44х0.25 in
• Peso con batteria: 9 g / 0,3 once
• Temperatura di lavoro -20°C no a 40°C
• Umidità Dal 30 % al 70 % di umidità relativa
• Alimentazione: 1 batteria CR2032 da 3 V
(inclusa)
• Durata della batteria: no a 2 anni
• Supporto multi-click: Fino a 4 azioni
possibili
• Protocollo radio: Bluetooth
• Bande di radiofrequenza:
2400 - 2483.5 MHz
• Massima potenza a radiofrequenza:
< 4 dBm
• Funzione faro: sì
• Crittograa: crittograa AES (modalità
CCM)
• Portata operativa (a seconda della strut-
tura locale):
-no a 30 m all‘aperto,
-no a 10 m all‘interno
Dichiarazione di conformità
Con la presente, Allterco Robotics EOOD dichia-
ra che il tipo di apparecchiatura radio ShellyBLU
Button1 è conforme alla Direttiva 2014/53/UE,
2014/35/UE, 2014/30/EU, 2011/65/EU. Il testo
completo della dichiarazione di conformità UE
è disponibile al seguente indirizzo internet:
https://shelly.link/blu-button-1_DoC
Produttore: Allterco Robotics EOOD
Indirizzo: Bulgaria, Soa, 1407, 103 Cherni vrah
Blvd.
Tel.: +359 2 988 7435
E-mail: support@shelly.cloud
Sito web uciale: https://www.shelly.cloud
Le modiche ai dati di contatto sono pubblicate
dal Produttore sul sito Web uciale.
https://www.shelly.cloud
Tutti i diritti sul marchio Shelly® e altri diritti
intellettuali associati a questo dispositivo ap-
partengono a Allterco Robotics EOOD.
AD
E
B
C
+
CR2032
3 V
+
CR2032
3 V
+
CR2032
3 V
g. 2
g. 3
09/2023
g. 1

ЕS
MANUAL DE USO Y SEGURIDAD
1 botón 4 acciones
ShellyBLU Button1
Lea antes de utilizar
Este documento contiene información técni-
ca y de seguridad importante sobre el apara-
to, su uso y su instalación segura.
⚠¡ATENCIÓN! Antes de comenzar la ins-
talación, lea atentamente y por completo la
documentación adjunta. El incumplimiento
de los procedimientos recomendados puede
provocar un mal funcionamiento, un peligro
para su vida o una violación de la ley. Allterco
Robotics no se hace responsable de cualquier
pérdida o daño debido a una instalación o uso
inadecuado de este dispositivo.
Los dispositivos Shelly® vienen con el r-
mware instalado de fábrica. Si es necesario
actualizar el rmware para que los dispositi-
vos sigan cumpliendo la normativa, incluidas
las actualizaciones de seguridad, Allterco Ro-
botics EOOD proporcionará las actualizacio-
nes de forma gratuita a través de la interfaz
web integrada en el dispositivo o la aplicación
móvil Shelly, donde está disponible la infor-
mación de la versión actual del rmware. La
decisión de instalar o no las actualizaciones
del rmware del dispositivo es responsabili-
dad exclusiva del usuario. Allterco Robotics
EOOD no se hace responsable de la falta de
conformidad del Dispositivo causada por el
hecho de que el Usuario no instale oportuna-
mente las actualizaciones previstas.
Resumen del producto
ShellyBLU Button1 (el Dispositivo) es un bo-
tón Bluetooth, que le ayuda a activar y desac-
tivar fácilmente cualquier dispositivo o esce-
na con sólo un clic. (imagen 1)
• A: Botón
• B: Anillo indicador LED
• C: Soporte para llavero
• D: Zumbador
• E: Cubierta trasera
Instrucciones de instalación
⚠¡ATENCIÓN! Peligro de electrocución.
Mantenga el aparato alejado de los líquidos y
la humedad. El aparato no debe utilizarse en
lugares con mucha humedad.
⚠¡ATENCIÓN! ¡No utilice el Aparato si está
dañado!
⚠¡ATENCIÓN! ¡No intente arreglar o reparar
el aparato usted mismo!
⚠¡ATENCIÓN! El Dispositivo puede conec-
tarse de forma inalámbrica y puede controlar
circuitos eléctricos y electrodomésticos. ¡Pro-
ceda con precaución! El uso irresponsable
del Dispositivo puede causar un mal funcio-
namiento, poner en peligro su vida o infringir
la ley.
Colocar la batería
1. Abra suavemente la tapa trasera del Dispo-
sitivo con la uña del pulgar, un destornillador
u otro objeto plano, como se muestra en la
imagen 2.
2. Introduzca la batería suministrada tal y
como se muestra en la imagen 2.
⚠¡ATENCIÓN! ¡Preste atención a la polaridad
de las baterías!
3. Vuelva a colocar la cubierta trasera presio-
nándola contra el Dispositivo hasta que oiga
un clic como se muestra en la imagen 2.
Uso del botón Shelly Blu
Al presionar el botón, el Dispositivo comen-
zará a transmitir señales durante un segundo
conforme al formato BT Home. Más informa-
ción en https://bthome.io
ShellyBLU Button1 tiene una función de se-
guridad avanzada y admite el modo cifrado.
ShellyBLU Button1 permite la pulsación mul-
ti-clic: simple, doble, triple y larga.
El indicador LED emitirá el mismo número de
parpadeos que las pulsaciones de los boto-
nes y el zumbador - el número correspondien-
te de pitidos.
Para emparejar el Shelly Blue Button1 con
otro dispositivo Bluetooth, mantenga pre-
sionado el botón del Dispositivo durante 10
segundos.
El dispositivo esperará la conexión durante el
siguiente minuto. Las características Bluetoo-
PT
GUIA DO UTILIZADOR E DE
SEGURANÇA
1 interruptor 4 ações
ShellyBLU Button1
Leia antes de utilizar
Este documento contém importante informa-
ção técnica e de segurança relativa ao dis-
positivo, sua utilização segura e instalação.
⚠ATENÇÃO! Antes de iniciar a instalação,
por favor leia atentamente e na íntegra a do-
cumentação incluída. O incumprimento dos
procedimentos recomendados poderão dar
origem a avarias, perigo à sua vida ou violação
da lei. A Allterco Robotics EOOD não se res-
ponsabiliza por quaisquer perdas ou danos em
caso de uma incorreta instalação ou incorreta
utilização deste dispositivo.
Os dispositivos Shelly® são distribuidos com
rmware instalado em fábrica. Se forem ne-
cessárias atualizações ao rmware de forma
a manter os dispositivos em conformidade,
incluindo atualizações de segurança, Allterco
Robotics EOOD fornecerá as atualizações
gratuitamente através do Interface Web em-
butido ou da Aplicação Móvel Shelly, onde a
informação sobre a versão de rmware atual
se encontra acessível. A escolha em instalar
ou não instalar as atualizações de rmware
do Dispositivo é responsabilidade única do
utilizador. Allterco Robotics EOOD não se
responsabiliza por qualquer falha na con-
formidade do Dispositivo causada pela não
instalação das atualizações disponíveis em
tempo útil, por parte do Utilizador.
Apresentação do Produto
ShellyBLU Button1 (o dispositivo) é um botão
Bluetooth, que ajuda você a ativar e desativar
facilmente qualquer dispositivo ou cena com
apenas um clique. (g. 1)
• A: Botão
• B: Anel de indicação LED
• C: Suporte para porta-chaves
• D: Campainha
• E: contracapa
Instruções de Instalação
⚠ATENÇÃO! Perigo de eletrocussão. Man-
tenha o dispositivo longe de líquidos e humi-
dade. O dispositivo não deve ser utilizado em
áreas com demasiada humidade.
⚠ATENÇÃO! Não utilize o Dispositivo se este
se encontrar danicado.
⚠ATENÇÃO! Não tente você mesmo fazer
manutenção ou reparar o Dispositivo!
⚠ATENÇÃO! O Dispositivo pode ser conecta-
do sem os e pode controlar circuitos elétri-
cos e eletrodomésicos. Proceda com cautela!
O uso irresponsável pode induzir o mau fun-
cionamento, colocar em perigo a sua vida ou
violar a lei.
Inserindo a bateria
1. Abra suavemente a tampa traseira do dis-
positivo usando a unha do polegar, chave de
fenda ou outro objeto plano conforme mos-
trado na g. 2.
2. Deslize a bateria fornecida conforme mos-
trado na g. 2.
⚠CUIDADO! Preste atenção na polaridade
da bateria!
3. Recoloque a tampa traseira pressionando-
-a no dispositivo até ouvir um clique confor-
me mostrado na g. 2.
Usando o ShellyBLU Button1
Pressionar o botão fará com que o dispositivo
comece a transmitir sinais por um segundo
em conformidade com o formato BT Home.
Saiba mais em https://bthome.io.
ShellyBLU Button1 possui recurso de segu-
rança avançado e suporta criptograa
ShellyBLU Button1 suporta cliques múltiplos -
clique único, duplo, triplo e longo.
A indicação do LED emitirá o mesmo número
de ashes que o botão pressionado e a cam-
painha, o número correspondente de bipes.
Para conectar o ShellyBLU Button1 com outro
dispositivo Bluetooth, pressione e segure o
botão do dispositivo por 10 segundos.
O dispositivo aguardará a conexão pelo pró-
ximo minuto. As características disponíveis
do Bluetooth são descritas na documentação
FR
NOTICE D‘UTILISATION ET
CONSIGNES DE SÉCURITÉ
1 bouton 4 actions
ShellyBLU Button1
À lire avant utilisation
Ce document contient des informations tech-
niques et des consignes de sécurité impor-
tantes concernant le dispositif, son utilisation
et son installation.
⚠ATTENTION ! Avant de commencer l’instal-
lation, veuillez lire attentivement et entièrement
cette notice d‘utilisation. Le non-respect des
procédures recommandées peut entraîner un
dysfonctionnement, représenter un danger ou
être une violation de la loi. Allterco Robotics
EOOD n’est pas responsable des pertes ou des
dommages causés lors d’une installation ou uti-
lisation inadéquate de ce dispositif.
Les dispositifs Shelly® sont livrés avec un mi-
crologiciel (rmwar) pré-installé. Si des mises
à jour du sont nécessaires pour maintenir les
dispositifs conformes ainsi que mettre à jour
les consignes de sécurité, Allterco Robotics
EOOD les fournira gratuitement depuis l‘in-
terface Web intégrée au dispositif ou depuis
l‘application Shelly, où les informations sur la
version actuelle du micrologiciel sont dispo-
nibles. Le choix d‘installer ou non les mises à
jour du micrologiciel du dispositif relève de la
seule responsabilité de l‘utilisateur. Allterco
Robotics EOOD n‘est aucunement responsable
de tout manque de la conformité du dispositif
causé par le fait que l‘utilisateur n‘a pas installé
les mises à jour fournies en temps voulu.
Présentation du produit
ShellyBLU Button1 (le Dispositif) est un bouton
Bluetooth qui permet d‘activer ou de désactiver
n‘importe quel dispositif ou scène en un seul
clic. (image 1)
• A: Bouton
• B : Anneau indicateur LED
• C : Porte-clés
• D : Bipeur
• E : Capot arrière
Instructions d‘installation
⚠ATTENTION ! Danger d’électrocution. Gar-
dez le dispositif à l’écart des liquides et de l’hu-
midité. Le dispositif ne doit pas être utilisé dans
des endroits très humides.
⚠ATTENTION ! Ne pas utiliser si le Dispositif a
été endommagé !
⚠ATTENTION ! N’essayez pas d’entretenir ou
de réparer le Dispositif vous-même !
⚠ATTENTION ! L’e Dispositif peut être bran-
ché sans l et peut contrôler des circuits et des
appareils électriques. Procédez avec prudence
! L’utilisation irresponsable du Dispositif peut
entraîner un dysfonctionnement, un danger pour
votre vie ou une violation de la loi.
Insertion de la pile
1. Ouvrez le capot arrière du Dispositif en utili-
sant un tournevis plat ou un quelconque autre
objet plat, comme indiqué sur l‘image 2.
2. Insérez la pile fournie comme indiqué sur
l‘image 2.
⚠ATTENTION ! Respectez la polarité des
piles !
3. Replacez le capot arrière en l‘appuyant sur le
Dispositif jusqu‘à ce que vous entendiez un clic,
comme indiqué sur l‘image 2.
Utilisation du bouton Shelly Blu
Lorsque vous appuyez sur le bouton, le Dispo-
sitif commence à émettre des signaux pendant
une seconde, conformément au format BT
Home. Plus d‘informations sur
https://bthome.io
ShellyBLU Button1 possède une fonction de
sécurité avancée et prend en charge le mode
cryptage.
ShellyBLU Button1 prend en charge le multi-clic
: simple, double, triple et appui long.
L‘indicateur LED va clignoter autant de fois que
le bouton du dispositif a été maintenu appuyé
et le bipeur va émettre le nombre de bips cor-
respondant.
Pour coupler ShellyBLU Button1 avec un autre
dispositif Bluetooth, appuyez sur le bouton du
Dispositif pendant 10 secondes.
Le dispositif attend la connexion pendant une
th disponibles se describen en la documenta-
ción ocial de la API Shelly en:
https://shelly.link/ble
ShellyBLU Button1 dispone de modo baliza.
Si está activado, el dispositivo emitirá señales
cada 8 segundos, y puede ser descubierto o
utilizado para la detección de presencia.
Este modo también permite activar a distan-
cia el zumbador del Dispositivo durante 30
segundos (por ejemplo, para encontrar un
Dispositivo perdido cerca).
Para restaurar la conguración del dispositivo
a los ajustes de fábrica, mantenga presiona-
do el botón durante 30 segundos breves des-
pués de colocar la batería.
Inclusión inicial
Si decide utilizar el Dispositivo con la aplica-
ción móvil Shelly Cloud y el servicio Shelly
Cloud, las instrucciones para conectar el
Dispositivo a la nube y controlarlo a través de
la App Shelly se encuentran en la “Guía de la
App”. La aplicación móvil Shelly y el servicio
Shelly Cloud no son condiciones para el buen
funcionamiento del Dispositivo. Este dispo-
sitivo puede utilizarse con otros servicios y
aplicaciones de domótica.
Cambio de batería
1. Abra la cubierta trasera como se muestra
en la imagen 2.
2. Extraiga la pila agotada utilizando la uña
del pulgar, un destornillador u otro objeto pla-
no, como se muestra en la imagen 3.
3. Coloque una pila nueva como se muestra
en la imagen 2.
⚠¡ATENCIÓN! ¡Utilice sólo pilas de 3 V
CR2032 o compatibles! ¡Preste atención a la
polaridad de la pila!
3. Vuelva a colocar la cubierta trasera presio-
nándola contra el Dispositivo hasta que oiga
un clic como se muestra en la imagen 2.
Especicaciones técnicas
• Dimensiones: 36x36x6 mm /
1.44х1.44х0.25 in
• Peso con batería: 9 g / 0,3 oz
• Temperatura de funcionamiento
-20°C a 40°C
• Humedad 30 % a 70 % HR
• Fuente de alimentación: 1 batería CR2032
de 3 V (incluida)
• Duración de la batería: hasta 2 años
• Soporte multi-clic: Hasta 4 acciones posi-
bles
• Protocolo de radio: Bluetooth
• Banda de radiofrecuencia: 2400 - 2483.5
MHz
• Potencia máxima de radiofrecuencia:
< 4 dBm
• Función baliza: Sí
• Cifrado: Cifrado AES (modo CCM)
• Alcance operativo (dependiendo de la
construcción local)
-hasta 30 m en exteriores
-hasta 10 m en interiores
Declaración de conformidad
Allterco Robotics EOOD declara por medio
de la presente que el equipo de radio tipo
ShellyBLU Button1 cumple con la Directi-
va 2014/53/UE, 2014/35/UE, 2014/30/EU,
2011/65/UE. El texto completo de la declara-
ción de conformidad de la UE está disponible
en la siguiente dirección web:
https://shelly.link/blu-button-1_DoC
Fabricante: Allterco Robotics EOOD
Dirección: Bulgaria, Soa, 1407, 103 Cherni
vrah Blvd.
Tel: +359 2 988 7435
Correo electrónico: support@shelly.cloud
Sitio web ocial: https://www.shelly.cloud
Los cambios en la información de contacto
son publicados por el fabricante en el sitio
web ocial. https://www.shelly.cloud
Todos los derechos de las marcas Shelly®, y
otros derechos de propiedad intelectual aso-
ciados a este dispositivo pertenecen a Allter-
co Robotics EOOD.
ocial da API Shelly em:
https://shelly.link/ble
ShellyBLU Button1 apresenta o modo sinali-
zador. Se ativado, o dispositivo emitirá sinais
a cada 8 segundos e poderá ser descoberto
por outros dispositivos Shelly na redondeza
ou usado para detecção de presença (Geo-
fencing)
Este modo também permite a ativação re-
mota da campainha do dispositivo por 30
segundos (por exemplo, para encontrar um
dispositivo perdido nas proximidades).
Para restaurar a conguração do dispositivo
para as congurações de fábrica, pressione e
segure o botão por 30 segundos após inserir
a bateria.
Inclusão Inicial
Se escolher usar o Dispositivo com a apli-
cação móvel Shelly Cloud e o serviço Shelly
Cloud, instruções em como conectar o Dispo-
sitivo à Cloud e como controlá-lo através da
App Shelly, podem ser encontradas no „Guia
da App“. A Shelly Mobile Application e o ser-
viço Shelly Cloud não são condições únicas
para o funcionamento adequado do disposi-
tivo. Este Dispositivo pode ser utilizado com
variadas aplicações e serviços de domótica.
Substituindo a bateria
1. Abra a tampa traseira conforme mostrado
na g. 2.
2. Retire a bateria usando a unha do polegar,
chave de fenda ou outro objeto plano. como
mostrado na g. 3.
3. Insira uma bateria nova conforme mostra-
do na g. 2
⚠CUIDADO! Use apenas 3 V CR2032 ou ba-
teria compatível! Preste atenção na polaridade
da bateria!
3. Recoloque a tampa traseira pressionando-
-a no dispositivo até ouvir um clique confor-
me mostrado na g. 2.
Especicações
• Dimensões: 36x36x6 mm /
1.44х1.44х0.25 in
• Peso com bateria: 9 g / 0,3 oz
• Temperatura de funcionamento
-20°C a 40°C
• Umidade 30% a 70% RH
• Fonte de alimentação: 1 bateria CR2032 de
3 V (incluída)
• Duração da bateria: até 2 anos
• Suporte multi-clique: Até 4 ações possíveis
• Protocolo de rádio: Bluetooth
• Banda de radiofrequências:
2400 - 2483.5 MHz
• Potência máxima de radiofrequências:
< 4 dBm
• Função sinalizador: Sim
• Criptograa: criptograa AES (modo CCM)
• Alcance de operação (dependendo da
construção local):
-até 30 m no exterior,
-até 10 m no interior
Declaração de conformidade
A Allterco Robotics EOOD declara por este
meio que o equipamento rádio ShellyBLU
Button1 opera conforme a Diretriz 2014/53/
EU, 2014/35/EU, 2014/30/EU, 2011/65/EU. O
texto completo da declaração da UE sobre a
conformidade está disponível no seguinte en-
dereço de internet:
https://shelly.link/blu-button-1_DoC
Fabricante: Allterco Robotics EOOD
Endereço: 1407, 103 Cherni vrah Blvd. Soa,
Bulgária
Tel.: +359 2 988 7435
E-mail: support@shelly.cloud
Site ocial: https://www.shelly.cloud
Alterações nos endereços de contato são
publicados pelo Fabricante no website ocial.
https://www.shelly.cloud
Todos os direitos sobre a marca registada
Shelly® e outros direitos de propriedade inte-
lectual associados a este Dispositivo perten-
cem a Allterco Robotics EOOD.
minute. Les propriétés Bluetooth disponibles
sont décrites dans la documentation ocielle
de l‘API Shelly à l‘adresse suivante :
https://shelly.link/ble
ShellyBLU Button1 dispose d‘un mode balise.
S‘il est activé, le Dispositif émet un bip toutes
les 8 secondes et peut être découvert ou utilisé
pour la détection de présence.
Ce mode vous permet aussi d‘activer à dis-
tance le bipeur du Dispositif pendant 30 se-
condes (par exemple, pour retrouver un Dispo-
sitif perdu à proximité).
Pour réinitialiser les paramètres du dispositif,
appuyez sur le bouton de celui-ci et mainte-
nez-le appuyé pendant 30 secondes après avoir
inséré la pile.
Intégration initiale
Si vous choisissez d‘utiliser le Dispositif avec
l‘application Shelly Cloud et le service Shelly
Cloud, les instructions pour connecter le Dispo-
sitif au Cloud et le contrôler depuis l‘application
Shelly se trouvent dans le « Guide de l‘App ».
L‘application Shelly et le service Shelly Cloud
ne sont pas des conditions au bon fonction-
nement du Dispositif. Ce Dispositif peut être
utilisé avec d‘autres services et applications
domotiques.
Remplacer la pile
1. Ouvrez le capot arrière comme indiqué sur
l‘image. 2.
2. Retirez la pile déchargée à l‘aide de l‘un de
vos ongles, d‘un tournevis ou d‘un autre objet
plat, comme indiqué sur l‘image 3.
3. Insérez une nouvelle pile, comme indiqué sur
l‘image 2.
⚠ATTENTION ! N‘utilisez que des piles
CR2032 de 3 V ou compatibles. Respectez la
polarité de la pile !
3. Replacez le capot arrière en l‘appuyant sur le
Dispositif jusqu‘à ce que vous entendiez un clic,
comme indiqué sur l‘image 2.
Caractéristiques techniques
• Dimensions (H x L x P) : 36 x 36 x 6 mm /
1.44 х 1.44 х 0.25 in
• Poids avec pile : 9 g / 0,3 oz
• Température de fonctionnement:
-20°C à 40°C
• Humidité : 30 % à 70 %
• Alimentation : 1 pile CR2032 de 3 V (incluse)
• Autonomie de la pile : jusqu‘à 2 ans
• Support multi-clics : jusqu‘à 4 actions
possibles
• Protocole radio : Bluetooth
• Bande de radiofréquences :
2400-2483.5 MHz
• Puissance de radiofréquence maximale :
< 4 dBm
• Fonction de balise : Oui
• Cryptage : Cryptage AES (mode CCM)
• Plage opérationnelle (en fonction des
collectivités locales) :
-jusqu‘à 30 m à l‘extérieur,
-jusqu‘à 10 m à l‘intérieur
Déclaration de conformité
Par la présente, Allterco Robotics EOOD dé-
clare que l’équipement radio de type ShellyBLU
Button1 est conforme à la directive 2014/53/
UE, 2014/35/UE, 2014/30/UE, 2011/65/UE. Le
texte complet de la déclaration de conformité
de l’UE est disponible à l’adresse Internet sui-
vante:
https://shelly.link/blu-button-1_DoC
Fabricant : Allterco Robotics EOOD
Adresse : 103, Boulevard „Cherni vrah“, 1407
Soa, Bulgarie
Tél : +359 2 988 7435
Email : support@shelly.cloud
Site ociel : https://www.shelly.cloud
Les modications des coordonnées, faites par
le fabricant, sont publiées sur le site ociel.
https://www.shelly.cloud
Tous les droits de la marque Shelly® et autres
droits de propriété intellectuelle associés à ce
Dispositif appartiennent à Allterco Robotics
EOOD.
AD
E
B
C
+
CR2032
3 V
+
CR2032
3 V
+
CR2032
3 V
g. 2
g. 3
09/2023
g. 1
-
 1
1
-
 2
2


in altre lingue
- français: Shelly 3CVR2032 Mode d'emploi
- español: Shelly 3CVR2032 Guía del usuario
- Deutsch: Shelly 3CVR2032 Benutzerhandbuch
- português: Shelly 3CVR2032 Guia de usuario
Documenti correlati
-
Shelly ALT-18793 Guida utente
-
Shelly BLU Guida utente
-
-
Shelly Smart Wi-Fi Humidity and Temperature Sensor Guida utente
-
Shelly Plus I4DC Guida utente
-
Shelly Pro 3EM Guida utente
-
Shelly DW2 Wi-Fi Door-Window Sensor Guida utente
-
Shelly Plus Plug S Guida utente
-
Shelly Plus Plug IT Guida utente
-