Lindy 4x4 HDMI 4K60 Matrix Manuale utente
- Categoria
- Interruttori video
- Tipo
- Manuale utente

© LINDY Group - FIRST EDITION (October 2022)
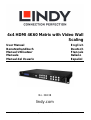
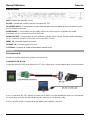
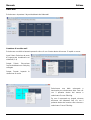
4x4 HDMI 4K60 Matrix with Video Wall
Scaling
User Manual English
Benutzerhandbuch Deutsch
Manuel Utilisateur Français
Manuale Italiano
Manual del Usuario Español
No. 38238
lindy.com

User Manual English
! WARNING !
Please read the following safety information carefully and always keep this document with
the product.
Failure to follow these precautions can result in serious injuries or death from electric
shock, fire or damage to the product.
This device works with a high voltage of 230 VAC. Do not connect it to mains supply
voltage system of 100 - 120 VAC – this will cause damage to the unit, fire and can result
in serious injuries or death from electric shock.
Touching the internal components or a damaged cable may cause electric shock, which may result in
death.
To reduce risk of fire, electric shocks or damage:
▪ Do not open the product. There are no user serviceable parts inside.
▪ Only qualified servicing personnel may carry out any repairs or maintenance.
▪ Never use damaged cables.
▪ Do not expose the product to water or places of moisture.
▪ Do not use this product outdoors it is intended for indoor use only.
▪ Do not place the product near direct heat sources. Always place it in a well-ventilated place.
▪ Do not place heavy items on the product or the cables.
▪ Please ensure any cables are firmly secured and locked in place before inserting into a power socket
Introduction
Thank you for purchasing the 4x4 HDMI 4K60 Matrix with Video Wall Scaling. This product has been
designed to provide trouble free, reliable operation. It benefits from both a LINDY 2-year warranty and free
lifetime technical support. To ensure correct use, please read this manual carefully and retain it for future
reference.
Package Contents
▪ 4x4 HDMI Matrix
▪ Country Specific C13 Power Cables, 2m
▪ 4 x IR Emitter Cables, 1.5m
▪ 4 x IR Receiver Cables, 1.5m
▪ IR Remote & CR2025 Battery
▪ 1 x 3-pin Phoenix Connector
▪ 1 x USB to RS-232 Cable
▪ Lindy Manual
Features
▪ Supports resolutions up to 3840x2160@60Hz 4:4:4 8bit
▪ Seamless switching between devices
▪ Video Wall Scaling – create up to a 2x2 or 4x1 vertical video wall
▪ Individual IR matrix control
▪ EDID Management
▪ Controllable output resolution scaling
▪ Push button, IR, RS-232, TCP/IP Control
Specification
▪ HDMI 2.0 18Gbps
▪ HDCP 1.4
▪ HDMI Audio Pass-through
▪ IR Support: 20-60kHz
▪ Housing Material: Metal

User Manual English
▪ Operating Temperature: 0°C - 40°C (32°F - 104°F)
▪ Storage Temperature: -20°C - 70°C (-4°F - 158°F)
▪ Humidity: 10-50% RH (non-condensing)
▪ Power Requirements: 100W, 110-240VAC
▪ Colour: Black
Connections:
▪ Input: 4 x HDMI Type A (Female), 4 x 3-Pin Phoenix
▪ Output: 4 x HDMI Type A (Female), 4 x 5-Pin Phoenix, 4 x Mini Toslink (Female)
▪ Control: RS-232 (Female), RJ-45 (Female), 8 x IR 3.5mm (Female)
▪ Power: IEC C14
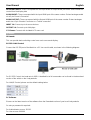
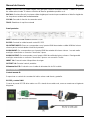
Front and Rear Panel Overview
Front Panel
INPUT 1-4: Select between 4 HDMI source devices by pushing the required Input button
OUTPUT 1-4: Select between 4 HDMI displays by pushing the required Output button
LOCK: Press and hold for two seconds to lock or unlock the matrix’s front panel push button control.
When the controls are locked the Lock LED will be illuminated.
ALL: Press ALL then a chosen Input and the Take button consecutively, this will switch the user’s
chosen Input to output on all output displays
RES: Press Res, a chosen output, then Next. Repeatedly pressing Next will allow the user to cycle through
several output resolutions for the selected display. Press Take to select the desired resolution. When Auto
resolution is selected the optimum resolution of the display will be chosen.
EDID: Press EDID, then a chosen Input, then Next. This will allow the user to manage the EDID of the
chosen Input port. The Manual EDID setting is for EDID Management via the Matrix’s control software.
NEXT: Cycles to the next option
SAVE: Press Save and a chosen Output, this will save the current layout of Inputs – Outputs under the
selected Output push button. The maximum number of possible saved layouts is 4.
RECALL: Press Recall and the same chosen Output as above to set the chosen layout from the
previously set 4 options.
CLEAR: Cancel the current command function
TAKE: Set the displayed option
Rear Panel
LAN: Control the unit using TCP/IP Control
RS-232: Control the unit using RS-232 Control

User Manual English
IR OUTPUT/INPUT: These correspond with the Input HDMI to Output HDMI port of the same number for
control from the display side
AUDIO INPUT: These correspond with the Input HDMI port of the same number. Embed analogue audio
via a 3-pin Phoenix Connector
AUDIO OUTPUT: These correspond with the Output HDMI port of the same number. Extract analogue
audio via a 5-pin Phoenix Connector or a Toslink connection
INPUT 1-4: Connect up to 4 source devices
OUTPUT 1-4: Connect up to 4 displays
C13 Power: Connect with included AC Power cord
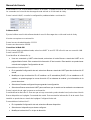
Operation
IR Remote
This can provide basic switching control over each source and display.
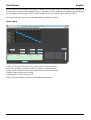
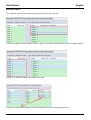
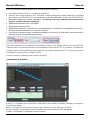
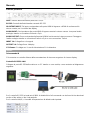
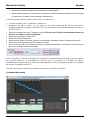
RS-232 & LAN Control
Connect the RS-232 port of the Matrix to a PC via a serial cable, as shown in the following diagram:
For RS-232 Control, the baud rate is 9600. A detailed list of all commands can be found in the download
section of the article on the Lindy website.
For LAN/IP Control, please see the default setting below
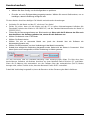
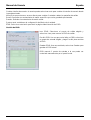
PC Software
Please run the latest version of the software from the Download section of your local Lindy website
On entry a password is required:
For Administrator access: 111111
For User access: 000000

User Manual English
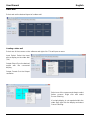
Connecting to the Web-GUI
On the default first page, please select UART if using with RS-232 or Network if using a LAN connection.
For RS-232 Control:
To identify IP information:
▪ Once connected and UART is selected, select the Find Via UART button on the Matrix Switch page.
This will show the IP information of the matrix. This can also be done via the Network Setting page.
To set IP address:
▪ On the Network Setting tab, select Find Via UART to read the current IP address.
▪ Modify the IP address type to Static IP or to Auto IP (DHCP). If set to Static IP, the new IP address,
subnet mask and gateway information can be added.
▪ Select Save Config to save the configuration
▪ Select Find Via UART to confirm the change has been successful
For Network control follow the steps below:
To identify IP address: Once connected and Network is selected, select the Search Device button on the
Matrix Switch page. This will show the IP information of the matrix. This can also be done via the Network
Setting page.
To set IP address:
▪ On the Network Setting tab, select Search Device.
▪ Select the device to configure.
▪ Modify the IP address or address type.
▪ Select Save Config to save the configuration
▪ A success message should now show. Select Search device again to confirm the change has been
successful.
For direct connection, please follow the instructions below
▪ Connect the matrix and PC using Cat.x cable
▪ Please ensure the matrix and PC are in the same network segment (The default IP address of the
matrix is 192.168.0.247, and the default network mask of the matrix is 255.255.255.0)
▪ Run the control software. Please note: If the IP address of the PC has changed after running the
software please reboot the software.
▪ Select Network under CTRL Mode
▪ Select Search device
▪ Select the matrix to control (Once selected, the software will read the network configuration)
▪ Select Disconnected to connect to the matrix
▪ Once a successful connection is made, Status will be changed to Connected. If this is selected again
it will disconnect from the matrix.

User Manual English
For connection via a Network switching or routing system please follow the process above with direct
connection to a network switch between the PC and matrix. If the IP address is not obtained automatically
by the software via Automatic (DHCP) mode, please ensure the network switch supports DHCP.
Once connected the user can now progress with controlling the matrix.
Matrix Switch
Switch UI: The user can select this to change the UI from the default
Allset: This provides a shortcut to switch 1 input to all output displays
Recall: Recall a specific matrix routing that has been previously saved
SaveAs: Save current matrix routing.
System Reset: Factory reset the unit.
EDID: Select this button to open the EDID Management page

User Manual English
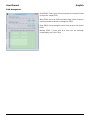
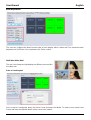
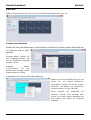
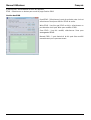
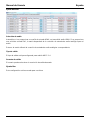
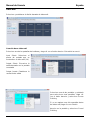
EDID Management
Read EDID: Select your chosen output port and select Read
to show the output EDID
Write EDID: Once an EDID has been read, select a chosen
Input port and then Write to change the EDID
Save EDID: Once changed, select Save to save the current
EDID
Manual EDID: 1 Input port at a time can be manually
controlled by the Front Panel

User Manual English
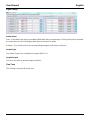
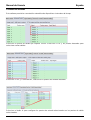
Signal Setting
Audio Select
Auto – If an HDMI input signal is provided, HDMI audio will be passthrough. If a DVI Input signal is provided,
the matrix will rely on the analogue audio input connection for audio.
External – The matrix will use the corresponding analogue audio input connection.
Output Type
The Output Type is pre-configured to support HDCP 1.4
Output Format
The user can select a desired output resolution.
Fine Tune
This setting is reserved for future use

User Manual English
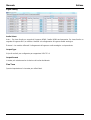
Advanced Switch
This software allows for automatic switching of devices at time intervals.
Select the Output port that requires control. Select CTRL and the desired ports to select multiple outputs.
Select CTRL and then select the desired input ports.
Select the → button to configure the selected inputs ports to the selected output ports.

User Manual English
Please ensure the desired output ports are ticked.
To configure automatic switching
Switch Frequency: The default is 2000milliseconds
Send all outputs combined: All outputs will be un-ticked by default
Un-ticked – Switch all ports one by one
Ticked – Switch all output & the desired input ports at the same time
Please note: If many input ports are selected, this will switch inputs one by one
Wait until others have finished then start next loop: This can be selected when “Send all outputs
combined” is ticked
Un-ticked - When the number of the selected input ports is not the same as selected output ports, the
next loop will automatically start once the final output has finished.
Ticked – All outputs will start a new loop at the same time. When the number of the selected input ports
is not the same as selected output ports, the next loop will automatically start once the final output has
finished.
Stop CMD after one loop: Automatically stops switching once one loop is finished
Select all outputs: Quickly tick/un-tick all output ports
Select Start to begin the automatic switching loop
While in progress, select Stop to instantly stop the loop.

User Manual English
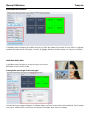
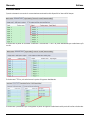
Video Wall
Select and set the desired layout of a video wall.
Creating a video wall
Select one of the screens on the software and right click. This will open a menu.
Input Select: Select the Input
port to display on the video wall
(1-4)
Output Select: Sync the desired
output with the connected
display
Output Format: Set the Output
resolution
Select one of the screens and drag to select
further screens. Right click and select
Screen Stitching
If a single display is not required within the
video wall, right click the display and select
Cancel Stitching.

User Manual English
Bezel Adjustment
The user can configure the bezel from all sides of each display within a video wall. The maximum bezel
adjustment is 100Pixels. Once set please click Set to confirm.
Multi-View Video Wall
The user can change a single display to a different source within
the video wall
Save or Load Layout
Once a layout is configured, pleas click Save Scene and enter the details. To load a scene select Load
Scene and enter the desired details of the scene to be loaded.

User Manual English
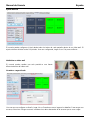
Web Control
For basic switching control
▪ Input the IP address in the web browser, then press ‘Enter’
▪ Input the username: admin
▪ Input the password: admin
▪ Login and then the user can control the matrix
Troubleshooting
If the matrix cannot be found via the Web-GUI or LAN, please follow the solutions below:
The IP address of the matrix or PC may have been added automatically but is still connected via Cat.X
cable or the matrix has been connected to a non-HDCP network switch. Please set up the IP address type
of the device or PC under Static mode or connect to a network switch that supports HDCP.
Please check the Cat.X cable is connected securely.
If the Web-GUI shows the message “device response timeout” after connection:
The IP address of the PC and Matrix may not be in the same network segment. Please ensure they are
both within the same segment.
If the Web-GUI shows the message “TCP connection failed! Error Code:xxxx” once connected to
the matrix:
The IP address of the PC and Matrix may not be in the same network segment. Please ensure they are
both within the same segment.
A firewall is blocking the Web-GUI. Please ensure the firewall will allow the Web-GUI or disable the firewall
on the PC.

Benutzerhandbuch Deutsch
! GEFAHR !
Bitte lesen Sie die folgenden Sicherheitshinweise sorgfältig durch und bewahren Sie
dieses Dokument immer zusammen mit dem Produkt auf.
Die Nichtbeachtung dieser Vorsichtsmaßnahmen kann zu schweren Verletzungen oder
zum Tod durch Stromschlag, Feuer oder Schäden am Produkt führen.
Dieses Gerät arbeitet mit hoher Spannung von 230 VAC. Schließen Sie es nicht an ein Stromnetz im
Spannungsbereich 100…120 VAC an – es könnte zu Schäden am Gerät, zu Brand, schweren
Verletzungen oder Tod durch Stromschlag führen.
Das Berühren interner Komponenten oder eines beschädigten Kabels kann einen elektrischen Schlag
verursachen, der zum Tod führen kann.
Um die Gefahr von Bränden, Stromschlägen oder Schäden zu verringern:
▪ Öffnen Sie das Produkt nicht. Es befinden sich keine vom Benutzer zu wartenden Teile im Inneren.
▪ Ausschließlich qualifiziertes Personal darf Reparaturen oder Wartungen durchführen.
▪ Verwenden Sie niemals beschädigte Kabel.
▪ Setzen Sie das Produkt nicht Wasser oder Feuchtigkeit aus.
▪ Dieses Produkt ist nur für den Gebrauch in geschlossenen Räumen bestimmt.
▪ Stellen Sie das Produkt nicht in der Nähe von direkten Wärmequellen auf. Stellen Sie es immer an
einem gut belüfteten Ort auf.
▪ Stellen Sie keine schweren Gegenstände auf das Produkt oder die Kabel.
▪ Vergewissern Sie sich vor dem Anschluss an eine Steckdose, dass alle Kabel sicher angeschlossen
sind.
Einführung
Wir freuen uns, dass Ihre Wahl auf ein LINDY-Produkt gefallen ist und danken Ihnen für Ihr Vertrauen. Sie
können sich jederzeit auf unsere Produkte und einen guten Service verlassen. Diese 4x4 HDMI 4K60
Matrix mit Video Wall Scaling unterliegt einer 2-Jahres LINDY Herstellergarantie und lebenslangem
kostenlosen technischen Support. Bitte lesen Sie diese Anleitung sorgfältig und bewahren Sie sie auf.
Lieferumfang
▪ 4x4 HDMI Matrix
▪ Multi-country C13-Stromkabels, 2m
▪ 4 x IR-Emitterkabel, 1.5m
▪ 4 x IR-Receiverkabel, 1.5m
▪ IR-Fernbedienung & CR2025 Batterie
▪ 1 x 3-pin Phoenix Stecker
▪ 1 x USB auf RS-232 Kabel
▪ Lindy Handbuch
Eigenschaften
▪ Unterstützt Auflösungen bis 3840x2160@60Hz 4:4:4 8bit
▪ Unterbrechungsfreies Umschalten zwischen Geräten
▪ Video Wall Scaling – Zum Erstellen einer 2x2 oder 4x1 Videowand
▪ Individuelle IR Matrix Steuerung
▪ EDID Management
▪ Steuerbare Skalierung der Outputauflösung
▪ Drucktasten, IR, Rs-232, TCP/IP Steuerung

Benutzerhandbuch Deutsch
Spezifikationen
▪ HDMI 2.0 18Gbps
▪ HDCP 1.4
▪ HDMI Audio Pass-through
▪ IR-Unterstützung: 20-60kHz
▪ Gehäusematerial: Metall
▪ Betriebstemperatur: 0°C - 40°C (32°F - 104°F)
▪ Lagertemperatur: -20°C - 70°C (-4°F - 158°F)
▪ Feuchtigkeit: 10-50% RH (nicht-kondensierend)
▪ Leistungsaufname: 100W, 110-240VAC
▪ Farbe: Schwarz
Anschlüsse:
▪ Eingänge: 4 x HDMI Type A (Buchse), 4 x 3-Pin Phoenix
▪ Ausgänge: 4 x HDMI Type A (Buchse), 4 x 5-Pin Phoenix, 4 x Mini Toslink (Buchse)
▪ Steuerung: RS-232 (Buchse), RJ-45 (Buchse), 8 x IR 3.5mm (Buchse)
▪ Stromversorgung: IEC C14
Front- und Rückseiten Übersicht
Front Panel
INPUT 1-4: Wählen Sie zwischen 4 HDMI-Quellgeräten, indem Sie die gewünschte Eingangstaste
drücken
OUTPUT 1-4: Wählen Sie zwischen 4 HDMI-Displays, indem Sie die gewünschte Ausgangstaste drücken
LOCK: Halten Sie die Taste zwei Sekunden lang gedrückt, um die Drucktastensteuerung an der
Vorderseite der Matrix zu sperren oder zu entsperren. Wenn die Bedienelemente gesperrt sind, leuchtet
die Lock-LED.
ALL: Drücken Sie ALL, dann einen gewählten Input und die TAKE-Taste nacheinander, um den vom
Benutzer gewählten Eingang auf allen Ausgangsdisplays auszugeben.
RES: Drücken Sie RES, einen gewählten Ausgang und dann NEXT. Durch wiederholtes Drücken der
Taste NEXT kann der Benutzer zwischen verschiedenen Ausgabeauflösungen für das ausgewählte
Display wählen. Drücken Sie TAKE, um die gewünschte Auflösung auszuwählen. Wenn die
automatische Auflösung ausgewählt ist, wird die optimale Auflösung des Displays gewählt.
EDID: Drücken Sie EDID, dann einen ausgewählten Eingang und dann NEXT. Damit kann der Benutzer
die EDID des gewählten Eingangsports verwalten. Die Einstellung Manuelle EDID ist für die EDID-
Verwaltung über die Steuersoftware der Matrix vorgesehen.
NEXT: Wechselt zur nächsten Option
SAVE: Drücken Sie SAVE und einen ausgewählten Ausgang, um das aktuelle Layout der Eingänge -
Ausgänge unter der ausgewählten Ausgangstaste zu speichern. Es können maximal 4 Layouts
gespeichert werden.
RECALL: Drücken Sie RECALLL und den gleichen gewählten Ausgang wie oben, um das gewählte
Layout aus den zuvor eingestellten 4 Optionen zu übernehmen.
CLEAR: Abbrechen der aktuellen Befehlsfunktion

Benutzerhandbuch Deutsch
TAKE: Einstellen der angezeigten Option
Rückseiten Panel
LAN: Zur Steuerung des Geräts über TCP/IP-Steuerung
RS-232: Zur Steuerung des Geräts über RS-232-Steuerung
IR OUTPUT/INPUT: Diese entsprechen dem HDMI-Eingang und dem HDMI-Ausgang mit der gleichen
Nummer für die Steuerung von der Displayseite aus
AUDIO INPUT: Diese entsprechen dem HDMI-Eingangsanschluss mit der gleichen Nummer.
Einbindung von analogem Audio über einen 3-poligen Phoenix-Anschluss
AUDIO OUTPUT Diese entsprechen dem HDMI-Ausgangsanschluss mit der gleichen Nummer.
Extrahieren Sie analoges Audiosignal über einen 5-poligen Phoenix-Stecker oder eine Toslink-
Verbindung
INPUT 1-4: Zum Anschluss von bis zu 4 Quellgeräten
OUTPUT 1-4: Zum Anschluss von bis zu 4 Displays
C13 Power: Zum Anschluss über das mitgelieferte AC-Netzkabel
Betrieb
IR Fernbedienung
Diese ermöglicht eine grundlegende Schaltsteuerung für jede Quelle und jedes Display
RS-232 & LAN Steuerung
Verbinden Sie den RS-232-Anschluss der Matrix über ein serielles Kabel mit einem PC, wie in der
folgenden Abbildung dargestellt:
Für die RS-232-Steuerung beträgt die Baudrate 9600. Eine detaillierte Liste aller Befehle finden Sie im
Download-Bereich des Artikels auf der Lindy-Website.

Benutzerhandbuch Deutsch
Für die LAN/IP-Steuerung sehen Sie bitte die Standardeinstellung unten
PC Software
Bitte führen Sie die neueste Version der Software aus dem Download-Bereich Ihrer lokalen Lindy-Website
aus.
Bei der Eingabe ist ein Passwort erforderlich:
Für den Administrator-Zugang: 111111
Für den Benutzerzugang: 000000
Verbinden mit dem Web-GUI
Auf der ersten Seite wählen Sie bitte UART, wenn Sie eine RS-232-Verbindung verwenden, oder Network,
wenn Sie eine LAN-Verbindung verwenden.
Für RS-232-Steuerung:
Zur Ermittlung der IP-Informationen:
• Sobald die Verbindung hergestellt und UART ausgewählt ist, wählen Sie die Schaltfläche Find Via
UART auf der Seite Matrix Switch. Dadurch werden die IP-Informationen der Matrix angezeigt.
Dies kann auch über die Seite Netzwerkeinstellungen erfolgen.
So stellen Sie die IP-Adresse ein:
▪ Wählen Sie auf der Registerkarte Network Setting (Netzwerkeinstellungen) die Option Find Via
UART (Über UART suchen), um die aktuelle IP-Adresse auszulesen.
▪ Ändern Sie den IP-Adresstyp auf Static IP oder auf Auto IP (DHCP). Bei der Einstellung "Statische
IP" können die neue IP-Adresse, die Subnetzmaske und die Gateway-Informationen hinzugefügt
werden.
▪ Wählen Sie Save Config, um die Konfiguration zu speichern.
▪ Wählen Sie Find Via UART, um zu bestätigen, dass die Änderung erfolgreich war.
Gehen Sie für die Netzwerksteuerung wie folgt vor:
So ermitteln Sie die IP-Adresse: Wenn die Verbindung hergestellt und das Netzwerk ausgewählt ist,
wählen Sie auf der Seite des Matrix-Schalters die Schaltfläche Gerät suchen. Dadurch werden die IP-
Informationen der Matrix angezeigt. Dies kann auch über die Seite Netzwerkeinstellungen erfolgen.
So legen Sie die IP-Adresse fest:
▪ On the Network Setting tab, select Search Device. Wählen Sie auf der Registerkarte Network
Setting (Netzwerkeinstellungen) die Option Search Device (Gerät suchen)
▪ Wählen Sie das zu konfigurierende Gerät aus.
▪ Ändern Sie die IP-Adresse oder den Adresstyp.

Benutzerhandbuch Deutsch
▪ Wählen Sie Save Config, um die Konfiguration zu speichern.
▪ Es sollte nun eine Erfolgsmeldung angezeigt werden. Wählen Sie erneut Gerät suchen, um zu
bestätigen, dass die Änderung erfolgreich war.
Für den direkten Anschluss befolgen Sie bitte die nachstehenden Anweisungen
▪ Verbinden Sie die Matrix und den PC mit einem Cat.x-Kabel
▪ Stellen Sie sicher, dass sich die Matrix und der PC im selben Netzwerksegment befinden (die
Standard-IP-Adresse der Matrix ist 192.168.0.247, und die Standard-Netzwerkmaske der Matrix ist
255.255.255.0)
▪ Führen Sie die Steuerungssoftware aus. Bitte beachte sie: Wenn sich die IP-Adresse des PCs nach
dem Ausführen der Software geändert hat, starten Sie die Software neu.
▪ Wählen Sie Network unter CTRL Mode
▪ Wählen Sie Search device
▪ Wählen Sie die zu steuernde Matrix aus (nach der Auswahl liest die Software die
Netzwerkkonfiguration ein)
▪ Wählen Sie Disconnected, um eine Verbindung mit der Matrix herzustellen
▪ Sobald eine erfolgreiche Verbindung hergestellt wurde, ändert sich der Status in Connected. Wird
diese Option erneut ausgewählt, wird die Verbindung zur Matrix getrennt.
Für den Anschluss über ein Netzwerk-Switching- oder Routing-System folgen Sie bitte dem oben
beschriebenen Verfahren mit direktem Anschluss an einen Netzwerk-Switch zwischen PC und Matrix.
Wenn die IP-Adresse nicht automatisch von der Software über den automatischen (DHCP) Modus
bezogen wird, stellen Sie bitte sicher, dass der Netzwerk-Switch DHCP unterstützt.
Sobald die Verbindung hergestellt ist, kann der Benutzer mit der Steuerung der Matrix fortfahren.

Benutzerhandbuch Deutsch
Matrix Switch
Switch UI: Der Benutzer kann dies auswählen, um die Benutzeroberfläche von der Standardeinstellung
zu ändern
Allset: Dies ist eine Abkürzung, um 1 Input auf alle Outputdisplays zu schalten
Recall: Ruft ein bestimmtes Matrix-Routing auf, das zuvor gespeichert wurde.
SaveAs: Aktuelles Matrix-Routing speichern
System Reset: Setzt das Gerät auf die Werkseinstellungen zurück
EDID: Wählen Sie diese Schaltfläche, um das EDID Management zu öffnen.
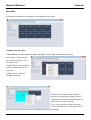
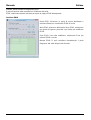
EDID Management
Read EDID: Wählen Sie den gewünschten
Ausgangsanschluss und wählen Sie Read, um die EDID
des Ausgangs anzuzeigen.
Write EDID: Sobald eine EDID eingelesen wurde, wählen
Sie einen Eingangsanschluss aus und Write, um die EDID
zu ändern.
Save EDID: Wählen Sie nach der Änderung Save, um die
aktuelle EDID zu speichern.
Manual EDID: Jeweils 1 Eingangsanschluss kann manuell
über das Frontpanel gesteuert werden.

Benutzerhandbuch Deutsch
Signal Setting
Audio Select
Auto – Wenn ein HDMI-Eingangssignal vorhanden ist, wird HDMI-Audio durchgeschleift. Wenn ein DVI-
Eingangssignal bereitgestellt wird, verwendet die Matrix den analogen Audioeingang für Audio.
External – Die Matrix verwendet den entsprechenden analogen Audio-Eingangsanschluss.
Output Type
Der Output Typ ist für die Unterstützung von HDCP 1.4 vorkonfiguriert.
Output Format
Der Benutzer kann eine gewünschte Ausgabeauflösung wählen.
Fine Tune
Diese Einstellung ist für die zukünftige Verwendung reserviert
La pagina si sta caricando...
La pagina si sta caricando...
La pagina si sta caricando...
La pagina si sta caricando...
La pagina si sta caricando...
La pagina si sta caricando...
La pagina si sta caricando...
La pagina si sta caricando...
La pagina si sta caricando...
La pagina si sta caricando...
La pagina si sta caricando...
La pagina si sta caricando...
La pagina si sta caricando...
La pagina si sta caricando...
La pagina si sta caricando...
La pagina si sta caricando...
La pagina si sta caricando...
La pagina si sta caricando...
La pagina si sta caricando...
La pagina si sta caricando...
La pagina si sta caricando...
La pagina si sta caricando...
La pagina si sta caricando...
La pagina si sta caricando...
La pagina si sta caricando...
La pagina si sta caricando...
La pagina si sta caricando...
La pagina si sta caricando...
La pagina si sta caricando...
La pagina si sta caricando...
La pagina si sta caricando...
La pagina si sta caricando...
La pagina si sta caricando...
La pagina si sta caricando...
La pagina si sta caricando...
La pagina si sta caricando...
La pagina si sta caricando...
La pagina si sta caricando...
La pagina si sta caricando...
La pagina si sta caricando...
La pagina si sta caricando...
La pagina si sta caricando...
La pagina si sta caricando...
La pagina si sta caricando...
-
 1
1
-
 2
2
-
 3
3
-
 4
4
-
 5
5
-
 6
6
-
 7
7
-
 8
8
-
 9
9
-
 10
10
-
 11
11
-
 12
12
-
 13
13
-
 14
14
-
 15
15
-
 16
16
-
 17
17
-
 18
18
-
 19
19
-
 20
20
-
 21
21
-
 22
22
-
 23
23
-
 24
24
-
 25
25
-
 26
26
-
 27
27
-
 28
28
-
 29
29
-
 30
30
-
 31
31
-
 32
32
-
 33
33
-
 34
34
-
 35
35
-
 36
36
-
 37
37
-
 38
38
-
 39
39
-
 40
40
-
 41
41
-
 42
42
-
 43
43
-
 44
44
-
 45
45
-
 46
46
-
 47
47
-
 48
48
-
 49
49
-
 50
50
-
 51
51
-
 52
52
-
 53
53
-
 54
54
-
 55
55
-
 56
56
-
 57
57
-
 58
58
-
 59
59
-
 60
60
-
 61
61
-
 62
62
-
 63
63
-
 64
64


Lindy 4x4 HDMI 4K60 Matrix Manuale utente
- Categoria
- Interruttori video
- Tipo
- Manuale utente
in altre lingue
Documenti correlati
-
Lindy 38238 Manuale utente
-
Lindy 8x8 HDMI 4K60 Matrix Manuale utente
-
-
-
-
-
Lindy 4x4 HDMI 18G Matrix Switch Manuale utente
-
-
-