
1
1
Questo manuale è da considerarsi parte integrante della macchina.
L’ Utente è tenuto alla sua consultazione prima dell’utilizzo della macchina
USE AND MAINTENANCE
USO E MANUTENZIONE
This Manual should be considered as an integral part of the machine.
The User should consult the manual before starting the machine.
REV. 3 (10-14)
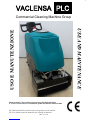
VACLENSA PLC
Commercial Cleaning Machine Group

2
2
INDICE - INDEX
N° PARAGRAFO - PARAGRAPH PAG - PAGE
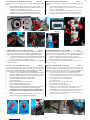
1 FOTO VISTA LATO DESTRO - VIEW RIGHT SIDE 3
2 FOTO VISTA LATO SINISTRO - VIEW LEFT SIDE 4
3 FOTO VISTA POSTERIORE - POSTERIOR VIEW 5
4 TABELLA SIMBOLI - SYMBOL CHART 6
5 UTILIZZO E CUSTODIA DEL MANUALE -HOW TO USE AND KEEP HANDBOOK 7
6 MATRICOLA E MARCHIO CE -SERIAL NUMBER AND CE MARK 7
7 NORME DI SICUREZZA E TRASPORTO -SAFETY RULES END TRASPORT 8
8 MONTAGGIO SPAZZOLA IN TYNEX -TYNEX BRUSHES ASSEMBLAGE 9
9 MOVIMENTAZIONE E SPOSTAMENTO -HANDLING AND MOVING 9
10 SOLLEVAMENTO SPAZZOLE A MACCHINA FERMA -LIFTING BRUSHES 10
11 PULIZIA A SECCO CON ASPIRATORE ESTERNO - THE DRY CLEANING WHIT EXTERNAL ASPIRATOR 10
12 PULIZIA A SECCO CON ASPIRATORE INTERNO - THE DRY CLEANING WHIT INTERNAL ASPIRATOR 11
13 POSIZIONAMENTO E PULIZIA LATO DX SCALA -PLACEMENT AND CLEANING RIGHT SIDE SCALE 11
14 ROTAZIONE TESTATA LAVANTE E PULIZIA LATO SX SCALA -ROTATING HEAD WASHING AND CLEANING LEFT
SIDE SCALE
11
15 TRATTAMENTO DELLA SCALA CON DETERGENTE -TREATMENT OF SCALE WITH CLEANER 12
16 MONTAGGIO SPAZZOLE IN PPL PER LAVAGGIO SCALE - PPL IN ASSEMBLY BRUSH FOR CLEANING STAIRS 12
17 PREPARAZIONE PER LAVAGGIO SCALA -PREPARATION FOR WASHING SCALE 13
18 POSIZIONAMENTO PER LAVAGGIO LATO DX SCALA -POSITIONING FOR WASHING RIGHT SIDE SCALE 13
19 ROTAZIONE TESTATA LAVANTE PER LAVAGGIO LATO SX -ROTATING HEAD WASHING WASHING LEFT SIDE 13
20 COLLEGAMENTO ACCESSORIO MANUALE -ACCESSORY CONNECTION MANUAL 14
21 ASPIRAZIONE CON ACCESSORIO MANUALE -INTAKE WITH ACCESSORY MANUAL 14
22 PULIZIA CON ACCESSORIO MANUALE -CLEANING WITH ACCESSORY MANUAL 14
23 MONTAGGIO/SOSTITUZIONE FILTRO A SACCO -INSTALLATION / REPLACEMENT FILTER BAG 15
24 SMONTAGGIO GRUPPO SPAZZOLE -REMOVAL BRUSH 15
25 PULIZIA DELLE SPAZZOLE -CLEANING BRUSHES 16
26 UTILIZZARE L’ESCALATOR COME LAVAMOQUETTES -HOW TO USE THE ESCALATOR CARPET CLEANERS 17
27 UTILIZZARE L’ESALATOR COME LAVASCIUGA PAVIMENTI -HOW TO USE THE ESALATOR SCRUBBING 17
28 SMALTIMENTO ACQUA SPORCA -DIRTY WATER DISPOSAL 18
29 PULIZIA FILTRO SOLUZIONE LAVAGGIO -FILTER CLEANING CLEANING SOLUTION 18
30 SVUOTAMENTO SERBATOIO SOLUZIONE LAVAGGIO -DRAIN CLEANING SOLUTION TANK 18
31 PULIZIA SERBATOIO RECUPERO E FILTRO ASPIRAZIONE—RINSING THE RECOVERY TANK AND THE VACUUM-
MOTOR WATER FILTER
18
32 DEMOLIZIONE E SMALTIMENTO MACCHINA -DEMOLITION AND DISPOSAL MACHINE 18
33 INCONVENIENTI COMUNI E RIMEDI -COMMON PROBLEMS AND SOLUTIONS 19
34 CARATTERISTICHE TECNICHE - TECHNICAL SPECIFICATIONS 19
35 IMPIANTO ELETTRICO -ELECTRICAL SYSTEM 20
36 IMPIANTO IDRICO -WATER SYSTEM 21


7
7
HOW TO USE AND KEEP HANDBOOK
A copy of this handbook delivered With the machine is addressed to
the operator and to the maintenance controller, who undertake to
read it and to keep it in a protected place near the machine and to
refer to it before starting any operation on the machine. The infor-
mation written in this handbook and placed in various Sections are
aimed to describe the use of the machine and its technical features
as provided for in the plan aims, to provide instructions as to carria-
ge, displacement, installation, assembling, setting and use, as to the
staff training, maintenance interventions, spare parts orders and
residual dangers.The Manufacturer begs the Customer to read com-
pletely this Handbook when receiving the machine and, however,
before starting any operation on it.This Handbook is made and ai-
med to give the user all the information, indications and instructions
he needs to know the machine, to understand its operating principles
and limits and to be properly informed about its safe use.
We urge You to follow the instructions written in this Handbook and
to comply with any specific regulations in force.
This operating Instructions Handbook should be considered as a
part of the machine and should be kept for future references until the
final dismantling. In case the Handbook should be damaged or lost,
it is possible to make request of it to the Manufacturer as it is inser-
ted in the list of the machine spare parts with the Code n°...
The Manufacturer makes know that the Handbook reflects the
technical situation when the machine has been commercialized
and it cannot be considered unsuitable in case of updating made
according to new information.
The Manufacturer reserves the right to update the production and
Handbook, without being under the obligation to update the pre-
vious production and Handbook, exept for extraordinry cases con-
cerning the Safety and Health of people and things. The Customer,
however, may address to the Manufacturer to ask for any updating
or integration of the Handbook that should complete it.
In case the Customer would like to get further information or to sug-
gest improvements to the Handbook, he can address directly to the
Manufacturer. The Customer is asked to notify the new owner’s ad-
dress to the Manufacturer in case of transfer of the machine in order
to send any integration of the Handbook to the new user. The Manu-
facturer informs the Customer that he considers himself not respon-
sible in case of :
improper use of the machine ;
use contrary to the specific regulations in force;
wrong installation;
feeding defects;
serious maintenance faults;
non-authorized changes or interventions;
use of non-original or non-specific spare parts;
total or partial non-compliance with the instructions;
exceptional events.
UTILIZZO E CUSTODIA DEL MANUALE
Una copia di questo manuale spedita insieme alla macchina è desti-
nata all’operatore e a chi ne controlla la manutenzione, il quale si
impegna a leggerlo, a custodirlo in luogo sicuro e a consultarlo pri-
ma di iniziare qualsiasi operazione sulla macchina stessa.
Le informazioni scritte in questo manuale sono finalizzate alla de-
scrizione dell’uso della macchina e delle sue caratteristiche tecniche,
a fornire istruzioni su trasporto, spostamento, messa in funzione,
assemblaggio, regolazioni, utilizzo, interventi di manutenzione, parti
di ricambio, rischi. Il Costruttore prega il Cliente di leggere comple-
tamente il manuale al ricevimento della macchina e comunque, pri-
ma di iniziare qualsiasi operazione su di essa. Questo manuale è fatto
ed è mirato a dare tutte le informazioni all’utente, tutte le indicazio-
ni e le istruzioni di cui ha bisogno per conoscere la macchina, per
capire i suoi principi di funzionamento e i suoi limiti ed essere infor-
mato propriamente dell’uso e della sicurezza. La preghiamo di se-
guire le istruzioni scritte in questo manuale ed accondiscendere con
alcune regolamentazioni specifiche in forza.
Questo manuale d’istruzioni di funzionamento dovrebbe essere con-
siderato come una parte della macchina e dovrebbe essere tenuto per
referenze future fino al finale smantellamento. Nel caso in cui il ma-
nuale dovesse essere danneggiato o perduto, è possibile richiederlo al
fabbricante nell’elenco dei ricambi della macchina.
Il fabbricante rende noto che il manuale riflette la situazione
tecnica nel momento in cui la macchina è stata commercializzata
e non può essere considerato disadatto in caso di aggiornamenti
fatti secondo nuove informazioni. Il fabbricante si riserva il di-
ritto di aggiornare la produzione ed il manuale, senza essere ob-
bligato ad aggiornare la produzione precedente ed il manuale, a
parte casi straordinari riguardo all’incolumità e alla salute di
persone e cose. Il cliente, comunque, può fare richiesta al fabbrican-
te per qualsiasi aggiornamento o integrazione del manuale.
Nel caso in cui il cliente desiderasse ottenere informazioni più spe-
cifiche o suggerire miglioramenti al manuale, può contattare diretta-
mente il fabbricante. Il cliente è pregato di notificare al fabbricante
l’indirizzo di un eventuale nuovo proprietario in caso di trasferimen-
to della macchina in ordine per poter provvedere alla spedizione di
qualsiasi integrazione del manuale all’utente nuovo.
Il fabbricante informa il cliente che si considera non-responsabile
in caso di:
uso improprio della macchina;
uso contrario alle regolamentazioni specifiche in forza;
installazione sbagliata;
difetti di alimentazione;
errori gravi di manutenzione;
cambi o interventi non-autorizzati;
uso di parti di ricambio non-originali o non-specifiche;
non-osservanza totale o parziale delle istruzioni;
eventi insoliti.
Via …………………..., n°
cap – ……………………..
Tel. ……………………….
Fax………………………...
E-Mail: ………………………
Mod. ABCDEFG
V - AC/DC 09/2008
W
IP
Lt.
Kg.
N° 000000 MADE IN ITALY
(B)
(C)
(D)
(E)
(F)
(A)
(G)
(H)
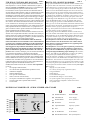
MATRICOLA E MARCHIO CE - SERIAL NUMBER AND CE MARK
(A) Modello Macchina Machine Model
(B) Alimentazione Power Supply
(C) Potenza Motori Power of Motors
(D) Protezione Protection
(E) Capacità Serbatoi Capacity of Tanks
(F) Peso Weight
(G) N° di Matricola Serial Number
(H) Data di Fabbricazione Date of Manufacture
COMPANY
PAR. 5 PAR. 5
PAR. 6

8
8
NORME DI SICUREZZA
Prima di lavorare con questa macchina, preparatevi ed adde-
stratevi leggendo con cura questo manuale.
L' uso della macchina è vietato a persone non addestrate e non
autorizzate.
Manovrate la macchina con cautela su pendenze e rampe, non
fate inversioni su pendenze.
ATTENZIONE: questa macchina va usata solo su pendenze
inferiori al 2%.
La macchina può causare esplosioni se funziona nelle vicinanze di
materiali o vapori infiammabili (carburanti, solventi , etc.).
Non operate in presenza di polveri dannose alla salute.
Per la manutenzione e la ricarica delle batterie, leggete con
attenzione le specifiche istruzioni di questo manuale.
Le riparazioni vanno effettuate solo da personale specializza-
to.
Le operazioni di manutenzione sono da eseguirsi con la mac-
china scollegata dalla rete elettrica, togliendo la spina dalla
presa.
Durante l'uso fare attenzione ai cavi elettrici di allacciamento
alla rete verificando che non ci siano danni.
Nel caso in cui il cavo sia danneggiato la macchina non può
essere usata.
In caso di sostituzione del cavo o spine o giunti, assicurare. la
protezione da spruzzi d'acqua la resistenza meccanica.
Durante l'uso fare attenzione alle altre persone ed in particola-
re ai bambini.
Per un buon funzionamento della macchina utilizzare deter-
genti non schiumogeni.
ATTENZIONE: non apportare modifiche alla macchina. La
macchina modificata richiede una nuova marcatura CE.
SAFETY RULES
Before working with this car, prepare you and trained reading
you with care this manual.
The use of the machine forbidden to people not trained and
not authorized.
Maneuver the machine with caution on inclinations and
ramps, you don't make inversions on inclinations.
ATTENTION: this machine must be used only on inferior
inclinations to 2%.
The machine can cause explosions if it works in the prox-
imities of materials or inflammable vapors (fuels, solvents,
etc.).
Not you operate in presence of dusts harmful to the health.
For the maintenance and the recharge of the batteries, you
read with attention the specific instructions of this manual.
The reparations must be effected only by specialized person-
nel.
The operations of maintenance are to perform him with the
machine disconnected from the electric net, removing the
thorn from the socket.
During the use watch out for the electric cables of lacing to
the net verifying that there are no damages.
In the case in which the cable is damaged the machine can’t
be used.
In case of substitution of the cable or thorns, assure the me-
chanical resistance protection from spray of water.
During the use watch out for the other people and particularly
to childrens.
For a good operation of the machine use detergents not
foamy.
ATTENTION: don't make changes to the machine. The
modified machine asks for a new CE mark.
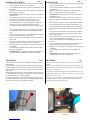
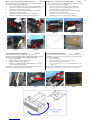
TRASPORTO PAR. 7
Importanti azioni che consentono di migliorare il trasporto della E-
SCALATOR.
Nei due lati della macchina sono state realizzate quattro maniglie di
cui due si trovano sul lato posteriore estraibili (Ca) e due impronte
cave si trovano davanti e sono ricavate specificamente nel serbatoio
acqua pulita.
Poiché la macchina pesa 96 Kg, queste maniglie consentono di alza-
re comodamente la macchina per caricarla su un mezzo di trasporto o
portarla al piano dove deve essere utilizzata.
La figura (0) rappresenta la regolazione (Rm) della maniglia di gui-
da; è sufficiente allentare il pomello, alzare la maniglia nella posizio-
ne più comoda e stringere nuovamente il pomello.
TRANSPORT PAR. 7
Important actions that allow to improve the transport of the ESCA-
LATOR.
In the two sides of the machine we have realized four handles , two
extractable (Ca) in the back side and two hollow traces in the front
under the clean water tank.
The weight of the machine is 96 kg and these handles allow to com-
fortably lift the machine on a vehicle of transport or to bring it to the
plan where it must be used.
The figure (0) represents the regulation (Rm) of the handle of guide;
is enough to loosen the knob, lift the handle in the position most
comfortable and again tighten the knob.
Fig. (0)
PAR. 7 PAR. 7

9
9
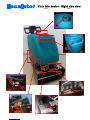
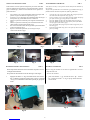
MONTAGGIO SPAZZOLE TYNEX PAR. 8
Prima di tutto è necessario spazzare ed aspirare la polvere dai canali della
scala. Per effettuare questa operazione si consiglia di montare le spazzole
grigie in TYNEX (fig.1) fornite con la macchina ed occorre seguire le se-
guenti indicazioni:
1. Agire sulla leva (fig.2) posta sul fianchetto mobile di sostegno delle
spazzole e togliere la canalina di aspirazione (fig.2/A).
2. Svitare le tre viti (V) di fissaggio del il fianchetto mobile di sostegno
delle spazzole (fig.3) utilizzando la chiave in dotazione.
3. Infilare le spazzole in TYNEX nei perni esagonali di trascinamento
(fig.4).
4. Infilare le spazzole in TYNEX nei perni di trascinamento del fian-
chetto mobile di sostegno delle spazzole (fig.5).
5. Riavvitare il fianchetto mobile di sostegno delle spazzole utilizzando
la chiave in dotazione (fig.6).
6. Riporre la canalina di aspirazione (T) in un luogo sicuro per
l’utilizzo nella fase di lavaggio.
Fig. 1 Fig. 2 Fig. 2/A Fig. 3
Fig. 4
Fig. 5
Fig. 6
TYNEX BRUSHES ASSEMBLAGE PAR. 8
At the first is necessary to sweep and to suck the dust from the channels of
the escalator.
To effect this operation advise to assemble the grey TYNEX brushes (fig.1)
furnished with the machine and follow the following indications:
1. Act on the lever (fig.2) sets on the mobile side of support of the bru
shes and remove the aspiration stripe (fig.2/A).
2. Unscrew the three screws (V) of fixing of the the mobile side of sup-
port of the brushes (fig.3) using the key in endowment.
3. Insert the TYNEX brushes in the hexagonal puller pivots (fig.4).
4. Insert the TYNEX brushes in the conic puller pivots of the mobile
side of support of the brushes (fig.5).
5. Screw the mobile side of support of the brushes using the key in en-
dowment (fig.6).
6. Put back the aspiration stripe (T) in a sure place for the use in the
phase of washing.
MOVIMENTAZIONE E SPOSTAMENTO PAR. 9
Prima di procedere assicurarsi che la macchina sia spenta e il cavo
scollegato elettricamente
Per spostare la macchina da un sito all’altro agire come segue:
1. Spingere sul manico “1” Fig. 60 facendo forza verso il basso
fino a quando si appoggia la ruotina “Rp” a terra, le spazzole
“2” Fig. 61 si sollevano e la macchina è pronta per gli sposta-
menti.
HANDLING AND MOVING PAR. 9
Before using the machine be sure that it is off and that it is electri
cally disconnected.
To move the machine:
1. push on the handle “1” fig. 60 until the wheel “Rp” touches
the ground, the brushes “2” Fig. 61 lift up and the machine
can be moved.
Fig. 60
Fig. 61

10
10
SOLLEVAMENTO SPAZZOLE A MACCHINA FERMA PAR. 10
Il sollevamento serve ad evitare la deformazione delle spazzole
con macchina ferma.
Procedere come segue:
1. Impugnare il pomello “3” fig.62 e ruotare in senso antiorario
2. fino a comparsa del cavalletto e a fermo meccanico “4” fig.
63.
La macchina ora è sorretta dal cavalletto “Cv” e la molla tiene
in posizione il cavalletto dritto per un appoggio sicuro. Fig.
64
LIFTING BRUSHES PAR. 10
The lifting up helps not to deform the brushes when the machine
stays.
Do as follows:
Take the knob “3” Fig. 62, turn it anticlockwise until the tre stle
comes out and at mechanical stop “4” Fig. 63.
Now the machine is supported by the trestle “Cv”and the
spring helps keeping it straight for a safe support. Fig. 64
Fig. 62
Fig. 63 Fig. 64
PREPARAZIONE DELLA MACCHINA PER LA PULIZIA A SECCO
( Con aspiratore Esterno) PAR. 11
Dopo aver montato le spazzole in TYNEX operare come segue:
1. Collegare un aspiratore (fig.7) di grande potenza alla macchina tra-
mite il bocchettone (K) (fig.7/A).
2. Collegare all'interno della macchina (fig.8) il tubo flessibile (C) al
bocchettone (2) (vedi LEGENDA )
3. Inserire la spina dell’aspiratore nella presa di corrente sulla macchi-
na lavascale (fig.9).
Fig. 7 Fig. 8
Fig. 7/A Fig. 9
PREPARATION OF THE MACHINE FOR THE DRY CLEANING
(with external aspirator). PAR. 11
After having assembled the TYNEX brushes operate as it follows:
1. Connect an aspirator (fig.7) with great aspiration power to the ma-
chine through the mouthpiece (K) (fig.7/A).
2. Connect inside the machine (fig.8) the flexible (C) pipe to the mou-
thpiece (2) (see LEGENDA).
3. Insert the thorn of the aspirator in the taking of tide on the escalator
machine (fig.9).

11
11
PREPARAZIONE DELLA MACCHINA PER LA PULIZIA A SECCO
(Con aspiratore a secco Interno). PAR. 12
Dopo aver montato le spazzole in TYNEX operare come segue:
1. Rimuovere il fianchetto SX (fig.17) attraverso l’apposito gancio (G).
2. Collegare all'interno della macchina (fig.18) il tubo flessibile (A) al
bocchettone (1) (vedi LEGENDA Pag. 10).
3. Collegare all'interno della macchina (fig.19) il tubo flessibile (B) al
bocchettone della testata (2) (vedi LEGENDA pag. 10).
4. Montare il Filtro a sacco nell’apposito Aspiratore (fig.20) e, quando
pieno, sostituirlo con un nuovo sacchetto (vedi MONTAGGIO/
SOSTITUZIONE FILTRO A SACCO PAG.15 PAR. 23 ).
5. ATTENZIONE:
Assicurarsi di controllare regolarmente, anche durante il lavoro,
lo Stato di riempimento/saturazione del sacchetto filtro e, in
Caso di necessità, provvedere alla sostituzione dello stesso.
PREPARATION OF THE MACHINE FOR THE DRY CLEANING
(with internal aspirator). PAR. 12
After having assembled the TYNEX brushes operate as it follows:
1. Remove the side SX (fig.17) through the special hook (G).
2. Connect inside the machine (fig.18) the flexible (A) pipe to the mou-
thpiece (1) (see LEGENDA pag. 10).
3. Connect inside the machine (fig.19) the flexible (B) pipe to the mou-
thpiece of the washing head (2) (see LEGEND pag. 10).
4. Assemble the paper Filter in the special Aspirator (fig.20) and, when
full, replace it with a new pouch (see ASSEMBLAGE / SUBSTITU-
TION PAPER FILTER PAG. 15 PAR. 23).
5. IMPORTANT:
Check the paper filter on a regular basis, even while working
with the machine, end when full/saturated, replace it with a
New one.
Fig. 19 Fig. 18 Fig. 17
Fig. 20
Fig. 14 Fig. 16 Fig. 15 Fig. 15/A
ROTAZIONE TESTATA LAVANTE E PULIZIA A SECCO PARTE SX.
PAR. 14
Per la pulizia a secco della parte sinistra della scala, procedere come segue:
1. Svitare il pomello di fissaggio della testata (F) (fig.14).
2. Ruotare la testata lavante della lavascale (fig.15-15/A).
3. Posizionare la macchina sulla sinistra del piano orizzontale della scala
mobile (fig.16).
4. Mettere in funzione il freno di stazionamento (Y) (fig.11).
5. Premere l’interruttore delle spazzole (fig.12).
6. Premere l’interruttore dell’ aspirazione (fig.12)
7. Mettere in funzione la scala mobile assicurandosi che il moto della
scala stessa sia diretto verso la lavascale.
8. Accertarsi che nei canali non vi sia più polvere, quindi aspirare tutti i
residui rimasti sul piano tramite l'accessorio manuale (fig.13) collegato
alla macchina (vedi COLLEGAMENTO ACCESSORIO MANUALE
PAG. 14 PAR. 20).
ROTATION WASHING-HEAD AND ESCALATOR DRY CLEANING
PART SX. PAR. 14
For the dry cleaning of the left part of the staircase, proceed as it follows:
1. Unscrew the knob of fixing of the Washing head (F) (fig.14).
2. Rotate the washing head of the machine (fig.15-15 /As).
3. Position the machine on the left side of the horizontal plan of the
mobile staircase (fig.10).
4. Put the brake of parking (Y) in operation (fig.11).
5. Press the interrupter of the brushes (fig.12).
6. Turn on the aspirator previously connected to the machine.
7. Put the mobile staircase in operation assuring that the motion of
the same staircase is directed toward the machine.
8. Verify that in the channels there is not more dust, therefore suck all
the residues remained through the manual accessory (fig.13).( see
MANUAL ACCESSORY CONNECTION PAG. 14 PAR. 20).
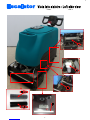
POSIZIONAMENTO DELLA MACCHINA E PULIZIA A SECCO
PARTE DX. PAR. 13
1. Posizionare la macchina sulla destra del piano orizzontale della scala
mobile (fig.10).
2. Mettere in funzione il freno di stazionamento (Y) (fig.11).
3. Premere l’interruttore delle spazzole (fig.12).
4. Premere l’interruttore dell’ aspirazione (fig.12).
5. Mettere in funzione la scala mobile assicurandosi che il moto
della scala stessa sia diretto verso la lavascale.
6. Accertarsi che nei canali non vi sia più polvere, quindi aspirare tutti i
residui rimasti sul piano tramite l'accessorio manuale (fig.13) colle-
gato alla macchina (vedi COLLEGAMENTO ACCESSORIO MA-
NUALE PAG. 14 PAR. 20).
Fig. 11 Fig. 12 Fig. 13
Fig. 10
POSITIONING OF THE MACHINE AND ESCALATOR DRY
CLEANING PART DX. PAR. 13
1. Position the machine on the right side of the horizontal plan of the
mobile staircase (fig.10).
2. Put the brake of parking (Y) in operation (fig.11).
3. Press the interrupter of the brushes (fig.12).
4. Turn on the aspirator previously connected to the machine.
5. Put the mobile staircase in operation assuring that the motion of
the same staircase is directed toward the machine.
6. Verify that in the channels there is not more dust, therefore suck all
the residues remained through the manual accessory (fig.13).( see
MANUAL ACCESSORY CONNECTION PAG. 14 PAR. 20).

12
12
TRATTAMENTO DELLA SCALA MOBILE CON DETERGENTE
PER SPORCO MINERALE PAR. 15
Prima di procedere al lavaggio della scala mobile con aspirazione dello spor-
co, è possibile eseguire un trattamento di prelavaggio utilizzando un deter-
gente specifico per lo sporco minerale, al fine di sgrassare le parti laterali nei
punti lubrificati per lo scorrimento degli elementi mobili.
Per procedere al prelavaggio operare come segue :
1. Spostare la valvola selettore (N) su “OPEN GUN”.
2. Collegare l’accessorio tubo spirale (S) all’attacco rapido (W).
3. Collegare l’accessorio pistola spray (P) al tubo spirale (S).
4. Aprire il rubinetto (M).
5. Collegare l’accessorio tubo pescante (D) all’attacco rapido (E).
6. Inserire il tubo pescante (D) nella tanica del detergente (fig.21).
7. Aprire il rubinetto (O).
8. Premere l’interruttore della pompa (fig.12).
9. Regolare la pressione di erogazione del detergente con il regolatore
(R) fino ad ottenere la giusta quantità di prodotto.
ATTENZIONE : La pressione di erogazione consigliata è 0,8 bar
per impedire al detergente di invadere la parte inferiore della
scala.
10. Nebulizzare il prodotto sulla scala mobile tramite l’accessorio pisto-
la spray ( P) per un ciclo di rotazione completo della scala stessa.
TREATMENT OF THE MOBILE STAIRCASE WITH DETERGENT
FOR MINERAL DIRTY. PAR. 15
Before proceeding to the washing of the mobile staircase with aspiration of
the dirty, is possible to perform a treatment of pre-washing using a specific
detergent for the mineral dirty , with the purpose of cleaning the side parts
in the points lubricated for the slide of the mobile elements.
To proceed to the pre-washing, operate as it follows :
1. Move the valve selector (N) on "OPEN GUN."
2. Connect the accessory spiral pipe (S) to the rapid (W) attack.
3. Connect the accessory gun spray (P) to the spiral pipe (S).
4. Open the faucet (M).
5. Connect the accessory aspiration pipe (D) to the rapid (E) attack.
6. Insert the aspiration (D) pipe in the tank of the detergent (fig.21).
7. Open the faucet (O).
8. Press the interrupter of the pump (fig.12).
9. Regulate the pressure of disbursement of the detergent with the
regulator (R) to get the correct quantity of product.
ATTENTION: The recommended pressure of disbursement is 0,8
bar to prevent that the detergent invade the inferior part of the
staircase.
10. Nebulize the product on the mobile staircase through the accessory
gun spray (P) for a complete cycle of rotation of the same staircase.
Fig. 21
MONTAGGIO SPAZZOLE PPL PER LAVAGGIO SCALA MOBILE PAR. 16
Dopo aver spazzato ed aspirato la polvere dai canali della scala occorre so-
stituire le due spazzole cilindriche in TYNEX con le due spazzole nere in
PPL (fig.22) per poi procedere alla fase di lavaggio. Per effettuare questa
operazione, seguire le seguenti indicazioni:
1. Svitare le tre viti (V) di fissaggio del il fianchetto mobile di sostegno
delle spazzole (fig.3) utilizzando la chiave in dotazione (fig. 6).
2. Rimuovere le spazzole in TYNEX precedentemente montate.
3. Infilare le spazzole nere in PPL nei perni esagonali di trascinamento
(fig.4).
4. Infilare le spazzole nere in PPL nei perni di trascinamento del fian-
chetto mobile di sostegno delle spazzole (fig.5).
5. Riavvitare il fianchetto mobile di sostegno delle spazzole utilizzando
la chiave in dotazione (fig.6).
6. Montare la canalina di aspirazione (T) riposta precedentemente, per
l’utilizzo nella fase di lavaggio (fig.23).
7. Agire sulla leva (fig.2) posta sul fianchetto mobile di sostegno delle
spazzole e bloccare la canalina di aspirazione (T) (fig.2/A).
Fig. 22
ASSEMBLAGE PPL BRUSHES FOR ESCALATOR WASHING PAR. 16
After having swept and sucked the dust from the channels of the staircase, is
necessary to replace the two cylindrical brushes in TYNEX with the two
black brushes in PPL (fig.18) before to proceed to the phase of washing. To
effect this operation, follow the following indications:
1. Unscrew the three screws (V) of fixing of the the mobile side of sup-
port of the brushes (fig.3) using the key in endowment.
2. Remove the TYNEX brushes previously assembled.
3. Insert the black PPL brushes in the hexagonal puller pivots (fig.4).
4. Insert the black PPL brushes in the puller pivots of the mobile side
of support of the brushes (fig.5).
5. Screw the mobile side of support of the brushes using the key in en-
dowment (fig.6).
6. Assemble the aspiration stripe (T) previously put in a sure place for
the use in the phase of washing (fig.19).
7. Act on the lever (fig.2) set on the mobile side of support of the bru-
shes and stop the aspiration stripe (T) (fig.2/A).
Fig. 23
Fig. 12
Fig. 2/A
Fig. 3
Fig. 4
Fig. 5
Fig. 6 Fig. 2

13
13
POSIZIONAMENTO DELLA MACCHINA E LAVAGGIO PARTE
DX. PAR. 18
1. Posizionare la macchina sulla destra del piano orizzontale della scala
mobile (fig.10).
2. Mettere in funzione il freno di stazionamento(Y) (fig.11).
3. Premere l’interruttore delle spazzole (fig.12).
4. Premere l’interruttore dell’ aspirazione (fig.12).
5. Aprire il rubinetto manuale (X) (fig.29).
6. Premere l’interruttore della pompa (fig.12).
7. Regolare la pressione di erogazione del detergente con il regolatore
(R) fino ad ottenere la giusta quantità di prodotto (fig.30).
8. Mettere in funzione la scala mobile assicurandosi che il moto
della scala stessa sia diretto verso la lavascale.
POSITIONING OF THE MACHINE AND ESCALATOR WASHING
PART DX. PAR. 18
1. Position the machine on the right side of the horizontal plan of the
mobile staircase (fig.10).
2. Put the brake of parking (Y) in operation (fig.11).
3. Press the interrupter of the brushes (fig.12).
4. Press the interrupter of aspiration (fig.12).
5. Open the manual faucet (X) (fig.29).
6. Press the interrupter of the pump (fig.12).
7. Regulate the pressure of disbursement of the detergent with the
regulator (R) to get the correct quantity of product (fig.30).
8. Put the mobile staircase in operation assuring that the motion of
the same staircase is directed toward the machine.
Fig. 14 Fig. 16 Fig. 15 Fig. 15/A
ROTAZIONE TESTATA LAVANTE E LAVAGGIO PARTE SX.
PAR. 19
Per il lavaggio della parte sinistra della scala, procedere come segue:
1. Svitare il pomello di fissaggio della testata (F) (fig.14).
2. Ruotare la testata lavante della lavascale (fig.15-15/A).
3. Posizionare la macchina sulla sinistra del piano orizzontale della
scala mobile (fig.16).
4. Mettere in funzione il freno di stazionamento(Y) (fig.11).
5. Premere l’interruttore delle spazzole (fig.12).
6. Premere l’interruttore dell’ aspirazione (fig.12).
7. Aprire il rubinetto manuale (X) (fig.29).
8. Premere l’interruttore della pompa (fig.12).
9. Regolare la pressione di erogazione del detergente con il regolatore
(R) fino ad ottenere la giusta quantità di prodotto (fig.30).
10. Mettere in funzione la scala mobile assicurandosi che il moto
della scala stessa sia diretto verso la lavascale.
ROTATION WASHING-HEAD AND ESCALATOR WASHING PART SX.
PAR. 19
For the washing of the left part of the staircase, proceed as it follows:
1. Unscrew the knob of fixing of the Washing head (F) (fig.14).
2. Rotate the washing head of the machine (fig.15-15 /As).
3. Position the machine on the left side of the horizontal plan of the mo-
bile staircase (fig.16).
4. Put the brake of parking (Y) in operation (fig.11).
5. Press the interrupter of the brushes (fig.12).
6. Press the interrupter of aspiration (fig.12).
7. Open the manual faucet (X) (fig.29).
8. Press the interrupter of the pump (fig.12).
9. Regulate the pressure of disbursement of the detergent with the regu-
lator (R) to get the correct quantity of product (fig.30).
10. Put the mobile staircase in operation assuring that the motion of the
same staircase is directed toward the machine.
PREPARAZIONE DELLA MACCHINA PER IL LAVAGGIO PAR. 17
Dopo aver montato le spazzole in PPL operare come segue:
1. Aprire il fianchetto DX (fig.24) attraverso l’apposito sportello.
2. Collegare all'interno della macchina (fig.25) il tubo flessibile (A) al
bocchettone della testata (2) (vedi LEGENDA pag. 10). In questa
condizione tutta lo sporco aspirato verrà trattenuta nel serbatoio di
recupero (Sr) della lavascale (fig.26).
3. Riempire il serbatoio soluzione (Ss) con una miscela di acqua e deter-
gente sgrassante universale per il lavaggio della scala mobile (fig.27).
4. Spostare la valvola selettore (N) su “OPEN VAPOR” (fig.28).
PREPARATION OF THE MACHINE FOR THE WASHING PAR . 17
After having assembled the PPL brushes, operate as it follows:
1. Open the DX side (fig.24) through the special counter.
2. Connect inside the machine (fig.25) the flexible (A) pipe to the mou-
thpiece of the washing-head (2) (see LEGENDA pag. 10). In this
condition all the dirty sucked will be held back in the recovery tank
(Sr) of the machine (fig.26).
3. Fill the solution tank (Ss) with a mixture of water and degreasing
universal detergent for the washing of the mobile staircase (fig.27).
4. Move the valve selector (N) on "OPEN VAPOR" (fig.28).
Fig. 26
Fig. 25 Fig. 24 Fig. 27 Fig. 28
Fig. 11 Fig. 12 Fig. 29 Fig. 10 Fig. 30

14
14
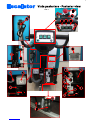
PULIZIA CON ACCESSORIO MANUALE PAR. 22
L’accessorio manuale (H) (fig.31) fornito con la lavascale è può essere usato
come sistema di lavaggio con iniezione ed estrazione negli angoli più inac-
cessibili e nella pulizia del frontespizio verticale del gradino della scala mo-
bile. Per pulire con l’accessorio manuale, operare come segue:
1. Collegare l’accessorio manuale (H) come precedentemente descritto.
2. Collegare la bocchetta (H1) o (H2) di aspirazione all’accessorio (H).
3. Riempire il serbatoio soluzione (Ss) con una miscela di acqua e de-
tergente sgrassante universale per il lavaggio (fig.27).
4. Spostare la valvola selettore (N) su “OPEN GUN”.
5. Aprire il rubinetto (M).
6. Premere l’interruttore dell’ aspirazione (fig.12).
7. Aprire il rubinetto manuale (X) (fig.29).
8. Premere l’interruttore della pompa (fig.12).
9. Regolare la pressione di erogazione del detergente con il regolatore
(R) fino ad ottenere la giusta quantità di prodotto detergente.
ATTENZIONE : La pressione di erogazione consigliata è 0,8 bar
per impedire al detergente di invadere la parte inferiore della
scala.
10. Nebulizzare il detergente nelle parti desiderate con l’accessorio ma-
nuale premendo la leva di comando sull’impugnatura.
COLLEGAMENTO ACCESSORIO MANUALE PAR. 20
Per collegare l’accessorio manuale (H) (fig.31) alla lavascale, operare come
segue:
1. Aprire il fianchetto DX (fig.34) attraverso l’apposito sportello.
2. Collegare all'interno della macchina (fig.32) il tubo flessibile (A) al
bocchettone (4) (vedi LEGENDA pag. 10).
3. Collegare l’accessorio manuale (H) al bocchettone (4) (fig.33).
4. Collegare l’accessorio tubo spirale (S) all’attacco rapido (W).
5. Collegare l’accessorio manuale (H) al tubo spirale (S) (fig.34).
MANUAL ACCESSORY CONNECTION PAR. 20
To connect the manual (H) accessory (fig.31) to the machine, operate as it
follows:
1. Open the DX side (fig.34) through the special counter.
2. Connect inside the machine (fig.32) the flexible (A) pipe to the mou-
thpiece (4) (see LEGENDA).
3. Connect the manual (H) accessory to the mouthpiece (4) (fig.33).
4. Connect the accessory spiral pipe (S) to the rapid (W) attack.
5. Connect the manual (H) accessory to the spiral pipe (S) (fig.34).
ASPIRAZIONE CON ACCESSORIO MANUALE PAR. 21
L’accessorio manuale (H) (fig.31) fornito con la lavascale è efficace per
aspirare tutti i residui rimasti sul piano durante le fasi di pulizia a secco e
lavaggio. Per aspirare con l’accessorio manuale, operare come segue:
1. Collegare l’accessorio manuale (H) come precedentemente descritto.
2. Collegare la bocchetta (H1) o (H2) di aspirazione all’accessorio (H).
3. Premere l’interruttore dell’ aspirazione (fig.12).
In questa condizione tutto lo sporco aspirato verrà trattenuto nel serbatoio di
recupero (Sr) (fig.26).
ASPIRATION WITH MANUAL ACCESSORY PAR. 21
The manual (H) accessory (fig.31) furnished with the machine is effective to
suck all the residues remained on the plan during the phases of dry cleaning
and washing. To suck with the manual accessory, operate as it follows:
1. Connect the manual (H) accessory as previously described.
2. Connect the aspiration mouthpiece (H1)or(H2) to the accessory (H).
3. Press the interrupter of the aspiration (fig.12).
In this condition all the dirty sucked will be held back in the reservoir of
recovery (Sr) (fig.26).
CLEANING WITH MANUAL ACCESSORY PAR. 22
The manual (H) accessory (fig.31) furnished with the machine can be used
as system of washing with injection and extraction in the most inaccessible
angles and in the cleaning of the vertical frontispiece of the step of the mobi-
le staircase. To clean with the manual accessory, operate as it follows:
1. Connect the manual (H) accessory as previously described.
2. Connect the aspiration mouthpiece (H1)or(H2) to the accessory (H).
3. Fill the solution tank (Ss) with a mixture of water and degreasing
universal detergent for the washing (fig.27).
4. Move the valve selector (N) on "OPEN GUN."
5. Open the faucet (M).
6. Press the interrupter of the aspiration (fig.12).
7. Open the manual (X) faucet (fig.29).
8. Press the interrupter of the pomp (fig.12).
9. Regulate the pressure of disbursement of the detergent with the re-
gulator (R) to get the correct quantity of product detergent.
ATTENTION: The recommended pressure of disbursement is 0,8 bar
to prevent thatthe detergent invade the inferior staircaase part.
10. Nebulize the detergent in the parts desired with the manual acces-
sory pressing the joy stick on the hilt.
Fig. 32
Fig. 34
Fig. 33
Fig. 31
Fig. 29
Fig. 26 Fig. 27
Fig. 12

15
15
MONTAGGIO/SOSTITUZIONE FILTRO A SACCO PAR. 23
Per il primo montaggio o la sostituzione del filtro a sacco dell’aspiratore
interno alla lavascale, operare come segue:
1. Rimuovere il fianchetto SX (fig.40) attraverso l’apposito gancio (G).
2. Tirare la leva (L) (fig.36) per liberare l’aspiratore interno (As).
3. Rimuovere il contenitore del filtro (fig.37).
4. Inserire il filtro a sacco (fig.38) nell’apposito bocchettone (Bo).
5. Rimontare il contenitore del filtro.
6. Premere la leva (L) per bloccare l’aspiratore interno (As).
7. Rimontare il fianchetto SX (fig.40) e bloccare il gancio (G).
ASSEMBLAGE / SUBSTITUTION PAPER FILTER PAR. 23
For the first assemblage or the substitution of the paper filter of the inside
aspirator of the machine, operate as it follows:
1. Remove the SX side (fig.40) through the special hook (G).
2. Throw (fig.36) the lever (L) to free the inside (As) aspirator.
3. Remove the container of the filter (fig.37).
4. Insert the paper filter (fig.38) in the special mouthpiece (Bo).
5. Reassemble the container of the filter.
6. Press the lever (L) to stop the inside (As) aspirator.
7. Reassemble the SX side (fig.40) and stop the hook (G).
SMONTARE IL GRUPPO SPAZZOLE PAR. 24
E' possibile smontare il gruppo spazzole dal corpo macchina.
Questo renderà la macchina più leggera e facilmente trasportabile, anche nei
luoghi poco accessibili. In questo caso procedere come segue:
1. Aprire i carter laterali.
2. Liberare il ferma cavo dal supporto (fig.41).
3. Disconnettere la morsettiera (fig.42).
4. Svitare la vite centrale di fissaggio della testata (fig.43 ) con una
chiave a brugola esagonale di 10.
La macchina ora peserà kg 65, mentre il gruppo spazzole (fig.44) pesa kg
31. Il tempo per questa operazione sarà di 10 minuti.
GET OFF THE BRUSHES GROUP PAR. 24
In order to transport easily the machine, also in inaccessible places, it is
possible to relieve the weight taking off the brushes system from the Ma-
chine. Proceed as follows:
1. Open the side casings.
2. Remove the locking cable from the support (fig. 41).
3. Disconnect the terminal board (fig.42).
4. Unscrew the central screw (fig. 43) with an hexagonal key seat
wrench of 10.
Now the weight of the Machine is 65 Kg, while the weight of the brushes
system (fig.44) is 31 Kg. You will make this procedure 10 minutes.
Fig. 40 Fig. 39
Fig. 37 Fig. 36 Fig. 38 Fig. 35
Fig. 43 Fig. 42 Fig. 44 Fig. 41
Filtro - paper filter

16
16
PULIZIA DELLE SPAZZOLE PAR. 25
Con l’accessorio Vasca inox (fig.45) è possibile pulire le spazzole a lavoro
terminato. Per procedere alla pulizia delle spazzole, operare come segue:
1. Sollevare la macchina sul cavalletto(fig. 64)(vedere par.10 pag.10 )
2. Agire sulla leva (fig.2) posta sul fianchetto mobile di sostegno delle
spazzole e togliere la canalina di aspirazione (fig.2/A).
3. Mettere la Vasca inox sotto alla testata lavante (fig.46).
4. Versare nell’accessorio Vasca inox una miscela di acqua e detergen-
te per il lavaggio delle spazzole MAX 2 Cm (fig.47).
5. Abbassare la macchina dal cavalletto (fig.64)(vedere par.10 pag.10)
e appoggiare la testata lavante nella Vasca inox (fig.48/A/B/C).
6. Aprire il fianchetto DX (fig.24) attraverso l’apposito sportello.
7. Collegare all'interno della macchina (fig.25) il tubo flessibile (A) al
bocchettone della testata (2) (vedi LEGENDA). In questa condizio-
ne tutto lo sporco aspirato verrà trattenuto nel serbatoio di recupero
(Sr) della lavascale (fig.26).
8. Riempire il serbatoio soluzione (Ss) con acqua pulita (fig.26).
9. Spostare la valvola selettore (N) su “OPEN VAPOR” (fig.28).
10. Premere l’interruttore dell’ aspirazione prima di azionare le
spazzole (fig.12).
11. Premere l’interruttore delle spazzole (fig.12).
12. Aprire il rubinetto manuale (X) (fig.29).
13. Premere l’interruttore della pompa (fig.12).
14. Regolare la pressione di erogazione dell’acqua pulita con il regolato-
re (R) fino ad ottenerne la giusta quantità (fig.28).
BRUSHES CLEANING PAR. 25
With the accessory Tub inox (fig.45) is possible to clean the brushes at fini-
shed work. To proceed to the cleaning of the brushes, operate as it follows:
1. Lift the machine with the rudder of guide. ( see section 10 peg.
10)
2. Act on the lever (fig.2) set on the mobile side of support of the bru-
shes and remove the aspiration stripe (fig.2/A).
3. Put the Tub inox under the washing head (fig.46).
4. Pour in the accessory Tub inox a mixture of water and detergent for
the washing of the brushes MAX 2 Cm (fig.47).
5. Lower the car from the stand (Fig.64) (see page 10 par.10)Put the
washing head in the Tub inox (fig.48/A/B/C).
6. Open the side DX (fig.24) through the special counter.
7. Connect inside the machine (fig.25) the flexible (A) pipe to the mou-
thpiece of the washing head (2) (see LEGENDA). In this condition
all the dirty sucked will be held back in the reservoir of recovery (Sr)
of the machine (fig.26).
8. Fill the reservoir solution (Ss) with clean water (fig.27).
9. Move the valve selector (N) on "OPEN VAPOR" (fig.28).
10. Press the switch of 'aspiration before operating the bru-
sche (fig.12).
11. Press the interrupter of the brushes (fig.12).
12. Open the manual (X) faucet (fig.29).
13. Press the interrupter of the pump (fig.12).
14. Regulate the pressure of disbursement of the clean water with the
regulator (R) to get its correct quantity (fig.28).
Fig. 48/A Fig. 48
Fig. 47
Fig. 46
Fig. 45
Fig. 48/B Fig. 48/C
Max 2,00 Cm
Fig. 2 Fig. 2/A
Fig. 24 Fig. 25
Fig. 26 Fig. 28
Fig. 12
Fig. 29 Fig. 64

17
17
UTILIZZARE l’ESCALATOR COME LAVAMOQUETTES PAR. 26
Con la lavascale Escalator è possibile pulire ampie aree in moquette (fig.49).
Per procedere alla pulizia delle moquette, operare come segue:
1. Agire sulla leva (fig.2) posta sul fianchetto mobile di sostegno delle
spazzole e togliere la canalina di aspirazione (fig.2/A).
2. Aprire il fianchetto DX (fig.49) attraverso l’apposito sportello.
3. Collegare all'interno della macchina (fig.25) il tubo flessibile (A) al
bocchettone della testata (2) (vedi LEGENDA Pag. 16). In questa
condizione tutto lo sporco aspirato verrà trattenuto nel serbatoio di
recupero (Sr) della lavascale (fig.26).
4. Riempire il serbatoio soluzione (Ss) con una miscela di acqua e deter-
gente per il lavaggio delle moquette (fig.26).
5. Spostare la valvola selettore (N) su “OPEN VAPOR” (fig.28).
6. Premere l’interruttore delle spazzole (fig.12).
7. Premere l’interruttore dell’ aspirazione (fig.12).
8. Aprire il rubinetto manuale (X) (fig.29).
9. Premere l’interruttore della pompa (fig.12).
10. Regolare la pressione di erogazione dell’acqua pulita con il regolatore
(R) fino ad ottenerne la giusta quantità (fig.28).
USE THE ESCALATOR AS CARPET CLEANER PAR. 26
With the machine Escalator is possible to clean ample areas of carpet
(fig.49). To proceed to the cleaning of the carpets, operate as it follows:
1. Act on the lever (fig.2) set on the mobile side of support of the bru-
shes and remove the aspiration strip (fig.2/A).
2. Open the side DX (fig.24) through the special counter.
3. Connect inside the machine (fig.25) the flexible (A) pipe to the mou-
thpiece of the washing head (2) (see LEGENDA pag. 16). In this
condition all the dirty sucked will be held back in the reservoir of
recovery (Sr) of the machine (fig.26).
4. Fill the reservoir solution (Ss) with a mixture of water and detergent
for the washing of the carpets (fig.26).
5. Move the valve selector (N) on "OPEN VAPOR" (fig.28).
6. Press the interrupter of the brushes (fig.12).
7. Press the interrupter of the aspiration (fig.12).
8. Open the manual (X) faucet (fig.29).
9. Press the interrupter of the pomp (fig.12).
10. Regulate the pressure of disbursement of the clean water with the
regulator (R) to get its correct quantity (fig.28).
UTILIZZARE L’ESCALATOR COME LAVASCIUGA PAVIMENTI
PAR. 27
Con la lavascale Escalator è possibile pulire pavimenti (fig.50) di qualsiasi
genere e in presenza di qualunque tipologia di sporco.
Per procedere alla pulizia dei pavimenti, operare come segue:
1. Agire sulla leva (fig.2) posta sul fianchetto mobile di sostegno delle
spazzole e togliere la canalina di aspirazione (fig.2/A).
2. Aprire il fianchetto DX (fig.49) attraverso l’apposito sportello.
3. Collegare all'interno della macchina (fig.51) il tubo flessibile (A) al
bocchettone (3) (vedi LEGENDA pag. 16). In questa condizione
tutto lo sporco aspirato verrà trattenuto nel serbatoio di recupero (Sr)
della lavascale (fig.26).
4. Montare il tergi pavimento per l’asciugatura tramite gli appositi
pomelli (fig.52) e controllare che lo stesso sia perfettamente perpen-
dicolare al pavimento, altrimenti regolarlo con l'apposito comando
(fig.53).
5. Alzare il tergi pavimento mediante l’apposita leva (fig.54).
6. Riempire il serbatoio soluzione (Ss) con una miscela di acqua e de-
tergente sgrassante per il lavaggio dei pavimenti (fig.26).
7. Spostare la valvola selettore (N) su “OPEN VAPOR” (fig.28).
8. Premere l’interruttore delle spazzole (fig.12).
9. Premere l’interruttore dell’ aspirazione (fig.12).
10. Abbassare il tergi pavimento mediante l’apposita leva (fig.54).
11. Aprire il rubinetto manuale (X) (fig.29).
12. Premere l’interruttore della pompa (fig.12).
13. Regolare la pressione di erogazione dell’acqua pulita con il regolato-
re (R) fino ad ottenerne la giusta quantità (fig.29).
USE THE ESCALATOR AS FLOOR SCRUBBER - DRYER
PAR. 27
With the machine Escalator is possible to clean floors (fig.50) of any kind
and in presence of whatever typology of dirt. To proceed to the cleaning of
the floors, operate as it follows:
1. Act on the lever (fig.2) set on the mobile side of support of the bru-
shes and remove the aspiration stripe (fig.2/A).
2. Open the side DX (fig.49) through the special counter.
3. Connect inside the machine (fig.51) the flexible (A) pipe to the mou-
thpiece (3) (see LEGENDA pag. 16). In this condition all the dirty
sucked will be held back in the reservoir of recovery (Sr) of the ma-
chine (fig.26).
4. Assemble the floor wiper for the drying through the special knobs
(fig.52) and check that the same is perfectly perpendicular to the
floor, otherwise regulate it with the special command (fig.53).
5. Lift the floor wiper through the special lever (fig.54).
6. Fill the reservoir solution (Ss) with a mixture of water and degrea-
sing detergent for the washing of the floors (fig.26).
7. Move the valve selector (N) on "OPEN VAPOR" (fig.28).
8. Press the interrupter of the brushes (fig.12).
9. Press the interrupter of the aspiration (fig.12).
10. Lower the floor wiper through the special lever (fig.54).
11. Open the manual (X) faucet (fig.29).
12. Press the interrupter of the pump (fig.12).
13. Regulate the pressure of disbursement of the clean water with the
regulator (R) to get its correct quantity (fig.29).
Fig. 49 Fig. 50
Fig. 51 Fig. 52 Fig. 53 Fig. 54
Fig. 2 Fig. 2/A
Fig. 25
Fig. 26 Fig. 28 Fig. 29
Fig. 12

18
18
SMALTIMENTO ACQUA SPORCA PAR. 28
La (fig. 55) rappresenta il tubo di scarico dell'acqua sporca; alla sua estremi-
tà si trova un tappo ad espansione. Per svuotare il serbatoio è necessario
svitare il tappo in senso antiorario fino ad ottenere la sua liberazione.
Abbassare il tubo flessibile, orientarlo nel contenitore e svuotare (fig.56).
Altezza dello scarico da terra cm.36.
ATTENZIONE : NON USARE PRODOTTI CON BASE SOLVENTE,
lavare il serbatoio con acqua pulita quando viene riposta la macchina. I de-
tergenti utilizzati devono essere non schiumogeni, biodegradabili. L'operato-
re deve usare i guanti di protezione.
PRODOTTI CONSIGLIATI: ALCALINICI, ACIDI E NEUTRI.
Attenersi alle indicazioni dei produttori dei prodotti chimici.
ELIMINATION OF DIRTY WATER PAR. 28
The (fig. 55) shows the hose dirty water drain, at his end is located an ex-
pansible drain plug. To empty the tank it is necessary to unscrew the drain
plug in counterclockwise sense of direction. Lower the flexible hose put in
on a container and drain the water(fig.56).
The height of the drain water is 36 cm from the floor.
ATTENTION: Don't use solvent products, wash the tank with clean water
when you finish working with the machine. Use only not foamy and biode-
gradable detergents. Use safety gloves for this operation.
RECOMMENDED PRODUCTS: ALKALINE, ACIDS AND NEUTRAL.
Follow the indications of the producers of the chemical products.
PULIZIA FILTRO SOLUZIONE LAVAGGIO PAR. 29
La (fig. 57) raffigura il filtro della soluzione di lavaggio (Wf) ; è importante
pulire periodicamente per assicurare un una buona erogazione della soluzio-
ne. Per la pulizia si procede come segue: svitare il contenitore trasparente
ruotando lo stesso in senso antiorario, ponendo la massima attenzione alle
guarnizioni; lavare e rimontare.
WASHING SOLUTION FILTER CLEANING PAR. 29
(Fig. 57) shows the solution filter (Wf) ; it's important to clean it periodi-
cally in order to ensure a good water erogation. To clean it make as it fol-
lows: unscrew the transparent container in counterclockwise sense, pay
attention to the clean and screw it again.
Fig. 55 Fig. 56 Fig. 57 Fig. 58
SVUOTAMENTO SERBATOIO SOLUZIONE LAVAGGIO PAR. 30
La (fig. 58) raffigura il rubinetto per lo svuotamento (Ap) della soluzione di
lavaggio dal serbatoio dell’acqua pulita; è importante smaltire la soluzione a
lavoro terminato per assicurare una buona erogazione della stessa.
SOLUTION TANK UNLOADING PAR. 30
(Fig. 58) represents the faucet for the emptying (Ap) of the solution of wa-
shing from the reservoir of the clean water; it is important to digest the solu-
tion at finished work to assure a good disbursement of the same one.
DEMOLIZIONE E SMALTIMENTO DELLA PAR. 32
MACCHINA
La demolizione e smaltimento della macchina prevede:
Il taglio dei cavo di alimentazione al fine di garantire l'invo-
lontario riutilizzo.
Il distacco della targhetta di identificazione e la sua elimina-
zione assieme alla documentazione a corredo.
La consegna della macchina ad una ditta autorizzata allo
smaltimento differenziato dei materiali, nel rispetto delle di-
sposizioni legislative vigenti. La macchina è stata costruita
con materie prime non pericolose.
DEMOLITION AND DISPOSAL OF THE MACHINE
PAR. 32
When demolishing and disposing of the machines, the following
steps should be taken :
The supply cable should be cut to ensure the machine is not
used again involuntarily.
The identification plate should be removed and eliminated
together with the accompanying documentation.
The machine should be consigned to a company authorized to
carry out the separate disposal of materials, in observance of
existing legislation. The machine has been built using no-
dangerous raw materials.
PULIZIA SERBATOIO RECUPERO E FILTRO ASPIRAZIONE
PAR.31
1 Ad ogni fine ciclo di lavoro, svuotare il serbatoio di recupero,
Vedi PAR.28 (fig. 56) e di sciacquare lo stesso (fig. 59).
2 Rimuovere il filtro di aspirazione dalla sua sede e sciacquarlo
in modo da liberarlo da qualsiasi impurità (fig.60 e 61)
3 Rimontare il filtro nell’apposita sede.
RINSING THE RECOVERY TANK END THE VACUUM-MOTOR
WATER FILTER PAR. 31
1 Empty the recovery tank at the end of each working cycle,
See PAR.28 (fig. 56) end rinse it (fig.59).
2 Remove the vacuum-motor filter from its seat, and rinse it until
totally free from dirt/impurities trapped in it Fig. (60 end 61)
3 Then, put it back into its seat
Fig. 59 Fig. 60 Fig. 61

19
19
INCONVENIENTI COMUNI E RIMEDI PAR. 33
POSSIBILI INCONVENIENTI CAUSE RIMEDI
La soluzione di lavaggio non
fuoriesce
Ostruzione dei condotti che porta-
no la soluzione.
Rimuovere le ostruzioni, pulire il
filtro
Filtro intasato Pulire o sostituire il filtro
Il serbatoio soluzione è vuoto Riempire il serbatoio
Il rubinetto di regolazione e' chiuso Aprire il rubinetto di regolazione
La macchina non recupera lo
sporco
Tubo di aspirazione ostruito. Pulire il tubo
Tubo di aspirazione perforato Sostituire il tubo.
La macchina non pulisce unifor-
memente Le spazzole sono consumate. Sostituire le spazzole
Il motore spazzola non funziona
per la macchina a corrente alter-
nata
Un maggiore sforzo sulle spazzole
ha fatto scattare il pulsante reset. Premere il pulsante RESET.
Uno sforzo sulle spazzole prolun-
gato ha fatto scattare il termostato
di protezione
Spegnere la macchina con l'in-
terruttore C e riaccenderla
quando il motore si è raffredda-
to
POSSIBLE PROBLEMS CAUSES SOLUTIONS
The solution of washing doesn't
come out
Obstruction of the ducts that brings the
solution.
Remove the obstructions and
clean the filter.
Clogged filter. Clean or replace the filter.
The solution tank is empty. Fill the solution tank.
The faucet of regulation is closed. Open the faucet of regulation.
The machine doesn't collect the
dirty
Pipe of aspiration obstructed. Clean the pipe.
Pipe of aspiration perfored. Replace the pipe.
The machine doesn't clean uni-
formly The brushes are consumed. Replace the brushes.
The brush motor doesn't work in
the cable model
A great effort on the brushes has acti-
vated the reset button. Push the RESET switch.
An effort on the brushes prolonged
has released the thermostat of protec-
tion.
Turn the machine off with the
switch C and turn it on when the
motor is colder.
COMMON PROBLEMS AND SOLUTIONS PAR. 33
U.M. Escalator
Area Pulita Mq/h 1000 Clean area
Motore Aspirazione W 1200 Vacuum motor
Motore Spazzole W 900 Brush motor
Lunghezza Spazzola mm 510 Brush Length
Rotazione Spazzola RPM 400 Brush rotation
Alimentazione V/Hz 230/50 – 60 110/50-60 Power supply
Tergipavimento mm 870 Squeegee
Pressione Spazzola Kg 30 Brush pressure
Serbatoio Soluzione Lt. 35 Solution tank
Serbatoio Recupero Lt. 35 Recovery tank
Depressione Mm/H2O 2100 Depression
Peso Kg 96 Weight
Dimensioni mm 1215x580x960 Dimensions
CARATTERISTICHE TECNICHE PAR. 34 TECHNICAL FEATURES

20
20
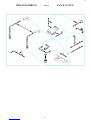
IMPIANTO ELETTRICO EC51 PAR. 35 - EC51 electrical plant
Descrizioni
Descriptions
N 1
Cavo Elett. Nero
Black electric cable
230V=Ø 1 mm² - 110V=Ø 2,08 mm²
MRS Morsetto Elettrico
Electric Clamp CND Condensatore
Condenser G/V 1 Cavo Elett. Gia/ver Ø 1 mm²
Yel/Gre electric cable Ø 1 mm²
TSP Tasto Motore Spazzole
Brush motor switch MAS Motore Aspirazione
Suction Motor Bl 1 Cavo Elett. Blu Ø 1 mm²
Blue electric cable Ø 1 mm²
TAS Tasto Motore Aspiraz.
Suction motor switch MSP Motore Spazzole
Brush Motor R 1
Cavo Elett. Rosso Ø 1 mm²
Red electric cable Ø 1 mm²
230V=Ø 1 mm² - 110V=Ø 2,08 mm²
PWR Spia Luminosa
Pilot Light FIL Filtro Antidisturbo
Electrical Noise filter M 1
Cavo Elett. Marrone
Brown electric cable
230V=Ø 1 mm² - 110V=Ø 2,08 mm²
RES
Tasto RESET
RESET Switch
230V=5A - 110V=10A
PMP Pompa BY-PASS
BY-PASS Pump BI 1 Cavo Elett. Bianco Ø 1 mm²
White electric cable Ø 1 mm²
TPM Tasto Pompa
Pump Switch LMP Lampeggiante
Flashing light GR 1 Cavo Elett. Grigio Ø 1 mm²
Grey electric cable Ø 1 mm²
La pagina si sta caricando...
La pagina si sta caricando...
La pagina si sta caricando...
La pagina si sta caricando...
-
 1
1
-
 2
2
-
 3
3
-
 4
4
-
 5
5
-
 6
6
-
 7
7
-
 8
8
-
 9
9
-
 10
10
-
 11
11
-
 12
12
-
 13
13
-
 14
14
-
 15
15
-
 16
16
-
 17
17
-
 18
18
-
 19
19
-
 20
20
-
 21
21
-
 22
22
-
 23
23
-
 24
24


in altre lingue
- English: Vaclensa PLC X51
Altri documenti
-
Lavor COMFORT DUOTECH Manuale utente
-
 Ghibli & Wirbel FR 30 SM 45 TOUCH Use And Maintenance
-
 Ghibli & Wirbel ROUND 45 E 55 TOUCH Use And Maintenance
-
 Ghibli & Wirbel ROUND 45 D 60 BC CHEM TOUCH Use And Maintenance
-
 Ghibli & Wirbel ROUND 45 SD 55 BC PLUS TOUCH Use And Maintenance
-
 Ghibli & Wirbel S2 80 D 70 BC Use And Maintenance
-
Powr-Flite PAS28R Manuale del proprietario
-
COMAC 26BT-32BT Manuale utente
-
-
COMAC 85 B - 100 B Manuale utente


