
2-682-471-02 (1)
Data Projector
Quick Reference Manual _____________________
Guide de référence rapide ____________________
Manual de referencia rápida ___________________
Kurzreferenz _______________________________
Guida rapida all’uso _________________________
_____________________________
© 2006 Sony Corporation
VPL-CX21
VPL-CS21
JP
GB
FR
ES
DE
IT
CS

2
A
B
C
A
B

3
1
2
3
4
a
b
c
d
JP

4
INPUT
TILT
ZOOM– +
FOCUS– +
FOCUS
AUTO
ENTER
PUSH
MENU
INPUT A
AC IN
VIDEO
AUDI O
POWER
SAVING
TEMP/
FAN
LAMP/
COVER
INPUT
TILT
ZOOM– +
FOCUS– +
FOCUS
AUTO
ENTER
PUSH
MENU
INPUT A
AC IN
VIDEO
AUDI O
POWER
SAVING
TEMP/
FAN
LAMP/
COVER

5
INPUT
TILT
ZOOM– +
FOCUS– +
FOCUS
AUTO
ENTER
PUSH
MENU
INPUT A
AC IN
VIDEO
AUDI O
POWER
SAVING
TEMP/
FAN
LAMP/
COVER
a
b
c y
1
2
3

6
a I 1
b
c
d
ENU
AC IN
COVER
Fn
FxF7
Power
On/Stand by
2
2
1
1
4
4
3
3
INPUT

7
a
b
c
a I 1
b I 1
c
I 1
TILT
ZOOM– +
FOCUS– +
2
2
1
1
3
3
FOCUS
AUTO
1
1
2
2
3
3

8
? 1
1
2
3

9
4
a
b
c
5
a
c
b
6
7
8
? 1
9
b B

10
1
2
3
4
5
6

11
? 1
c
c
c
c
c
c
c
c
c
c

12
c
c
c
c
c
c
I 1 I 1

13

2
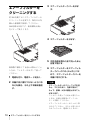
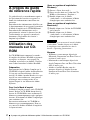
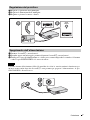
About the Quick Reference Manual / Using the CD-ROM Manuals
About the Quick
Reference Manual
This Quick Reference Manual explains the
connections and basic operations of this unit,
and gives notes on operations and
information required for maintenance.
For details on the operations, refer to the
Operating Instructions contained in the
supplied CD-ROM.
For safety precautions to which you have to
pay attention to prevent accidents when
handling and using this unit, refer to the
separate “Safety Regulations.”
Using the CD-ROM
Manuals
The supplied CD-ROM contains Operating
Instructions and ReadMe file in Japanese,
English, French, Spanish, German, Italian
and Chinese. First, refer to the ReadMe file.
Preparations
To read the Operating Instructions in the
CD-ROM, Adobe Acrobat Reader 5.0 or
later is required. If the Adobe Acrobat
Reader is not installed in your computer, you
can download free Acrobat Reader software
from URL of Adobe Systems.
To read the Operating Instructions
The Operating Instructions are contained in
the supplied CD-ROM. Insert the supplied
CD-ROM into the CD-ROM drive of your
computer, and the CD-ROM will start
automatically after a while. Select the
Operating Instructions you want to read.
The CD-ROM may not start automatically
depending on the computer. In this case,
open the Operating Instructions file as
follows:
(In case of Windows)
A Open “My Computer.”
B Right-click the CD-ROM icon and select
“Explorer.”
C Double-click “index.htm” file and select
the Operating Instructions you want to
read.
(In case of Macintosh)
A Double-click the CD-ROM icon on the
desk top.
B Double-click “index.htm” file and select
the Operating Instructions you want to
read.
If you cannot open “index.htm” file, double-
click on the Operating Instructions you want to
read from among those in
“Operating_Instructions” folder.
On trademarks
• Windows is a registered trademark of
Microsoft Corporation in the United States
and/or other countries.
• Macintosh is a registered trademark of
Apple Computer, Inc. in the United States
and/or other countries.
• Adobe and Acrobat Reader is a registered
trademark of Adobe Systems Incorporated
in the United States and/or other countries.
Note

3
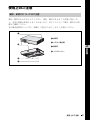
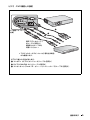
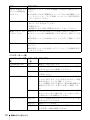
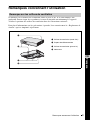
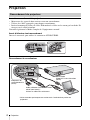
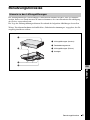
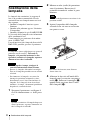
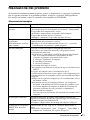
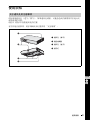
Notes on Use
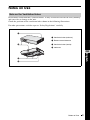
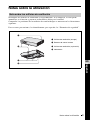
Notes on Use
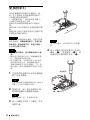
Do not block ventilation holes (exhaust/intake). If they are blocked, internal heat may build up
and cause fire or damage to the unit.
Check the positions of the ventilation holes shown in the following illustrations.
For other precautions, read the separate “Safety Regulations” carefully.
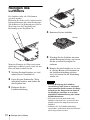
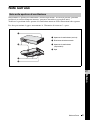
Note on the Ventilation Holes
1
2
3
4
a Ventilation holes (exhaust)
b Remote control detector
c Ventilation holes (intake)
d Indicators
GB
English

4
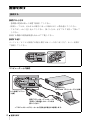
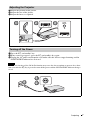
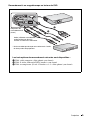
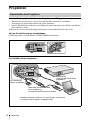
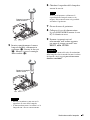
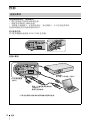
Projecting
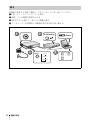
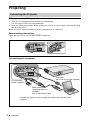
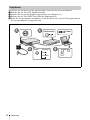
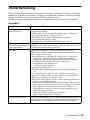
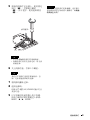
Projecting
When you connect the projector, make sure to:
• Turn off all equipment before making any connections.
• Use the proper cables for each connection.
• Insert the cable plugs firmly. When pulling out a cable, be sure to pull it out from the plug,
not the cable itself.
Refer also to the instruction manual of the equipment to be connected.
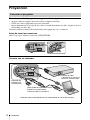
Before making connections
Open the cover to use the AUDIO/VIDEO connector.
Connecting with a computer
Connecting the Projector
INPUT
TILT
ZOOM– +
FOCUS– +
FOCUS
AUTO
ENTER
PUSH
MENU
INPUT A
AC IN
VIDEO
AUDI O
POWER
SAVING
TEMP/
FAN
LAMP/
COVER
Push.
INPUT
TILT
ZOOM– +
FOCUS– +
FOCUS
AUTO
ENTER
PUSH
MENU
INPUT A
AC IN
VIDEO
AUDI O
POWER
SAVING
TEMP/
FAN
LAMP/
COVER
video input
HD D-sub 15-pin cable (supplied)
A/V connecting
adaptor (supplied)
Audio (stereo audio
connecting cable (not
supplied))*
Use a no-resistance cable.
* Connect only when you want to output the audio from the speaker of the
projector.

5
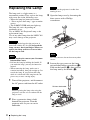
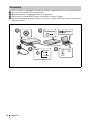
Projecting
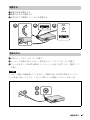
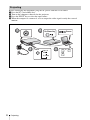
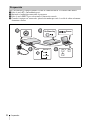
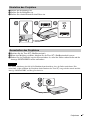
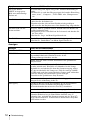
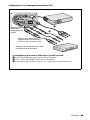
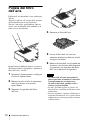
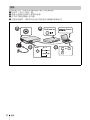
Connecting with a VCR/DVD player
INPUT
TILT
ZOOM– +
FOCUS– +
FOCUS
AUTO
ENTER
PUSH
MENU
INPUT A
AC IN
VIDEO
AUDI O
POWER
SAVING
TEMP/
FAN
LAMP/
COVER
The following three connecting options are available:
a Composite video (phono plug) cable (not supplied)
b S video (Mini DIN 4-pin) cable (not supplied)
c Component (D-sub 15-pin y 3
× phono plug) cable (not supplied)
A/V connecting
adaptor (supplied)
a
b
c
Audio (stereo audio
connecting cable (not
supplied))*
Use a no-resistance
cable.
* Connect only when you want to output the
audio from the speaker of the projector.

6
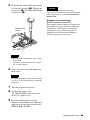
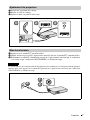
Projecting
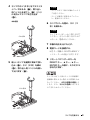
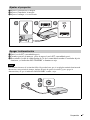
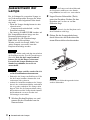
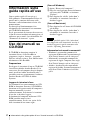
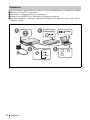
Before connecting the equipment, plug the AC power cord into a wall outlet.
a Press the I/1 (on/standby) key.
b Turn on the computer connected to the projector.
c Press the INPUT key to select the input source.
d When the computer is connected, set it to output the video signal to only the external
monitor.
Projecting
ENU
AC IN
COVER
Fn
FxF7
Power
On/Stand by
2
2
1
1
4
4
3
3
INPUT
or
and
Input A
Video
S-Video

7
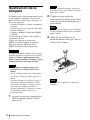
Projecting
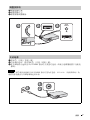
a Adjust the position of the picture.
b Adjust the size of the picture.
c Adjust the focus, as required.
a Press the I/1 (on/standby) key.
b When a message appears, press the I/1 (on/standby) key again.
c Unplug the AC power cord from the wall outlet after the fan has stopped running and the
ON/STANDBY indicator has lit in red.
The internal circuitry of the Off & Go function may cause the fan to continue to operate for a short
time even after the
I/1 key is pressed to turn off the power and the ON/STANDBY indicator changes
to red.
Adjusting the Projector
TILT
ZOOM– +
FOCUS– +
2
2
1
1
3
3
FOCUS
AUTO
or
Turning off the Power
Notes
1
1
2
2
3
3

8
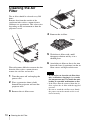
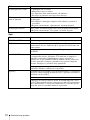
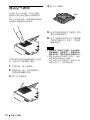
Replacing the Lamp
Replacing the Lamp
The lamp used as a light source is a
consumable product. Thus, replace the lamp
with a new one in the following cases.
• When the lamp has burnt out or dims
• “Please replace the Lamp.” appears on the
screen
• The LAMP/COVER indicator lights up
The lamp life varies depending on
conditions of use.
Use an LMP-C163 Projector Lamp as the
replacement lamp.
Use of any other lamps than the LMP-C163
may cause damage to the projector.
The lamp remains hot after the projector is
turned off with the ?/1 key. If you touch the
lamp, you may burn your finger. When you
replace the lamp, wait for at least an hour
for the lamp to cool.
• If the lamp breaks, contact your Customer
Information Center.
• Pull out the lamp by holding the handle. If
you touch the lamp, you may be burned or
injured.
• When removing the lamp, make sure it
remains horizontal, then pull straight up. Do
not tilt the lamp. If you pull out the lamp
while it is tilted and if the lamp breaks, the
pieces may scatter, causing injury.
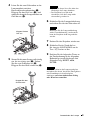
1 Turn off the projector, and disconnect
the AC power cord from the AC outlet.
When replacing the lamp after using the
projector, wait for at least an hour for the
lamp to cool.
2 Place a protective sheet (cloth)
beneath the projector. Turn the
projector over so you can see its
underside.
Be sure that the projector is stable after
turning it over.
3 Open the lamp cover by loosening the
three screws with a Phillips
screwdriver.
For safety reasons, do not loosen any other
screws.
4 Loosen the two screws on the lamp
unit with the Phillips screwdriver (a).
Fold out the handle (b), then pull out
the lamp unit by the handle (c).
Caution
Notes
Note
Note
Note
Fold out the handle.
La pagina sta caricando ...
La pagina sta caricando ...
La pagina sta caricando ...
La pagina sta caricando ...
La pagina sta caricando ...
La pagina sta caricando ...
La pagina sta caricando ...
La pagina sta caricando ...
La pagina sta caricando ...
La pagina sta caricando ...
La pagina sta caricando ...
La pagina sta caricando ...
La pagina sta caricando ...
La pagina sta caricando ...
La pagina sta caricando ...
La pagina sta caricando ...
La pagina sta caricando ...
La pagina sta caricando ...
La pagina sta caricando ...
La pagina sta caricando ...
La pagina sta caricando ...
La pagina sta caricando ...
La pagina sta caricando ...
La pagina sta caricando ...
La pagina sta caricando ...
La pagina sta caricando ...
La pagina sta caricando ...
La pagina sta caricando ...
La pagina sta caricando ...
La pagina sta caricando ...
La pagina sta caricando ...
La pagina sta caricando ...
La pagina sta caricando ...
La pagina sta caricando ...
La pagina sta caricando ...
La pagina sta caricando ...
La pagina sta caricando ...
La pagina sta caricando ...
La pagina sta caricando ...
La pagina sta caricando ...
La pagina sta caricando ...
La pagina sta caricando ...
La pagina sta caricando ...
La pagina sta caricando ...
La pagina sta caricando ...
La pagina sta caricando ...
La pagina sta caricando ...
La pagina sta caricando ...
La pagina sta caricando ...
La pagina sta caricando ...
La pagina sta caricando ...
La pagina sta caricando ...
La pagina sta caricando ...
La pagina sta caricando ...
La pagina sta caricando ...
La pagina sta caricando ...
La pagina sta caricando ...
La pagina sta caricando ...
La pagina sta caricando ...
La pagina sta caricando ...
La pagina sta caricando ...
La pagina sta caricando ...
La pagina sta caricando ...
La pagina sta caricando ...
La pagina sta caricando ...
La pagina sta caricando ...
La pagina sta caricando ...
La pagina sta caricando ...
-
 1
1
-
 2
2
-
 3
3
-
 4
4
-
 5
5
-
 6
6
-
 7
7
-
 8
8
-
 9
9
-
 10
10
-
 11
11
-
 12
12
-
 13
13
-
 14
14
-
 15
15
-
 16
16
-
 17
17
-
 18
18
-
 19
19
-
 20
20
-
 21
21
-
 22
22
-
 23
23
-
 24
24
-
 25
25
-
 26
26
-
 27
27
-
 28
28
-
 29
29
-
 30
30
-
 31
31
-
 32
32
-
 33
33
-
 34
34
-
 35
35
-
 36
36
-
 37
37
-
 38
38
-
 39
39
-
 40
40
-
 41
41
-
 42
42
-
 43
43
-
 44
44
-
 45
45
-
 46
46
-
 47
47
-
 48
48
-
 49
49
-
 50
50
-
 51
51
-
 52
52
-
 53
53
-
 54
54
-
 55
55
-
 56
56
-
 57
57
-
 58
58
-
 59
59
-
 60
60
-
 61
61
-
 62
62
-
 63
63
-
 64
64
-
 65
65
-
 66
66
-
 67
67
-
 68
68
-
 69
69
-
 70
70
-
 71
71
-
 72
72
-
 73
73
-
 74
74
-
 75
75
-
 76
76
-
 77
77
-
 78
78
-
 79
79
-
 80
80
-
 81
81
-
 82
82
-
 83
83
-
 84
84
-
 85
85
-
 86
86
-
 87
87
-
 88
88


Sony vpl cx21 Manuale del proprietario
- Categoria
- Proiettori di dati
- Tipo
- Manuale del proprietario
in altre lingue
- English: Sony vpl cx21 Owner's manual
- français: Sony vpl cx21 Le manuel du propriétaire
- español: Sony vpl cx21 El manual del propietario
- Deutsch: Sony vpl cx21 Bedienungsanleitung
- 日本語: Sony vpl cx21 取扱説明書
Documenti correlati
-
Sony VPL-CS20 Manuale del proprietario
-
Sony VPL-ES4 Manuale utente
-
Sony VPL-EX4 Manuale del proprietario
-
Sony VPL-ES3 Manuale utente
-
Sony VPL-EX7 Manuale del proprietario
-
Sony VPL-EX5 Manuale del proprietario
-
Sony VPL-ES2 Manuale del proprietario
-
Sony VPL-MX25 Manuale del proprietario
-
Sony VPL-PX41 Manuale del proprietario
-