
s
Gigaset 4000 Micro, De-It-Fr-Sp-GB, A31008-G4000-
4000co-
17. 04.02
Be inspired
ENGLISH
Operating instructions
and safety precautions
!

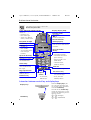
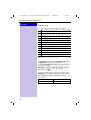
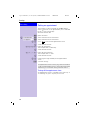
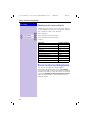
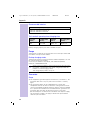
Brief overview of the handset
2
Gigaset 4000 Micro, De-It-Fr-Sp-GB, A31008-G4000-B027-1-
4000COU.FM
06.05.02
Brief overview of the handset
Interaction between control key and display keys
The display is protected by a plastic film.
Remove the plastic film.
Ñe
Annabella
19.07.01 13:13
{ ¨
Socket
–for Headset,
MP3-Player
Open the directory
End call and On/
Off key
Ta l k k ey
Sel Services key
Caller list
–End call
– Cancelling function
– One menu level back
(press briefly)
– Return to idle state
(hold down)
– Handset on/off
(hold key down)
Handsfree key
Keypad protection
On/off
hold key down!
– Accept call
– Dial number
– Switch from hands-
free talking to
handset
Asterisk key
Hold down to acti-
vate and deactivate
the ringer
Charging status
= empty
U
full
flashes: Battery low
With the display keys, you
have access to the current
functions.
Reception strength
Control key
Status LED (light-emitting diode)
– Open network access
list: press briefly!
– R key function:
hold key down!
Current functions
and display keys
lights up during a call;
flashes at:
– Incoming call
–New messages
– Alarm call, appoint-
ments, anniversaries
Access to message lists
Key 1
Hold down to select Answ.
machine/Mailbox
Microphone
Display (display field)
With the display keys you
can carry out functions that
can also be partly controlled
with the control key.
The side of the control key
which you must press is indi-
cated in the operating instruc-
tions by arrows:
F
/
G
(left/right)
E
/
D
(top/bottom)
Control key
Display keys
INT

Brief overview of the handset
3
Gigaset 4000 Micro, De-It-Fr-Sp-GB, A31008-G4000-B027-1-
4000COU.FM
06.05.02
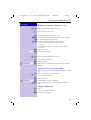
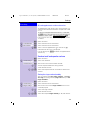
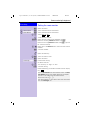
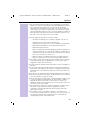
Important menus
Display symbols
The following symbols appear above the display keys depending on the situation:
* Not available in all countries
Display keys
Meaning
¨
Menu key: Activates the main menu when the phone is idle. During a call, it
activates a menu for the particular situation.
Z
Selects and confirms the menu function.
Ends and saves an entry.
W
Delete key (Backspace): Deletes characters from right to left.
{
Automatic redial key: Opens a list of the last five numbers dialled.
I
Displayed if SMS*, answering machine, mail service box or caller list is active
Í
One menu level back, cancel
©
Text Message*
Select Services
Add. Features
Calendar/Clock
Sound Settings
Call Charges
OKƒ
H/Set Settings
Base Settings
Voice Mail
Handset Volume
Ringer Settings
Advisory Tones
D
New Entry
Anne
Barbara
Chris
:
©
Display Number
Delete Entry
Copy Entry
Delete List
Send List
Available Memory

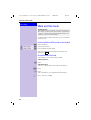
Safety precautions
4
Gigaset 4000 Micro, De-It-Fr-Sp-GB, A31008-G4000-B027-1-
4000COU.FM
06.05.02
Safety precautions
Only use the power supply unit supplied as indicated on the underside of the
device.
Only insert approved rechargeable batteries of the same type. Never use ordi-
nary (non-rechargeable) batteries as they may pose a health hazard or cause injury.
Make sure the rechargeable battery is inserted the right way round
Use the battery specified in these operating instructions
The phone may affect medical equipment so always switch your phone off before
entering hospitals or doctors’ practices.
The handset may cause an unpleasant humming noise in hearing aids.
Do not operate the phone in places where there is a risk of explosion (such as paint
workshops).
The handset is not splash-proof (see page 25).
Drivers must not use the phone while driving (including the Walk and Talk
function).
The phone must be switched off at all times in an aircraft (including the Walk and
Talk function). Make sure it cannot be switched on accidentally.
If you give your Gigaset to someone else you should also give them the operating
instructions.
Dispose of batteries and the phone carefully. Do not pollute the environment.
Not all the functions described in these operating instructions are available in all countries.
!
$
‹
Œ
ƒ

Contents
5
Gigaset 4000 Micro, De-It-Fr-Sp-GB, A31008-G4000-B027-1-
4000coivz.fm
08.03.02
Contents
Brief overview of the handset . . . . . . . . . . . . . . . . . . . . . . . . . . . . . . . . . . . . . . . . . . . . 2
Interaction between control key and display keys. . . . . . . . . . . . . . . . . . . . . . . . . .2
Important menus . . . . . . . . . . . . . . . . . . . . . . . . . . . . . . . . . . . . . . . . . . . . . . . . . .3
Display symbols . . . . . . . . . . . . . . . . . . . . . . . . . . . . . . . . . . . . . . . . . . . . . . . . . . .3
Safety precautions . . . . . . . . . . . . . . . . . . . . . . . . . . . . . . . . . . . . . . . . . . . . . . . . . . . . . 4
Preparing the handset. . . . . . . . . . . . . . . . . . . . . . . . . . . . . . . . . . . . . . . . . . . . . . . . . . . 6
Delivery package . . . . . . . . . . . . . . . . . . . . . . . . . . . . . . . . . . . . . . . . . . . . . . . . . . .6
Inserting the battery
. . . . . . . . . . . . . . . . . . . . . . . . . . . . . . . . . . . . . . . . . . . . . . . . . . . . . . . . . . . . . . . .6
Registering the handset . . . . . . . . . . . . . . . . . . . . . . . . . . . . . . . . . . . . . . . . . . . . .6
Charging the battery . . . . . . . . . . . . . . . . . . . . . . . . . . . . . . . . . . . . . . . . . . . . . . . .7
Attaching the belt clip . . . . . . . . . . . . . . . . . . . . . . . . . . . . . . . . . . . . . . . . . . . . . . .7
Setting the date and time . . . . . . . . . . . . . . . . . . . . . . . . . . . . . . . . . . . . . . . . . . . .8
Changing the display language . . . . . . . . . . . . . . . . . . . . . . . . . . . . . . . . . . . . . . . .8
Making calls . . . . . . . . . . . . . . . . . . . . . . . . . . . . . . . . . . . . . . . . . . . . . . . . . . . . . . . . . . . 9
Making an external call . . . . . . . . . . . . . . . . . . . . . . . . . . . . . . . . . . . . . . . . . . . . . .9
Making internal calls . . . . . . . . . . . . . . . . . . . . . . . . . . . . . . . . . . . . . . . . . . . . . . . .9
Answering a call . . . . . . . . . . . . . . . . . . . . . . . . . . . . . . . . . . . . . . . . . . . . . . . . . . .9
Open caller list/message list . . . . . . . . . . . . . . . . . . . . . . . . . . . . . . . . . . . . . . . . .10
Handsfree talking. . . . . . . . . . . . . . . . . . . . . . . . . . . . . . . . . . . . . . . . . . . . . . . . . .10
Forwarding an external call, enquiry call . . . . . . . . . . . . . . . . . . . . . . . . . . . . . . . .10
Automatic redial . . . . . . . . . . . . . . . . . . . . . . . . . . . . . . . . . . . . . . . . . . . . . . . . . . . . . . . 11
Directory and network access list . . . . . . . . . . . . . . . . . . . . . . . . . . . . . . . . . . . . . . . 12
Speed dialling from the network access list . . . . . . . . . . . . . . . . . . . . . . . . . . . . .13
Dialling with speed dialling . . . . . . . . . . . . . . . . . . . . . . . . . . . . . . . . . . . . . . . . . .13
Settings . . . . . . . . . . . . . . . . . . . . . . . . . . . . . . . . . . . . . . . . . . . . . . . . . . . . . . . . . . . . . . 17
Setting the alarm clock . . . . . . . . . . . . . . . . . . . . . . . . . . . . . . . . . . . . . . . . . . . . .17
Deactivating the alarm clock . . . . . . . . . . . . . . . . . . . . . . . . . . . . . . . . . . . . . . . . .17
Turning off the alarm call. . . . . . . . . . . . . . . . . . . . . . . . . . . . . . . . . . . . . . . . . . . .17
Setting an appointment . . . . . . . . . . . . . . . . . . . . . . . . . . . . . . . . . . . . . . . . . . . .18
Handset and loudspeaker volume . . . . . . . . . . . . . . . . . . . . . . . . . . . . . . . . . . . . .19
Activating/deactivating warning and signal tones . . . . . . . . . . . . . . . . . . . . . . . . .20
Activating/deactivating the vibration alarm . . . . . . . . . . . . . . . . . . . . . . . . . . . . . .21
Auto talk feature on/off . . . . . . . . . . . . . . . . . . . . . . . . . . . . . . . . . . . . . . . . . . . . .21
Resetting to the factory defaults . . . . . . . . . . . . . . . . . . . . . . . . . . . . . . . . . . . . .22
Room monitoring (babyphone). . . . . . . . . . . . . . . . . . . . . . . . . . . . . . . . . . . . . . . . . . . 22
Setting the room monitor . . . . . . . . . . . . . . . . . . . . . . . . . . . . . . . . . . . . . . . . . . .23
Walk and Talk mode . . . . . . . . . . . . . . . . . . . . . . . . . . . . . . . . . . . . . . . . . . . . . . . . . . . 24
Appendix . . . . . . . . . . . . . . . . . . . . . . . . . . . . . . . . . . . . . . . . . . . . . . . . . . . . . . . . . . . . . 25
Operating on base stations in the Gigaset family . . . . . . . . . . . . . . . . . . . . . . . . .25
Contact with liquid. . . . . . . . . . . . . . . . . . . . . . . . . . . . . . . . . . . . . . . . . . . . . . . . .25
Range . . . . . . . . . . . . . . . . . . . . . . . . . . . . . . . . . . . . . . . . . . . . . . . . . . . . . . . . . .26
Guarantee . . . . . . . . . . . . . . . . . . . . . . . . . . . . . . . . . . . . . . . . . . . . . . . . . . . . . . .26
Customer Care Service . . . . . . . . . . . . . . . . . . . . . . . . . . . . . . . . . . . . . . . . . . . . .29
Display languages . . . . . . . . . . . . . . . . . . . . . . . . . . . . . . . . . . . . . . . . . . . . . . . . .30

6
Press Keys:
Preparing the handset
Gigaset 4000 Micro, De-It-Fr-Sp-GB, A31008-G4000-B027-1-6419
4000CO.FM
06.05.02
Preparing the handset
Delivery package
Gigaset 4000 Micro handset, one battery, charging
unit, belt clip, operating instructions.
Inserting the battery
Registering the handset
Step 1:
©
Open the menu.
åååååååååååååååååååååååååååååååå
D
H/Set Settings
[
Select and confirm.
åååååååååååååååååååååååååååååååå
D
Register H/Set
[
Select and confirm.
D [
Select base ( , , or ).
o
[
Key in PIN and confirm (as supplied: 0000):
is displayed, for example.
Step 2:
Press down the key on the back of the Gigaset 4010i
Micro base and keep it pressed down for a while. The
handset will be automatically assigned the next free in-
ternal number (1–3). The internal number 6 will be over-
written if all positions are already occupied.
The handset will return to the idle condition following
successful registration. The internal number (e.g.
“INT1”) is displayed.
The default display language on your handset is
Italian. To set the desired language, see page 8.
Gigaset
4000
micro
Gigaset
4000
micro
o
Base 1 Base 2 Base 3 Base 4
Regstr.Procedure Base 1
Gigaset On the base station or base telephone

7
Press Keys:
Preparing the handset
Gigaset 4000 Micro, De-It-Fr-Sp-GB, A31008-G4000-B027-1-6419
4000CO.FM
06.05.02
Charging the battery
Leave the handset for approx. 5,5 hours in
the charging unit to charge the battery, as
they are not charged when they leave the
factory. The charging status icon flashes on
the handset to indicate that the battery are
being charged:
See the appendix for a list of recommended battery.
Attaching the belt clip
Push the belt clip onto the back of the handset until the
lugs at the side click into place.
4010/4015 Hold down the key on the underside of
the base station.
3010/3015
Hold down the paging-key
y
on the base
station until you hear signal tones.
3020/25
3030/35
4030/35
Select
settings
,
system settings
and
regi-
ster handset
in the menu at the base sta-
tion telephone and confirm with
OK
.
3070/75
4070/75
Press the LED – it will flash during regis-
tration.
Non-Sie-
mens base
stations
To register at “GAP base stations”, follow
the relevant operating instructions
(steps 2 and 3).
●
The battery heat up during charging. This is normal
and not dangerous.
●
Opening the battery compartment unnecessarily
may cause the wrong charging status to be dis-
played.
5,5

8
Press Keys:
Preparing the handset
Gigaset 4000 Micro, De-It-Fr-Sp-GB, A31008-G4000-B027-1-6419
4000CO.FM
06.05.02
Setting the date and time
You need to set the date and time so that the time that
messages and calls are received is shown correctly.
©
Open the menu.
åååååååååååååååååååååååååååååååå
D
Calendar/Clock
[
Select and confirm.
åååååååååååååååååååååååååååååååå
D
Date/Time
[
Select and confirm.
The current setting is shown.
Enter the date
Enter the day/month/year.
In this case 20.05.2001. e. g.
ŸÞÞ¢Þ]
D
Go down one line.
Enter the time
Enter hours and minutes.
In this case 19:05
e. g.
] ¬ Þ ¢
D
Go down one line.
Select the display mode
use the left side of the control key to select the 12-
hour mode (am or pm) or the 24-hour mode (default).
åååååååååååååååååååååååååååååååå
Save
[
Save the settings.
Changing the display language
©
Open the menu.
åååååååååååååååååååååååååååååååå
D
H/Set Settings
[
Confirm the function.
åååååååååååååååååååååååååååååååå
D
Language
[
The current language is marked with a
✓
.
D[
Select the language you want and confirm.
Dialling an emergency number
You can dial the emergency numbers saved in the base
station even if the telephone lock is activated. Please
refer to the operating instructions for your base station.
You will find a.table on the last page of this booklet.

9
Press Keys:
Making calls
Gigaset 4000 Micro, De-It-Fr-Sp-GB, A31008-G4000-B027-1-6419
4000CO.FM
06.05.02
Making calls
Making an external call
o Enter the telephone number. If you make a mistake
use the
X
key
to correct individual digits.
c
Press the talk key.
a
Press the end call key to end the call.
Making internal calls
F
Open the list of internal users. Your own handset is
identified by “<".
D E
c
Select the handset you want and press the talk key.
or
e. g.
Ÿ
Enter the internal number of the handset.
or
c
or
«
All handsets are called.
a
Press the end call key to end the call.
Answering a call
Your telephone will ring (ringing tone) and the status
LED will flash.
c
/
u
Press the talk key or handsfree key.
or
Simply remove the handset from the charging unit
(factory setting: “Auto talk”).
●
You can also press the talk key
c
first and then
enter the telephone number - each digit will be di-
alled immediately.
●
You can cancel the dialling operation by pressing
the end call key
a
.
●
You can insert a pause: After entering the prefix,
open the menu using the display key
©
and se-
lect “insert pause”.
Call All
k
Ö

10
Press Keys:
Making calls
Gigaset 4000 Micro, De-It-Fr-Sp-GB, A31008-G4000-B027-1-6419
4000CO.FM
06.05.02
Open caller list/message list
*
A message appears in the display and the status LED
flashes to indicate that there are new calls/messages.
?
Press
Handsfree talking
Handsfree talking when dialling
o Dial the telephone number.
u
Press the handsfree key.
Handsfree talking during a call
u
Activate handsfree talking.
To s e t t h e v o l u m e :
Press the handsfree key u once more.
F G
Raise or lower the volume.
Save
Save the volume level.
c
Change from handsfree talking to the handset
a
End the call.
Forwarding an external call, enquiry call
You can forward an external call to another handset or
make an internal enquiry call.
F
Open the list of internal users.
E
D
c
Select the internal user and call.
If the internal user answers:
●
To f o r w a r d t h e c a l l : Press the end call key
a
.
●
To end the enquiry call: Use
End
to return to the
waiting party.
* Not available in all countries
When handsfree talking is activated, the handsfree
key u and the status LED are lit.

11
Press Keys:
Automatic redial
Gigaset 4000 Micro, De-It-Fr-Sp-GB, A31008-G4000-B027-1-6419
4000CO.FM
06.05.02
Automatic redial
Manual redial
You have access to the last five telephone numbers di-
alled.
z D
Display and select the telephone number.
c
Press the talk key.
Automatic redial
The handsfree key flashes and open listening is activat-
ed. The function is deactivated after ten unsuc-
cessful call attempts or if a call was made in the
meantime.
Press
Off
or any key if the person you called is not avail-
able.
z D
Display and select the telephone number.
©
Open the menu.
åååååååååååååååååååååååååååååååå
Automatic Redial
[
Activate.
c
If the other person answers press the talk key.
Deleting a number from the redialling list
z D
Display and select the telephone number.
©
Open the menu.
åååååååååååååååååååååååååååååååå
D
Delete Entry
[
The telephone number is deleted.
Copying a telephone number to the directory
z D
Display and select the telephone number.
©
Open the menu.
åååååååååååååååååååååååååååååååå
D
Copy to Directory
[
The telephone number is entered.
o If you like you can change the number and enter a
name (you can also enter an anniversary s. page 16).
For notes on how to enter letters and characters
s. page 14.
©
Open the menu.
åååååååååååååååååååååååååååååååå
Save Entry
[
Save the entry.
This function is not available in all countries.

12
Press Keys:
Directory and network access list
Gigaset 4000 Micro, De-It-Fr-Sp-GB, A31008-G4000-B027-1-6419
4000CO.FM
06.05.02
Directory and network access
list
With the
D
directory
you can store up to 200 tele-
phone numbers and then dial them at the push of a
button.
You can save the prefixes (Call-by-Call)
*
of telephone
companies in the network access list
C
. The direc-
tory and network access list are used in exactly the
same way.
Storing an entry
D
/
C
Open the directory/network access list.
åååååååååååååååååååååååååååååååå
New Entry
[
Select the menu item and confirm.
o Enter the telephone number (no more than 32 dig-
its).
D
o Scroll to the name field and enter the name. You can
also enter an anniversary in the directory, see also
page 16.
©
Open the menu.
åååååååååååååååååååååååååååååååå
Save Entry
[
Store the entry
Dialling with the directory
D
Open the directory.
e. g.
^^
Enter the first letter of the name. For example for “E”
press the
^
key twice or scroll with the
D
key.
c
Press the talk key.
* Not available in all countries
After selecting the name you can also open the menu,
select , extend/change the number
and dial with the talk key
c
.
Display Number

13
Press Keys:
Directory and network access list
Gigaset 4000 Micro, De-It-Fr-Sp-GB, A31008-G4000-B027-1-6419
4000CO.FM
06.05.02
Dialling with the network access list
(Call-by-Call)
C
Open the network access list.
D©
Select call-by-call number and open the menu.
åååååååååååååååååååååååååååååååå
Display Number
[
Select the menu item and confirm.
o Enter the telephone number of the person you want
to call.
or
DD [
Select the telephone number in directory and confirm.
c
Press the talk key. The telephone number is dialled.
Speed dialling from the network
access list
You can store 8 speed dialling numbers in the network
access list. Enter a speed dialling number (2–9) before
the name.
Dialling with speed dialling
e. g.
Ÿ
Hold down the key:
The stored network provider's name is displayed.
e. g.
o Enter the telephone number
or
DD [
Select an entry from the directory and confirm.
c
Press.
Example: Press speed dial key 2 and then enter the
network provider's name.

14
Press Keys:
Directory and network access list
Gigaset 4000 Micro, De-It-Fr-Sp-GB, A31008-G4000-B027-1-6419
4000CO.FM
06.05.02
Character map
Press the relevant key repeatedly or hold down:
Sort sequence:
1 x 2 x 3 x 4 x 5 x 6 x 7 x 8 x 9 x 10 x
]
blank
1
â
£$¥¤
Ÿ
a b c 2 ä á à â ã ç
^
def3ëéèê
¡
g h i 4 ï í ì î
¢
jkl5
£
m n o 6 ö ñ ó ò ô õ
¤
pqrs7ß
¥
t u v 8 ü ú ù û
¬
wxyz9ÿýæøå
«
a→
→→
→A
*
/()<=>%
Þ
. , ? ! 0 + - : ¿
¡
*
*
Other characters on this key:
“,‘,;,_
ª
# @ \ & §
The first letter of the name is automatically written
in uppercase and the rest in lowercase.
To cha ng e one letter from uppercase to lowercase or
vice versa press
«
.
Control the cursor with
F G E D
. Delete
characters with
X
Letters are always inserted to the left of the cursor.
Inserting a blank
before a name takes that name to
the top of the directory (for example “ Karla”).
1. Blank
3.
Letters (alphabetical)
2.
Digits (0-9)
4.
Other characters

15
Press Keys:
Directory and network access list
Gigaset 4000 Micro, De-It-Fr-Sp-GB, A31008-G4000-B027-1-6419
4000CO.FM
06.05.02
Displaying, changing or deleting an entry
D
/
C
Open the directory/network access list.
D
Select the entry you want.
View
View all the information for the entry.
Change
Open the input field and make the necessary changes.
o Change the number if necessary.
D
o
Go to the name field and change the name.
For notes on entering letters and characters
s. page 14.
For the directory enter an anniversary if necessary
s. page 16.
©
Open the menu.
åååååååååååååååååååååååååååååååå
Save Entry
[
Confirm the changes.
or
D
/
C
Open the directory/network access list.
D
Select the relevant entry.
©
Open the menu.
åååååååååååååååååååååååååååååååå
D
Delete Entry
[
You will hear a confirmation tone. The entry has been
deleted.
Copying an entry to another handset
You can copy an entry to another Micro/Comfort hand-
set.
D
/
C
Open the directory/network access list.
D
Select the required entry.
©
Open the menu.
åååååååååååååååååååååååååååååååå
D
Delete Entry
[
Select the menu item and confirm.
D
[
Select the internal user (receiving handset) and con-
firm.
Copying a further entry:
YES
Press.
D
Select the required number.
Copy
Initiate the copy process.

16
Press Keys:
Directory and network access list
Gigaset 4000 Micro, De-It-Fr-Sp-GB, A31008-G4000-B027-1-6419
4000CO.FM
06.05.02
Copying the directory/network access list
You can copy the entire directory/network access list
to another Micro/Comfort handset.
See “Copying an entry to another handset”.
Deleting the directory/network access list
D
/
C
Open the directory/network access list.
D
Select the required entry.
©
Open the menu.
åååååååååååååååååååååååååååååååå
D
Delete List
[
Select the menu item and confirm.
YES
Confirm delete all entries.
Entering anniversaries (birthdays and so on)
You can store the date and time of anniversaries so you
can be reminded of them.
D
Open the directory.
D
View
Select and display the entry.
Change
Open the input field.
D
Move the cursor into the birthday/anniversary field.
Change
Confirm.
o Enter or change the date (day/month).
D
o Scroll forward one line and enter the time.
D
Scroll forward one line.
F G
Choose the indicator for the alarm.
[
Store entries.
Use the display key
Delete
to delete the anniversary
alarm.
Transmission is interrupted:
●
if the memory of the receiving handset is full.
●
if you receive a call.
Copying of an entry is terminated.

17
Press Keys:
Settings
Gigaset 4000 Micro, De-It-Fr-Sp-GB, A31008-G4000-B027-1-6419
4000CO.FM
06.05.02
Settings
Setting the alarm clock
If activated, the alarm clock (
¼
icon) on your handset
will ring every day at the time entered.
With the handset idle:
©
Open the menu.
åååååååååååååååååååååååååååååååå
D
Calendar/Clock
[
Select the menu item and confirm.
åååååååååååååååååååååååååååååååå
D
Alarm Clock
[
Select the menu item and confirm.
The current setting is displayed.
F G
Select
.
D
Scroll forward one line.
Þ £Þ Þ
Enter the hours/minutes. The example here is 06.00.
D
Scroll forward one line.
F G
Choose the ringer melody for the alarm call.
Save
Save the settings.
Deactivating the alarm clock
The alarm clock is set but you do not want it to ring.
©
Open the menu.
åååååååååååååååååååååååååååååååå
D
Calendar/Clock
[
Select the menu item and confirm.
åååååååååååååååååååååååååååååååå
D
Alarm Clock
[
Select the menu item and confirm.
F G
Select .
Save
Save the settings.
Turning off the alarm call
An alarm call is signalled like an incoming call. Press
any key to turn it off.
On
An alarm call will not be made if room monitoring (ba-
byphone) is activated or during automatic redialling.
Off

18
Press Keys:
Settings
Gigaset 4000 Micro, De-It-Fr-Sp-GB, A31008-G4000-B027-1-6419
4000CO.FM
06.05.02
Setting an appointment
Your handset is able to remind you of one appoint-
ment. If you have set an appointment, this is indicated
by the
¼
icon in the display.
With the handset idle.
©
Open the menu.
åååååååååååååååååååååååååååååååå
D
Calendar/Clock
[
Select the menu item and confirm.
åååååååååååååååååååååååååååååååå
Set Appoints.
[
Select the menu item and confirm.
F G
Select
to activate the appointment alarm.
D
Scroll forward one line.
Ÿ Þ Þ ¢
Enter the day/month.
The example here is 20th May.
D
Scroll forward one line.
Þ ¬ ^ Þ
Enter the hours/minutes.
The example here is: 9.30.
D
Scroll forward one line.
F
G
Choosing the ringer melody for the appointment
alarm.
Save
Save the settings.
Turning off the appointment alarm
An appointment alarm is signalled in the same way as
an incoming call; press any key to turn it off.
On
An appointment alarm will only ring when the handset
is idle. An appointment alarm is not made when room
monitoring is activated or during automatic redial.

19
Press Keys:
Settings
Gigaset 4000 Micro, De-It-Fr-Sp-GB, A31008-G4000-B027-1-6419
4000CO.FM
06.05.02
Missed appointments and anniversaries
An appointment and anniversaries that have been sig-
nalled on the handset but not been accepted are saved
in a list.
If you want to view your appointment again, proceed
as follows:
©
Open the menu.
åååååååååååååååååååååååååååååååå
D
Calendar/Clock
[
Select the menu item and confirm.
åååååååååååååååååååååååååååååååå
D
Missed Dates
[
Select the menu item and confirm.
D [
Select a missed appointment
¼
or anniversary
‚
Information on this entry is displayed.
Use the display key
Delete
to delete the appointment/
anniversary.
Handset and loudspeaker volume
©
Open the menu.
åååååååååååååååååååååååååååååååå
D
Sound Settings
[
Select the submenu.
åååååååååååååååååååååååååååååååå
Handset Volume
[
You will hear the current handset volume.
F G
Set the required handsfree talking volume.
D
Scroll forward one line.
F G
Save
Select the required level for the handset volume and
confirm.
Setting the ringer volume/melody
You can choose from five ringer volumes, “crescen-
do” ring (increasing volume), ringer off and any of ten
ringer melodies:
©
Open the menu.
åååååååååååååååååååååååååååååååå
D
Sound Settings
[
Select the menu item and confirm.
åååååååååååååååååååååååååååååååå
D
Ringer Settings
[
You will hear the current ringer volume and its level
will be displayed.
F G
Select the ringer volume.
D
Scroll forward one line.
F G
Save
Select the required ringer melody (1–10) and confirm.
A new missed appointment/anniversary is indicated
by
Appt.
. Press the right display key to display the list
Events list. Then select
[
.
Missed Appoint.
¼

20
Press Keys:
Settings
Gigaset 4000 Micro, De-It-Fr-Sp-GB, A31008-G4000-B027-1-6419
4000CO.FM
06.05.02
Time control for ringer volume
You can set a different ringer volume for a particular
time of day.
©
Open the menu.
åååååååååååååååååååååååååååååååå
D
Sound Settings
[
Select the menu item and confirm.
åååååååååååååååååååååååååååååååå
D
Ringer Settings
[
You will hear the current ringer volume and its level
will be displayed.
Time C.
Press.
F G
Activate/deactivate time control.
D
o Enter the period for the different ringer
e. g.
]]ÞÞ
]¢ÞÞ
from 11:00 to 15:00.
DF G
Scroll forward one line and select the ringer volume
Save Entry
Save the settings.
Save
or
a
Press.
Activating/deactivating warning and
signal tones
●
Key beeps: Every keystroke is confirmed.
●
Confirmation beeps: Confirmation beep (a rising
tone sequence) when you make entries/settings and
when you replace the handset in the charging sta-
tion.
●
Battery low beep: The battery must be recharged.
©
Open the menu.
åååååååååååååååååååååååååååååååå
D
Sound Settings
[
Select the menu item and confirm.
åååååååååååååååååååååååååååååååå
D
Advisory Tones
[
Select the menu item and confirm.
D
Select the required function.
F G
, or select (battery low beep in the
call).
Save
Save the settings.
On Off In Call
La pagina si sta caricando...
La pagina si sta caricando...
La pagina si sta caricando...
La pagina si sta caricando...
La pagina si sta caricando...
La pagina si sta caricando...
La pagina si sta caricando...
La pagina si sta caricando...
La pagina si sta caricando...
La pagina si sta caricando...
La pagina si sta caricando...
La pagina si sta caricando...
-
 1
1
-
 2
2
-
 3
3
-
 4
4
-
 5
5
-
 6
6
-
 7
7
-
 8
8
-
 9
9
-
 10
10
-
 11
11
-
 12
12
-
 13
13
-
 14
14
-
 15
15
-
 16
16
-
 17
17
-
 18
18
-
 19
19
-
 20
20
-
 21
21
-
 22
22
-
 23
23
-
 24
24
-
 25
25
-
 26
26
-
 27
27
-
 28
28
-
 29
29
-
 30
30
-
 31
31
-
 32
32


in altre lingue
- English: Siemens Cell Phone 4000i User manual
Documenti correlati
-
Siemens Gigaset 4000 Micro Manuale del proprietario
-
-
-
-
-
-
-