Swisscom Gigaset SL400 Manuale utente
- Categoria
- Telefoni
- Tipo
- Manuale utente
Questo manuale è adatto anche per

Gigaset CL540 / LUG IM-Nord en / A31008-M2602-R201-1-SM19 / Cover_front.fm / 2/26/14
GIGASET. INSPIRING CONVERSATION.
MADE IN GERMANY
CL540

Gigaset CL540 / LUG IM-Nord en / A31008-M2602-R201-1-SM19 / Cover_front.fm / 2/26/14

da en fi no sv 1
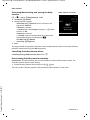
Gigaset CL540 / LUG IM-Nord en / A31008-M2602-R201-1-SM19 / overview.fm / 2/26/14
Template Borneo, Version 1, 21.06.2012
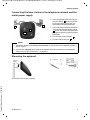
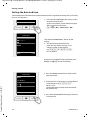
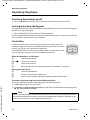
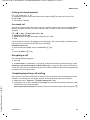
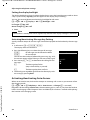
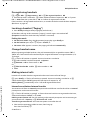
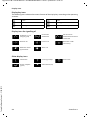
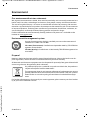
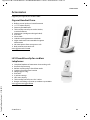
Overview of Gigaset Dune (CL540)
Overview of Gigaset Dune (CL540)
Handset
2
3
5
4
6
13
10
1
12
9
11
8
7
i
V
07:15
INT 1 14 Oct
Calls Calendar
1 Display in idle status
2 Status bar (
¢ page 51)
Icons display current settings and
operating status of the phone
3 Display keys (
¢ page 17, ¢ page 31)
4 Message key (
¢ page 18)
Access to the calls and message lists;
Flashing: new message or new call
5 End call key, On/off key
End call;
Cancel function;
Go back one menu level (press briefly);
Back to idle status (press and hold);
Switch handset on/off (press and hold
in idle status)
6 Hash key
Keypad lock on/off (press and hold in
idle status);
Toggles between upper/lower case
and digits;
Insert a dialling pause (press and hold)
7 Microphone
8 Recall key
Consultation call (flash) (press and hold)
9 Connection socket for headset
(
¢ page 13)
10 Star key
In idle status: Ringtone on/off (press and
hold);
With an open connection: switch from
pulse dialling to tone dialling (press
briefly);
When inputting text: Open special
characters table
11 Key 1
Select network mailbox (press and hold)
12 Answer call key / Handsfree key
Dial number displayed;
Accept call;
Switch from earpiece to handsfree mode;
Open the redial list (press briefly);
Start dialling (press and hold);
13 Control key / Menu key (
¢ page 16)

2 da en fi no sv
Gigaset CL540 / LUG IM-Nord en / A31008-M2602-R201-1-SM19 / overview.fm / 2/26/14
Template Borneo, Version 1, 21.06.2012
Overview of Gigaset Dune (CL540)
Registration/paging key
u Locate handsets ("Paging") (press briefly)
¢ page 37.
u Register handsets and DECT devices (press and hold)
¢ page 36.

da en fi no sv 3
Gigaset CL540 / LUG IM-Nord en / A31008-M2602-R201-1-SM19 / LUGIVZ.fm / 2/26/14
Template Borneo, Version 1, 21.06.2012
Contents
Contents
Overview of Gigaset Dune (CL540) . . . . . . . . . . . . . . . . . . . . . . . . . . . . . . . . . . . . . . . . . . . . . . . . . . . . . . . . . 1
Safety precautions . . . . . . . . . . . . . . . . . . . . . . . . . . . . . . . . . . . . . . . . . . . . . . . . . . . . . . . . .
. . . . . . . . . . . . . . . . 4
Getting started . . . . . . . . . . . . . . . . . . . . . . . . . . . . . . . . . . . . . . . . . . . . . . . . . . . . . . . . . . . .
. . . . . . . . . . . . . . . . 6
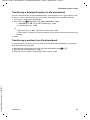
Understanding the operating steps in the user guide . . . . . . . . . . . . . . . . . . . . . . . . . . . . . . . . . . . . . . 1
5
Operating the phone . . . . . . . . . . . . . . . . . . . . . . . . . . . . . . . . . . . . . . . . . . . . . . . . . . . . . .
. . . . . . . . . . . . . . . 16
Making calls . . . . . . . . . . . . . . . . . . . . . . . . . . . . . . . . . . . . . . . . . . . . . . . . . . . . . . . . . .
. . . . . . . . . . . . . . . . . . . . 20
Adjusting the telephone settings . . . . . . . . . . . . . . . . . . . . . . . . . . . . . . . . . . . . . . . . . . . . . . . .
. . . . . . . . . 27
Operating a repeater . . . . . . . . . . . . . . . . . . . . . . . . . . . . . . . . . . . . . . . . . . . . . . . . . . . . . .
. . . . . . . . . . . . . . . 32
Changing the system PIN . . . . . . . . . . . . . . . . . . . . . . . . . . . . . . . . . . . . . . . . . . . . . . . . . . . .
. . . . . . . . . . . . . 33
Restoring phone to default setting . . . . . . . . . . . . . . . . . . . . . . . . . . . . . . . . . . . . . . . . . . . . . . .
. . . . . . . . . 33
ECO DECT . . . . . . . . . . . . . . . . . . . . . . . . . . . . . . . . . . . . . . . . . . . . . . . . . . . . . . . . . . .
. . . . . . . . . . . . . . . . . . . . . 34
Network mailbox . . . . . . . . . . . . . . . . . . . . . . . . . . . . . . . . . . . . . . . . . . . . . . . . . . . . . . . . . .
. . . . . . . . . . . . . . . 35
Multiple handsets . . . . . . . . . . . . . . . . . . . . . . . . . . . . . . . . . . . . . . . . . . . . . . . . . . . . . . . . .
. . . . . . . . . . . . . . . 36
Phonebook (Address book) . . . . . . . . . . . . . . . . . . . . . . . . . . . . . . . . . . . . . . . . . . . . . . . . . . . . . .
. . . . . . . . . 39
Call list . . . . . . . . . . . . . . . . . . . . . . . . . . . . . . . . . . . . . . . . . . . . . . . . . . . . . . . . . . . . . .
. . . . . . . . . . . . . . . . . . . . . 42
Contactability . . . . . . . . . . . . . . . . . . . . . . . . . . . . . . . . . . . . . . . . . . . . . . . . . . . . . . . .
. . . . . . . . . . . . . . . . . . . . 43
Calendar . . . . . . . . . . . . . . . . . . . . . . . . . . . . . . . . . . . . . . . . . . . . . . . . . . . . . . . . . . . .
. . . . . . . . . . . . . . . . . . . . . 44
Alarm clock . . . . . . . . . . . . . . . . . . . . . . . . . . . . . . . . . . . . . . . . . . . . . . . . . . . . . . . . . .
. . . . . . . . . . . . . . . . . . . . 46
Baby monitor . . . . . . . . . . . . . . . . . . . . . . . . . . . . . . . . . . . . . . . . . . . . . . . . . . . . . . . . . .
. . . . . . . . . . . . . . . . . . . 47
Operating the telephone on a router/PABX . . . . . . . . . . . . . . . . . . . . . . . . . . . . . . . . . . . . . . . . . . . . . .
. . 49
Display icons . . . . . . . . . . . . . . . . . . . . . . . . . . . . . . . . . . . . . . . . . . . . . . . . . . . . . . . . .
. . . . . . . . . . . . . . . . . . . . 51
Menu tree . . . . . . . . . . . . . . . . . . . . . . . . . . . . . . . . . . . . . . . . . . . . . . . . . . . . . . . . . .
. . . . . . . . . . . . . . . . . . . . . 53
Customer Service & Assistance . . . . . . . . . . . . . . . . . . . . . . . . . . . . . . . . . . . . . . . . . . . . . . . . . . .
. . . . . . . . . 55
Environment . . . . . . . . . . . . . . . . . . . . . . . . . . . . . . . . . . . . . . . . . . . . . . . . . . . . . . . . . .
. . . . . . . . . . . . . . . . . . . 59
Appendix . . . . . . . . . . . . . . . . . . . . . . . . . . . . . . . . . . . . . . . . . . . . . . . . . . . . . . . . . . .
. . . . . . . . . . . . . . . . . . . . . 60
Accessories . . . . . . . . . . . . . . . . . . . . . . . . . . . . . . . . . . . . . . . . . . . . . . . . . . . . . . . . . .
. . . . . . . . . . . . . . . . . . . . . 63
Index . . . . . . . . . . . . . . . . . . . . . . . . . . . . . . . . . . . . . . . . . . . . . . . . . . . . . . . . . . . . . . . .
. . . . . . . . . . . . . . . . . . . . . 65

4 da en fi no sv
Gigaset CL540 / LUG IM-Nord en / A31008-M2602-R201-1-SM19 / security.fm / 2/26/14
Template Borneo, Version 1, 21.06.2012
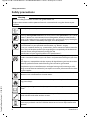
Safety precautions
Safety precautions
Warning
Read the safety precautions and the user guide before use.
Explain their content and the potential hazards associated with using the device to your
children.
Use only the power adapter indicated on the device.
Use only rechargeable batteries that correspond to the specification (see "Specifi-
cations"). Never use a conventional (non-rechargeable) battery or other battery
types as this could result in significant health risks and personal injury. Rechargea-
ble batteries, which are noticeably damaged, must be replaced.
Using your telephone may affect nearby medical equipment. Be aware of the tech-
nical conditions in your particular environment, e.g. doctor's surgery.
If you use a medical device (e.g. a pacemaker), please contact the device manufac-
turer. They will be able to advise you regarding the susceptibility of the device to
external sources of high frequency energy (for the
specifications of your Gigaset product see "Specifications").
Do not hold the rear of the handset to your ear when it is ringing or when speaker
mode is activated. Otherwise you risk serious and permanent damage to your hear-
ing.
Your Gigaset is compatible with the majority of digital hearing aids on the market.
However, perfect function with all hearing aids cannot be guaranteed.
The phone may cause interference in analogue hearing aids (humming or whis-
tling) or cause them to overload. If you require assistance, please contact the hear-
ing aid supplier.
The devices are not splashproof. For this reason do not install them in a damp envi-
ronment such as bathrooms or shower rooms.
Do not use the devices in environments with a potential explosion hazard
(e.g. paint shops).
If you give your Gigaset to a third party, make sure you also give them the user
guide.
Remove faulty devices from use or have them repaired by our Service team, as these
could interfere with other wireless services.
Do not use the device if the display is cracked or broken. Broken glass or plastic can
cause injury to hands and face. Send the device to our Service department to be
repaired.

da en fi no sv 5
Gigaset CL540 / LUG IM-Nord en / A31008-M2602-R201-1-SM19 / security.fm / 2/26/14
Template Borneo, Version 1, 21.06.2012
Safety precautions
To prevent loss of hearing, avoid listening at high volume over long periods of time.
Please note
u The device cannot be used in the event of a power failure. It is also not possible to trans-
mit emergency calls.
u Emergency numbers cannot be dialled if the keypad/display lock is activated!

6 da en fi no sv
Gigaset CL540 / LUG IM-Nord en / A31008-M2602-R201-1-SM19 / starting.fm / 2/26/14
Template Borneo, Version 1, 21.06.2012
Getting started
Getting started
Checking the contents of the package
u One base station,
u One power adapter for the base,
u One phone cord,
u One handset,
u One battery cover (rear cover for the handset),
u Two batteries,
u One rubber seal for the headset connection,
u One user guide.
If you have purchased a model with multiple handsets, the package should contain two
batteries, a battery cover, a belt clip and a charging cradle with power adapter for each
additional handset.
Setting up the base station and charging cradle (if included)
The base and charging cradle are designed for use in closed, dry rooms in a temperature range
of +5°C to +45°C.
¤ Set up the base on a level, non-slip surface at a central point in the building or house, or
mount the base on the wall (
¢ page 7).
The phone's feet do not usually leave any marks on surfaces. However, due to the multitude of
diff
erent varnishes and polishes used on today's furnishings, marks on the surfaces cannot be
completely ruled out.
Notes
u Never expose the telephone to the effects of heat sources, direct sunlight or other
electrical devices.
u Protect your Gigaset from moisture, dust, corrosive liquids and fumes.
u Pay attention to the range of the base. This is up to 50 m inside buildings and up to 300 m
in unobstructed outdoor areas. The range is reduced when Maximum Range is deacti-
vated (
¢ page 34).

da en fi no sv 7
Gigaset CL540 / LUG IM-Nord en / A31008-M2602-R201-1-SM19 / starting.fm / 2/26/14
Template Borneo, Version 1, 21.06.2012
Getting started
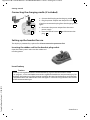
Connecting the base station to the telephone network and the
mains power supply
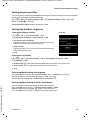
Mounting the optional)
(assembly materials not supplied)
¤ Insert the phone cable into the con-
nection socket at the rear of the
base until it clicks into place and
feed under the cable protection.
¤ Insert the power cable for the power
adapter into the connection socket
at the rear of the base and rotate
the right-angle plug under the cable
protection.
¤ Connect the power adapter .
¤ Connect the phone jack .
1
2
3
4
4
3
2
1
Notes
u The power adapter must always be connected, as the phone will not operate without a
power supply.
u Use only the supplied power adapter and phone cord. Pin connections on telephone
cables can vary (pin connections,
¢ page 62).
approx.
2 mm
42 mm

8 da en fi no sv
Gigaset CL540 / LUG IM-Nord en / A31008-M2602-R201-1-SM19 / starting.fm / 2/26/14
Template Borneo, Version 1, 21.06.2012
Getting started
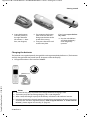
Connecting the charging cradle (if included)
Setting up the handset for use
The display is protected by a plastic film. Please remove the protective film!
Inserting the rubber seal for the headset plug socket
Open the battery cover and insert the rubber seal
into the groove.
Insert battery
¤ Connect the flat plug to the charging cradle .
¤ Plug the power adapter into the power socket .
If you have to remove the plug from the charging cradle
again:
¤ Disconnect the power adapter from the mains
power supply.
¤ Press the release button and disconnect the
plug .
1
2
3
4
2
1
3
4
Caution
Use only rechargeable batteries recommended by Gigaset Communications GmbH
(
¢ page 61) , as this could otherwise result in significant health risks and personal injury. For
example, the outer casing of the batteries could be destroyed or the batteries could explode.
The phone could also malfunction or be damaged as a result of using batteries that are not
of the recommended type.

da en fi no sv 9
Gigaset CL540 / LUG IM-Nord en / A31008-M2602-R201-1-SM19 / starting.fm / 2/26/14
Template Borneo, Version 1, 21.06.2012
Getting started
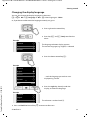
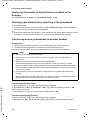
Charging the batteries
The batteries are supplied partially charged. Please charge completely before use. (The batteries
are fully charged when the power icon
disappears from the display.)
¤ Charge the handset in the base for 8.5 hours.
¤ Insert the batteries
with the polarity in
the right direction
(for correct +/- direc-
tion, see diagram).
¤ First orientate the battery
cover with the side tabs
fitting into the slots on the
inside of the casing.
¤ Then press the cover until
it clicks into place.
If you have to open the bat-
tery cover:
¤ Grip the side hollows
and slide the battery
cover diagonally
upwards.
8.5 h
Notes
u The handset may only be placed in the designated base/charging cradle.
u The battery may heat up during charging. This is not dangerous.
u After a time, the charge capacity of the battery will decrease for technical reasons.
u Handsets contained in the package have already been registered to the base. If, however,
a handset has not been registered (display "Please register handset" or "Place handset
in base"), please register it manually (
¢ page 36).

10 da en fi no sv
Gigaset CL540 / LUG IM-Nord en / A31008-M2602-R201-1-SM19 / starting.fm / 2/26/14
Template Borneo, Version 1, 21.06.2012
Getting started

da en fi no sv 11
Gigaset CL540 / LUG IM-Nord en / A31008-M2602-R201-1-SM19 / starting.fm / 2/26/14
Template Borneo, Version 1, 21.06.2012
Getting started
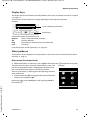
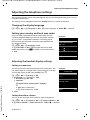
Changing the display language
You can also change the display language via the menu:
v
¤ Ï ¤ OK ¤ q Language ¤ OK ¤ q Select language ¤ Select
or, if you do not understand the language currently set, go to:
¤ Press and hold the End call key a to return to idle status.
¤ Press right on the control key.
¤ Press keys L and 5 slowly one after the
other.
The language selection display appears.
The current language (e.g. English) is selected.
¤ Press the down control key s ...
... until the language you wish to use is
displayed e.g. French.
¤ Press the right key, directly under the
display, to select the language.
The selection is marked with Ø.
Deutsch
±
English
Ø
Francais
±
Deutsch
±
English
Ø
Francais
±
Deutsch
±
English
Ø
Francais
±
Italiano
±
Espanol
±
x
Back Select
Deutsch
±
English
Ø
Francais
±
Deutsch
±
English
±
Francais
Ø
L5
Example
Example
Example

12 da en fi no sv
Gigaset CL540 / LUG IM-Nord en / A31008-M2602-R201-1-SM19 / starting.fm / 2/26/14
Template Borneo, Version 1, 21.06.2012
Getting started
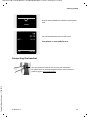
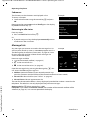
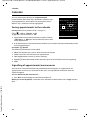
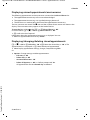
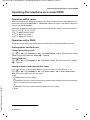
Setting the date and time
Set the date/time so that the correct date and time can be assigned to incoming calls, and so that
you can use the alarm.
¤ Press the key Time below the display screen
to open the input field.
(If you have already set the date/time, open
the input field via the menu:
v
¤ Ϥ OK ¤ Date/Time ¤ OK)
The submenu Date/Time is shown on the
display.
¤ The active input position flashes.
Enter the day, month and year as an
8-digit number via the keypad,
e.g. 4Q2Q4
for 14.10.2014.
If you wish to change the input position, press
left
u or right v on the control key.
¤ Press the down control key to switch to the
time input field.
¤ Enter the hours and minutes in 4-digit format
via the keypad e.g., QM5
for 07:15 am.
Change the input position with the control
key if necessary.
¤ Press the key Save below the display screen to
save the entry.
Date/Time
Date:
15.01.2013
Time:
00:00
Back Save
Calls Time
Date/Time
Date:
14.10.2013
Time:
07:15
Back Save

da en fi no sv 13
Gigaset CL540 / LUG IM-Nord en / A31008-M2602-R201-1-SM19 / starting.fm / 2/26/14
Template Borneo, Version 1, 21.06.2012
Getting started
Connecting the headset
You can connect a headset with 2.5 mm jack connectors.
Fo
r information on recommended headsets, see the relevant
produc
t page at www.gigaset.com
Display shows: Saved. You will hear a confirmation
tone.
Date/Time
‰
Saved
i
V
07:15
INT 1 14 Oct
Calls Calendar
You will automatically return to idle status.
Your phone is now ready for use.

14 da en fi no sv
Gigaset CL540 / LUG IM-Nord en / A31008-M2602-R201-1-SM19 / starting.fm / 2/26/14
Template Borneo, Version 1, 21.06.2012
Getting started
What would you like to do next?
After successfully setting up the phone, you can make calls straight away, customise your
Gigaset according to your requirements or firstly familiarise yourself with the operation.
If you have any questions about using
your phone, please read the tips on troubleshooting
(
¢ page 56) or contact our Customer Service team (¢ page 55).
Setting ringtones
Assign specific tunes to internal and external calls, reminders (¢ page 29), wake-up calls
(
¢ page 46) and to certain callers (¢ page 39).
Protecting yourself against unwanted calls
Set your phone up so that it doesn't ring if there is an anonymous call or use the time control
(
¢ page 30).
Register an existing Gigaset handset and add it to the phonebook
Use available handsets to continue calling from your new base. Transfer directory entries
from these handsets to your new handset (
¢ page 36,¢ page 40).
Configuring ECO DECT settings
Reduce the transmission power (emissions) of your phone (¢ page 34).

da en fi no sv 15
Gigaset CL540 / LUG IM-Nord en / A31008-M2602-R201-1-SM19 / starting.fm / 2/26/14
Template Borneo, Version 1, 21.06.2012
Understanding the operating steps in the user guide
Understanding the operating steps in the user guide
The keys on your Gigaset handset are set out in these operating instructions as follows:
c / v / a Answer call key / Menu key / End call key
Q to O Number / Letter keys
* / # Star key / Hash key
f / S Message key / Recall key
Overview of display icons (
¢ page 51).
Example: Activating/deactivating Auto Answer
Illustration in the user guide:
v
¤ Ï ¤ OK ¤ q Telephony ¤ OK ¤ Auto Answer ¤ Change (³
= activated)
Follow this procedure:
¤ v: With the handset in idle status, press the right control key to open the main menu.
¤ Ï: Navigate to the Ï icon using the control key p.
¤ OK: Press the display key OK or the middle of the control key w to open the submenu
Settings.
¤ q Telephony: Scroll to the entry Te le pho ny with the control key q.
¤ OK: Press the display key OK or the middle of the control key w to open the submenu
Tel ep hony .
¤ Auto Answer: The activate/deactivate auto answer function is selected.
¤ Change (³
= activated): Press the display key Change or the middle of the control key w
to alternate between activating or deactivating (³
= activated, ´
= deactivated).

16 da en fi no sv
Gigaset CL540 / LUG IM-Nord en / A31008-M2602-R201-1-SM19 / operating.fm / 2/26/14
Template Borneo, Version 1, 21.06.2012
Operating the phone
Operating the phone
Switching the handset on/off
¤ Press and hold the End call key a in idle status to switch the handset on or off.
Locking/unlocking the keypad
The keypad lock prevents any accidental use of the phone. If you press a key when the keypad is
locked, a message is displayed.
¤ Press and hold the # key to lock or unlock the keypad.
If a call is signalled on the handset, the keypad
automatically unlocks. and you can accept the
call. It then locks again when the call is finished.
Control key
In the description below, the side of the control key (up, down, right, left,
middle) that you have to press in the different operating situations is marked
in bla
ck, e.g. v for "press right on the control key".
The control key allows you to navigate with
in menus and entry fields. In idle
status or during an external call, it has the following functions:
When the handset is in idle status
s Open the phonebook.
v or w Open the main menu.
u Open list of handsets.
t Bring up the menu for setting the handset's call volume (
¢ page 22).
During an external call
s Open the phonebook.
u Initiate an internal consultation call.
t Adjust the loudspeaker volume for earpiece and handsfree mode.
Functions when pressing the centre of the control key
The key has different functions, depending on the operating situation.
u In
idle status, it opens the main menu.
u In submenus, selection and entry fields, the key takes on the function of the display keys
OK, Ye s, Save, Select or Change.
Note
These instructions demonstrate opening the main menu by pressing the right of the control
key and confirming the functions by pressing the appropriate display key. However, if you
prefer, you can also press the middle of the control key.

da en fi no sv 17
Gigaset CL540 / LUG IM-Nord en / A31008-M2602-R201-1-SM19 / operating.fm / 2/26/14
Template Borneo, Version 1, 21.06.2012
Operating the phone
Display keys
The display keys have a function preset by default in idle status, but the keys can be re-assigned
(
¢ page 31).
The functions of the display keys change dependi
ng on the operating situation.
Example
Some of the important display keys are:
Options O
pen a menu for further functions.
OK Confirm selection.
Back Skip back one menu level or cancel operation.
Save Save entry.
Overview of icons on the display keys (
¢ page 52).
Menu guidance
The functions of your telephone are displayed on a menu that consists of several levels. Menu
overview
¢ page 53.
Main menu (first menu level)
¤ When the handset is in idle status, press right on the control key v to open the main menu.
The main menu functions are shown in the display as icons. The
icon for the selected function is highlighted and the name of
the assoc
iated function appears in the display header.
Accessing a function, i.e. opening the corresponding submenu
(n
ext menu level):
¤ Use the control key p to navigate to the required function
and press the display key OK.
Returning to idle status: Brief
ly press the display key Back or
End call key a.
Back Save
Current display key functions
Display keys
Settings
ì Ê
Ì Ç
É Ï
Back OK
Example

18 da en fi no sv
Gigaset CL540 / LUG IM-Nord en / A31008-M2602-R201-1-SM19 / operating.fm / 2/26/14
Template Borneo, Version 1, 21.06.2012
Operating the phone
Submenus
The functions in the submenus are displayed as lists.
To access a function:
¤ Scroll to the function using the control key q and press
OK.
Returning to the previous menu level: Br
iefly press the display
key Back or End call key a.
Returning to idle status
From any menu:
¤ Press and hold the End call key a.
Or:
¤ If you do not press a key, the display automatically returns
to idle status after 2 minutes.
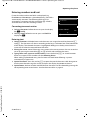
Message lists
Any messages you receive are saved in the message lists. An
advisory tone sounds as soon as a new entr
y appears on a list.
The Message key also flashes (if activated,
¢ page 28). Icons
for message types and the number of new messages are
shown on the i
dle display.
New messages available:
u
ÃOn the network mailbox (¢ page 35)
u ™ In the missed calls list
u
In the missed alarms list (¢ page 45)
Open the message list by pressing the Message key f. You
ca
n access the following message lists:
u Mailbo
x: Network mailbox (if your network provider sup-
ports this function and the number of the network mailbox has been stored.)
u Missed Calls: Missed call list (see "Call list"
¢ page 42)
u Missed Alarms: Missed appointments list
The icon for the network mailbox is always displa
yed, provided the number is stored in the
telephone. The other lists are only displayed if they contain messages.
Opening the list: q Select required list.
¤ OK
Exception: If
you select the network mailbox, the number of the network mailbox will be
selected (
¢ page 35). Lists are not opened on the display.
Settings
Date/Time
Audio Settings
Display
Language
Registration
x
Back OK
Example
i
V
07:15
INT 1 14 Oct
Ã
™
02 10 08
Calls Calendar
Example
La pagina si sta caricando...
La pagina si sta caricando...
La pagina si sta caricando...
La pagina si sta caricando...
La pagina si sta caricando...
La pagina si sta caricando...
La pagina si sta caricando...
La pagina si sta caricando...
La pagina si sta caricando...
La pagina si sta caricando...
La pagina si sta caricando...
La pagina si sta caricando...
La pagina si sta caricando...
La pagina si sta caricando...
La pagina si sta caricando...
La pagina si sta caricando...
La pagina si sta caricando...
La pagina si sta caricando...
La pagina si sta caricando...
La pagina si sta caricando...
La pagina si sta caricando...
La pagina si sta caricando...
La pagina si sta caricando...
La pagina si sta caricando...
La pagina si sta caricando...
La pagina si sta caricando...
La pagina si sta caricando...
La pagina si sta caricando...
La pagina si sta caricando...
La pagina si sta caricando...
La pagina si sta caricando...
La pagina si sta caricando...
La pagina si sta caricando...
La pagina si sta caricando...
La pagina si sta caricando...
La pagina si sta caricando...
La pagina si sta caricando...
La pagina si sta caricando...
La pagina si sta caricando...
La pagina si sta caricando...
La pagina si sta caricando...
La pagina si sta caricando...
La pagina si sta caricando...
La pagina si sta caricando...
La pagina si sta caricando...
La pagina si sta caricando...
La pagina si sta caricando...
La pagina si sta caricando...
La pagina si sta caricando...
La pagina si sta caricando...
La pagina si sta caricando...
La pagina si sta caricando...
-
 1
1
-
 2
2
-
 3
3
-
 4
4
-
 5
5
-
 6
6
-
 7
7
-
 8
8
-
 9
9
-
 10
10
-
 11
11
-
 12
12
-
 13
13
-
 14
14
-
 15
15
-
 16
16
-
 17
17
-
 18
18
-
 19
19
-
 20
20
-
 21
21
-
 22
22
-
 23
23
-
 24
24
-
 25
25
-
 26
26
-
 27
27
-
 28
28
-
 29
29
-
 30
30
-
 31
31
-
 32
32
-
 33
33
-
 34
34
-
 35
35
-
 36
36
-
 37
37
-
 38
38
-
 39
39
-
 40
40
-
 41
41
-
 42
42
-
 43
43
-
 44
44
-
 45
45
-
 46
46
-
 47
47
-
 48
48
-
 49
49
-
 50
50
-
 51
51
-
 52
52
-
 53
53
-
 54
54
-
 55
55
-
 56
56
-
 57
57
-
 58
58
-
 59
59
-
 60
60
-
 61
61
-
 62
62
-
 63
63
-
 64
64
-
 65
65
-
 66
66
-
 67
67
-
 68
68
-
 69
69
-
 70
70
-
 71
71
-
 72
72


Swisscom Gigaset SL400 Manuale utente
- Categoria
- Telefoni
- Tipo
- Manuale utente
- Questo manuale è adatto anche per
in altre lingue
- English: Swisscom Gigaset SL400 User manual
Altri documenti
-
Proximus Twist 654 Manuale utente
-
AEG Loop Manuale del proprietario
-
Motorola D1104P Manuale utente
-
Gigaset E630H Guida utente
-
AEG Voxtel D220BT Manuale del proprietario
-
-
-
Binatone Brick 4home edition Manuale utente
-
Gigaset E290 Manuale del proprietario
-