Kenwood Chef and Major KM007 series Instructions Manual
- Tipo
- Instructions Manual


page 3instructions
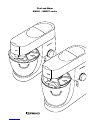
Congratulations on buying a Kenwood. With such a wide range of attachments available, it’s
more than just a mixer. It’s a state-of-the-art kitchen machine. We hope you’ll enjoy it.
Robust. Reliable. Versatile. Kenwood.
page 11 mode d’emploi
Félicitations pour l’achat de votre robot Kenwood. Avec une gamme impressionnante
d’accessoires adaptables, votre robot est plus qu’un simple batteur: c’est un robot de cuisine
ultra-perfectionné qui vous donnera entière satisfaction. Nous espérons que vous
l’apprécierez.
Solide. Sûr. sur-mesure. Kenwood.
sieten 19 bedienungsanleitung
Wir beglückwünschen Sie zu Ihrer Entscheidung für Kenwood. Sie haben nicht nur eine
Küchenmaschine zum Rühren und Kneten erworben, sondern können durch ein reichhaltiges
Zubehörprogramm Ihre neue Maschine zu einem universellen Küchensystem ausbauen. Wir
wünschen Ihnen viel Freude beim Kochen und Backen mit Kenwood
Robust. Zuverlässig. Vielseitig. Kenwood.
pagg 28 istruzioni
Ci congratuliamo con Lei dell’acquisto di questo elettrodomestico Kenwood. Con una tale
ampia gamma di accessori disponibili, questo apparecchio è molto più di un semplice mixer,
è un modernissimo apparecchio da cucina. Ci auspichiamo che Le piacerà.
Robusto. Affidabile. Versatile. Kenwood.
blz. 37 instructies
Gefeliciteerd met de aankoop van uw Kenwood keukenmachine. Er zijn zo veel accessoires
verkrijgbaar dat je deze machine niet meer gewoon een mixer kunt noemen. Het is een echte
keukenmachine en we hopen dan ook dat u er veel plezier van zult hebben.
Krachtig, betrouwbaar en veelzijdig, dat is Kenwood.
página 45 instrucciones
Felicidades por comprar un aparato Kenwood. Con el abanico de accesorios disponibles,
Ud. ha comprado algo más que una mezcladora. Es una obra de arte para la cocina.
Esperamos que lo disfrute.
Sólida. Fiable. Versátil. Kenwood.
página 54 instruções
Parabéns pela compra da sua Kenwood. Com a grande variedade de acessórios para ela
disponíveis, esta máquina é mais que uma batedeira. É uma máquina de cozinha super
moderna. Esperamos que a sua Kenwood lhe dê muito prazer.
Robusta. Fiável. Versátil. Kenwood.
side 63 brugsanvisning
Tillykke med Deres nye Kenwood. Med så stort et udvalg af tilbehør, er det mere end blot en
røremaskine - det er en suveræn, moderne køkkenmaskine. Vi håber, De vil få meget glæde
af den.
Robust. Pålidelig. Alsidig. Kenwood.
sid 71 bruksanvisning
Grattis! Du har just blivit ägare till en Kenwood. Till Kenwood finns det så många tillbehör att
köpa, så det är inte bara en vanlig matberedare du har - du har det allra senaste inom
köksmaskiner. Vi hoppas du kommer att trivas med den.
Robust. Pålitlig. Mångsidig. Kenwood.
Kenwood
English
Français
Deutsch
Italiano
Nederlands
Español
Portugêus
Dansk
Svenska

side 79 Bruksanvisning
Gratulerer med kjøpet av Kenwood. Med et så stort utvalg av tilbehør, er den mer enn bare
en mikser. Det er en kjøkkenkunstner-maskin. Vi håper du vil ha stor glede av den.
Robust. Pålitelig. Allsidig. Kenwood.
sivu 87 käyttöohjeet
Onnittelut Kenwood-ostoksen johdosta! Koneeseenne kuuluu niin suuri määrä erilaisia laitteita,
että se on todellakin paljon enemmän kuin pelkkä vatkain. Tämä yleiskone on alansa viimeisintä
huutoa ja toivotamme teille miellyttäviä työhetkiä sen parissa.
Vahva. Luotettava. Monipuolinen. Kenwood.
sayfada 95 kkuullllaannıımm yyöönneerrggeelleerrii
Kenwood karı…tırıcıyı seçtiòiniz için tebrikler. Kenwood'un kapsamlı ek parça dizisi istediòiniz
yiyeceòi hazırlama olanaòı verir. Kenwood yalnızca bir karı…tırıcı aygıt deòil, mutfak sanatı
aracıdır. Zevkle kullanınız.
Kenwood saòlam, güvenilir ve kullanı…lıdır.
str. 103 návod k pou¥ití
Blahop¡ejeme Vám ke koupi spot¡ebiïe znaïky Kenwood. Díky •irokému sortimentu
dodávaného p¡íslu•enství jste zakoupili víc, ne¥ jen kuchyñskƒ strojek. Získali jste •piïkovƒ
kuchyñskƒ robot. Vê¡íme, ¥e Vám bude dob¡e slou¥it.
Robustní. Spolehlivƒ. Univerzální. Kenwood.
oldal 111 használati utasítás
Köszöntjük a Kenwood vásárlói körében! Az Ön által kiválasztott robotgép a csatlakoztatható
változatos tartozékok révén a legtöbb konyhai munkában segítòtársa lesz. Reméljük, örömmel
használja majd.
Ellenálló, megbízható, sokoldalú - Kenwood.
str. 119 instrukcje
Gratulujemy zakupu Kenwooda. Majåc tak szeroki asortyment narzëdzi jest on wiëcej, ni¯
malakserem. Jest on dzie¢em bie¯åcej sztuki kuchennej. Mamy nadziejë, ¯e sië Paæstwu
spodoba.
Mocny. Niezawodny. Uniwersalny. Kenwood.
странице 127 Указания по применению
Мы рады, что вы приобрели кухонный комбайн нашей фирмы. Благодаря широкому
ассортименту имеющихся насадок этот прибор является не просто миксером - это
современный кухонный комбайн. Пользуясь им, вы получите истинное удовольствие.
Прочный. Надежный. Универсальный. Изготовитель - фирма KENWOOD.
135
Kenwood.
,
. .
. . . Kenwood.
Kenwood
Norsk
Suomi
Türkçe
Cesky
Magyar
Polski
Русский
Ekkgmij
´d°w
¢FKOLU‹ 144 ÅH∫W
≤NMµJr ´Kv ®d«¡ §NU“ ØOMuËœ. ˱l ¢u≠d ¢AJOKW Ë«ßFW ØNcÁ ±s «∞LK∫IU‹, ≠Nu ∞Of ±πdœ îö©W. °q «≤t §NU“ ±D∂a
¨U¥W ≠w «∞dË´W Ë«ô¢IUÊ.«≤MU ≤Q±q ¢L∑FJr °t.
±∑Os, ±u£u‚, ±∑Fbœ «ôß∑FLUô‹, ØOMuËœ.

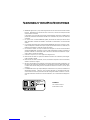
safety
●Switch off and unplug before fitting or removing tools/attachments, after
use and before cleaning.
●This machine is not intended for use by young children or infirm persons
without supervision.
●Keep your fingers away from moving parts and fitted attachments.
●Never leave the machine on unattended.
●Never use a damaged machine. Get it checked or repaired: see
‘service’, page 8.
●Never use an unauthorised attachment or more than one attachment
at once.
●Never exceed the maximum capacities on page 4.
●Don’t let children play with this machine.
●When using an attachment, read the safety instructions that come with it.
●Only use this machine for its intended domestic use.
●Take care when lifting this appliance as it is heavy. Ensure the head is
locked and that the bowl, tools, outlet covers and cord are secure before
lifting.
before plugging in
important - UK only ●Make sure your electricity supply is the same as the one shown on
the underside of your machine.
●The wires in the cord are coloured as follows:
Blue = Neutral, Brown = Live.
●This machine complies with European Economic Community Directive
89/336/EEC.
before using for the first time
1Remove all packaging.
2Wash the parts: see ‘care and cleaning’, page 8.
3Push excess cord into the cord stowage compartment at the back of
the machine.
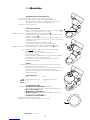
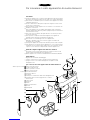
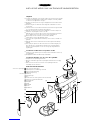
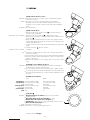
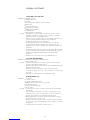
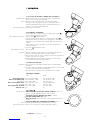
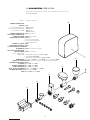
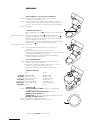
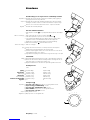
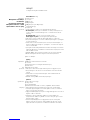
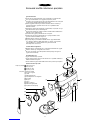
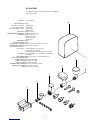
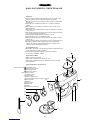
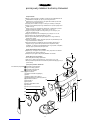
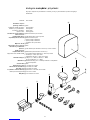
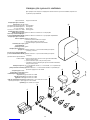
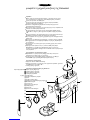
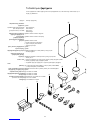
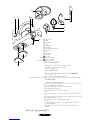
know your Kenwood kitchen machine
attachment outlets high-speed outlet
medium speed outlet
the mixer slow-speed outlet
tool socket
mixer head
outlet catch
bowl
head-lift lever
on/off and speed switch
power unit
K-beater
whisk
dough hook
spatula
splashguard
know your Kenwood kitchen machine
3
0
min
123
4
5
6
P
English

CHEF
0
min
1
2
3
P
CHEF
0
min
1
2
3
P
CHEF
0
min
1
2
3
P
0
min
max
123
4
5
6
P
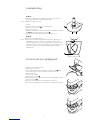
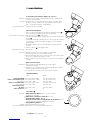
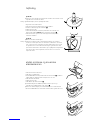
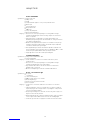
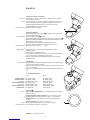
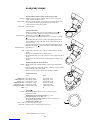
the mixing tools and some of their uses
K-beater ●For making cakes, biscuits, pastry, icing, fillings, éclairs and mashed
potato.
whisk ●For eggs, cream, batters, fatless sponges, meringues, cheesecakes,
mousses, soufflés. Don’t use the whisk for heavy mixtures (eg creaming
fat and sugar) - you could damage it.
dough hook ●For yeast mixtures.
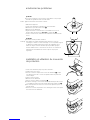
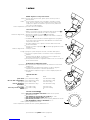
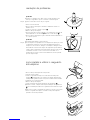
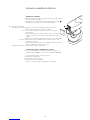
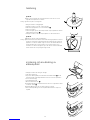
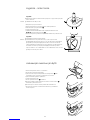
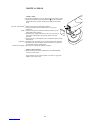
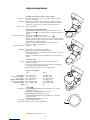
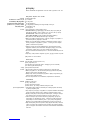
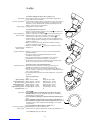
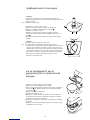
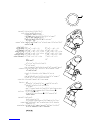
to use your mixer
1Turn the head-lift lever clockwise and raise the mixer head till it locks.
to insert a tool 2Turn till it stops then push.
3Fit the bowl onto the base - press down and turn clockwise
4To lower the mixer head, raise it slightly, then turn the head lift lever
clockwise. Lower into the locked position.
5Switch on and turn the speed switch to the desired setting.
●Switch to pulse for short bursts.
to remove a tool 6Unscrew.
hints ●Switch off and scrape the bowl with the spatula frequently.
●Eggs at room temperature are best for whisking.
●Before whisking egg whites, make sure there’s no grease or egg yolk
on the whisk or bowl.
●Use cold ingredients for pastry unless your recipe says otherwise.
points for bread making
important ●Never exceed the maximum capacities below - you’ll overload the
machine.
●If you hear the machine labouring, switch off, remove half the dough
and do each half separately.
●The ingredients mix best if you put the liquid in first.
maximum capacities
CHEF MAJOR
shortcrust pastry ●Flour weight: 680g - 1lb 8oz Flour weight: 910g - 2lb
stiff yeast dough ●Flour weight: 1.36kg - 3lb Flour weight: 1.5kg - 3lb 5oz
British type ●Total weight: 2.18kg - 4lb 13oz Total weight: 2.4kg - 5lb 5oz
soft yeast dough ●Flour weight: 1.3kg - 2lb 14oz Flour weight: 2.6kg - 5lb 12oz
continental type ●Total weight: 2.5kg - 5lb 8oz Total weight: 5kg - 11lb
fruit cake mix ●Total weight: 2.72kg - 6lb Total weight: 4.55kg - 10lb
egg whites ●12 16
speed switch
K-beater ●creaming fat and sugar start on min, gradually increasing to ‘max’.
●beating eggs into creamed mixtures 4- ‘max’.
●folding in flour, fruit etc Min - 1
●all in one cakes start on min speed, gradually increase to max.
●rubbing fat into flour min - 2.
whisk ●Gradually increase to ‘max’.
dough hook ●Start on ‘min’, gradually increasing to 1.
for cleaning see page 8
P
4
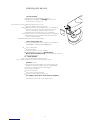
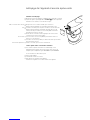
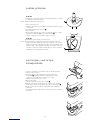
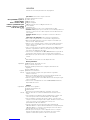
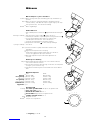
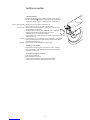
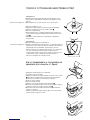
the mixer

problem
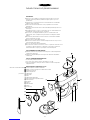
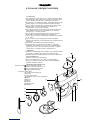
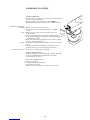
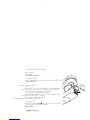
●The whisk or K-beater knocks against the bottom of the bowl or isn’t
reaching the ingredients in the bottom of the bowl.
solution ●Adjust the height. Here’s how:
1Unplug.
2Raise the mixer head and insert the whisk or beater.
3Hold it, then loosen the nut
4Lower the mixer head.
5Adjust the height by turning the shaft. Ideally the whisk/K-beater should
be almost touching the bottom of the bowl
6Raise the head, hold the whisk/K-beater and tighten the nut.
problem
●The mixer stops during operation.
solution ●Your mixer is fitted with an overload protection device and will stop if
overloaded to protect the machine. If this happens, switch off and
unplug the mixer. Remove some of the ingredients to reduce the load,
and allow the mixer to stand for a few minutes. Plug in and reselect the
speed. If the mixer does not restart immediately allow to stand for
additional time.
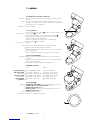
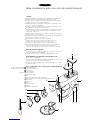
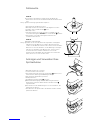
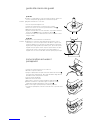
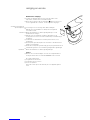
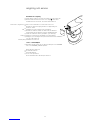
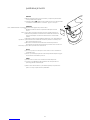
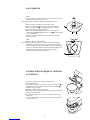
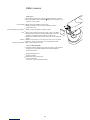
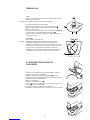
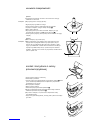
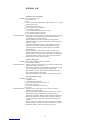
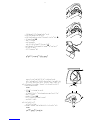
to fit and use your splashguard
1Raise the mixer head until it locks.
2Fit the bowl onto the base.
3Push the splashguard onto the underside of the mixer head until
fully located. The food chute should be positioned as shown.
4Insert required tool.
5Lower the mixer head.
6Fit the food chute cover .
●During mixing the chute cover can be removed and ingredients added
directly to the bowl .
●You do not need to remove the splashguard to change tools.
7Remove the splashguard by raising the mixer head and sliding it down.
troubleshooting
5
CHEF
0
min
1
P
0
min
123
P
0
min
123
P

6
b
c
a
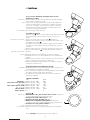
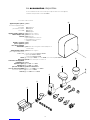
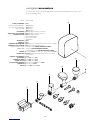
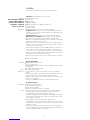
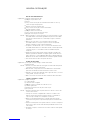
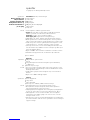
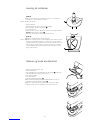
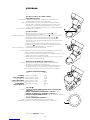
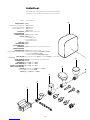
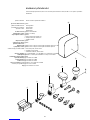
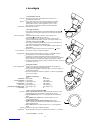
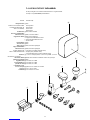
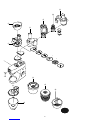
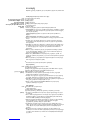
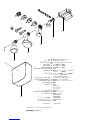
attachment attachment code
flat pasta maker A970
additional pasta attachments A971 tagliatelle
(not shown) used in conjunction A972 tagliolini
with A970 A973 trenette
A974 spaghetti
pasta maker A936 comes with 6screens
slow speed slicer/shredder A948 comes with 4drums
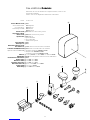
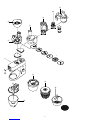
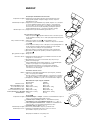
super mincer A950 comes with
alarge sausage nozzle
bsmall sausage nozzle
ckebbe maker
grain mill A941
citrus juicer A960
food processing attachment A980 includes 3 cutting plates as standard and a knife blade
high speed slicer/shredder A998 includes 3 cutting plates as standard
optional plates for A980 & A998 aextra coarse shredder part number 639021
brasping plate part number 639150
cstandard chipper part number 639083
liquidiser 1.2 l acrylic A993A, 1.2 l glass A994A,
1.5 l stainless steel A996A
multi-mill A938A comes with 3glass jars and 3 lids for storage
continuous juice extractor A935
ice-cream maker CHEF A956, MAJOR A957
potato peeler CHEF A934, MAJOR A952
colander and sieve CHEF A992, MAJOR A930
stainless steel bowls polished: CHEF 672487, MAJOR 672499
splashguard CHEF & MAJOR 672475
cover CHEF, 672504,MAJOR 672516
the attachments available
To buy an attachment not included in your pack, call your KENWOOD repairer.


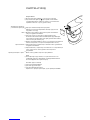
cleaning and service
care and cleaning
●Always switch off and unplug before cleaning.
●A little grease may appear at outlet when you first use
it. This is normal - just wipe it off.
power unit, outlet covers ●Wipe with a damp cloth, then dry.
●Never use abrasives or immerse in water.
bowl ●Wash by hand, then dry thoroughly or wash in the dishwasher.
●Never use a wire brush, steel wool or bleach to clean your
stainless steel bowl. Use vinegar to remove limescale.
●Keep away from heat (cooker tops, ovens, microwaves).
tools ●Stainless steel tools can be washed by hand or in a dishwasher.
●Non stainless steel tools (coated) should only be washed by
hand, then dried thoroughly.
splashguard ●Wash by hand, then dry thoroughly.
service and customer care
●If the cord is damaged it must, for safety reasons, be replaced
by KENWOOD or an authorised KENWOOD repairer.
UK If you need help with:
●using your machine
●servicing or repairs (in or out of guarantee)
call KENWOOD Customer Care on 023 92392333.
Have your model number ready - it’s on the underside of the mixer.
●spares and attachments
call 0870 2413653.
Eire ●See our advertisement in Golden Pages.
other countries ●Contact the shop where you bought your machine.
guarantee UK only
●If your machine goes wrong within one year from the date you
bought it, we will repair or replace it free of charge provided:
●you have not misused, neglected or damaged it;
●it has not been modified;
●it is not second-hand;
●it has not been used commercially;
●you have not fitted a plug incorrectly; and
●you supply your receipt to show when you bought it.
This guarantee does not affect your statutory rights.
8

recipes
See important points for bread making on page 4.
white bread stiff British-type dough
ingredients ●1.36kg (3lb) strong plain flour
●15ml (3tsp) salt
●25g (1oz) fresh yeast; or 15g/20ml (1⁄2oz) dried yeast + 5ml (1tsp) sugar
●750ml (11⁄4pts) warm water: 43˚C (110˚F). Use a thermometer or add
250ml (9floz) boiling water to 500ml (18floz) cold water
●25g (1oz) lard
method 1dried yeast (the type that needs reconstituting): pour the warm water
into the bowl. Then add the yeast and the sugar and leave to stand for
about 10 minutes until frothy.
fresh yeast: crumble into the flour.
other types of yeast: follow the manufacturer’s instructions.
2Pour the liquid into the bowl. Then add the flour (with fresh yeast if used),
salt and lard.
3Knead at minimum speed for 45 - 60 seconds. Then increase to speed 1,
adding more flour if necessary, until a dough has formed.
4Knead for 3 - 4 more minutes at speed 1 until the dough is smooth,
elastic and leaves the sides of the bowl clean.
5Put the dough into a greased polythene bag or a bowl covered with a tea
towel. Then leave somewhere warm until doubled in size.
6Re-knead for 2 minutes at speed 1.
7Half fill four 450g (1lb) greased tins with the dough, or shape it into rolls.
Then cover with a tea towel and leave somewhere warm until doubled in
size.
8Bake at 230˚C/450˚F/Gas Mark 8 for 30 - 35 minutes for loaves or 10 - 15
minutes for rolls.
●When ready, the bread should sound hollow when tapped on the base.
shortcrust pastry
ingredients ●450g (1lb) flour, sieved with the salt
●5ml (1tsp) salt
●225g (8oz) fat (mix lard and margarine straight from the fridge)
●About 80ml (4tbsp) water
hint ●Don’t overmix
method 1Put the flour into the bowl. Chop the fat up roughly and add to the flour.
2Mix at speed 1 until it resembles breadcrumbs. Stop before it looks
greasy.
3Add the water and mix at minimum speed. Stop as soon as the water is
incorporated.
4Cook at around 200˚C/400˚F/Gas Mark 6, depending on the filling.
pavlova
ingredients ●3 large egg whites
●175g (6oz) caster sugar
●275ml (10 fl.oz.) double cream
●fresh fruit eg raspberries, strawberries, grapes, kiwi fruit
method 1Whisk the egg whites on a high speed until they form ‘soft peaks’.
2With the whisk operating on speed 5, gradually add the sugar one
tablespoon at a time, whisking after each addition.
3Line a baking tray with silicone paper, then spoon the meringue onto the
paper forming a nest approximately 20cm/8” in diameter.
4Place the baking tray into an oven preheated to 150˚C/300˚F/Gas Mark
2, then immediately reduce the temperature to 140˚C/275˚F/Gas Mark 1
and bake for 1 hour. Turn the heat off but leave the pavlova in the oven to
cool down.
5When ready to serve, peel off the silicone paper and place on a serving
dish. Whip the cream until soft peaks form then spread over the top of
the pavlova and decorate with the fruit.
9

recipes continued
scrumptious chocolate cake
ingredients ●225g (8oz) butter, softened
●250g (9oz) caster sugar
●4 eggs
●5ml (1tsp) instant coffee dissolved in 15ml (1tbsp) hot water
●30ml (2tbsp) milk
●5ml (1tsp) almond essence
●50g (2oz) ground almonds
●100g (4oz) self raising flour
●5ml (1tsp) baking powder
●50g (2oz) unsweetened cocoa powder
method 1Cream the butter and sugar on a low speed gradually increasing to a
higher speed until the mixture is light and fluffy. Scrape down the bowl
and beater.
2Beat the eggs in a jug and whilst the mixer is operating on a high
speed, gradually add the egg a little at a time until incorporated. Switch
off and scrape down.
3Incorporate the dissolved coffee, milk and almond essence on a low
speed. Add the ground almonds, sieved flour, baking powder and
cocoa. Mix on a low speed to incorporate.
4Divide the mixture between two 20cm/8” cakes tins that have been
lined with greased greaseproof paper. Level the tops then bake at
180˚C/350˚F/Gas Mark 4 for approximately 30 minutes until springy to
the touch.
5Turn out and cool on a wire rack.
chocolate mousseline filling
ingredients ●275g (10oz) plain chocolate, broken into pieces
●225ml (8 fl.oz.) double cream
method 1Melt the chocolate by placing in a bowl over a pan of barely
simmering water.
2Whisk the cream starting on a low speed gradually increasing to a
higher speed until it forms soft peaks.
3When the chocolate has melted remove the bowl from the heat and,
using a large spoon fold into the cream.
4Spread the chocolate filling between the cooled cakes.
carrot and coriander soup
ingredients ●25g (1oz) butter
●1 onion chopped
●1 clove garlic crushed
●600g (1lb 6oz) carrot cut into 2.5cm cubes
●cold chicken stock
●10-15ml (2-3tsp) ground coriander
●salt and pepper
method 1Melt the butter in a pan, add the onion and garlic and fry until soft.
2Place the carrot into the liquidiser, add the onion and garlic. Add
sufficient stock to reach the 1.2 level marked on the gobet. Fit the lid
and filler cap.
3Blend on maximum speed for 5 seconds for a coarse soup or longer
for a finer result.
4Transfer the mixture to a saucepan, add the coriander and seasoning
and simmer the soup for 30 to 35 minutes or until cooked.
5Adjust the seasoning as necessary and add extra liquid if required.
10

sécurité
●Éteignez et débranchez l'appareil avant d'adapter ou de retirer tout
élément/accessoire, après l'utilisation et avant le nettoyage.
●Cet appareil n'est pas prévu pour être utilisé par de jeunes enfants
ou des personnes infirmes sans surveillance.
●N’approchez jamais vos doigts des éléments en mouvement ou des
accessoires fixés sur votre robot.
●Ne laissez jamais votre appareil sans surveillance lorsqu’il fonctionne
et maintenez-le hors de portée des enfants.
●N’utilisez jamais un appareil endommagé ou en mauvais état. Faites-
le vérifier et réparer. Pour cela reportez-vous à la rubrique 'service
après-vente' en page 16.
●N’utilisez jamais un accessoire non adapté à cet appareil et n’utilisez
pas plus d’un accessoire à la fois.
●Ne dépassez jamais les capacités maximales de charge de l’appareil
telles qu’elles sont précisées en page 12.
●Ne laissez pas un enfant jouer avec cet appareil.
●Lorsque vous utilisez un accessoire, lisez attentivement les
instructions sur la sécurité concernant cet accessoire.
●Ce robot est uniquement prévu pour un usage domestique.
●Faites attention pour soulever le robot qui est lourd. Assurez-vous
que la tête est verrouillée et que le bol, les accessoires, les
couvercles des orifices et le cordon sont fixés avant de le soulever.
avant de brancher l’appareil
●Assurez-vous que le courant électrique que vous utilisez est le même
que celui indiqué sous votre appareil.
●Cet appareil est conforme à la directive 89/336/CEE de la C. E.
avant d’utiliser votre appareil pour la première fois
1Retirez tous les emballages.
2Lavez les différentes parties de l’appareil. Reportez-vous pour cela à
la page 16: 'entretien et nettoyage de l’appareil'.
3Rentrez l’excédant de cordon dans le compartiment prévu à cet effet
à l’arrière du robot.
faites connaissance avec votre robot de cuisine Kenwood
orifices de branchement sortie ultra-rapide
des différents accessoires sortie vitesse moyenne
sortie lente
sortie planétaire
le batteur tête du batteur
loquet de blocage
bol
manette pour soulever la tête du batteur
bouton marche/arrêt (on/off) et de réglage de la vitesse
bloc moteur
batteur 'K'
fouet
crochet à pâte
spatule
couvercle de protection
faites connaissance avec votre robot de cuisine Kenwood
11
Français
0
min
123
4
5
6
P

les accessoires du batteur et quelques unes de leurs
utilisations possibles
batteur 'K' ●Pour la confection de cakes, biscuits, pâtisseries, glaçages, garnitures,
éclairs et purées de pommes de terre.
fouet ●Pour les oeufs, la crème, la pâte à frire, les gâteaux (type gâteau de
Savoie) sans matière grasse, les meringues, les gâteaux au fromage,
les mousses, les soufflés. N’utilisez pas le fouet pour les mélanges
épais (comme par exemple pour travailler les matières grasses ou le
sucre) car vous pourriez l’endommager.
crochet à pâte ●pour les mélanges à base de levure.
pour utiliser le batteur
1Tournez le levier dans le sens des aiguilles d’une montre pour soulever
la tête du batteur et soulevez-la jusqu’à ce qu’elle s’enclenche en
position.
pour insérer un accessoire 2Tournez l’accessoire jusqu’à ce qu’il s’arrête puis pousser.
3Adaptez le bol sur la base - pressez vers le bas et tournez dans le sens
des aiguilles d’une montre
4Pour abaisser la tête du batteur, soulevez-la légèrement, puis tournez le
levier dans le sens des aiguilles d’une montre. Abaissez-la en position
verrouillée.
5Mettez le robot sous tension et tournez le variateur sur la vitesse voulue.
●Passez en mode pulsateur pour procéder par brèves impulsions.
pour retirer un accessoire 6Dévissez.
astuces ●Eteignez l’appareil et raclez fréquemment le bol avec la spatule.
●Pour battre les oeufs, il est conseillé d’utiliser des oeufs à température
ambiante.
●Avant de monter les blancs en neige, vérifiez qu’il n’y a pas de restes de
graisse ou de jaune d’oeuf sur le fouet ou dans le bol.
●Utilisez des ingrédients froids pour la pâte sauf indications contraires
mentionnées sur votre recette.
points importants pour la fabrication du pain
important ●Ne dépassez jamais les capacités maximales signalées ci-dessous car
vous risqueriez de surcharger votre appareil.
●Si vous entendez votre appareil forcer, éteignez l’appareil, retirez la moitié
de la pâte et travaillez chaque moitié séparément.
●Les ingrédients se mélangeront mieux si vous mettez les liquides en
premier dans l’appareil.
capacités maximales
CHEF MAJOR
pâte brisée ●Quantité de farine: 680g 910g
pâte ferme à base de levure ●Quantité de farine: 1,36kg 1,5kg
type anglais ●Quantité de farine: 2,18kg 2,4kg
pâte souple à base de levure ●Quantité de farine: 1,3kg 2,6kg
type continental ●Quantité de farine: 2,5kg 5kg
cake aux fruits ●Quantité de farine: 2,72kg 4,55kg
blancs d’oeufs ●12 16
vitesses
batteur “K” ●Travailler les corps gras en crème avec le sucre commencez
sur min, augmentez progressivement jusqu'au max.
●Incorporer les œufs à une crème 4 - "max".
●Incorporer la farine, les fruits, etc. Min - 1.
●Battre tous les ingrédients d'un gâteau simultanément
commencez à vitesse min, augmentez progressivement jusqu'au max.
●Incorporer les corps gras à la farine min - 2.
fouet ●Augmentez progressivement jusqu’à 'max'.
crochet à pâte ●Commencez sur 'min', puis augmentez graduellement jusqu’à passer
sur 1.
pour le nettoyage de l’appareil reportez-vous à la page 16.
P
12
le batteur
CHEF
0
min
1
2
3
P
CHEF
0
min
1
2
3
P
CHEF
0
min
1
2
3
P
0
min
max
123
4
5
6
P

problème
●Le fouet ou le batteur 'K' vient heurter le fond du bol ou ne peut pas
atteindre les ingrédients situés au fond du bol.
solution ●Ajuster la hauteur de la manière suivante :
1Débranchez l’appareil.
2Levez la tête du batteur et introduisez le fouet ou batteur.
3Maintenez-le, puis desserrez l’écrou.
4Abaissez la tête du batteur.
5Réglez la hauteur en tournant l'axe. Le fouet/batteur en K est en
position idéale lorsqu'il touche presque le fond du bol.
6Levez à nouveau la tête, maintenez le fouet/batteur en K et resserrez
l’écrou.
problème
●Le batteur s’arrête pendant l’utilisation.
solution ●Votre batteur est équipé d’un dispositif de protection contre les
surcharges, il s’arrête en cas de surcharge. Si cela se produit, éteignez
et débranchez le batteur. Retirez une partie des ingrédients pour
réduire la charge et laissez le batteur reposer pendant quelques
minutes. Rebranchez-le et sélectionnez une vitesse. Si le batteur ne
redémarre pas immédiatement, laissez-le reposer un peu plus
longtemps.
installation et utilisation du couvercle
de protection
1Levez la tête du batteur jusqu'en position verrouillée.
2Installez le bol sur le socle.
3Placez le couvercle de protection sous la tête du batteur jusqu’à
son emplacement correct. Le bac récupérateur doit être positionné
comme indiqué.
4Insérez l’outil nécessaire.
5Abaissez la tête du batteur.
6Fixez le couvercle du bac récupérateur .
●Pendant le mélange le couvercle du bac récupérateur peut être enlevé
; les ingrédients peuvent ainsi être ajoutés directement dans le bol .
●Vous n’avez pas besoin d’enlever le couvercle de protection pour
changer d’outil.
7Retirez le couvercle de protection en le faisant glisser vers le bas après
avoir soulevé la tête du batteur.
solutionner les problèmes
13
CHEF
0
min
1
P
0
min
123
P
0
min
123
P

les accessoires disponibles
Si vous souhaitez acheter un accessoire qui n’a pas été livré avec votre appareil,
contactez votre specialiste conseil KENWOOD.
accessoire code accessoire
appareil à pâtes plates AA970
accessoires supplémentaires
pour pâtes A971 tagliatelle
(non illustrés) à utiliser A972 tagliolini
avec A970 A973 trenette
A974 spaghetti
appareil à pâtes fraîches A936 livré avec 6 grilles
éminceur/râpe lent A948 livrée avec 4 cônes
hachoir A950 livré avec
a grand adaptateur à saucisses
b petit adaptateur à saucisses
c adaptateur à kebbés
moulin à céréales A941
presse-agrumes A960
cuve de préparation
alimentaire A980 livrée avec trois grilles à émincer/râper et un
couteau rotatif
éminceur/râpe rapide A998 livré avec 3 grilles
grilles supplémentaires pour
A980 & A998 a moulin extra robuste référence 639021
b grille râpe référence 639150
c coupe frites référence 639083
mixer 1,2 l acrylique A993A, 1,2 l verre A994A, 1,5 l acier inoxydable A996A
mini cuve A938A livrée avec 3 pots en verre et 3
couvercles de rangement
centrifugeuse A935
appareil à glace CHEF A956, MAJOR A957
éplucheuse CHEF A934, MAJOR A952
passoire et tamis n CHEF A992, MAJOR A930
bols en acier inoxydable polis : CHEF 672487, MAJOR 672499
couvercle de protection CHEF & MAJOR 672475
housse CHEF, 672504, MAJOR 672516
14
b
c
a


nettoyage de l’appareil et service après-vente
entretien et nettoyage
●Eteignez toujours votre appareil et débranchez-le avant de le nettoyer.
●Un peu de graisse peut apparaître à l’orifice lors de la première
utilisation. C’est normal, il vous suffit de l’essuyer.
robot, couvercles des orifices ●Essuyez-les avec un chiffon humide, puis séchez-les.
●N’utilisez jamais d’abrasifs et n‘immergez jamais dans l’eau.
bol ●ü Lavez-le à la main puis essuyez-le ou lavez le en lave-vaisselle.
●N’utilisez jamais de brosse métallique, de paille de fer ou de
chlore pour nettoyer votre bol en acier inoxydable. Utilisez du
vinaigre pour enlever le calcaire.
●Tenez le bol à l’écart de la chaleur (plaques de cuisson, fours
conventionnels, fours à micro-ondes).
accessoires ●Les accessoires en acier inoxydables peuvent être lavés à la
main ou en lave-vaisselle.
●Les autres accessoires (enduits) ne doivent être lavés qu’à la main,
puis entièrement séchés.
couvercle de protection ●Lavez-le à la main, puis séchez-le entièrement.
service après-vente et assistance clientèle
●Si le cordon souple de votre robot est endommagé, il faut
impérativement, pour des raisons de sécurité, que celui-ci soit
remplacé par un réparateur agréé KENWOOD ou par KENWOOD.
Si vous avez besoin d’assistance pour:
●utiliser votre appareil
●commander un autre accessoire
●faire réparer ou entretenir votre appareil:
Contactez le magasin où vous avez acheté votre appareil.
16

recettes
Pour connaître les points importants de la fabrication du pain,
veuillez vous reporter à la page 12.
pain blanc pâte souple type continental
●2,6kg de farine ordinaire
●1,3 litre de lait
●300g de sucre
●450g de margarine
●100g de levure fraîche ou 50g de levure sèche
●6 oeufs, préalablement battus
●5 pincées de sel
méthode 1Faites dissoudre la margarine dans le lait et portez la température à 43˚C.
2levure sèche (à reconstituer) : Ajoutez la levure et le sucre au lait et
laissez reposer pendant environ 10 minutes jusqu’à ce que le mélange
obtenu soit mousseux.
levure fraîche: incorporez à la farine en émiettant et ajoutez le sucre.
autres types de levure : reportez-vous aux instructions du fabricant.
3Versez le lait dans le bol, ajoutez-y les oeufs battus et 2kg de farine.
4Mélangez à la vitesse minimale pendant 1 minute puis à la vitesse 1
pendant une minute supplémentaire.
5Ajoutez le neste de la farine et le stel et mélangez le tout à la vitesse
minimale pendant une minute, puis à la vitesse 1 pendant 2 - 3 minutes
jusqu’à ce le mélange soit homogène et bien mélangé.
6Remplissez à moitié plusieurs moules de 450g avec la pâte. (Ces
moules doivent être préalablement beurrés) ou bien réalisez des petits
pains avec la pâte. Couvrez ensuite avec un torchon de cuisine et
laissez reposer dans un endroit chaud jusqu’à ce que la pâte ait doublé
de volume.
7Faites cuire à 200˚C/Thermostat 6 pendant 20 - 25 minutes pour les
miches de pain et 15 minutes pour les petits pains.
8Lorsque le pain est cuit, il doit sonner creux lorsqu’on le tapote sur la
base.
●Permet de réaliser environ 10 miches de pain.
pâte brisée
ingrédients ●450g de farine tamisée avec du sel
●5ml de sel
●225g de matière grasse (mélange de lard et de margarine directement
sortis du réfrigérateur)
●Environ 80ml d’eau (soit l’équivalent de 4 cuillères à soupe)
astuce ●Ne mélangez pas pendant trop longtemps.
méthode 1Mettez la farine dans le bol. Découpez la matière grasse que vous
utilisez en morceaux grossiers et ajoutez à la farine.
2Mélangez à vitesse 1 jusqu'à obtenir l'apparence de miettes de pain.
Arrêtez avant d'obtenir une apparence grasse.
3Ajoutez l’eau et mélangez à la vitesse minimale. Arrêtez dès que l’eau
est bien incorporée au mélange.
4Faites cuire à environ 200˚C/Thermostat 6, selon la garniture.
pavlova
ingrédients ●blancs de 3 gros œufs
●175 g de sucre extra fin
●275 ml de crème fraîche épaisse
●fruits frais, p. ex. framboises, fraises, raisins, kiwis
méthode 1Battez les blancs d’œuf en neige jusqu’à ce que la mousse tienne au
fouet.
2Le fouet fonctionnant à la vitesse 5, ajouter graduellement le sucre
cuillère à soupe par cuillère à soupe, en battant après chaque ajout.
3Couvrez une plaque de four avec du papier siliconé, puis déposez la
meringue à la cuillère sur le papier pour former un nid d’environ 20 cm
de diamètre.
4Placez la plaque dans un four préchauffé à environ 150 ° C/thermostat 2,
puis réduisez immédiatement la température à 140 ° C/thermostat 1 et
faites cuire pendant une heure. Éteignez le four mais laissez le pavlova
refroidir dans le four.
5Lorsque le dessert est prêt à servir, retirez le papier siliconé et placez-le
sur un plat. Fouettez la crème jusqu’à ce qu’elle tienne au fouet et
répandez-la au dessus du pavlova et décorez-le avec les fruits.
17
ingrédients
Ces quantités s’appliquent
aux modèles Major.
Pour les modèles Chef,
réduisez les quantités de
moitié et ajoutez la farine en
une fois.

recettes suite
délicieux gâteau au chocolat
ingrédients ●225 g de beurre ramolli
●250 g de sucre extra fin
●4 œufs
●5 ml de café instantané dissous dans 15 ml d’eau chaude
●30 ml de lait
●5 ml d’essence d’amende
●50 g de poudre d’amende
●100 g de farine auto-levante
●5 ml de levure chimique
●50 g de cacao en poudre non sucré
méthode 1Mélangez le beurre et le sucre à faible vitesse en passant
graduellement à une vitesse plus rapide jusqu’à obtenir un mélange
léger et onctueux. Videz le bol et nettoyez le fouet.
2Battez les œufs dans une jatte et pendant que le batteur tourne à
grande vitesse, ajoutez l’œuf peu à peu jusqu’à ce qu’il s’incorpore.
Éteignez et videz la jatte.
3Incorporez le café dissous, le lait et l’essence d’amende à faible
vitesse. Ajoutez la poudre d’amende, la farine tamisée, le levure
chimique et le cacao. Mélangez à faible vitesse jusqu’à incorporation.
4Partagez le mélange dans deux moules à gâteau de 20 cm
préalablement recouverts de papier sulfurisé beurré. Nivelez le dessus,
puis cuire à 180 ° C/thermostat 4 pendant environ 30 minutes jusqu’à
ce qu’il soit moelleux au toucher.
5Retournez les gâteaux et laissez-les refroidir sur une grille.
garniture mousseline au chocolat
ingrédients ●275 g de chocolat noir brisé en morceaux
●225 ml de crème fraîche épaisse
méthode 1Faites fondre le chocolat dans un bol au bain-marie.
2Fouettez la crème en commençant à faible vitesse puis augmentez
graduellement la vitesse jusqu’à ce que la crème tienne au fouet.
3Lorsque le chocolat a fondu retirez le bol du bain-marie, et incorporez
le chocolat à la crème avec une grande cuillère.
4Répartissez la garniture au chocolat sur les gâteaux refroidis.
soupe aux carottes et à la coriandre
ingrédients • 25 g de beurre
●1 oignon émincé
●1 gousse d’ail écrasée
●600 g de carottes coupées en dés de 2,5cm de côté
●bouillon de poulet froid
●10-15 ml (2 à 3 cuillères à café) de coriandre hachée
●sel et poivre
méthode 1Faites fondre le beurre dans une poêle, ajoutez l’ail, l’oignon et faites
fondre le tout.
2Placez les carottes dans le mixer, ajoutez l’oignon et l’ail. Ajoutez
suffisamment de bouillon pour atteindre le niveau 1.2 marqué sur le
bol. Mettez en place le couvercle et le bouchon de remplissage.
3Mélangez à vitesse maximum pendant 5 secondes pour obtenir une
soupe avec morceaux ou plus longtemps pour obtenir une soupe plus
fine.
4Versez le mélange dans une casserole, ajoutez la coriandre et
l’assaisonnement faites frémir pendant 30 à 35 minutes ou jusqu’à
cuisson complète.
5Ajustez l’assaisonnement si nécessaire et ajoutez éventuellement du
liquide.
18

Wichtige Sicherheitshinweise
●Vor dem Einsetzen oder Abnehmen von Rührgeräten oder
Zubehörteilen, nach dem Gebrauch und vor dem Reinigen immer
ausschalten und Netzstecker ziehen.
●Kinder und gebrechliche Personen bitte nur unter Beaufsichtigung
dieses Gerät benutzen lassen.
●Greifen Sie nicht in rotierende Teile und montierte Vor- und Aufsätze.
●Lassen Sie die Maschine nie unbeaufsichtigt eingeschaltet. Halten Sie
Kinder von der Maschine fern.
●Benutzen Sie eine beschädigte Maschine nicht weiter, sondern lassen
Sie sie vor Benutzung überprüfen und reparieren - siehe Seite 24,
Abschnitt 'Kundendienst'.
Verwenden Sie nur das von Kenwood zugelassene Zubehör, und immer
nur ein Zubehörteil auf einmal.
●Überschreiten Sie die auf Seite 20 angegebenen Höchstmengen nicht.
●Kinder nicht mit dem Gerät spielen lassen.
●Beachten Sie die mit jedem Zubehörteil mitgelieferten Sicherheitsanweisungen.
●Dieses Gerät darf nur für den dafür vorgesehenen Zweck im Haushalt
verwendet werden.
●Heben Sie das Gerät vorsichtig an, denn es ist schwer. Vergewissern
Sie sich vor dem Anheben, dass der Kopf arretiert ist und dass die
Schüssel, Werkzeuge, Abdeckungen und das Kabel fest sitzen.
Vor dem Einschalten
●Überprüfen Sie, ob die Spannung Ihres Stromnetzes mit der auf dem
Typenschild (auf der Unterseite der Maschine) angegebenen
Spannung übereinstimmt.
●Diese Maschine erfüllt die Richtlinie 89/336/EEC der Europäischen Union.
Vor dem Gebrauch
1Entfernen Sie alles Verpackungsmaterial.
2Waschen Sie alle Teile ab - siehe Seite 24, 'Reinigung und Pflege'.
3Drücken Sie überflüssiges Kabel in das Kabelfach auf der Rückseite
der Maschine.
Gerätebeschreibung
Anschlüsse Hochgeschwindigkeitsantrieb
Öffnung für mittlere Geschwindigkeit
Langsamer Antrieb
Planetenantrieb
Die Maschine Rührarm
Verschlußhebel
Rührschüssel
Entriegelungshebel für Rührarm
Ein/Ausschalter und Geschwindigkeitsregler
Motoreinheit
K Rührer
Schneebesen
Knethaken
Teigschaber
Spritzschutz
Ihre Küchenmaschine von Kenwood
19
Deutsch
0
min
123
4
5
6
P
La pagina si sta caricando...
La pagina si sta caricando...
La pagina si sta caricando...
La pagina si sta caricando...
La pagina si sta caricando...
La pagina si sta caricando...
La pagina si sta caricando...
La pagina si sta caricando...
La pagina si sta caricando...
La pagina si sta caricando...
La pagina si sta caricando...
La pagina si sta caricando...
La pagina si sta caricando...
La pagina si sta caricando...
La pagina si sta caricando...
La pagina si sta caricando...
La pagina si sta caricando...
La pagina si sta caricando...
La pagina si sta caricando...
La pagina si sta caricando...
La pagina si sta caricando...
La pagina si sta caricando...
La pagina si sta caricando...
La pagina si sta caricando...
La pagina si sta caricando...
La pagina si sta caricando...
La pagina si sta caricando...
La pagina si sta caricando...
La pagina si sta caricando...
La pagina si sta caricando...
La pagina si sta caricando...
La pagina si sta caricando...
La pagina si sta caricando...
La pagina si sta caricando...
La pagina si sta caricando...
La pagina si sta caricando...
La pagina si sta caricando...
La pagina si sta caricando...
La pagina si sta caricando...
La pagina si sta caricando...
La pagina si sta caricando...
La pagina si sta caricando...
La pagina si sta caricando...
La pagina si sta caricando...
La pagina si sta caricando...
La pagina si sta caricando...
La pagina si sta caricando...
La pagina si sta caricando...
La pagina si sta caricando...
La pagina si sta caricando...
La pagina si sta caricando...
La pagina si sta caricando...
La pagina si sta caricando...
La pagina si sta caricando...
La pagina si sta caricando...
La pagina si sta caricando...
La pagina si sta caricando...
La pagina si sta caricando...
La pagina si sta caricando...
La pagina si sta caricando...
La pagina si sta caricando...
La pagina si sta caricando...
La pagina si sta caricando...
La pagina si sta caricando...
La pagina si sta caricando...
La pagina si sta caricando...
La pagina si sta caricando...
La pagina si sta caricando...
La pagina si sta caricando...
La pagina si sta caricando...
La pagina si sta caricando...
La pagina si sta caricando...
La pagina si sta caricando...
La pagina si sta caricando...
La pagina si sta caricando...
La pagina si sta caricando...
La pagina si sta caricando...
La pagina si sta caricando...
La pagina si sta caricando...
La pagina si sta caricando...
La pagina si sta caricando...
La pagina si sta caricando...
La pagina si sta caricando...
La pagina si sta caricando...
La pagina si sta caricando...
La pagina si sta caricando...
La pagina si sta caricando...
La pagina si sta caricando...
La pagina si sta caricando...
La pagina si sta caricando...
La pagina si sta caricando...
La pagina si sta caricando...
La pagina si sta caricando...
La pagina si sta caricando...
La pagina si sta caricando...
La pagina si sta caricando...
La pagina si sta caricando...
La pagina si sta caricando...
La pagina si sta caricando...
La pagina si sta caricando...
La pagina si sta caricando...
La pagina si sta caricando...
La pagina si sta caricando...
La pagina si sta caricando...
La pagina si sta caricando...
La pagina si sta caricando...
La pagina si sta caricando...
La pagina si sta caricando...
La pagina si sta caricando...
La pagina si sta caricando...
La pagina si sta caricando...
La pagina si sta caricando...
La pagina si sta caricando...
La pagina si sta caricando...
La pagina si sta caricando...
La pagina si sta caricando...
La pagina si sta caricando...
La pagina si sta caricando...
La pagina si sta caricando...
La pagina si sta caricando...
La pagina si sta caricando...
La pagina si sta caricando...
La pagina si sta caricando...
La pagina si sta caricando...
La pagina si sta caricando...
La pagina si sta caricando...
La pagina si sta caricando...
La pagina si sta caricando...
La pagina si sta caricando...
La pagina si sta caricando...
La pagina si sta caricando...
La pagina si sta caricando...
La pagina si sta caricando...
-
 1
1
-
 2
2
-
 3
3
-
 4
4
-
 5
5
-
 6
6
-
 7
7
-
 8
8
-
 9
9
-
 10
10
-
 11
11
-
 12
12
-
 13
13
-
 14
14
-
 15
15
-
 16
16
-
 17
17
-
 18
18
-
 19
19
-
 20
20
-
 21
21
-
 22
22
-
 23
23
-
 24
24
-
 25
25
-
 26
26
-
 27
27
-
 28
28
-
 29
29
-
 30
30
-
 31
31
-
 32
32
-
 33
33
-
 34
34
-
 35
35
-
 36
36
-
 37
37
-
 38
38
-
 39
39
-
 40
40
-
 41
41
-
 42
42
-
 43
43
-
 44
44
-
 45
45
-
 46
46
-
 47
47
-
 48
48
-
 49
49
-
 50
50
-
 51
51
-
 52
52
-
 53
53
-
 54
54
-
 55
55
-
 56
56
-
 57
57
-
 58
58
-
 59
59
-
 60
60
-
 61
61
-
 62
62
-
 63
63
-
 64
64
-
 65
65
-
 66
66
-
 67
67
-
 68
68
-
 69
69
-
 70
70
-
 71
71
-
 72
72
-
 73
73
-
 74
74
-
 75
75
-
 76
76
-
 77
77
-
 78
78
-
 79
79
-
 80
80
-
 81
81
-
 82
82
-
 83
83
-
 84
84
-
 85
85
-
 86
86
-
 87
87
-
 88
88
-
 89
89
-
 90
90
-
 91
91
-
 92
92
-
 93
93
-
 94
94
-
 95
95
-
 96
96
-
 97
97
-
 98
98
-
 99
99
-
 100
100
-
 101
101
-
 102
102
-
 103
103
-
 104
104
-
 105
105
-
 106
106
-
 107
107
-
 108
108
-
 109
109
-
 110
110
-
 111
111
-
 112
112
-
 113
113
-
 114
114
-
 115
115
-
 116
116
-
 117
117
-
 118
118
-
 119
119
-
 120
120
-
 121
121
-
 122
122
-
 123
123
-
 124
124
-
 125
125
-
 126
126
-
 127
127
-
 128
128
-
 129
129
-
 130
130
-
 131
131
-
 132
132
-
 133
133
-
 134
134
-
 135
135
-
 136
136
-
 137
137
-
 138
138
-
 139
139
-
 140
140
-
 141
141
-
 142
142
-
 143
143
-
 144
144
-
 145
145
-
 146
146
-
 147
147
-
 148
148
-
 149
149
-
 150
150
-
 151
151
-
 152
152
-
 153
153


Kenwood Chef and Major KM007 series Instructions Manual
- Tipo
- Instructions Manual
in altre lingue
- français: Kenwood Chef and Major KM007 series
- dansk: Kenwood Chef and Major KM007 series
- Türkçe: Kenwood Chef and Major KM007 series
Documenti correlati
-
Kenwood 0WKMM02052 Manuale del proprietario
-
Kenwood KMC510 Manuale utente
-
Kenwood KMM770 Manuale del proprietario
-
Kenwood KMM065 Manuale utente
-
Kenwood KM040 Manuale del proprietario
-
Kenwood KM616 Manuale del proprietario
-
-
Kenwood KM 630 Manuale del proprietario
-
-