
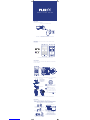
STEP FOUR
INSTALL CAMERA TO WALL OR CEILING
QUICK START GUIDE
A. USE THE INCLUDED MOUNTING TEMPLATE TO
DRILL HOLES ON YOUR WALL OR CEILING
B. TAP THE INCLUDED ANCHORS INTO THE HOLES
GENTLY USING A HAMMER
C. SECURE THE MOUNT TO THE WALL OR CEILING
USING THE INCLUDED MOUNTING SCREWS
1. LOOSEN ADJUSTMENT RING TO ADJUST THE
HORIZONTAL POSITION
2. LOOSEN WITH THE INCLUDED ALLEN KEY TO
ADJUST THE VERTICAL POSITION
3. LOOSEN WITH THE INCLUDED ALLEN KEY TO
TWIST THE CAMERA ON THE STAND
MAKE SURE TO FULLY TIGHTEN THE ADJUSTMENT
SCREWS AFTER SETTING THE POSITION
1
2
3
D. ADJUST THE CAMERA POSITION
STEP TWO
STEP THREE
DOWNLOAD THE FLIR FX APP TO YOUR SMARTPHONE
OR TABLET
USING THE APP, SCAN THE QR CODE ON THE BOTTOM
OF THE STAND
STEP ONE
PLUG IN THE CAMERA
FOLLOW THE PROMPTS TO COMPLETE WIFI SETUP
LAUNCH APP AND CREATE AN ACCOUNT
PLEASE WATCH THE GETTING STARTED VIDEO AVAILABLE VIA THE APP
COMPLETE STEPS 1-3 BEFORE MOUNTING CAMER A
IMPORTANT: IT IS RECOMMENDED TO INSTALL THE CAMERA IN A LOCATION
WITH A STRONG WI-FI SIGNAL. YOU CAN CHECK THE WI-FI STRENGTH USING
THE SIGNAL INDICATOR ON YOUR SMARTPHONE OR TABLET.
Cancel Camera set up
PLACE THE QR CODE INSIDE
THE TARGET
PLEASE MAKE SURE THE
CAMERA IS TURNED ON
lch003484156
Rating: 5V DC 2A
Model No: FXV101-H
IC:8575AFXV101
FCC ID: UCZFXV101
FLIR SYSTEMS, INC.
LINTHICUM, MD 21090, USA
MADE IN CHINA
Serial:123456789012
MAC ID:123456789012
lch003484156
Rating: 5V DC 2A
Model No: FXV101-H
IC:8575AFXV101
FCC ID: UCZFXV101
FLIR SYSTEMS, INC.
LINTHICUM, MD 21090, USA
MADE IN CHINA
Serial:123456789012
MAC ID:123456789012
LOGIN
Login
Email Address
A. USE THE INCLUDED
ALLEN KEY TO UNFASTEN
THE SCREW ON THE
CAMERA ARM. SLIDE THE
SUNSHADE FROM THE
MOUNT
B. OPEN LATCHES
LATCH
IF THE APP PROMPTS YOU TO CHECK THE LED STATUS
REMOVE THE CAMERA
C. OPEN CAMERA
COMPARTMENT
D. SLIDE CAMERA OFF
WIFI LED
(BACK OF CAMERA)
REPLACE THE CAMERA WHEN COMPLETED
Direct Mode: View live or recorded
video on the microSD card directly
from FLIR FX without an Internet
connection.
Cloud Mode: View live video via
the Internet, recorded video from
the microSD card, or cloud-stored
videos and FLIR Recaps from FLIR
Cloud.
NOTE: USE THE APP OR PRESS THE
13
14
BUTTON TO
CHANGE MODES
CHARGE CAMERA FOR 30 MINUTES BEFORE
BEGINNING SET UP

© 2015, FLIR Systems, Inc.
FXV101-W_QSG_EN_FR_R4
FIND HELP AT FLIR.COM/FX
1. Latch: Lock or unlock camera
inside mount. Both latches
must be firmly locked to ensure
weatherproof rating of the mount.
2. Camera: You can remove the
camera to use on its own or with
one of the other accessories. See
FLIR.COM/FX for instructions.
3. Accessory Connector: Slide
the camera all the way right to
remove it from the mount or all
the way left to connect it.
4. Outdoor Night Vision LEDs: See
further in the dark.
5
6
7
8
9
10
12 13 14 15
11
5. Lens Cover: Keep the lens cover
clean using a slightly damp cloth.
Don’t use chemical cleaners as
they may damage the lens cover.
6. Microphone: Record sound and
communicate
7. Speaker: Communicate via 2-way
intercom.
8. Adjustment Ring: Loosen to adjust
the horizontal position of the camera.
9. Vertical Adjustment Screw: Loosen
to adjust the vertical position of the
camera.
10. Sunshade: Push towards the back
of the camera to remove sunshade.
11. QR Code: Scan during setup using the
FLIR FX app.
12. Twist Adjustment Screw: Loosen to
twist the camera head around the
stand.
13. Temperature Sensor
14. Mounting Holes: Mount the camera to
the wall or ceiling.
15. Power Cable: Run the power cable
through the cable notch on the stand
or through the wall.
CAUTION: Make sure the power connector
and power outlets are protected from the
elements when installing.
1
3
4
2
SECURITY HOME MONITORING
Keep an eye on the things that matter most with FLIR F X™. Using the mobile app, you can connect to your camera in Cloud
mode via a WiFi net work or through Direct mode with no Internet required. Tap the camera from the Camera List to view
live video and set up SmartZone motion detection. Manage push notifications and automatic recording through the camera
settings. See your day in a minute by creating and viewing Rapid Recaps™.
QUICK START GUIDE
A. CONNECT THE CAMER A TO THE INCLUDED
POWER ADAPTER AND CONNECT THE POWER
ADAPTER TO A POWER OUTLET
CAUTION: MAKE SURE THE POWER CONNECTOR
AND POWER OUTLETS ARE PROTECTED FROM THE
ELEMENTS WHEN INSTALLING.
B. REMOVE THE PROTECTIVE FILM FROM THE
LENS COVER AFTER YOU HAVE FINISHED THE
INSTALLATION
STEP FIVE
RECONNECT POWER AND REMOVE LENS FILM
GET TO KNOW YOUR FLIR FX

QUATRIÈME ÉTAPE
FIXER LA CAMÉRA AU MUR OU AU PLAFOND
GUIDE DE DÉMARRAGE RAPIDE
A. UTILISER LE MODÈLE DE FIXATION INCLUS POUR PERCER LES
TROUS DANS VOTRE MUR OU AU PLAFOND
B. ENFONCER DÉLICATEMENT LES DISPOSITIFS
D’ANCR AGE INCLUS DANS LES TROUS À L’AIDE
D’UN MARTEAU
C. BIEN FIXER LE SUPPORT AU MUR OU AU
PLAFOND EN SE SERVANT DE S VIS DE FIX ATION
INCLUSES
1. DESSERRER LA BAGUE DE RÉGL AGE POUR
RÉGLER LA POSITION HORIZONTALE
2. LA DESSERRER DAVANTAGE (AU BESOIN) À
L’AIDE DE LA CLÉ ALLEN INCLUSE POUR RÉGLER
LA POSITION VERTICALE
3. DESSERRER À L’AIDE DE LA CLÉ ALLEN INCLUSE
POUR FAIRE PIVOTER LA CAMÉRA SUR LE SUPPORT
S’ASSURER DE BIEN SERRER LES VIS DE RÉGLAGE
APRÈS AVOIR RÉGLÉ LA POSITION
1
2
3
D. RÉGLER LA POSITION DE LA CAMÉR A
DEUXIÈME ÉTAPE
TROISIÈME ÉTAPE
TÉLÉCHARGER L’APPLICATION FLIR FX SUR VOTRE TÉLÉPHONE
INTELLIGENT OU SUR VOTRE TABLETTE
À L’AIDE DE L’APPLICATION, NUMÉRISER LE CODE QR SITUÉ AU BAS DU
SOCLE
PREMIÈRE ÉTAPE
BRANCHER LA CAMÉRA
SUIVRE LES INSTRUCTIONS POUR TERMINER L’INSTALLATION WI-FI
LANCER L’APPLICATION ET CRÉER UN COMPTE
VEUILLEZ REGARDER LA VIDÉO D’INTRODUCTION QUI EST OFFERTE AVEC L’APPLICATION
EFFECTUER LES ÉTAPES 1 À 3 AVANT D’INSTALLER LA CAMÉRA
IMPORTANT : IL EST CONSEILLÉ D’INSTALLER LA CAMÉRA DANS UN LIEU OÙ LE SIGNAL
WI-FI EST FORT. VOUS POUVEZ VÉRIFIER LA PUISSANCE DU WI-FI EN UTILISANT
L’INDICATEUR DE SIGNAL DE VOTRE TÉLÉPHONE INTELLIGENT OU DE VOTRE TABLETTE.
Cancel Camera set up
PLACE THE QR CODE INSIDE
THE TARGET
PLEASE MAKE SURE THE
CAMERA IS TURNED ON
lch003484156
Rating: 5V DC 2A
Model No: FXV101-H
IC:8575AFXV101
FCC ID: UCZFXV101
FLIR SYSTEMS, INC.
LINTHICUM, MD 21090, USA
MADE IN CHINA
Serial:123456789012
MAC ID:123456789012
lch003484156
Rating: 5V DC 2A
Model No: FXV101-H
IC:8575AFXV101
FCC ID: UCZFXV101
FLIR SYSTEMS, INC.
LINTHICUM, MD 21090, USA
MADE IN CHINA
Serial:123456789012
MAC ID:123456789012
LOGIN
Login
Email Address
A.UTILISEZ LA CLÉ ALLAN
POUR RETIRER LA VIS DU
BRAS DE LA CAMÉRA. FAITES
GLISSER LE PARE-SOLEIL DU
SUPPORT DE MONTAGE.
B. OUVRIR LES LOQUETS
LOQUET
SI L’APPLICATION VOUS DEMANDE DE VÉRIFIER L’ÉTAT DE LA DEL
RETIRER LA CAMÉRA
C. OUVRIR LE
COMPARTIMENT DE
LA CAMÉRA
D. FAIRE GLISSER LA
CAMÉRA DU SUPPORT
DEL DU WI-FI
(À L’ARRIÈRE DE LA CAMÉRA)
UNE FOIS TERMINÉ, REPLACER LA CAMÉRA
En mode direct : Visualiser des vidéos en
temps réel ou enregistrées sur la carte
microSD directement depuis le FLIR FX
sans connexion Internet.
En mode Internet : Visualisez des vidéos
en temps réel sur Internet, des vidéos
enregistrées sur la carte microSD, ou
des vidéos sauvegardées sur un nuage
informatique ainsi que des FLIR Recaps
sauvegardés sur un FLIR Cloud.
REMARQUE : UTILISER L’APPLICATION OU
APPUYER SUR LA TOUCHE
13
14
POUR CHANGER DE
MODE
CHARGER LA CAMÉRA PENDANT 30 MINUTES AVANT DE COMMENCER LA
CONFIGURATION

© 2015, FLIR Systems, Inc.
VOUS TROUVEREZ DE L’AIDE SUR FLIR.COM/FX
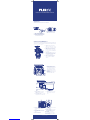
1. Loquet : Verrouiller ou déverrouiller le
support intérieur de la caméra. Les deux
loquets doivent être fermement verrouillés
afin d’assurer l’étanchéité du support.
2. Caméra : Vous pouvez retirer la caméra
pour l’utiliser telle quelle ou avec l’un des
accessoires. Consulter FLIR.COM/FX pour
les instructions.
3. Connecteur d’accessoire : Faire glisser la
caméra jusqu’au bout vers la droite pour
la retirer du montage ou jusqu’au bout
vers la gauche pour la brancher.
4. DEL avec vision nocturne extérieure :
Permet une meilleure visibilité dans
l’obscurité.
5
6
7
8
9
10
12 13 14 15
11
5. Obturateur de l’objectif : Maintenir
l’obturateur propre à l’aide d’un
chiffon légèrement humide. Ne pas
utiliser de nettoyant chimique; il
pourrait endommager l’obturateur.
6. Microphone : Enregistrer les sons et
communiquer
7. Haut-parleur : Communiquer grâce
à un interphone bidirectionnel.
8. Bague de réglage : Desserrer pour
régler la position horizontale de la
caméra.
9. Vis de réglage vertical : Desserrer pour
régler la position verticale de la caméra.
10. Pare-soleil : Pousser vers l’arrière
de la caméra pour retirer le pare-
soleil.
11. Code QR : Numérisation pendant
l’installation à l’aide de l’application
FLIR FX.
12. Vis de réglage rotatif : Desserrer pour
faire tourner la tête de caméra sur le
support.
13. Capteur de température
14. Trous de montage : Fixer la caméra au
mur ou au plafond.
15. Câble d’alimentation : Passer le câble
d’alimentation dans l’encoche située
sur le support ou dans le mur.
MISE EN GARDE : S’assurer que le
connecteur d’alimentation et les prises
électriques sont protégés des intempéries
lors de l’installation.
1
3
4
2
VIDÉO SURVEILLANCE À DOMICILE
Garder un œil sur ce qui compte le plus grâce à FLIR FXMC. À l’aide de l’application mobile, vous pouvez vous connecter à votre
caméra en mode Internet grâce à un réseau Wi-Fi ou en mode direct sans la nécessité d’un réseau Internet. Appuyer sur la
caméra dans la liste des caméras pour voir la vidéo en direct et pour configurer la détection de mouvement SmartZone. Gérer
les notifications Push et les enregistrements automatiques dans les paramètres de la caméra. Regarder votre journée en une
minute en créant et en visualisant des Rapid RecapsMC.
GUIDE DE DÉMARRAGE RAPIDE
A. BRANCHER LA CAMÉRA AU BLOC D’ALIMENTATION INCLUS ET
BRANCHER CE DERNIER À UNE PRISE ÉLECTRIQUE
MISE EN GARDE : S’ASSURER QUE LE CONNECTEUR
D’ALIMENTATION ET LES PRISES ÉLECTRIQUES SONT PROTÉGÉS
DES INTEMPÉRIES LORS DE L’INSTALLATION.
B. RETIRER LE FILM PROTECTEUR DE L’OBTURATEUR DE
L’OBJECTIF UNE FOIS L’INSTALLATION TERMINÉE
CINQUIÈME ÉTAPE
RÉALIMENTER ET RETIRER LE FILM DE L’OBJECTIF
APPRENEZ À CONNAÎTRE VOTRE FLIR FX
-
 1
1
-
 2
2
-
 3
3
-
 4
4


in altre lingue
- English: FLIR FX Quick start guide
- português: FLIR FX Guia rápido