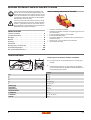
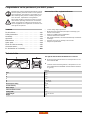
Wolf Garten 2.32 E-1 Manuale del proprietario
- Categoria
- Tosa erba
- Tipo
- Manuale del proprietario

2.32 E-1
Gebrauchsanweisung 6
Instruction Manual 11
Mode d’emploi 16
Istruzioni d’uso 21
Gebruiksaanwijzing 26
Brugsanvisning 31
Käyttöohje 36
Bruksanvisning 41
Bruksanvisning 46
Návod k použití 51
Használati utasítás 56
Instrukcja obs³ugi 61
Upute za uporabu 66
Návod na obsluhu 71
Navodilo za uporabo 76
Инструкция за употреба 81
Инструкция по применению 86
Instrucţiuni de folosire 91
Kullanım Kılavuzu 96
Οδηγίες χρήσης 101
2.32 E-1

2

3

4
2.32 E-1
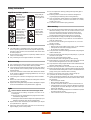
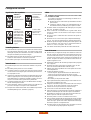
D
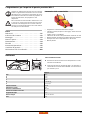
1 Ein-/ Ausschalter
2 Kabelzugentlastung
3 Kabelknickschutz
4 Schutzklappe
5 Grasfangkorb
6 Griffbefestigung
7 Füllstandsanzeige
8 Schnitthöheneinstellung
9 Schnitthöhenanzeige
G
1 On/off switch
2 Cable tension relief
3 Cable kinking prevention
4 Cover
5 Grass collection basket
6 Handle fixing
7 Level indicatior
8 Cutting height adjustment
9 Cutting height display
F
1 Bouton marche / arrêt
2 Guide-câble
3 Protection contre le pliage du câble
4 Carter
5 Bac de ramassage de l’herbe
6 Poignée de serrage
7 Indicateur de remplissage
8 Réglage de la hauteur de coupe
9 Indicateur de la hauteur de coupe
I
1 Interruttore
2 Scarico trazione cavo
3 Dispositivo antipiegamento per cavo
4 Sportello di protezione
5 Cestello raccolta erba
6 Attacco manubrio
7 Indicazione livello di riempimento
8 Regolazione dell'altezza di taglio
9 Indicazione dell'altezza di taglio
n
1 In-/uitschakelaar
2 Kabelontlasting
3 Kabelknikbeveiliging
4 Veiligheidsklep
5 Grasvangkorf
6 Greepbevestiging
7 niveauwijzer
8 Snijhoogte-instelling
9 Snijhoogteaanduiding
d
1 Tænd/sluk-knap
2 Kabeltræksaflastning
3 Kabelknæksbeskyttelse
4 Beskyttelsesklap
5 Græsbeholder
6 Grebets fastgørelse
7 Niveaumåler
8 Greb til indstilling af skærehøjde
9 Markering af skærehøjden
1
3
4
5
6
2
6
8
9
7

5
f
1 Virtakytkin
2 Kaapelinohjain
3 Kaapelin taittumissuoja
4 Suojapäällinen
5 Ruohosäiliö
6 Kädensijan kiinnitin
7 Täyttötason osoitin
8 Leikkuukorkeudensäätö
9 Leikkuukorkeuden osoitin
N
1 På-/ Av-bryter
2Trekkavlaster
3 Knekkbeskytter
4 Beskyttelsesdeksel
5 Gressfanger
6 Håndtaksfeste
7 Nivåindikator
8 Innstilling av snitthøyde
9 Snitthøydeindikato
S
1 Strömbrytare
2 Dragavlastning för kabel
3 Knäckskydd för kabel
4 Skyddslucka
5 Gräsuppsamlingskorg
6 Handtagsfästen
7 Nivåindikering
8 Inställning av klipphöjd
9 Indikering av klipphöjd
C
1 Spínač / vypínač
2 Odlehčení tahu v kabelu
3 Ochrana kabelu před zlomením
4 Ochranný klobouček
5 Záchytný koš na trávu
6 Upevnění madla
7 Ukazatel hladiny
8 Nastavení výšky sečení
9 Ukazatel výšky sečení
H
1 Ki-/Bekapcsoló
2 Kábel feszültségmentesítése
3 Kábeltörésvédő
4 Védőkupak
5 Gyűjtőkosár
6 Fogantyú erősítése
7 Telítettségmutató
8 Vágómagasság beállítása
9 Vágómagasság mutató
p
1Włącznik/ Wyłącznik
2 Zabezpieczenie kabla przed wyrwaniem
3 Ochrona przeciwzgięciowa kabla
4 Obudowa zabezpieczająca
5 Kosz zbierający na trawę
6 Przymocowanie uchwytu
7 Wskaźnik wypełnienia
8 Regulator wysokości cięcia
9 Wskaźnik wysokości cięcia
h
1Prekidač za uključivanje i isključivanje
2Držač za rasterećenje kabela
3 Zaštita od gnječenja kabela
4 Zaštitni poklopac
5 Košarica za travu
6 Pričvršćivanje držača
7 Indikator stanja
8 Namještanje visine kosa
9 Pokazivač visine kosa
s
1 Stikalo za vklop/izklop
2 Natezna razbremenitev za kabel
3 Pregibno varovalo za kabel
4 Varnostni pokrov
5 Lovilna koљara za travo
6 Ojaиitev roиaja
7 Kazalo nivoja polnjenja
8 Nastavitev viљine koљnje
9 Kazalo viљine koљnje
O
1 Stikalo za vklop/izklop
2 Natezna razbremenitev za kabel
3 Pregibno varovalo za kabel
4 Varnostni pokrov
5 Lovilna košara za travo
6 Ojačitev ročaja
7 Kazalo nivoja polnjenja
8 Nastavitev višine košnje
9 Kazalo višine košnje
b
1 Включвател/изключвател
2 Стойка за опъване на кабела
3 Защита срещу пречупване на кабела
4 Предпазен капак
5 Кошница за поемане на
тревата
6 Приспособление за закрепване на
ръкохватката
7 Индикатор за нивото на запълване
8 Настройване на височината на косене
9 Индикатор за височината на косене
R
1 Выключатель
2 Держатель кабеля
3 Защита от перегиба
4 Защитный клапан
5 Травосборник
6 Крепеж рукоятки
7 Индикатор наполнения
8 Регулятор высоты скашивания
9 Индикатор высоты скашивания
o
1 Buton de pornire / oprire
2 Dispozitiv de descărcare de tracţiune
pentru cablu
3 Dispozitiv de protecţie împotriva tor-
sionării cablului
4 Clapetă de protecţie
5 Coş
de colectare a ierbii
6 Element de fixare a mânerului
7 Indicator pentru nivelul de umplere
8 Reglarea înălţimii de tăiere
9 Indicator pentru înălţimea de tăiere
T
1 Açma/Kapama düğmesi
2 Kablo tutucu
3 Kablo kırılma önleyici
4 Koruma kapağı
5 Çimen toplama sepeti
6 Sap bağlantısı
7 Seviye gösterici
8 Kesme yüksekliği ayarları
9 Kesme yüksekliği göstergesi
g
1 ∆ιακόπτης on/off
2 Λαβή εύκαµπτου καλωδίου
3 Προστασία κάµψης καλωδίου
4 Προστατευτικό κάλυµµα
5 Καλάθι συγκέντρωσης χόρτων
6 Στερέωση λαβής
7 Ένδειξη στάθµης πλήρωσης
8 Ρύθµιση ύψους κοπής
9 Ένδειξη ύψους κοπής

6
D
D Herzlichen Glückwunsch zum Kauf Ihres WOLF-Produkts
Inhaltsverzeichnis
Technische Daten . . . . . . . . . . . . . . . . . . 6
Sicherheitshinweise . . . . . . . . . . . . . . . . . 7
Montage . . . . . . . . . . . . . . . . . . . . . . . 8
Betrieb . . . . . . . . . . . . . . . . . . . . . . . . 8
Wartung. . . . . . . . . . . . . . . . . . . . . . . . 9
Ersatzteile . . . . . . . . . . . . . . . . . . . . . . 9
Beseitigung von Störungen . . . . . . . . . . . . .10
Garantiebedingungen. . . . . . . . . . . . . . . . .10
EG-Konformitätserklärung . . . . . . . . . . . . . 108
Die Ausstattungsmerkmale im Überblick
–
zentrale Schnitthöheneinstellung
– Minimaler Platzbedarf (Transport und Lagerung) „Einfach auf
den Korb stellen“
– Passt zusammengeklappt in einen SMART
– Fangkorbfüllstandsanzeige
– hochwertige Materialien, ausgezeichnete Verarbeitung und
attraktives Design
– Ready-to-use: von 0 auf Mähen in 30 Sekunden
– durchzugsstarker Motor
Technische Daten
Lesen Sie die Gebrauchsanweisung sorgfältig, und
machen Sie sich mit den Bedienungselementen und
dem richtigen Gebrauch des Gerätes vertraut. Der Be-
nutzer ist verantwortlich für Unfälle mit anderen Perso-
nen oder deren Eigentum. Beachten Sie die Hinweise,
Erläuterungen und Vorschriften.
Lassen Sie nie Kinder oder andere Personen, die die
Gebrauchsanweisung nicht kennen, den Rasenmäher
benutzen. Jugendliche unter 16 Jahre dürfen das Ge-
rät nicht benutzen. Örtliche Bestimmungen können das
Mindestalter des Benutzers festlegen.
Änderungen aus technischen Gründen vorbehalten.
D Lärmmessung am Ohr der Bedienperson in Anlehnung an
EN 836
E
Schwingungen gemessen am Führungsholm, mit Bedien-
person nach EN 1033 und EN 836. Die bewertete Beschleu-
nigung beträgt typischerweise:
2.32 E-1
Typ 4905 ...
A 94 cm
B 34 cm
C 36 cm
D LP 76 dB (A)
E a
hw
≤ 2,5 m/s
2
Nennleistung 1000 W
Stromstärke 5,6 A
Netzspannung 230 VAC
Fangkorbvolumen 25 l
Schnittbreite 32 cm
Schnitthöhe 20, 32, 45, 60 mm
Gewicht 12 kg
Gebrauchsanweisung

7
D
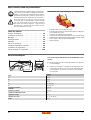
Sicherheitshinweise
Bedeutung der Symbole
Allgemeine Hinweise
z Dieser Rasenmäher ist für die Pflege von Gras- und Rasen-
flächen im privaten Bereich vorgesehen. Wegen körperlicher
Gefährdung des Benutzers oder anderer Personen darf der
Rasenmäher nicht für andere Zwecke eingesetzt werden.
z Mähen Sie niemals, wenn Personen, besonders Kinder und
Tiere, in der Nähe sind.
z Mähen Sie nur bei entsprechenden Lichtverhältnissen.
Vor dem Mähen
z Mähen Sie nur in festem Schuhwerk und langer Hose.
z Mähen Sie nie barfuß oder in Sandalen.
z Überprüfen Sie das Gelände, auf dem der Mäher eingesetzt
wird, und entfernen Sie alle Gegenstände, die erfasst und
weggeschleudert werden können.
z Das Anschlusskabel und die am Gerät außen installierte Lei-
tung auf Beschädigung und Alterung (Brüchigkeit) untersu-
chen. Nur in einwandfreiem Zustand benutzen.
z Überprüfen Sie die Grasfangeinrichtung häufig auf Verschleiß
und Verformungen.
z Prüfen Sie vor Benutzung (Sichtprüfung), ob die Schneid-
werkzeuge und ihre Befestigungsmittel stumpf oder beschä-
digt sind.
z Ersetzen Sie stumpfe oder beschädigte Schneidwerkzeuge
im ganzen Satz, um keine Unwucht zu erzeugen (siehe „War-
tung“, Seite 9).
Kabel
1 Achtung! Stromschlag durch Kabelschaden
Wenn das Kabel durchtrennt oder beschädigt wird, löst
nicht immer die Sicherung aus.
z Kabel nicht berühren, bevor der Netzstecker aus der
Steckdose gezogen ist.
z Beschädigtes Kabel komplett austauschen. Es ist verbo-
ten, das Kabel mit Isolierband zu flicken.
z Lassen Sie Reparaturen am Kabel nur vom Fachmann durch-
führen (siehe „Wartung“, Seite 9).
z Anschlusskabel an der Zugentlastung befestigen. Nicht an
Kanten, spitzen oder scharfen Gegenständen scheuern las-
sen.
z Kabel nicht durch Türritze oder Fensterspalten quetschen.
z Schalteinrichtungen dürfen nicht entfernt oder überbrückt
werden (z. B. Anbinden des Schalthebels am Führungsholm).
z Verwenden Sie ausschließlich Verlängerungskabel, die nicht
leichter sind als Gummischlauchleitungen, Typ: HO 7 RN-F,
Mindest-Querschnitt 3 x 1,5 mm
2
, Länge: max. 25 m.
z Die Kabel müssen spritzwassergeschützt sein.
Beim Mähen
z Kippen Sie das Gerät nicht, wenn Sie den Motor einschalten,
es sei denn, das Gerät muss beim Anlassen gekippt werden.
Wenn dies der Fall ist, kippen Sie das Gerät nicht mehr als un-
bedingt notwendig ist und heben nur den Teil an, der vom Be-
nutzer entfernt ist. Überprüfen Sie immer, dass sich beide
Hände in Arbeitsstellung befinden, bevor das Gerät wieder auf
den Boden zurückgestellt wird.
z Halten Sie den durch das Griffgestänge gegebenen Sicher-
heitsabstand ein.
z Schalten Sie den Motor nur ein, wenn Ihre Füße in sicherem
Abstand von den Schneidwerkzeugen sind.
z Achten Sie auf sicheren Stand. Nie laufen, ruhig vorwärts ge-
hen.
z Mähen an Abhangstellen:
– Immer quer zum Gefälle mähen, nicht auf- und abwärts
– Besondere Vorsicht beim Richtungswechsel
– Mähen Sie nicht an steilen Abhängen
z Seien Sie besonders vorsichtig, wenn Sie rückwärts Mähen
und den Mäher zu sich ziehen.
z Schalten Sie den Mäher ab, wenn Sie ihn kippen oder trans-
portieren, z. B. von-/ zum Rasen oder über Wege.
z Vorsicht, nicht an laufende Schneiden greifen.
z Stellen Sie sich nicht vor die Grasauswurföffnung.
z Bevor Sie den Mäher aufheben oder wegtragen, schalten Sie
den Motor ab und warten Sie, bis die Schneidwerkzeuge zum
Stillstand gekommen sind.
z Verstellen Sie die Schnitthöhe nur bei abgeschaltetem Motor
und stillstehendem Schneidwerkzeug.
z Öffnen Sie die Schutzklappe nie, wenn der Motor noch läuft.
z Vor dem Abnehmen der Grasfangvorrichtung: Motor abstellen
und den Stillstand des Schneidwerkzeuges abwarten. Nach
der Entleerung Grasfangvorrichtung sorgfältig befestigen.
z Nie mit laufendem Motor über Kies fahren – Steinschlag!
z Wenn möglich, mähen Sie nicht in nassem Gras.
z Unter folgenden Umständen muss das Gerät abgeschaltet-,
der Netzstecker gezogen werden und das Gerät stehen:
– bei Verlassen des Mähers
– um ein blockiertes Messer frei zu machen
– um das Gerät zu überprüfen, zu reinigen oder daran zu ar-
beiten
– wenn ein Fremdkörper getroffen wurde (Überzeugen Sie
sich erst, ob Mäher oder Schneidwerkzeuge beschädigt
worden sind. Beseitigen Sie dann zunächst die Beschädi-
gung).
– wenn der Mäher durch Unwucht stark vibriert (sofort ab-
schalten und Ursache suchen).
– wenn die Anschlussleitung während des Gebrauchs be-
schädigt wird.
Warnung!
Vor
Inbetriebnahme
die Gebrauchs-
anweisung
lesen!
Dritte aus dem
Gefahren-
bereich
fernhalten!
Vorsicht! - Scharfe
Schneidmesser -
vor Wartungs-ar-
beiten und bei Be-
schädigung der
Leitung den
Stecker aus dem
Netz entfernen!
Anschluss-
kabel vom
Schneidwerk-
zeug fern-
halten!

8
D
Wartung
1 Achtung! Rotierendes Messer
Vor allen Wartungs- und Reinigungsarbeiten:
z Netzstecker ziehen.
z Nicht an laufende Schneiden greifen.
z Alle sichtbaren Befestigungsschrauben und Muttern, beson-
ders die des Messerbalkens, regelmäßig auf festen Sitz prü-
fen und nachziehen.
z Stellen Sie den Mäher nicht in feuchten Räumen ab.
z Ersetzen Sie aus Sicherheitsgründen verschlissene oder be-
schädigte Teile.
z Nur WOLF Original-Ersatzteile verwenden, sonst haben Sie
keine Garantie, dass Ihr Mäher den Sicherheitsbestimmun-
gen entspricht.
Entsorgung
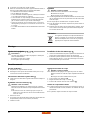
Montage
Griffgestänge befestigen
1 Vorsicht!
Beim Zusammenlegen oder Ausklappen des Griffgestän-
ges kann das Kabel beschädigt werden.
z Achten Sie darauf, das Kabel nicht zu knicken.
z Montage siehe Abbildungen.
Fangkorb montieren
1. Führen Sie die Nasen des Fangkorboberteils in die Öffnungen
des Fangkorbunterteils.
2. Drücken Sie das Fangkorboberteil gleichmäßig auf das Fang-
korbunterteil. Der Fangkorb ist fest, sobald er einrastet.
Betrieb
Betriebszeiten
z Bitte regionale Vorschriften beachten.
z Erfragen Sie die Betriebszeiten bei Ihrer örtlichen Ordnungs-
behörde.
Kabel in die Zugentlastung führen
z Bitte führen Sie das Kabel anhand der Abbildung in die Zug-
entlastung
.
Fangkorb einhängen
1 Achtung! Rotierendes Messer
Einstellungen am Gerät nur bei abgeschaltetem Motor und
stillstehendem Schneidwerkzeug vornehmen.
z Fangkorb erst dann einhängen, wenn Ihre Füße in siche-
rem Abstand zum Schneidwerkzeug sind.
1. Heben Sie die Schutzklappe an.
2. Hängen Sie den Fangkorb mit Haken in die Aussparungen im
Chassis (siehe Pfeil).
3. Legen Sie die Schutzklappe auf.
Schnitthöhe einstellen
1 Achtung! Rotierendes Messer
Arbeiten/Einstellungen am Gerät nur bei abgeschaltetem
Motor und stillstehendem Schneidwerkzeug vornehmen.
z Motor ausschalten und Netzstecker ziehen.
1. Ziehen Sie den Hebel nach außen .
2. Stellen Sie die gewünschte Schnitthöhe ein .
3. Drücken Sie Hebel wieder nach innen .
Schnitthöhe – Graszustand
z Mähen Sie möglichst trockenen Rasen, um die Grasnarbe zu
schonen. Bei feuchtem und hohem Rasen eventuell mit höhe-
rer Schnitthöhe mähen.
z In der Regel stellt man eine Schnitthöhe von 40 mm ein.
Anschluss an die Steckdose (230 Volt, 50 Hz)
z Das Gerät nur an Steckdosen anschließen, die mit einer
16 Amp. Sicherung träge (oder LS-Schalter Typ B) abgesi-
chert sind.
3 Hinweis: Fehlerstromschutzeinrichtung
Diese Schutzeinrichtungen schützen beim Berühren von
beschädigten Leitungen, Isolationsfehlern und in bestimm-
ten Fällen auch beim Beschädigen von unter Spannung ste-
henden Leitungen vor schweren Verletzungen.
z Wir empfehlen, das Gerät nur an Steckdosen anzu-
schließen, die mit einer Fehlerstromschutzeinrichtung
(RCD) mit einem Fehlerstrom von nicht mehr als 30 mA
abgesichert sind.
z Für Alt-Installationen gibt es Nachrüstsätze. Sprechen
Sie mit einer Elektro-Fachkraft.
Elektrogeräte gehören nicht in den Hausmüll. Ge-
rät, Zubehör und Verpackung einer umweltfreund-
lichen Wiederverwertung zuführen.
A B C D E
F
G
H
J
K

9
D
Mäher ein-/ausschalten
z Mäher auf ebener Fläche einschalten.
z Nicht im hohen Gras – hier notfalls kippen .
Motor ein
1. Drücken Sie den Knopf (1) und halten diesen.
2. Ziehen Sie den Bügel (2) an.
3. Lassen Sie den Knopf (1) los.
Motor aus
z Geben Sie den Bügel (2) frei.
Tipps zum Mähen
z Damit keine Rasenstreifen entstehen, müssen sich die
Schneidbahnen immer um einige Zentimeter überdecken .
z Legen Sie das Kabel stets sicher auf Terrasse, Wege oder
das bereits geschnittene Gras.
Fangkorb entleeren
z Sobald der Fangkorb gefüllt ist, senkt sich der Deckel der Füll-
standsanzeige
(1).
z Ist der Fangkorb leer, wird der Deckel bei laufendem Motor
nach oben gedrückt
(2).
1 Achtung! Rotierendes Messer
Einstellungen am Gerät nur bei abgeschaltetem Motor und
stillstehendem Schneidwerkzeug vornehmen.
z Motor ausschalten und Netzstecker ziehen.
z Fangkorb entleeren.
z Vor dem Starten eventuelle Verstopfungen im Mähraum
beseitigen.
3 Hinweis zur Füllstandsanzeige:
Für eine einwandfreie Funktion der Füllstandsanzeige reini-
gen Sie regelmäßig die Löcher unter der Füllstandsanzeige
mit einem Handfeger.
Wartung
Allgemein
1 Achtung! Rotierendes Messer
Vor allen Wartungs- und Reinigungsarbeiten:
z Netzstecker ziehen.
z Nicht an laufende Schneiden greifen.
Reinigung
z Reinigen Sie den Rasenmäher nach jedem Mähen mit einem
Handfeger. Stellen Sie Ihn dazu einfach senkrecht auf den
Fangkorb.
z Spritzen Sie den Mäher keinesfalls mit Wasser ab.
Lagerung
z Klappen Sie das Griffgestänge zusammen, um den Mäher
platzsparend zu abzustellen . Durch seine Konstruktion
lässt sich der 2.32 E-1 selbst senkrecht auf den Fangkorb stel-
len .
z Führen Sie nach jeder Mähsaison eine komplette Reinigung
an Ihrem Mäher durch.
z Lassen Sie Ihren Mäher im Herbst von einer WOLF-Kunden-
dienstwerkstatt kontrollieren.
z Lagern Sie den Mäher im trockenen Raum.
Messerwechsel
z Bei allen Arbeiten an Messern, Kupplung und Messerbalken
zunächst den Netzstecker ziehen und Schutzhandschuhe tra-
gen.
1 Achtung!
Nach dem Nachschleifen des Messers kann eine Unwucht
entstehen.
z Lassen Sie die Messer immer von einer Fachwerkstatt
nachschleifen, da eine Unwuchtprüfung entsprechend
den Sicherheitsbestimmungen vorgenommen werden
muss.
z Lassen Sie einen Messerwechsel immer von einer Fachwerk-
statt durchführen. Ein Drehmomentschlüssel 10 mm ist zwin-
gend erforderlich.
Anzugsmoment der Schrauben: 6 - 7 Nm .
z Nur WOLF Original-Ersatzteile verwenden.
Ersatzteile
L
M
M
N
O
O
O
P
Q
R
R
Bestell-Nr. Artikel-Bezeichnung Artikel-Beschreibung
4905 034 Grasfangkorb kpl.
4905 096 Vi 32 S Messerbalken 32 cm

10
D
Beseitigung von Störungen
Garantiebedingungen
Die vom Verkäufer ausgefüllte Garantiekarte bzw. den Kaufbeleg
bitte sorgfältig aufbewahren.
Für die Dauer von 24 Monaten vom Kaufdatum an leistet die Firma
WOLF-Garten eine dem jeweiligen Stand der Technik und dem Ver-
wendungszweck/Anwendungsgebiet entsprechende Garantie. Die
gesetzlichen Rechte des Endverbrauchers werden durch die nachste-
henden Garantierichtlinien nicht beeinträchtigt.
Voraussetzungen für den 24monatigen Garantieanspruch:
- Einsatz des Gerätes für den ausschließlichen privaten Gebrauch.
Im gewerblichen Bereich oder Verleihgeschäft reduziert sich die
Garantie auf 12 Monate.
- Sachgemäße Behandlung und Beachtung aller Hinweise in der Ge-
brauchsanweisung, die Bestandteil unserer Garantiebedingungen
ist.
- Beachtung der vorgeschriebenen Wartungsintervalle.
- Keine eigenmächtige Änderung der Konstruktion.
- Einbau von Original WOLF Ersatzteilen/Zubehör.
- Vorlage der ausgefüllten Garantiekarte und/oder des Kaufnachwei-
ses.
Die Garantie erstreckt sich nicht auf den normalen Verschleiß von
Messern, Messerbefestigungsteilen wie Reibscheiben, Keil-/Zahnrie-
men, Laufräder/Reifen, Luftfilter, Zündkerzen und Zündkerzenste-
cker. Bei eigenmächtiger Reparatur erlischt automatisch sofort
jeglicher Garantieanspruch.
Auftretende Fehler und Mängel, deren Ursachen auf Material- oder
Fertigungsfehler zurückzuführen sind, werden ausschließlich durch
unsere Vertragswerkstätten (der Verkäufer hat das Recht zur Nach-
besserung) in Ihrer Nähe oder, falls er näher liegt, durch den Herstel-
ler beseitigt. Über die Garantieleistung hinausgehende Ansprüche
sind ausgeschlossen. Ein Anspruch auf Ersatzlieferung besteht nicht.
Etwaige Transportschäden sind nicht uns, sondern dem zuständigen
Transportträger zu melden, da sonst die Ersatzansprüche an diese
Unternehmen verloren gehen.
Abhilfe (X) durch
Problem Mögliche Ursache
WOLF
Service Werkstatt
Selbst
Unruhiger Lauf, starkes
Vibrieren des Gerätes
• Messer schadhaft
X ---
• Messer in der Befestigung gelöst
--- X
Motor läuft nicht
• Haus-Sicherung schadhaft
--- X
• Kabelschaden:
1 Achtung! Stromschlag durch Kabelschaden
Wenn das Kabel durchtrennt oder beschädigt wird,
löst nicht immer die Sicherung aus.
z Kabel nicht berühren, bevor der Netzstecker aus
der Steckdose gezogen ist.
z Beschädigtes Kabel komplett austauschen. Es
ist verboten, das Kabel mit Isolierband zu fli-
cken.
X ---
Schlechte Mäh-/Fangleis-
tung
• Messer stumpf
X ---
• Fangkorb verstopft
--- X
• Nicht angepasste Schnitthöhe
--- X
Im Zweifelsfall immer eine WOLF Service-Werkstatt aufsuchen.
Achtung: Mäher vor jeder Prüfung oder vor Arbeiten am Messer abstellen, und Netzstecker ziehen.
Die Garantieleistungen werden erfüllt durch unsere autorisierten
Kundendienstwerkstätten oder bei:
a
WOLF-Garten Austria Ges.m.b.H
Businesspark Wien Süd, Campus 21
Liebermannstraße F02-402
2345 Brunn am Gebirge
Tel.: ++ 43 (1) - 8 66 70 - 2 25 30
Fax: ++ 43 (1) - 8 66 70 - 2 25 40
E-mail: [email protected]
Z
WOLF-Garten Schweiz AG
Nordringstraße 16
4702 Oensingen
Tel.: ++ 41 (62) - 3 88 04 50
Fax: ++ 41 (62) - 3 88 04 60
D
WOLF-Garten GmbH & Co KG
Industriestraße 83-85
57518 Betzdorf
Tel.: ++ 49 (27 41) - 28 15 00
Fax: ++ 49 (27 41) - 28 12 99
E-mail: [email protected]

11
G
GCongratulations on the purchase of your WOLF product
Contents
Technical data . . . . . . . . . . . . . . . . . . . .11
Safety instructions . . . . . . . . . . . . . . . . . .12
Assembly . . . . . . . . . . . . . . . . . . . . . . .13
Operation . . . . . . . . . . . . . . . . . . . . . . .13
Maintenance . . . . . . . . . . . . . . . . . . . . .14
Spare parts . . . . . . . . . . . . . . . . . . . . . .14
Faults and how to remedy . . . . . . . . . . . . . .15
Guarantee terms . . . . . . . . . . . . . . . . . . .15
EC Declaration of Conformity. . . . . . . . . . . . 108
An overview of the equipment features
–
central cutting height adjustment
– Minimum space requirement (transport and storage) "just
stand it on the basket"
– will fit into a SMART when folded down
– Collection basket level indicator
–
high quality materials, excellent workmanship and attracti-
ve design.
– Ready-to-use: from 0 to mowing in 30 seconds
– tough and capable motor
Technical data
Read the user manual carefully and familiarise yourself
with the operating elements and the correct operation
of the equipment. The operator is responsible for acci-
dents involving other persons and their property. Ob-
serve the notes, explanations and regulations.
Never allow children or other persons who are not fa-
miliar with the operating instructions to use the lawn-
mower.Young persons under the age of 16 may not
use the equipment.Local regulations can limit the mini-
mum age of the operator.
The right to make technical modifications is reserved
D Noise level measurement at the ear of the operator in accor-
dance with EN 836
E
Vibration measured at the guide bar, with operator in accor-
dance with EN 1033 and EN 836.The estimated acceleration
is, typically:
2.32 E-1
Type 4905 ...
A 94 cm
B 34 cm
C 36 cm
D LP 76 dB (A)
E a
hw
≤ 2,5 m/s
2
Nominal power rating 1000 W
Current intensity 5,6 A
Mains voltage 230 VAC
Collection basket volume 25 l
Cutting width 32 cm
Cutting height 20, 32, 45, 60 mm
Weight 12 kg
Instruction Manual

12
G
Safety instructions
Significance of the symbols
General Notes
z This lawnmower is intended for the care of grass and lawn
areas in private grounds. Because of physical danger to the
operator or other persons, the lawnmower must not be used
for other purposes.
z Do not mow the grass if persons, especially children and ani-
mals, are in the vicinity.
z Only mow the grass if the light conditions are suitable.
Before mowing
z Only mow the grass wearing sturdy shoes and long trousers.
z Never mow the grass in bare feet or wearing sandals.
z Check the ground where the lawnmower is to be used, and re-
move any items which could be picked up and thrown out by
the lawnmower.
z Check the connection cable and the wire fitted to the outside
of the mower for damage and ageing (brittleness). Use only if
it is in perfect condition.
z Check the grass collection unit regularly for wear and defor-
mation.
z Before use check (visually), whether the cutting tools and their
fixings are blunt or damaged.
z Replace the cutting tools if they are blunt or damaged in comple-
te sets to avoid imbalance (see „Maintenance“, page 14).
Cable
1 Caution! Risk of electrocution from damaged cables
The fuse does not always respond if the cable is cut
or damaged.
z Do not touch the cable before the plug has been remo-
ved from the plug socket.
z Damaged cables should be replaced completelyIt is pro-
hibited to mend the cable using insulating tape.
z Repairs to the cable should only be undertaken by an expert
(see „Maintenance“, page 14).
z Attach the cable to the tension relief unit. Do not let it rub up
against edges, points or sharp items.
z Do not squash the cable by putting it through door gaps or
gaps in windows.
z Switching devices must not be removed or bridged out
(e.g.strapping the switching lever to the guide bar).
z Only use extension cables which are not lighter than rubber
hose, Type HO 7 RN-F, minimum cross-section 3 x 1.5 mm
2
,
Length: max. 25 m.
z The cables must be water spray protected.
When mowing
z
Do not tilt the mower when starting the motor unless it has to be
tilted when starting. In this case, do not tilt it more than neces-
sary and only lift the section that is away from the opera-
tor.Check continuously that both hands are in the working
position before lowering the mower back to the ground.
z Keep the distance away provided by the handle linkage.
z Only switch the motor on if your feet are at a safe distance
from the cutting tools.
z Ensure that it is standing securely.Never run, move for-
wards smoothly.
z Mowing on inclines:
– Always mow at right angles to the incline, not up and down
– Take particular care when changing direction.
– Do not mow very steep ground
z Take particular care when mowing backwards and pulling the
mower towards you.
z Switch the mower off when tilting or transporting it, e.g. from/to
the lawn or over paths.
z Take care not to grab running cutters.
z Do not stand in front of the grass ejection opening.
z Before lifting or carrying the mower, switch the motor off and
wait until the cutting tools have come to a standstill.
z Only adjust the cutting height with the motor switched off and
with the cutting tools at a standstill.
z Never open the protective cover if the motor is still running.
z Before removing the grass collection device:Switch the motor
off and wait until the cutting tools come to a standstill.After em-
ptying, fix the grass collection device carefully.
z Never run the mower over gravel– Stones will fly up!
z If possible, do not mow if the grass is wet.
z Under the following conditions the mower must be switched
off, the mains plug must be removed and the mower must
be stationary:
– when leaving the mower
– when releasing blocked cutters
– in order to check the mower, to clean it and to work on it
– if foreign bodies are struck (check first whether the mower
or cutting tools have been damaged. Only then should you
remove the damage).
– if the mower is vibrating badly because of imbalance (switch
off and look for the cause).
– if the connection wire is damaged during use.
Warning!
Read the opera-
ting instructions
before using for
the first time!
Keep third par-
ties away from
the danger area
Caution! - Sharp
cutting blades - re-
move the plug
from the mains
before any main-
tenance work and
if the cable is da-
maged!
Keep the con-
nection cable
away from the
cutting tools!

13
G
Maintenance
1 Caution! Rotating cutters
Before all maintenance and cleaning tasks:
z Pull the mains plug out.
z Take care not to grab running cutters.
z Check all the visible fixing bolts and nuts regularly for tight-
ness and retighten, particularly those of the cutter beam.
z Do not store the mower in damp rooms.
z For safety reasons, replace worn or damaged parts.
z Use only original WOLF spare parts, otherwise there is no gua-
rantee that your mower complies with the safety regulations.
Disposal
Assembly
Fixing the grab handle
1 Caution!
When collapsing and unfolding the grab handle, the cable
could be damaged.
z Take care that you do not kink the cable.
z See illustrations for assembly.
Fitting the collecting basket
1. Insert the projections of the collecting basket upper section
into the openings in the collecting basket lower section.
2. Push the collecting basket upper section evenly onto the coll-
ecting basket lower section.The collecting basket is securely
located as soon as it clicks in position.
Operation
Operating times
z Please observe the regional regulations.
z Request the operating times from your local authorities.
Insert the cable into the tension relief unit
z Please insert the cable into the tension relief unit in accor-
dance with the illustrations
.
Fit the collecting basket
1 Caution! Rotating cutters
Settings only to be carried out on the mower with the motor
switched off and with the cutting tools at a standstill.
z Only insert the collection basket when your feet are at a
safe distance from the cutting tools.
1. Lift the protection cover.
2. Hang the collection basket in the notches in the chassis (see
arrow) using the hooks.
3. Apply the protection cover.
Setting the cutting height
1 Caution! Rotating cutters
Settings only to be carried out on the mower with the motor
switched off and with the cutting tools at a standstill.
z switch the motor off and pull the plug out from the mains.
1. Pull the lever outwards .
2. Adjust to the required cutting height .
3. Push the lever back inwards .
Cutting height– Grass condition
z Mow when the lawn is dry if possible, to protect the turf. If the
lawn is wet and the grass is long, it may be better to mow with
a higher cutting height.
z Generally, you should set a cutting height of 40 mm.
Connection to the plug socket (230 Volt, 50 Hz)
z Only connect the mower to plug sockets having a 16 Amp.
fuse (slow acting) (or LS Switch Type B).
3 Note: Residual current protection device
These protection devices protect against serious injury
when touching damaged wires, insulation faults and in cer-
tain cases also when damaging wires under potential.
z We recommend that the mower only be connected to
plug sockets which are protected by a residual current
protection device (RCD) having a residual current of no
more than 30 mA.
z There are retro-fitting sets for older installations. Consult
your specialist electrician.
Switching the mower on/off
z Switch the mower on when standing on level ground.
z Not in long grass– or tilt if necessary .
Motor on
1. Push button (1) and hold it down.
2. Pull the bracket (2).
3. Release the button (1).
Motor off
z Release the bracket (2).
Tips for mowing
z In order to prevent stripes on the lawn, always overlap the
tracks of the cut by a few centimetres .
z Always lay the cable securely on the terrace, paths or grass
which has already been cut.
Electrical equipment must not be placed in the hou-
sehold waste.The unit, accessories and packing
material should be taken to an environment-friend-
ly recycling unit.
A B C D E
F
G
H
J
K
L
M
M
N

14
G
Emptying the collection basket
z As soon as the collection basket is full, the cover of the level
indicator goes down
(1).
z If the collection basket is empty, the cover is pushed upwards
when the motor is running
(2).
1 Caution! Rotating cutters
Settings only to be carried out on the mower with the motor
switched off and with the cutting tools at a standstill.
z Switch the motor off and pull the plug out from the mains.
z Empty the collection basket.
z Before starting, remove any blockages in the mowing
area.
3 Note concerning level indicator
In order to ensure that the level indicator operates correctly,
the holes under the level indicator should be cleaned out re-
gularly using a handbrush.
Maintenance
General
1 Caution! Rotating cutters
Before all maintenance and cleaning tasks:
z Pull the mains plug out.
z Take care not to grab running cutters.
Cleaning
z Always clean the lawnmower after each use with a handbrush.
Simply stand it vertically on the collection basket.
z Never spray the mower with water.
Storage
z Fold the grab handle in order to save space when storing .
The design of the 2.32 E-1 allows it to be stood vertically on
the collection basket .
z At the end of each mowing season, you should perform a
complete cleaning operation on the mower.
z The mower should be checked by a WOLF customer service
workshop in the autumn.
z Store the mower in a dry room.
Changing the cutters
z When performing any work on the cutters, coupling and cutter
beam, pull the plug out and wear protective gloves.
1 Caution!
After the cutters have been sharpened there could be imba-
lance.
z Always have the cutters sharpened by a specialist work-
shop, since a balance test in accordance with the safety
regulations must be carried out.
z Always have the cutters changed by a specialist workshop. A
10 mm torque wrench is an absolute must.
Torque for tightening the bolts: 6 - 7 Nm .
z Use only original WOLF spare parts.
Spare parts
O
O
O
P
Q
R
R
Ordering Number Designation of the item Description of the item
4905 034 Complete grass collecting basket
4905 096 Vi 32 S Cutter beam 32 cm

15
G
Faults and how to remedy
Guarantee terms
Please keep the guarantee card filled out by the vendor, or the re-
ceipt, in a safe place.
For a period of 24 months from the date of purchase, WOLF-Garten
provides a guarantee in accordance with the state of technology and
the application/area of usage.The legal rights of the end-user are not
affected by the following guarantee guidelines.
Pre-requisites for a 24-month guarantee claim:
- Only use the mower for private use.
If used commercially or for hire, the guarantee reduces to 12
months.
- Proper handling and observation of all notes in the operating in-
structions, which form part of the guarantee conditions.
- Keeping of the prescribed maintenance intervals.
- No modification to the design without approval.
- The use of original WOLF spare parts/accessories.
- Submission of the completed guarantee card and/or proof of purchase.
The guarantee does not extend to the normal wear of cutters, cutter
fixing components such as friction discs, V-belts / toothed belts, run-
ning wheels / tyres, air filters, sparking plugs and sparking plug con-
nectors.In the event of a repair by yourself the guarantee immediately
becomes invalid in all respects.
Faults and defects whose cause can be attributed to material or
manufacturing faults are rectified exclusively by our official ser-
vice centres (the vendor has the right of repair) in your locality, or
by the manufacturer if that is closer. Demands in excess of the gu-
arantee are excluded.The possibility of a replacement unit does
not exist.Any transport damage should be reported not to us but
to the relevant transport organisation otherwise the right to a re-
placement may be lost.
Help from (X)
Problem Possible cause
WOLF
Service Workshop
Self
Running rough, heavy
vibration of the unit
• Cutter faulty
X ---
• Cutter has come loose in the fixings
--- X
Motor will not run
• House fuse faulty
--- X
• Cable damage:
1 Caution! Risk of electrocution from damaged
cables
The fuse does not always respond if the cable is cut
or damaged.
z Do not touch the cable before the plug has been
removed from the plug socket.
z Damaged cables should be replaced completely
It is prohibited to mend the cable using insulating
tape.
X---
Poor mowing/collection
• Cutters blunt
X ---
• Collection basket blocked
--- X
• Inappropriate cutting height
--- X
If you are not sure, then always consult the WOLF service workshop.
Caution! Switch the mower off and pull the mains plug out before checking or working on the cutters.
The guarantee work is undertaken by our authorised customer
service workshops or by:
G
WOLFGarden Ltd.
Crown BusinessPark
Tredegar
Gwent, NP22 4EF
Tel. : ++ 44 / 14 95 30 66 00
Fax : ++ 44 / 14 95 30 33 44
E-mail: [email protected]

16
F
F Merci d'avoir acheté un produit WOLF
Table des matières
Donnés Techniques . . . . . . . . . . . . . . . . .16
Consignes de sécurité . . . . . . . . . . . . . . . .17
Montage . . . . . . . . . . . . . . . . . . . . . . .18
Fonctionnement . . . . . . . . . . . . . . . . . . .18
Entretien . . . . . . . . . . . . . . . . . . . . . . .19
Pièces de rechange . . . . . . . . . . . . . . . . .20
Comment remédier aux pannes . . . . . . . . . . .20
Conditions de la garantie . . . . . . . . . . . . . . .20
CE Déclaration de conformité . . . . . . . . . . . 108
Présentation des caractéristiques de l'équipement
–
Réglage central de la hauteur de coupe
– Encombrement minime (Transport et stockage) "Il suffit de po-
ser l'ensemble sur le bac"
– Tient dans une SMART une fois repliée
– Indicateur du niveau de remplissage sur la bac de ramassage
– Matériaux haute qualité, fonctionnement parfait et design soigné
– Prêt à l'emploi : 30 secondes de préparation
– Moteur puissant
Donnés techniques
Lisez attentivement le mode d'emploi et familiarisez-
vous avec les commandes et l'utilisation correcte du
matériel. L'utilisateur est responsable des accidents
qu'il pourrait occasionner à un tiers ou à ses biens. Li-
sez bien les remarques, explications et instructions.
Ne laissez jamais un enfant ou une personne qui
ne connaît pas le mode d'emploi utiliser la tonde-
use. Les jeunes âgés de moins de 16 ans ne sont
pas autorisés à utiliser l'appareil. L'âge minimum
autorisé pour l'utilisation de la tondeuse est fixé
par des dispositions locales.
Sous réserve de modifications pour des modifications tech-
niques.
D Niveau sonore mesurée à l'oreille de l'utilisateur conforme à
la norme EN 836
E Vibrations mesurées à la poignée de direction lors de la
manipulationconforme aux normes EN 1033 et EN 836.
A l'accélération, les valeurs calculées sont en général
les suivantes:
2.32 E-1
Type 4905 ...
A 94 cm
B 34 cm
C 36 cm
D LP 76 dB (A)
E a
hw
≤ 2,5 m/s
2
Puissance nominale 1000 W
Intensité 5,6 A
Tension du secteur 230 VAC
Volume de ramassage du bac 25 l
Largeur de coupe 32 cm
Hauteurs de coupe 20, 32, 45, 60 mm
Poids 12 kg
Mode d’emploi

17
F
Consignes de sécurité
Signification des symboles
Conseils généraux
z Cette tondeuse est prévue pour l'entretien des surfaces d'her-
be et de pelouse de terrains privés. Pour prévenir tout risque
de danger corporel pour l'utilisateur ou un tiers, la tondeuse ne
doit pas être utilisée pour d'autres usages.
z Ne tondez jamais lorsque des personnes, en particulier des
enfants ou des animaux se trouvent à proximité.
z Ne tondez que lorsque la luminosité est suffisante.
Avant la tonte
z Tondez toujours avec des chaussures fermées et en panta-
lon.
z Ne tondez jamais pieds nus ou en sandales.
z Contrôlez le terrain sur lequel vous allez faire passer la tonde-
use et retirez tous les objets que la tondeuse pourrait ramas-
ser et projeter au loin.
z Inspecter le câble de branchement et l'installation de la ligne
reliée à l'appareil pour vous assurer qu'ils sont exempts de
toute détérioration ou altération (fragilité). N'utilisez la machi-
ne que si vous êtes sûr(e) qu'elle est en parfait état.
z Contrôlez fréquemment l'usure et les déformations du dispo-
sitif de ramassage de l'herbe.
z Avant l'utilisation, vérifiez (contrôle visuel) si les outils de cou-
pe et leurs serrages ne sont pas usés ou détériorés.
z Remplacez la totalité du kit-outils usé ou détérioré pour éviter
tout déséquilibrage (voir „Entretien“, page 19).
Câble
1 Attention! Risque d'électrocucion en raison d'une dété-
rioration du câble
Si le câble est sectionné ou endommagé, le fusible ne se
déclenche pas toujours.
z Ne touchez pas le câble avant qu'il soit débranché de la
prise secteur.
z Changer le câble en entier. Il est interdit d'utiliser du ru-
ban adhésif isolant (Chatterton) pour réparer le câble.
z Ne faîtes réaliser les réparations de câble que par un spécia-
liste (voir „Entretien“, page 19).
z Fixez le câble de raccordement sur le guide-câble. Ne le
laissez pas frotter sur des arêtes ou des objets coupants
ou pointus.
z Ne coincez pas le câble dans des ouvertures de porte ou
de fenêtre.
z N'enlevez ou ne court-circuitez pas le dispositif d'allumage
(par ex. fixer le levier d'allumage à la poignée de direction).
z N'utilisez que des rallonges de câble plus lourdes que les câb-
les en caoutchouc, type HO 7 RN-F, coupe transversale mi-
nimum x 1,5 mm
2
, Longueur : max. 25 m.
z Les câbles doivent être préservés de toute éclaboussure.
Lors de la tonte
z Ne basculez pas l'appareil lorsque vous mettez le moteur en
marche à moins que cette action soit vraiment nécessaire. Si
vous avez besoin de le faire, ne le basculez pas plus que né-
cessaire et ne soulevez que la partie qui est éloignée de l'uti-
lisateur. Replacez les mains en position de travail avant de
reposer l'appareil au sol.
z Respectez la distance de sécurité que représente la poignée
avec l'appareil
z N'allumez le moteur que lorsque vos pieds sont à une dis-
tance de sécurité suffisante des outils de coupe.
z Adopter une posture prudente. Ne courez jamais mais avan-
cez tranquillement.
z Tondre des terrains en pente :
– Tondez toujours perpendiculairement au dénivelé de la
pente et non pas de haut en bas et de bas en haut.
– Faites particulièrement attention lors des changements de
direction
– Ne tondez pas de pentes très raides
z Soyez particulièrement prudent lorsque vous tondez en arri-
ère et tirez la tondeuse vers vous.
z Eteignez la tondeuse lorsque vous la basculez ou la transpor-
tez, par ex. de ou vers la pelouse ou sur des chemins.
z Prenez soin de ne pas toucher les outils de coupe.
z Tenez-vous à l'écart de la bouche d'éjection.
z Avant de soulever ou de transporter la tondeuse, éteignez le
moteur et attendez que les outils de coupe s'immobilisent.
z Ne modifiez la hauteur de coupe que lorsque le moteur est
éteint et que les outils de coupe sont à l'arrêt.
z N'ouvrez jamais le carter si le moteur tourne encore.
z Avant le retrait du dispositif de ramassage de l'herbe : Arrêtez
le moteur et patientez jusqu'à l'immobilisation complète des
outils de coupe. Après avoir vidé le dispositif de ramassage
de l'herbe, replacez-le soigneusement.
z Ne roulez jamais sur des gravillons avec le moteur en marche
– Il y aurait des risque de projection de pierres !
Attention !
Lisez le mode
d'emploi de
mettreen marche !
Tenez toutes les
personnes
éloignésde la
zone de danger !
Précautions ! -
Lame de coupe af-
fûtée - Débranchez
l'interrupteur de la
prise secteur avant
d'effectuer tous
travaux d'entretien
ou en cas d'en-
dommagement de
la ligne !
Tenez le filde
branchement à
distance de
l'outilde coupe !

18
F
z Si possible, ne tondez pas l'herbe mouillée.
z Dans les circonstances suivantes, l'appareil doit être éteint, la
prise de courant débranchée et l'appareil immobilisé :
– Si l'utilisateur de la tondeuse s'absente
– lors du déblocage de la lame
– si vous souhaitez contrôler l'appareil, le nettoyer ou effectu-
er un quelconque travail sur l'appareil
– Si vous trouvez un corps étranger (Vérifiez d'abord que la
tondeuse ou les outils de coupe n'ont pas été endomma-
gés. Enlevez ensuite ce qui a causé le dommage).
– Quand la tondeuse vibre fortement pour cause d'un
déséquilibrage (éteignez-la aussitôt et recherchez-en
la cause).
– si le câble d'alimentation subit une détérioration durant l'uti-
lisation.
Entretien
1 Attention ! Lame en rotation
Avant tous travaux d'entretien ou de nettoyage :
z Débranchez la prise.
z Ne touchez pas les outils de coupe.
z Vérifiez régulièrement la solidité des fixations et resserrer tous
les vis de fixation et écrous en particulier ceux de la barre des
outils de coupe.
z Ne rangez pas la tondeuse dans une pièce humide.
z Pour des raisons de sécurité, remplacez les pièces usées ou
endommagées.
z N'utilisez que des pièces de rechange WOLF d'origine, sinon
vous n'aurez aucune garantie que votre tondeuse réponde
aux normes de sécurité.
Elimination
Montage
Fixation de la poignée
1 Précautions !
Lorsque vous dépliez ou repliez la poignée, le câble peut
subir une détérioration.
z Veillez à ne pas plier le câble.
z Voir figures pour le montage.
Installation du bac de ramassage
1. Inserez les extrémités de la partie supérieure du bac dans les
orifices de la partie inférieure du bac de ramassage.
2. Emboîtez la partie supérieure du bac de ramassage dans la
partie inférieure du bac. Le bac de ramassage est correcte-
ment installé dès qu'il s'enclenche.
Fonctionnement
Horraire d'utilisation
z Respectez les règlementations locales.
z Renseignez-vous auprès des autorités locales pour ce qui
concerne les horraires d'utilisation.
Placement du câble dans le guide-câble
z Faîtes passer le câble dans le guide-câble comme indiqué sur
la figure
.
Installation du bac de ramassage
1 Attention ! Lame en rotation
N'effectuez de réglages sur l'appareil qu'avec le moteur
éteint et une fois les outils de coupe complètement immobi-
lisés.
z N'installez le bac de ramassage que lorsque vos
pieds sont à une distance de sécurité suffisante des
outils de coupe.
1. Relevez le carter.
2. Accrochez le bac de ramassage à l'aide des crochets dans les
emplacements prévus sur le châssis (voir flèche).
3. Fermez le carter.
Réglage de la hauteur de coupe
1 Attention ! Lame en rotation
N'effectuez de réglages sur l'appareil qu'avec le moteur
éteint et une fois les outils de coupe complètement immobi-
lisés.
z Eteignez le moteur et débranchez la prise.
1. Tirez le levier vers l'extérieur .
2. Réglez la hauteur de coupe souhaitée .
3. Poussez de nouveau le levier vers l'intérieur .
Hauteur de coupe-Etat de l'herbe
z Tondez lorsque l'herbe est sèche pour ménager le gazon. Si
l'herbe est humide ou haute, tondez à une hauteur de coupe
plus élevée.
z En général, règlez la hauteur de coupe à 40 mm.
Les appareils électriques sont pas des déchets mé-
nagers. L'appareil, les accessoires et l'emballage
doivent être déposé dans un lieu de recyclage ap-
proprié pour le respect de l'environnement.
A B C D E
F
G
H
J
K

19
F
Branchement à la prise (230 Volt, 50 Hz)
z Ne branchez l'appareil qu'à des prises de courant qui suppor-
tent une puissance (ou interrupteur LS de type B) de 16 Amp.
3 Remarque : Disjoncteur de sécurité
Ce disjoncteur protège des blessures graves que peuvent
occasionner le contact avec des lignes endommagées, en
cas de défauts d'isolation et, dans certains cas, si les lignes
sous tension sont endommagées.
z Nous vous recommandons de ne brancher l'appareil
qu'à une prise de courant qui soit protégé par un dis-
joncteur de sécurité (RCD) d'un courant résiduel de
30 mA maxi.
z Des kits complémentaires existent pour les vieilles in-
stallations. Consultez un électricien professionnel.
Allumer/Eteindre la tondeuse
z Allumez la tondeuse sur une surface plane.
z Pas dans l'herbe haute- ou bacsulez-la si nécessaire .
Allumer le moteur
1. Appuyez et maintenez le bouton (1) appuyé.
2. Tirez sur la manette (2).
3. Relâchez le bouton (1).
Eteindre le moteur
z Libérez la manette (2).
Trucs et astuces de tonte
z Pour éviter qu'ils se forment des bandes sur le gazon, chevau-
chez toujours les lignes de coupe de quelques centimètres.
.
z Assurez-vous que le câble se trouve toujours sur une terasse,
un chemin ou sur l'herbe déjà tondue.
Vider le bac de ramassage
z Dès que le bac de ramassage est plein, le carter d'indication
de remplissage s'abaisse. (1).
z Lorsque le bac de ramassage vide, le carter remonte quand le
moteur est allumé (2).
1 Attention ! Lame en rotation
N'effectuez de réglages sur l'appareil qu'avec le moteur
éteint et une fois les outils de coupe complètement immobi-
lisés.
z Eteignez le moteur et débranchez la prise.
z Videz le bac de ramassage.
z Avant le démarrage, retirez tout objet de l'espace de tonte.
3 Remarque concernant l'indicateur de remplissage:
Pour le bon fonctionnement de l'indicateur de remplissage,
nettoyez régulièrement les trous situés sous l'indicateur à
l'aide d'une balayette.
Entretien
Généralités
1 Attention ! Lame en rotation
Avant tous travaux d'entretien ou de nettoyage :
z Débranchez la prise.
z Ne touchez pas les outils de coupe.
Nettoyage
z Nettoyez la tondeuse après chaque tonte à l'aide d'une balay-
ette. Stabilisez-la à la verticale en appui sur le bac de ramas-
sage.
z Ne passez jamais la tondeuse à l'eau.
Entreposage
z Repliez la poignée pour limiter l'espace nécessaire au range-
ment de la tondeuse . La conception du modèle 2.32 E-1
permet de le positionner à la verticale en appui sur le bac de
ramassage .
z A la fin de chaque saison de tonte, effectuez le nettoyage
complet de la tondeuse.
z En automne, faîtes contrôler votre tondeuse par un atelier de
service clientèle WOLF.
z Entreposez la tondeuse dans un endroit sec.
Changement des lames
z Avant d'effectuer tous travaux sur des lames, l'embrayage et
la barre des outils de coupe, débranchez d'abord la prise et
mettez des gants de protection.
1 Attention!
Après l'affûtage de la lame, un déséquilibre peut se pro-
duire.
z Faîtes toujours affûter les lames dans un atelier spécia-
lisé qui, conformément aux normes de sécurité en vi-
gueur, effectuera un contrôle d'équilibrage.
z Faîtes toujours effectuer le changement de lame par un atelier
spécialisé. Une clé dynamométrique est de 10 mm est obli-
gatoirement requise.
Couple de serrage des vis : 6 - 7 Nm .
z N'utilisez que des pièces de rechange WOLF d'origine.
Pièces de rechange
L
M
M
N
O
O
O
P
Q
R
R
N° de commande Désignation de l'article Description de l'article
4905 034 Bac de ramassage de l'herbe complet
4905 096 Vi 32 S Barre d'outils de coupe 32 cm

20
F
Comment remédier aux pannes
Conditions de la garantie
Conservez soigneusement la carte de garantie remplie par le
vendeur ou le justificatif d'achat.
L'entreprise WOLF-Garten assure une garantie conforme à l'état de la
technique et à l'utilisation visée / domaine d'application pendant une
durée de 24 mois après la date d'achat. L'attestation de garantie ci-
dessous n'affecte pas les droits légaux de l'utilisateur final.
Conditions de recours à la garantie de 24 mois :
- Utilisation de l'appareil pour un usage exclusivement privé.
Si l'appareil est utilisé à des fins commerciales ou pour une acti-
vité de location, la garantie est réduite à 12 mois.
- La garantie s'applique sous réserve du bon entretien de la tondeuse
et du respect scrupuleux de toutes les indications mentionnées
dans le mode d'emploi.
- Dans le respect des périodes d'entretien prescrites.
- Si vous n'avez entrepris aucune modification sur la machine.
- Si les pièces de rechange / accessoires installés sont des pièces
WOLF d'origine.
- Sur présentation de la carte de garantie dûment remplie et / ou du
justificatif d'achat.
La garantie ne couvre pas l'usure normale des lames, des pièces de
fixation des lames telles que les disques à friction, les courroies trapè-
zoïdales / crantées, les roues / pneus, les filtres à air, les bougies d'al-
lumage et le filetage des bougies d'allumage. Toute réparation
effectuées par vous-même annule automatiquement tout recours pos-
sible à la garantie.
Tout défaut dû à un vice caché ou à un vice de fabrication sera trai-
té par nos ateliers officiel près de chez vous (le vendeur est auto-
risé à effectuer des réparations) ou, par le fabricant lui-même s'il
est plus proche de chez vous. Des recours à la garantie en dehors
de la période indiquée sont exclus. La garantie ne donne pas de
droit à la livraison de pièces. Tout dommage survenant lors du
transport sont à signaler au transporteur compétent sinon, tout
remplacement sera impossible.
Assistance (X)
Problème Cause possible
Service atelier
WOLF
Vous-même
Fonctionnement bruyant,
forte vibration de l'appareil
• Lame défectueuse
X ---
• Lame mal fixée ou lâche
--- X
Le moteur ne fonctionne pas
• Fusible domestique défectueux
--- X
• Câble endommagé :
1 Attention !Risque d'électrocucion en raison
d'une détérioration du câble
Si le câble est sectionné ou endommagé, le fusible
ne se déclenche pas toujours.
z Ne touchez pas le câble avant qu'il soit débran-
ché de la prise secteur.
z Changer le câble en entier. Il est interdit d'utiliser
du ruban adhésif isolant (Chatterton) pour répa-
rer le câble.
X ---
Mauvaise performance de
tonte / de ramassage
• Lame usée
X ---
• Bac de ramassage obstrué
--- X
• Hauteur de coupe inadaptée
--- X
En cas de doute, consultez toujours un atelier de service WOLF.
Attention: Arrêtez la tondeuse et débrancher la prise secteur avant d'effectuer toute vérification ou tous travaux sur la lame.
Les prestations de garantie sont assurées par nos ateliers de
service clientèle autorisés ou par :
B
Graham NV-SA
Zoning Industriel21
1440 Wauthier-Braine
Tel.: ++ 32 (2) - 3 67 16 11
Fax: ++ 32 (2) - 3 67 16 12
E-mail: [email protected]
Z
WOLF-Garten Schweiz AG
Nordringstraße 16
4702 Oensingen
Tel.: ++ 41 (62) - 3 88 04 50
Fax: ++ 41 (62) - 3 88 04 60
l
WOLF-Garten GmbH & Co KG
Industriestraße 83-85
57518 Betzdorf
Tel.: ++ 49 (27 41) - 28 15 00
Fax: ++ 49 (27 41) - 28 12 99
E-mail: [email protected]
La pagina sta caricando ...
La pagina sta caricando ...
La pagina sta caricando ...
La pagina sta caricando ...
La pagina sta caricando ...
La pagina sta caricando ...
La pagina sta caricando ...
La pagina sta caricando ...
La pagina sta caricando ...
La pagina sta caricando ...
La pagina sta caricando ...
La pagina sta caricando ...
La pagina sta caricando ...
-
 1
1
-
 2
2
-
 3
3
-
 4
4
-
 5
5
-
 6
6
-
 7
7
-
 8
8
-
 9
9
-
 10
10
-
 11
11
-
 12
12
-
 13
13
-
 14
14
-
 15
15
-
 16
16
-
 17
17
-
 18
18
-
 19
19
-
 20
20
-
 21
21
-
 22
22
-
 23
23
-
 24
24
-
 25
25
-
 26
26
-
 27
27
-
 28
28
-
 29
29
-
 30
30
-
 31
31
-
 32
32
-
 33
33


Wolf Garten 2.32 E-1 Manuale del proprietario
- Categoria
- Tosa erba
- Tipo
- Manuale del proprietario
in altre lingue
- English: Wolf Garten 2.32 E-1 Owner's manual
- français: Wolf Garten 2.32 E-1 Le manuel du propriétaire
- Deutsch: Wolf Garten 2.32 E-1 Bedienungsanleitung
- Nederlands: Wolf Garten 2.32 E-1 de handleiding
Documenti correlati
-
Wolf Garten 2.32 E Manuale utente
-
-
-
-
-
WOLF-Garten Premio 36 E Manuale del proprietario
-
-
-