
CAUTION:
TO REDUCE-THE-RISK-OF-ELECTRIC-SHOCK, DO-NOT REMOVE-COVER-(OR
BACK). NO USER-SERVICEABLE-PARTS-INSIDE. REFER SERVICING
TO-QUALIFIED-SERVICE PERSONNEL.
WARNING:
TO REDUCE THE RISK OF FIRE OR ELECTRIC SHOCK, DO NOT EXPOSE
THIS PRODUCT TO RAIN OR MOISTURE.
CAUTION:
TO REDUCE THE RISK OF ELECTRIC SHOCK AND TO REDUCE ANNOYING
INTERFERENCE, USE THE RECOMMENDED ACCESSORIES ONLY.
The serial number of this product may be found on the bottom. No others have the
same serial number as yours. You should record the number and other vital
information here and retain this information as a permanent record of your purchase
to aid identification in case of theft.
Date of Purchase
Dealer Purchased From
Dealer Address
Dealer Phone No.
Model No. CR-560
Serial No.
When the replacement or the repair of the Charge Adapter/Car Battery Cable Kit
CR-560 (CG-560+CB-560) is required, please return it to the responsible nearest
Canon Service Center.
The exclamation point within an equilateral triangle is intended to alert the
user to the presence of important operating and maintenance (servicing)
instructions in the literature accompanying the product.
“This digital apparatus does not exceed the Class B limits for radio noise emissions
from digital apparatus as set out in the interference-causing equipment standard
entitled “Digital Apparatus,” ICES-003 of the Industry Canada.”
CR-560A
“Cet appareil numérique respecte les limites de bruits radioélectriques applicables
aux appareils numériques de Class B prescrites dans la norme sur le matériel
brouilleur: “Appareils Numériques,” NMB-003 édictée par l'Industrie Canada.”
CR-560A
Note: This equipment has been tested and found to comply with the limits for a Class
B digital device, pursuant to Part 15 of the FCC Rules. These limits are designed to
provide reasonable protection against harmful interference in a residential installation.
This equipment generates, uses and can radiate radio frequency energy and, if not
installed and used in accordance with the instructions, may cause harmful interference
to radio communications. However, there is no guarantee that interference will not
occur in a particular installation. If this equipment does cause harmful interference
to radio or television reception, which can be determined by turning the equipment
off and on, the user is encouraged to try to correct the interference by one or more of
the following measures:
• Reorient or relocate the receiving antenna.
• Increase the separation between the equipment and receiver.
• Connect the equipment into an outlet on a circuit different from that to which the
receiver is connected.
• Consult the dealer or an experienced radio/TV technician for help.
Do not make any changes or modifications to the equipment unless otherwise
specified in the manual. If such changes or modifications should be made, you could
be required to stop operation of the equipment.
CR-560A
In these safety instructions the word “product” refers to the Charge Adapter
CB-560.
1. Read Instructions – All the safety and operating instructions should be read before the product is
operated.
2. Retain Instructions – The safety and operating instructions should be retained for future reference.
3. Heed Warnings – All warnings on the product and in the operating instructions should be adhered to.
4. Follow Instructions – All operating and maintenance instructions should be followed.
5. Cleaning – Unplug this product from the wall outlet before cleaning. Do not use liquid or aerosol
cleaners. The product should be cleaned only as recommended in this manual.
6. Accessories – Do not use accessories not recommended in this manual as they may be hazardous.
7. Avoid magnetic or electric fields – Do not use the camera close to TV transmitters, portable
communication devices or other sources of electric or magnetic radiation. They may cause picture
interference, or permanently damage the camera.
8. Water and Moisture – Hazard of electric shock – Do not use this product near water or in rainy/moist
situations.
9. Placing or Moving – Do not place on an unstable cart, stand, tripod, bracket or table. The
product may fall, causing serious injury to a child or adult, and serious damage to the
product.
A product and cart combination should be moved with care. Quick stops, excessive force, and uneven
surfaces may cause the product and cart combination to overturn.
10. Power Sources – The product should be operated only from the type of power source indicated on
the marking label. If you are not sure of the type of power supply to your home, consult your product
dealer or local power company. Regarding other power sources such as battery power, refer to
instructions in this manual.
11. Polarization – The product is equipped with a polarized 2-prong plug (a plug having one blade wider
than the other).
The 2-prong polarized plug will fit into the power outlet only one way. This is a safety feature. If you
are unable to insert the plug fully into the outlet, try reversing the plug. If the plug still fails to fit,
contact your electrician to replace your obsolete outlet. Do not defeat the safety purpose of the
polarized plug.
12. Power Cord Protection – Power cords should be routed so that they are not likely to be walked on or
pinched by items placed upon or against them. Pay particular attention to plugs and the point from
which the cords exit the product.
13. Outdoor Antenna Grounding – If an outside antenna is connected to the product, be sure the
antenna is grounded so as to provide some protection against voltage surges and built-up static
charges. Section 810 of the National Electrical Code, ANSI / NFPA No. 70–1984, provides
information with respect to proper grounding of the mast and supporting structure, grounding of the
lead-in wire to an antenna discharge unit, size of grounding conductors, location of antenna
discharge unit, connection to grounding electrodes, and requirements for the grounding electrode.
See figure 3.
14. Lightning – For added protection of this product
during a lightning storm, or when it is left
unattended and unused for long periods of time,
disconnect it from the wall outlet and disconnect
the antenna. This will prevent damage to the
product due to lightning and power-line surges.
15. Power Lines – An outside antenna system
should not be located in the vicinity of overhead
power lines or other electric light or power
circuits, or where it can fall into such power lines
or circuits. When installing an outside antenna
system, extreme care should be taken to keep
from touching such power lines or circuits as contact with them might be fatal.
16. Overloading–Do not overload wall outlets and extension cords as this can result in a risk of fire or
electric shock.
17. Objects and Liquid Entry – Never push objects of any kind into this product through openings as
they may touch dangerous voltage points or short out parts that could result in a fire or electric
shock. Be careful not to spill liquid of any kind onto the product.
18. Servicing – Do not attempt to service this product yourself as opening or removing covers may
expose you to dangerous voltage or other hazards. Refer all servicing to qualified service personnel.
19. Damage Requiring Service – Disconnect this product from the wall outlet and all power sources
including battery, and refer servicing to qualified service personnel under the following conditions:
a. When the power-supply cord or plug is damaged.
b. If any liquid has been spilled onto, or objects have fallen into, the product.
c. If the product has been exposed to rain or water.
d. If the product does not operate normally even if you follow the operating instructions. Adjust only
those controls that are covered by the operation instructions. Improper adjustment of other
controls may result in damage and will often require extensive work by a qualified technician to
restore the product to its normal operation.
e. If the product has been dropped or the cabinet has been damaged.
f. When the product exhibits a distinct change in performance. This indicates a need for service.
20. Replacement Parts – When replacement parts are required, be sure the service technician has used
replacement parts that are specified by Canon or that have the same characteristics as the original
part. Unauthorized substitutions may result in fire, electric shock or other hazards.
21. Safety Check – Upon completion of any service or repairs to this product, ask the service technician
to perform safety checks to determine that the product is in safe operating order.
EXAMPLE OF ANTENNA GROUNDING AS
PER NATIONAL ELECTRICAL CODE
ANTENNA
LEAD IN
WIRE
ANTENNA
DISCHARGE
UNIT
(NEC SECTION
810-20)
GROUNDING CONDUCTORS
(NEC SECTION 810-21)
GROUND CLAMPS
POWER SERVICE
GROUNDING ELECTRODE
SYSTEM
(NEC ART 250. PART H)
NEC - NATIONAL ELECTRICAL CODE
ELECTRIC
SERVICE
EQUIPMENT
GROUND
CLAMP
Fig. 3
IMPORTANT-SAFETY INSTRUCTIONS
For CB-560A
In these safety instructions the word “product” refers to the Charge Adapter
CG-560.
1. Read Instructions – All the safety and operating instructions should be read before the product is
operated.
2. Retain Instructions – The safety and operating instructions should be retained for future reference.
3. Heed Warnings – All warnings on the product and in the operating instructions should be adhered to.
4. Follow Instructions – All operating and maintenance instructions should be followed.
5. Cleaning – Unplug this product from the wall outlet before cleaning. Do not use liquid or aerosol
cleaners. The product should be cleaned only as recommended in this manual.
6. Accessories – Do not use accessories not recommended in this manual as they may be hazardous.
7. Avoid magnetic or electric fields – Do not use the camera close to TV transmitters, portable
communication devices or other sources of electric or magnetic radiation. They may cause picture
interference, or permanently damage the camera.
8. Water and Moisture – Hazard of electric shock – Do not use this product near water or in rainy/moist
situations.
9. Placing or Moving – Do not place on an unstable cart, stand, tripod, bracket or table. The
product may fall, causing serious injury to a child or adult, and serious damage to the
product.
A product and cart combination should be moved with care. Quick stops, excessive force,
and uneven surfaces may cause the product and cart combination to overturn.
10. Power Sources – The product should be operated only from the type of power source indicated on
the marking label. If you are not sure of the type of power supply to your home, consult your product
dealer or local power company. Regarding other power sources such as battery power, refer to
instructions in this manual.
11. Polarization – The product is equipped with a polarized 2-prong plug (a plug having one blade wider
than the other).
The 2-prong polarized plug will fit into the power outlet only one way. This is a safety feature. If you
are unable to insert the plug fully into the outlet, try reversing the plug. If the plug still fails to fit,
contact your electrician to replace your obsolete outlet. Do not defeat the safety purpose of the
polarized plug.
12. Power Cord Protection – Power cords should be routed so that they are not likely to be walked on or
pinched by items placed upon or against them. Pay particular attention to plugs and the point from
which the cords exit the product.
13. Outdoor Antenna Grounding – If an outside antenna is connected to the product, be sure the
antenna is grounded so as to provide some protection against voltage surges and built-up static
charges. Section 810 of the National Electrical Code, ANSI / NFPA No. 70–1984, provides
information with respect to proper grounding of the mast and supporting structure, grounding of the
lead-in wire to an antenna discharge unit, size of grounding conductors, location of antenna
discharge unit, connection to grounding electrodes, and requirements for the grounding electrode.
See figure 3.
14. Lightning – For added protection of this product
during a lightning storm, or when it is left
unattended and unused for long periods of time,
disconnect it from the wall outlet and disconnect
the antenna. This will prevent damage to the
product due to lightning and power-line surges.
15. Power Lines – An outside antenna system should
not be located in the vicinity of overhead power
lines or other electric light or power circuits, or
where it can fall into such power lines or circuits.
When installing an outside antenna system,
extreme care should be taken to keep from
touching such power lines or circuits as contact with them might be fatal.
16. Overloading–Do not overload wall outlets and extension cords as this can result in a risk of fire or
electric shock.
17. Objects and Liquid Entry – Never push objects of any kind into this product through openings as
they may touch dangerous voltage points or short out parts that could result in a fire or electric
shock. Be careful not to spill liquid of any kind onto the product.
18. Servicing – Do not attempt to service this product yourself as opening or removing covers may
expose you to dangerous voltage or other hazards. Refer all servicing to qualified service personnel.
19. Damage Requiring Service – Disconnect this product from the wall outlet and all power sources
including battery, and refer servicing to qualified service personnel under the following conditions:
a. When the power-supply cord or plug is damaged.
b. If any liquid has been spilled onto, or objects have fallen into, the product.
c. If the product has been exposed to rain or water.
d. If the product does not operate normally even if you follow the operating instructions. Adjust only
those controls that are covered by the operation instructions. Improper adjustment of other
controls may result in damage and will often require extensive work by a qualified technician to
restore the product to its normal operation.
e. If the product has been dropped or the cabinet has been damaged.
f. When the product exhibits a distinct change in performance. This indicates a need for service.
20. Replacement Parts – When replacement parts are required, be sure the service technician has used
replacement parts that are specified by Canon or that have the same characteristics as the original
part. Unauthorized substitutions may result in fire, electric shock or other hazards.
21. Safety Check – Upon completion of any service or repairs to this product, ask the service technician
to perform safety checks to determine that the product is in safe operating order.
EXAMPLE OF ANTENNA GROUNDING AS
PER NATIONAL ELECTRICAL CODE
ANTENNA
LEAD IN
WIRE
ANTENNA
DISCHARGE
UNIT
(NEC SECTION
810-20)
GROUNDING CONDUCTORS
(NEC SECTION 810-21)
GROUND CLAMPS
POWER SERVICE
GROUNDING ELECTRODE
SYSTEM
(NEC ART 250. PART H)
NEC - NATIONAL ELECTRICAL CODE
ELECTRIC
SERVICE
EQUIPMENT
GROUND
CLAMP
Fig. 3
IMPORTANT-SAFETY INSTRUCTIONS
For CG-560
Batterien und Akkumulatoren gehören nicht in den Hausmüll !
Im lnteresse des Umweltschutzes sind Sie als Endverbraucher gesetzlich
verpflichtet (Batterieverordnung), alte und gebrauchte Batterien und
Akkumulatoren zurückzugeben. Sie können die gebrauchten Batterien an den
Sammelstellen der öffentlich-rechtlichen Entsorgungsträger in Ihrer Gemeinde
oder überall dort abgeben, wo Batterien der betreffenden Art verkauft werden.
Die Batterien werden unentgeltlich für den Verbraucher zurückgenommen.
Hinweise für Deutschland

•
•
•
•
•
•
•
•
•
•
•
•
•
•
•
•
J
•
•
Canon Charge Adapter/Car Battery
Cable Kit CR-560
INSTRUCTIONS
English
E
To power your product from a cigarette lighter
socket:
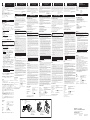
1. Connect the DC Cable to your product’s DC in terminal (Fig.1-q).
• See your product instruction manual for the location of the terminal.
2. Connect the other end of the DC Cable to the Charge Adapter (Fig.1-w).
3. Connect the Car Battery Cable to the Charge Adapter (Fig.1-e).
4. Start the car engine, and plug the Charge Adapter into the cigarette
lighter socket (Fig.1-r). You can now turn on your product.
To disconnect the kit:
1. Turn the product off.
2. Unplug the Charge Adapter from the cigarette lighter socket (before you
turn off the car engine).
3. Disconnect the Car Battery Cable from the Charge Adapter.
4. Disconnect the DC Cable from the Charge Adapter.
5. Disconnect the DC Cable from the product.
To charge battery packs:
Make sure the DC Cable is not connected to the Charge Adapter. The
battery pack(s) will not charge if the DC Cable is connected to the
Charge Adapter.
1. Connect the Car Battery Cable to the Charge Adapter (Fig.2-q).
2. Start the car engine, then plug the Charge Adapter into the cigarette
lighter socket. (Fig.2-w)
3. Slide one or two battery packs on to the Charge Adapter (Fig.2-e).
• Align the edge of the battery pack with the triangle on the Charge
Adapter. Press the battery pack down, and slide it in the direction of the
arrow until it clicks into place.
• One of the two charge indicators starts flashing to show the progress of
charging. Single flashes mean that the battery is less than 50%
charged. Double flashes mean that it is 50–75% charged. Triple flashes
mean that it is more than 75% charged. (All charging levels are
approximates.) The indicator glows steadily when the battery pack is
fully charged.
• If you attach two battery packs, they are charged one following the other
(i.e. sequentially).
In this case, a red charge indicator shows the progress of charging for
the battery pack that you attached first (or for the battery pack attached
to the side labeled A, if you attached both before plugging the Charge
Adapter into the cigarette lighter socket.)
When the indicator starts to glow steadily (the first battery is fully
charged), the second charge indicator shows the progress of charging for
the other battery pack. When both battery packs are fully charged, both
indicators glow steadily.
• To check the remaining power of a battery pack, attach a single battery
pack to the Charge Adapter, and check the charge indicator.
4. Slide the battery pack(s) in the opposite direction from the arrow and
remove. Unplug the Charge Adapter (before you turn off the car engine).
•
If you need to turn off the car engine while you are charging a battery
pack, first remove the plug from the cigarette lighter socket. To resume
charging, reinsert the plug after you have turned the car engine back on.
You can also charge battery packs with power from a household power
socket by connecting the Compact Power Adapter CA-560 to the Charge
Adapter instead of the Car Battery Cable(Fig.3).
Notes:
• The CR-560 Kit can only be used with 12 or 24 V negative-ground car
batteries.
• Car cigarette lighter sockets have different shapes and dimensions, so the
Car Battery Cable plug may not fit all types.
• To avoid exhausting the car battery, use the kit only when the car engine is
on. Always unplug it before you turn off the engine.
• Do not leave the car when the engine is on and the kit is in use.
• The kit may interfere with AM radio broadcasts and cellular phones in use
if it is too close to the car antenna. It may also interfere with playback on a
camcorder or function of a product, if it is closer than about 4 in. (10 cm).
• Charging will take about 10 minutes longer when the interior of the vehicle
is warm, when charging from a vehicle with 24 V DC battery.
• The upper surface of the Charge Adapter may become warm during use.
This is not a malfunction.
• If the fuse needs replacing, use the same size 125 V, 4 A fuse. (Outside the
U.S.A., a 250 V, T 2.5 A fuse may be used instead.)
• Do not disassemble any part of the kit, do not get it wet, and do not expose
it to shock or vibration, or to direct sunlight. Avoid exposure to temperatures
greater than 60°C (140°F). Do not leave it in a closed car in hot weather, for
example, or near heat-radiating equipment.Do not charge battery packs
under high temperature (battery packs are to be charged within the range
of 0-40°C (32-104F°).
• Do not store battery packs at temperatures greater than 60°C (140°F), as
this may cause their performance to deteriorate.
• Never connect an unspecified product to the Charge Adapter.
Specifications:
Applicable vehicles: Vehicles with 12 or 24 V DC negative-
ground car batteries
Power supply DC 9.5/12–24 V
Rated output (nominal) Ad apter mode: 9.5 V, 1.5 A DC
Ch arger mode: 8.4 V, 2.5 A (BATT.) A
DC
Operating temperature range 0°–40°C (32°–104°F)
Fuse 125 V, 4 A
(CR-560: 250 V, T 2.5 A also compatible)
Dimensions (W × H × D) 93 × 36 × 71 mm
(3
5
⁄8 × 1
3
⁄8 × 2
3
⁄4 in.)
Weight 260 g (9
1
⁄8 oz.) (including cables)
Weight and dimensions are approximate.
Errors and omissions excepted.
Subject to change without notice.
Thank you for purchasing the Canon Charge Adapter/Car Battery Cable Kit
CR-560. Connect it to a car cigarette lighter socket to power a Canon product
or charge the BP-500 Series lithium ion battery packs. To check that your
product can be used with this kit, contact your Canon sales company at the
address given on the back of the product instruction manual.
Your CR-560 kit includes the following: • Charge Adapter CG-560
• Car Battery Cable CB-560
• DC Cable
INSTRUCTIONS
Kit Adaptateur chargeur/câble pour batterie de
voiture Canon CR-560
F
Français
Alimentation de votre produit à partir d’une
douille d’allume-cigare:
1. Branchez le câble CC sur la prise CC du produit (Fig.1-q).
• Voir le mode d’emploi du produit pour l’emplacement de la prise.
2.
Branchez l’autre extrémité du câble CC sur l’adaptateur-chargeur (Fig.1-
w
).
3. Branchez le câble allume-cigare sur l’adaptateur-chargeur (Fig.1-e).
4. Mettez le moteur de la voiture en marche, et branchez l’adaptateur
chargeur dans la douille de l’allume-cigare (Fig.1-r). Il est maintenant
possible de mettre votre produit sous tension.
Débranchement du kit:
1. Mettez le produit hors tension.
2. Débranchez l’adaptateur de la douille de l’allume-cigare (avant de mettre
le moteur de la voiture à l’arrêt).
3. Débranchez le câble allume-cigare de l’adaptateur chargeur.
4. Débranchez le câble CC de l’adaptateur chargeur.
5. Débranchez le câble CC du produit.
Recharge les batteries:
Assurez-vous que le câble CC n’est pas raccordé à l’adaptateur
chargeur. La ou les batteries ne se chargeront pas si le câble CC est
raccordé à l’adaptateur chargeur.
1. Branchez le câble allume-cigare sur l’adaptateur chargeur (Fig. 2-q).
2. Mettez le moteur en marche, et branchez l’adaptateur chargeur dans la
douille de l’allume-cigare. (Fig.2-w).
3. Installer une ou deux batteries dans l’adaptateur chargeur (Fig. 2-e).
• Alignez le bord de la batterie sur le triangle de l’adaptateur chargeur.
Appuyer sur la batterie et la faire glisser dans le sens de la flèche
jusqu’à ce qu’elle s’encliquette.
•Un des deux indicateurs de charge commence à clignoter pour indiquer
que le processus de charge est en cours. Des clignotements simples
signifient que la batterie est chargée à moins de 50%. Des
clignotements doubles indiquent que la batterie est chargée entre 50 et
75%. Des clignotements triples indiquent que la batterie est chargée à
plus de 75%. (Tous les niveaux de charge indiqués sont approximatifs.)
L’indicateur s'allume en continu lorsque la batterie est complètement
rechargée.
• Si vous avez introduit deux batteries, elles se chargent l’une après
l’autre (dans l’ordre).
Dans ce cas, un indicateur de charge rouge montre la progression du
chargement de la batterie installée en premier (ou de la batterie
installée sur le côté A, si vous avez installé les deux batteries avant
dans la douille de l’allume-cigare.) Lorsque l’indicateur commence à
rester allumé (la première batterie est alors chargée), le second
indicateur de charge s’allume pour indiquer que la seconde batterie
commence à être rechargée. Lorsque les deux batteries sont
complètement chargées, les deux indicateurs sont allumés de façon
continue.
• Pour vérifier la capacité restante d’une batterie, installer une seule
batterie sur l’adaptateur chargeur et vérifiez l’indicateur de charge.
4. Faites glisser la ou les batteries dans le sens opposé de la flèche et
retirer. Débranchez l’adaptateur chargeur (avant de mettre le moteur de la
voiture à l’arrêt).
•
Si vous devez arrêter le moteur de la voiture pendant que vous
rechargez une batterie, retirez d’abord la prise de la douille de l’allume-
cigare. Pour continuer la recharge de la batterie, mettez d’abord le
moteur en marche puis réinsérez la prise.
Des batteries peuvent être rechargées par une prise de courant domestique
en raccordant l'adaptateur secteur compact CA-560 à l'adaptateur-chargeur
au lieu du câble allume-cigare (Fig. 3).
Remarques:
• Le kit CR-560 ne peut être utilisé qu’avec des batteries de voiture à masse
négative de 12 ou 24 V.
• Sur certains types de véhicules, la fiche du câble allume-cigare ne pourra
pas être insérée en raison de la différence de formes et de dimensions de
la douille d’allume cigare.
• Afin d’éviter d’épuiser la batterie, utilisez le kit uniquement lorsque le moteur
de la voiture est en marche. Débranchez-le toujours avant de mettre le
moteur à l’arrêt.
• Ne laissez pas le moteur tourner et le kit en marche lorsque vous quittez la
voiture.
• Le kit peut perturber la réception radio AM et les communications
téléphoniques s'il est trop prés de l’antenne de voiture. Il peut aussi perturber
la lecture sur un camescope ou le fonctionnement d’un produit, si celui-ci
se trouve à moins de 10 cm.
• La recharge prendra 10 minutes environ si l’intérieur du véhicule est chaud
et une batterie de voiture de 24 volts est utilisée pour la recharge.
• La surface supérieure de l’adaptateur chargeur peut devenir chaude pendant
l’emploi. Il ne s’agit pas d’un dysfonctionnement.
• Si le fusible doit être remplacé, utilisez un fusible de même taille 125 V, 4 A
(En dehors des U.S.A, un fusible de 250 V, T 2,5 A peut être utilisé à la place.)
•
Ne démonter aucune pièce du kit (ou le coupleur DC), ne pas l’exposer à l’eau
et à des chocs ou vibrations, ou encore à la lumière directe du soleil. Eviter
d’exposer l’appareil à des températures supérieures à 60°C. Ne pas laisser
l’appareil à l’intérieur d’une voiture par temps chaud, par exemple, ou à
proximité d’un appareil dégageant de la chaleur. Ne pas recharger les batteires
à une température élevée (elles doivent être rechargées entre 0°C à 40°C).
• Ne pas ranger les batteries d’alimentation dans des endroits où les
températures sont supérieures à 60°C, cela peut causer une diminution de
leur performance.
• Ne jamais raccorder un produit non spécifié au adaptateur chargeur.
Fiche technique:
Véhicules utilisables: Véhicules avec batteries 12 ou 24V CC
à masse négative
Source d’alimentation CC 9,5/12–24V
Sortie nominale Mode adaptateur: 9,5 V, 1,5 A CC
Mode chargeur: 8,4 V, 2,5 A CC
Plage de température de
fonctionnement 0° à 40°C
Fusible 125 V, 4 A
Dimensions 93 × 36 × 71 mm
Poids 260 g (câbles compris)
Le poids et les dimensions sont approximatifs.
Sauf erreur et omissions.
Sous réserve de modifications sans préavis.
Merci pour l’achat de ce Kit Adaptateur chargeur/câble pour batterie de
voiture Canon CR-560.
Raccordez-le à la douille allume-cigare d’une voiture pour alimenter un
produit Canon ou charger des batteries au lithium-ion série BP-500.
Pour vérifier que votre produit peut être utilisé avec ce kit, prenez contact
avec la société des ventes Canon à l’adresse indiquée au dos du mode
d’emploi de votre produit.
Le kit CR-560 contient : • L’adaptateur chargeur CG-560
• Le câble pour batterie de voiture CB-560
• Un câble CC
De
Deutsch
Canon Ladegerät/Autobatterie-
Kabelsatz CR-560
ANLEITUNGEN
Stromversorgung über Zigarettenzünderbuchse:
1. Schließen Sie das Gleichstromkabel an die Gleichstrom-Eingangsbuchse
des Produkts an (Abb.1-q).
• Zur Lage der Buchse siehe Bedienungsanleitung des Produkts.
2. Schließen Sie das andere Ende des Gleichstromkabels an den
Ladeadapter an (Abb.1-w).
3. Schließen Sie das Autobatteriekabel an den Ladeadapter an (Abb.1-e).
4. Den Fahrzeugmotor starten und das Ladeadapterkabel in die
Zigarettenzünderbuchse stecken (Abb.1-r). Jetzt können Sie Ihren
Produkt einschalten.
Abtrennen des Netzadapters:
1. Das Produckt ausschalten.
2. Den Adapter vom Zigarettenzünder trennen (bevor Sie den
Fahrzeugmotor abstellen).
3. Das Autobatteriekabel vom Ladegerät trennen.
4. Das Gleichstromkabel vom Ladegerät trennen.
5. Das Gleichstromkabel vom Produkt trennen.
Aufladen von Akkus:
Sicherstellen, dass das Gleichstromkabel nicht an den Ladeadapter
angeschlossen ist. Andernfalls erfolgt kein Ladevorgang.
1. Das Fahrzeugbatteriekabel an den Ladeadapter anschließen (Abb.2-q).
2. Den Fahrzeugmotor starten und das Ladeadapterkabel in die
Zigarettenzünderbuchse stecken (Abb. 2-w).
3. Ein oder zwei Akkus in den Netzadapter setzen (Abb. 2-e).
• Richten Sie die Kante des Akkus mit der Dreiecksmarkierung am
Ladeadapter aus. Drücken Sie den Akku nach unten und schieben ihn
in Pfeilrichtung, bis er hörbar einrastet.
• Die blinkende Ladekontrolllampe informiert über den Ablauf des
Ladevorgangs. Einfaches Blinken in regelmäßigen Intervallen
bedeutet, dass das Batteriepack weniger als 50% geladen ist.
Doppelblinken in regelmäßigen Intervallen zeigt eine Ladung von 50 bis
75% an. Dreifaches Dauerblinken bedeutet, dass der Akku mehr als
75% geladen. (Alle Ladepegel sind Annäherungswerte.) Bei voll
geladenem Batteriepack leuchtet die Kontrolllampe kontinuierlich.
• Bei Ansetzen von zwei Akkus werden diese nacheinander geladen.
In diesem Fall zeigt eine rote Ladeanzeige an, dass der Ladevorgang
für den zuerst angebrachten Akku ausgeführt wird (oder für den Akku,
der an der Seite mit der Markierung A angebracht ist, wenn beide Akkus
vor dem Anschließen an die Zigarettenzünderbuchse angesetzt
wurden.) Sobald diese Kontrollampe kontinuierlich leuchtet (Akku voll
geladen), informiert das Blinken der zweiten Kontrolllampe über den
Ablauf des Ladevorgangs für den anderen Akku. Wenn beide Akkus voll
geladen sind, leuchten beide Kontrollampen kontinuierlich.
• Zum Prüfen der Restladung eines Akkus, schließen Sie diesen einzeln
an, als ob Sie ihn aufladen wollten. Die Ladekontrolllampe zeigt
hiernach die ungefähre Restladung an.
4.
Den (die) Akku(s) in die dem Pfeil entgegengesetzte Richtung schieben, und
entfernen. Den Netzadapter abtrennen (bevor der Fahrzeugmotor abgestellt wird).
• Wenn Sie während des Aufladens eines Akkus den Fahrzeugmotor
abstellen müssen, trennen Sie zuerst den Netzadapter von der
Zigarettenanzünderbuchse ab. Zum Fortsetzen des Ladevorgangs
stecken Sie den Stecker wieder ein, nachdem Sie den Fahrzeugmotor
wieder gestartet haben.
Sie können auch die Akkus mit Netzstrom laden, indem Sie das Kompakt-
Netz/Ladegerät CA-560 anstelle des Autobatteriekabels an das Netzteil und
eine Steckdose anschließen (Abb. 3).
Hinweise:
• Der CR-560 kann nur mit 12- oder 24-V-Autobatterien mit negativer Erdung
verwendet werden. Der Einsatz einer Autobatterie mit positiver Erdung kann
zu Funktionstörungen führen.
• Die Einsatzmöglichkeit des Autobatteriekabelsteckers hängt vom
Fahrzeugsmodell ab, da die Form und Abmessungen der
Zigarettenanzünderbuchse unterschiedlich sind.
• Der Fahrzeugmotor muss laufen, wenn der Netzadapter verwendet wird, um
zu vermeiden, dass die Fahrzeugsbatterie erschöpft wird. Den Adapter
trennen bevor der Fahrzeugmotor abgestellt wird.
• Nicht das Fahrzeug verlassen, während der Motor läuft und der Netzadapter
in Betrieb ist.
• Den Adapter nicht in der Nähe einer Fahrzeugantenne verwenden, weil
dadurch der Empfang von MW/LW-Rundfunksendungen sowie Gespräche
auf Handys gestört werden können. Es können auch Störungen bei
Wiedergabe auf einem Camcorder oder der Funktion eines Produkts
auftreten, wenn der Abstand geringer als 10 cm ist.
• Der Ladevorgang dauert ca. 10 Minuten länger, wenn das Fahrzeuginnere
warm ist, wenn in einem Fahrzeug mit 24-V-Autobatterie geladen wird.
• Der Netzadapter kann sich bei Betrieb erwärmen. Dies ist normal und keine
Fehlfunktion.
• Sollte die Sicherung ausgewechselt werden, verwenden Sie eine Sicherung
der selben Größe 125 V, 4 A. (Außer in den Vereinigten Staaten kann eine
Sicherung von 250 V, T 2,5 A an der Stelle der anderen verwendet werden.)
• Keinen Teil des Satzes zerlegen, nass werden lassen, Erschütterungen und
Stößen oder direkter Sonneneinstrahlung aussetzen. Den Adapter keinen
Temperaturen höher als 60 °C aussetzen. Den Adapter nicht in einem
geschlossenem Wagen an einem heißen Tag oder in der Nähe von
Heizkörpern lassen. Akkus nicht unter hohen Temperaturen aufladen (Akkus
müssen in einem Bereich von 0 °C bis 40 °C aufgeladen werden).
• Akkus nicht an Orten aufbewahren, wo die Temperaturen höher als 60 °C
sind, da es zu einer Verminderung der Akkuleistung führen kann.
•
Niemals ein hier nicht aufgeführtes Produkt an den Netzadapter anschließen.
Technische Daten:
Verwendung: In Kfz mit 12- oder 24-V-
Gleichstrom-Autobatterien mit negativer Masse.
Stromversorgung 9,5/12-24 V Gleichstrom
Nennausgangsleistung
9,5 V, 1,5 VA Gleichstrom (Betriebsart Netzteil)
8,4 V, 2,5 A Gleichstrom (Betriebsart Ladegerät)
Betriebstemperaturbereich 0 °C bis 40 °C
Sicherung 125 V, 4 A
Abmessungen 93 × 36 × 71 mm
Gewicht 260 g (einschließlich Kabel)
Gewicht und Abmessungen sind annähernde Werte.
Irrtümer und Auslassungen vorbehalten.
Technische Änderungen, auch ohne vorige Bekanntgabe, bleiben
vorbehalten.
Wir danken Ihnen für das Vertrauen, das Sie Canon mit dem Kauf des
Ladegerät/Autobatterie-Kabelsatzes CR-560 erwiesen haben. Schließen
Sie das Gerät an die Zigarettenanzünderbuchse im Fahrzeug an, um ein
Canon-Produkt mit Strom zu versorgen oder Lithiumionen-Akkus der Serie
BP-500 aufzuladen.
Zum Überprüfen, dass Ihr Produkt mit dem CR-560 verwendet werden kann,
wenden Sie sich an die Canon Verkaufstelle unter der Adresse, die auf der
Rückseite der Bedienungsanleitung Ihres Produkts angegeben ist.
Der Satz CR-560 enthält folgende Teile: • Ladegerät CG-560
• Autobatterie-Kabel CB-560
• Gleichstromkabel
Es
Español
Juego de adaptador de carga/cable para
batería de coche CR-560 de Canon
INSTRUCCIONES
Para alimentar su producto de un enchufe del
encendedor de cigarrillos:
1. Conecte el cable de CC en el terminal de CC de su producto (Fig. 1-q).
•Vea el manual de instrucciones del producto para la posición del
terminal.
2.
Conecte la otra punta del cable de CC en el adaptador de carga (Fig. 1-w).
3. Conecte el cable para batería de coche al adaptador de carga (Fig. 1-e).
4.
Arranque el motor del coche y enchufe el adaptador de carga en el enchufe
del encendedor de cigarrillos (Fig. 1-r). Puede activar ahora su producto.
Para desconectar el kit:
1. Desactive el producto.
2. Desenchufe el adaptador de carga del enchufe del encendedor de
cigarrillo (antes de apagar el motor del coche).
3. Desconecte el cable para batería de coche del adaptador de carga.
4. Desconecte el cable de CC del adaptador de carga.
5. Desconecte el cable de CC del producto.
Para cargar la batería:
Asegúrese de que el cable de CC no está conectado al adaptador de
carga. La batería no se carga si el cable de CC está conectado en el
adaptador de carga.
1.
Conecte el cable para batería de coche en el adaptador de carga (Fig. 2-q).
2. Arranque el motor del coche y enchufe el adaptador de carga en el
enchufe del encendedor de cigarrillos (Fig. 2-w)
3. Deslice una o dos baterías en el adaptador de carga (Fig. 2-e).
• Alinee una o dos baterías con el triángulo en el adaptador de carga.
Presione la batería y deslice en el sentido de la flecha hasta que entre
en su lugar con un chasquido.
• Uno de los dos indicadores de carga empieza a destellar para mostrar
el avance de la carga. Un destello simple significa que la batería tiene
una carga de menos de 50%. Un destello doble significa que se ha
cargado entre el 50-75%. Un destello triple significa que tiene una
carga de más del 75%. (Todos los niveles de carga son aproximados.)
El indicador se enciende cuando la batería está totalmente cargado.
• Si se colocan dos baterías, se cargan una después de la otra (es decir,
secuencialmente).
En este caso, un indicador de carga rojo muestra el avance de la carga
para la batería instalada primero (o la batería instalada en el lado con la
etiqueta A, si se instalaron ambas antes de enchufar el adaptador de
carga en el enchufe del encendedor de cigarrillos.)
Cuando el indicador queda firmemente encendido (la primera batería
está totalmente cargada), el segundo indicador de carga muestra el
avance de la carga de la otra batería. Cuando ambas baterías están
totalmente cargadas, ambos indicadores se encienden
completamente.
• Para verificar la carga remanente de un paquete de batería, instale un
solo paquete de batería en el adaptador de carga y verifique el
indicador de carga.
4. Deslice la batería en el sentido opuesto de la flecha y desmonte.
Desenchufe el adaptador de carga (antes de apagar el motor del coche).
•
Si debe apagar el motor del coche cuando está cargando una batería,
saque el tapón del enchufe del encendedor de cigarrillos. Para
continuar la carga, vuelva a colocar el tapón después de volver a poner
en marcha el motor del coche.
También puede cargar la batería con la electricidad de un tomacorriente,
conectando el adaptador eléctrico compacto CA-560 en el adaptador de
carga en lugar del cable para batería de coche (Fig. 3).
Notas:
• El kit del CR-560 sólo puede utilizarse con baterías de coche de 12 ó 24 V
con tierra negativa.
• Los enchufes de encendedores de cigarrillos para coches tienen distintas
formas y dimensiones y el enchufes de cable para batería de coche puede
no enchufar en todos los tipos.
•
Para evitar que la batería del coche se agote, utilice el kit sólo cuando el motor
del coche está en marcha. Desenchufe siempre antes de apagar el motor.
•
No abandone el coche con el motor en marcha y cuando se está utilizando el kit.
•
El kit puede provocar interferencias en las transmisiones de radio AM y los
teléfonos celulares si se utilizan demasiado cerca de la antena del coche.
También puede provocar interferencias en la reproducción de una
videocámara o el funcionamiento de un producto, si está más cerca de 10 cm.
• La carga demorará unos 10 minutos más cuando el interior del vehículo está
caliente, cuando se carga de un vehículo con una batería de CC de 24 V.
• La superficie superior del adaptador de coche puede calentarse durante el
uso. Esto no es una avería.
• Si fuera necesario cambiar el fusible, utilice un fusible del mismo tamaño,
de 125 V, 4 A. (Fuera de los EE.UU. puede utilizar un fusible de 250 V, T,25
A en su lugar.)
•
No desarme ninguna parte del kit, no lo moje ni lo exponga a golpes o vibración
o a la luz directa del sol. Evite exponerlo a temperaturas superiores a los 60°C.
No deje en un coche cerrado cuando hace calor, por ejemplo, o cerca de un
equipo de calefacción. No cargue la batería a altas temperaturas (los
paquetes de batería deben cargarse dentro de una gama de 0-40°C.
• No guarde los paquetes de batería a temperaturas de más de 60°C ya que
sus prestaciones pueden deteriorarse.
• Nunca conecte un producto no especificado en el adaptador de carga.
Especificaciones:
Vehículos aplicables: Vehículos con baterías de CC de 12 ó 24 V con
tierra negativa
Alimentación eléctrica CC de 9,5/12-24 V
Salida de régimen Modo de adaptador: CC de 9,5 V, 1,5 A
(nominal) Modo de cargador: CC de 8,4 V, 2,5 A (BATT.)
Gama de temperaturas 0°-40°C
de funcionamiento
Fusible 125 V, 4A
(CR-560: 250 V, T 2,5A también compatible)
Dimensiones
(An. × Al. × Prof.) 93 × 36 × 71 mm
Peso 260 g (incluyendo cables)
El peso y las dimensiones son aproximados.
Se exceptúan el peso y dimensiones.
Sujeto a cambios sin previo aviso.
Muchas gracias por su compara del juego de adaptador de carga/cable para
batería de coche CR-560 de Canon. Conéctelo a un enchufe del encendedor
de cigarrillo del coche para alimentar un producto de Canon o cargue la
batería de litio de la serie BP-500. Para verificar si su producto puede
utilizarse con este kit, llame a su empresa de ventas de Canon en la
dirección indicada en la parte trasera del manual de instrucciones del
producto.
Su kit CR-560 incluye lo siguiente: • Adaptador de carga CG-560
• Cable para batería de coche CB-560
• Cable de CC
Kit adattatore di ricarica/cavo batteria
auto CR-560 Canon
ISTRUZIONI
Italiano
I
Alimentazione dalla presa accendisigari:
1. Collegate il cavo CC alla presa CC del prodotto del morsetto (Fig. 1-q).
• Per identificare la posizione del morsetto, fate riferimento al manuale
d’istruzioni del prodotto.
2. Collegate l’altra estremità del cavo CC all’adattatore di ricarica (Fig. 1-w).
3. Collegate il cavo della batteria auto all’adattatore di ricarica (Fig. 1-e).
4.
Avviate il motore dell’auto, quindi inserite la spina dell’adattatore di ricarica
nella presa accendisigari (Fig. 1-r). Ora sarà possibile attivare il prodotto.
Scollegamento del kit:
1. Spegnere l’apparecchio.
2. Disinserite l’adattatore di ricarica dalla presa accendisigari (prima di
spegnere il motore dell’auto).
3. Scollegate il cavo della batteria auto all’adattatore di ricarica.
4. Scollegate il cavo CC dall’adattatore di ricarica.
5. Scollegate il cavo CC dall’apparecchio.
Ricarica del gruppo batteria:
Verificate che il cavo CC non sia collegato all’adattatore di ricarica. In
caso contrario, il/i gruppo/i batteria non potrà/potranno essere ricaricato/i.
1. Collegate il cavo della batteria auto all’adattatore di ricarica (Fig. 2-q).
2. Avviate il motore dell’auto, quindi inserite la spina dell’adattatore di
ricarica nella presa accendisigari. (Fig.2-w)
3. Collegate uno o due gruppi batteria all’adattatore di ricarica (Fig.2-e).
•
Allineate il bordo del gruppo batteria al triangolo presente sull’adattatore
di ricarica. Premete verso il basso il gruppo batteria, quindi fatelo
scorrere in direzione della freccia, finché scatti in posizione.
• Una delle due spie luminose di ricarica inizierà a lampeggiare, ad
indicazione della fase di ricarica. Un singolo lampeggio indica che il
livello della ricarica è inferiore al 50%. Il doppio lampeggio indica che il
livello della ricarica è compreso tra 50% e 75%. Il triplo lampeggio indica
che il livello della ricarica è superiore al 75%. (Tutti i livelli di ricarica
sono approssimativi). Quando la ricarica è stata completata, la spia
luminosa rimane a luce fissa.
• Collegando due gruppi batteria, essi verranno ricaricati uno dopo l’altro
(cioè in sequenza).
In tal caso, una spia luminosa di colore rosso indicherà la fase di ricarica
del gruppo batteria collegato per primo (o del gruppo batteria collegato
al lato indicato con A, qualora abbiate collegato entrambi i gruppi
batteria prima di aver inserito la spina dell’adattatore di ricarica
nell’accendisigari). Quando la spia luminosa rimane a luce fissa (cioè la
prima batteria è stata ricaricata), la seconda spia luminosa indicherà la
fase di ricarica dell’altro gruppo batteria. Nel momento in cui entrambi i
gruppi batteria saranno stati ricaricati, entrambe le spie luminose
rimarranno a luce fissa.
• Per verificare lo stato di ricarica del gruppo batterie, inserite la spina
dell’adattatore e collegate un solo gruppo batteria, proprio come se
doveste effettuarne la ricarica.
4. Fate scorrere i/il gruppo/i batterie nella direzione opposta alla freccia e
rimuovetelo/i. Prima di spegnere il motore, disinserite sempre la spina
dell’adattatore di ricarica.
•
Nel caso in cui dobbiate spegnere il motore dell’auto durante la fase di
ricarica, innanzitutto rimuovete la spina dell’adattatore dalla presa
accendisigari. Per ripristinare la ricarica, reinserite la spina dopo aver
riacceso l’auto.
E’ anche possibile ricaricare i gruppi batteria mediante una presa elettrica
domestica collegando l’adattatore compatto di ricarica CA-560 all’adattatore
di ricarice piuttosto che al cavo batteria auto (Fig. 3).
Note:
• E’ possibile utilizzare il kit CR-560 solamente con batterie auto con
messa a terra negativa da 12 o 24 V.
• Poiché le prese accendisigaro variano per forma e dimensioni, è
possibile che il cavo batteria auto non sia sempre idoneo.
• Per evitare che la batteria auto si scarichi, utilizzate il kit solamente a
motore accesso. Prima di spegnere il motore, disinserite sempre la
spina dell’adattatore.
• Non lasciate l’auto con il motore acceso ed il kit in funzione.
• Se troppo vicino all’antenna dell’auto, il kit potrebbe creare interferenze
alle trasmissioni radio AM o ai telefoni cellulari. Se la distanza è inferiore
a 10 cm, potrebbe anche interferire con l’attività di riproduzione della
videocamera o con il buon funzionamento del prodotto.
• Se la temperatura interna all’auto è elevata o se l’auto è dotata di
batteria da 24 V CC, la ricarica potrebbe durare circa 10 minuti in più.
• Durante l’utilizzo, la superficie dell’adattatore di ricarica potrebbe
surriscaldarsi. Non si tratta di un malfunzionamento.
• Dovendo sostituire i fusibili, utilizzate fusibili di ricambio aventi la stessa
dimensione, 125 V, 4 A (all’esterno degli U.S.A., è possibile utilizzare
anche fusibili a 250 V, T 2.5 A).
• Non smontate alcuna parte del kit, non bagnatelo né esponetelo a
scosse, vibrazioni, o alla luce diretta del sole. Evitate di esporlo a
temperature superiori ai 60° C. Evitate di lasciarlo, ad esempio,
all’interno dell’auto durante i mesi caldi, oppure in prossimità di fonti
di calore. Non ricaricate i gruppi batteria in condizioni di temperatura
elevata (rispettate il campo di 0°C-40°C.
• Per evitare che le performance subiscano peggioramenti, non
conservate i gruppi batteria a temperature superiori ai 60°C.
• Non collegate all’adattatore di ricarica prodotti non specificati.
Specifiche:
Veicoli idonei: veicoli con alimentazione batterie con messa a
terra negativa pari a 12 o 24 V.
Alimentazione CC 9,5/12–24 V
Uscita nominale Modalità adattatore: 9,5 V, 1,5 A CC
Modalità di ricarica: 8,4 V, 2,5 A (BATT.) CC
Gamma temperature 0°– 40°C
d’esercizio
Fusibile 125 V, 4 A
(CR-560: compatibile anche 250 V, T 2,5 A)
Dimensioni (L × A × D) 93 × 36 × 71 mm
Peso: 260 g (cavi inclusi)
I valori relativi al peso ed alle dimensioni sono approssimativi.
Salvo errori ed omissioni.
Soggetto a modifiche senza preavviso.
Grazie per aver acquistato il kit adattatore di ricarica/cavo batteria auto
CR-560 Canon. Collegato ad una presa accendisigari, è in grado di
alimentare i prodotti Canon o ricaricare i gruppi batteria al litio Serie BP-500.
Per ulteriori informazioni circa la compatibilità del Vostro prodotto con questo
kit, contattate la società commerciale Canon all’indirizzo riportato sul retro
del manuale d’istruzioni della videocamera.
Il kit CR-560 include i seguenti prodotti: • Adattatore di ricarica CG-560
• Cavo batteria auto CB-560
• Cavo CC
C
•
•
•
•
•
•
•
•
•
•
•
•
•
•
•
•
•
•
•
•
CANON INC.
CANON U.S.A., INC. NEW JERSEY OFFICE
100 Jamesburg Road, Jamesburg, NJ 08831 USA
CANON EUROPA N.V.
P.O. Box 2262, 1180 EG Amstelveen, the Netherlands
PRINTED IN JAPAN
IMPRIME AU JAPON
PUB. DIM-323ic
CANON-INC. 2002
DY8-9120-223-000
DC IN
9.5V
CHARGE
DC Cable
Un câble CC
GleichstromkabelGleichstromkabel
Cable de CC
Cavo CC
1.
q
3.
w
To car's cigarette lighter socket
à la prise de l'allume-cigarettes
Zur Zigarettenanzünderbuchse
Al enchufe del encendedor de
cigarrillos del coche
Presa accendisigari dell’auto
q
e
2.
To car's cigarette lighter socket
à la prise de l'allume-cigarettes
Zur Zigarettenanzünderbuchse
Al enchufe del encendedor de
cigarrillos del coche
Presa accendisigari dell’auto
e
w
r
CG-560
CB-560
-
 1
1
-
 2
2


Canon ZR30MC Manuale del proprietario
- Tipo
- Manuale del proprietario
- Questo manuale è adatto anche per
in altre lingue
- English: Canon ZR30MC Owner's manual
- français: Canon ZR30MC Le manuel du propriétaire
- español: Canon ZR30MC El manual del propietario
- Deutsch: Canon ZR30MC Bedienungsanleitung
- 日本語: Canon ZR30MC 取扱説明書
Documenti correlati
-
Canon ZR70MC Manuale utente
-
Canon XL1S Manuale del proprietario
-
-
-
-
-
-
Canon CBC-NB2 Manuale utente
-
-
