TFA ZENO 35.1163.01 Manuale utente
- Categoria
- Sveglie
- Tipo
- Manuale utente

64
Estación meteorológica inalámbrica
Estas instrucciones o extractos de las mismas no pueden ser publicados sin la autorización de la TFA Dostmann. Los datos técnicos de este producto
corresponden al estado en el momento de la impresión y pueden ser modificados sin previo aviso. Los actuales datos técnicos e informaciones sobre su
producto los puede encontrar bajo el número de artículo en nuestra página web.
Declaración UE de conformidad
Por la presente, TFA Dostmann declara que el tipo de equipo radioeléctrico 35.1163 es conforme con la Directiva 2014/53/UE. El texto completo de la
declaración UE de conformidad está disponible en la dirección Internet siguiente: www.tfa-dostmann.de/service/downloads/ce
www.tfa-dostmann.de
E-Mail: [email protected]
TFA Dostmann GmbH & Co.KG, Zum Ottersberg 12, 97877 Wertheim, Alemania 08/21
Bedienungsanleitung
Operating Instructions
Mode d’emploi
Istruzioni per l’uso
Gebruiksaanwiijzing
Instrucciones de uso
Kat. Nr. 35.1163.01
Instruction manuals
www.tfa-dostmann.de/en/service/downloads/instruction-manuals
TFA_No. 35.1163_Anleitung 28.08.2021 9:18 Uhr Seite 1

32
k
Vielen Dank, dass Sie sich für dieses
Gerät aus dem Hause TFA entschieden
haben.
Bevor Sie mit dem Gerät arbeiten
•
Lesen Sie sich bitte die
Bedienungsanleitung genau
durch.
Die Bedienungsanleitung liegt dem
Gerät bei oder zum Download unter
www.tfa-dostmann.de/service/
downloads/anleitungen
•
Verwenden Sie das Gerät nicht
anders, als in der Anleitung darge-
stellt wird.
•
Durch die Beachtung der Bedie-
nungsanleitung vermeiden Sie auch
Beschädigungen des Gerätes und
die Gefährdung Ihrer gesetzlichen
Mängelrechte durch Fehlgebrauch.
Für Schäden, die aus Nichtbeach-
tung dieser Bedienungsanleitung
verursacht werden, übernehmen wir
keine Haftung.
•
Beachten Sie besonders die
Sicherheitshinweise!
•
Bewahren Sie die Bedienungsan-
leitung gut auf!
t
Thank you for choosing this instrument
from TFA.
Before you use this product
•
Please make sure you read
the instruction manual
carefully.
•
The operating instructions are
enclosed with the device or can be
downloaded at
www.tfa-dostmann.de/en/
service/downloads/instruction-
manuals
•
This product should only be used as
described within these instructions.
•
Following and respecting the
instructions in your manual will pre-
vent damage to your instrument and
loss of your statutory rights arising
from defects due to incorrect use.
We shall not be liable for any dama-
ge occurring as a result of non-follo-
wing of these instructions.
•
Please take particular note of the
safety advice!
•
Please keep this instruction
manual safe for future reference.
p
Nous vous remercions d'avoir choisi
l'appareil de la société TFA.
Avant d'utiliser votre appareil
•
Veuillez lire attentivement le
mode d'emploi.
•
Le mode d'emploi est joint à l'appa-
reil ou peut être téléchargé à l'adres-
se suivante
www.tfa-dostmann.de/en/
service/downloads/instruction-
manuals
•
N'utilisez jamais l’appareil à d'autres
fins que celles décrites dans le pré-
sent mode d'emploi.
•
En respectant ce mode d'emploi,
vous éviterez d'endommager votre
appareil et de perdre vos droits
légaux en cas de défaut si celui-ci
résulte d’une utilisation non-confor-
me. Nous n'assumons aucune
responsabilité pour des dommages
qui auraient été causés par le non-
respect du présent mode d'emploi.
•
Suivez bien toutes les consignes
de sécurité !
•
Conservez soigneusement le
mode d'emploi !
C
Vi ringraziamo per aver scelto l'appa-
recchio della TFA.
Prima di utilizzare l'apparecchio
•
Leggete attentamente le
istruzioni per l'uso.
•
Le istruzioni per l'uso sono allegate
all'apparecchio o possono essere
scaricate da
www.tfa-dostmann.de/en/
service/downloads/instruction-
manuals
•
Non utilizzate il prodotto in maniera
diversa da quanto descritto in que-
ste istruzioni.
•
Seguendo le istruzioni per l'uso, evi-
terete anche di danneggiare il pro-
dotto e di pregiudicare, a causa di
un utilizzo scorretto, i diritti del con-
sumatore che vi spettano per legge.
Decliniamo ogni responsabilità per i
danni derivanti dal mancato rispetto
delle presenti istruzioni per l'uso.
•
Prestate particolare attenzione
alle misure di sicurezza!
•
Conservate con cura le istruzioni
per l'uso.
N
Hartelijk dank dat u voor dit apparaat
van TFA hebt gekozen.
Voordat u met het apparaat gaat
werken
•
Leest de gebruiksaanwijzing
aandachtig door.
•
De gebruiksaanwijzing is bij het
apparaat gevoegd of kan worden
gedownload van
www.tfa-dostmann.de/en/
service/downloads/instruction-
manuals
•
Gebruik het product niet anders dan
in deze handleiding is aangegeven.
•
Door rekening te houden met wat er
in de handleiding staat, vermijdt u
ook beschadigingen van het product
en riskeert u niet dat uw wettelijke
rechten door verkeerd gebruik niet
meer gelden. Voor schade die wordt
veroorzaakt doordat u geen reke-
ning houdt met de handleiding aan-
vaarden wij geen aansprakelijkheid.
•
Volg met name de veiligheidsin-
structies op!
•
Deze gebruiksaanwijzing goed
bewaren a.u.b.!
m
Muchas gracias por haber adquirido
este dispositivo de TFA.
Antes de utilizar el dispositivo
•
Lea detenidamente las
instrucciones de uso.
•
Las instrucciones de uso se adjun-
tan al dispositivo o pueden descar-
garse de
www.tfa-dostmann.de/en/
service/downloads/instruction-
manuals
•
No emplee el dispositivo de modo
distinto al especificado en estas
instrucciones.
•
Si sigue las instrucciones de uso,
evitará que se produzcan daños en
el dispositivo y no comprometerá a
sus derechos por vicios, previstos
legalmente debido a un uso incor-
recto. No asumimos responsabilidad
alguna por los daños originados por
el incumplimiento de estas instruc-
ciones de uso.
•
Tenga en cuenta ante todo las
advertencias de seguridad.
•
Guarde estas instrucciones de
uso en un sitio seguro.
k
Bedienungsanleitung
t
Instruction manual
p
Mode d’emploi
C
Istruzioni per l'uso
N
Gebruiksaanwijzing
m
Instrucciones de uso
j
Návod k použití
U
Bruksanvisning
P
Instrukcja obsługi
k
Bedienungsanleitung
t
Instruction manual
p
Mode d’emploi
C
Istruzioni per l'uso
N
Gebruiksaanwijzing
m
Instrucciones de uso
j
Návod k použití
U
Bruksanvisning
P
Instrukcja obsługi
TFA_No. 35.1163_Anleitung 28.08.2021 9:18 Uhr Seite 2

54
j
Děkujeme, že jste si vybrali výrobek
značky TFA.
Před použitím
•
Následující instrukce k
použití čtěte velmi pozorně.
•
Návod k použití je přiložen u zařízení
nebo je možné si ho stáhnout z
www.tfa-dostmann.de/en/
service/downloads/instruction-
manuals
•
Tento produkt je možné používat
pouze tak jak je popsáno v návodu k
použití.
•
Pozorným přečtením a dodržením
instrukcí obsažených v tomto
manuálu předejdete poškození
přístroje a ztrátě práv vyplývající z
poškození vlivem nesprávného
použití. Neneseme zodpovědnost za
jakékoliv poškození přístroje
způsobené v důsledku nenásledová-
ní instrukcí obsažených v tomto
manuálu.
•
Dbejte zvýšené pozornosti bez-
pečnostním pokynům.
•
Uchovejte si manuál pro případ
budoucího použití.
U
Tack för att du väljer detta instrument
från TFA.
Innan du använder den här produkten
•
Var god se till att du läser
igenom bruksanvisningen
noggrant.
•
Bruksanvisningen följer med enhe-
ten eller kan laddas ner på
www.tfa-dostmann.de/en/
service/downloads/instruction-
manuals
•
Denna produkt ska endast användas
enligt beskrivningen inom dessa
anvisningar.
•
Att följa och respektera anvisningar-
na i din manual kommer att förhindra
skador på ditt instrument och förlust
av dina lagstadgade rättigheter som
uppstår på grund av felaktig använd-
ning. Vi ska inte hållas ansvariga för
eventuella skador som uppstår till
följd av att inte dessa instruktioner
efterföljs.
•
Vänligen ta särskild hänsyn till
säkerhetsråden!
•
Vänligen förvara denna instruktions-
bok säkert för framtida referens.
P
Dziękujemy, że zdecydowali się
Państwo na to urządzenie firmy TFA.
Zanim zaczniecie Państwo
użytkować to urządzenie
•
Prosimy zapoznać się
dokładnie z instrukcją
obsługi.
•
Instrukcja obsługi jest załączona do
urządzenia lub może zostać pobrana
ze strony:
www.tfa-dostmann.de/en/service/
downloads/instruction-manuals
•
Nie należy używać urządzenia inaczej,
niż zostało to przedstawione w
instrukcji.
•
Przestrzegając instrukcji unikniecie
Państwo uszkodzeń urządzenia oraz
zagrożenia utraty swoich ustawowych
praw konsumenckich poprzez niepra-
widłowe użytkowanie. Nie ponosimy
odpowiedzialności za jakiekolwiek
szkody powstałe w wyniku
nieprzestrzegania tych instrukcji.
•
Przestrzegajcie szczególnie
zasad bezpieczeństwa !
•
Zachowujcie instrukcję obsługi w
dobrym stanie !
k
Bedienungsanleitung
t
Instruction manual
p
Mode d’emploi
C
Istruzioni per l'uso
N
Gebruiksaanwijzing
m
Instrucciones de uso
j
Návod k použití
U
Bruksanvisning
P
Instrukcja obsługi
Fig. 1
A 3A 3
A 4
A 16 A 5
A 6
A 8
A 7
A 9
A 1 A 2
A 11
A 12
A 13A 13
A 14 A 10
A 15
A 12 A 10
TFA_No. 35.1163_Anleitung 28.08.2021 9:18 Uhr Seite 3

76
Fig. 2 Fig. 3
C 1
B 1 B 2 B 3 B 4 B 5
C 2C 3
D 6
D 7
D 3D 2
D 5
D 4D 1
D 8
TFA_No. 35.1163_Anleitung 28.08.2021 9:18 Uhr Seite 4

98
Funk-Wetterstation
1. Lieferumfang
• Funk-Wetterstation (Basisstation)
• Temperatursender (Kat.-Nr.: 30.3248.02)
• Bedienungsanleitung
2. Einsatzbereich und alle Vorteile Ihres neuen Gerätes auf einen Blick
• Funkuhr mit großer Anzeige
• Außentemperatur über kabellosen Funksender (433 MHz), Reichweite bis 100 m (Freifeld)
• Innentemperatur
• Permanente Anzeige der Höchst- und Tiefsttemperaturen
• Wettervorhersage mit Symbolen und Luftdrucktendenz
• Weckalarm mit Schlummerfunktion
• Datumsanzeige
• Manuelle Einstellmöglichkeit der Uhrzeit und Zeitzone
• Zum Aufstellen oder an die Wand hängen
• Optional: Erweiterbar auf bis zu 3 Temperatursender (im Handel separat erhältlich), auch zur Temperaturkontrolle von ent-
fernten Räumen, z.B. Kinderzimmer, Kellerraum
3. Sicherheitshinweise
• Das Produkt ist ausschließlich für den oben beschriebenen Einsatzbereich geeignet.
WARNUNG
• Halten Sie die Geräte und die Batterien außerhalb der Reichweite von Kindern.
• Kleinteile können von Kindern (unter drei Jahren) verschluckt werden.
• Batterien enthalten gesundheitsschädliche Säuren und können bei Verschlucken lebensgefährlich sein. Wurde eine Batterie
verschluckt, kann dies innerhalb von 2 Stunden zu schweren inneren Verätzungen und zum Tode führen. Wenn Sie vermu-
ten, eine Batterie könnte verschluckt oder anderweitig in den Körper gelangt sein, nehmen Sie sofort medizinische Hilfe in
Anspruch.
• Batterien nicht ins Feuer werfen, kurzschließen, auseinandernehmen oder aufladen. Explosionsgefahr!
• Um ein Auslaufen der Batterien zu vermeiden, sollten schwache Batterien möglichst schnell ausgetauscht werden. Achten
Sie auf die richtige Polarität beim Einlegen der Batterien. Verwenden Sie nie gleichzeitig alte und neue Batterien oder Batte-
rien unterschiedlichen Typs. Entfernen Sie die Batterien, wenn Sie das Gerät längere Zeit nicht verwenden. Beim Hantieren
mit ausgelaufenen Batterien chemikalienbeständige Schutzhandschuhe und Schutzbrille tragen!
Funk-Wetterstation
ACHTUNG
• Das eigenmächtige Reparieren, Umbauen oder Verändern des Gerätes ist nicht gestattet.
• Setzen Sie das Gerät keinen extremen Temperaturen, Vibrationen und Erschütterungen aus.
• Reinigen Sie das Gerät mit einem weichen, leicht feuchten Tuch. Keine Scheuer- oder Lösungsmittel verwenden!
• Die Basisstation ist nur für den Betrieb in Innenräumen geeignet. Vor Feuchtigkeit schützen!
• Der Sender ist spritzwassergeschützt, aber nicht wasserdicht.
4. Bestandteile
Basisstation (Empfänger)
A: LCD-Anzeige (Fig. 1):
A 1: Zeitzone A 2: DCF Empfangssignal
A 3: Uhrzeit/Datum A 4: Snooze-Symbol
A 5: Alarmsymbol A 6: Empfangssignal Sender
A 7: Kanalnummer A 8: Batteriesymbol für den Sender
A 9: Symbol automatischer Kanalwechsel A 10 Höchstwert (MAX)
A 11: Außentemperatur A 12: Tiefstwert (MIN)
A 13: Luftdrucktendenz A 14: Wettersymbol
A 15: Innentemperatur A 16: Batteriesymbol für die Basisstation
B: Tasten (Fig. 2):
B 1: MODE Taste B 2: CHANNEL Taste
B 3: ALARM Taste B 4: UP/MAX/MIN Taste
B 5: DOWN/RCC Taste
C: Gehäuse (Fig. 2):
C 1: Wandaufhängung C 2: Batteriefach
C 3: Ständer (ausklappbar)
D: Außensender (Fig. 3):
D 1: Übertragungsanzeige LED D 2: Sendesymbol
D 3: Außentemperatur D 4: Kanalnummer
D 5: Batteriesymbol für den Sender D 6: Wandaufhängung
D 7: Schiebeschalter Kanal 1,2,3 D 8: Batteriefach
TFA_No. 35.1163_Anleitung 28.08.2021 9:18 Uhr Seite 5

1110
Funk-Wetterstation
5. Inbetriebnahme
5.1 Batterien einlegen
• Entfernen Sie die Schutzfolie vom Display.
• Legen Sie die Basisstation und den Außensender in einem Abstand von ca. 1,5 Metern voneinander auf einen Tisch. Ver-
meiden Sie die Nähe zu möglichen Störquellen (elektronische Geräte und Funkanlagen).
• Öffnen Sie das Batteriefach der Basisstation und legen Sie zwei neue Batterien 1,5 V AA polrichtig ein.
• Ein Signalton ertönt und alle LCD-Segmente werden kurz angezeigt. Die Innentemperatur mit Höchst- und Tiefstwert
erscheint auf dem Display.
• Schließen Sie den Batteriedeckel wieder.
• Öffnen Sie das Batteriefach des Außensenders und legen Sie zwei neue Batterien 1,5 V AAA polrichtig ein. Der Schiebe-
schalter ist auf Kanal 1 eingestellt.
• Das Kontrolllicht leuchtet kurz auf. Die Außentemperatur wird angezeigt. Schließen Sie den Batteriedeckel wieder.
5.2 Empfang der Außenwerte
• Die Basisstation versucht nun 3 Minuten lang, die Außentemperatur zu empfangen und das Empfangssymbol blinkt.
• Wird die Außentemperatur nicht empfangen, bleibt „- -. -” auf dem Display der Basisstation stehen. Prüfen Sie die Batterien
und starten Sie einen weiteren Versuch.
• Sie können die Sendersuche zu einem späteren Zeitpunkt auch manuell starten (z.B. bei Verlust des Senders oder Batterie-
wechsel). Halten Sie die CHANNEL Taste auf der Basisstation für zwei Sekunden gedrückt. Der registrierte Sender (Kanal)
wird gelöscht und „- -. -” erscheint auf dem Display. Bei der Sendersuche werden automatisch auch die maximalen und
minimalen Werte gelöscht.
5.3 Empfang der Funkzeit
• Die Uhr versucht nun, das Funksignal zu empfangen und das DCF-Empfangssymbol blinkt. Wenn der Zeitcode nach einigen
Minuten empfangen wurde, werden die funkgesteuerte Zeit und das DCF-Empfangssymbol ständig im Display angezeigt.
• Ist kein Funkempfang erfolgt, können Sie die Initialisierung auch manuell starten. Halten Sie die DOWN/RCC Taste für zwei
Sekunden gedrückt.
• Das DCF-Empfangssymbol blinkt.
• Unterbrechen Sie den Empfangsversuch, indem Sie die DOWN/RCC Taste noch einmal für zwei Sekunden gedrückt halten.
Das DCF-Empfangssymbol verschwindet.
• Der DCF-Signalempfang findet täglich um 1:00, 2:00, 3:00, 4:00 und 5:00 Uhr morgens statt.
• Es gibt drei verschiedene Empfangszustände:
blinkt – Empfang aktiv
bleibt stehen – Empfang erfolgreich
verschwindet – kein Empfang
Funk-Wetterstation
• Falls die Funkuhr kein DCF-Funksignal empfangen kann (z.B. wegen Störungen, Übertragungsdistanz, etc.), kann die Zeit
manuell eingestellt werden. Die Uhr arbeitet dann wie eine normale Quarz-Uhr (siehe „Manuelle Einstellungen”).
5.4 Hinweis: Empfang der Funkzeit
• Die Zeitübertragung erfolgt von einer Atomuhr in der Nähe von Frankfurt am Main durch ein DCF-77 (77,5 kHz) Frequenzsi-
gnal mit einer Reichweite von ca. 1.500 km. Ihre Funkuhr empfängt das Signal, wandelt es um und zeigt immer die exakte
Zeit an. Auch die Umstellung von Sommer- und Winterzeit erfolgt automatisch.
• Nachts sind die atmosphärischen Störungen meist geringer. Ein einziger Empfang pro Tag genügt, um die Genauigkeit
(±1 Sekunde) zu gewährleisten. In Extremfällen wird empfohlen, das Gerät in Fensternähe zu platzieren.
6. Bedienung
• Das Gerät verlässt automatisch den Einstellmodus, wenn länger als 15 Sekunden keine Taste gedrückt wird.
• Halten Sie die UP/MAX/MIN oder DOWN/RCC Taste im Einstellmodus gedrückt, gelangen Sie in den Schnelllauf.
6.1 Manuelle Einstellungen
• Drücken Sie die MODE Taste und halten Sie diese für zwei Sekunden gedrückt, um in den Einstellmodus zu gelangen.
• Der erste einstellbare Wert blinkt im Display.
• Wählen Sie mit der UP/MAX/MIN oder DOWN/RCC Taste die gewünschte Einstellung, solange die Anzeige blinkt.
• Durch Drücken der MODE Taste bestätigen Sie die Einstellung und gelangen zum nächsten Wert.
• Die Reihenfolge ist wie folgt:
– Jahr, Monat, Datum
– Stunden, Minuten
– Zeitzone +12/-12 (Voreinstellung: ZONE 00)
– DCF Funkempfang ON/OFF (Voreinstellung: ON)
6.1.1 Einstellung der Zeitzone
• Im Einstellungsmodus können Sie eine Zeitzonenkorrektur (+12/-12) vornehmen.
• Die Zeitzonenkorrektur wird benötigt, wenn das DCF-Funksignal empfangen werden kann, die Zeitzone sich aber von der
funkgesteuerten Zeit unterscheidet (z.B. +1 = eine Stunde später).
6.1.2 DCF Empfang
• Standardgemäß ist der DCF-Empfang aktiviert (ON) und nach erfolgreichem Empfang des DCF-Funksignals ist keine manu-
elle Zeiteinstellung erforderlich.
• Bei deaktiviertem Empfang (OFF) müssen Sie die Uhrzeit und das Datum manuell einstellen.
• Ist der DCF-Funkuhrempfang aktiviert, wird bei erfolgreichem Empfang die manuell eingestellte Zeit überschrieben.
TFA_No. 35.1163_Anleitung 28.08.2021 9:18 Uhr Seite 6

1312
Funk-Wetterstation
6.2 Datumsanzeige
• Mit der MODE Taste können Sie zwischen der Zeitanzeige und der Datumsanzeige wechseln. Die Reihenfolge ist wie folgt:
Uhrzeit, Jahr, Monat, Tag. Das Display wechselt automatisch wieder zurück zur aktuellen Uhrzeit.
7. Höchst- und Tiefsttemperaturen
• Die Höchst- und Tiefstwerte für die Innen- und Außentemperatur seit der letzten Rückstellung werden permanent auf dem
Display angezeigt.
• Drücken und halten Sie die UP/MAX/MIN Taste für 3 Sekunden. Alle MAX/MIN Werte werden gelöscht und auf den aktuellen
Wert zurückgesetzt.
8. Vorhersage
8.1 Wettervorhersage-Symbole
• Die Funkwetterstation unterscheidet 7 unterschiedliche Wettersymbole:
sonnig teilweise bewölkt bedeckt regnerisch Gewitter Schneefall Gewitter
(Regen) (Schneefall)
• Ein Schneekristall (Symbol 6 und 7) wird angezeigt, wenn Regen oder Gewitter gemeldet ist und die Außentemperatur auf
Kanal 1 unter 0°C beträgt. Ist auf Kanal 1 kein Sender angeschlossen, greift das Gerät auf die Werte von Kanal 2 bzw. 3
zurück. Steht der entsprechende Sender nicht im Freien oder ist kein Sender angeschlossen, erhält man keine Schneevor-
hersage.
• Die Vorhersage über die Symbolanzeige bezieht sich auf einen Zeitraum von 6-12 Stunden und gibt lediglich einen Wetter-
trend an. Ist es zum Beispiel im Moment wolkig und es wird Regen angezeigt, deutet dies nicht auf eine Fehlfunktion des
Gerätes hin, sondern gibt an, dass der Luftdruck gesunken und eine Wetterverschlechterung zu erwarten ist, wobei es sich
aber nicht unbedingt um Regen handeln muss.
8.2 Trendpfeile
• Der Trendpfeil zeigt Ihnen, ob der Luftdruck in den letzten 3 Stunden steigt, fällt oder gleichbleibt.
Steigen (+1-2 hPa) Wetterverbesserung
Funk-Wetterstation
Schnelles Steigen (>+2 hPa) Markante Wetterverbesserung
Gleichbleibend (±1 hPa) Stabile Wetterlage
Fallen (-1-2 hPa) Wetterverschlechterung
Schnelles Fallen (>-2 hPa) Markante Wetterverschlechterung
9. Alarmmodus
• Drücken Sie die ALARM Taste im Normalmodus, um in den Alarmmodus zu gelangen. 7:00 (Voreinstellung) oder die zuletzt
eingestellte Weckzeit wird auf dem Display angezeigt. Drücken Sie erneut die ALARM Taste. Der Alarm ist aktiviert und das
Alarmsymbol erscheint auf dem Display. Drücken Sie noch einmal die ALARM Taste, ist der Alarm ausgeschaltet. Das
Alarmsymbol verschwindet. Das Display wechselt nach 5 Sekunden automatisch wieder zurück zur aktuellen Uhrzeit.
9.1 Einstellung der Weckzeit
• Halten Sie die ALARM Taste für drei Sekunden gedrückt, um in den Alarm-Einstellmodus zu gelangen.
• Das Alarmsymbol und die Stundenanzeige blinken. Stellen Sie mit der UP/MAX/MIN oder DOWN/RCC Taste die Stunden ein.
• Bestätigen Sie die Eingabe mit der ALARM Taste und stellen Sie auf gleiche Weise die Minuten ein.
• Drücken Sie die ALARM Taste noch einmal, um zur aktuellen Uhrzeit zurückzukehren.
• Der Alarm ist aktiviert und das Alarmsymbol erscheint auf dem Display.
9.2 Weckvorgang
• Bei aktiviertem Alarm beginnt der Wecker zu klingeln, wenn die eingestellte Weckzeit erreicht ist. Das Alarmsymbol blinkt.
• Wird der Alarm nicht unterbrochen, schaltet sich der ansteigende Weckton automatisch nach zwei Minuten aus und akti-
viert sich erneut zur gleichen Weckzeit wieder.
• Drücken Sie auf eine beliebige Taste, um den Alarmton auszuschalten und die Snooze- Funktion zu aktivieren. Das Snooze-
Symbol blinkt.
• Der Alarm wird für die Dauer von ca. 5 Minuten unterbrochen.
• Drücken Sie auf eine beliebige Taste, um die Alarmfunktion zu beenden.
10. Aufstellen der Basisstation und Befestigen des Senders
• Suchen Sie im Freien einen schattigen, niederschlagsgeschützten Platz für den Sender aus. (Direkte Sonneneinstrahlung
verfälscht die Messwerte und ständige Nässe belastet die elektronischen Bauteile unnötig).
TFA_No. 35.1163_Anleitung 28.08.2021 9:18 Uhr Seite 7

1514
Funk-Wetterstation
• Stellen Sie die Basisstation im Wohnraum auf. Vermeiden Sie die Nähe zu anderen elektrischen Geräten (Fernseher, Com-
puter, Funktelefone) und massiven Metallgegenständen.
• Prüfen Sie, ob eine Übertragung der Messwerte vom Sender am gewünschten Aufstellort zur Basisstation stattfindet
(Reichweite Freifeld ca. 100 Meter, bei massiven Wänden, insbesondere mit Metallteilen kann sich die Sendereichweite
erheblich reduzieren.
• Suchen Sie sich gegebenenfalls einen neuen Aufstellort für Sender und/oder Empfänger.
• Ist die Übertragung erfolgreich, können Sie Sender und Basisstation aufstellen oder mit der Aufhängevorrichtung an die
Wand hängen.
11. Batteriewechsel
• Sobald das entsprechende Batteriesymbol im Display erscheint, wechseln Sie bitte die Batterien der Basisstation bzw. des
Senders.
•Achtung: Bei einem Batteriewechsel muss der Kontakt zwischen Außensender und Basisstation wiederhergestellt werden –
also immer beide Geräte neu in Betrieb nehmen oder manuelle Außensendersuche starten.
12. Zusätzliche Außensender
• Wenn Sie mehrere Außensender anschließen wollen (maximal 3), wählen Sie mit dem 1/2/3 Schiebeschalter im Batterie-
fach des Außensenders für jeden Außensender einen anderen Kanal aus. Legen Sie dann zwei neue Batterien 1,5 V AAA
polrichtig ein. Nehmen Sie die Basisstation anschließend in Betrieb oder starten Sie die manuelle Sendersuche.
• Zur manuellen Sendersuche wählen Sie mit der CHANNEL Taste den gewünschten Sender aus.
• Halten Sie die CHANNEL Taste für zwei Sekunden gedrückt. Der registrierte Sender (Kanal) wird gelöscht und die Sendersu-
che beginnt.
• Die Außentemperatur mit Höchst- und Tiefstwert und die Kanalnummer werden auf dem Display der Basisstation angezeigt.
Falls Sie mehr als einen Außensender angeschlossen haben, können Sie mit der CHANNEL Taste auf der Basisstation zwi-
schen den Kanälen 1 bis 3 wechseln.
• Sie können auch einen automatischen Kanalwechsel einstellen. Nach dem letzten registrierten Sender (1 bis 3) erscheint
bei erneuter Bedienung der CHANNEL Taste das Kreissymbol für automatischen Kanalwechsel. Drücken Sie die CHANNEL
Taste noch einmal, um die Funktion auszuschalten.
• Nach erfolgreicher Inbetriebnahme der Außensender schließen Sie die Batteriefächer wieder sorgfältig.
13. Fehlerbeseitigung
Problem Lösungen
Keine Anzeige auf ➜ Batterien polrichtig einlegen
Basisstation oder Sender ➜ Batterien wechseln
Funk-Wetterstation
Kein Senderempfang ➜ Kein Sender installiert
Anzeige „- -. -” ➜ Batterien des Außensenders prüfen (nur Batterien/Akkus mit 1,5V Spannung verwenden!)
für Kanal 1/2/3 ➜ Neuinbetriebnahme von Außensender und Basisgerät gemäß Anleitung
➜ CHANNEL Taste für zwei Sekunden drücken und manuelle Außensendersuche starten
➜ Anderen Aufstellort für Außensender und/oder Basisgerät wählen
➜ Abstand zwischen Außensender und Basisgerät verringern
➜ Beseitigen der Störquellen
Kein DCF Empfang ➜ DOWN/RCC Taste für zwei Sekunden drücken und Initialisierung starten
➜ Empfangsversuch in der Nacht abwarten
➜ Anderen Aufstellort für das Gerät wählen
➜ Uhrzeit manuell einstellen
➜ Beseitigen der Störquellen
➜ Neuinbetriebnahme des Gerätes gemäß Bedienungsanleitung
Unkorrekte Anzeige ➜ Batterien wechseln
Wenn Ihr Gerät trotz dieser Maßnahmen immer noch nicht funktioniert, wenden Sie sich an den Händler, bei dem Sie das Pro-
dukt gekauft haben.
14. Entsorgung
Dieses Produkt und die Verpackung wurden unter Verwendung hochwertiger Materialien und Bestandteile hergestellt, die
recycelt und wiederverwendet werden können. Dies verringert den Abfall und schont die Umwelt.
Entsorgen Sie die Verpackung umweltgerecht über die eingerichteten Sammelsysteme.
Entsorgung des Elektrogeräts
Entnehmen Sie nicht festverbaute Batterien und Akkus aus dem Gerät und entsorgen Sie diese getrennt.
Dieses Gerät ist entsprechend der EU-Richtlinie über die Entsorgung von Elektro- und Elektronik-Altgeräten
(WEEE) gekennzeichnet. Dieses Produkt darf nicht mit dem Hausmüll entsorgt werden. Der Nutzer ist verpflich-
tet, das Altgerät zur umweltgerechten Entsorgung bei einer ausgewiesenen Annahmestelle für die Entsorgung
von Elektro- und Elektronikgeräten abzugeben. Beachten Sie die aktuell geltenden Vorschriften!
Entsorgung der Batterien
Batterien und Akkus dürfen keinesfalls in den Hausmüll. Sie enthalten Schadstoffe, die bei unsachgemäßer Ent-
sorgung der Umwelt und der Gesundheit Schaden zufügen können. Als Verbraucher sind Sie gesetzlich ver-
pflichtet, gebrauchte Batterien und Akkus zur umweltgerechten Entsorgung beim Handel oder entsprechenden
Sammelstellen gemäß nationalen oder lokalen Bestimmungen abzugeben.
Die Bezeichnungen für enthaltene Schwermetalle sind: Cd=Cadmium, Hg=Quecksilber, Pb=Blei.
TFA_No. 35.1163_Anleitung 28.08.2021 9:18 Uhr Seite 8

1716
Funk-Wetterstation
15. Technische Daten
Basisstation
Spannungsversorgung Batterien 2 x 1,5 V AA (nicht inklusive)
Wir empfehlen Alkaline Batterien
Messbereich Temperatur -10°C … 50°C
Gehäusemaße 216 x 28 (67) x 160 mm
Gewicht 302 g (nur das Gerät)
Außensender
Spannungsversorgung Batterien 2 x 1,5 V AAA (nicht inklusive)
Wir empfehlen Alkaline Batterien
Messbereich Temperatur -40°C … 70°C
Reichweite ca. 100 m (Freifeld)
Übertragungsfrequenz 433 MHz
Maximale Sendeleistung < 10mW
Anzeige LL.L /HH.H Temperatur außerhalb des Messbereichs
Gehäusemaße 40 x 105 x 26 mm
Gewicht 41 g (nur das Gerät)
Diese Anleitung oder Auszüge daraus dürfen nur mit Zustimmung von TFA Dostmann veröffentlicht werden. Die technischen Daten entsprechen dem
Stand bei Drucklegung und können ohne vorherige Benachrichtigung geändert werden.
Die neuesten technischen Daten und Informationen zu Ihrem Produkt finden Sie auf unserer Homepage unter Eingabe der Artikel-Nummer in das Suchfeld.
EU-Konformitätserklärung
Hiermit erklärt TFA Dostmann, dass der Funkanlagentyp 35.1163 der Richtlinie 2014/53/EU entspricht. Der vollständige Text der EU-Konformitätserklärung
ist unter der folgenden Internetadresse verfügbar: www.tfa-dostmann.de/service/downloads/ce
www.tfa-dostmann.de
E-Mail: [email protected]
TFA Dostmann GmbH & Co.KG, Zum Ottersberg 12, 97877 Wertheim, Deutschland 08/21
Wireless Weather Station
1. Delivery contents
• Wireless weather station (base station)
• Temperature transmitter (Cat. No. 30.3248.02)
• Instruction manual
2. Range of application and all the benefits of your new instrument at a glance
• Radio controlled clock with large display
• Outdoor temperature wireless (433 MHz), distance range up to 100 m (open field)
• Indoor temperature
• Permanent indication of maximum and minimum temperatures
• Weather forecast with symbols and atmospheric pressure trend
• Alarm with snooze function
• Date display
• Manual setting option of time and time zone
• Wall mounting or table stand
• Optional: Expandable up to 3 temperature transmitters (sold separately), also for the temperature control of remote rooms,
e.g. children's room, wine-cellar etc.
3. Safety notices
• This product is exclusively intended for the range of application described above.
WARNING
• Keep the devices and the batteries out of reach of children.
• Small parts can be swallowed by children (under three years old).
• Batteries contain harmful acids and may be hazardous if swallowed. If a battery is swallowed, this can lead to serious inter-
nal burns and death within two hours. If you suspect a battery could have been swallowed or otherwise caught in the body,
seek medical help immediately.
• Batteries must not be thrown into a fire, short-circuited, taken apart or recharged. Risk of explosion!
• Low batteries should be changed as soon as possible to prevent damage caused by leaking. Make sure the polarities are
correct. Never use a combination of old and new batteries together, nor batteries of different types. Remove the batteries if
the device will not be used for an extended period of time. Wear chemical-resistant protective gloves and safety glasses
when handling leaking batteries.
TFA_No. 35.1163_Anleitung 28.08.2021 9:18 Uhr Seite 9

1918
Wireless Weather Station
CAUTION
• Unauthorized repairs, alterations or changes to the product are prohibited.
• Do not expose the device to extreme temperatures, vibrations or shocks.
• Clean the device with a soft damp cloth. Do not use solvents or scouring agents.
• The base station is only suitable for indoor use. Protect it from moisture!
• The transmitter is splashproof, but not watertight.
4. Elements
Base station (Receiver)
A: LCD display (Fig. 1):
A 1: Time zone A 2: DCF reception symbol
A 3: Time/date A 4: Snooze symbol
A 5: Alarm symbol A 6: Transmitter reception symbol
A 7: Channel number A 8: Battery symbol for the transmitter
A 9: Symbol for alternating channels A 10: Maximum value (MAX)
A 11: Outdoor temperature A 12: Minimum value (MIN)
A 13: Atmospheric pressure trend A 14: Weather forecast with symbols
A 15: Indoor temperature A 16: Battery symbol for the base station
B: Buttons (Fig. 2):
B 1: MODE button B 2: CHANNEL button
B 3: ALARM button B 4: UP/MAX/MIN button
B 5: DOWN/RCC button
C: Housing (Fig. 2):
C 1: Wall mounting hole C 2: Battery compartment
C 3: Stand (fold out)
D: Outdoor transmitter (Fig. 3):
D 1: Transmission indication LED D 2: Transmission symbol
D 3: Outdoor temperature D 4: Channel number
D 5: Battery symbol for the transmitter D 6: Wall mounting hole
D 7: Channel switch 1,2,3 D 8: Battery compartment
Wireless Weather Station
5. Getting started
5.1 Insert the batteries
• Remove the protective film from the display.
• Place the base station and the transmitter on a table at a distance of about 1.5 meters from each other. Avoid being close to
possible sources of interference such as electronic devices and radio equipment.
• Open the battery compartment of the base station and insert two new AA 1.5V batteries, polarity as illustrated.
• The device will alert you with a beep and all LCD segments will be displayed for a short moment. The indoor temperature
with highest and lowest values appears on the display.
• Close the battery cover again.
• Open the battery compartment of the transmitter and insert two new AAA 1.5 V batteries, polarity as illustrated. The switch
is set to channel 1.
• The indicator light lights up briefly. The outdoor temperature is shown. Close the battery cover again.
5.2 Outdoor values reception
• The base station will scan the outdoor temperature for three minutes and the reception symbol flashes.
• If the reception of the outdoor temperature fails, “- -.-” remains on the display. Check the batteries and try it again.
• You can also start the outdoor transmitter search manually later (e.g. if the transmitter is lost or if the batteries are changed).
Press and hold the CHANNEL button on the base station for two seconds. The last registered transmitter (channel) will be
cancelled and “- -.-” appears on the display. During the transmitter search the maximum and minimum values are auto-
matically reset.
5.3 Radio-controlled time reception
• The clock will now scan the DCF frequency signal and the DCF symbol flashes on the display. When the time code is suc-
cessfully received after some minutes, the radio-controlled time and the DCF symbol will be shown steadily on the display.
• If there is no reception, you can start the initialisation manually. Press and hold the DOWN/RCC button for 2 seconds.
• The DCF symbol flashes.
• Interrupt the reception by pressing the DOWN/RCC button again for two seconds. The DCF reception symbol disappears.
• The DCF reception always takes place daily at 1:00, 2:00, 3:00, 4:00 and 5:00 o'clock in the morning.
• There are three different reception states:
flashing – reception is active
remains – reception is successful
disappears – no reception
• If the clock cannot detect the DCF-signal (e.g. due to interference, transmitting distance, etc.), the time can be set manual-
ly. The clock will then work as a normal quartz clock (see: “Manual settings”).
TFA_No. 35.1163_Anleitung 28.08.2021 9:18 Uhr Seite 10

2120
Wireless Weather Station
5.4 Note on radio-controlled time
• The time is transmitted from an atomic clock near Frankfurt am Main by a DCF-77 (77.5 kHz) frequency signal with a range
of about 1,500 km. Your radio-controlled clock receives the signal, converts it and always shows the exact time. The
adjustment of Daylight Saving Time and Standard Time is also automatic.
• During night-time, the atmospheric interference is usually less severe. A single daily reception is adequate to keep the
accuracy deviation under 1 second. In extreme cases, please place the unit close to a window to improve reception.
6. Operation
• The device will automatically quit the setting mode if no button is pressed for 15 seconds.
• Press and hold the UP/MAX/MIN or DOWN/RCC button in setting mode for fast mode.
6.1 Manual settings
• Press and hold the MODE button for two seconds to enter the setting mode.
• The first adjustable value flashes on the display.
• Use the UP/MAX/MIN or DOWN/RCC button to make the desired setting, while the value flashes.
• Confirm with the MODE button and go to the next setting.
• The sequence is shown as follows:
– Year, month, day
– Hours, minutes
– Time zone +12/-12 (default: ZONE 00)
– DCF reception ON/OFF (default: ON)
6.1.1 Time zone setting
• In the setting mode you can make the time zone correction +12/-12).
• The time zone correction is needed for countries where the DCF signal can be received but the time zone is different from
the DCF time (e.g. +1=one hour plus).
6.1.2 DCF reception
• By default, the DCF reception is activated (ON) and after successful reception of the DCF signal no manual time setting is
necessary.
• Once the DCF time reception is deactivated (OFF) the time and date must be manually set.
• If the DCF reception is activated, the manually set time will be overwritten by the DCF time when the signal is received suc-
cessfully.
Wireless Weather Station
6.2 Date display
• With the MODE button you can switch between the display of time and date. The sequence is shown as follows: time, year,
month, date. The display automatically switches back to the current time display.
7. Maximum and minimum temperatures
• The maximum and minimum outdoor and indoor temperatures since the last reset are permanently displayed.
• Press and hold the UP/MAX/MIN button for 3 seconds. All MAX/MIN values will be deleted and reset to the current state.
8. Forecast
8.1 Weather forecast symbols
• The weather station has 7 different weather symbols:
sunny slightly cloudy cloudy rainy thunderstorm snowfall thunderstorm
(rain) (snow)
• A snow crystal (symbol 6 and 7) is shown if rain or thunderstorm is forecasted and the outdoor temperature on channel 1
is under 0°C. If no transmitter is connected on channel 1, the device uses the values of channel 2 or 3. If this respective
transmitter is not situated outside or if there is no transmitter connected, there will be no snow forecast.
• The weather forecast relates to a range of 6 to 12 hours and indicates only a general weather trend. For example, if the cur-
rent weather is cloudy and the rain symbol is displayed, it does not mean the product is faulty because it is not raining. It
simply means that the air pressure has dropped and the weather is expected to get worse but not necessarily rain.
8.2 Trend arrows
• The trend arrows on the display will show whether the atmospheric pressure of the last 3 hours is increasing, steady or
decreasing.
Increase (+1-2 hPa) Weather improvement
Fast increase (>+2hPa) Significant weather improvement
TFA_No. 35.1163_Anleitung 28.08.2021 9:18 Uhr Seite 11

2322
Wireless Weather Station
Steady (+-1hPa) Stable weather conditions
Decrease (-1-2 hPa) Weather deterioration
Fast decrease(>-2hPa) Significant weather deterioration
9. Alarm mode
• Press the ALARM button in normal mode to enter the alarm mode. 7:00 (default) or the last adjusted alarm time appear on
the display. Press again the ALARM button. The alarm is activated and the alarm symbol appears on the display. Press
again the ALARM button to deactivate the alarm function. The alarm symbol disappears. The display automatically switches
back to the current time display after 5 seconds.
9.1 Alarm time setting
• Press and hold the ALARM button for three seconds to enter the alarm setting mode.
• The alarm symbol and the hour digit are flashing. Press the UP/MAX/MIN or DOWN/RCC button to adjust the hours.
• Confirm the setting with the ALARM button and set minutes in the same way.
• Press the ALARM button again to return to the current time.
• The alarm is activated and the alarm symbol appears on the display.
9.2 Alarm process
• When the alarm is activated, the alarm starts to ring when the set alarm time is reached. The alarm symbol flashes.
• If the alarm is not stopped manually, the ascending alarm tone automatically turns off after two minutes and the alarm will
be reactivated at the same set time on the following day.
• Press any button to turn off the alarm sound and to activate the snooze function. The snooze symbol flashes.
• The alarm will be interrupted for about 5 minutes.
• Press any button to stop the alarm function.
10. Positioning and mounting of the base station and the transmitter
• When placed outdoors, choose a shady and dry place for the transmitter. Direct sunlight may trigger incorrect measure-
ment and continuous humidity damages the electronic components needlessly.
• Place the base station in any room of the house. Make sure to avoid the vicinity of any source of interference such as com-
puter screens, TV sets or solid metal objects.
Wireless Weather Station
• Once the desired location is chosen, check whether the transmission from the transmitter to the base station is possible
(transmission range of up to 100m in open areas). Within solid walls, especially ones with metal parts, the transmission
range can be reduced considerably.
• If necessary, choose, another position for the outdoor transmitter and/or receiver.
• If the transmission is successful, you can place or wall mount the base station and the outdoor transmitter with the sus-
pension device.
11. Battery replacement
• As soon as the corresponding battery symbol appears in the display, please change the batteries of the base station or
transmitter.
•Please note: When the batteries are changed, the contact between the outdoor transmitter and the base station must be
restored – so always restart both devices or start a manual transmitter search.
12. Additional outdoor transmitters (optional)
• When having more than one external transmitter (maximum 3), select a different channel for each one with the 1/2/3
switch inside the transmitter's battery compartment. Insert two new AAA 1.5 V batteries, polarity as illustrated. Start the
base station operation or the manual search for the outdoor transmitters.
• For the manual search choose the respective transmitter by pressing the CHANNEL button.
• Press and hold the CHANNEL button for two seconds. The last registered transmitter (channel) will be cancelled and the
transmitter search begins.
• The outdoor temperature with highest and lowest values and the channel number appear on the base station display. If you
have installed more than one outdoor transmitter, press the CHANNEL button on the base station to change between the
channels 1 to 3.
• You can also choose an alternating channel display. Press the CHANNEL button. After the last registered channel (1 to 3) a
circle symbol will appear. To deactivate the function press the CHANNEL button again.
• After a successful installation of the outdoor transmitters close the battery compartments carefully.
13. Troubleshooting
Problem Solution
No indication on the ➜ Ensure the batteries' polarities are correct
base station/transmitter ➜ Change the batteries
No transmitter reception ➜ No transmitter installed
Display “- -. -” ➜ Check the outdoor transmitter's batteries
for channel 1/2/3 (only use batteries/rechargeable batteries with 1.5V voltage!)
➜ Restart the transmitter and the base station according to the manual
TFA_No. 35.1163_Anleitung 28.08.2021 9:18 Uhr Seite 12

2524
Wireless Weather Station
➜ Start the manual transmitter search: Press the CHANNEL button for 2 seconds
➜ Choose another place for the outdoor transmitter and/or the base station
➜ Reduce the distance between the outdoor transmitter and the base station
➜ Check if there is any source of interference.
No DCF reception ➜ Press and hold the DOWN/RCC button for two seconds and start the initialisation manually
➜ Wait for an attempt reception during the night
➜ Choose another place for your device
➜ Set the clock manually
➜ Check if there is any source of interference
➜ Restart the instrument according to the manual
Incorrect indication ➜ Change the batteries
If your device fails to work despite these measures, contact the retailer where you purchased the product.
14. Waste disposal
This product and its packaging have been manufactured using high-grade materials and components which can be recycled
and reused. This reduces waste and protects the environment.
Dispose of the packaging in an environmentally friendly manner using the collection systems that have been set up.
Disposal of the electrical device
Remove non-permanently installed batteries and rechargeable batteries from the device and dispose of them
separately.
This product is labelled in accordance with the EU Waste Electrical and Electronic Equipment Directive (WEEE).
Please do not dispose of this product in ordinary household waste. As a consumer, you are required to take end-
of-life devices to a designated collection point for the disposal of electrical and electronic equipment, in order to
ensure environmentally-compatible disposal. Observe the current regulations in place!
Disposal of the batteries
Never dispose of empty batteries and rechargeable batteries with ordinary household waste. They contain pollu-
tants which, if improperly disposed of, can harm the environment and human health. As a consumer, you are
required by law to take them to your retail store or to an appropriate collection site depending on national or
local regulations in order to protect the environment.
The symbols for the contained heavy metals are:
Cd=cadmium, Hg=mercury, Pb=lead.
Wireless Weather Station
15. Specifications
Base station
Power consumption 2 x AA 1,5 V batteries (not included)
We recommend Alkaline batteries
Measuring range
temperature -10°C … 50°C
Housing dimension 216 x 28 (67) x 160 mm
Weight 302 g (device only)
Outdoor transmitter
Power consumption Batteries 2 x AAA 1.5 V (not included)
We recommend Alkaline batteries
Measuring range
temperature -40°C … 70°C
Range max. 100 m (open field)
Transmission frequency 433 MHz
Maximum
radio-frequency power < 10mW
Display LL.L /HH.H Temperature is outside measuring range
Housing dimension 40 x 105 x 26 mm
Weight 41 g (device only)
No part of this manual may be reproduced without written consent of TFA Dostmann. The technical data are correct at the time of going to print and may
change without prior notice. The latest technical data and information about this product can be found in our homepage by simply entering the product
number in the search box.
EU Declaration of conformity
Hereby, TFA Dostmann declares that the radio equipment type 35.1163 is in compliance with Directive 2014/53/EU. The full text of the EU declaration of
conformity is available at the following internet address: www.tfa-dostmann.de/service/downloads/ce
www.tfa-dostmann.de
E-Mail: [email protected]
TFA Dostmann GmbH & Co.KG, Zum Ottersberg 12, 97877 Wertheim, Germany 08/21
TFA_No. 35.1163_Anleitung 28.08.2021 9:18 Uhr Seite 13

2726
Station météo radio-pilotée
1. Contenu de la livraison
• Station météo radio-pilotée (station de base)
• Émetteur de température (N° de l'art. 30.3248.02)
• Mode d'emploi
2. Aperçu du domaine d'utilisation et de tous les avantages de votre nouvel appareil
• Horloge radio-pilotée avec grand écran
• Température extérieure sans fil (433 MHz), rayon d’action de max. 100 mètres (champ libre)
• Température intérieure
• Affichage permanent des températures maximales et minimales
• Prévisions météo par symboles et tendance de la pression atmosphérique
• Réveil avec fonction « snooze »
• Affichage de la date
• Option de réglage manuel de l'heure et du fuseau horaire
• Peut être posée sur une surface plane ou fixée au mur
• En option : extensible jusqu'à 3 émetteurs de température (vendus séparément), également pour le contrôle de la tempé-
rature dans des espaces éloignés, p. ex. chambre d´enfants, cave
3. Consignes de sécurité
• Le produit est destiné uniquement à l'utilisation décrite ci-dessus.
AVERTISSEMENT
• Placez vos appareils et les piles hors de la portée des enfants.
• Les petites pièces peuvent être avalées par les enfants (de moins de trois ans).
• Les piles contiennent des acides nocifs pour la santé et peuvent être mortelles dans le cas d’une ingestion. Si une pile a été
avalée, elle peut entraîner des brûlures internes graves ainsi que la mort dans l’espace de 2 heures. Si vous craignez qu’une
pile ait pu être avalée ou ingérée d’une autre manière, quelle qu’elle soit, contactez immédiatement un médecin d’urgence.
• Ne jetez jamais de piles dans le feu, ne les court-circuitez pas, ne les démontez pas et ne les rechargez pas. Risque d'ex-
plosion !
• Une pile faible doit être remplacée le plus rapidement possible afin d'éviter toute fuite. Veillez à la bonne polarité des piles.
N'utilisez jamais simultanément de piles anciennes avec des piles neuves ou des piles de types différents. Retirez les piles
si vous n'utilisez pas votre appareil pendant une durée prolongée. Pour manipuler des piles qui ont coulé, utilisez des gants
de protection chimique spécialement adaptés et portez des lunettes de protection !
Station météo radio-pilotée
ATTENTION
• Vous ne devez en aucun cas réparer, démonter ou modifier l'appareil par vous-même.
• Évitez d’exposer l’appareil à des températures extrêmes, à des vibrations ou à des chocs.
• Pour le nettoyage de votre appareil, utilisez un chiffon doux et humide. N’utilisez pas de solvants ou d'agents abrasifs !
• La station de base ne peut être utilisée qu'à l'intérieur. Protégez l'appareil contre l'humidité !
• L'émetteur résiste aux éclaboussures d'eau mais il n'est pas étanche.
4. Composants
Station de base (récepteur)
A : Affichage LCD (Fig. 1) :
A 1 : Fuseau horaire A 2 : Symbole de réception DCF
A 3 : Heure / date A 4 : Symbole de répétition « snooze »
A 5 : Symbole de réveil A 6 : Symbole de réception de l'émetteur
A 7 : Numéro de canal A 8 : Symbole de pile faible pour l’émetteur
A 9 : Symbole de changement de canal automatique A 10 : Valeur maximale (MAX)
A 11 : Température extérieure A 12 : Valeur minimale (MIN)
A 13 : Tendance de la pression atmosphérique A 14 : Prévisions météo par symboles
A 15 : Température intérieure A 16 : Symbole de pile faible pour la station de base
B: Touches (Fig. 2):
B 1: Touche MODE B 2: Touche CHANNEL
B 3: Touche ALARM B 4: Touche UP/MAX/MIN
B 5: Touche DOWN/RCC
C: Boîtier (Fig. 2):
C 1: Œillet de suspension C 2: Compartiment à piles
C 3: Support (dépliable)
D: Émetteur extérieur (Fig. 3):
D 1: Affichage transfert LED D 2: Symbole de transmission
D 3: Température extérieure D 4: Numéro de canal
D 5: Symbole de pile faible pour l’émetteur D 6: Œillet de suspension
D 7: Interrupteur canal 1,2,3 D 8: Compartiment à piles
TFA_No. 35.1163_Anleitung 28.08.2021 9:18 Uhr Seite 14

2928
Station météo radio-pilotée
5. Mise en service
5.1 Insertion des piles
• Retirez le film de protection de l'affichage.
• Déposez la station de base et l'émetteur sur une table à une distance d'environ 1,5 mètre l'un de l'autre. Évitez la proximité
de sources parasites (appareils électroniques ou appareils radio).
•
Ouvrez le compartiment à piles de la station de base et insérez deux piles neuves de type 1,5 V AA en respectant la polarité +/-.
• Un signal sonore se fait entendre et tous les segments LCD s'allument brièvement. Sur l'écran apparaît la température
intérieure avec les valeurs maximales et minimales.
• Refermez le couvercle.
• Ouvrez le compartiment à piles de l'émetteur et insérez deux nouvelles piles de type 1,5 V AAA en respectant la polarité +/-.
L'interrupteur est réglé sur le canal 1.
• La lampe de signalisation s'allume brièvement. La température extérieure sera affichée. Refermez le couvercle.
5.2 Réception des valeurs extérieures
• La station de base cherche la température extérieure pour 3 minutes et le symbole de réception clignote.
• Si la température extérieure n'est pas reçue, « - -. - » reste affiché en continu. Contrôlez les piles et effectuez une nouvelle
tentative.
• Vous pouvez activer manuellement la recherche de l'émetteur ultérieurement (par exemple en cas de perte de l'émetteur ou
de remplacement des piles). Appuyez sur la touche CHANNEL de la station de base pendant deux secondes. L’émetteur enre-
gistré (canal) est effacé et « - -. - » apparaît sur l'écran. Pendant la recherche de l'émetteur, les valeurs maximales et mini-
males seront effacées automatiquement.
5.3 Réception de l'heure radio
• L’horloge cherche le signal radio et le symbole de réception DCF clignote. En cas de réception correcte après quelques
minutes, l’heure radio et le symbole de réception DCF apparaissent en continu sur l'écran.
• S'il n'y a pas de réception, vous pouvez également activer manuellement la réception. Appuyez sur la touche DOWN/RCC
pendant deux secondes.
• Le symbole de réception DCF clignote.
• Interrompez la tentative de réception en maintenant encore une fois la touche DOWN/RCC appuyée pour deux secondes. Le
symbole de réception DCF disparaît.
• La réception du signal DCF a lieu une fois par heure à 1:00, 2:00, 3:00, 4:00 à 5:00 heures du matin.
• Il y a 3 états de réception différents :
clignote – réception en cours
reste en arrêt – réception a abouti
disparaît – pas de réception
Station météo radio-pilotée
• Si votre horloge radio-pilotée ne peut pas recevoir le signal DCF (par exemple en cas de perturbations, d'une distance de
transmission excessive etc.), vous pouvez régler l'horaire manuellement. L’horloge fonctionne comme une horloge à quartz
normale (voir : Réglages manuels).
5.4 Consignes pour la réception de l'heure radio
• La transmission de l’heure radio s’effectue via une horloge atomique près de Francfort-sur-le-Main, avec un signal DCF-77
(77,5 kHz) d'une portée d’environ 1 500 km. Votre horloge radio-pilotée reçoit le signal, le convertit et affiche l'heure pré-
cise. Le passage de l'heure d'hiver à l'heure d'été et vice-versa s'effectue également automatiquement.
• La nuit, les perturbations s’affaiblissent en règle générale. Une seule réception par jour suffit pour maintenir d’éventuels
écarts en dessous d'1 seconde. Dans les cas extrêmes, nous vous conseillons de placer l’appareil près d’une fenêtre.
6. Utilisation
• L'appareil quitte automatiquement le mode de réglage si aucune touche n’est pressée pendant 15 secondes.
• Si vous maintenez la touche UP/MAX/MIN ou DOWN/RCC appuyée au cours d'un mode de réglage, vous passez en dérou-
lement rapide.
6.1 Réglages manuels
• Maintenez la touche MODE appuyée pendant deux secondes pour accéder au mode de réglage.
• La première valeur réglable clignote sur l'écran.
• Utilisez la touche UP/MAX/MIN ou DOWN/RCC pour effectuer le réglage souhaité, pendant que la valeur clignote.
• Appuyez sur la touche MODE pour confirmer le réglage et passer à la valeur suivante.
• L’ordre est le suivant :
– Année, mois, date
– Heures, minutes
– Fuseau horaire +12/-12 (par défaut : ZONE 00)
– Réception de l'heure radio DCF ON/OFF (par défaut : ON)
6.1.1 Réglage du fuseau horaire
• En mode de réglage, vous pouvez régler la correction du fuseau horaire (+12/-12).
• Vous avez la possibilité d'utiliser un autre fuseau horaire si votre horloge radio-pilotée peut recevoir le signal DCF mais
l'heure de votre fuseau horaire est différente de l’heure DCF (par exemple : +1 = une heure plus tard).
6.1.2 Réception DCF
• Par défaut, la réception DCF est activée (ON) et après une réception réussie du signal DCF, aucun réglage manuel n’est
nécessaire.
• Si la réception est désactivée (OFF), l'heure et la date doivent être réglées manuellement.
• Lorsque la réception du signal DCF est activée et a abouti, l'heure ajustée manuellement sera remplacée par l’heure radio.
TFA_No. 35.1163_Anleitung 28.08.2021 9:18 Uhr Seite 15

3130
Station météo radio-pilotée
6.2 Affichage de la date
• Utilisez la touche MODE pour passer de l'affichage de l'heure à l'affichage de la date. L’ordre est le suivant : Heure, année,
mois, jour. L'affichage revient automatiquement à l'affichage actuel de l'heure.
7. Températures maximales et minimales
• Les valeurs maximales et minimales de la température intérieure et extérieure depuis la dernière réinitialisation sont affi-
chées en permanence à l'écran.
• Appuyez sur la touche UP/MAX/MIN pendant 3 secondes. Tous les valeurs MAX/MIN seront effacées et remplacées par les
valeurs actuelles.
8. Prévisions météo
8.1 Prévisions météo avec symboles
• La station météo radio-pilotée dispose de 7 différents symboles météo :
ensoleillé partiellement nuageux pluie orage (pluie) neige orage (neige)
nuageux
• Un cristal de neige (symbole 6 et 7) est affiché, si des précipitations sont annoncées est la température extérieure sur le
canal 1 est inférieure à 0°C. Si aucun émetteur n'est connecté sur le canal 1, l'appareil utilise les valeurs du canal 2 ou 3.
Si l'émetteur respectif n'est pas placé à l'extérieur ou si aucun émetteur n'est connecté, vous ne recevez pas de prévisions
de neige.
• Les prévisions de l'affichage par symboles couvrent une période de temps de 6 - 12 heures et proposent uniquement une
tendance météorologique. Par exemple, si le ciel est nuageux et le symbole de pluie s'affiche, cela ne signifie pas que l'ap-
pareil est en panne, cela signifie simplement que la pression atmosphérique a baissé et qu'il faut s'attendre à une dégrada-
tion du temps : cela ne signifie pas forcément qu'il va pleuvoir.
8.2 Flèches de tendance
•
La flèche de tendance indique si la pression atmosphérique pendant les dernières 3 heures augmente, diminue ou reste stable.
Si elle augmente (+1-2 hPa) Amélioration du temps
Station météo radio-pilotée
Si elle augmente rapidement (>+2hPa) Amélioration du temps considérable
Si elle reste stable (+-1hPa) Conditions météorologiques stables
Si elle diminue (-1-2 hPa) Détérioration du temps
Si elle diminue rapidement (>-2hPa) Détérioration du temps considérable
9. Mode de réveil
• Appuyez sur la touche ALARM en mode normal pour entrer en mode de réveil. 7:00 h (par défaut) ou l'heure de réveil réglée
précédemment sont affichés à l'écran. Appuyez encore une fois sur la touche ALARM. Le réveil est activé et le symbole de
réveil apparaît sur l'écran. Appuyez encore sur la touche ALARM pour désactiver le réveil. Le symbole de réveil disparaît de
l'affichage. L'affichage revient automatiquement après 5 secondes à l'affichage actuel de l'heure.
9.1 Réglage de l'heure de réveil
• Maintenez la touche ALARM appuyée pendant trois secondes pour accéder au mode de réglage de réveil.
• Le symbole de réveil et l'indication de l'heure clignotent. Réglez l'heure avec la touche UP/MAX/MIN ou DOWN/RCC.
• Validez le réglage au moyen de la touche ALARM et procédez de la même manière pour le paramétrage des minutes.
• Appuyez une nouvelle fois sur la touche ALARM afin de retourner à affichage de l'heure actuelle.
• Le réveil est activé et le symbole de réveil apparaît sur l'écran.
9.2 Au réveil
• Lorsque l'heure de réveil fixée est atteinte, le réveil se met à sonner (si la fonction de réveil est activée). Le symbole de
réveil clignote.
• Si le réveil n'est pas coupé, l'alarme croissante s'arrêtera automatiquement après deux minutes et sera de nouveau activé
pour l'heure de réveil suivante.
• Lorsque le réveil sonne, appuyez sur la touche de votre choix, pour éteindre l'alarme et pour activer la fonction de répéti-
tion snooze. Le symbole de répétition snooze clignote sur l'écran.
• L'alarme s'interrompt pendant environ 5 minutes.
• Appuyez sur une touche de votre choix pour terminer la fonction de réveil.
10. Placement de la station de base et fixation de l'émetteur
• Si vous installez l'émetteur à l’extérieur, choisissez un emplacement à l’ombre et protégé de la pluie. (Un ensoleillement
direct fausse la mesure et une humidité continue use les composants électroniques inutilement).
TFA_No. 35.1163_Anleitung 28.08.2021 9:18 Uhr Seite 16

3332
Station météo radio-pilotée
• Déposez la station base dans une pièce d'habitation. Évitez de la placer à proximité d'autres appareils électriques (télévi-
seur, ordinateur, téléphone sans fil) ou d'objets métalliques.
• Vérifiez que les valeurs mesurées sont bien transmises entre l'émetteur et la station de base (portée sur champ libre jus-
qu'à 100 mètres) depuis l'endroit choisi. Si les murs sont massifs, en particulier s'ils comportent des parties métalliques,
la portée d'émission peut se trouver réduite considérablement.
• Si nécessaire, choisissez un autre emplacement pour l'émetteur et/ou pour la station de base.
• Si le transfert est correct, vous pouvez poser ou accrocher au mur l'émetteur et la station de base à l'aide d’une vis.
11. Remplacement des piles
• Dès que le symbole de la pile correspondante apparaît à l'écran, veuillez changer les piles de la station de base ou de l'émet-
teur.
•Attention: il faut rétablir le contact entre l'émetteur et le récepteur après le remplacement des piles - il faut donc toujours
recommencer la mise en service des deux appareils ou bien lancer la recherche manuellement.
12. Émetteurs supplémentaires (optionnel)
• Si vous désirez raccorder plusieurs émetteurs (3 au maximum), sélectionnez un canal différent pour chaque émetteur à l'ai-
de de l'interrupteur 1/2/3 dans le compartiment à piles de l'émetteur. Insérez deux piles neuves de type 1,5 V AAA en res-
pectant la polarité +/-. Mettez alors la station de base en service ou bien démarrez manuellement la recherche de l'émet-
teur.
• Por la recherche de l'émetteur, appuyez sur la touche CHANNEL et sélectionnez l'émetteur correspondant.
• Maintenez la touche CHANNEL appuyée pendant deux secondes. L’émetteur enregistré (canal) est effacé et la recherche de
l'émetteur commence.
• La température extérieure avec les valeurs maximales et minimales et le numéro de canal apparaissent sur l'écran de la sta-
tion de base. Si vous avez plus d'un émetteur, vous pouvez appuyer sur la touche CHANNEL pour passer des canaux 1 à 3.
• Il est possible également de régler un changement de canal automatique. Après l'enregistrement du dernier émetteur (1 à
3), appuyez pour cela de nouveau sur la touche CHANNEL, le symbole circulaire de changement automatique de canal appa-
raît. Appuyez de nouveau sur la touche CHANNEL pour arrêter la fonction.
• Après la mise en service des émetteurs extérieurs, replacez soigneusement les couvercles des compartiments à piles.
13. Dépannage
Problème Solution
Aucun affichage sur la ➜ Contrôlez la bonne polarité des piles
station de base ou émetteur ➜ Changez les piles
Pas de réception d'émetteur ➜ Aucun émetteur installé
Affichage « - -. - » ➜ Vérifiez les piles de l'émetteur
pour les canaux 1/2/3 (utilisez uniquement des piles/batteries rechargeables d'une tension de 1,5 V)
Station météo radio-pilotée
➜ Remettez l'émetteur et la station de base en service, conformément aux instructions
➜ Recherche manuelle de l’émetteur :
maintenez la touche CHANNEL appuyée pour deux secondes
➜ Sélectionnez une autre position pour l'émetteur et la station de base
➜ Modifiez la distance entre l'émetteur et la station de base
➜ Éliminez les sources parasites
Pas de réception DCF ➜Maintenez la touche DOWN/RCC appuyée pendant deux secondes et activez manuellement la
réception de l'heure radio
➜ Attendez la réception du signal de nuit
➜ Choisissez une autre position pour votre appareil
➜ Réglez l'heure manuellement
➜ Éliminez les sources parasites
➜ Remettez l'appareil en service, conformément aux instructions
Affichage incorrect ➜ Changez les piles
Si votre appareil ne fonctionne toujours pas malgré ces mesures, adressez-vous au vendeur chez qui vous l'avez acheté.
14. Traitement des déchets
Ce produit et son emballage ont été fabriqués avec des matériaux de haute qualité qui peuvent être recyclés et réutilisés. Cela
permet de réduire les déchets et de protéger l’environnement.
Éliminez les emballages de manière respectueuse de l'environnement par le biais des systèmes de collecte établis.
Mise au rebut de l'appareil électrique
Retirez de l'appareil les piles et les batteries rechargeables qui ne sont pas installées de façon permanente et
jetez-les séparément. Cet appareil est conforme aux normes de l'UE relatives au traitement des déchets électri-
ques et électroniques (WEEE).
L'appareil usagé ne doit pas être jeté dans les ordures ménagères. L’utilisateur s’engage, pour le respect de l’en-
vironnement, à déposer l’appareil usagé dans un centre de traitement agréé pour les déchets électriques et élec-
troniques. Respectez les réglementations en vigueur !
Élimination des piles
Les piles usagées ne doivent pas être jetées dans les détritus ménagers. Ils contiennent des polluants qui peu-
vent nuire à l'environnement et à la santé s'ils sont éliminés de manière inappropriée. En tant qu'utilisateur, vous
avez l'obligation légale de rapporter les piles et piles rechargeables usagées à votre revendeur ou de les dépo-
ser dans une déchetterie proche de votre domicile conformément à la réglementation nationale et locale.
Les métaux lourds sont désignés comme suit : Cd = cadmium, Hg = mercure, Pb = plomb.
TFA_No. 35.1163_Anleitung 28.08.2021 9:18 Uhr Seite 17

3534
Station météo radio-pilotée
15. Caractéristiques techniques
Station de base
Alimentation Piles 2 x 1,5 V AA (non incluses)
Nous recommandons des piles alcalines
Plage de mesure
température -10°C … 50°C
Dimensions du boîtier 216x 28 (67) x 160 mm
Poids 302g (appareil seulement)
Émetteur extérieur
Alimentation Piles 2 x 1,5 V AAA (non incluses)
Nous recommandons des piles alcalines
Plage de mesure
température -40°C … 70°C
Rayon d’action env. 100 mètres (champ libre)
Fréquence de transmission 433 MHz
Puissance de fréquence
radio maximale transmise < 10mW
Affichage LL.L /HH.H Température mesurée hors de la plage de mesure
Dimensions du boîtier 40 x 105 x 26 mm
Poids 41g (appareil seulement)
La reproduction, même partielle, du présent mode d'emploi est strictement interdite sans l'accord explicite de TFA Dostmann. Les caractéristiques techni-
ques de ce produit ont été actualisées au moment de l'impression et peuvent être modifiées sans avis préalable. Les dernières données techniques et les
informations concernant votre produit peuvent être consultées en entrant le numéro de l'article sur notre site Internet.
Déclaration de conformité UE
Le soussigné, TFA Dostmann, déclare que l'équipement radioélectrique du type 35.1163 est conforme à la directive 2014/53/UE. Le texte complet de la
déclaration UE de conformité est disponible à l'adresse Internet suivante : www.tfa-dostmann.de/service/downloads/ce
www.tfa-dostmann.de
E-Mail: [email protected]
TFA Dostmann GmbH & Co.KG, Zum Ottersberg 12, 97877 Wertheim, Allemagne 08/21
Stazione meteorologica radiocontrollata
1. La fornitura include
• Stazione meteorologica (stazione base)
• Trasmettitore della temperatura (Cat. n. 30.3248.02)
• Istruzioni per l'uso
2. Utilizzi e vantaggi del vostro nuovo apparecchio
• Orologio radiocontrollato con grande display
• Trasmissione senza fili della temperatura esterna (433 MHz), raggio d'azione max: 100 metri (campo libero)
• Temperatura interna
• Visualizzazione permanente delle temperature massime e minime
• Previsioni del tempo con simboli e tendenza della pressione atmosferica
• Sveglia con funzione snooze
• Visualizzazione della data
• Possibilità di impostazione manuale dell'ora e del fuso orario
• Montaggio a muro o sistemazione su piano d’appoggio
• Opzionale: Espandibile fino ad un massimo di 3 trasmettitori della temperatura (venduti separatamente), anche in ambienti
interni, ad es. stanza dei bambini, cantina da vino
3. Avviso di sicurezza
• Il prodotto è adatto esclusivamente agli utilizzi di cui sopra.
AVVERTENZA
• Tenere i dispositivi e le batterie lontano dalla portata dei bambini.
• Le piccole parti possono essere ingerite dai bambini (sotto i tre anni).
• Le batterie contengono acidi nocivi per la salute. Se ingerite, le batterie possono essere mortali. Se una batteria venisse
ingerita, potrebbe causare gravi ustioni e portare alla morte nel giro di due ore. Se si sospetta che una batteria sia stata
ingerita o inserita nel corpo in altra maniera, consultare immediatamente un medico.
• Non gettare le batterie nel fuoco, non polarizzarle in maniera scorretta, non smontarle e non cercare di ricaricarle. Pericolo
di esplosione!
• Sostituire quanto prima le batterie esauste, in modo da evitare perdite. Inserire le batterie rispettando attentamente le pola-
rità indicate. Non utilizzate mai contemporaneamente batterie usate e batterie nuove né batterie di tipi diversi. Rimuovere le
batterie, se non si utilizza l'apparecchio per un periodo prolungato. Quando si maneggiano batterie esaurite indossare sem-
pre guanti resistenti alle sostanze chimiche e occhiali di protezione.
TFA_No. 35.1163_Anleitung 28.08.2021 9:18 Uhr Seite 18

3736
Stazione meteorologica radiocontrollata
ATTENZIONE
• Non sono consentite riparazioni, alterazioni o modifiche non autorizzate del dispositivo.
• Non esporre l'apparecchio a temperature estreme, vibrazioni e urti.
• Per pulire l'apparecchio utilizzare solo un panno morbido leggermente inumidito. Non usare solventi o prodotti abrasivi.
• La stazione base è adatta solo per uso interno. Proteggere dall’umidità!
• Il trasmettitore è resistente agli spruzzi d'acqua, ma non impermeabile.
4. Componenti
Stazione base (ricevitore)
A: Display LCD (Fig. 1):
A 1: Fuso orario A 2: Simbolo della ricezione del segnale DCF
A 3: Orologio/data A 4: Simbolo snooze
A 5: Simbolo della sveglia A 6: Simbolo della ricezione del trasmettitore
A 7: Numero di canale A 8: Simbolo della batteria del trasmettitore
A 9: Simbolo del cerchio per cambio canale A 10: Valore massimo (MAX)
A 11: Temperatura esterna A 12: Valore minimo (MIN)
A 13: Tendenza della pressione atmosferica A 14: Previsioni del tempo con simboli
A 15: Temperatura interna A 16: Simbolo della batteria della stazione base
B: Tasti (Fig. 2):
B 1: Tasto MODE B 2: Tasto CHANNEL
B 3: Tasto ALARM B 4: Tasto UP/MAX/MIN
B 5: Tasto DOWN/RCC
C: Struttura esterna (Fig. 2):
C 1: Foro per sospensione alla parete C 2: Vano batteria
C 3: Supporto (pieghevole)
D: Trasmettitore esterno (Fig. 3):
D 1: Spia di trasmissione LED D 2: Simbolo della trasmissione
D 3: Temperatura esterna D 4: Numero di canale
D 5: Simbolo della batteria del trasmettitore D 6: Foro per sospensione alla parete
D 7: Commutatore canale 1,2,3 D 8: Vano batteria
Stazione meteorologica radiocontrollata
5. Messa in funzione
5.1 Inserire le batterie
• Rimuovere il foglio protettivo dal display.
• Posizionare gli apparecchi su un tavolo ad una distanza di circa 1,5 metri l'uno dall'altro. Tenerli lontano da eventuali fonti
di interferenza (dispositivi elettronici e impianti radio).
• Aprire il vano batteria della stazione base e inserire due batterie nuove tipo AA da 1,5 V, rispettando le corrette polarità.
• Viene emesso un segnale acustico e tutti i segmenti appaiono brevemente. Sul display appare la temperatura interna con il
valore massimo e minimo.
• Richiudere il coperchio.
• Aprire il vano batteria del trasmettitore e inserire due batterie nuove tipo AAA da 1,5 V, rispettando le corrette polarità. L'in-
terruttore è posizionato sul canale 1.
• La spia di trasmissione si accende brevemente. Viene visualizzata la temperatura esterna. Richiudere il coperchio.
5.2 Ricezione di valori esterni
• La stazione base inizia a ricevere la temperatura esterna per 3 minuti e il simbolo della ricezione inizia a lampeggiare.
• Se non si riceve la temperatura esterna, sul display della stazione base resta visualizzata “- -.-”. Controllare le batterie e
riprovare di nuovo.
• È successivamente possibile avviare anche manualmente la ricerca del segnale del trasmettitore (ad esempio in caso di
perdita del segnale o di sostituzione della batteria). Tenere premuto il tasto CHANNEL della stazione base per due secondi.
Il trasmettitore (canale) registrato viene cancellato e sul display viene visualizzato “- -. -”. Durante la ricerca del segnale del
trasmettitore i valori massimi e minimi sono eliminati automaticamente.
5.3 Ricezione dell'ora radiocontrollata
• L'orologio inizia a ricevere il segnale radio e il simbolo della ricezione del segnale DCF inizia a lampeggiare. Se il codice
dell'ora è stato ricevuto dopo alcuni minuti, l'ora radiocontrollata e il simbolo della ricezione del segnale DCF sono costan-
temente visualizzati sul display.
• In caso di mancata ricezione del segnale, è possibile avviare l'inizializzazione manualmente. Tenere premuto per due secon-
di il tasto DOWN/RCC.
• Il simbolo della ricezione del segnale DCF lampeggia.
• Interrompere l'operazione di ricezione tenendo premuto nuovamente il tasto DOWN/RCC per due secondi. Il simbolo della
ricezione del segnale DCF scompare.
• La ricezione del segnale DCF avviene ogni giorno ore 01:00, 02:00, 03:00, 04:00 e 05:00 del mattino.
• Ci sono 3 differenti stati di ricezione:
lampeggiante – ricezione attiva
si ferma – ricezione molto buona
scompare – nessuna ricezione
TFA_No. 35.1163_Anleitung 28.08.2021 9:18 Uhr Seite 19

3938
Stazione meteorologica radiocontrollata
• Nel caso in cui l’orologio non riesca a ricevere il segnale DCF (a causa di guasti, della distanza di trasmissione, ecc.), l'ora
può essere impostata manualmente. L'orologio funziona come un normale orologio al quarzo (vedi: Impostazioni manuali).
5.4 Indicazione per la ricezione dell'ora radiocontrollata
• L'ora viene trasmessa da un orologio atomico vicino Francoforte con un segnale a frequenza DCF - 77 (77,5 kHz) entro un
raggio di 1.500 km. Il vostro orologio radiocontrollato riceve il segnale e lo converte per visualizzare l'ora precisa. Anche il
passaggio tra ora solare e ora legale è automatico.
• Durante le ore notturne, le interferenze dovute ad agenti atmosferici sono normalmente meno influenti. Una singola ricezio-
ne giornaliera è sufficiente a mantenere la deviazione al di sotto di un secondo. In casi estremi si consiglia di sistemare
l'unità vicino ad una finestra.
6. Uso
• L'apparecchio esce automaticamente dalla modalità impostazione se non si preme alcun tasto per più di 15 secondi.
• Tenere premuto il tasto UP/MAX/MIN o DOWN/RCC in modalità impostazione per procedere velocemente.
6.1 Impostazioni manuali
• Tenere premuto il tasto MODE per due secondi per passare alla modalità di impostazione.
• Il primo valore regolabile lampeggia sul display.
• Utilizzare il tasto UP/MAX/MIN o DOWN/RCC per effettuare l'impostazione desiderata, mentre il valore lampeggia.
• Premere il tasto MODE per confermare l'impostazione e passare al valore successivo.
• L'ordine è il seguente:
– Anno, mese, data
– Ore, minuti
– Fuso orario +12/-12 (predefinito: ZONE 00)
– Ricezione del segnale radio DCF ON/OFF (predefinito: ON)
6.1.1 Impostazione del fuso orario
• In modalità impostazione è possibile effettuare la correzione del fuso orario (+12/-12).
• La correzione del fuso orario è attiva dove è possibile ricevere il segnale DCF ma il fuso orario differisce da quello tedesco
(ad esempio, +1 = un'ora dopo).
6.1.2 Ricezione DCF
• La ricezione DCF è attiva per impostazione predefinita (ON). Dopo l'avvenuta ricezione del segnale DCF non è necessaria
alcuna regolazione della ora manuale.
• Se la ricezione del segnale radio è disattivata (OFF) è necessario impostare l'ora e la data manualmente.
• Se il segnale DCF è attivato, in caso di corretta ricezione del segnale DCF, l'ora impostata in modo manuale viene sostituita.
Stazione meteorologica radiocontrollata
6.2 Visualizzazione della data
• Premere il tasto MODE per alternare tra la visualizzazione dell'ora e quella della data. L'ordine è il seguente: Ora, anno,
mese, giorno. Il display cambia automaticamente alla visualizzazione dell'ora attuale.
7. Temperature massime e minime
• I valori massimi e minimi della temperatura interna ed esterna dall'ultimo reset sono visualizzati permanentemente sul
display.
• Tenere premuto il tasto UP/MAX/MIN per 3 secondi. I valori MAX/MIN vengono cancellati e viene ripristinato il valore attuale.
8. Previsioni del tempo
8.1 Previsioni del tempo con simboli
• La stazione meteorologica riconosce 7 simboli meteo diversi:
soleggiato parzialmente coperto piovoso temporale neve temporale
nuvoloso (pioggia) (neve)
• Viene visualizzato un cristallo di neve (simbolo 6 e 7) quando è segnalata pioggia o temporale e la temperatura esterna sul
canale 1 è inferiore a 0°C. Se sul canale 1 non è collegato alcun trasmettitore, l'apparecchio utilizza i valori del canale 2 o 3.
Se il trasmettitore corrispondente non si trova all'aperto o non è collegato alcun trasmettitore, non si riceve una previsione
di neve.
• La previsione tramite l'indicazione del simbolo si riferisce ad un periodo di tempo di 6 – 12 ore e indica solo una tendenza
atmosferica. Se ad esempio in questo momento è nuvoloso e viene segnalata pioggia, non si tratta di un funzionamento
difettoso dell'apparecchio, bensì di una indicazione che la pressione dell'aria è scesa e c'è da aspettarsi un peggioramento
del tempo, anche se non necessariamente la pioggia.
8.2 Frecce di tendenza
• La freccia della tendenza mostra se la pressione atmosferica nelle ultime 3 ore è in aumento, in discesa o stazionaria.
In aumento (+1-2 hPa) Miglioramento del tempo
TFA_No. 35.1163_Anleitung 28.08.2021 9:18 Uhr Seite 20
La pagina si sta caricando...
La pagina si sta caricando...
La pagina si sta caricando...
La pagina si sta caricando...
La pagina si sta caricando...
La pagina si sta caricando...
La pagina si sta caricando...
La pagina si sta caricando...
La pagina si sta caricando...
La pagina si sta caricando...
La pagina si sta caricando...
La pagina si sta caricando...
-
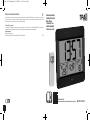 1
1
-
 2
2
-
 3
3
-
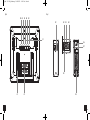 4
4
-
 5
5
-
 6
6
-
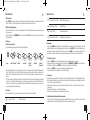 7
7
-
 8
8
-
 9
9
-
 10
10
-
 11
11
-
 12
12
-
 13
13
-
 14
14
-
 15
15
-
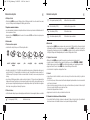 16
16
-
 17
17
-
 18
18
-
 19
19
-
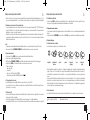 20
20
-
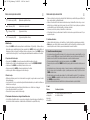 21
21
-
 22
22
-
 23
23
-
 24
24
-
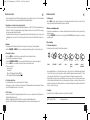 25
25
-
 26
26
-
 27
27
-
 28
28
-
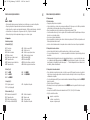 29
29
-
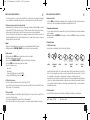 30
30
-
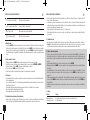 31
31
-
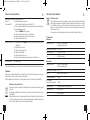 32
32


TFA ZENO 35.1163.01 Manuale utente
- Categoria
- Sveglie
- Tipo
- Manuale utente
in altre lingue
- français: TFA ZENO 35.1163.01 Manuel utilisateur
- español: TFA ZENO 35.1163.01 Manual de usuario
- Deutsch: TFA ZENO 35.1163.01 Benutzerhandbuch
- Nederlands: TFA ZENO 35.1163.01 Handleiding
Documenti correlati
-
TFA 35.1118.01 Manuale utente
-
TFA Dostmann Radio-controlled Weather Station MEMO Manuale utente
-
-
-
-
TFA Dostmann Wireless weather station WEATHER BOY Manuale utente
-
-
-
-
