
TASTIERA LCD CAPSENSE
MANUALE DI INSTALLAZIONE E
PROGRAMMAZIONE
KSI2100000.300
www.kseniasecurity.com
MULTIFUNCTION LCD KEYPAD
QUICK INSTALLATION AND PROGRAMMING
GUIDE
CLAVIER LCD MULTIFONCTION
GUIDE DE PROGRAMMATION ET
D’INSTALLATION RAPIDE

2
INDICE | INDEX | TABLE DES MATIÈRES
INTRODUZIONE ...................................................................................................................................................... 3
DATI TECNICI .........................................................................................................................................................3
ACCESSORI OPZIONALI........................................................................................................................................4
INSTALLAZIONE ...................................................................................................................................................... 4
FUNZIONI ................................................................................................................................................................4
APERTURA COPERTURA TRASPARENTE ...............................................................................................................7
CONSIGLI SULL’USO DELLA TASTIERA CAPSENSE ............................................................................................... 8
DESCRIZIONE FUNZIONI TASTIERA ........................................................................................................................ 8
INTRODUCTION ...................................................................................................................................................11
TECHNICAL DATA ...............................................................................................................................................11
OPTIONALS ..........................................................................................................................................................12
FUNCTIONS .......................................................................................................................................................... 12
INSTALLATION ...................................................................................................................................................... 12
OPEN TRANSPARENT COVER .............................................................................................................................15
SUGGESTION ABOUT THE USE OF THE CAPSENSE TECHNOLOGY ................................................................... 16
KEYPAD FUNCTION DESCRIPTION .....................................................................................................................16
INTRODUCTION ...................................................................................................................................................19
DONNEES TECHNIQUES ......................................................................................................................................19
ACCESSOIRES OPTIONNELLE .............................................................................................................................20
FONCTIONS .........................................................................................................................................................20
INSTALLATION ...................................................................................................................................................... 20
OUVRIR LE COUVERCLE TRANSPARENT ............................................................................................................23
CONSEILS D’UTILISATION DE LA TECHNOLOGIE CAPSENSE ............................................................................ 24
DESCRIPTION DES FONCTIONS DU CLAVIER ....................................................................................................24
CERTIFICAZIONI | CERTIFICATIONS ................................................................................................................... 27

IT
3
INTRODUZIONE
ergo è un’innovativa tastiera con display a cristalli liquidi dal design sobrio e pulito e dal prolo
estremamente sottile (incassata a parete sporge meno di 13 mm) che collocata in un qualsiasi
ambiente ne esalta prestigio e modernità.
Grazie all’impiego della tecnologia “CapSense” sono state eliminate completamente tutte le
antiestetiche parti meccaniche (tasti e pulsantini vari), oggetto spesso di falsi contatti e fonte di accumulo
di polvere (al punto che la maggior parte delle soluzioni attualmente presenti sul mercato necessitano
nella migliore delle ipotesi di uno sportellino per nasconderle). Il frontale della nuova tastiera ergo è
invece completamente liscio e tutte le funzioni desiderate si attivano semplicemente sorandone la
supercie in corrispondenza delle area indicate dalla graca (tutta protetta all’interno: numeri, simboli,
area del mouse a scorrimento circolare), in maniera semplice e razionale. Le funzioni possibili, come
dettagliatamente descritto in seguito, sono davvero molte e innovative. Può essere personalizzata nei
4 colori Ksenia (bianco, nero, grigio e rosso) semplicemente sostituendo le mascherine interne, incluse
nella confezione per utente nale, operazione effettuabile con estrema facilità anche da parte di
quest’ultimo semplicemente rimuovendo il coperchio a pressione. E’ stata pensata anche per essere
montata ad incasso (senza aggiunta di altre parti plastiche) nella scatola DIN 503 standard oppure
a parete, oppure, se si desidera, si può optare per la soluzione da tavolo con l’ausilio del supporto
incluso. La tastiera ergo può essere collegata sia al Comunicatore Universale GSM/GPRS gemino sia
alle centrali anti-intrusione Ksenia della serie lares, in quanto, a differenza di qualsiasi altro dispositivo
analogo, funziona anche come “unità di programmazione”, semplicando la vita dell’installatore che
così non ha più necessità di portare con sè il computer per la programmazione del Comunicatore o
della centrale anti-intrusione. Tutta la programmazione e la gestione di gemino (in modalità stand-
alone e non) e lares, infatti, possono essere effettuate direttamente dalla tastiera ergo. ergo quindi può
essere usata per programmare interamente il sistema o anche per modicare solo i dati che si desidera,
in qualsiasi momento della vita dell’impianto, come numeri telefonici,indirizzi email, sms, ecc. (Il cavo
per programmazione è disponibile come accessorio opzionale).
DATI TECNICI
• Display LCD 16x2 (area visibile 61 x 16 mm)
• Tecnologia CapSense (nessun tasto meccanico)
• Scroll circolare: veloce accesso al menù
• Disponibile al cliente nale in 4 colori
• Lettore di prossimità RFID/ NFC
• Microfono ed altoparlante integrato per ascolto ambientale
• “Fast Addressing System”: nessuna necessità di pre-impostazione dell’indirizzo del dispositivo
(rilevamento automatico da parte della centrale/comunicatore)
• Alimentazione: 13,8Vcc
• Assorbimento: 15mA standby, 400mA max
• Nr. 2 morsetti programmabili come ingressi (per zone, contatti), oppure come uscite Open Collector
(500mA max)
• 1 uscita di alimentazione di servizio per dispositivi esterni (0,5 A max)
• Bus di comunicazione/alimentazione con connettore ridondato a collegamento rapido
• RFID/NFC 13.56 MHz (2 cm distanza massima)
• Temperatura di funzionamento: 5 - 40°C
• Dimensioni ingombro massimo: 105 x 145 x 25 mm
• Peso: 180 gr

IT
4
FUNZIONI
• Visualizzazione dello stato dell’impianto
• Visualizzazione dei parametri di funzionamento (data/ora, rete GSM attiva, livello GSM, ecc.)
• Comando del sistema (inserimenti totali o parziali, reset, attivazione dei terminali di uscita, chiamate
telefoniche, ecc.)
• Programmazione dei parametri del sistema/centrale
• Programmazione dei parametri locali (volume dell’audio, livello della luminosità)
• Esclusione funzionalità tastiera per pulizia frontale
• Ascolto Ambientale
• Registrazione di messaggi Vocali
• Lettura di Tag RFID/NFC per l’inserimento e disinserimento dei sistemi antintrusione realizzati con i
dispositivi della serie lares
ACCESSORI OPZIONALI
KSI7500000.000 / KIT cavetto 1,5 m. per programmazione GSM/GPRS
KSI2100001.300 / Supporto da parete
KSI2100002.300 / KIT tastiera ergo
INSTALLAZIONE
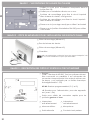
INSTALLAZIONE AD INCASSO O A PARETE
INSTALLAZIONE CON SUPPORTO DA TAVOLO
La tastiera ergo può essere installata direttamente a muro o essere alloggiata in una scatola DIN 503
incassata a muro oppure, tramite l’apposito supporto, appoggiata ad una supercie piana.
1. Far passare i li attraverso l’apposita apertura.
2. Fissare il fondo della tastiera alla scatola DIN 503 usando le viti fornite aprendo le apposite asole. Per
il ssaggio a muro usare opportuni tasselli (non forniti) attraverso le apposite asole.
3. Collegare i li ai terminali sul retro della tastiera.
4. Fissare ad incastro il circuito stampato sul lato sinistro del fondo tastiera con il display rivolto verso
l’alto e la morsettiera sul fondo del retro ed esercitare pressione sul lato esterno destro no a sentire
il doppio clic.
5. Posizionare la mascherina colorata all’interno del coperchio.
6. Chiudere il coperchio.
1. Installare la parte 1 del supporto da tavolo sul retro del fondo tastiera esercitando una leggera
pressione.
2. Applicare la parte 2 del supporto alla parte 1 attraverso l’apposito perno.
3. Far passare i li attraverso l’apposita apertura.
4. Collegare i li ai terminali sul retro della tastiera.
5. Fissare ad incastro il circuito stampato sul lato sinistro del fondo tastiera con il display rivolto verso
l’alto e la morsettiera sul fondo del retro ed esercitare pressione sul lato esterno destro no a sentire
il doppio clic.
6. Posizionare la mascherina colorata all’interno del coperchio.
7. Chiudere il coperchio.
8. Utilizzare il cavetto opzionale per programmazione del comunicatore GSM/GPRS gemino.

IT
5
NOTE DI INSTALLAZIONE
1. All’accensione, il dispositivo ergo visualizzerà sul display le seguenti informazioni:
• Prima riga: ‘Ksenia Security’
• Seconda riga: a partire dal primo carattere a destra la versione relativa al FW caricato sul dispositivo
(x.x.xxx), a partire dal 10° carattere il Serial Number del dispositivo (6 caratteri numerici).
Quanto detto è vero se ergo viene acceso per la prima volta, senza essere collegato sul KS-BUS o se
collegato ad un dispositivo diverso da quello a cui in precedenza era stato connesso.
2. ergo come già detto può essere personalizzata utilizzando le mascherine fornite nella confezione
originale, per effettuare questa operazione (cioè il cambio della mascherina) è opportuno
consigliato attivare la funzione “Pulizia” prima di aprire il frontalino e poi procedere alla sostituzione
della stessa (per successive modiche a questa operazione si rimanga ai manuali dei dispositivi della
serie gemino o lares).
Informazioni sullo smaltimento per gli utenti (Direttive RAEE)
Attenzione: Per smaltire il presente dispositivo, non utilizzare il normale bidone della spazzatura!
Le apparecchiature elettriche ed elettroniche usate devono essere gestite a parte e in conformità alla legislazione che richiede il
trattamento, il recupero e il riciclaggio adeguato dei suddetti prodotti.
In seguito alle disposizioni attuate dagli Stati membri, i privati residenti nella UE possono conferire gratuitamente le apparecchiature
elettriche ed elettroniche usate a centri di raccolta designati* o al rivenditore locale che può ritirare gratuitamente se l’utente acquista un
altro prodotto nuovo di tipologia simile.
Se le apparecchiature elettriche o elettroniche usate hanno batterie o accumulatori, l’utente dovrà smaltirli a parte preventivamente in
conformità alle disposizioni locali.
Lo smaltimento corretto del presente prodotto contribuirà a garantire che i riuti siano sottoposti al trattamento, al recupero e al riciclaggio
necessari prevenendone il potenziale impatto negativo sull’ambiente e sulla salute umana, che potrebbe derivare da un’inadeguata
gestione dei riuti.
Sono previste sanzioni molto elevate nel caso di irregolarità nel rispetto del Decreto Leg.vo 151/05.
* Per maggiori informazioni si prega di contattare l’autorità locale competente.
L’installazione di queste apparecchiature deve essere effettuata a regola d’arte, in accordo con le norme vigenti. Queste apparecchiature
sono state sviluppate secondo criteri di qualità, afdabilità e prestazioni adottati dalla Ksenia Security.
Si raccomanda di vericare il corretto funzionamento del sistema almeno una volta al mese. Le procedure per il collaudo dipendono dalla
congurazione del sistema.
Rivolgersi all’installatore del sistema per conoscere le procedure da seguire.
Ksenia Security Srl declina ogni responsabilità nel caso in cui le apparecchiature vengano manomesse da personale non autorizzato. Il
contenuto di questo manuale può essere soggetto a modiche, senza preavviso, e non rappresenta un impegno da parte della KSENIA
SECURITY.

IT
6
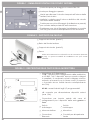
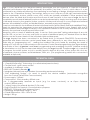
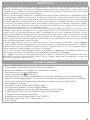
FIGURA 1 - IMMAGINE FRONTALE DEL FONDO TASTIERA
FIGURA 2 - SUPPORTO DA TAVOLO
3
3
1 1
6
5
2
24
4
1Asole da aprire per ssaggio su scatola DIN 530
1Supporto da tavolo (parte 1)
2Asole per ssaggio a parete
2Retro del fondo tastiera
3Alette per allocare il circuito stampato all’interno della
tastiera, lato sinistro
3Supporto da tavolo (parte 2)
4Mollette in plastica per il blocco denitivo del circuito
all’interno della tastiera.
4Perno
5Posizionare una vite di ssaggio (installazione a parete)
per usufruire della protezione anti-rimozione
6Posizionare una vite di ssaggio (installazione su scatola
DIN 530) per usufruire della protezione anti-rimozione
1
3
4
2Al ne di mantenere la conformità con le normative elencate
a pag. 11 questa modalità di installazione non può essere
utilizzata.
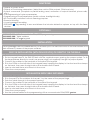
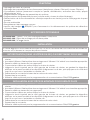
FIGURA 3 - DESCRIZIONE DELLE PARTI E DELLA MORSETTIERA
7
3
88
1
6
5
2
4
1Morsettiera di Collegamento
+ A B - : Morsetti per il collegamento delle periferiche
su KS-BUS. Tutti i dispositivi devono essere collegati
in parallelo, è necessario quindi collegare ciascun
morsetto ai morsetti con lo stesso nome (il morsetto
+ è protetto da un fusibile termico autoripristinante
da 1,5A).
M1 M2: morsetti relativi agli I/O programmabili
+P: morsetto per alimentazione dispositivi esterni
(max 1,5A).
2
Connettore per innesto rapido del cavo di
collegamento per i dispositivi della serie gemino e
lares.
3Switch
Antistrappo
7Connettore
Riservato 8Contatti per altoparlante
fondo
Switch
Antistrappo
4
5Microcontrollore 6Microfono

IT
7
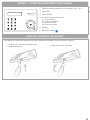
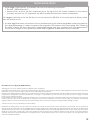
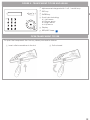
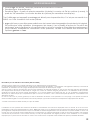
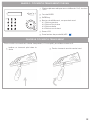
FIGURA 4 - COPERTURA TRASPARENTE E MASCHERINA
ESC
4.1
4.2
4.4
4.3
3
1
65
2
4
1Tastierino alfanumerico con i tasti da 1 a 9, * e #
2Tasto ESC
3Tasto ENTER
Scroll che prevede anche:
4.1. Freccia a Sx
4.2. Freccia in Basso
4.3. Freccia a Dx
4.4. Freccia in Alto
4
5Display
6RFID/NFC Area
Per aprire la copertura trasparente della tastiera procedere come illustrato in gura:
Inserire un cacciavite piatto nella
apposita fessura Fare leva verso l’esterno
APERTURA COPERTURA TRASPARENTE
1 2

IT
8
CONSIGLI SULL’USO DELLA TASTIERA CAPSENSE
La tastiera che hai acquistato non utilizza tasti meccanici, ma la nuova tecnologia CapSense. Se
possiedi già dispositivi con tastiere capacitive non avrai alcuna difcoltà ad utilizzarla, se invece è la
prima volta che utilizzi questo tipo di dispositivi ti invitiamo a seguire alcuni piccoli consigli per ottenere
rapidamente il massimo delle prestazioni da questa tecnologia. Appena si accende, la tastiera effettua
una calibrazione per adattare la sua sensibilità in funzione delle condizioni di umidità, temperatura,
etc..
Dopo l’accensione è bene aspettare 10-15 sec. prima di avvicinare le dita alla tastiera.
In questa fase è importante che la tastiera sia nelle sue reali condizioni di utilizzo, ad esempio se la
si usa con il supporto da tavolo non va lasciata capovolta. Se anche così fosse, nessun problema:
basta non premere alcun tasto ed in 8-10 sec. la tastiera effettua una nuova calibrazione adattandosi
continuamente alle condizioni ambientali. Questo permette anche di mantenere una sensibilità
uniforme nel tempo.
Evitare di compiere qualsiasi operazioni con le dita bagnate o umide.
Avvicina le dita nella posizione dei “tasti”, sorando appena la tastiera con il polpastrello. Se ti sembra
che la sensibilità sia troppo bassa, non occorre aumentare la pressione esercitata, anzi questo non
porta nessun benecio. In questo caso basta cambiare la regolazione della sensibilità, impostabile su
tre livelli diversi e selezionabile sia dal menù della tastiera sia dalla programmazione tramite software
basis.
Inne un gioco - Inserisci il tuo PIN, naviga nei menù con lo scroll circolare, scegli un menù, ad esempio
quello che consente di inserire un numero in rubrica ed inserisci un numero telefonico, premendo i tasti.
Dopo alcuni minuti capirai di aver già preso condenza con la tastiera ergo!
PIN INSTALLATORE: 123456
PIN UTENTE: 147258 (attivo solo dopo aver assegnato la tastiera alla centrale)
DESCRIZIONE FUNZIONI TASTIERA
TASTIERINO
Il Tastierino serve per l’immissione di dati/caratteri in fase di congurazione, inserimento PIN
(programmatore o utente), ecc..
Sorando o effettuando una leggera pressione nell’area corrispondente al numero desiderato, è
possibile l’immissione oltre che dei numeri da 0 a 9, anche di caratteri alfanumerici (lettere e simboli)
a seconda del contesto (menu) in cui si sta agendo. Per l’immissione tramite tastierino di caratteri è
stata implementata la modalità tipica dei Cellulari, cioè la pressione ripetuta del tasto che, permette
di cambiare la lettera immessa in base a quanto prestabilito (in seguito è riportata la tabella di
associazione caratteri Tasto).
Durante l’immissione di una stringa utilizzando il tastierino, l’avanzamento sulla riga del display, può
essere effettuata in due modi: digitando un “tasto” diverso da quello utilizzato in precedenza, oppure
dopo 3s di inattività dall’ultimo “tasto” digitato.
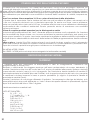
Tabella associazione caratteri tasti:
TASTO SET CARATTERI:
0 ( ) / % - _ # *
1 “ “ ‘spazio’ ? ! , . \ ‘ &
A B C a b c 2 $ @
D E F d e f 3 ; <
G H I g h i 4 = >
J K L j k l 5 [ ]
M N O m n o 6 { :
P Q R S p q r s 7
T U V t u v 8 + }
W X Y Z w x y z 9

IT
9
TASTO ESC
Il tasto ESC serve per uscire dal menu, permettendo di tornare al livello immediatamente superiore;
quindi nel caso in cui si è all’interno di un menu ramicato, ci vorranno pressioni ripetute del tasto ESC
per uscire e tornare magari al menu principale.
Con la tastiera a riposo, la pressione prolungata del Tasto ESC per circa 2 sec. permette di attivare la
funzione pulizia che come dice il nome stesso consente di pulire la supercie frontale disabilitando tutte
le funzioni della tastiera.
Durante lo stato di blocco della tastiera per l’attivazione della funzione pulizia, sul display di ergo
verranno visualizzate le seguenti informazioni:
• Prima riga: “Blocco tastiera”
• Seconda riga: “.” in avanzamento che scandiscono la durata del “Blocco tastiera”; cioè quando
il “.” occupa l’ultimo carattere della riga, la funzione pulizia termina ed ergo torna nello stato di
funzionamento normale.
ENTER
DISPLAY
RFID/NFC AREA
Il tasto ENTER permette di entrare nel menu desiderato, nel caso in cui si stia navigando, di andare in
modica in fase di visualizzazione dei dati di programmazione oppure di confermare l’immissione di un
dato se si era in fase modica.
A tal proposito, si evidenzia il seguente comportamento:
• Durante la navigazione nel menu principale la “pressione” dell’Enter permette di entrare
nel sottomenu e di andare avanti nell’esplorazione nel caso il menu abbia più ramicazioni;
• Durante la visualizzazione dei dati di programmazione, la “pressione” dell’Enter permette
di andare in modica sul dato stesso e questo provoca:
- il lampeggio del valore impostato se esso è selezionabile con un set predenito attraverso
lo Scroll;
- il lampeggio del primo carattere della stringa nel caso in cui si stia modicando una
stringa;
- il lampeggio del primo numero nel caso in cui si stia modicando un valore numerico o
un numero telefonico.
• Durante la fase di modica, l’ulteriore “pressione” dell’Enter conferma il dato immesso o
modicato (che quindi viene inviato a gemino o lares che li memorizzano) e sul display di
ergo può essere visualizzato: il dato successivo, il menu successivo o rimanere in
visualizzazione del dato stesso.
La “pressione” dell’ENTER con ergo a riposo, permette di visualizzare i dati relativi all’installatore (Nome,
Numero o indirizzo email) sempre se impostati in fase di congurazione. Nel caso in cui i dati installatore
non fossero presenti, sulla prima e seconda riga del display verranno visualizzate due stringhe di default:
<Installatore>
<Informazioni>
Il Display permette le visualizzazioni di tutte le informazioni e dei dati gestibili tramite ergo, esso è
composto da 16 caratteri per 2 righe (non è graco), però è possibile visualizzare stringhe più lunghe
(no a 32 caratteri) grazie alle funzioni di shift manuale e automatico che sono state implementate nel
suo FW. Infatti nel caso in cui una stringa da visualizzare sulla prima riga del Display fosse di 32 caratteri,
essa verrà shiftata in avanti e indietro di 16 caratteri alla volta ogni 3 sec. circa in modo automatico.
La tastiera e’ provvista di un’antenna interna che permette il rilevamento di Tag, Telefonini o qualsiasi
altro dispositivo provvisti di chip funzionanti con lo standard RFID/NFC 13.56MHz semplicemente
avvicinandoli all’area indicata in gura a pag. 7

IT
10
Esso in realtà non è un tasto ma la zona delimitata dalla circonferenza (presente sul lato destro di ergo)
in cui è presente una piccola depressione. Agendo in questa zona, in senso orario (per andare avanti)
o antiorario (per andare all’indietro) si può:
• scorrere le varie voci del menu in avanti o all’indietro;
• scegliere i dati di congurazione da immettere(che saranno quelli previsti per il dato che
si sta modicando e non altri) quali: caratteri , numeri, valori prestabiliti ecc. (#);
Sempre in questa zona è possibile utilizzare le funzioni di:
• “Freccia in Alto” agendo in modo prolungato (circa 0,5 sec.) nella zona indicata dal
punto 4.4 della gura 4; si accendono alle stesse funzioni descritte per lo Scroll utilizzato in
senso Orario (ovviamente lo scorrere il menu o i valori di programmazione possibili in
questa modalità è più lenta in quanto va a step di 0,5s);
• “Freccia in Basso” agendo in modo prolungato (circa 0,5 sec.) nella zona indicata dal
punto 4.2 della gura 4; si accendono alle stesse funzioni descritte per lo Scroll utilizzato in
senso Antiorario (ovviamente lo scorrere il menu o i valori di programmazione possibili in
questa modalità è più lenta in quanto va a step di 0,5s);
• ”Freccia a Sx” agendo in modo prolungato (circa 0,5 sec.) nella zona indicata dal punto
4.1. Questa funzione permette di scorrere una stringa all’indietro; nel caso in cui si è nella
fase di modica di un dato e si è posizionati sull’ultimo carattere numero a destra, l’utilizzo
di questa funzione permette la cancellazione in successione di uno o più caratteri/numeri
del dato che si sta modicando no ad eliminarlo completamente;
• ”Freccia a Dx” agendo in modo prolungato (circa 0,5 sec.) nella zona indicata dal punto
4.3. Questa funzione permette di scorrere una stringa in avanti, qualora essa fosse più
lunga dei 16 caratteri che il display di ergo può visualizzare. Lo scorrimento in avanti può
funzionare in modo diverso a seconda se si è in fase di navigazione nei menu o in fase di
modica di un dato, infatti nel primo caso l’avanzamento prevede uno scorrimento di 16
caratteri alla volta, mentre nel secondo caso di un singolo carattere alla volta.
(#) Lo Scroll durante la fase di inserimento dati, permette nelle varie situazioni di selezionare in modo
veloce i possibili valori che possono essere immessi nel dato che si è in procinto di modicare la
congurazione e la navigazione all’interno dei vari menu.Nel caso in cui si sta inserendo o modicando
una stringa, esso permette di scorrere tutta la gamma di caratteri Ascii Standard (a partire dalla lettera
A) ruotando in senso Orario/Antiorario sullo Scroll o utilizzando le funzioni “Freccia in Alto”/ “Freccia
in Basso” per andare in avanti o indietro. I caratteri previsti dalla Tabella Ascii Standard e quindi
selezionabili tramite lo Scroll o le Frecce sono:
• ” “ ‘spazio’ ! “ # $ % & ‘ ( ) * + , - . / ‘ 0 1 2 3 4 5 6 7 8 9 : ; < = > ? @ A B C D E F G H I J K L M N O P R S T
U V W X Y Z [ \ ] ^ _ ‘ a b c d e f g h i j k l m n o p q r s t u v w x y z { | } ~
Nel caso in cui si sta inserendo o modicando un dato che non è una stringa esso permette, di scorrere
tra i valori possibili previsti per il dato specico, alcuni esempi sono:
• 0 1 2 3 4 5 6 7 8 9 (se si stanno inserendo valori numerici);
• 0 1 2 3 4 5 6 7 8 9 * # (se si sta inserendo un numero telefonico);
• 0 1 2 3 4 5 6 7 8 9 A B C D E F (se si stanno inserendo valore Esadecimali);
• valori da 01 a 31 (se si sta modicando il giorno di una data);
• numeri da 01 a 12 (se si sta modicando il mese di una data);
• numeri da 00 a 99 (se si sta modicando l’anno di una data);
• ON, OFF
• ecc.
Il tutto per far capire che la funzione principale dello Scroll e delle funzioni su di esso implementate,
hanno lo scopo di facilitare l’inserimento dei Dati in fase di congurazione e la navigazione all’interno
di vari menù.
SCROLL

EN
11
INTRODUCTION
ergo is a very advanced LCD Keypad carefully developed with the objective to capture a modern,
minimalist and discreet style and an extremely slim prole ( less than ½ inch.), which allows it to be
positioned in any interior architecture thus expressing a new feeling of design, prestige and innovation.
Thanks to the “Capacitive Sensing” Technology, here you won’t see any of the ugly mechanical parts
(like as membranes, buttons, plastic cover, etc.) which are typically available in other products and
that are often the ideal dust location and the source of bad contacts. In the case of ergo the front is
completely smooth and all desired functions can be implemented by simply touching upon the surface
in the areas shown by the graphic (letters, symbols, circular-scroll mouse) in a very simple and rational
manner. All available functions, as detailed below, are really many and surprising.
It can be customized in the 4 different Ksenia institutional colors (White, Black, Red and metallized Grey),
simply by removing the transparent cover and interchanging the internal cover (Lexan) with one of
those included in the package envelope, such operation is meant to be so easy and safe that can be
done by the end-user at anytime and without risks.
Moreover, with no need of additional parts, it can be “ush-mounted” taking advantage of any std.
box Din 503, or just as it is on any wall (with no need of additional parts) or if desired even the desk-
solution can be chosen thanks to the included stylish sustainer parts.
The ergo keypad has been conceived to be linked both to Universal GSM/GPRS Communicator
geminoTM and Ksenia intrusion control panel lares, since, differently to any other similar devices, it
works also as “programming unit” , making the installer’s life much easier by avoiding the need of
having a PC with for the Communicator or the Intrusion Control Panel programming (see gure below).
As a matter of fact, all gemino’s and lares’s programming and managing functions (whether working
at stand-alone or not) can be executed directly from the ergo Keypad. Therefore ergo is in a position
to program the entire system or just to modify specic data at any time of the system life, such as,
for example, phone numbers, email addresses, SMSs, etc. (The programming cable with connectors is
available as optional).
TECHNICAL DATA
• LCD Display 16x2 (visible area 61 x 16mm)
• “Capacitive Sensing” Technology (no mechanical press-buttons)
• Circular Scroll : quick menu access
• Available in 4 different colors
• RFID/ NFC Proximity Reader
• Integrated Microphone and Speaker for recording and remote listening
• “Fast Addressing System”: no need to pre-set the device address (automatic recognition
from the Control Panel/GSM Communicator)
• Power supply: 13,8Vdc
• Consumption: 15mA standby, 400mA max
• Nr. 2 programmable terminals as inputs (e.g. for zones, contacts), or as Open Collector
outputs (500mA max.)
• 1 supply output for external devices (0,5 A max)
• Plug & Play BUS for Supply & Communication purposes
• RFID/NFC 13.56 MHz (max. distance 2 cm.)
• Operating temperature range: 5 - 40°C
• Overall Dimensions: 105 x 145 x 25 mm
• Weight: 180 gr

EN
12
FUNCTIONS
• Display of system status
• Display of functioning parameters ( date/time, active GSM network, GSM level, etc)
• System commands (complete or partial arming, reset, activation of outputs terminals, phone calls,
etc.)
• Full Programming of system parameters
• Programming of local parameters (audio volume, backlight levels)
• KP functionality exclusion for front cleaning purposes
• Remote Listening
• Vocal messages recording
• RFID/NFC Tag reading to arm and disarm the intrusion detection systems set up with the lares
devices.
OPTIONALS
KSI7500000.000 / KIT 1,5 m. cable for GSM/GPRS programming
KSI2100001.300 / Table sustainer
KSI2100002.300 / KIT ergo keypad
INSTALLATION
BUILT-IN INSTALLATION (WITH DIN 503 BOX) OR DIRECTLY ON THE WALL
INSTALLATION WITH TABLE SUSTAINER
The keypad ergo can be installed directly on a wall or put in an DIN 503 box set in the wall or leant on a
plain surface by means of the proper sustainer.
1. Push the cable through to the proper opening.
2. Fix the keypad base to the DIN 503 box with the supplied screws opening the proper eyelets. To x
the keypad base directly to a wall, use proper plugs (not supplied) through the proper eyelets.
3. Connect the cables to the terminals on the rear of the keypad.
4. Fit in the PCBA on the left side of the keypad base, keeping the display in the front and the clamps
on the back, then press the right side until a double-click is heard.
5. Insert a coloured Lexan at choice into the cover.
6. Close the cover properly.
1. Install, with a light pressure, the part 1 of the table sustainer on the back of the keypad base.
2. Fit in the part 2 of the sustainer on the part 1 by the mean of the proper hinge.
3. Push the cable through to the proper opening.
4. Connect the cables to the terminals on the rear of the keypad.
5. Fit in the PCBA on the left side of the keypad base, keeping the display in the front and the clamps
on the back, then press the right side until a double-click is heard.
6. Insert a coloured Lexan at choice into the cover.
7. Close the cover properly.
8. Use the optional cable for the programming of the communicator GSM/GPRS gemino.

EN
13
INSTALLATION NOTES
1. When ergo is switched on, the display will show the following information:
• First line: “KSENIA Security”
• Second Line: As from the rst character (from the right) the FW version loaded on the device
(x.xx.xxx), as from the 10° character the device serial-number (six numeirc characters).
This if ergo is switched on for the rst time, if not connected to KSI-BUS, or if connected to a device other
than the previous one.
2. As said, ergo has been conceived to be customized using the interchangeable Lexans provided in
the original package. In order to perform the operation (the Lexan switch) activating the “Cleaning
Function” before the front removal is suitable/advisable, and then proceed with the replacement
(for further changes to this operation please refer to gemino or lares series device manuals.
Installation of these systems must be carried out strictly in accordance with the instructions described in this manual, and in compliance
with the local laws and bylaws in force. ergo series have been designed and made with the highest standards of quality and performance
adopted by Ksenia Security. Is recommended that the installed system should be completely tested at least once a month. Test procedures
depends on the system conguration. Ask to the installer for the procedures to be followed. Ksenia Security srl shall not be responsible for
damage arising from improper installation or maintenance by unauthorized personnel. The content of this guide can change without prior
notice from KSENIA SECURITY.
Information for users: Disposal (RAEE Directive)
Warning! Do not use an ordinary dustbin to dispose of this equipment.
Used electrical and electronic equipment must be treated separately, in accordance with the relative legislation which requires the proper
treatment, recovery and recycling of used electrical and electronic equipment.
Following the implementation of directives in member states, private households within the EU may return their used electrical and electronic
equipment to designated collection facilities free of charge*. Local retailers may also accept used products free of charge if a similar
product is purchased from them.
If used electrical or electronic equipment has batteries or accumulators, these must be disposed of separately according to local provisions.
Correct disposal of this product guarantees it undergoes the necessary treatment, recovery and recycling. This prevents any potential
negative effects on both the environment and public health which may arise through the inappropriate handling of waste.
* Please contact your local authority for further details.

EN
14
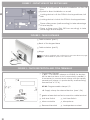
FIGURE 1 - FRONT VIEW OF THE KEYPAD BASE
FIGURE 2 - TABLE SUSTAINER
3
3
1 1
6
5
2
24
4
1Eyelets to be opened to Built-In installation on DIN 530
box
1Table sustainer (part 1)
2Eyelets to direct installation on a wall
2Back of the keypad base
3Locking device to x the PCBA in the keypad base, left
side
3Table sustainer (part 2)
4Locking device to block the PCBA in the keypad base
4Hinge
5Place a xing screw (wall mounting) to take advantage
of tear tamper
6Place a xing screw (DIN 530 box mounting) to take
advantage of tear tamper
1
3
4
2
In order to maintain the conformity to the norms listed on page
21, this installation option can’t be used.
FIGURE 3 - PARTS DESCRIPTION AND PCBA TERMINALS
7
3
88
1
6
5
2
4
1Connection Clamps
+ A B - : Connection clamps on KSI-BUS for devices.
All the devices have to be connected in parallel, it
is necessary to connect each clamp with an equally
named one (clamp + is protected by a self-restoring
thermal fuse of 1.5 A)
M1 M2: Programmable clamps I/O
+P: Supply clamp for external devices (max 1,5A)
2gemino e lares devices fast-connection cable terminal
3Anti-tear Switch
7Reserved terminal 8Loudspeakers contact
Anti-tear Switch
4
5Micro-controllor 6Microphone

EN
15
FIGURE 4 - TRANSPARENT COVER AND LEXAN
ESC
4.1
4.2
4.4
4.3
3
1
65
2
4
1Alphanumeric keypad with 1 a 9, * and # keys
2ESC key
3ENTER key
Scroll, also including:
4.1. Left arrow
4.2. Down arrow
4.3. Right arrow
4.4. Up arrow
4
5Display
6RFID/NFC Area
To open the transparent front cover, please proceed as follows:
Insert a at screwdriver in the slot Pull outward
OPEN TRANSPARENT COVER
1 2

EN
16
SUGGESTION ABOUT THE USE OF THE CAPSENSE TECHNOLOGY
The Keypad you have purchased do not utilize mechnical buttons, but the modern Capsense
Technology. If you already have other devices with capacitive Keypads, you won’t have any issues
in utilizating it and therefore do not need to continue reading this text. If instead it’s your rst time, we
inviteto follow a few small advices in order to obtain rapidly the best performances from this Technology.
Once powered, the Keypad does a self-calibration to adapt its sensitivity to the existing Humidity and
Temperature conditions.
Important note - Please wait 10 to 15 seconds before touching any buttons.
In this stage, it’s important that the keypad is positioned in its actual use conditions, for example if you
are using the desk-mount support, do not live it up-side down. Should this happen, no worries, leave
it with no touch for 10 seconds and it will go in self-calibration again in order to assure a consistent
sensitivity in the course of time.
Attention - Please avoid any contact with wet ngers!
Getting the button’s position, just touch upon with your nger tips, no pressure needed. If you believe
that the sensitivity is too low, do not increase the nger’s pressure, this doesn’t bring any benet. In this
case, it is enough to change the sensitivity setting, available in 3 different levels, by selecting it from the
keypad menù or by programming the setting taking advantage of the basis software.
At last a small test/game - Insert your PIN, surf in the menù with the circular scroll, select a menù (for
example the one which allows to insert a phone number in the phone-book and insert it by digiting on
the keypad). After few minutes only you’ll be surprised about your condence with the ergo Keypad!
DEFAULT INSTALLER’S PIN: 123456
DEFAULT USER’S PIN: 147258 (active only after the KP has benn assigned to the lares Control Panel)
KEYPAD FUNCTION DESCRIPTION
KEYPAD
It is conceived for data-entering (data/charachter) during the conguration process, PIN entering
(programmer or user) etc. By touching or exerting a slight pressure on the area corresponding to the
desired number, it allows to enter alphanumeric characters (letters and symbols) in addition to 0-9
numbers , depending on the
operating context (menu). This is possible because the keypad is provided with the tipical mobile phone
mode
technology, which allows to change the entered character depending on the settings (refer to the
following key-characters match chart).
Two ways to move forward the display line are possible while entering a text: using
another key or avoiding touching any key for 3 seconds after the last type.
Key-characters match chart:
KEY FONT:
0 ( ) / % - _ # *
1 “ “ ‘space’ ? ! , . \ ‘ &
A B C a b c 2 $ @
D E F d e f 3 ; <
G H I g h i 4 = >
J K L j k l 5 [ ]
M N O m n o 6 { :
P Q R S p q r s 7
T U V t u v 8 + }
W X Y Z w x y z 9

EN
17
ESC
The ESC key allows to exit the current menu, and go back to the previous level. This means that, wether
in a branched menu, repeated clics on the key will be needed to get back, for exanple to main menu.
A 2-second pressure on the ‘Esc’ key when the keyboard is not used allows the activation of the
cleaning function. As the name suggests, this function disable the keypad functionality for front-
cleaning purposes.
During the keypad block due to the activation of the cleaning function, the following information will
be displayed on the ergo screen:
• First line: “Keypad block”
• Second line: forewarding “.” which marks the keypad block lasting. It means that, as the “.” gets to
the last line character, the cleaning function ends and ergo recovers its regular functionally.
ENTER
DISPLAY
RFID/NFC AREA
The Enter key allows to enter the intended menu when browsing, to start editing during conguration
phase or to conrm the input of a data during an editing session.
In this regard, the following conduct:
• When broswsing the main menu, a pressure on the Enter key allows to enter the submenu and to
keep exploring in case the menu has several branches
• When visualizing the conguration data, a push on the Enter key permits the editing of the data itself
and this involves:
- the congured object ashes if it is slectable with a predened set through the Scroll;
- the rst character of a string ashes in case the string its being edited;
- the rst number ashes when a numeric data or a phone number is being edited.
• During the editing phase, a further pressure on the ENTER key conrms the immission or modication
of the data (which will be sent to gemino or lares that will store it) and the ergo display permits to show:
the following data, the subsequent menu or the data itself.
If “Enter” key is pushed when ergoTM is in standby mode, the display will show the installator’s data
(Name, Number or email address) if they were set during the keypad conguration. In case the
installator’s data were not available, the screen will display the two following default line:
<Installator>
<Information>
The Display shows all the information and the datas ergo can manage. It consist of 2 lines with 16
characters each (it is not graphic), but it can display longer strings (up to 32 characters) thanks to the
manual and automatic shift functions available on his FW. As a matter of fact, if there’s the need to
display a 32 characters string on the rst dsplay line it will be shifted to and fro 16 characters at any 3
seconds. If the 32 character string were on the second line it would be shifted through the “Right arrow”
and “Left arrow” keys. It will shift one character at any one time when in a data editing phase or 16
characters at any one time when browsing the menu.
The keypad is provided with an internal antenna that allows to detect Tags, Mobile phones or any other
devices provided with chips that work with RFID/NFC 13,56MHz standard simply by approaching it to the
area shown in gure at page 15.

EN
18
Actually, “Scroll” is not a key but the zone borded by a circle (on the right side of ergo) typied by a little
depression. The action on this zone clockwise (to move forward) or anticlockwise (to move backwards)
permits to:
• Slide forwards or backwards the menu entries;
• Pick the conguration data to enter (which will only be the suitable ones for the changing data)
such as: character, numbers, presetted values, etc. (#);
This area also allows to use the following functions:
• “Up arrow”. If a prolonged pressure (about 0,5 sec.) is exerted on the 4.4 area of the gure 5; the
same functions described for the clockwise moved scroll are activated (obviously the slide of the
menu or the conguration data available during this procedure is slower since it works at 0,5
seconds steps);
• “Down arrow”. If a prolonged pressure (about 0,5 sec.) is exerted on the 4.2 area of the gure 5; the
same functions described for the anticlockwise moved scroll are activated (obviously the slide of
the menu or the conguration data available during this procedure is slower since it works at 0,5
seconds steps);
• ”Left arrow”. A prolonged pressure (about 0,5 sec.) exerted on the 4.1 area of the gure 5 allows to
slide backwards along a line; if settled on the last character / number to the right, this function
allows to cancel in order one or more data characters / numbers until they are completely deleted;
• ”Right arrow”. A prolonged pressure (about 0,5 sec.) exerted on the 4.3 area of the gure 5 allows
to slide backwards along a line; if it is longer than the 16 characters the ergo display can show. The
forward slide can work in different ways depending on the data we are working on: if we are
browsing a menu it will slide 16 characters at any one time, while during data editing it will only slide
character at any one time.
(#) In a data entering phase “Scroll” allows to quickly select the suitable values for the data we’re
about to edit. In case a string is being entered or edited, the “Scroll” allows to slide the whole ASCII
standard cheracters range (from letter A) by its clockwise / anticlockwise twist or by using the “Up
arrow” / “Down arrow“ function to move forward or backward. The ASCII standard characters which
are eligible with this metod are:
• ” “ ‘space’ ! “ # $ % & ‘ ( ) * + , - . / ‘ 0 1 2 3 4 5 6 7 8 9 : ; < = > ? @ A B C D E F G H I J
K L M N O P R S T U V W X Y Z [ \ ] ^ _ ‘ a b c d e f g h i j k l m n o p q r s t u v w x y z {
| } ~;
If entering or editing data other than a string the Scroll allows to slide the likely possible values for the
individual data item, such as for example:
• 0 1 2 3 4 5 6 7 8 9 (when entering numbers values);
• 0 1 2 3 4 5 6 7 8 9 * # (when entering phone numbers);
• 0 1 2 3 4 5 6 7 8 9 A B C D E F (when entering hexadecimal values);
• values from 01 to 31 (if editing the day of a date);
• numbers from 01 to 12 (if editing the month of a date);
• numbers from 00 to 99 (if editing the year of a date);
• ON, OFF
• ecc.
The above said is intended to explain that the purpose of the scroll mai and anforced function is to
make data entering during conguration and menu browsing much easier.
SCROLL

FR
19
INTRODUCTION
ergo est un clavier LCD très avancé et soigneusement conçu avec comme objectif de créer un style
moderne, minimaliste et discret et un prol extrêmement plat (moins que 25mm), ce qui permet son
installation en accord avec n’importe quel style d’architecture intérieure, exprimant ainsi une nouvelle
sensation de design, de prestige et d’innovation.
Grâce à sa technologie capacitive, les éléments mécaniques laids, typiquement l’apanage d’autres
produits, souvent idéalement exposés à la poussière et qui sont souvent la source de faux contacts,
ne sont pas visibles (comme les membranes, boutons, couvercles en plastique, etc.). La paroi frontale
du clavier ergo est complètement lisse, et toutes les fonctions souhaitées peuvent être exécutées
en touchant tout simplement la surface aux endroits indiqués par les éléments graphiques (lettres,
symboles, bouton de délement-circulaire), de façon très simple et très logique. Ses fonctions sont
nombreuses et surprenantes, comme détaillé plus loin.
Il peut être personnalisé avec 4 couleurs institutionnelles Ksenia différentes (blanc, noir, rouge et gris
métallisé), en enlevant simplement le couvercle transparent, et en remplaçant la feuille intérieure
(Lexan) avec l’une des feuilles incluses dans l’emballage du kit. Cette opération est facile, sûre et
réalisable par l’utilisateur nal à n’importe quel moment et sans aucun risque. De plus, sans aucune
pièce additionnelle, il peut être encastré dans n’importe quel boîtier Din 503, ou monté sur n’importe
quel mur (aucune pièce additionnelle n’est nécessaire) ou, si souhaité, une solution-bureau est possible
grâce aux pièces de liaison stylées incluses.
Le clavier ergo a été conçu pour être connecté au communicateur GSM/GPRS universel gemino
et à la centrale d’intrusion lares Ksenia. Il fonctionne comme unité de programmation, en facilitant
grandement la vie de l’installateur en évitant le recours obligatoire à un PC pour la programmation du
communicateur ou de la centrale d’intrusion. (Voir image).
En fait, toutes les fonctions de programmation et de gestion du gemino et de la lares (qu’elles soient
autonomes ou pas) peuvent être exécutées directement à partir du clavier ergo.
Donc, ergo est en mesure de programmer tout le système ou seulement de modier des données
spéciques à n’importe quel moment dans la vie du système, telles que, par exemple, numéros de
téléphone, adresses e-mail, SMS, etc.
DONNEES TECHNIQUES
• Écran LCD 16x2 (partie visible 61 x 16mm)
• Technologie capacitive (pas de bouton mécanique)
• Bouton de délement circulaire : accès rapide au menu
• Disponible en 4 couleurs différentes
• Lecteur de proximité RFID/ NFC
• Microphone et haut-parleur intégrés pour l’enregistrement et l’écoute ambientale
• Système d’adressage rapide : il n’est pas nécessaire de prérégler l’adresse du système
(reconnaissance automatique à partir de la centrale/communicateur GSM)
• Alimentation : 13,8Vdc
• Absorption: 15mA mode veille, 400mA max.
• Deux bornes d’entrée / sortie programmable
• 1 sortie d’alimentation pour des systèmes extérieurs (0,5 A max)
• Un BUS Plug & Play pour l’alimentation & la communication
• 13.56 MHz Lecteur de proximité/NFC
• Température de fonctionnement : de 5° à 40°C.
• Dimensions globales : 105 x 145 x 25 mm
• Poids: 180 gr

FR
20
FONCTIONS
• Afchage du statut du système
• Afchage des paramètres de fonctionnement (date/heure, réseau GSM actif, niveau GSM,etc.)
• Commandes système (armement complet ou partiel, réinitialisation, activation des sorties, appels
téléphoniques, etc.)
• Programmation intégrale des paramètres du système
• Programmation des paramètres locaux (volume audio, niveau du rétro-éclairage)
• Désactivation de la fonctionnalité du clavier(composition au clavier) pour le nettoyage de la paroi
frontale
• Écoute ambientale
• Enregistrement des messages vocaux
• Lecture des badges RFID/NFC pour l’armement et le désarmement du système de détection
d’intrusion lares
ACCESSOIRES OPTIONNELLE
KSI7500000.000 / Câble 1,5 m. pour la programmation GSM/GPRS
KSI2100001.300 / Pièce de montage pour surface plate
KSI2100002.300 / KIT ergo clavier
INSTALLATION
INCORPORATION (DANS LE BOÎTIER DIN 503) OU DIRECTEMENT SUR LE MUR
INSTALLATION AVEC PIÈCE DE MONTAGE POUR SURFACE PLATE
Le clavier ergo peut être installé directement sur un mur ou encastré dans un boîtier DIN 503 installé sur
le mur ou sur un bureau au moyen des pièces fournies.
1. Installez, en appuyant légèrement, l’élément 1 de la pièce de montage sur le dos de la base du
clavier.
2. Accordez l’élément 2 de la pièce de montage avec l’élément 1 à l’aide d’une charnière appropriée.
3. Passez le câble au travers du trou approprié.
4. Connectez les câbles aux sorties situées sur le dos du clavier.
5. Intégrez le circuit imprimé par le côté gauche de la base du clavier, en gardant la disposition
afcheur sur la paroi frontale et les dispositifs d’alignement sur le dos, puis appuyez sur le côté droit
jusqu’à ce que vous n’entendiez un double-clic.
6. Insérez dans le couvercle le Lexan de la couleur de votre choix.
7. Fermez bien le couvercle.
8. Utilisez le câble optionnel pour la programmation du communicateur GSM/GPRS gemino.
La pagina sta caricando ...
La pagina sta caricando ...
La pagina sta caricando ...
La pagina sta caricando ...
La pagina sta caricando ...
La pagina sta caricando ...
La pagina sta caricando ...
La pagina sta caricando ...
-
 1
1
-
 2
2
-
 3
3
-
 4
4
-
 5
5
-
 6
6
-
 7
7
-
 8
8
-
 9
9
-
 10
10
-
 11
11
-
 12
12
-
 13
13
-
 14
14
-
 15
15
-
 16
16
-
 17
17
-
 18
18
-
 19
19
-
 20
20
-
 21
21
-
 22
22
-
 23
23
-
 24
24
-
 25
25
-
 26
26
-
 27
27
-
 28
28


in altre lingue
- English: Ksenia Ergo
- français: Ksenia Ergo
Documenti correlati
-
Ksenia ergo wls KSI2100022.302 Manuale utente
-
-
-
-
Ksenia Gemino Guida d'installazione
-
-
-
-
-
