
USER MANUAL
READ THIS MANUAL CAREFULLY BEFORE USING
LESEN SIE DIESE ANLEITUNG VOR DEM GEBRAUCH SORGFÄLTIG DURCH
LEA ATENTAMENTE ESTE MANUAL ANTES DE UTILIZARLO
LIRE CE MANUEL AVEC ATTENTION AVANT DE L’UTILISATION
ΔΙΑΒΆΣΤΕ ΠΡΟΣΕΚΤΙΚΆ ΑΥΤΌ ΤΟ ΕΓΧΕΙΡΊΔΙΟ ΠΡΙΝ ΤΟ ΧΡΗΣΙΜΟΠΟΙΉΣΕΤΕ
LEGGERE ATTENTAMENTE QUESTO MANUALE PRIMA DELL’USO
LEES DEZE HANDLEIDING AANDACHTIG DOOR VOOR GEBRUIK
PRZED UŻYCIEM NALEŻY DOKŁADNIE PRZECZYTAĆ NINIEJSZĄ INSTRUKCJĘ
LEIA CUIDADOSAMENTE ESTE MANUAL ANTES DE O UTILIZAR
CITIȚI CU ATENȚIE ACEST MANUAL ÎNAINTE DE UTILIZARE
ВНИМАТЕЛЬНО ПРОЧИТАЙТЕ ДАННОЕ РУКОВОДСТВО ПЕРЕД ИСПОЛЬЗОВАНИЕМ
09368450
09368460
AUTOMATIC
SAUSAGE STUFFER
MODEL:


3
EN
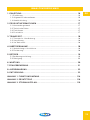
TABLE OF CONTENTS
1. PREFACE ..................................................................................................................6
1.1 Introduction .................................................................................................................... 6
1.2 General information ......................................................................................................6
1.3 Warranty .........................................................................................................................6
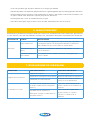
2. PRODUCT INFORMATION .....................................................................................7
2.1 Intended use ...................................................................................................................7
2.2 Specifications ................................................................................................................ 7
2.3 Features ..........................................................................................................................7
2.4 Spare parts ....................................................................................................................7
3. TRANSPORT ............................................................................................................ 8
3.1 Transport & handling ................................................................................................... 8
3.2 Packaging .......................................................................................................................8
3.3 Before use ...................................................................................................................... 8
4. INITIAL SET-UP .......................................................................................................8
4.1 Wiring & connections ....................................................................................................8
4.2 Placement ......................................................................................................................8
5. OPERATION .............................................................................................................9
5.1 How to use the appliance .............................................................................................9
5.2 Cleaning ........................................................................................................................10
6. MAINTENANCE .................................................................................................... 10
7. TROUBLESHOOTING ............................................................................................ 11
8. STORAGE ...............................................................................................................12
9. DISCARDING .........................................................................................................12
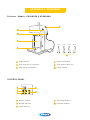
APPENDIX 1: FEATURES ...................................................................................... 114
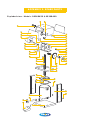
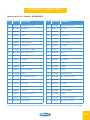
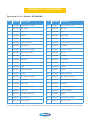
APPENDIX 2: SPARE PARTS ............................................................................... 116
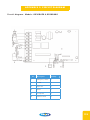
APPENDIX 3: CIRCUIT DIAGRAM ....................................................................... 119

SAFETY INSTRUCTIONS
OThis appliance may only be used for its designed purpose. Neither
the manufacturer nor the supplier are liable for damage caused by
the incorrect use of this item.
OThis is a commercial product that should only to be used by those
who have read and fully understand this manual. It must not be used
by children, or persons with reduced physical, sensory or mental
capabilities without supervision.
OThis device is intended for indoor use only.
OKeep the appliance and electrical plug away from water and other
liquids. If either is exposed to a liquid, immediately disconnect
the power supply and have the appliance checked by a certified
technician. Not following these instructions may result in electric
shock, or even death.
ODo not use the appliance after it has fallen or if is damaged in any
way. Have it checked and repaired by a certified technician.
ODo not move the appliance while in operation and never move or
carry the appliance by the power cord.
ODo not place or move the appliance on its side, upside-down or
while tilted.
ODo not open the casing or try to repair the appliance yourself, unless
instructed to by a Maxima technician. This may void the warranty,
cause damage to the machine or result in a hazardous situation.
ODo not use any devices or accessories that are not supplied with
the appliance or designed to work with it.
ONever put your hands or other body parts near the moving parts
of the appliance while operational and always keep an eye on the
appliance when in use.
ODo not insert objects in the casing or openings of the appliance.

5
EN
OAvoid overloading the appliance.
OKeep all packaging away from children and dispose of packaging
in accordance with local and national regulations.
OThe electrical installation must comply with local regulations.
OSwitch off the appliance before removing the power plug.
OAlways disconnect the power supply when the appliance is not in
use. To remove the plug from the socket, always pull the plug itself
and not the cable.
ODo not touch the power plug with damp or wet hands.
OKeep the power cable away from the range of operation and do not
cover the cable. Make sure the power cable does not come in contact
with hot or sharp objects and keep it away from open flames.
ONote that while the plug is in the electrical socket, the appliance is
connected to the electrical grid.
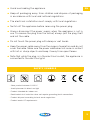
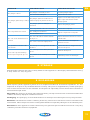
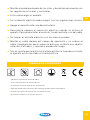
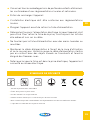
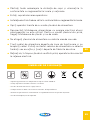
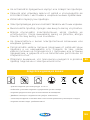
SAFETY SYMBOLS
• Store product between 10-30°C
• Avoid placement in direct sunlight
• Product intended for indoor use
• Double electrical insulation: does not require grounding/earth connections
• Product disposal according to local waste regulations
• Product meets CE requirements

1. PREFACE
1.1 Introduction
Thank you for purchasing this product from Maxima. To ensure your own safety and to get the best out
of your purchase, please read the instructions carefully before attempting to install or use this product.
This manual should be available at all times and stored near the appliance.
All Maxima products are CE certified. Our products meet the legal requirements regarding health, safety
and the environment, as set out by the European Commission. In addition, all products are thoroughly
tested prior to shipment to ensure product quality and safety.
1.2 General information
For after sales support, please visit our Customer Service page at: www.maxima.com/en/service. User
manuals are available online and can be downloaded electronically from the product’s page on our website.
If the manual for your product is not available, please contact Customer Service. For more information,
visit our website: www.maxima.com
1.3 Warranty
We offer a 12-month warranty from the date of purchase, as indicated on your purchase invoice. Under
the warranty, we will deliver additional spare parts in case of: material defects, manufacturing defects
or other quality issues.
The following is not covered by the warranty:
• Damage relating to the incorrect use of the product
• Damage relating to use of parts that were not part of the original machine
• Damage due to transport to another location after delivery, or incorrect installation and connection
• Component damage caused by incorrect electrical or water connection
• Damage as a result of disassembly and/or modification to the original machine without permission
• Damage as a result of misuse, poor cleaning or improper maintenance
• Damage as a result of fire, building collapse, lightning, flooding, power surges or vermin
• Failure to read or follow the user manual
• Consumables and parts prone to wear and tear
• An altered invoice or no invoice

7
EN
2. PRODUCT INFORMATION
2.1 Intended use
This appliance may only be used for the purpose for which it was designed and intended. The manufacturer
and supplier are not liable for any damage caused by incorrect operation and improper use.
This is a commercial product that must only be used by a trained professional who has read and understands
this manual. It must not be used by children or persons with reduced capabilities without supervision.
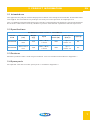
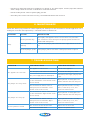
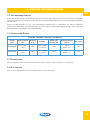
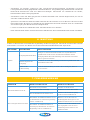
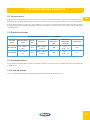
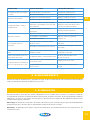
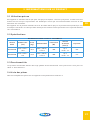
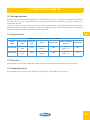
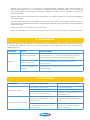
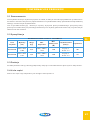
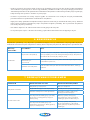
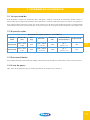
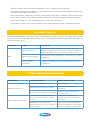
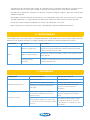
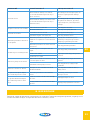
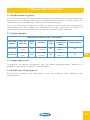
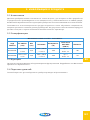
2.2 Specifications
MAXIMA SAUSAGE STUFFER - AUTOMATIC
Article
Code
Dimensions
(cm)
Weight
(kg) Input Piston Speed
(mm/s) Capacity
09368450 W37 x D33 x
H64 26,5 230V / 50Hz /
1 Phase 260 Up: 7
Down: 2-7 10L
09368460 W37 x D33 x
H77 28,8 230V / 50Hz /
1 Phase 260 Up: 7
Down: 2-7 15L
2.3 Features
Maxima’s products offer a wide range of features. You can read more about these in Appendix 1.
2.4 Spare parts
An exploded view and list of the spare parts is available in Appendix 2.
Electrical
Power (W)

3. TRANSPORT
3.1 Transport & handling
This appliance needs to be lifted by two or more people. Remember to always lift from the legs and
not the back. Never try to lift or move objects beyond your capabilities. Ask for assistance or use the
appropriate equipment, if necessary.
3.2 Packaging
Unpack and inspect your purchase immediately after receipt. If there are any latent defects or damage
to the item, please contact your supplier immediately. Save all packaging materials in case the machine
needs to be returned or inspected by the courier.
3.3 Before use
Remove any protective film from any surfaces and clean the appliance and accessories thoroughly before
use (see section 6 on “Maintenance”).
4. INITIAL SET-UP
4.1 Wiring & connections
If your machine is supplied with a factory fitted molded plug then you may plug the unit into a standard
electrical outlet. Make sure that the voltage of the machine and the wall outlet are compatible.
If your machine is not supplied with a factory fitted molded plug then a certified electrician must be
contracted to wire the unit to the power supply.
Please find the circuit diagram in Appendix 3.
4.2 Placement
The appliance must be positioned on a stable, flat surface. Choose a surface where there is no direct
sunlight and is not close to a direct heat source, such as a cooker, oven or radiator.
When positioning the appliance, keep a distance of 10cm (4") between the appliance and walls, or other
objects for ventilation and ease of use.
Position the appliance so that the plug is accessible at all times. Always plug the power cord into a
compatible, grounded socket.

9
EN
5. OPERATION
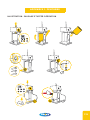
5.1 How to use the appliance
• Press the “Up” button, followed by the “Start” button. The appliance will now lift the pressure plate
to the highest point and stop automatically.
Connect the pedal to the 2-pin connector located below the control panel.
• Once the pressure plate has lifted entirely and the appliance is no longer in use, tilt the bucket to
the right of the appliance and lift it out of place to remove it from the casing.
• Fill the bucket with ground meat. Place the bucket back into its original location and lock in place.
Always secure the bucket back into place and align the pressure plate to avoid serious damage to
the machine or yourself.
Tighten the exhaust pin before using the appliance. This will maintain the air pressure in the bucket.
• Remove the triangular locking ring from the front of the appliance.
• Slide the desired filling nozzle inside the ring and secure it by screwing it onto the appliance.
• Press the “Down” button and use the “+” and “-” icons to adjust the descending speed of the
pressure plate.
• Using the foot pedal, drop the pressure plate until the meat reaches the end of the nozzle.
Do not touch the moving parts while the appliance is in use as this may cause serious injuries.
• Once the appliance is ready, hold the sausage casing on the nozzle and use the foot pedal to push
the filling out of the nozzle.
Use the “Emergency Stop” button if the appliance is in motion and not responding (see illustration
in Appendix 1).
• When finished, follow the cleaning instructions. This machine requires cleaning after every use.
5.2 Cleaning
• Regularly check and clean the appliance, its parts and accessories.
• Always switch off and disconnect the power before any cleaning or maintenance.
• Unscrew the exhaust pin on the pressure plate to release the pressure in the appliance.
• Press the “Up” button and then the “Start” button. The appliance will now lift the pressure plate to
the highest point and stop automatically.
• Once the pressure plate has lifted entirely and the appliance is no longer in use, tilt the bucket to
the right of the appliance and lift it out of place to remove it from the casing.
• Clean the pressure plate, bucket and nozzle thoroughly with warm water and a food-safe detergent.
• Clean the exhaust valve in the pressure plate. If clogged, this may cause problems during use.
• Never use aggressive or abrasive cleaning agents. Do not use solvents or petroleum-based cleaning
agents. Some cleaning agents may leave a harmful residue or cause damage to the machine. Use a
mild, food-safe cleaning product instead.
• Do not use a scouring sponge or any sharp objects during cleaning as this may cause damage to
the machine.

• Never hose down the machine or immerse it in water or any other liquid. Instead, wipe the exterior
with a damp cloth. Do not use a steamer to clean the machine.
• Never let the power cable or power plug get wet.
• Once the parts and accessories are dry, reassemble them for the next use.
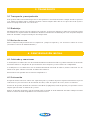
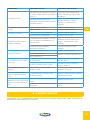
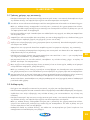
6. MAINTENANCE
Check the mains plug and mains cable regularly for damage. Do not continue to use the appliance if it is
damaged. Have the unit repaired by a certified electrical technician.
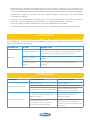
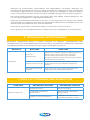
INTERVAL ACTION DESCRIPTION
Daily
Cleaning & disinfecting
Thoroughly clean appliance and accessories after every use with a
soft cloth and food-safe detergent. The plunger gasket should not be
washed with boiling water
Lubrication (after
cleaning)
Lubricate the plunger gasket and bucket thoroughly with the food-safe
oil
Check the plunger gasket If the plunger gasket is deformed or damaged, it must be replaced
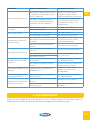
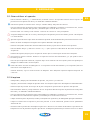
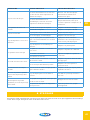
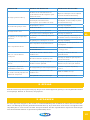
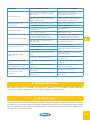
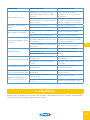
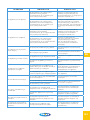
7. TROUBLESHOOTING
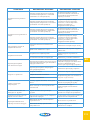
PROBLEM POSSIBLE CAUSE POSSIBLE SOLUTION
The appliance does not work
The appliance is switched off Switch on the appliance
The emergency switch has been activated Deactivate the emergency switch
The power supply has been interrupted Check the power supply, plug in power
cable
The plunger does not go down
The terminal of the induction wire is loose
(connected with the "Lower bound" on the
electric board)
Open right side of sealing plate and
put the induction wire back into place
The terminal of the induction wire is
damaged (connected with the "Lower
bound" on the electric board)
Open right and left sides of sealing
plates, as well as top cover, and
replace the induction wire
The plunger does not go up
The terminal of the induction wire is loose
(connected with the "Upper bound" on the
electric board)
Open right side of sealing plate and
put the induction wire back into place
The terminal of the induction wire is
damaged (connected with the "Upper
bound" on the electric board)
Open right and left sides of sealing
plates, as well as top cover, and
replace the induction wire
Speed regulation is invalid The electric board has broken down Replace the electric board
The motor has broken down Replace or repair the motor

11
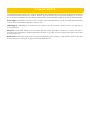
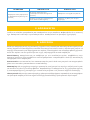
EN
PROBLEM POSSIBLE CAUSE POSSIBLE SOLUTION
The plunger is tilted The plunger is not firmly locked Lock the plunger in place
The set screw is damaged Replace the set screw
The plunger gasket keeps coming
loose
The plunger gasket or bucket are not
lubricated properly with food-safe oil
Apply food-safe lubricating oil to the
upper edge of the bucket and the
plunger gasket
The plunger gasket is damaged or
deformed Replace the plunger gasket
The foot pedal does not work
The foot pedal has come off or is broken Replace the food pedal
The welding has weakened Repair or replace the food pedal
The terminal is loose
The "ear" of the bucket has been
crushed
The size of the tube is smaller than the
meat pieces
Replace the bucket and choose a more
suitable tube
The screw is not in the right position Replace the bucket and adjust the
position of screw
The ground meat doesn't come
out the tube
The meat pieces are bigger than the tube
diameter
Replace the tube for a bigger one and
increase the speed
A lot of air is produced during
the meat pressing down process
The exhaust pin is blocked by the meat
pieces Clear the meat pieces
The position of the exhaust pin is not well
placed Adjust the position of exhaust pin
8. STORAGE
Roll the power cable up and store it safely. Make sure the appliance is thoroughly cleaned before storing
it away. Store in a cool, dry place.
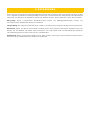
9. DISCARDING
When disposing of this appliance, please do so in compliance with local and national regulations. It’s also
important to dispose of any related materials correctly. This piece of equipment may contain packaging
and accessories that have to be collected and disposed of separately. These should not be treated as
unsorted municipal waste.
Recycling: By disposing of waste in the proper manner, you help avoid hazards in the environment that
could be caused by improper treatment of waste.
Packaging: The packaging is made from materials to be disposed of through local recycling facilities.
Batteries: If the machine contains a battery, these may contain toxic substances and are a hazard to the
environment. Please dispose of used or rechargeable batteries responsibly through a local collection point.
Electronics: If this appliance contains electronic parts, please dispose of electrical waste at a recycling
collection point for electronic equipment.


13
DE
INHALTSVERZEICHNIS
1. EINLEITUNG ......................................................................................................... 16
1.1 Einführung ....................................................................................................................16
1.2 Allgemeine Informationen .........................................................................................16
1.3 Gewährleistung ...........................................................................................................16
2. PRODUKTINFORMATIONEN ..............................................................................17
2.1 Verwendungszweck ....................................................................................................17
2.2 Technische Daten ........................................................................................................ 17
2.3 Funktionen ...................................................................................................................17
2.4 Ersatzteile ....................................................................................................................17
3. TRANSPORT ......................................................................................................... 18
3.1 Transport u. Handhabung ..........................................................................................18
3.2 Verpackung ..................................................................................................................18
3.3 Vor Gebrauch ...............................................................................................................18
4. INBETRIEBNAHME .............................................................................................. 18
4.1 Verkabelung u. Anschlüsse ........................................................................................18
4.2 Platzierung ...................................................................................................................18
5. BETRIEB ................................................................................................................ 19
5.1 Bedienungsanleitung ..................................................................................................19
5.2 Reinigung .................................................................................................................... 20
6. WARTUNG ............................................................................................................. 20
7. FEHLERBEHEBUNG ............................................................................................. 21
8. AUFBEWAHRUNG................................................................................................ 22
9. ENTSORGUNG ...................................................................................................... 22
ANHANG 1. FUNKTIONSUMFANG ...................................................................... 114
ANHANG 2. ERSATZTEILE ................................................................................... 116
ANHANG 3. STROMLAUFPLAN ........................................................................... 119

SICHERHEITSHINWEISE
OGerät darf nur für den vorgesehenen Zweck verwendet werden.
Weder Hersteller noch Lieferant haften für Schäden aus fehlerhafter
Handhabung dieses Artikels.
ODieses Handelserzeugnis ist nur von Personen zu verwenden, die diese
Anleitung gelesen und vollständig verstanden haben. Es darf nicht von
unbeaufsichtigten Kindern oder Personen mit reduzierten physischen,
sensorischen oder mentalen Fähigkeiten verwendet werden.
OGerät ist nur für den Gebrauch im Innenbereich vorgesehen.
OGerät und elektrische Stecker von Wasser und anderen Flüssigkeiten
fernhalten. Andernfalls sofort die Stromversorgung unterbrechen
und Gerät von einem geprüften Techniker kontrollieren lassen.
Nichtbefolgung dieser Anleitung kann zu Stromschlag oder Tod führen.
OWenn es heruntergefallen oder irgendwie beschädigt ist, Gerät nicht
mehr verwenden, sondern von einem geprüften Techniker kontrollieren
und reparieren lassen.
OGerät nicht bewegen, während es in Betrieb ist und nie am Netzkabel
bewegen oder tragen.
OGerät nicht auf eine Seite, umgedreht oder geneigt platzieren
oder bewegen.
OGehäuse nicht öffnen oder versuchen Gerät selbst zu reparieren, es
sei denn unter Aufsicht eines Maxima-Technikers. Dadurch kann die
Garantie erlöschen, das Gerät Schaden nehmen oder eine gefährdende
Situation entstehen.
OKeine Geräte oder Zubehörteile verwenden, die nicht dem Gerät
geliefert wurden oder dafür konstruiert sind.
OIn Betrieb nie Hände oder andere Körperteile in die Nähe beweglicher
Geräteteile bringen und das Gerät nicht unbeaufsichtigt betreiben.
OKeine Gegenstände in Gehäuse oder Öffnungen des Geräts stecken.

15
DE
OGesamte Verpackung von Kindern fernhalten und in Übereinstimmung
mit örtlichen und nationalen Vorschriften entsorgen.
OGerät nicht überladen.
ODie elektrische Anlage muss örtlichen Vorschriften entsprechen.
OGerät vor Trennen des Netzsteckers ausschalten.
OImmer die Stromversorgung trennen, wenn das Gerät nicht in
Gebrauch ist. Stecker immer am Stecker selbst und nicht am Kabel
aus der Steckdose ziehen.
ONetzstecker nicht mit feuchten oder nassen Händen anfassen.
OStromkabel immer vom Betriebsbereich fernhalten und nicht
abdecken. Das Stromkabel darf auf keine Fall mit heißen oder scharfen
Gegenständen in Kontakt kommen und ist von offenen Flammen
fernzuhalten.
OAchtung: Während der Stecker in der Steckdose steckt, ist das Gerät
mit dem Stromnetz verbunden.
SICHERHEITSSYMBOLE
• Produkt zwischen 10–30° C lagern
• Vermeiden Sie die Aufstellung in direktem Sonnenlicht
• Produkt ist für den Gebrauch im Innenbereich vorgesehen
• Doppelte elektrische Isolierung: keine Erdung/Erdanschlüsse erforderlich
• Produktentsorgung gemäß den örtlichen Abfallvorschriften
• Produkt erfüllt CE-Anforderungen

1. EINLEITUNG
1.1 Einführung
Vielen Dank für den Kauf dieses Maxima-Geräts. Bevor du versuchst, das Gerät zu installieren oder zu
verwenden, solltest Sie für Ihre eigene Sicherheit sorgen. Lesen Sie die Anleitung bitte aufmerksam,
um Ihr Gerät optimal zu nutzen. Diese Anleitung sollte stets zur Hand sein und in der Nähe des Geräts
aufbewahrt werden.
Alle Maxima-Geräte sind CE-zertifiziert. Darum erfüllen unsere Geräte den gesetzliche Bestimmungen zu
Gesundheit, Sicherheit und Umwelt, wie die Europäische Kommission sie vorschreibt. Vor dem Versandt
werden alle Geräte zudem gründlich geprüft, um Produktqualität und -sicherheit zu gewährleisten.
1.2 Allgemeine Informationen
Rufen sie für den After-Sales-Support bitte unsere Seite für den Kundenservice auf: https://maxima.com/
de/kundendienst. Benutzerhandbücher sind online verfügbar und können auf der Produktseite unserer
Website heruntergeladen werden. Sollte das Handbuch deines Geräts nicht verfügbar sein, dann wende Sie
sich an den Kundenservice. Weitere Informationen sind auf unserer Website zu finden:www.maxima.com
1.3 Gewährleistung
Wir geben ab Kaufdatum 12 Monate Gewährleistung, wie auf Ihrer Rechnung angegeben. Diese Garantie
deckt die Lieferung von Ersatzteilen bei Materialfehlern, Herstellungsfehlern oder Qualitätsmängeln.
Was die Garantie nicht abdeckt:
• Schäden, die durch unsachgemäßen Gebrauch des Produkts entstanden sind
• Schäden, die auf die Verwendung von Teilen zurückzuführen sind, die nicht Teil der ursprünglichen
Maschine waren
• Schäden durch den Transport an einen anderen Ort nach der Lieferung oder durch unsachgemäßen
Einbau und Anschluss
• Beschädigung von Bauteilen durch falschen Elektro- oder Wasseranschluss
• Schäden infolge von unerlaubter Demontage und/oder Änderung des Originalgeräts
• Schäden infolge von Missbrauch, schlechter Reinigung oder unsachgemäßer Pflege
• Schäden infolge von Feuer, Einsturz eines Gebäudes, Blitzschlag, Flut, Überspannung oder Ungeziefer
• Nichtlesen oder Nichtbefolgen des Benutzerhandbuchs
• Verbrauchsgüter und Verschleißteile
• Bei abgeänderter oder fehlender Rechnung

17
DE
2. PRODUKTINFORMATIONEN
2.1 Verwendungszweck
Dieses Gerät darf nur für den Zweck verwendet werden, für den es konstruiert und vorgesehen ist. Hersteller
und Lieferant haften nicht für Schäden infolge von fehlerhaftem Betrieb und nicht bestimmungsgemäßer
Verwendung.
Dieses Handelserzeugnis ist nur von geschultem Fachpersonen zu verwenden, die dieses Handbuch
gelesen und vollständig verstanden haben. Es darf nicht von unbeaufsichtigten Kindern oder Personen
mit reduzierten Fähigkeiten verwendet werden.
2.2 Technische Daten
MAXIMA SAUSAGE STUFFER - AUTOMATIC
Artikel
Code
Abmessungen
(cm)
Gewicht
(kg) Eingabe Kolbendrehzahl
(mm/s) Kapazität
09368450 W37 x D33 x
H64 26,5 230V / 50Hz
/ 1 Phase 260 Up: 7
Down: 2-7 10L
09368460 W37 x D33 x
H77 28,8 230V / 50Hz
/ 1 Phase 260 Up: 7
Down: 2-7 15L
2.3 Funktionen
Maxima-Geräte haben einen großen Funktionsumfang. Mehr dazu Erfahren Sie in Anhang 1.
2.4 Ersatzteile
Eine vollständige Stückliste dieses Geräts findet sich in Anhang 2.
Elektrische
Leistung (W)

3. TRANSPORT
3.1 Transport u. Handhabung
Dieses Gerät muss von zwei oder mehr Personen angehoben werden. Hinweis: Gerät immer aus den Beinen
und nicht aus dem Rücken heben. Niemals Gegenstände versuchen zu heben, die über die eigene Kraft
hinausgehen. Stattdessen um Hilfe bitten oder ggf. geeignete Ausrüstung verwenden.
3.2 Verpackung
Packen Sie Ihren Kauf sofort nach Erhalt aus und prüfen Sie ihn. Wenden Sie sich im Fall verborgener
Mängel oder Schäden am Gerät sofort an Ihren Lieferanten. Bewahren Sie das ganze Verpackungsmaterial
auf, falls das Gerät vom Transportunternehmen retourniert oder geprüft werden muss.
3.3 Vor Gebrauch
Entfernen Sie vor Gebrauch alle Schutzfolien von allen Oberflächen und reinige Gerät und Zubehör
gründlich (siehe Abschnitt 6, „Wartung“).
4. INBETRIEBNAHME
4.1 Verkabelung u. Anschlüsse
Wenn Ihr Gerät ab Werk mit einem eingekapselten Steckverbinder geliefert wird, können Sie es in eine
normale Steckdose stecken. Stellen Sie sicher, dass Gerät und Steckdose die gleiche elektrische Spannung
haben.
Wenn das Gerät nicht ab Werk mit einem eingekapselten Steckverbinder geliefert wird, muss ein geprüfter
Elektriker es an den Strom anschließen.
Schaltplan ist in Anhang 3 zu finden.
4.2 Platzierung
Das Gerät muss auf einer ebenen und stabilen Oberfläche platziert werden. Wählen Sie eine Fläche, auf
die kein direktes Sonnenlicht fällt und die sich nicht in der Nähe einer direkten Wärmequelle befindet,
wie z. B. Herd, Ofen oder Heizkörper.
Beim Aufstellen des Geräts ist ein Abstand von 10 cm (4 Zoll) zu Wänden oder anderen Gegenständen
einzuhalten, um gute Belüftung und einfache Verwendung zu gewährleisten.
Das Gerät ist so aufzustellen, dass der Stecker jederzeit zugänglich ist. Das Netzkabel ist immer in eine
passende geerdete Steckdose zu stecken.

19
DE
5. BETRIEB
5.1 Bedienungsanleitung
• Drücken Sie die Taste "Up" und anschließend die Taste "Start". Das Gerät wird nun die Druckplatte
bis zum höchsten Punkt anheben und automatisch anhalten.
Schließen Sie das Pedal an den 2-poligen Anschluss unterhalb des Bedienfelds an.
• Wenn sich die Druckplatte vollständig angehoben hat und das Gerät nicht mehr in Betrieb ist, kippen
Sie den Becher nach rechts und heben Sie ihn aus dem Gehäuse heraus.
• Füllen Sie den Becher mit Hackfleisch. Setzen Sie den Becher wieder an seinen ursprünglichen Platz
und verriegeln Sie ihn.
Befestigen Sie den Becher immer wieder an seinem Platz und richten Sie die Druckplatte aus, um
schwere Schäden an der Maschine oder an Ihnen selbst zu vermeiden.
Ziehen Sie den Entlüftungsstift fest, bevor Sie das Gerät benutzen. Dadurch wird der Luftdruck in
dem Becher aufrechterhalten.
• Entfernen Sie den dreieckigen Sicherungsring an der Vorderseite des Geräts.
• Schieben Sie den gewünschten Füllstutzen in den Ring und schrauben Sie ihn auf das Gerät.
• Drücken Sie die Taste "Down" und verwenden Sie die Symbole "+" und "-", um die Absenkgeschwindigkeit
der Druckplatte einzustellen.
• Senken Sie die Druckplatte mit dem Fußpedal, bis das Fleisch das Ende der Düse erreicht.
Berühren Sie nicht die beweglichen Teile, während das Gerät in Betrieb ist, da dies zu schweren
Verletzungen führen kann.
• Sobald das Gerät bereit ist, halten Sie die Wursthülle an die Düse und drücken Sie die Füllung mit
dem Fußpedal aus der Düse.
Betätigen Sie die " Emergency Stop "-Taste, wenn das Gerät in Bewegung ist und nicht reagiert
(siehe Abbildung in Anhang 1).
• Wenn Sie fertig sind, befolgen Sie die Reinigungsanweisungen. Dieses Gerät muss nach jedem
Gebrauch gereinigt werden.
5.2 Reinigung
• Überprüfen und reinigen Sie das Gerät, seine Teile und sein Zubehör regelmäßig.
• Schalten Sie das Gerät vor jeder Reinigung oder Wartung immer aus und trennen Sie es vom Stromnetz.
• Schrauben Sie den Entlüftungsstift an der Druckplatte ab, um den Druck im Gerät zu entlasten.
• Drücken Sie die Taste "Up" und dann die Taste "Start". Das Gerät wird nun die Druckplatte bis zum
höchsten Punkt anheben und automatisch anhalten.
• Wenn sich die Druckplatte vollständig angehoben hat und das Gerät nicht mehr in Betrieb ist, kippen
Sie den Becher nach rechts und heben Sie ihn aus dem Gehäuse heraus.
• Reinigen Sie die Druckplatte, den Eimer und die Düse gründlich mit warmem Wasser und einem
lebensmittelsicheren Reinigungsmittel.
• Reinigen Sie das Abluftventil in der Druckplatte. Wenn es verstopft ist, kann dies zu Problemen bei
der Verwendung führen.

• Verwenden Sie niemals aggressive oder scheuernde Reinigungsmittel. Verwenden Sie keine
Lösungsmittel oder Reinigungsmittel auf Petroleumbasis. Einige Reinigungsmittel können schädliche
Rückstände hinterlassen oder das Gerät beschädigen. Verwenden Sie stattdessen ein mildes,
lebensmittelsicheres Reinigungsmittel.
• Verwenden Sie bei der Reinigung keinen Scheuerschwamm oder scharfe Gegenstände, da dies zu
Schäden am Gerät führen kann.
• Spritzen Sie das Gerät niemals mit dem Schlauch ab oder tauchen Sie es in Wasser oder eine andere
Flüssigkeit unter. Wischen Sie stattdessen die Außenseite mit einem feuchten Tuch ab. Verwenden
Sie zur Reinigung des Geräts keinen Dampfstrahler.
• Lassen Sie niemals das Netzkabel oder den Netzstecker nass werden.
• Nach dem Trocknen bauen Sie die Teile und das Zubehör für den nächsten Gebrauch wieder zusammen.
6. WARTUNG
Prüfen Sie Netzstecker und Netzkabel regelmäßig auf Beschädigungen. Verwende das Gerät bei Schäden
nicht weiter. Lassen Sie das Gerät von einem zertifizierten Elektrotechniker reparieren.
ZEITRAUM MASSNAHME BESCHREIBUNG
Täglich
Reinigung und Desinfektion
Reinigen Sie das Gerät und das Zubehör nach jedem Gebrauch
gründlich mit einem weichen Tuch und lebensmittelsicherem
Reinigungsmittel. Die Kolbendichtung sollte nicht mit kochendem
Wasser gewaschen werden
Schmierung (nach der
Reinigung)
Schmieren Sie die Kolbendichtung und den Eimer gründlich mit dem
lebensmittelsicheren Öl
Prüfen Sie die
Kolbendichtung
Wenn die Kolbendichtung verformt oder beschädigt ist, muss sie
ersetzt werden
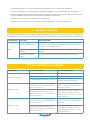
7. FEHLERBEHEBUNG
PROBLEM MÖGLICHE URSACHE MÖGLICHE LÖSUNG
Das Gerät funktioniert nicht
Das Gerät ist ausgeschaltet Schalten Sie das Gerät ein
Der Notschalter wurde betätigt Deaktivieren Sie den Notschalter
Die Stromzufuhr wurde unterbrochen Prüfen Sie die Stromversorgung,
stecken Sie das Netzkabel ein
Der Stößel geht nicht nach unten
Die Klemme des Induktionsdrahtes ist lose
(verbunden mit der "Unteren Begrenzung"
auf der Schaltkasten)
Öffnen Sie die rechte Seite der
Dichtungsplatte und legen Sie den
Induktionsdraht wieder an seinen Platz
Die Klemme des Induktionsdrahtes ist
beschädigt (verbunden mit der "Unteren
Begrenzung" auf der Schaltkasten)
Öffnen Sie die rechte und linke Seite
der Siegelplatte sowie die obere
Abdeckung und ersetzen Sie den
Induktionsdraht
La pagina si sta caricando...
La pagina si sta caricando...
La pagina si sta caricando...
La pagina si sta caricando...
La pagina si sta caricando...
La pagina si sta caricando...
La pagina si sta caricando...
La pagina si sta caricando...
La pagina si sta caricando...
La pagina si sta caricando...
La pagina si sta caricando...
La pagina si sta caricando...
La pagina si sta caricando...
La pagina si sta caricando...
La pagina si sta caricando...
La pagina si sta caricando...
La pagina si sta caricando...
La pagina si sta caricando...
La pagina si sta caricando...
La pagina si sta caricando...
La pagina si sta caricando...
La pagina si sta caricando...
La pagina si sta caricando...
La pagina si sta caricando...
La pagina si sta caricando...
La pagina si sta caricando...
La pagina si sta caricando...
La pagina si sta caricando...
La pagina si sta caricando...
La pagina si sta caricando...
La pagina si sta caricando...
La pagina si sta caricando...
La pagina si sta caricando...
La pagina si sta caricando...
La pagina si sta caricando...
La pagina si sta caricando...
La pagina si sta caricando...
La pagina si sta caricando...
La pagina si sta caricando...
La pagina si sta caricando...
La pagina si sta caricando...
La pagina si sta caricando...
La pagina si sta caricando...
La pagina si sta caricando...
La pagina si sta caricando...
La pagina si sta caricando...
La pagina si sta caricando...
La pagina si sta caricando...
La pagina si sta caricando...
La pagina si sta caricando...
La pagina si sta caricando...
La pagina si sta caricando...
La pagina si sta caricando...
La pagina si sta caricando...
La pagina si sta caricando...
La pagina si sta caricando...
La pagina si sta caricando...
La pagina si sta caricando...
La pagina si sta caricando...
La pagina si sta caricando...
La pagina si sta caricando...
La pagina si sta caricando...
La pagina si sta caricando...
La pagina si sta caricando...
La pagina si sta caricando...
La pagina si sta caricando...
La pagina si sta caricando...
La pagina si sta caricando...
La pagina si sta caricando...
La pagina si sta caricando...
La pagina si sta caricando...
La pagina si sta caricando...
La pagina si sta caricando...
La pagina si sta caricando...
La pagina si sta caricando...
La pagina si sta caricando...
La pagina si sta caricando...
La pagina si sta caricando...
La pagina si sta caricando...
La pagina si sta caricando...
La pagina si sta caricando...
La pagina si sta caricando...
La pagina si sta caricando...
La pagina si sta caricando...
La pagina si sta caricando...
La pagina si sta caricando...
La pagina si sta caricando...
La pagina si sta caricando...
La pagina si sta caricando...
La pagina si sta caricando...
La pagina si sta caricando...
La pagina si sta caricando...
La pagina si sta caricando...
La pagina si sta caricando...
La pagina si sta caricando...
La pagina si sta caricando...
La pagina si sta caricando...
La pagina si sta caricando...
La pagina si sta caricando...
La pagina si sta caricando...
-
 1
1
-
 2
2
-
 3
3
-
 4
4
-
 5
5
-
 6
6
-
 7
7
-
 8
8
-
 9
9
-
 10
10
-
 11
11
-
 12
12
-
 13
13
-
 14
14
-
 15
15
-
 16
16
-
 17
17
-
 18
18
-
 19
19
-
 20
20
-
 21
21
-
 22
22
-
 23
23
-
 24
24
-
 25
25
-
 26
26
-
 27
27
-
 28
28
-
 29
29
-
 30
30
-
 31
31
-
 32
32
-
 33
33
-
 34
34
-
 35
35
-
 36
36
-
 37
37
-
 38
38
-
 39
39
-
 40
40
-
 41
41
-
 42
42
-
 43
43
-
 44
44
-
 45
45
-
 46
46
-
 47
47
-
 48
48
-
 49
49
-
 50
50
-
 51
51
-
 52
52
-
 53
53
-
 54
54
-
 55
55
-
 56
56
-
 57
57
-
 58
58
-
 59
59
-
 60
60
-
 61
61
-
 62
62
-
 63
63
-
 64
64
-
 65
65
-
 66
66
-
 67
67
-
 68
68
-
 69
69
-
 70
70
-
 71
71
-
 72
72
-
 73
73
-
 74
74
-
 75
75
-
 76
76
-
 77
77
-
 78
78
-
 79
79
-
 80
80
-
 81
81
-
 82
82
-
 83
83
-
 84
84
-
 85
85
-
 86
86
-
 87
87
-
 88
88
-
 89
89
-
 90
90
-
 91
91
-
 92
92
-
 93
93
-
 94
94
-
 95
95
-
 96
96
-
 97
97
-
 98
98
-
 99
99
-
 100
100
-
 101
101
-
 102
102
-
 103
103
-
 104
104
-
 105
105
-
 106
106
-
 107
107
-
 108
108
-
 109
109
-
 110
110
-
 111
111
-
 112
112
-
 113
113
-
 114
114
-
 115
115
-
 116
116
-
 117
117
-
 118
118
-
 119
119
-
 120
120


Maxima 09368450 Manuale del proprietario
- Tipo
- Manuale del proprietario
- Questo manuale è adatto anche per
in altre lingue
- français: Maxima 09368450 Le manuel du propriétaire
- español: Maxima 09368450 El manual del propietario
- português: Maxima 09368450 Manual do proprietário
- română: Maxima 09368450 Manualul proprietarului