TechniSat Wegavision FHD43A Manuale del proprietario
- Categoria
- TV LCD
- Tipo
- Manuale del proprietario
Questo manuale è adatto anche per

Flachbildfernseher
BEDIENUNGS-
ANLEITUNG
Nordmende Wegavision FHD24A/32A/43A

1
Deutsch
Inhalt
1. Wichtige Sicherheitsinformationen ......................................................................... 2
Vorsicht �������������������������������������������������������������������������������������������������������������������������������������� 2
Rechtliche Hinweise ������������������������������������������������������������������������������������������������������������������3
2. LCD-Fernseher installieren ...................................................................................... 4
Lieferumfang������������������������������������������������������������������������������������������������������������������������������4
Standfuß befestigen / Wandmontage ����������������������������������������������������������������������������������������5
3. Übersicht des Fernsehers ........................................................................................ 6
Komponenten und Tasten ����������������������������������������������������������������������������������������������������������6
4. Antenne verbinden ................................................................................................... 7
5. Externe Geräte verbinden ........................................................................................ 8
6. Fernbedienung .......................................................................................................... 9
Batterien in die Fernbedienung einlegen �����������������������������������������������������������������������������������9
Fernbedienung verwenden ��������������������������������������������������������������������������������������������������������9
7. Grundlegende Funktionen des Fernsehers .......................................................... 11
Fernseher ein- und ausschalten ���������������������������������������������������������������������������������������������� 11
Erstinstallation ������������������������������������������������������������������������������������������������������������������������� 11
Automatische Sendersuche ���������������������������������������������������������������������������������������������������� 11
Programmwahl ������������������������������������������������������������������������������������������������������������������������ 11
Lautstärkeregelung ������������������������������������������������������������������������������������������������������������������12
Eingangsquelle auswählen ������������������������������������������������������������������������������������������������������12
8. Menüfunktionen ...................................................................................................... 13
Sender-Menü �������������������������������������������������������������������������������������������������������������������������������� 13
Bild-Menü ������������������������������������������������������������������������������������������������������������������������������������� 14
Sound-Menü ��������������������������������������������������������������������������������������������������������������������������������� 14
Zeit-Menü ������������������������������������������������������������������������������������������������������������������������������������� 15
Sperren-Menü������������������������������������������������������������������������������������������������������������������������������� 15
Setup-Menü ���������������������������������������������������������������������������������������������������������������������������������� 16
9. Multimedia ............................................................................................................... 17
10. Fehlerbehebung ...................................................................................................... 19
11. Technische Daten ................................................................................................... 20
Unterstützte Signale ����������������������������������������������������������������������������������������������������������������20
Entsorgung ������������������������������������������������������������������������������������������������������������������������������20

2
Deutsch
Wichtige Sicherheitsinformationen
1
Vorsicht
1� Diese Bedienungsanleitung aufmerksam durchlesen�
2� Diese Bedienungsanleitung für späteres Nachschlagen aufbewahren�
3� Alle Warnungen beachten�
4� Alle Anleitungen befolgen�
5� Fernseher nicht in der Nähe von Wasser verwenden�
6� Nur mit einem trockenen Tuch reinigen�
7� Ventilationsönungen nicht abdecken. Gemäß Herstellerangaben installieren.
8� Nicht in der Nähe von Wärmequellen wie Heizkörpern, Öfen oder anderen
wärmeabstrahlenden Geräten (einschließlich Verstärkern) installieren.
9� Netzkabel so verlegen, dass niemand darüber stolpern kann oder das Kabel geknickt wird,
insbesondere am Stecker, der Steckdose sowie am Geräteaustritt.
10� Nur vom Hersteller vorgegebenes Zubehör verwenden�
11� Fernseher während Gewittern oder längeren Zeiten des Nichtgebrauchs vom Netz trennen.
12� Reparaturarbeiten nur durch qualiziertes Personal. Eine Wartung ist erforderlich, wenn das
Gerät beschädigt ist, u.a. wenn das Netzkabel oder der Netzstecker beschädigt ist, Flüssigkeit
oder Gegenstände in das Gerät eingedrungen sind, das Gerät Regen oder Feuchtigkeit
ausgesetzt war oder das Gerät nicht ordnungsgemäß funktioniert oder fallengelassen wurde.
13� WARNUNG: Um die Gefahr von Feuer oder Stromschlag zu vermeiden, muss der Fernseher
vor Regen und Feuchtigkeit geschützt werden�
14� Das Gerät ist nicht spritz- oder tropfwasserdicht. Stellen Sie keine mit Flüssigkeit gefüllten
Gegenstände wie Vasen auf das Gerät.
15� Der Netzstecker oder der Gerätestecker müssen immer frei zugänglich sein.
16� Gebrauch im Außenbereich: Dieser Fernseher ist nicht für den Außengebrauch geeignet.
Schützen Sie den Fernseher vor Regen, da anderenfalls die Gefahr von Feuer oder
Stromschlag besteht� Schützen Sie den Fernseher vor direkter Sonneneinstrahlung, da er
anderenfalls erhitzen und beschädigt werden könnte�
Sicherheit:
UM DIE GEFAHR VON STROMSCHLÄGEN ZU VERMEIDEN,
RÜCKSEITIGE ABDECKUNG (ODER RÜCKSEITE) NICHT
ENTFERNEN� ES BEFINDEN SICH KEINE VOM NUTZER ZU
WARTENDEN TEILE IM INNEREN. REPARATUR NUR DURCH
QUALIFIZIERTE FACHKRÄFTE.
Gefährliche Spannung: Der Blitz mit Pfeilspitze innerhalb eines
gleichseitigen Dreiecks warnt den Nutzer vor gefährlicher
Spannung im Inneren des Produktes, die stark genug ist,
Stromschläge zu verursachen�
Anleitung:
Das Ausrufezeichen innerhalb eines gleichseitigen Dreiecks
weist den Nutzer auf wichtige Gebrauchsanleitungen in der
Begleitliteratur des Produkts hin�

3
Deutsch
Wichtige Sicherheitsinformationen
1
Vorsicht
WARNUNG!
Installieren Sie den Fernseher nicht in einer instabilen Position� Der Fernseher könnte
herunterfallen und dadurch schwerwiegende oder sogar tödliche Unfälle verursachen�
Viele Verletzungen, insbesondere bei Kindern, können durch Einhaltung folgender
Vorsichtsmaßnahmen vermieden werden�
* Verwenden Sie nur vom Hersteller des Fernsehers empfohlene Wandhalterungen�
* Verwenden Sie nur Möbel, die dem Gewicht des Fernsehers standhalten können.
* Achten Sie darauf, dass keine Teile des Fernsehers über das tragende Möbelstück hervorragen�
* Stellen Sie den Fernseher nicht auf erhöhte Möbelstücke (z. B. Hängeschränke oder
Bücherregale), ohne sowohl das Möbelstück als auch den Fernseher mit einer entsprechenden
Halterung zu sichern�
* Stellen Sie den Fernseher nicht auf Stoe oder andere Materialien, die sich zwischen dem
Gerät und der tragenden Fläche benden.
* Erklären Sie Kindern die Gefahren, die entstehen, wenn sie auf Möbelstücke klettern um den
Fernseher oder dessen Tasten zu erreichen�
Rechtliche Hinweise
Hiermit erklärt TechniSat, dass der Funkanlagentyp Nordmende Wegavision FHD24A/32A/43A
der Richtlinie 2014/53/EU entspricht� Der vollständige Text der EU-Konformitätserklärung ist
unter der Internetadresse http://konf.tsat.de/?ID=11704 verfügbar:
Wegavision FHD24A, Wegavision 32A, Wegavision 43A und TechniSat sind eingetragene
Warenzeichen der:
TechniSat Digital GmbH
TechniPark
Julius-Saxler-Straße 3
D-54550 Daun/Eifel
www�technisat�de
NORDMENDE ist eine Marke der Technicolor oder verbundener Unternehmen, die unter Lizenz
der TechniSat Digital GmbH verwendet wird.
Namen der erwähnten Firmen, Institutionen oder Marken sind Warenzeichen oder eingetragene
Warenzeichen der jeweiligen Inhaber�
Dieses Produkt ist qualitätsgeprüft und mit der gesetzlichen Gewährleistungszeit von 24 Monaten
ab Kaufdatum versehen� Bitte bewahren Sie den Rechnungsbeleg als Kaufnachweis auf� Bei
Gewährleistungsansprüchen wenden Sie sich bitte an den Händler des Produktes.
Hinweis!
Für Fragen und Informationen oder wenn es mit diesem Gerät zu einem Problem kommt, ist
unsere Technische Hotline Mo. - Fr. 8:00 - 20:00 unter Tel.: 06592/712 1500 erreichbar.
Für eine evtentuell erforderliche Einsendung des Gerätes verwenden Sie bitte ausschließlich
folgende Anschrift:
TechniSat Digital GmbH
Service-Center
Nordstr� 4a
39418 Staßfurt

4
Deutsch
2
Lieferumfang
Überprüfen Sie, ob die folgenden Teile im Lieferumfang Ihres LCD-Fernsehers enthalten sind.
Falls Teile fehlen sollten, wenden Sie sich bitte an Ihren Händler�
Fernbedienung 2 Batterien Kurzanleitung
LCD-Fernseher
+
SOURCE
P.MODE S.MODE FAV SLEEP
CH.LIST AUTO
ASPECT
TEXT
EPG
HOLD
INDEX
SUBPAGE
SIZE
-
+
-
MENU
EXIT
DISPLAY
CH VOL
Audio
FREEZE
SUBTITLE
REVEAL
1 2
3
4
5
6
7 8 9
0
-/- -
TIMESHIFT
LIST
Mini-YPbPr-Kabel
Mini-AV-Kabel
LCD-Fernseher installieren

5
Deutsch
Mounting on a wall
Attach an optional wall mount bracket at the rear
of the TV carefully and install the wall mount
bracket on a solid wall perpendicular to the
floor. When you attach the TV to other building
materials, please contact qualified personnel.
LG recommends that wall mounting be
performed by a qualified professional installer.
10 cm
10 cm
10 cm
10 cm
Make sure to use screws and wall mount
bracket that meet the VESA standard. Standard
dimensions for the wall mount kits are described
in the following table.
Separate purchase(Wall Mounting Bracket)
Model
VESA (A x B)
200 x 200
Standard
screw
M4
Number of
screws
2
100 x 100
M4
2
Wall mount bracket
A
B
43”24”/32”
43”24”/32”
(*Not Provided)
(*Not Provided)
Figure 1 Figure 2 Figure 3
24”: Insert 2 screws
32”/43”: Insert 4 screws
1. Place the TV set on soft cloth or cushion with face down.Place the base in position as shown.
2. I
ver.
3. Place the TV upward.
FrontBack
2
LCD-Fernseher installieren
Standfuß befestigen / Wandmontage
1� Legen Sie den Fernseher mit der Vorderseite auf einen weichen Untergrund oder eine
Polsterung� Positionieren Sie das Unterteil wie folgt�
2� Stecken Sie die Schrauben (mitgeliefert) in die Schraublöcher und ziehen Sie diese mit einem
Schraubenzieher fest�
3� Stellen Sie den Fernseher wieder aufrecht hin�
Mounting on a wall
Attach an optional wall mount bracket at the rear
of the TV carefully and install the wall mount
bracket on a solid wall perpendicular to the
floor. When you attach the TV to other building
materials, please contact qualified personnel.
LG recommends that wall mounting be
performed by a qualified professional installer.
10 cm
10 cm
10 cm
10 cm
Make sure to use screws and wall mount
bracket that meet the VESA standard. Standard
dimensions for the wall mount kits are described
in the following table.
Separate purchase(Wall Mounting Bracket)
Model
VESA (A x B)
200 x 200
Standard
screw
M4
Number of
screws
2
100 x 100
M4
2
Wall mount bracket
A
B
43”24”/32”
43”24”/32”
(*Not Provided)
(*Not Provided)
Figure 1 Figure 2 Figure 3
24”: Insert 2 screws
32”/43”: Insert 4 screws
1. Place the TV set on soft cloth or cushion with face down.Place the base in position as shown.
2. I
ver.
3. Place the TV upward.
FrontBack
Abbildung 1 Abbildung 2
Rückseite Vorderseite
24": 2 Schrauben anstecken
32"/43": 4 Schrauben anstecken
Abbildung 3
Wandbefestigung
Befestigen Sie vorsichtig eine optionale
Wandhalterung an der Rückseite des Gerätes
und installieren Sie die Wandhalterung
senkrecht zum Boden an einer stabilen
Wand� Falls Sie den Fernseher an anderen
Konstruktionen befestigen möchten, wenden
Sie sich bitte an eine qualizierte Fachkraft.
Wir empfehlen die Wandinstallation von einem
professionellen Installateur durchführen zu
lassen�
Verwenden Sie nur Schrauben und
Wandhalterungen, die den VESA-Normen
entsprechen� Die Standardabmessungen
der Wandhalterungen nden Sie in der
nachfolgenden Tabelle�
Separat erhältlich (Wandhalterung)
Modell 24"/32" 43"
VESA (A x B) 100 x 100 200 x 200
Standardschraube M4 M4
Anzahl der
Schrauben
2 2
Wandhalterung
24"/32"
(*nicht enthalten)
43"
(*nicht enthalten)
Mounting on a wall
Attach an optional wall mount bracket at the rear
of the TV carefully and install the wall mount
bracket on a solid wall perpendicular to the
floor. When you attach the TV to other building
materials, please contact qualified personnel.
LG recommends that wall mounting be
performed by a qualified professional installer.
10 cm
10 cm
10 cm
10 cm
Make sure to use screws and wall mount
bracket that meet the VESA standard. Standard
dimensions for the wall mount kits are described
in the following table.
Separate purchase(Wall Mounting Bracket)
Model
VESA (A x B)
200 x 200
Standard
screw
M4
Number of
screws
2
100 x 100
M4
2
Wall mount bracket
A
B
43”24”/32”
43”24”/32”
(*Not Provided)
(*Not Provided)
Figure 1 Figure 2 Figure 3
24”: Insert 2 screws
32”/43”: Insert 4 screws
1. Place the TV set on soft cloth or cushion with face down.Place the base in position as shown.
2. I
ver.
3. Place the TV upward.
FrontBack

6
Deutsch
Übersicht des Fernsehers3
24”
32”/43”
Taste Erläuterung
1
/BETRIEB
Fernseher einschalten/in Standby schalten�
2
SOURCE
Eingangsquelle auswählen�
3
MENU
OSD-Menü aufrufen/verlassen.
4
+ CH -
Sender aufwärts/abwärts im TV-Modus, oder Option auswählen im
OSD-Menü.
5
+ VOL -
Lautstärke erhöhen/reduzieren oder eine im OSD-Menü markierte
Option einstellen.
Komponenten und Tasten

7
Deutsch
Antenne verbinden 4
ANSCHLÜSSE VORNEHMEN
Sie können unterschiedliche externe Geräte
mit dem Fernseher verbinden und den
entsprechenden Eingangsmodus zur Auswahl
des externen Geräts einschalten. Informieren
Sie sich in der Bedienungsanleitung Ihres
externen Geräts näher über die Verbindung.
Mögliche externe Geräte: Blu-ray-/DVD-Player,
Audiosysteme, USB-Speichergeräte, PC und
andere externe Geräte.
Antenne/LNB verbinden
Verbinden Sie den Fernseher unter
Verwendung eines RF-Kabels (75 Ω) mit einer
Antennenbuchse�
MAKING CONNECTIONS
Connect various external devices to the TV
and switch input modes to select an external
device. For more information of external device’s
connection, refer to the manual provided with
each device.
Available external devices are: HD receivers,
DVD players, audio systems, USB
storage devices, PC, and other external
devices.
NOTE
y
The external device connection may differ
from the model.
y
Connect external devices to the TV
regardless of the order of the TV port.
y
Refer to the external equipment’s manual
for operating instructions.
y
In PC mode, there may be noise
associated with the resolution, vertical
pattern, contrast or brightness. If noise is
present, change the PC output to another
resolution, change the refresh rate to
another rate or adjust the brightness and
contrast on the PICTURE menu until the
picture is clear.
y
In PC mode, some resolution settings
may not work properly depending on the
graphics card.
Connect the TV to a wall antenna socket with an
RF cable (75 Ω).
NOTE
y
Use a signal splitter to use more than 2
TVs.
y
If the image quality is poor, install a signal
amplifier properly to improve the image
quality.
y
If the image quality is poor with an
antenna connected, try to realign the
antenna in the correct direction.
y
An antenna cable and converter are not
supplied.
y
Supported DTV Audio: MPEG, Dolby
Digital.
Antenna connection
SAT/LNB
AERIAL/
CABLE
• Verwenden Sie einen Signalsplitter für die
Nutzung von mehr als 2 Fernsehern�
• Falls die Bildqualität schlecht ist, installieren
Sie ordnungsgemäß einen Signalverstärker,
um die Bildqualität zu verbessern�
• Falls eine Antenne verbunden und die
Bildqualität schlecht ist, versuchen Sie, die
Antenne entsprechend auszurichten�
• Antennenkabel und Konverter sind nicht im
Lieferumfang enthalten�
• Unterstützte DTV-Audioformate: MPEG, Dolby
Digital�
HINWEIS
MAKING CONNECTIONS
Connect various external devices to the TV
and switch input modes to select an external
device. For more information of external device’s
connection, refer to the manual provided with
each device.
Available external devices are: HD receivers,
DVD players, audio systems, USB
storage devices, PC, and other external
devices.
NOTE
y
The external device connection may differ
from the model.
y
Connect external devices to the TV
regardless of the order of the TV port.
y
Refer to the external equipment’s manual
for operating instructions.
y
In PC mode, there may be noise
associated with the resolution, vertical
pattern, contrast or brightness. If noise is
present, change the PC output to another
resolution, change the refresh rate to
another rate or adjust the brightness and
contrast on the PICTURE menu until the
picture is clear.
y
In PC mode, some resolution settings
may not work properly depending on the
graphics card.
Connect the TV to a wall antenna socket with an
RF cable (75 Ω).
NOTE
y
Use a signal splitter to use more than 2
TVs.
y
If the image quality is poor, install a signal
amplifier properly to improve the image
quality.
y
If the image quality is poor with an
antenna connected, try to realign the
antenna in the correct direction.
y
An antenna cable and converter are not
supplied.
y
Supported DTV Audio: MPEG, Dolby
Digital.
Antenna connection
SAT/LNB
AERIAL/
CABLE
HINWEIS
• Die Verbindung mit externen Geräten kann je
nach Modell variieren�
• Schließen Sie externe Geräte unabhängig von
der Reihenfolge der TV-Anschlüsse an den
Fernseher an�
• Informieren Sie sich in der Bedienungsanleitung
des externen Geräts über dessen Funktionsweise.
• Im PC-Modus können Störungen in Bezug auf
Auösung, vertikales Muster, Kontrast und
Helligkeit auftreten� Falls Störungen auftreten,
ändern Sie die Auösung des PC-Ausgangs,
ändern Sie die Aktualisierungsrate oder stellen
Sie im BILD-Menü Helligkeit und Kontrast ein,
bis das Bild schärfer ist�
• Einige Auösungen funktionieren im PC-
Modus möglicherweise je nach Grakkarte
nicht ordnungsgemäß�
MAKING CONNECTIONS
Connect various external devices to the TV
and switch input modes to select an external
device. For more information of external device’s
connection, refer to the manual provided with
each device.
Available external devices are: HD receivers,
DVD players, audio systems, USB
storage devices, PC, and other external
devices.
NOTE
y
The external device connection may differ
from the model.
y
Connect external devices to the TV
regardless of the order of the TV port.
y
Refer to the external equipment’s manual
for operating instructions.
y
In PC mode, there may be noise
associated with the resolution, vertical
pattern, contrast or brightness. If noise is
present, change the PC output to another
resolution, change the refresh rate to
another rate or adjust the brightness and
contrast on the PICTURE menu until the
picture is clear.
y
In PC mode, some resolution settings
may not work properly depending on the
graphics card.
Connect the TV to a wall antenna socket with an
RF cable (75 Ω).
NOTE
y
Use a signal splitter to use more than 2
TVs.
y
If the image quality is poor, install a signal
amplifier properly to improve the image
quality.
y
If the image quality is poor with an
antenna connected, try to realign the
antenna in the correct direction.
y
An antenna cable and converter are not
supplied.
y
Supported DTV Audio: MPEG, Dolby
Digital.
Antenna connection
SAT/LNB
AERIAL/
CABLE

8
Deutsch
Externe Geräte verbinden
5
Schalten Sie die Stromversorgung aus, bevor Sie den Fernseher mit einem externen Gerät
verbinden�
Der Fernseher kann unterschiedliche Multimedia-Quellen abspielen, je nachdem welcher
Anschluss verbunden ist (Blu-ray-Player, PC, usw.) und welche Eingangsquelle aktiviert ist.
CamcorderDVD playerPC (HDMI-output)Blu-ray disc playerAudio system
DVD player with
component output
Headphone
USB
ARCSCART
TV
CI SLOT
The sound
system
HDMI1(ARC)
AERIAL/CABLESAT/LNB
VGA IN PC AUDIO IN
USB
EARPHONE
HDMI2 HDMI3
MINI AV IN
MINI
YPBPR IN
S/PDIF OUT
CI SLOT
SCART IN
PC-Anschluss
DVD-Player mit
Komponentenausgang
Audioanlage
Kopfhörer
Common Interface
HDMI
(ARC)
Audiosystem
DVD-Player
Camcorder
Blu-ray-Player
PC
(HDMI-Ausgang)

9
Deutsch
Fernbedienung
6
1� Richten Sie den Sensor der Fernbedienung
direkt auf die untere rechte Ecke des
Fernsehers�
2� Die Reichweite der Fernbedienung beträgt
ca� 10 Meter mit einem Winkel von ca� 30
Grad.
3� Entfernen Sie Hindernisse zwischen der
Fernbedienung und dem Sensor�
☼ Falls Sie die Fernbedienung längere Zeit
nicht verwenden werden, entfernen Sie die
Batterien�
☼ Falls die Fernbedienung nicht ordnungsgemäß
funktioniert oder die Reichweite verringert ist,
ersetzen Sie beide Batterien durch neue�
Batterien in die Fernbedienung einlegen
1� Entfernen Sie die Batteriefachabdeckung, indem Sie diese auf der Unterseite der
Fernbedienung nach unten schieben und die Abdeckung dann anheben�
2� Legen Sie die Batterien gemäß den Markierungen (+) und (-) im Batteriefach ein.
3� Schließen Sie die Batteriefachabdeckung wieder durch Aufsetzen und Hochschieben des
Deckels�
VORSICHT
• Verwenden Sie nur AAA-Batterien�
• Alte und neue Batterien nicht gemeinsam verwenden� Andernfalls könnten die Batterien
beschädigt werden oder auslaufen, was wiederum Feuer oder Verletzungen verursachen kann�
• Legen Sie die Batterien gemäß den Markierungen (+) und (-) ein. Bei unsachgemäßer Installation
können Batterien auslaufen oder Fehlfunktionen verursachen�
• Entsorgen Sie Batterien gemäß den örtlich geltenden Gesetzen und Vorschriften.
• Halten Sie die Batterien von Kindern oder Haustieren fern�
• Entnehmen Sie die Batterien, falls Sie die Fernbedienung längere Zeit nicht verwenden werden�
Fernbedienung verwenden
30 30
IR Receiver
+
SOURCE
P.MODE S.MODE FAV SLEEP
CH.LIST AUTO
ASPECT
TEXT
EPG
HOLD
INDEX
SUBPAGE
SIZE
-
+
-
MENU
EXIT
DISPLAY
CH VOL
Audio
FREEZE
SUBTITLE
REVEAL
1 2
3
4
5
6
7 8 9
0
-/- -
TIMESHIFT
LIST
IR-Empfänger

10
Deutsch
Fernbedienung
6
1. POWER
Press to enter or exit standby mode.
2. MUTE
Press to turn on or off the audio sound.
18.
14.
15.
21.
10.
5.
7.
6.
4.
S.MODE
Press to change the audio mode.
3.
P.MODE
Press to select the picture mode.
19.
DISPLAY
Press to display the information window.
8.
CH.LIST
Press to display the Channel List.
9.
AUTO
Press to adjust automatically in VGA mode.
16.
Press the direction buttons to select menu options or settings.
17.
OK
Confirmation button,select the OSD menuoption.
11.
Press to change the channel of the TV.
12.
-/--
Press this button before entering a programme greater than 09.
13.
Press to return to the channel last viewed.
20.
22.
TEXT
Start the teletext mode.
27.
HOLD
Hold freeze the current teletext page on the screen.
25.
SUBTITLE
Open subtitle menu for subtitle selection.
26.
INDEX
Display a list and information about the teletext pages.
28.
SIZE
LIST
You can change the picture size in the teletext mode.
23.
Press to display electronic program guide menu.
EPG
33.
Display the submenu of the teletext mode.
According to the OSD prompt operation.
SUBPAGE
COLOR
24.
Press audio to PAL-BG/Stereo or PAL-BG Momo(ATV)&Audio Languages.
AUDIO
30.
Press to play or stop the current program.
Start the time-shift function.
Display the PVR file list.
To play the next chapter,title or track.
Press to scan in forword.
Press to scan in reuerse.
34.
To play the previous chapter,title or track.
31.
Press the botton to stop the current program.
32.
Press to start recording.
29.
REVEAL
TIMESHIFT
Display or remove the content that is hidden in teletext mode.
+
SOURCE
P.MODE S.MODE FAV SLEEP
CH.LIST AUTO
ASPECT
TEXT
EPG
HOLD
INDEX
SUBPAGE
SIZE
-
+
-
MENU
EXIT
DISPLAY
CH VOL
Audio
FREEZE
SUBTITLE
REVEAL
1 2
3
4
5
6
7 8 9
0
-/--
TIMESHIFT
LIST
7
4
19
9
13
17
14
24
10
25
27
22
3
5
6
2
18
8
1
11
12
15
16
20
28
26
30
21
23
29
33
31
34
32
1. BETRIEB
Gerät ein-/ausschalten
2. STUMM
Ton stumm bzw� wieder einschalten
3. P.MODE
Bildmodus auswählen
4. S.MODE
Tonmodus auswählen
5. FAV
Favoritenliste önen
6. SLEEP
Sleep-Timer zum Ausschalten des Fernsehers nach
Ablauf der ausgewählten Zeit aktivieren
7. FREEZE
Videoanzeige pausieren� Erneut drücken, um Anzeige
wieder fortzusetzen
8. CH.LIST
Programmliste anzeigen
9. AUTO
Automatische Einstellung im VGA-Modus
10. ASPECT
Bildformate durchschalten
11. 0-9
Programmauswahl per Programmplatzeingabe
12. -/--
Programmnummer eingeben, die größer ist als 9
13.
1. POWER
Press to enter or exit standby mode.
2. MUTE
Press to turn on or off the audio sound.
18.
14.
15.
21.
10.
5.
7.
6.
4.
S.MODE
Press to change the audio mode.
3.
P.MODE
Press to select the picture mode.
19.
DISPLAY
Press to display the information window.
8.
CH.LIST
Press to display the Channel List.
9.
AUTO
Press to adjust automatically in VGA mode.
16.
Press the direction buttons to select menu options or settings.
17.
OK
Confirmation button,select the OSD menuoption.
11.
Press to change the channel of the TV.
12.
-/--
Press this button before entering a programme greater than 09.
13.
Press to return to the channel last viewed.
20.
22.
TEXT
Start the teletext mode.
27.
HOLD
Hold freeze the current teletext page on the screen.
25.
SUBTITLE
Open subtitle menu for subtitle selection.
26.
INDEX
Display a list and information about the teletext pages.
28.
SIZE
LIST
You can change the picture size in the teletext mode.
23.
Press to display electronic program guide menu.
EPG
33.
Display the submenu of the teletext mode.
According to the OSD prompt operation.
SUBPAGE
COLOR
24.
Press audio to PAL-BG/Stereo or PAL-BG Momo(ATV)&Audio Languages.
AUDIO
30.
Press to play or stop the current program.
Start the time-shift function.
Display the PVR file list.
To play the next chapter,title or track.
Press to scan in forword.
Press to scan in reuerse.
34.
To play the previous chapter,title or track.
31.
Press the botton to stop the current program.
32.
Press to start recording.
29.
REVEAL
TIMESHIFT
Display or remove the content that is hidden in teletext mode.
+
SOURCE
P.MODE S.MODE FAV SLEEP
CH.LIST AUTO
ASPECT
TEXT
EPG
HOLD
INDEX
SUBPAGE
SIZE
-
+
-
MENU
EXIT
DISPLAY
CH VOL
Audio
FREEZE
SUBTITLE
REVEAL
1 2
3
4
5
6
7 8 9
0
-/--
TIMESHIFT
LIST
7
4
19
9
13
17
14
24
10
25
27
22
3
5
6
2
18
8
1
11
12
15
16
20
28
26
30
21
23
29
33
31
34
32
Zum zuletzt angesehenen Programm zurückkehren
14. MENU
Bildschirmmenü (OSD) önen
15. EXIT
Bildschirmmenü verlassen
16. ▲▼◄►
Mit den Pfeiltasten wählen Sie Menüoptionen oder
Einstellungen aus
17. OK
Bestätigungstaste; OSD-Menüoptionen auswählen
18. SOURCE
Verfügbare Quellen anzeigen und auswählen
19. DISPLAY
Informationsfenster önen
20. CH (+/-)
Zum nächsten/vorherigen TV-/Radioprogramm schalten
21. VOL (+/-)
Lautstärke des Fernsehers erhöhen oder reduzieren
22. TEXT
Videotextmodus aktivieren
23. EPG
Elektronische Programmzeitschrift önen
24. AUDIO
Auswahl verfügbarer Audiosprachen bzw. PAL-BG/Stereo
oder PAL-BG Mono (ATV)
25. SUBTITLE
Untertitelmenü zur Auswahl von Untertiteln önen
26. INDEX
1. POWER
Press to enter or exit standby mode.
2. MUTE
Press to turn on or off the audio sound.
18.
14.
15.
21.
10.
5.
7.
6.
4.
S.MODE
Press to change the audio mode.
3.
P.MODE
Press to select the picture mode.
19.
DISPLAY
Press to display the information window.
8.
CH.LIST
Press to display the Channel List.
9.
AUTO
Press to adjust automatically in VGA mode.
16.
Press the direction buttons to select menu options or settings.
17.
OK
Confirmation button,select the OSD menuoption.
11.
Press to change the channel of the TV.
12.
-/--
Press this button before entering a programme greater than 09.
13.
Press to return to the channel last viewed.
20.
22.
TEXT
Start the teletext mode.
27.
HOLD
Hold freeze the current teletext page on the screen.
25.
SUBTITLE
Open subtitle menu for subtitle selection.
26.
INDEX
Display a list and information about the teletext pages.
28.
SIZE
LIST
You can change the picture size in the teletext mode.
23.
Press to display electronic program guide menu.
EPG
33.
Display the submenu of the teletext mode.
According to the OSD prompt operation.
SUBPAGE
COLOR
24.
Press audio to PAL-BG/Stereo or PAL-BG Momo(ATV)&Audio Languages.
AUDIO
30.
Press to play or stop the current program.
Start the time-shift function.
Display the PVR file list.
To play the next chapter,title or track.
Press to scan in forword.
Press to scan in reuerse.
34.
To play the previous chapter,title or track.
31.
Press the botton to stop the current program.
32.
Press to start recording.
29.
REVEAL
TIMESHIFT
Display or remove the content that is hidden in teletext mode.
+
SOURCE
P.MODE S.MODE FAV SLEEP
CH.LIST AUTO
ASPECT
TEXT
EPG
HOLD
INDEX
SUBPAGE
SIZE
-
+
-
MENU
EXIT
DISPLAY
CH VOL
Audio
FREEZE
SUBTITLE
REVEAL
1 2
3
4
5
6
7 8 9
0
-/--
TIMESHIFT
LIST
7
4
19
9
13
17
14
24
10
25
27
22
3
5
6
2
18
8
1
11
12
15
16
20
28
26
30
21
23
29
33
31
34
32
Liste und Informationen über die Videotextseiten önen
Vorheriges/vorherigen Kapitel, Titel oder Track abspielen
27. HOLD
1. POWER
Press to enter or exit standby mode.
2. MUTE
Press to turn on or off the audio sound.
18.
14.
15.
21.
10.
5.
7.
6.
4.
S.MODE
Press to change the audio mode.
3.
P.MODE
Press to select the picture mode.
19.
DISPLAY
Press to display the information window.
8.
CH.LIST
Press to display the Channel List.
9.
AUTO
Press to adjust automatically in VGA mode.
16.
Press the direction buttons to select menu options or settings.
17.
OK
Confirmation button,select the OSD menuoption.
11.
Press to change the channel of the TV.
12.
-/--
Press this button before entering a programme greater than 09.
13.
Press to return to the channel last viewed.
20.
22.
TEXT
Start the teletext mode.
27.
HOLD
Hold freeze the current teletext page on the screen.
25.
SUBTITLE
Open subtitle menu for subtitle selection.
26.
INDEX
Display a list and information about the teletext pages.
28.
SIZE
LIST
You can change the picture size in the teletext mode.
23.
Press to display electronic program guide menu.
EPG
33.
Display the submenu of the teletext mode.
According to the OSD prompt operation.
SUBPAGE
COLOR
24.
Press audio to PAL-BG/Stereo or PAL-BG Momo(ATV)&Audio Languages.
AUDIO
30.
Press to play or stop the current program.
Start the time-shift function.
Display the PVR file list.
To play the next chapter,title or track.
Press to scan in forword.
Press to scan in reuerse.
34.
To play the previous chapter,title or track.
31.
Press the botton to stop the current program.
32.
Press to start recording.
29.
REVEAL
TIMESHIFT
Display or remove the content that is hidden in teletext mode.
+
SOURCE
P.MODE S.MODE FAV SLEEP
CH.LIST AUTO
ASPECT
TEXT
EPG
HOLD
INDEX
SUBPAGE
SIZE
-
+
-
MENU
EXIT
DISPLAY
CH VOL
Audio
FREEZE
SUBTITLE
REVEAL
1 2
3
4
5
6
7 8 9
0
-/--
TIMESHIFT
LIST
7
4
19
9
13
17
14
24
10
25
27
22
3
5
6
2
18
8
1
11
12
15
16
20
28
26
30
21
23
29
33
31
34
32
Aktuelle Videotextseite auf dem Bildschirm einfrieren
Nächstes/nächsten Kapitel, Titel oder Track abspielen
28. SIZE
1. POWER
Press to enter or exit standby mode.
2. MUTE
Press to turn on or off the audio sound.
18.
14.
15.
21.
10.
5.
7.
6.
4.
S.MODE
Press to change the audio mode.
3.
P.MODE
Press to select the picture mode.
19.
DISPLAY
Press to display the information window.
8.
CH.LIST
Press to display the Channel List.
9.
AUTO
Press to adjust automatically in VGA mode.
16.
Press the direction buttons to select menu options or settings.
17.
OK
Confirmation button,select the OSD menuoption.
11.
Press to change the channel of the TV.
12.
-/--
Press this button before entering a programme greater than 09.
13.
Press to return to the channel last viewed.
20.
22.
TEXT
Start the teletext mode.
27.
HOLD
Hold freeze the current teletext page on the screen.
25.
SUBTITLE
Open subtitle menu for subtitle selection.
26.
INDEX
Display a list and information about the teletext pages.
28.
SIZE
LIST
You can change the picture size in the teletext mode.
23.
Press to display electronic program guide menu.
EPG
33.
Display the submenu of the teletext mode.
According to the OSD prompt operation.
SUBPAGE
COLOR
24.
Press audio to PAL-BG/Stereo or PAL-BG Momo(ATV)&Audio Languages.
AUDIO
30.
Press to play or stop the current program.
Start the time-shift function.
Display the PVR file list.
To play the next chapter,title or track.
Press to scan in forword.
Press to scan in reuerse.
34.
To play the previous chapter,title or track.
31.
Press the botton to stop the current program.
32.
Press to start recording.
29.
REVEAL
TIMESHIFT
Display or remove the content that is hidden in teletext mode.
+
SOURCE
P.MODE S.MODE FAV SLEEP
CH.LIST AUTO
ASPECT
TEXT
EPG
HOLD
INDEX
SUBPAGE
SIZE
-
+
-
MENU
EXIT
DISPLAY
CH VOL
Audio
FREEZE
SUBTITLE
REVEAL
1 2
3
4
5
6
7 8 9
0
-/--
TIMESHIFT
LIST
7
4
19
9
13
17
14
24
10
25
27
22
3
5
6
2
18
8
1
11
12
15
16
20
28
26
30
21
23
29
33
31
34
32
Bildgröße im Videotextmodus ändern
Rückwärts suchen
29. REVEAL
1. POWER
Press to enter or exit standby mode.
2. MUTE
Press to turn on or off the audio sound.
18.
14.
15.
21.
10.
5.
7.
6.
4.
S.MODE
Press to change the audio mode.
3.
P.MODE
Press to select the picture mode.
19.
DISPLAY
Press to display the information window.
8.
CH.LIST
Press to display the Channel List.
9.
AUTO
Press to adjust automatically in VGA mode.
16.
Press the direction buttons to select menu options or settings.
17.
OK
Confirmation button,select the OSD menuoption.
11.
Press to change the channel of the TV.
12.
-/--
Press this button before entering a programme greater than 09.
13.
Press to return to the channel last viewed.
20.
22.
TEXT
Start the teletext mode.
27.
HOLD
Hold freeze the current teletext page on the screen.
25.
SUBTITLE
Open subtitle menu for subtitle selection.
26.
INDEX
Display a list and information about the teletext pages.
28.
SIZE
LIST
You can change the picture size in the teletext mode.
23.
Press to display electronic program guide menu.
EPG
33.
Display the submenu of the teletext mode.
According to the OSD prompt operation.
SUBPAGE
COLOR
24.
Press audio to PAL-BG/Stereo or PAL-BG Momo(ATV)&Audio Languages.
AUDIO
30.
Press to play or stop the current program.
Start the time-shift function.
Display the PVR file list.
To play the next chapter,title or track.
Press to scan in forword.
Press to scan in reuerse.
34.
To play the previous chapter,title or track.
31.
Press the botton to stop the current program.
32.
Press to start recording.
29.
REVEAL
TIMESHIFT
Display or remove the content that is hidden in teletext mode.
+
SOURCE
P.MODE S.MODE FAV SLEEP
CH.LIST AUTO
ASPECT
TEXT
EPG
HOLD
INDEX
SUBPAGE
SIZE
-
+
-
MENU
EXIT
DISPLAY
CH VOL
Audio
FREEZE
SUBTITLE
REVEAL
1 2
3
4
5
6
7 8 9
0
-/--
TIMESHIFT
LIST
7
4
19
9
13
17
14
24
10
25
27
22
3
5
6
2
18
8
1
11
12
15
16
20
28
26
30
21
23
29
33
31
34
32
Versteckte Inhalte im Videotext ein-/ausblenden
Vorwärts suchen
30. TIMESHIFT
1. POWER
Press to enter or exit standby mode.
2. MUTE
Press to turn on or off the audio sound.
18.
14.
15.
21.
10.
5.
7.
6.
4.
S.MODE
Press to change the audio mode.
3.
P.MODE
Press to select the picture mode.
19.
DISPLAY
Press to display the information window.
8.
CH.LIST
Press to display the Channel List.
9.
AUTO
Press to adjust automatically in VGA mode.
16.
Press the direction buttons to select menu options or settings.
17.
OK
Confirmation button,select the OSD menuoption.
11.
Press to change the channel of the TV.
12.
-/--
Press this button before entering a programme greater than 09.
13.
Press to return to the channel last viewed.
20.
22.
TEXT
Start the teletext mode.
27.
HOLD
Hold freeze the current teletext page on the screen.
25.
SUBTITLE
Open subtitle menu for subtitle selection.
26.
INDEX
Display a list and information about the teletext pages.
28.
SIZE
LIST
You can change the picture size in the teletext mode.
23.
Press to display electronic program guide menu.
EPG
33.
Display the submenu of the teletext mode.
According to the OSD prompt operation.
SUBPAGE
COLOR
24.
Press audio to PAL-BG/Stereo or PAL-BG Momo(ATV)&Audio Languages.
AUDIO
30.
Press to play or stop the current program.
Start the time-shift function.
Display the PVR file list.
To play the next chapter,title or track.
Press to scan in forword.
Press to scan in reuerse.
34.
To play the previous chapter,title or track.
31.
Press the botton to stop the current program.
32.
Press to start recording.
29.
REVEAL
TIMESHIFT
Display or remove the content that is hidden in teletext mode.
+
SOURCE
P.MODE S.MODE FAV SLEEP
CH.LIST AUTO
ASPECT
TEXT
EPG
HOLD
INDEX
SUBPAGE
SIZE
-
+
-
MENU
EXIT
DISPLAY
CH VOL
Audio
FREEZE
SUBTITLE
REVEAL
1 2
3
4
5
6
7 8 9
0
-/--
TIMESHIFT
LIST
7
4
19
9
13
17
14
24
10
25
27
22
3
5
6
2
18
8
1
11
12
15
16
20
28
26
30
21
23
29
33
31
34
32
Timeshift-Funktion starten
Wiedergabe der aktuellen Sendung starten oder beenden
31. LIST
1. POWER
Press to enter or exit standby mode.
2. MUTE
Press to turn on or off the audio sound.
18.
14.
15.
21.
10.
5.
7.
6.
4.
S.MODE
Press to change the audio mode.
3.
P.MODE
Press to select the picture mode.
19.
DISPLAY
Press to display the information window.
8.
CH.LIST
Press to display the Channel List.
9.
AUTO
Press to adjust automatically in VGA mode.
16.
Press the direction buttons to select menu options or settings.
17.
OK
Confirmation button,select the OSD menuoption.
11.
Press to change the channel of the TV.
12.
-/--
Press this button before entering a programme greater than 09.
13.
Press to return to the channel last viewed.
20.
22.
TEXT
Start the teletext mode.
27.
HOLD
Hold freeze the current teletext page on the screen.
25.
SUBTITLE
Open subtitle menu for subtitle selection.
26.
INDEX
Display a list and information about the teletext pages.
28.
SIZE
LIST
You can change the picture size in the teletext mode.
23.
Press to display electronic program guide menu.
EPG
33.
Display the submenu of the teletext mode.
According to the OSD prompt operation.
SUBPAGE
COLOR
24.
Press audio to PAL-BG/Stereo or PAL-BG Momo(ATV)&Audio Languages.
AUDIO
30.
Press to play or stop the current program.
Start the time-shift function.
Display the PVR file list.
To play the next chapter,title or track.
Press to scan in forword.
Press to scan in reuerse.
34.
To play the previous chapter,title or track.
31.
Press the botton to stop the current program.
32.
Press to start recording.
29.
REVEAL
TIMESHIFT
Display or remove the content that is hidden in teletext mode.
+
SOURCE
P.MODE S.MODE FAV SLEEP
CH.LIST AUTO
ASPECT
TEXT
EPG
HOLD
INDEX
SUBPAGE
SIZE
-
+
-
MENU
EXIT
DISPLAY
CH VOL
Audio
FREEZE
SUBTITLE
REVEAL
1 2
3
4
5
6
7 8 9
0
-/--
TIMESHIFT
LIST
7
4
19
9
13
17
14
24
10
25
27
22
3
5
6
2
18
8
1
11
12
15
16
20
28
26
30
21
23
29
33
31
34
32
PVR-Dateiliste anzeigen
Wiedergabe der aktuellen Sendung beenden
32.
1. POWER
Press to enter or exit standby mode.
2. MUTE
Press to turn on or off the audio sound.
18.
14.
15.
21.
10.
5.
7.
6.
4.
S.MODE
Press to change the audio mode.
3.
P.MODE
Press to select the picture mode.
19.
DISPLAY
Press to display the information window.
8.
CH.LIST
Press to display the Channel List.
9.
AUTO
Press to adjust automatically in VGA mode.
16.
Press the direction buttons to select menu options or settings.
17.
OK
Confirmation button,select the OSD menuoption.
11.
Press to change the channel of the TV.
12.
-/--
Press this button before entering a programme greater than 09.
13.
Press to return to the channel last viewed.
20.
22.
TEXT
Start the teletext mode.
27.
HOLD
Hold freeze the current teletext page on the screen.
25.
SUBTITLE
Open subtitle menu for subtitle selection.
26.
INDEX
Display a list and information about the teletext pages.
28.
SIZE
LIST
You can change the picture size in the teletext mode.
23.
Press to display electronic program guide menu.
EPG
33.
Display the submenu of the teletext mode.
According to the OSD prompt operation.
SUBPAGE
COLOR
24.
Press audio to PAL-BG/Stereo or PAL-BG Momo(ATV)&Audio Languages.
AUDIO
30.
Press to play or stop the current program.
Start the time-shift function.
Display the PVR file list.
To play the next chapter,title or track.
Press to scan in forword.
Press to scan in reuerse.
34.
To play the previous chapter,title or track.
31.
Press the botton to stop the current program.
32.
Press to start recording.
29.
REVEAL
TIMESHIFT
Display or remove the content that is hidden in teletext mode.
+
SOURCE
P.MODE S.MODE FAV SLEEP
CH.LIST AUTO
ASPECT
TEXT
EPG
HOLD
INDEX
SUBPAGE
SIZE
-
+
-
MENU
EXIT
DISPLAY
CH VOL
Audio
FREEZE
SUBTITLE
REVEAL
1 2
3
4
5
6
7 8 9
0
-/--
TIMESHIFT
LIST
7
4
19
9
13
17
14
24
10
25
27
22
3
5
6
2
18
8
1
11
12
15
16
20
28
26
30
21
23
29
33
31
34
32
Aufnahme starten
33. SUBPAGE
Untermenü des Videotextmodus önen
34. FARBTASTEN
Funktion je nach Einblendung im OSD-Menü

11
Deutsch
Fernseher ein- und ausschalten
Drücken Sie die Taste BETRIEB auf der Fernbedienung�
Sie können auch die Betriebstaste am unteren/seitlichen
Bedienfeld verwenden�
* Falls 15 Minuten lang kein Eingangssignal erfasst wird,
schaltet sich der Fernseher automatisch aus�
Erstinstallation
Wählen Sie in der Erstinstallation aus, in welcher Sprache das OSD-Menü und Informationen am
Bildschirm eingeblendet werden sollen, in welchem Land das Gerät betrieben wird, ob sie den
Heim- oder Vorführmodus verwenden möchten sowie welches Empfangssignal Sie verwenden�
Verwenden Sie die Tasten ◄/►, um den Wert in der markierten Zeile zu ändern.
Verwenden Sie die Tasten ▼/▲, um die Markierung in eine andere Zeile zu bewegen.
OK
Germany
Environment
Digital Type
Home Mode
DVB-T
Automatische Sendersuche
Für die ATV-Sendersuche drücken Sie die Menü-Taste und die linke Pfeiltaste, um die ATV-
Suche zu überspringen� Für die DTV-Sendersuche drücken Sie die Menü-Taste und die linke
Pfeiltaste, um die DTV-Suche zu überspringen�
Thailand
OK
Sender einschalten
1� Sendertasten verwenden
Drücken Sie die Taste +CH-, um einen anderen Sender
einzuschalten� Die Sender werden nacheinander eingeschaltet�
Es können alle gespeicherten Sender wiedergegeben werden�
Gelöschte oder nicht gespeicherte Sender werden nicht angezeigt.
* Drücken Sie die Taste
, um zum vorherigen Sender
zurückzukehren�
P.MODE S.MODE FAV SLEEP
CH.LIST AUTO
ASPECT
MENU
EXIT
FREEZE
1 2
3
4
5
6
7 8 9
0
-/--
+
SOURCE
TEXT
EPG
HOLD
INDEX
SUBPAGE
SIZE
-
+
-
DISPLAY
CH VOL
Audio
SUBTITLE
REVEAL
TIMESHIFT
LIST
Grundlegende Funktionen des Fernsehers
7
1. POWER
Press to enter or exit standby mode.
2. MUTE
Press to turn on or off the audio sound.
18.
14.
15.
21.
10.
5.
7.
6.
4.
S.MODE
Press to change the audio mode.
3.
P.MODE
Press to select the picture mode.
19.
DISPLAY
Press to display the information window.
8.
CH.LIST
Press to display the Channel List.
9.
AUTO
Press to adjust automatically in VGA mode.
16.
Press the direction buttons to select menu options or settings.
17.
OK
Confirmation button,select the OSD menuoption.
11.
Press to change the channel of the TV.
12.
-/--
Press this button before entering a programme greater than 09.
13.
Press to return to the channel last viewed.
20.
22.
TEXT
Start the teletext mode.
27.
HOLD
Hold freeze the current teletext page on the screen.
25.
SUBTITLE
Open subtitle menu for subtitle selection.
26.
INDEX
Display a list and information about the teletext pages.
28.
SIZE
LIST
You can change the picture size in the teletext mode.
23.
Press to display electronic program guide menu.
EPG
33.
Display the submenu of the teletext mode.
According to the OSD prompt operation.
SUBPAGE
COLOR
24.
Press audio to PAL-BG/Stereo or PAL-BG Momo(ATV)&Audio Languages.
AUDIO
30.
Press to play or stop the current program.
Start the time-shift function.
Display the PVR file list.
To play the next chapter,title or track.
Press to scan in forword.
Press to scan in reuerse.
34.
To play the previous chapter,title or track.
31.
Press the botton to stop the current program.
32.
Press to start recording.
29.
REVEAL
TIMESHIFT
Display or remove the content that is hidden in teletext mode.
+
SOURCE
P.MODE S.MODE FAV SLEEP
CH.LIST AUTO
ASPECT
TEXT
EPG
HOLD
INDEX
SUBPAGE
SIZE
-
+
-
MENU
EXIT
DISPLAY
CH VOL
Audio
FREEZE
SUBTITLE
REVEAL
1 2
3
4
5
6
7 8 9
0
-/--
TIMESHIFT
LIST
7
4
19
9
13
17
14
24
10
25
27
22
3
5
6
2
18
8
1
11
12
15
16
20
28
26
30
21
23
29
33
31
34
32
1. BETRIEB
Gerät ein-/ausschalten
2. STUMM
Ton stumm bzw� wieder einschalten
3. P.MODE
Bildmodus auswählen
4. S.MODE
Tonmodus auswählen
5. FAV
Favoritenliste önen
6. SLEEP
Sleep-Timer zum Ausschalten des Fernsehers nach
Ablauf der ausgewählten Zeit aktivieren
7. FREEZE
Videoanzeige pausieren� Erneut drücken, um Anzeige
wieder fortzusetzen
8. CH.LIST
Programmliste anzeigen
9. AUTO
Automatische Einstellung im VGA-Modus
10. ASPECT
Bildformate durchschalten
11. 0-9
Programmauswahl per Programmplatzeingabe
12. -/--
Programmnummer eingeben, die größer ist als 9
13.
1. POWER
Press to enter or exit standby mode.
2. MUTE
Press to turn on or off the audio sound.
18.
14.
15.
21.
10.
5.
7.
6.
4.
S.MODE
Press to change the audio mode.
3.
P.MODE
Press to select the picture mode.
19.
DISPLAY
Press to display the information window.
8.
CH.LIST
Press to display the Channel List.
9.
AUTO
Press to adjust automatically in VGA mode.
16.
Press the direction buttons to select menu options or settings.
17.
OK
Confirmation button,select the OSD menuoption.
11.
Press to change the channel of the TV.
12.
-/--
Press this button before entering a programme greater than 09.
13.
Press to return to the channel last viewed.
20.
22.
TEXT
Start the teletext mode.
27.
HOLD
Hold freeze the current teletext page on the screen.
25.
SUBTITLE
Open subtitle menu for subtitle selection.
26.
INDEX
Display a list and information about the teletext pages.
28.
SIZE
LIST
You can change the picture size in the teletext mode.
23.
Press to display electronic program guide menu.
EPG
33.
Display the submenu of the teletext mode.
According to the OSD prompt operation.
SUBPAGE
COLOR
24.
Press audio to PAL-BG/Stereo or PAL-BG Momo(ATV)&Audio Languages.
AUDIO
30.
Press to play or stop the current program.
Start the time-shift function.
Display the PVR file list.
To play the next chapter,title or track.
Press to scan in forword.
Press to scan in reuerse.
34.
To play the previous chapter,title or track.
31.
Press the botton to stop the current program.
32.
Press to start recording.
29.
REVEAL
TIMESHIFT
Display or remove the content that is hidden in teletext mode.
+
SOURCE
P.MODE S.MODE FAV SLEEP
CH.LIST AUTO
ASPECT
TEXT
EPG
HOLD
INDEX
SUBPAGE
SIZE
-
+
-
MENU
EXIT
DISPLAY
CH VOL
Audio
FREEZE
SUBTITLE
REVEAL
1 2
3
4
5
6
7 8 9
0
-/--
TIMESHIFT
LIST
7
4
19
9
13
17
14
24
10
25
27
22
3
5
6
2
18
8
1
11
12
15
16
20
28
26
30
21
23
29
33
31
34
32
Zum zuletzt angesehenen Programm zurückkehren
14. MENU
Bildschirmmenü (OSD) önen
15. EXIT
Bildschirmmenü verlassen
16. ▲▼◄►
Mit den Pfeiltasten wählen Sie Menüoptionen oder
Einstellungen aus
17. OK
Bestätigungstaste; OSD-Menüoptionen auswählen
18. SOURCE
Verfügbare Quellen anzeigen und auswählen
19. DISPLAY
Informationsfenster önen
20. CH (+/-)
Zum nächsten/vorherigen TV-/Radioprogramm schalten
21. VOL (+/-)
Lautstärke des Fernsehers erhöhen oder reduzieren
22. TEXT
Videotextmodus aktivieren
23. EPG
Elektronische Programmzeitschrift önen
24. AUDIO
Auswahl verfügbarer Audiosprachen bzw. PAL-BG/Stereo
oder PAL-BG Mono (ATV)
25. SUBTITLE
Untertitelmenü zur Auswahl von Untertiteln önen
26. INDEX
1. POWER
Press to enter or exit standby mode.
2. MUTE
Press to turn on or off the audio sound.
18.
14.
15.
21.
10.
5.
7.
6.
4.
S.MODE
Press to change the audio mode.
3.
P.MODE
Press to select the picture mode.
19.
DISPLAY
Press to display the information window.
8.
CH.LIST
Press to display the Channel List.
9.
AUTO
Press to adjust automatically in VGA mode.
16.
Press the direction buttons to select menu options or settings.
17.
OK
Confirmation button,select the OSD menuoption.
11.
Press to change the channel of the TV.
12.
-/--
Press this button before entering a programme greater than 09.
13.
Press to return to the channel last viewed.
20.
22.
TEXT
Start the teletext mode.
27.
HOLD
Hold freeze the current teletext page on the screen.
25.
SUBTITLE
Open subtitle menu for subtitle selection.
26.
INDEX
Display a list and information about the teletext pages.
28.
SIZE
LIST
You can change the picture size in the teletext mode.
23.
Press to display electronic program guide menu.
EPG
33.
Display the submenu of the teletext mode.
According to the OSD prompt operation.
SUBPAGE
COLOR
24.
Press audio to PAL-BG/Stereo or PAL-BG Momo(ATV)&Audio Languages.
AUDIO
30.
Press to play or stop the current program.
Start the time-shift function.
Display the PVR file list.
To play the next chapter,title or track.
Press to scan in forword.
Press to scan in reuerse.
34.
To play the previous chapter,title or track.
31.
Press the botton to stop the current program.
32.
Press to start recording.
29.
REVEAL
TIMESHIFT
Display or remove the content that is hidden in teletext mode.
+
SOURCE
P.MODE S.MODE FAV SLEEP
CH.LIST AUTO
ASPECT
TEXT
EPG
HOLD
INDEX
SUBPAGE
SIZE
-
+
-
MENU
EXIT
DISPLAY
CH VOL
Audio
FREEZE
SUBTITLE
REVEAL
1 2
3
4
5
6
7 8 9
0
-/--
TIMESHIFT
LIST
7
4
19
9
13
17
14
24
10
25
27
22
3
5
6
2
18
8
1
11
12
15
16
20
28
26
30
21
23
29
33
31
34
32
Liste und Informationen über die Videotextseiten önen
Vorheriges/vorherigen Kapitel, Titel oder Track abspielen
27. HOLD
1. POWER
Press to enter or exit standby mode.
2. MUTE
Press to turn on or off the audio sound.
18.
14.
15.
21.
10.
5.
7.
6.
4.
S.MODE
Press to change the audio mode.
3.
P.MODE
Press to select the picture mode.
19.
DISPLAY
Press to display the information window.
8.
CH.LIST
Press to display the Channel List.
9.
AUTO
Press to adjust automatically in VGA mode.
16.
Press the direction buttons to select menu options or settings.
17.
OK
Confirmation button,select the OSD menuoption.
11.
Press to change the channel of the TV.
12.
-/--
Press this button before entering a programme greater than 09.
13.
Press to return to the channel last viewed.
20.
22.
TEXT
Start the teletext mode.
27.
HOLD
Hold freeze the current teletext page on the screen.
25.
SUBTITLE
Open subtitle menu for subtitle selection.
26.
INDEX
Display a list and information about the teletext pages.
28.
SIZE
LIST
You can change the picture size in the teletext mode.
23.
Press to display electronic program guide menu.
EPG
33.
Display the submenu of the teletext mode.
According to the OSD prompt operation.
SUBPAGE
COLOR
24.
Press audio to PAL-BG/Stereo or PAL-BG Momo(ATV)&Audio Languages.
AUDIO
30.
Press to play or stop the current program.
Start the time-shift function.
Display the PVR file list.
To play the next chapter,title or track.
Press to scan in forword.
Press to scan in reuerse.
34.
To play the previous chapter,title or track.
31.
Press the botton to stop the current program.
32.
Press to start recording.
29.
REVEAL
TIMESHIFT
Display or remove the content that is hidden in teletext mode.
+
SOURCE
P.MODE S.MODE FAV SLEEP
CH.LIST AUTO
ASPECT
TEXT
EPG
HOLD
INDEX
SUBPAGE
SIZE
-
+
-
MENU
EXIT
DISPLAY
CH VOL
Audio
FREEZE
SUBTITLE
REVEAL
1 2
3
4
5
6
7 8 9
0
-/--
TIMESHIFT
LIST
7
4
19
9
13
17
14
24
10
25
27
22
3
5
6
2
18
8
1
11
12
15
16
20
28
26
30
21
23
29
33
31
34
32
Aktuelle Videotextseite auf dem Bildschirm einfrieren
Nächstes/nächsten Kapitel, Titel oder Track abspielen
28. SIZE
1. POWER
Press to enter or exit standby mode.
2. MUTE
Press to turn on or off the audio sound.
18.
14.
15.
21.
10.
5.
7.
6.
4.
S.MODE
Press to change the audio mode.
3.
P.MODE
Press to select the picture mode.
19.
DISPLAY
Press to display the information window.
8.
CH.LIST
Press to display the Channel List.
9.
AUTO
Press to adjust automatically in VGA mode.
16.
Press the direction buttons to select menu options or settings.
17.
OK
Confirmation button,select the OSD menuoption.
11.
Press to change the channel of the TV.
12.
-/--
Press this button before entering a programme greater than 09.
13.
Press to return to the channel last viewed.
20.
22.
TEXT
Start the teletext mode.
27.
HOLD
Hold freeze the current teletext page on the screen.
25.
SUBTITLE
Open subtitle menu for subtitle selection.
26.
INDEX
Display a list and information about the teletext pages.
28.
SIZE
LIST
You can change the picture size in the teletext mode.
23.
Press to display electronic program guide menu.
EPG
33.
Display the submenu of the teletext mode.
According to the OSD prompt operation.
SUBPAGE
COLOR
24.
Press audio to PAL-BG/Stereo or PAL-BG Momo(ATV)&Audio Languages.
AUDIO
30.
Press to play or stop the current program.
Start the time-shift function.
Display the PVR file list.
To play the next chapter,title or track.
Press to scan in forword.
Press to scan in reuerse.
34.
To play the previous chapter,title or track.
31.
Press the botton to stop the current program.
32.
Press to start recording.
29.
REVEAL
TIMESHIFT
Display or remove the content that is hidden in teletext mode.
+
SOURCE
P.MODE S.MODE FAV SLEEP
CH.LIST AUTO
ASPECT
TEXT
EPG
HOLD
INDEX
SUBPAGE
SIZE
-
+
-
MENU
EXIT
DISPLAY
CH VOL
Audio
FREEZE
SUBTITLE
REVEAL
1 2
3
4
5
6
7 8 9
0
-/--
TIMESHIFT
LIST
7
4
19
9
13
17
14
24
10
25
27
22
3
5
6
2
18
8
1
11
12
15
16
20
28
26
30
21
23
29
33
31
34
32
Bildgröße im Videotextmodus ändern
Rückwärts suchen
29. REVEAL
1. POWER
Press to enter or exit standby mode.
2. MUTE
Press to turn on or off the audio sound.
18.
14.
15.
21.
10.
5.
7.
6.
4.
S.MODE
Press to change the audio mode.
3.
P.MODE
Press to select the picture mode.
19.
DISPLAY
Press to display the information window.
8.
CH.LIST
Press to display the Channel List.
9.
AUTO
Press to adjust automatically in VGA mode.
16.
Press the direction buttons to select menu options or settings.
17.
OK
Confirmation button,select the OSD menuoption.
11.
Press to change the channel of the TV.
12.
-/--
Press this button before entering a programme greater than 09.
13.
Press to return to the channel last viewed.
20.
22.
TEXT
Start the teletext mode.
27.
HOLD
Hold freeze the current teletext page on the screen.
25.
SUBTITLE
Open subtitle menu for subtitle selection.
26.
INDEX
Display a list and information about the teletext pages.
28.
SIZE
LIST
You can change the picture size in the teletext mode.
23.
Press to display electronic program guide menu.
EPG
33.
Display the submenu of the teletext mode.
According to the OSD prompt operation.
SUBPAGE
COLOR
24.
Press audio to PAL-BG/Stereo or PAL-BG Momo(ATV)&Audio Languages.
AUDIO
30.
Press to play or stop the current program.
Start the time-shift function.
Display the PVR file list.
To play the next chapter,title or track.
Press to scan in forword.
Press to scan in reuerse.
34.
To play the previous chapter,title or track.
31.
Press the botton to stop the current program.
32.
Press to start recording.
29.
REVEAL
TIMESHIFT
Display or remove the content that is hidden in teletext mode.
+
SOURCE
P.MODE S.MODE FAV SLEEP
CH.LIST AUTO
ASPECT
TEXT
EPG
HOLD
INDEX
SUBPAGE
SIZE
-
+
-
MENU
EXIT
DISPLAY
CH VOL
Audio
FREEZE
SUBTITLE
REVEAL
1 2
3
4
5
6
7 8 9
0
-/--
TIMESHIFT
LIST
7
4
19
9
13
17
14
24
10
25
27
22
3
5
6
2
18
8
1
11
12
15
16
20
28
26
30
21
23
29
33
31
34
32
Versteckte Inhalte im Videotext ein-/ausblenden
Vorwärts suchen
30. TIMESHIFT
1. POWER
Press to enter or exit standby mode.
2. MUTE
Press to turn on or off the audio sound.
18.
14.
15.
21.
10.
5.
7.
6.
4.
S.MODE
Press to change the audio mode.
3.
P.MODE
Press to select the picture mode.
19.
DISPLAY
Press to display the information window.
8.
CH.LIST
Press to display the Channel List.
9.
AUTO
Press to adjust automatically in VGA mode.
16.
Press the direction buttons to select menu options or settings.
17.
OK
Confirmation button,select the OSD menuoption.
11.
Press to change the channel of the TV.
12.
-/--
Press this button before entering a programme greater than 09.
13.
Press to return to the channel last viewed.
20.
22.
TEXT
Start the teletext mode.
27.
HOLD
Hold freeze the current teletext page on the screen.
25.
SUBTITLE
Open subtitle menu for subtitle selection.
26.
INDEX
Display a list and information about the teletext pages.
28.
SIZE
LIST
You can change the picture size in the teletext mode.
23.
Press to display electronic program guide menu.
EPG
33.
Display the submenu of the teletext mode.
According to the OSD prompt operation.
SUBPAGE
COLOR
24.
Press audio to PAL-BG/Stereo or PAL-BG Momo(ATV)&Audio Languages.
AUDIO
30.
Press to play or stop the current program.
Start the time-shift function.
Display the PVR file list.
To play the next chapter,title or track.
Press to scan in forword.
Press to scan in reuerse.
34.
To play the previous chapter,title or track.
31.
Press the botton to stop the current program.
32.
Press to start recording.
29.
REVEAL
TIMESHIFT
Display or remove the content that is hidden in teletext mode.
+
SOURCE
P.MODE S.MODE FAV SLEEP
CH.LIST AUTO
ASPECT
TEXT
EPG
HOLD
INDEX
SUBPAGE
SIZE
-
+
-
MENU
EXIT
DISPLAY
CH VOL
Audio
FREEZE
SUBTITLE
REVEAL
1 2
3
4
5
6
7 8 9
0
-/--
TIMESHIFT
LIST
7
4
19
9
13
17
14
24
10
25
27
22
3
5
6
2
18
8
1
11
12
15
16
20
28
26
30
21
23
29
33
31
34
32
Timeshift-Funktion starten
Wiedergabe der aktuellen Sendung starten oder beenden
31. LIST
1. POWER
Press to enter or exit standby mode.
2. MUTE
Press to turn on or off the audio sound.
18.
14.
15.
21.
10.
5.
7.
6.
4.
S.MODE
Press to change the audio mode.
3.
P.MODE
Press to select the picture mode.
19.
DISPLAY
Press to display the information window.
8.
CH.LIST
Press to display the Channel List.
9.
AUTO
Press to adjust automatically in VGA mode.
16.
Press the direction buttons to select menu options or settings.
17.
OK
Confirmation button,select the OSD menuoption.
11.
Press to change the channel of the TV.
12.
-/--
Press this button before entering a programme greater than 09.
13.
Press to return to the channel last viewed.
20.
22.
TEXT
Start the teletext mode.
27.
HOLD
Hold freeze the current teletext page on the screen.
25.
SUBTITLE
Open subtitle menu for subtitle selection.
26.
INDEX
Display a list and information about the teletext pages.
28.
SIZE
LIST
You can change the picture size in the teletext mode.
23.
Press to display electronic program guide menu.
EPG
33.
Display the submenu of the teletext mode.
According to the OSD prompt operation.
SUBPAGE
COLOR
24.
Press audio to PAL-BG/Stereo or PAL-BG Momo(ATV)&Audio Languages.
AUDIO
30.
Press to play or stop the current program.
Start the time-shift function.
Display the PVR file list.
To play the next chapter,title or track.
Press to scan in forword.
Press to scan in reuerse.
34.
To play the previous chapter,title or track.
31.
Press the botton to stop the current program.
32.
Press to start recording.
29.
REVEAL
TIMESHIFT
Display or remove the content that is hidden in teletext mode.
+
SOURCE
P.MODE S.MODE FAV SLEEP
CH.LIST AUTO
ASPECT
TEXT
EPG
HOLD
INDEX
SUBPAGE
SIZE
-
+
-
MENU
EXIT
DISPLAY
CH VOL
Audio
FREEZE
SUBTITLE
REVEAL
1 2
3
4
5
6
7 8 9
0
-/--
TIMESHIFT
LIST
7
4
19
9
13
17
14
24
10
25
27
22
3
5
6
2
18
8
1
11
12
15
16
20
28
26
30
21
23
29
33
31
34
32
PVR-Dateiliste anzeigen
Wiedergabe der aktuellen Sendung beenden
32.
1. POWER
Press to enter or exit standby mode.
2. MUTE
Press to turn on or off the audio sound.
18.
14.
15.
21.
10.
5.
7.
6.
4.
S.MODE
Press to change the audio mode.
3.
P.MODE
Press to select the picture mode.
19.
DISPLAY
Press to display the information window.
8.
CH.LIST
Press to display the Channel List.
9.
AUTO
Press to adjust automatically in VGA mode.
16.
Press the direction buttons to select menu options or settings.
17.
OK
Confirmation button,select the OSD menuoption.
11.
Press to change the channel of the TV.
12.
-/--
Press this button before entering a programme greater than 09.
13.
Press to return to the channel last viewed.
20.
22.
TEXT
Start the teletext mode.
27.
HOLD
Hold freeze the current teletext page on the screen.
25.
SUBTITLE
Open subtitle menu for subtitle selection.
26.
INDEX
Display a list and information about the teletext pages.
28.
SIZE
LIST
You can change the picture size in the teletext mode.
23.
Press to display electronic program guide menu.
EPG
33.
Display the submenu of the teletext mode.
According to the OSD prompt operation.
SUBPAGE
COLOR
24.
Press audio to PAL-BG/Stereo or PAL-BG Momo(ATV)&Audio Languages.
AUDIO
30.
Press to play or stop the current program.
Start the time-shift function.
Display the PVR file list.
To play the next chapter,title or track.
Press to scan in forword.
Press to scan in reuerse.
34.
To play the previous chapter,title or track.
31.
Press the botton to stop the current program.
32.
Press to start recording.
29.
REVEAL
TIMESHIFT
Display or remove the content that is hidden in teletext mode.
+
SOURCE
P.MODE S.MODE FAV SLEEP
CH.LIST AUTO
ASPECT
TEXT
EPG
HOLD
INDEX
SUBPAGE
SIZE
-
+
-
MENU
EXIT
DISPLAY
CH VOL
Audio
FREEZE
SUBTITLE
REVEAL
1 2
3
4
5
6
7 8 9
0
-/--
TIMESHIFT
LIST
7
4
19
9
13
17
14
24
10
25
27
22
3
5
6
2
18
8
1
11
12
15
16
20
28
26
30
21
23
29
33
31
34
32
Aufnahme starten
33. SUBPAGE
Untermenü des Videotextmodus önen
34. FARBTASTEN
Funktion je nach Einblendung im OSD-Menü

12
Deutsch
Lautstärke einstellen
Drücken Sie die Tasten + VOL - zum Ändern der
Lautstärke�
Drücken Sie die Taste STUMM, um den Ton
auszuschalten�
Drücken Sie STUMM erneut oder die Tasten VOL +,
um den Ton wieder einzuschalten�
Eingangsquelle auswählen
Auswahl des TV-Modus oder anderer Eingangsgeräte,
die mit dem Fernseher verbunden sind�
1� Drücken Sie die Taste Source, um die Liste mit den
Eingangsquellen anzuzeigen�
2� Drücken Sie ▼/▲ oder SOURCE, um die gewünschte
Eingangsquelle zu markieren. (Satellit, DTV, ATV, AV, PC,
SCART, Component, HDMI, Media).
3� Drücken Sie OK, um die Eingangsquelle einzuschalten�
+
SOURCE
TEXT
EPG
HOLD
INDEX
SUBPAGE
SIZE
-
+
-
DISPLAY
CH VOL
Audio
SUBTITLE
REVEAL
TIMESHIFT
LIST
OK
HDMI3
Grundlegende Funktionen des Fernsehers
7

13
Deutsch
Menübetrieb
8
• Befolgen Sie die nachfolgenden Schritte für die Konguration der Menüeinstellungen in späteren
Kapiteln�
• Anleitungen und Abbildungen der Menüeinstellungen werden normalerweise für die TV-Eingangsquelle
erläutert� Ausnahmen werden speziell hervorgehoben�
• Einige Funktionen können je nach Signalquelle nicht konguriert werden.
Menü önen
Drücken Sie die Taste [MENU], um das Hauptmenü zu önen.
Drücken Sie die Tasten [◄/►], um im Hauptmenü ein Untermenü auszuwählen.
Drücken Sie [OK] oder [▼/▲] zum Önen des ausgewählten Menüs.
Menübetrieb
[▼/▲]: Option im Menü auswählen.
[◄/►]: Einstellung vornehmen oder Untermenü önen.
[OK]: Untermenü önen oder Einstellung bestätigen.
Menü verlassen
Drücken Sie die Taste [MENU], um zum vorherigen Menü zurückzukehren oder um das Menü zu
verlassen. Oder drücken Sie die Taste [EXIT], um das Menü zu verlassen.
Dieses Menü ist nur im TV-Modus verfügbar�
SENDER
Sender-Menü
1� Automatische Sendersuche
Drücken Sie ▼/▲ zur Auswahl der automatischen Suche und bestätigen Sie mit OK/►.
2� Manuelle ATV-Sendersuche
Drücken Sie die Tasten ▼/▲ zur Auswahl der manuellen ATV-Sendersuche und drücken Sie OK,
um das Untermenü zu önen. Wählen Sie mit den Tasten ◄/► zur Auswahl von Sender und
drücken Sie OK, um Sender zu suchen.
3� Manuelle DTV-Sendersuche
Drücken Sie die Tasten ▼/▲ zur Auswahl der manuellen DTV-Sendersuche und drücken Sie
OK, um das Untermenü zu önen. Wählen Sie mit den Tasten ◄/► zur Auswahl von Sender und
drücken Sie OK, um Sender zu suchen.
4� Programm bearbeiten
Drücken Sie die Tasten ▼/▲ zur Auswahl von Programm bearbeiten und drücken Sie OK, um
das Untermenü zu önen.
5� Terminliste
Drücken Sie die Tasten ▼/▲ zur Auswahl von Terminliste und drücken Sie OK, um das
Untermenü zu önen. Es ist für die Quelle verfügbar.
6� Signalinformationen
Drücken Sie die Tasten ▼/▲ zur Auswahl von Signalinformationen und drücken Sie OK, um detaillierte
Informationen über das Signal anzuzeigen� Nur verfügbar, wenn ein DTV-Signal vorhanden ist�
7� CI-Daten
Drücken Sie die Tasten ▼/▲ zur Auswahl von CI-Daten und drücken Sie OK, um das Untermenü
zu önen.

14
Deutsch
BILD
Einstellbare Optionen können je nach Signalquelle variieren. Die
Funktionen einer gleichen Option sind jedoch immer gleich.
Bild-Menü
1. Bildeinstellungen
Drücken Sie die Tasten ▼/▲ zur Auswahl von Bildeinstellung und drücken Sie OK, um das
Untermenü zu önen. Im persönlichen Bildmodus können Sie die Werte für Kontrast, Helligkeit,
Farbe, Bildschärfe und Farbton ändern�
2. Kontrast / Helligkeit / Farbe / Farbton / Bildschärfe
Diese Einstellungen können nur konguriert werden, wenn Sie Persönlich als Bildmodus
auswählen�
Drücken Sie die Tasten ▼/▲ zur Auswahl der Option und ändern Sie die Einstellung mit den
Tasten ◄/►.
3. Farbtemperatur
Drücken Sie die Tasten ▼/▲ zur Auswahl von Farbtemperatur und drücken Sie OK, um das
Untermenü zu önen.
Drücken Sie ▼/▲ zur Auswahl. (Verfügbarer Bildmodus: Kalt, Normal, Warm).
4. Rauschunterdrückung
Um Bildstörungen herauszultern und zu reduzieren und um die Bildqualität zu verbessern.
Drücken Sie die Tasten ▼/▲ zur Auswahl von Rauschunterdrückung und drücken Sie OK, um
das Untermenü zu önen.
5. HDMI-Modus
Drücken Sie die Tasten ▼/▲ zur Auswahl von HDMI-Modus und drücken Sie OK, um das
Untermenü zu önen.
SOUND
Sound-Menü
1. Soundmodus
Wählen Sie den von Ihnen bevorzugten Ton-Modus aus� Die Einstellungen für Treble und Bass
sind nur im Modus Persönlich verfügbar; ändern Sie die Einstellung nach Belieben�
2. Höhen/Bässe
Drücken Sie die Tasten ▼/▲ zur Auswahl der Option und ändern Sie mit den Tasten ◄/► die
Einstellungen�
3. Balance
Drücken Sie die Tasten ▼/▲ zur Auswahl der Option und ändern Sie mit den Tasten ◄/► die
Einstellungen�
4. Automatische Lautstärke
Drücken Sie die Tasten ▼/▲ zur Auswahl von Automatischer Lautstärke und drücken Sie OK zur
Auswahl von Ein oder Aus�
5. SPDIF-Modus
Drücken Sie die Tasten ▼/▲ zur Auswahl von SPDIF-Modus und drücken Sie OK zur Auswahl
von Aus/PCM/Automatisch.
6. Audio Delay (AV-Synchronität)
Drücken Sie die Tasten ▼/▲ zur Auswahl der Option und ändern Sie mit den Tasten ◄/► die
Einstellungen�
7. Audiobeschreibung
Drücken Sie die Tasten ▼/▲ zur Auswahl von Audiobeschreibung und drücken Sie OK zu
Auswahl von Ein oder Aus� Die Funktion ist für blinde Personen; die Inhalte der aktuellen
Bildschirmanzeige werden über eine zusätzliche Tonspur erläutert, sofern diese gesendet wird�
8
Menübetrieb

15
Deutsch
Menübetrieb
8
ZEIT
Zeit-Menü
1. Uhrzeit
Drücken Sie die Tasten ▼/▲ zur Auswahl von: Datum / Monat / Jahr / Stunde / Minute.
Drücken Sie ▼/▲ zum Einstellen der Uhrzeit.
2. Zeitzone
Drücken Sie die Tasten ▼/▲ zur Auswahl von Zeitzone und drücken Sie OK, um das Untermenü
zu önen.
3. Sleep-Timer
Wählen Sie die Dauer in Minuten, nach Ablauf derer sich der Fernseher automatisch ausschaltet�
Deaktivieren Sie diese Funktion durch Auswahl der Einstellung Aus�
4. Auto Standby
Drücken Sie die Tasten ▼/▲ zur Auswahl von Auto Standby und drücken Sie OK, um das
Untermenü zu önen.
Wenn in der vorgegebenen Dauer keine Eingabe über die Fernbedienung erfolgt, wird das Gerät
automatisch ausgeschaltet� Falls Sie eine Funktion ausführen, wird die Dauer dieses Zeitraums
zurückgesetzt�
5. OSD-Timer
Drücken Sie die Tasten ▼/▲ zur Auswahl von OSD-Timer und drücken Sie OK, um das
Untermenü zu önen.
HINWEIS:
Die Uhrzeit ändert sich je nach der von Ihnen eingestellten Zeitzone�
SPERRE
Sperren-Menü
1. Systemsperre
Drücken Sie die Tasten ▼/▲ zur Auswahl von Systemsperre und drücken Sie OK, um eine der
folgenden 3 Optionen zu aktivieren. 0000 ist das werksseitige Passwort. Falls Sie das Passwort
vergessen, wenden Sie sich an den Kundendienst�
2. Passwort vergeben
Drücken Sie die Tasten ▼/▲ zur Auswahl von Passwort setzen und drücken Sie OK, um das
Untermenü für die Einrichtung eines neuen Passworts zu önen.
3. Sendersperre
Drücken Sie die Tasten ▼/▲ zur Auswahl von Sendersperre und drücken Sie OK, um das
Untermenü zu önen. Drücken Sie die grüne Taste, um den Sender zu sperren oder zu entsperren.
4. Jugendschutz
Drücken Sie die Tasten ▼/▲ zur Auswahl von Jugendschutz und drücken Sie OK, um das
Untermenü zu önen. Dort können Sie die für Ihre Kinder geeignete Alterseinstellung auswählen.
5. Tastensperre
Drücken Sie ▼/▲ zur Auswahl von Tastensperre und drücken Sie dann ◄/► zur Auswahl von
Ein oder Aus�
Wenn die Tastensperre aktiviert ist, können Sie die Tasten auf dem Bedienfeld nicht mehr verwenden�
6. Hotelmodus
Drücken Sie die Tasten ▼/▲ zur Auswahl von Hotelmodus und drücken Sie OK, um die Option
Ein oder Aus auszuwählen�

16
Deutsch
Menübetrieb
8
SETUP
Setup-Menü
1. Sprache
Anzeigesprache auswählen�
2. Videotext Zeichensatz
Drücken Sie die Tasten ▼/▲ zur Auswahl von Videotext Zeichensatz und drücken Sie OK, um
das Untermenü zu önen.
3. Audiosprachen
Drücken Sie die Tasten ▼/▲ zur Auswahl von Audiosprache und drücken Sie OK, um das
Untermenü zu önen.
4. Untertitelsprache
Drücken Sie die Tasten ▼/▲ zur Auswahl von Untertitelsprache und drücken Sie OK, um das
Untermenü zu önen.
5. Gehörlosenhilfe
Drücken Sie ▼/▲ zur Auswahl der Option Gehörlosenhilfe und drücken Sie dann ◄/► zur
Auswahl von Ein oder Aus�
6. PVR-Dateisystem
Drücken Sie die Tasten ▼/▲ zur Auswahl von PVR-Dateisystem und drücken Sie OK, um das
Untermenü zu önen.
Drücken Sie die Tasten ▼/▲ zur Auswahl von PVR-Dateisystem überprüfen und drücken Sie OK
zum Bestätigen. Die USB-Geschwindigkeit wird getestet.
7. Bildformat
Bildformat einstellen in dem das Bild des TV-Programms dargestellt werden soll�
8. Blauer Bildschirm
Drücken Sie ▼/▲ zur Auswahl der Option blauer Bildschirm und drücken Sie dann ◄/► zur
Auswahl von Ein oder Aus�
9. Erstinstallation
Drücken Sie die Tasten ▼/▲ zur Auswahl von Erstinstallation und drücken Sie OK zum
Bestätigen�
10. Werkseinstellungen wiederherstellen
Drücken Sie die Tasten ▼/▲ zur Auswahl von Werkseinstellungen wiederherstellen, drücken Sie
OK und bestätigen Sie anschließend die erscheinende Abfrage mit ◄.
11. Software Update (USB)
Drücken Sie ▼/▲ zur Auswahl von Software Update (USB). Schließen Sie Ihr USB-Gerät an den
USB-Port an und drücken Sie OK, um die Software zu aktualisieren.
12. Energiemodus
Drücken Sie ▼/▲ zur Auswahl von Umgebung und wählen Sie dann mit den Tasten ◄/► den
Heim-Modus oder den Vorführ-Modus�
13. HDMI CEC
Drücken Sie die Tasten ▼/▲ zur Auswahl von HDMI CEC und drücken Sie OK, um das
Untermenü zu önen.

17
Deutsch
Multimedia
9
Hinweis: Schließen Sie vor der Verwendung der Medienfunktionen Ihr USB-Gerät an. Drücken
Sie dann die Taste SOURCE, um die Option Media als Eingangsquelle auszuwählen.
Drücken Sie die Tasten ▼/▲ zur Auswahl von Media als Eingangsquelle und bestätigen Sie mit OK�
Warten Sie, bis der Fernseher das USB-Speichergerät erkannt hat und drücken Sie dann die
Taste ◄ oder ► zur Auswahl von Foto / Musik / Film / Text und drücken Sie OK zum Önen der
Option. Die Funktionen für Foto / Musik / Film / Text sind gleich.
jlbhd.jpg
Pause
!
Info.
jlbhd.jpg
Play
Play
Aa
Char Set 1
Time: 14:30:58
Date: Fri Mar 14, 2014
-----------------------------------
-----------------------------------
------
-----------------------------------
-----------------------------------
------
Music Playlist
Aa
Char Set
Previous P...
1� Drücken Sie ◄ oder ►, um ggf. einen Unterordner zu önen, und drücken Sie dann OK zum
Önen des Ordners. Drücken Sie OK, um die Wiedergabe zu starten. Drücken Sie die Beenden-
Taste, um zurückzukehren. Drücken Sie OK, um den übergeordneten Ordner auszuwählen und
zum vorherigen Menü zurückzukehren. Drücken Sie ◄ oder ► zum Umblättern von Seiten.
2� Drücken Sie ►, um die Wiedergabe zu starten oder zu unterbrechen� Drücken Sie , um
die Wiedergabe zu beenden�
3� Drücken Sie , um zur vorhergehenden Datei zurückzukehren� Drücken Sie , um zur
nächsten Datei zu gelangen�

18
Deutsch
Hinweise für die Verwendung von USB-Geräten
• MTP (Media Transfer Protocol) wird nicht unterstützt.
• Max. HDD-Kapazität: 500GB.
• Dieses Gerät unterstützt nur USB-Flashgeräte des Formats FAT32. Dieser Fernseher garantiert
nicht die Wiedergabe von USB-Flashgeräten anderer Formate (wie z.B. FAT16 oder NTFS).
• Einige Arten von digitalen USB-Kameras, Audiogeräten oder Kartenleser sind möglicherweise
nicht mit diesem Fernseher kompatibel�
• Falls ein USB-Gerät viel Energie benötigt (mehr als 500mA oder 5V), wird dieses USB-Gerät
möglicherweise nicht unterstützt�
• Dieser Fernseher unterstützt keine USB-Geräte mit mehreren Partitionen.
• Schließen Sie das USB-Gerät direkt an den USB-Port des Fernsehers an. Falls Sie ein separates
Kabel oder einen USB-Hub für die Verbindung verwenden, können Kompatibilitätsprobleme
auftreten�
• Sichern Sie vor dem Anschluss eines USB-Geräts alle Daten, um Schäden oder Datenverluste
zu vermeiden� Sie tragen das Risiko für Dateischäden oder Datenverluste�
• Je höher die Auösung des Bildes, desto länger dauert es, bis das Bild angezeigt wird.
• Je nach USB-Gerät kann es unterschiedlich lang dauern, bis der Fernseher das Gerät vollständig
initialisiert hat�
• Falls Dateien nicht unterstützt werden oder beschädigt sind, erscheint die Mitteilung „unsupported
File (Datei nicht unterstützt)“.
• MP3-Dateien mit DRM, die von einer kostenpichtigen Seite heruntergeladen wurden, können
nicht abgespielt werden. Digital Rights Management (DRM) ist eine Technologie, die die
Erstellung von Inhalten und den Vertrieb und die Verwaltung auf eine integrierte und umfassende
Art und Weise unterstützt, einschließlich des Schutzes von Rechten und Interessen der Anbieter
dieser Inhalte, der Prävention der illegalen Vervielfältigung der Inhalte, sowie die Verwaltung der
Rechnungsstellung und Bezahlung�
• Falls Sie ein Foto verschieben, kann es einige Sekunden dauern, bis das Bild geladen wird� Zu
diesem Zeitpunkt erscheint das Laden-Icon auf dem Bildschirm�
• Falls ein USB-Gerät nicht ordnungsgemäß funktioniert, trennen und verbinden Sie es erneut.
• Prüfen Sie, ob das USB-Gerät ordnungsgemäß mit Ihrem PC funktioniert.
TYP FORMAT DATEIENDUNG
Bild
JPEG .jpg, .jpeg
BMP .bmp
Audio MP3 .mp3
Video
MP4 .mp4
MPG .mpg
9
Multimedia

19
Deutsch
Fehlerbehebung
10
Bevor Sie sich mit dem Kundendienst in Verbindung setzen, lesen Sie bitte zunächst die
nachfolgende Tabelle zur Störbehebung durch� Falls dann immer noch Probleme auftreten,
trennen Sie den Fernseher vom Netzstrom und kontaktieren Sie den Kundendienst�
Problem Mögliche Abhilfe
Kein Bild, kein Ton • Überprüfen Sie, ob die Stromversorgung zum Fernseher
gegeben ist�
• Überprüfen Sie die Verbindung des Netzkabels und/oder anderer
Kabel�
Bild normal, kein Ton • Überprüfen Sie die Lautstärkeeinstellung�
• Überprüfen Sie, ob die Taste
Select “Auto Adjust“ to adjust the image.
gedrückt wurde�
• Überprüfen Sie die Verbindung des externen Gerätes.
Schlechte oder keine
Farbe, Ton vorhanden
• Überprüfen Sie die Einstellungen für „Helligkeit“ und „Kontrast“ im
BILD-Menü�
Doppelbilder/-konturen,
Ton vorhanden
• Überprüfen Sie die Verbindung und die Ausrichtung der Antenne�
• TV-Sender feineinstellen�
• Überprüfen Sie die Verbindung des externen Geräts.
• Die Rundfunkanstalt hat möglicherweise Übertragungsprobleme�
Versuchen Sie, einen anderen Sender einzuschalten�
Schnee im Bild, schlechter
Ton
• Überprüfen Sie die Verbindung und die Ausrichtung der Antenne�
• Die Rundfunkanstalt hat möglicherweise Übertragungsprobleme�
Versuchen Sie, einen anderen Sender einzuschalten�
Periodische Störungen • Entfernen Sie elektrische Geräte aus der Umgebung des Fernsehers.
Schlechter Stereoton • Die Rundfunkanstalt hat möglicherweise Übertragungsprobleme�
Versuchen Sie, Mono einzuschalten�
Die Fernbedienung
funktioniert nicht�
• Überprüfen Sie, ob die Batterien richtig eingelegt sind�
• Möglicherweise sind die Batterien leer� Ersetzen Sie die Batterien
durch neue�
• Entfernen Sie alle Hindernisse zwischen der Fernbedienung und
dem Infrarotempfänger des Fernsehers�
• Vergewissern Sie sich, dass der Infrarotempfänger des
Fernsehers keinen starken Lichtquellen ausgesetzt ist�
„Kein Signal“ erscheint auf
dem Bildschirm�
• Der Fernseher empfängt kein Signal über die Eingänge�
• Überprüfen Sie, ob die Empfangskabel richtig angeschlossen sind�
• Überprüfen Sie, ob die externen Geräte eingeschaltet sind.
Die Anzeige „Kein Signal“
oder „Unsupported
Signal“ erscheint
(nur im RGB-Modus)
• Überprüfen Sie, ob die Displayauösung oder Displayfrequenz
Ihres PCs vom Fernseher unterstützt werden. Siehe Übersicht
mit empfohlenen RGB-Eingangssignalen.
Bild nicht mittig
ausgerichtet
(nur im PC-Modus)
• Wählen Sie „Automatisch einstellen“, um das Bild auszurichten.
La pagina si sta caricando...
La pagina si sta caricando...
La pagina si sta caricando...
La pagina si sta caricando...
La pagina si sta caricando...
La pagina si sta caricando...
La pagina si sta caricando...
La pagina si sta caricando...
La pagina si sta caricando...
La pagina si sta caricando...
La pagina si sta caricando...
La pagina si sta caricando...
La pagina si sta caricando...
La pagina si sta caricando...
La pagina si sta caricando...
La pagina si sta caricando...
La pagina si sta caricando...
La pagina si sta caricando...
La pagina si sta caricando...
La pagina si sta caricando...
La pagina si sta caricando...
La pagina si sta caricando...
La pagina si sta caricando...
La pagina si sta caricando...
La pagina si sta caricando...
La pagina si sta caricando...
La pagina si sta caricando...
La pagina si sta caricando...
La pagina si sta caricando...
La pagina si sta caricando...
La pagina si sta caricando...
La pagina si sta caricando...
La pagina si sta caricando...
La pagina si sta caricando...
La pagina si sta caricando...
La pagina si sta caricando...
La pagina si sta caricando...
La pagina si sta caricando...
La pagina si sta caricando...
La pagina si sta caricando...
La pagina si sta caricando...
La pagina si sta caricando...
La pagina si sta caricando...
La pagina si sta caricando...
La pagina si sta caricando...
La pagina si sta caricando...
La pagina si sta caricando...
La pagina si sta caricando...
La pagina si sta caricando...
La pagina si sta caricando...
La pagina si sta caricando...
La pagina si sta caricando...
La pagina si sta caricando...
La pagina si sta caricando...
La pagina si sta caricando...
La pagina si sta caricando...
La pagina si sta caricando...
La pagina si sta caricando...
La pagina si sta caricando...
La pagina si sta caricando...
La pagina si sta caricando...
La pagina si sta caricando...
La pagina si sta caricando...
La pagina si sta caricando...
La pagina si sta caricando...
La pagina si sta caricando...
La pagina si sta caricando...
La pagina si sta caricando...
La pagina si sta caricando...
La pagina si sta caricando...
La pagina si sta caricando...
La pagina si sta caricando...
La pagina si sta caricando...
La pagina si sta caricando...
La pagina si sta caricando...
La pagina si sta caricando...
La pagina si sta caricando...
La pagina si sta caricando...
La pagina si sta caricando...
La pagina si sta caricando...
La pagina si sta caricando...
La pagina si sta caricando...
La pagina si sta caricando...
-
 1
1
-
 2
2
-
 3
3
-
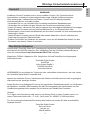 4
4
-
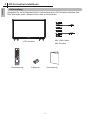 5
5
-
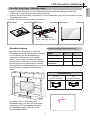 6
6
-
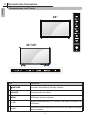 7
7
-
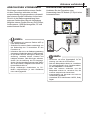 8
8
-
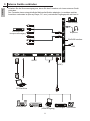 9
9
-
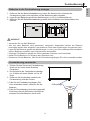 10
10
-
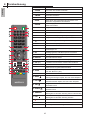 11
11
-
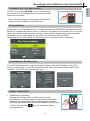 12
12
-
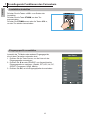 13
13
-
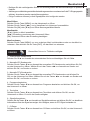 14
14
-
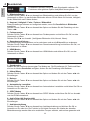 15
15
-
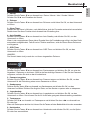 16
16
-
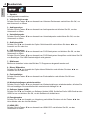 17
17
-
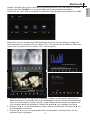 18
18
-
 19
19
-
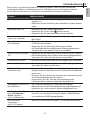 20
20
-
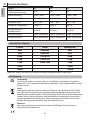 21
21
-
 22
22
-
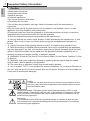 23
23
-
 24
24
-
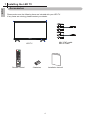 25
25
-
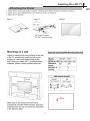 26
26
-
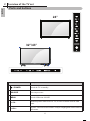 27
27
-
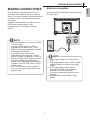 28
28
-
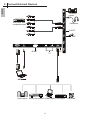 29
29
-
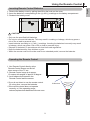 30
30
-
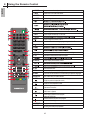 31
31
-
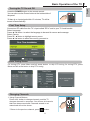 32
32
-
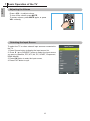 33
33
-
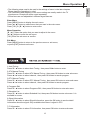 34
34
-
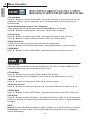 35
35
-
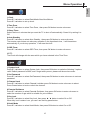 36
36
-
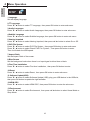 37
37
-
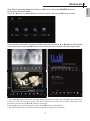 38
38
-
 39
39
-
 40
40
-
 41
41
-
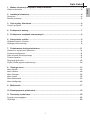 42
42
-
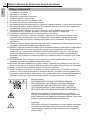 43
43
-
 44
44
-
 45
45
-
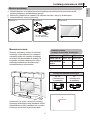 46
46
-
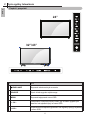 47
47
-
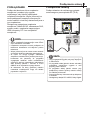 48
48
-
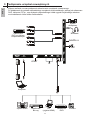 49
49
-
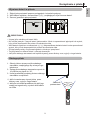 50
50
-
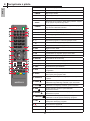 51
51
-
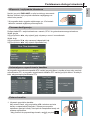 52
52
-
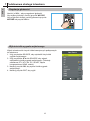 53
53
-
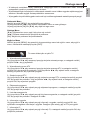 54
54
-
 55
55
-
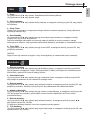 56
56
-
 57
57
-
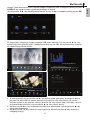 58
58
-
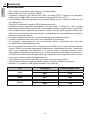 59
59
-
 60
60
-
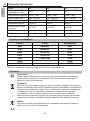 61
61
-
 62
62
-
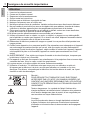 63
63
-
 64
64
-
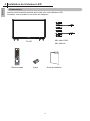 65
65
-
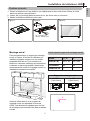 66
66
-
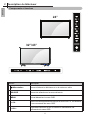 67
67
-
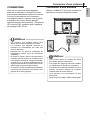 68
68
-
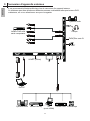 69
69
-
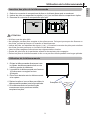 70
70
-
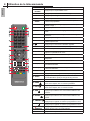 71
71
-
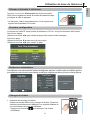 72
72
-
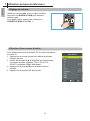 73
73
-
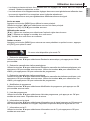 74
74
-
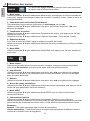 75
75
-
 76
76
-
 77
77
-
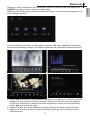 78
78
-
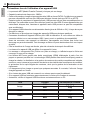 79
79
-
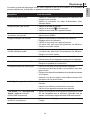 80
80
-
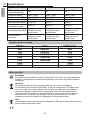 81
81
-
 82
82
-
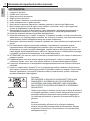 83
83
-
 84
84
-
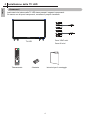 85
85
-
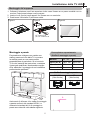 86
86
-
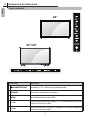 87
87
-
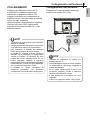 88
88
-
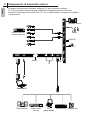 89
89
-
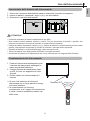 90
90
-
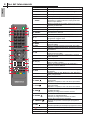 91
91
-
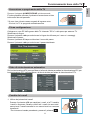 92
92
-
 93
93
-
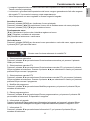 94
94
-
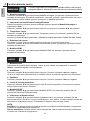 95
95
-
 96
96
-
 97
97
-
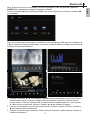 98
98
-
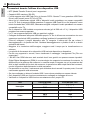 99
99
-
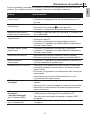 100
100
-
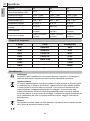 101
101
-
 102
102
-
 103
103


TechniSat Wegavision FHD43A Manuale del proprietario
- Categoria
- TV LCD
- Tipo
- Manuale del proprietario
- Questo manuale è adatto anche per
in altre lingue
Documenti correlati
Altri documenti
-
DGM LTV-1914WHTC Manuale utente
-
Sharp Aquos LC-32LD171K Istruzioni per l'uso
-
Haier LE32F600C Manuale del proprietario
-
Haier LE40B650CF Manuale utente
-
-
Haier LET19T1000H Manuale utente
-
Samsung LE37C579 Manuale utente
-
-
Samsung LE32C630K1P Manuale utente
-