


3
ELECTRONICS FOR SPECIALISTS ELECTRONICS FOR SPECIALISTS ELECTRONICS FOR SPECIALISTS
Deutsch ............Seite 4
English ............Page 8
Français ............Page 12
Italiano ............Pagina 16
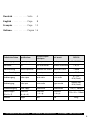
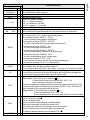
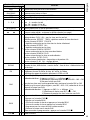
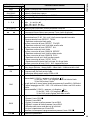
Technische Daten
Specifications
Caractéristiques
techniques
Dati tecnici
DPR-10
Frequenzgang
Frequency response Bande passante Banda passante
20 – 20 000 Hz
Klirrfaktor
THD Taux de distorsion Fattore di distorsione
< 0,3 %
Kanaltrennung
Channel separation Séparation des canaux Separazione canali
> 60 dB
Dynamikumfang
Dynamic range Dynamique Range dinamico
> 96 dB
Audioausgang
Audio output Sortie audio Uscita audio
0 – 1,2 V
RCA (Cinch)
Audioeingang
Audio input Entrée audio Ingresso audio
800 mV max.
RCA (Cinch)
Stromversorgung
Power supply Alimentation Alimentazione
12 V (
⎓
) , 400 mA
Abmessungen
(B × H × T)
Dimensions
(W × H × D)
Dimensions
(l × h × p)
Dimensioni
(l × h × p)
174 × 52 × 110 mm
Gewicht
Weight Poids Peso
545 g

Deutsch
4
English
English Page
Français
Français Page
Italiano
Italiano Pagina
Español
Español Página
Nederlands
Nederlands Pagina
Polski
Polski Strona
Title-This so
TR0052 03:49 MP3
5 6 7 8 9
0 1 2 3 4 REC
FOLDER
VOL.
FUNC
SD / MMC CARD
IR
DPR-10
12V
OUTPUT
AUX INPUT
R L
R L
MP3-Rekorder
Diese Bedienungsanleitung richtet sich an
Benutzer ohne besondere Fachkenntnisse. Bitte
lesen Sie die Anleitung vor dem Betrieb gründ-
lich durch und heben Sie sie für ein späteres
Nachlesen auf.
1 Einsatzmöglichkeiten
Mit dem MP3-Rekorder DPR-10 lassen sich
MP3- und WMA-Dateien von USB-Speicher-
sticks* und Speicherkarten* (bis 64 GB) ab-
spielen. Für Aufnahmen im MP3-Format kann
ein Audiogerät (Radio, CD-Spieler usw.) an-
geschlossen werden. Außerdem lassen sich
Audio dateien von einer Speicherkarte auf einen
USB-Stick kopieren und umgekehrt.
Der DPR-10 kann als separates Gerät betrie-
ben werden, lässt sich aber auch wegen seiner
kompakten Bauform in ein anderes Gerät (z. B.
in eine Aktivlautsprecherbox) einbauen. Dabei
darauf achten, dass ihn das Gerät, in welches
der DPR-10 eingesetzt wird, nicht zu stark er-
wärmt.
* Hinweis: Aufgrund der Vielfalt von Speicher-Her-
stellern und Gerätetreibern kann nicht garantiert
werden, dass alle Speichermedien mit dem DPR-10
kompatibel sind.
2 Wichtige Hinweise
fürdenGebrauch
Das Gerät entspricht allen relevanten Richt-
linien der EU und trägt deshalb das -Zeichen.
•
Das Gerät ist nur zur Verwendung im Innen-
bereich geeignet. Schützen Sie es vor Tropf-
und Spritzwasser sowie hoher Luftfeuchtig-
keit. Der zulässige Einsatztemperaturbereich
beträgt 0 – 40 °C.
•
Verwenden Sie zum Reinigen nur ein tro-
ckenes, weiches Tuch, niemals Wasser oder
Chemikalien.
•
Wird das Gerät zweckentfremdet, nicht rich-
tig angeschlossen, falsch bedient oder nicht
fachgerecht repariert, kann keine Garantie
für das Gerät und keine Haftung für daraus
resultierende Sach- oder Personenschäden
übernommen werden.
•
Für Datenverluste auf einem Speicher, die
durch Fehlbedienung oder durch einen De-
fekt entstanden sind, kann ebenfalls keine
Haftung übernommen werden.
Soll das Gerät endgültig aus dem
Betrieb genommen werden, überge-
ben Sie es zur umweltgerechten Ent-
sorgung einem ört lichen Recycling-
betrieb.
Deutsch
Deutsch Seite

5
Deutsch
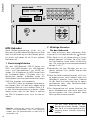
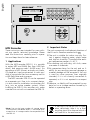
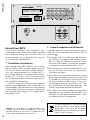
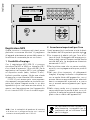
3 Anschlüsse
Vor dem Anschluss oder vor dem Verändern
von Anschlüssen den DPR-10 und die anzu-
schließenden Geräte ausschalten.
1) Die Buchsen OUTPUT über ein Cinch- Kabel
mit einem Line-Pegel-Eingang, z. B. an einem
Mischpult oder an einem Verstärker, verbin-
den (L = linker Kanal, R = rechter Kanal).
2) Für MP3-Aufnahmen ein Audiogerät mit
Line- Pegel-Ausgang (z. B. CD-Spieler, Misch-
pult) an die Buchsen AUX INPUT anschlie-
ßen.
3) Zur Stromversorgung wird ein stabilisiertes
12-V-Netzgerät mit einer Belastbarkeit von
400 mA und einem Kleinspannungs stecker
5,5 / 2,1 mm (Außen- / Innendurchmesser) be-
nötigt (z. B. PSS-1205DC von MONACOR).
Das Netzgerät an die Buchse 12 V⎓ an-
schließen: Am Mittelkontakt muss der Plus-
pol anliegen!
4 Bedienung
Das Gerät mit der Taste am Gerät oder POWER
auf der Fernbedienung einschalten. Auf dem
Display erscheint die Anzeige Welcome. Ist
weder eine Speicherkarte noch ein USB-Stick
eingesteckt, zeigt das Display NO USB an.
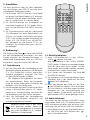
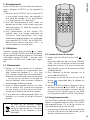
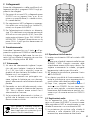
4.1 Fernbedienung
1) Auf der Rückseite der Fernbedienung den
Batteriefachdeckel abnehmen. Die Batterien
(2 × 1,5 V, Größe AAA = Micro), wie im Bat-
teriefach angegeben, einsetzen. Das Fach
mit dem Deckel wieder schließen.
Bei längerem Nichtgebrauch die Batte-
rien herausnehmen, damit die Fernbedie-
nung bei einem eventuellen Auslaufen der
Batterien nicht beschädigt wird.
2) Die Fernbedienung beim Drücken einer Taste
immer in Richtung des Sensors „IR“ halten.
Dabei muss Sichtverbindung zwischen der
Fernbedienung und dem Sensor bestehen.
3) Lässt die Reichweite der Fernbedienung
nach, sind die Batterien verbraucht und
müssen ausgewechselt werden.
Batterien dürfen nicht in den Haus-
müll geworfen werden. Geben Sie
sie zur umweltgerechten Entsorgung
nur in den Sondermüll (z. B. Sammel-
behälter im Einzelhandel).
4.2 Musiktitel abspielen
1) Einen USB-Speicherstick in den USB-An-
schluss
stecken und / oder
eine Speicherkarte in den Schlitz SD/ MMC
CARD stecken. Dabei muss die abgeschrägte
Ecke der Karte nach rechts zeigen. Soll die
Karte wieder entnommen werden, sie etwas
hineindrücken, sodass sie ausrastet.
2) Zum Starten des Abspielens die Taste II
PLAY/ PAUSE drücken.
3) Die weiteren Funktionsmöglichkeiten beim
Abspielen sind in der Tabelle auf der Seite
7
übersichtlich dargestellt.
4) Nach dem Betrieb das Gerät mit der Taste
oder POWER ausschalten. Wird es längere
Zeit nicht benutzt, sollte das angeschlossene
Netzgerät von der Stromversorgung ge-
trennt werden. Es verbraucht auch bei aus-
geschaltetem DPR-10 einen geringen Strom.
4.3 Audio-Aufnahmen
Von einem an den Buchsen AUX INPUT ange-
schlossenen Gerät (z. B. CD-Spieler) lassen sich
MP3-Aufnahmen erstellen und auf einer Spei-
cherkarte oder auf einem USB-Stick speichern.
1) Der Schreibschutz an der Speicherkarte bzw.
am USB-Stick darf nicht aktiviert sein; ggf.
den Schutz deaktivieren.
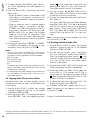
2 31
5 64
8 97
0
STOP
PROG
DISPLAY
ID3
PLAY
PAUSE
REV – SKIP – CUE
FUNCREPEAT
DEL VOL – VOL +REC
FOLDER
FIND MUTE
POWER

6
Deutsch
2) Zum Anwählen der Buchsen AUX INPUT die
Taste FUNC so oft drücken, bis das Display
AUX anzeigt.
3) Die Taste REC drücken. Es wird RECORD
Waiting....
angezeigt.
– Ist eine Speicherkarte oder ein USB-Stick
eingesteckt, startet die Aufnahme nach
einer Vorbereitungszeit von ca. 10 s.
– Sind eine Speicherkarte und ein USB-
Stick eingesteckt, wird nach 2 s Target
[CARD]
oder [USB] angezeigt. Mit den
Tasten , / REV – SKIP – CUE wählen, auf
welchen Speicher die Aufnahme erfolgen
soll. Dann die Taste REC erneut drücken.
Die Aufnahme startet nach einer Vorberei-
tungszeit von ca. 10 s.
4) Während der Aufnahme zeigt das Display
RECORD Ɗ [CARD] oder [USB] an. Zum
Beenden der Aufnahme die Taste STOP /
drücken.
Hinweise:
1. Für die eigenen Aufnahmen legt das Gerät den
Ordner TMC_AUX auf dem Speicher an. Die aufge-
nommenen Dateien erhalten folgende Namen:
REC_AUX.mp3
REC_AUX001.mp3
REC_AUX002.mp3
usw.
Das Datum und die Uhrzeit der Dateien sind jedoch
nicht korrekt. Der Ordnername und die Dateinamen
können mit einem Computer umbenannt werden.
2. Falls die Aufnahme verzerrt ist, die Lautstärke des
angeschlossenen Gerätes verringern. (Der Signal-
pegel an den Buchsen darf 800 mV nicht über-
schreiten).
4.4 Audiodateien oder komplette Ordner
kopieren
Einzelne Audiodateien oder komplette Ordner
lassen sich von einer Speicherkarte auf einen
USB-Stick kopieren oder umgekehrt.
1) Mit der Taste FUNC den Speicher anwählen,
auf dem sich die zu kopierenden Titel befin-
den (Anzeige
CARD oder USB).
2) Die Taste REC drücken. Das Display zeigt
kurz RECORD an. Dann blinkt unten links das
Lupensymbol und daneben wird Dir an-
gezeigt. Die Ordnersuchfunktion ist aktiviert.
3) Mit den Tasten , / REV – SKIP – CUE den
Ordner wählen, der kopiert werden soll
oder in dem sich die zu kopierende Datei
be findet.
4) Soll der gewählte Ordner kopiert werden,
jetzt die Taste REC erneut drücken oder,
wenn nur eine Datei aus dem gewählten
Ordner kopiert werden soll, die Taste REV,
CUE, oder gedrückt halten, bis neben
dem Lupensymbol File angezeigt wird.
Dann durch Antippen der Taste REV, CUE,
oder
die zu kopierende Datei wählen. Das
Kopieren mit der Taste REC starten.
Hinweis: Der Kopiervorgang kann jederzeit mit der
Taste STOP / abgebrochen werden.
4.5 Einzelne Audiodateien löschen
1) Mit der Taste FUNC den Speicher anwählen,
auf dem sich die zu löschende Datei befin-
det (Anzeige
CARD oder USB).
2) Auf der Fernbedienung die Taste DEL drü-
cken; das Display zeigt kurz
DELETE an.
Dann blinkt unten links das Symbol und
daneben wird
Dir angezeigt. Die Ordner-
suchfunktion ist aktiviert.
3) Mit den Tasten REV – SKIP – CUE den Ordner
wählen, in dem sich die zu löschende Datei
befindet.
4) Ist der Ordner gefunden, die Taste REV
oderCUE gedrückt halten, bis File neben
demSymbol
angezeigt wird. Dann durch
Antippen der Taste REV oder CUE die zu
löschende Datei wählen.
5) Zum Löschen die Taste DEL drücken. Das
Display zeigt kurz DELETE an.
6) Zum Löschen weiterer Dateien die Schritte 2)
bis 5) wiederholen.
Hinweis: Der Vorgang kann jederzeit mit der Taste
STOP / abgebrochen werden.
Änderungen vorbehalten.
Diese Bedienungsanleitung ist urheberrechtlich für MONACOR
®
INTERNATIONAL GmbH & Co. KG geschützt.
Eine Reproduktion für eigene kommerzielle Zwecke – auch auszugsweise – ist untersagt.

7
Deutsch
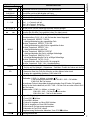
Fernbedienungstasten
Funktionsübersicht
Tasten am Gerät
FUNC × × Umschalten zwischen USB-Anschluss und Speicherkarte
II
PLAY/ PAUSE
×
×
Wiedergabe starten und
Umschalten zwischen Wiedergabe und Pause
VOL × × Signalpegel (Lautstärke) an den Buchsen OUTPUT
MUTE × Ton aus- und einschalten
1… 9, 0 × ×
Direktwahl eines Titels, Beispiele:
Titel 8 = Tasten 8 und II
Titel 30 = Tasten 3, 0 und II
Titel 125 = Tasten 1, 2, 5 und II
FOLDER
× ×
auf den ersten Titel des vorherigen / nächsten Ordners springen
REV − SKIP − CUE
×
×
Titelanfang, vorheriger / nächster Titel: Taste kurz drücken
schneller Vor- / Rücklauf: Taste gedrückt halten (Ton dabei stumm)
REPEAT ×
Wiederholfunktionen, Zufallswiedergabe und Anspielfunktion
Grundeinstellung PLAY ALL: alle Titel werden einmal abgespielt
erster Tastendruck REPEAT TRACK
ständige Wiederholung des angewählten Titels
nächster Tastendruck REPEAT FOLDER
ständige Wiederholung aller Titel im angewählten Ordner
nächster Tastendruck REPEAT ALL
ständige Wiederholung aller Titel
nächster Tastendruck RANDOM REPEAT
ständiges Abspielen aller Titel in zufälliger Reihenfolge
nächster Tastendruck RANDOM PLAY
einmalige Wiedergabe aller Titel in zufälliger Reihenfolge
nächster Tastendruck INTRO PLAY
Anspielfunktion: Jeder Titel wird für 10 s angespielt
nächster Tastendruck PLAY ALL: Grundeinstellung
DISPLAY ×
Umschalten der unteren Displayzeile (nicht bei Stopp möglich)
– Titel-Nr. und Titel-Spielzeit – Ordnername – Titelname – Anzahl der Ordner und der Titel
ID3 ×
Umschalten der oberen Displayzeile
– Namen der Datei, des Titels, des Künstlers und des Albums laufen durch
– Anzeige des angewählten Speichers:
CARD oder USB
FIND ×
Alphabetische Suche von Titeln und Ordnern
Titelsuche:
1) FIND 1 × drücken Anzeige "A".
2) Den Anfangsbuchstaben des Titels mit REV − SKIP − CUE wählen.
3) Mit PLAY den Titel starten.
Bei mehreren Titeln mit demselben Anfangsbuchstaben Taste REV oder CUE gedrückt
halten, bis der Buchstabe blinkt; mit REV − SKIP − CUE den Titel aussuchen und mit PLAY
den Titel starten.
Ordnersuche:
1) FIND 2 × drücken Anzeige Dir.
2) Mit REV − SKIP − CUE den Ordner aussuchen.
3) Mit PLAY den 1. Titel im Ordner starten.
PROG ×
Eigene Titelfolge programmieren:
1) Taste STOP / drücken.
2) Taste PROG drücken.
3) Ordner-Nr. eingeben und Taste PROG drücken.
4) Titel-Nr. eingeben und Taste PROG drücken.
5) Alle weiteren Titel genauso programmieren.
6) Abspielen mit Taste PLAY starten.
Programmierung löschen oder abbrechen: Taste STOP / drücken.
STOP
× × Wiedergabe beenden

English
8
Deutsch
Deutsch Seite
Français
Français Page
Italiano
Italiano Pagina
Español
Español Página
Nederlands
Nederlands Pagina
Polski
Polski Strona
Title-This so
TR0052 03:49 MP3
5 6 7 8 9
0 1 2 3 4 REC
FOLDER
VOL.
FUNC
SD / MMC CARD
IR
DPR-10
12V
OUTPUT
AUX INPUT
R L
R L
MP3 Recorder
These instructions are intended for users with-
out any specific technical knowledge. Please
read the instructions carefully prior to opera-
tion and keep them for later reference.
1 Applications
With the MP3 recorder DPR-10, it is possible
to replay MP3 and WMA files from USB flash
drives* and memory cards* (64 GB max.). For
recordings in MP3 format, an audio unit (radio,
CD player etc.) can be connected. It is also pos-
sible to copy audio files from a memory card to
a USB flash drive and vice versa.
The MP3 recorder DPR-10 can be operated
as a separate unit. Due to its compact design,
it is also suited for installation into another unit
(e. g. into an active speaker system). When
installing the DPR-10 into another unit, make
sure that this unit will not overheat the DPR-10.
* Note: Due to the large number of storage device
manufacturers and device drivers, it cannot be guar-
anteed that all storage media are compatible with
the DPR-10.
2 Important Notes
The unit corresponds to all relevant directives of
the EU and is therefore marked with
.
•
The unit is suitable for indoor use only. Pro-
tect it against dripping water, splash water
and high air humidity. The admissible ambi-
ent temperature range is 0 – 40 °C.
•
For cleaning only use a dry, soft cloth; never
use water or chemicals.
•
No guarantee claims for the unit and no li-
ability for any resulting personal damage or
material damage will be accepted if the unit
is used for other purposes than originally
intended, if it is not correctly connected or
operated, or if it is not repaired in an expert
way.
•
Likewise, no liability will be accepted for any
data loss on a storage medium caused by a
defect or operating errors.
If the unit is to be put out of oper-
ation definitively, take it to a local
recycling plant for a disposal which is
not harmful to the environment.
English
English Page

9
English
3 Connections
Prior to making or changing any connections,
switch off the DPR-10 and the units to be con-
nected.
1) Use an RCA cable to connect the jacks OUT-
PUT to a line level input, e. g. of a mixer or
amplifier (L = left channel, R = right chan-
nel).
2) For MP3 recordings, connect an audio unit
with line level output (e. g. CD player, mixer)
to the jacks AUX INPUT.
3) For power supply, a regulated 12 V power
supply unit with a rating of 400 mA and
with a low-voltage plug of 5.5 / 2.1 mm
(outside / inside diameter) is required (e. g.
PSS-1205DC from MONACOR). Connect
the power supply unit to the jack 12 V⎓:
Make sure to connect the positive pole to
the centre contact!
4 Operation
Switch on the unit by means of the button at
the unit or the button POWER on the remote
control. Welcome will appear on the display.
If neither a memory card nor a USB flash drive
is inserted,
NO USB will appear on the display.
4.1 Remote control
1) Remove the battery compartment cover on
the rear side of the remote control. Insert
the batteries (2 × 1.5 V, size AAA) as indi-
cated in the battery compartment. Close the
compartment with the cover.
If the remote control is not used for a
longer period of time, remove the batteries
as a precaution so that the remote control
will not be damaged in case the batteries
should leak.
2) When pressing a button, always point the
remote control towards the sensor “IR”.
Make sure that there are no obstacles be-
tween the remote control and the sensor.
3) When the operating range of the remote
control decreases, the batteries are dis-
charged and must be replaced.
Never put batteries in the household
waste. To protect the environment,
always take them to a special waste
disposal, e. g. collection container at
your retailer.
4.2 Replaying music titles
1) Connect a USB flash drive to the USB port
and/or
insert a memory card into the slot SD/ MMC
CARD (notched corner to the right). To re-
move the card, push the card into the slot
until it disengages.
2) To start the replay, press the button II
PLAY/ PAUSE.
3) All other functions available during replay
are listed in the table on page 11
.
4) After operation, switch off the unit with the
button
or POWER. The power supply unit
has a low power consumption even when
the DPR-10 has been switched off; there-
fore, disconnect the power supply unit from
the mains socket when the DPR-10 is not
used for a longer period of time.
4.3 Audio recordings
It is possible to make MP3 recordings from a
unit connected to the jacks AUX INPUT (e. g.
CD player) and to store them on a memory card
or a USB flash drive.
1) Make sure that the write protection of the
memory card or USB flash drive is not ena-
bled; if required, disable the protection.
2 31
5 64
8 97
0
STOP
PROG
DISPLAY
ID3
PLAY
PAUSE
REV – SKIP – CUE
FUNCREPEAT
DEL VOL – VOL +REC
FOLDER
FIND MUTE
POWER

10
English
2) To select the jacks AUX INPUT, press the but-
ton FUNC repeatedly until
AUX appears on
the display.
3) Press the button REC. The display will show
Waiting....
– When a memory card is inserted or a USB
flash drive is connected, recording will
start after a preparation period of approx.
10 seconds.
– When a memory card is inserted and a
USB flash drive is connected,
Target
[CARD]
or [USB] will appear on the dis-
play after 2 seconds. Use the buttons ,
/ REV – SKIP – CUE to select the storage
medium to be used for recording. Then
press the button REC again. Recording will
start after a preparation period of approx.
10 seconds.
4) During the recording, RECORD Ɗ [CARD]
or
[USB] will appear on the display. To stop
recording, press the button STOP / .
Notes:
1. The unit will create the folder TMC_AUX on the
storage medium for its own recordings. The follow-
ing names will be assigned to the files recorded:
REC_AUX.mp3
REC_AUX001.mp3
REC_AUX002.mp3
etc.
The date and the time of the files, however, are not
correct. The folder name and the file names can be
changed with a computer.
2. If a recording is distorted, reduce the volume of the
unit connected. (The signal level at the jacks must
not exceed 800 mV.)
4.4 Copying audio files or entire folders
Individual audio files or entire folders can be
copied from a memory card to a USB flash drive
or vice versa.
1) Use the button FUNC to select the storage
medium containing the title to be copied
(indication
CARD or USB).
2) Press the button REC. The display will briefly
show RECORD. Then the magnifying glass
symbol in the lower left corner will start
flashing and, next to it,
Dir will be shown.
The folder search function is activated.
3) Use the buttons , / REV – SKIP – CUE to
select the folder to be copied or the folder
containing the file to be copied.
4) To copy the folder selected, press the button
REC again, or
to copy a single file from the folder selected,
keep the button REV, CUE, or pressed
until
File is shown next to the magnifying
glass symbol. Then briefly press the button
REV, CUE, or to select the file to be
copied. Press the button REC to start cop-
ying.
Note: The copy process can be stopped at any time
with the button STOP / .
4.5 Deleting individual audio files
1) Use the button FUNC to select the storage
medium containing the file to be deleted
(indication
CARD or USB).
2) On the remote control, press the button
DEL; the display will briefly show
DELETE.
Then the magnifying glass symbol in the
lower left corner will start flashing and, next
to it,
Dir will be shown. The folder search
function is activated.
3) Use the buttons REV – SKIP – CUE to select the
folder containing the file to be deleted.
4) When the folder has been found, keep the
button REV or CUE pressed until
File is
shown next to the magnifying glass symbol
. Then briefly press the button REV or CUE
to select the file to be deleted.
5) To delete the file, press the button DEL. The
display will briefly show DELETE.
6) To delete further files, repeat steps 2) to 5).
Note: The process can be stopped at any time with
the button STOP / .
Subject to technical modification.
All rights reserved by MONACOR
®
INTERNATIONAL GmbH & Co. KG. No part of this instruction manual may be
reproduced in any form or by any means for any commercial use.

11
English
Remote control buttons
Function overview
Buttons at the unit
FUNC × × to switch between USB port and memory card
II
PLAY/ PAUSE
×
×
to start the replay and
to switch between replay and pause
VOL × × signal level (volume) at the jacks OUTPUT
MUTE ×
to mute / unmute the sound
1… 9, 0 × ×
direct title selection, examples:
title 8 = buttons 8 and II
title 30 = buttons 3, 0 and II
title 125 = buttons 1, 2, 5 and II
FOLDER
× ×
to go to the first title of the previous / next folder
REV − SKIP − CUE
×
×
beginning of title, previous / next title: press button briefly
fast forward / reverse: keep button pressed (sound will be muted in the process)
REPEAT ×
repeat functions, random replay and intro function
basic setting PLAY ALL: all titles will be replayed once
first actuation of button REPEAT TRACK
the title selected will be repeated continuously
next actuation of button REPEAT FOLDER
all titles in the folder selected will be repeated continuously
next actuation of button REPEAT ALL
all titles will be repeated continuously
next actuation of button RANDOM REPEAT
all titles will be replayed continuously in random order
next actuation of button RANDOM PLAY
all titles will be replayed once in random order
next actuation of button INTRO PLAY
intro function: the first 10 seconds of each title will be replayed
next actuation of button PLAY ALL: basic setting
DISPLAY ×
to change the information shown in the lower line of the display
(not available when the replay has been stopped)
– no. and playing time of the title – folder name – title name – no. of folders and titles
ID3 ×
to change the information shown in the upper line of the display
– name of the file, the title, the artist and the album will scroll through the upper line
– the selected storage medium will be indicated:
CARD or USB
FIND ×
alphabetic search for titles and folders
Title search:
1) Press FIND once Indication "A".
2) Select the first letter of the title with REV − SKIP − CUE.
3) Press the button PLAY to start the replay.
If there are multiple titles beginning with the same letter, keep the button REV or CUE
pressed until the letter starts flashing; select the title with REV − SKIP − CUE and then
press the button PLAY to start the replay of the title.
Folder search:
1) Press FIND twice Indication Dir.
2) Select the folder with REV − SKIP − CUE.
3) Press the button PLAY to start the replay of the first title in the folder.
PROG ×
to compile an individual title sequence:
1) Press the button STOP / .
2) Press the button PROG.
3) Enter the folder number and press the button PROG.
4) Enter the title number and press the button PROG.
5) Proceed in the same way to add further titles to the sequence.
6) Press the button PLAY to start the replay of the sequence.
To delete or stop the sequence, press the button STOP / .
STOP
× × to stop the replay

Français
12
Deutsch
Deutsch Seite
English
English Page
Italiano
Italiano Pagina
Español
Español Página
Nederlands
Nederlands Pagina
Polski
Polski Strona
Title-This so
TR0052 03:49 MP3
5 6 7 8 9
0 1 2 3 4 REC
FOLDER
VOL.
FUNC
SD / MMC CARD
IR
DPR-10
12V
OUTPUT
AUX INPUT
R L
R L
Enregistreur MP3
Cette notice s’adresse aux utilisateurs sans
connaissances techniques particulières. Veuillez
lire la présente notice avec attention avant le
fonctionnement et conservez-la pour pouvoir
vous y reporter ultérieurement.
1 Possibilités d’utilisation
Avec l’enregistreur MP3, DPR-10, vous pouvez
lire des fichiers MP3 et WMA depuis une clé
USB* et des cartes mémoires* (jusqu’à 64 GO).
Pour des enregistrements au format MP3, il
est possible de relier un appareil audio (radio,
lecteur CD...). De plus, il est possible de copier
des fichiers audio depuis une carte mémoire sur
une clé USB et inversement.
Le DPR-10 peut fonctionner comme appareil
séparé, il peut également être intégré dans un
autre appareil (par exemple dans une enceinte
active) grâce à sa forme compacte. Veillez à ce
que l’appareil dans lequel il est intégré, ne le
chauffe pas trop.
* Conseil: En raison de la multitude de fabricants de
cartes mémoires et de drivers d’appareils, il n’est pas
possible de garantir que tous les supports de mé-
moire soient compatibles avec le DPR-10.
2 Conseils importants d’utilisation
L’appareil répond à toutes les directives néces-
saires de l’Union européenne et porte donc le
symbole
.
•
L’appareil n’est conçu que pour une utilisation
en intérieur. Protégez-le des éclaboussures,
de tout type de projections d’eau et d’une
humidité d’air élevée. La plage de tempéra-
ture ambiante admissible est de 0 – 40 °C.
•
Pour le nettoyer, utilisez uniquement un chif-
fon sec et doux, en aucun cas, de produits
chimiques ou d’eau.
•
Nous déclinons toute responsabilité en cas de
dommages matériels ou corporels consécutifs
si l’appareil est utilisé dans un but autre que
celui pour lequel il a été conçu, s’il n’est pas
correctement branché ou utilisé ou s’il n’est
pas réparé par une personne habilitée ; de
même, la garantie deviendrait caduque.
•
De même, notre responsabilité ne saurait être
engagée en cas de pertes de données cau-
sées par une mauvaise manipulation ou par
un défaut et leurs conséquences.
Lorsque l’appareil est définitivement
retiré du service, vous devez le dé-
poser dans une usine de recyclage
adaptée pour contribuer à son élimi-
nation non polluante.
Français
Français Page

13
Français
3 Branchements
Avant d’effectuer ou de modifier des branche-
ments, éteignez le DPR-10 et les appareils à
relier.
1) Reliez les prises OUTPUT via un cordon RCA
à une entrée niveau ligne, par exemple à
une table de mixage ou un amplificateur
(L=canal gauche, R = canal droit).
2) Pour des enregistrements MP3, reliez un
appareil audio avec sortie niveau ligne (par
exemple lecteur CD, table de mixage), aux
prises AUX INPUT.
3) Pour l’alimentation, un bloc secteur 12 V
stabilisé avec une charge admissible de
400 mA et fiche alimentation 5,5 / 2,1 mm
(diamètre extérieur/intérieur) est nécessaire
(par exemple PSS-1205DC de MONACOR).
Reliez le bloc secteur à la prise 12 V⎓ : le
contact médian est au pôle plus!
4 Utilisation
Allumez l’appareil avec la touche sur l’appa-
reil ou la touche POWER sur la télécommande.
Le message Welcome est visible sur l’affichage.
L’affichage indique NO USB si aucune carte
mémoire ou clé USB n’est insérée dans l’appa-
reil.
4.1 Télécommande
1) Retirez sur la face arrière de la télécom-
mande le couvercle du compartiment bat-
terie. Insérez les batteries (2 × 1,5 V, type
R03) comme indiqué dans le compartiment.
Refermez le compartiment avec le couvercle.
En cas de non utilisation prolongée, re-
tirez les batteries, elles pourraient couler et
endommager la télécommande.
2) Tenez la télécommande toujours en direc-
tion du capteur «IR» lorsque vous appuyez
sur une touche. Il ne doit pas y avoir d’obs-
tacle entre la télécommande et le capteur.
3) Si la portée de la télécommande faiblit, les
batteries sont mortes et doivent être rem-
placées.
Ne jetez pas les batteries usagées
dans la poubelle domestique. Vous
devez les déposer dans un container
spécifique ou les ramenez à votre
revendeur.
4.2 Lecture de titres de musique
1) Insérez une clé USB dans le port USB
et / ou
une carte mémoire dans la fente SD/ MMC
CARD. Le coin oblique de la carte doit être
dirigé vers la droite. Si la carte doit être reti-
rée, appuyez un peu sur la carte pour qu’elle
se désenclenche.
2) Pour démarrer la lecture, appuyez sur la
touche II
PLAY/ PAUSE.
3) Les autres possibilités de fonction lors de la
lecture sont présentées dans le tableau sur
la page 15
.
4) Après le fonctionnement, éteignez l’appa-
reil avec la touche
ou POWER. En cas de
non utilisation prolongée, il convient de dé-
brancher le bloc secteur car il a une faible
consommation même si le DPR-10 est éteint.
4.3 Enregistrements audio
Il est possible de créer des enregistrements MP3
depuis un appareil relié aux prises AUX INPUT
(par exemple lecteur CD) et de les stocker sur
une carte mémoire ou une clé USB.
1) La protection d’écriture sur la carte mémoire
ou la clé USB ne doit pas être activée ; le cas
échéant désactivez la protection.
2 31
5 64
8 97
0
STOP
PROG
DISPLAY
ID3
PLAY
PAUSE
REV – SKIP – CUE
FUNCREPEAT
DEL VOL – VOL +REC
FOLDER
FIND MUTE
POWER

14
Français
2) Pour sélectionner les prises AUX INPUT, ap-
puyez sur la touche FUNC jusqu’à ce que
l’affichage indique
AUX.
3) Appuyez sur la touche REC.
RECORD Waiting.... s’affiche.
– Si une carte mémoire ou une clé USB est
insérée, l’enregistrement démarre après
une durée de préparation de 10 secondes
environ.
– Si une carte mémoire et une clé USB sont
insérées, Target [CARD] ou [USB]
s’affiche après 2 secondes. Avec les
touches , / REV – SKIP – CUE, sélection-
nez sur quel support de stockage l’enre-
gistrement doit se faire. Appuyez à nou-
veau sur la touche REC. L’enregistrement
démarre après une durée de préparation
de 10 secondes environ.
4) Pendant l’enregistrement, l’affichage in-
dique
RECORD Ɗ [CARD] ou [USB]. Pour
arrêter l’enregistrement, appuyez sur la
touche STOP / .
Remarques :
1. Pour des enregistrements personnalisés, l’appareil
crée le dossier TMC_AUX sur le support de mé-
moire. Les fichiers enregistrés ont les noms suivants:
REC_AUX.mp3
REC_AUX001.mp3
REC_AUX002.mp3
etc.
La date et l’heure des fichiers ne sont pas corrects.
Le nom du dossier et les noms des fichiers peuvent
être renommés avec un ordinateur.
2. Si l’enregistrement présente des distorsions, dimi-
nuez le volume de l’appareil relié. (Le niveau de
signal aux prises ne doit pas dépasser 800 mV.)
4.4 Copie de fichiers audio ou
d’undossiercomplet
Il est possible de copier des fichiers audio in-
dividuels ou des dossiers complets depuis une
carte mémoire sur une clé USB et inversement.
1) Avec la touche FUNC, sélectionnez le sup-
port de mémoire sur lequel se trouvent les
titres à copier (affichage CARD ou USB).
2) Appuyez sur la touche REC. L’affichage in-
dique brièvement RECORD. Ensuite, le sym-
bole de loupe
en bas à gauche clignote
et, à côté,
Dir est affiché. La fonction de
recherche de dossier est activée.
3) Avec les touches , / REV – SKIP – CUE, sé-
lectionnez le dossier qui doit être copié ou
dans lequel se trouve le fichier à copier.
4) Si le dossier sélectionné doit être copié, ap-
puyez à nouveau sur la touche REC ou,
si seul un fichier doit être copié depuis le
dossier sélectionné, maintenez la touche
REV, CUE, ou enfoncée jusqu’à ce
que
File soit affiché à côté du symbole de
loupe. Ensuite, en appuyant brièvement sur
la touche REV, CUE, ou , sélectionnez
le fichier à copier. Démarrez la copie avec la
touche REC.
Remarque : Le processus de copie peut être inter-
rompu à tout moment avec la touche STOP / .
4.5 Effacer des fichiers audio individuels
1) Avec la touche FUNC, sélectionnez le sup-
port de stockage sur lequel se trouve le fi-
chier à effacer (affichage
CARD ou USB).
2) Sur la télécommande, appuyez sur la touche
DEL ; l’affichage indique brièvement
DE-
LETE
. Ensuite, le symbole en bas à gauche
clignote et, à côté,
Dir est affiché. La fonc-
tion de recherche de dossier est activée.
3) Avec les touches REV – SKIP – CUE, sélection-
nez le dossier dans lequel se trouve le fichier
à effacer.
4) Lorsque le dossier est trouvé, maintenez la
touche REV ou CUE enfoncée jusqu’à ce que
File soit visible à côté du symbole . En-
suite, en appuyant brièvement sur la touche
REV ou CUE, sélectionnez le fichier à effacer.
5) Pour effacer, appuyez sur la touche DEL. L’af-
fichage indique brièvement DELETE.
6) Pour effacer d’autres fichiers, répétez les
points 2) à 5).
Remarque : Le processus peut être interrompu à tout
moment avec la touche STOP / .
Tout droit de modification réservé.
CARTONS ET EMBALLAGE
PAPIER À TRIER
Notice d’utilisation protégée par le copyright de MONACOR
®
INTERNATIONAL GmbH & Co. KG. Toute reproduc-
tion même partielle à des fins commerciales est interdite.

15
Français
Touches télécommande
Functions
Touches sur l’appareil
FUNC × × Commutation entre port USB et carte mémoire
II
PLAY/ PAUSE
×
×
Démarrer la lecture et
commuter entre Lecture et Pause
VOL × × Niveau signal (volume) aux prises OUTPUT
MUTE ×
Couper /Activer le son
1… 9, 0 × ×
Sélection directe d‘un titre, exemples :
Titre 8 = touches 8 et II
Titre 30 = touches 3, 0 et II
Titre 125 = touches 1, 2, 5 et II
FOLDER
× ×
Saut au premier titre du dossier précédent / suivant
REV − SKIP − CUE
×
×
Début de titre, titre précédent / suivant : appuyez brièvement sur la touche
Avance et retour rapides : maintenez la touche enfoncée (son coupé)
REPEAT ×
Fonctions répétition, lecture aléatoire et fonction lecture introduction
Réglage de base PLAY ALL : tous les titres sont lus une fois
Première pression REPEAT TRACK : répétition continue du titre sélectionné
Pression suivante REPEAT FOLDER
répétition continue de tous les titres dans le dossier sélectionné
Pression suivante REPEAT ALL
répétition continue de tous les titres
Pression suivante RANDOM REPEAT
lecture continue de tous les titres en ordre aléatoire
Pression suivante RANDOM PLAY
lecture unique de tous les titres en ordre aléatoire
Pression suivante INTRO PLAY
fonction lecture introduction : chaque titre est lu pendant 10 s
Pression suivante PLAY ALL : réglage de base
DISPLAY ×
Commutation de la ligne inférieure de l‘affichage (impossible sur Stop)
– numéro du titre, durée du titre – nom du dossier – nom du titre – nombre de dossiers
et de titres
ID3 ×
Commutation de la ligne supérieure de l‘affichage
– défilement du nom du fichier, du titre, de l‘artiste, de l‘album
– affichage du support de mémoire sélectionné :
CARD ou USB
FIND ×
Recherche alphabétique de titres et dossiers
Recherche de titres : 1) Appuyez sur FIND 1 × affichage "A".
2) Sélectionnez la première lettre du titre avec REV − SKIP − CUE.
3) Démarrez le titre avec PLAY.
Pour plusieurs titres avec la même première lettre, maintenez la touche REV ou CUE
enfoncé jusqu‘à ce que la lettre clignote ; avec REV − SKIP − CUE, recherchez le titre et
démarrez la lecture avec PLAY.
Recherche de dossiers :
1) Appuyez sur FIND 2 × affichage Dir.
2) Sélectionnez le dossier avec REV − SKIP − CUE.
3) Démarrez le premier titre dans le dossier avec PLAY.
PROG ×
Programmation d‘une suite de titres personnalisée :
1) Appuyez sur la touche STOP / .
2) Appuyez sur la touche PROG.
3) Saisissez le numéro du dossier et appuyez sur la touche PROG.
4) Saisissez le numéro du titre et appuyez sur la touche PROG.
5) Programmez tous les autres titres de la même manière.
6) Démarrez la lecture avec la touche PLAY.
Effacer ou annuler la programmation : appuyez sur la touche STOP / .
STOP
× × Arrêter la lecture

Italiano
16
Deutsch
Deutsch Seite
English
English Page
Français
Français Page
Español
Español Página
Nederlands
Nederlands Pagina
Polski
Polski Strona
Title-This so
TR0052 03:49 MP3
5 6 7 8 9
0 1 2 3 4 REC
FOLDER
VOL.
FUNC
SD / MMC CARD
IR
DPR-10
12V
OUTPUT
AUX INPUT
R L
R L
Registratore MP3
Queste istruzioni si rivolgono agli utenti senza
particolari conoscenze tecniche. Vi preghiamo
di leggerle attentamente prima della messa in
funzione e di conservarle per un uso futuro.
1 Possibilità d’impiego
Con il registratore MP3 DPR-10 si possono
riprodurre file MP3 e WMA su chiavette USB*
e su schede di memoria* (fino a 64 GB). Per le
registrazioni nel formato MP3 si può collegare
un dispositivo audio (radio, lettore CD ecc.).
Inoltre è possibile copiare i file da una scheda
di memoria su una chiavetta USB e viceversa.
Il DPR-10 può essere usato come apparec-
chio separato, ma grazie alla sua struttura com-
patta può essere integrato anche in un altro
apparecchio (p. es. una cassa acustica attiva). In
questo caso fare attenzione che l’apparecchio
in cui si monta il DPR-10 non lo riscaldi troppo.
* N.B.: Data la molteplicità di produttori di memorie
e di driver non si può garantire che tutti i mezzi di
memoria siano compatibili con il DPR-10.
2 Avvertenze importanti per l’uso
Quest’apparecchio è conforme a tutte le diret-
tive rilevanti dell’UE e pertanto porta la sigla
.
•
Lo strumento è adatto solo per l’uso all’in-
terno di locali. Proteggerlo dall’acqua goccio-
lante e dagli spruzzi d’acqua nonché da alta
umidità dell’aria. La temperatura d’esercizio
ammessa è 0 – 40 °C.
•
Per la pulizia usare solo un panno morbido,
asciutto; non impiegare mai acqua o prodotti
chimici.
•
Nel caso d’uso improprio, di collegamenti
sbagliati, d’impiego scorretto o di riparazione
non a regola d’arte dell’apparecchio, non si
assume nessuna responsabilità per eventuali
danni consequenziali a persone o a cose e
non si assume nessuna garanzia per l’appa-
recchio.
•
Nello stesso modo non si assume nessuna
responsabilità per la perdita di dati su un di-
spositivo di memoria causata da impiego sba-
gliato o da un difetto dell’apparecchio.
Se si desidera eliminare l‘apparecchio
definitivamente, consegnarlo per lo
smaltimento ad un‘istituzione locale
per il riciclaggio.
Italiano
Italiano Pagina

17
Italiano
3 Collegamenti
Prima del collegamento o della modifica di col-
legamenti esistenti, spegnere il DPR-10 e gli ap-
parecchi da collegare.
1) Per mezzo di un cavo RCA, collegare le prese
OUTPUT con un ingresso Line, p. es. di un
mixer o un amplificatore (L = canale sinistro,
R = canale destro).
2) Per registrazioni MP3 collegare un apparec-
chio audio con uscita Line (p. es. lettore CD,
mixer) con le prese AUX INPUT.
3) Per l’alimentazione è richiesto un alimenta-
tore 12 V stabilizzato con potenza massima di
400 mA e con uno spinotto 5,5 / 2,1 mm (dia-
metro esterno / interno) (p. es. PSS-1205DC di
MONACOR). Collegare l’alimentatore con la
presa 12 V⎓: il polo positivo deve essere sul
contatto centrale!
4 Funzionamento
Accendere l’apparecchio con il tasto sull’ap-
parecchio oppure con POWER sul telecomando.
Sul display si legge ora Welcome. Se non è in-
serito né una scheda di memoria né una chia-
vetta USB, il display indica NO USB.
4.1 Telecomando
1) Sul retro del telecomando togliere il coper-
chio del vano batterie. Inserire le batterie
(2 × 1,5 V, tipo AAA = ministilo), come se-
gnalato nel vano batterie. Richiudere il vano
batterie con il suo coperchio.
In caso di mancato uso prolungato con-
viene togliere le batterie per non danneg-
giare il telecomando se le batterie dovessero
perdere.
2) Premendo un tasto del telecomando, orien-
tare questo sempre in direzione del sensore
“IR”. Non ci devono essere ostacoli fra il
tele comando e il sensore.
3) Se la portata del telecomando si riduce, si-
gnifica che le batterie sono scariche e che
devono essere sostituite.
Non gettare le batterie scariche o
difettose nelle immondizie di casa
bensì negli appositi contenitori (p. es.
presso il vostro rivenditore).
4.2 Riprodurre titoli di musica
1) Inserire una chiavetta USB nel contatto USB
e / o
inserire una scheda di memoria nella fessura
SD/ MMC CARD. L’angolo smussato della
scheda deve essere rivolto verso destra. Per
togliere nuovamente la scheda, spingerla
leggermente indentro per sbloccarla.
2) Per avviare la riproduzione, premere il tasto
II
PLAY/ PAUSE.
3) Le ulteriori possibilità di funzionamento du-
rante la riproduzione sono rappresentate in
modo chiaro nella tabella a pagina 19
.
4) Dopo l’uso, spegnere l’apparecchio con il
tasto
o con POWER. Se non viene usato
per un certo periodo, conviene staccare l’a-
limentatore dall’alimentazione perché con-
suma un po’ di corrente anche con il DPR-10
spento.
4.3 Registrazioni audio
Da un apparecchio (p. es. lettore CD) colle-
gato con le prese AUX INPUT si possono creare
delle registrazioni MP3 e memorizzarle su una
scheda di memoria o su una chiavetta USB.
1) La protezione da scrittura sulla scheda di
memoria o sulla chiavetta USB non deve
essere attiva; eventualmente disattivarla.
2 31
5 64
8 97
0
STOP
PROG
DISPLAY
ID3
PLAY
PAUSE
REV – SKIP – CUE
FUNCREPEAT
DEL VOL – VOL +REC
FOLDER
FIND MUTE
POWER

18
Italiano
2) Per scegliere le prese AUX INPUT, premere il
tasto FUNC tante volte finché il display in-
dica
AUX.
3) Premere il tasto REC.
Si vede
RECORD Waiting....
– Se è inserito una scheda di memoria op-
pure una chiavetta USB, la registrazione
si avvia dopo un tempo di preparazione di
10 s ca.
– Se sono inserite una scheda di memoria e
una chiavetta USB, dopo 2 s viene indicato
Target [CARD] oppure [USB]. Con i
tasti , / REV – SKIP – CUE decidere su
quale memoria si deve effettuare la regi-
strazione. Quindi premere nuovamente il
tasto REC. La registrazione si avvia dopo
un tempo di preparazione di 10 s ca.
4) Durante una registrazione, il display indica
RECORD Ɗ [CARD] o [USB]. Per terminare
la registrazione premere il tasto STOP / .
N.B.:
1. Per le proprie registrazioni, l’apparecchio crea la
cartella TMC_AUX nella memoria. I file registrati
avranno i seguenti nomi:
REC_AUX.mp3
REC_AUX001.mp3
REC_AUX002.mp3
ecc.
La data e l’ora dei file invece non sono corrette. Il
nome della cartella e i nomi dei file possono essere
rinominati su un computer.
2. Se la registrazione è distorta, ridurre il volume
dell’apparecchio collegato. (Il livello del segnale alle
prese non deve superare 800 mV).
4.4 Copiare file audio o cartelle complete
Singoli file audio o cartelle complete possono
essere copiati da una scheda di memoria su una
chiavetta USB o viceversa.
1) Con il tasto FUNC scegliere la memoria sulla
quale si trovano i titoli da copiare (indica-
zione
CARD o USB).
2) Premere il tasto REC. Il display indica breve-
mente
RECORD. Quindi in basso a sinistra si
mette a lampeggiare il simbolo della lente
d’ingrandimento e di fianco si vede Dir. È
attivata la funzione di ricerca cartella.
3) Con i tasti , / REV – SKIP – CUE scegliere
la cartella da copiare oppure nella quale si
trova il file da copiare.
4) Se si deve copiare la cartella, premere ora
nuovamente il tasto REC oppure,
se si deve copiare solo un file della cartella
scelta, tener premuto il tasto REV, CUE,
o , finché di fianco al simbolo della lente
d’ingrandimento si vede File. Quindi toc-
cando il tasto REV, CUE, o scegliere il
file da copiare. Avviare la copiatura con il
tasto REC.
N.B.: Il processo di copiatura può essere interrotto in
qualsiasi momento con il tasto STOP / .
4.5 Cancellare singoli file audio
1) Con il tasto FUNC scegliere la memoria
dove si trova il file da cancellare (indicazione
CARD o USB).
2) Sul telecomando premere il tasto DEL; il
display visualizza brevemente
DELETE.
Quindi, in basso a sinistra si mette a lampeg-
giare il simbolo
e di fianco si vede Dir. È
attivata la funzione di ricerca cartella.
3) Con i tasti REV – SKIP – CUE scegliere la car-
tella dove si trova il file da cancellare.
4) Se è stata trovata la cartella, tener premuto il
tasto REV o CUE finché si vede File vicino
al simbolo . Quindi toccando il tasto REV o
CUE, scegliere il file da cancellare.
5) Per cancellare il file premere il tasto DEL. Il
display indica brevemente DELETE.
6) Per cancellare ulteriori file, ripetere i passi 2)
a 5).
N.B.: Il processo può essere interrotto in qualsiasi mo-
mento con il tasto STOP /
Con riserva di modifiche tecniche.
La MONACOR
®
INTERNATIONAL GmbH & Co. KG si riserva ogni diritto di elaborazione in qualsiasi forma delle
presenti istruzioni per l’uso. La riproduzione – anche parziale – per propri scopi commerciali è vietata.

19
Italiano
Tasti sul telecomando
Panoramica delle funzioni
Tasti sull’apparecchio
FUNC × × Cambio fra contatto USB e scheda di memoria
II
PLAY/ PAUSE
×
×
Avviare la riproduzione e
cambio fra riproduzione e pausa
VOL × × Livello del segnale (volume) alle prese OUTPUT
MUTE ×
Dis- /attivare l’audio
1… 9, 0 × ×
Scelta diretta di un titolo, esempi:
Titolo 8 = tasti 8 e II
Titolo 30 = tasti 3, 0 e II
Titolo 125 = tasti 1, 2, 5 e II
FOLDER
× ×
Saltare sul primo titolo della cartella precedente / successiva
REV − SKIP − CUE
×
×
Inizio del titolo, titolo precedente / successivo: premere brevemente il tasto
Avanzamento / ritorno veloce: tener premuto il tasto (audio disattivato)
REPEAT ×
Funzioni di ripetizione, riproduzione casuale e riproduzione dell’inizio di un titolo
Impostazione base PLAY ALL: tutti i titoli saranno riprodotti una volta
Prima pressione del tasto REPEAT TRACK
Ripetizione continua del titolo scelto
Pressione successiva del tasto REPEAT FOLDER
Ripetizione continua di tutti i titoli della cartella scelta
Pressione successiva del tasto REPEAT ALL
Ripetizione continua di tutti i titolo
Pressione successiva del tasto RANDOM REPEAT
Ripetizione continua di tutti i titoli in ordine casuale
Pressione successiva del tasto RANDOM PLAY
Ripetizione unica di tutti i titoli in ordine casuale
Pressione successiva del tasto INTRO PLAY
Riproduzione dell’inizio dei titoli: inizio per 10 s di ogni titolo
Pressione successiva del tasto PLAY ALL: Impostazione base
DISPLAY ×
Cambio della riga inferiore del display (non possibile con Stop)
– Nr. e durata del titolo – Nome cartella – Nome titolo – Numero cartella e titoli
ID3 ×
Cambio della riga superiore del display
– Scorrono nomi file, titolo, artista e albo
– Indicazione della memoria scelta:
CARD o USB
FIND ×
Ricerca alfabetica di titoli e cartelle
Ricerca titoli:
1) FIND 1 × premere Indicazione "A".
2) Con REV − SKIP − CUE scegliere la lettera iniziale del titolo.
3) Con PLAY avviare il titolo.
Con più titoli con la stessa lettera iniziale tener premuto il tasto REV o CUE finché
la lettera lampeggia; con REV − SKIP − CUE selezionare il titolo e con PLAY avviare
il titolo.
Ricerca cartelle:
1) FIND 2 × premere Indicazione Dir.
2) Con REV − SKIP − CUE scegliere la cartella.
3) Con PLAY avviare il primo titolo della cartella.
PROG ×
Programmare una sequenza individuale di titoli:
1) Premere il tasto STOP / .
2) Premere il tasto PROG.
3) Digitare il numero cartelle e premere il tasto PROG.
4) Digitale il numero del titolo e premere il tasto PROG.
5) Procedere nello stesso modo per tutti gli altri titoli.
6) Avviare la riproduzione con il tasto PLAY.
Cancellare o interrompere la programmazione: premere il tasto STOP / .
STOP
× × Terminare la riproduzione

MONACOR INTERNATIONAL GmbH & Co. KG • Zum Falsch 36 • 28307 Bremen • Germany
Copyright
©
by MONACOR INTERNATIONAL. All rights reserved. A-0875.99.05.05.2018
-
 1
1
-
 2
2
-
 3
3
-
 4
4
-
 5
5
-
 6
6
-
 7
7
-
 8
8
-
 9
9
-
 10
10
-
 11
11
-
 12
12
-
 13
13
-
 14
14
-
 15
15
-
 16
16
-
 17
17
-
 18
18
-
 19
19
-
 20
20


in altre lingue
- English: Monacor DPR-10 User manual
- français: Monacor DPR-10 Manuel utilisateur
- Deutsch: Monacor DPR-10 Benutzerhandbuch
Altri documenti
-
Optimus DPR 110 Manuale del proprietario
-
-
Paso P8083-R Manuale del proprietario
-
IMG STAGELINE MPX-40DMP Manuale utente
-
IMG Stage Line CD-290DJ Manuale del proprietario
-
Numark NDX800 Guida Rapida
-
-
Denon DN-C635 Manuale del proprietario
-
 Denon Professional Denon DN-500BD MKII Manuale utente
-
