La pagina si sta caricando...

Multi-zone weather station
Model: RAR502
USER MANUAL

EN
1
Multi-zone weather station
Model: RAR502
USER MANUAL
INDEX
Overview ................................................................... 2
Front view .............................................................. 2
Back view ............................................................... 3
Sensor .................................................................... 3
Accessories – separate purchase required ............ 4
Getting started .......................................................... 4
Remote sensor installation ..................................... 4
Main unit installation .............................................. 5
Synchronising and placing sensors ....................... 5
Name tags .............................................................. 6
Weather forecast ...................................................... 6
Temperature and humidity ...................................... 6
Mold alert ............................................................... 6
Troubleshooting ..................................................... 6
Reset .......................................................................... 7
Specifications ........................................................... 7
Precautions ............................................................... 8
About Oregon Scientific .......................................... 8
EU-Declaration of conformity .................................. 9
FCC statement .......................................................... 9
Information for users ............................................. 10

EN
2
OVERVIEW
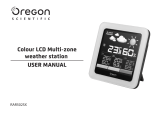
FRONT VIEW
6
5
4
3
2
1
1. Weather forecast
2.
: mold alert
3. Main unit batteries low
4. Temperature and humidity for location where main
unit is placed
5. Temperature and humidity for location where sensor
is placed
6. Customisable name tags

EN
3
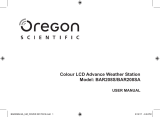
BACK VIEW
1
4
5
2
3
1. Wall mount hole
2. Battery compartment
3. Collapsible table stand
4. °C / °F: select temperature unit
5. RESET: reset unit to default settings
SENSOR
This product can work with up to 3 sensors at any one time
to capture temperature and relative humidity readings in
various locations around the home.
A complete set of 3 sensors are provided in this package,
while replacement wireless remote sensors can be
purchased separately.
THGR122N
This sensor conveniently displays the temperature /
humidity which makes it especially suited for locations
where you would like to see this data at a glance without
having to refer each time to the main unit, such as
children’s room.
2
1
3
4
5
6

EN
4
1. LCD display
2. LED status indicator
3. Wall mount hole
4. RESET
5. CHANNEL switch
6. Battery compartment
THGN132N
1
2
3
4
5
1. LED status indicator
2. Wall mount hole
3. Battery compartment
4. RESET hole
5. CHANNEL switch
ACCESSORIES – SEPARATE PURCHASE
REQUIRED
Optional wireless remote sensors such as those
listed below can be purchased separately. For more
information, please contact your local retailer.*
-THGR122N / THGN122N
- THGN132N
* Features and accessories will not be available in all
countries.
GETTING STARTED
REMOTE SENSOR INSTALLATION
1. Step applicable only to THGR122N:
Using a Philips screwdriver, open the battery
compartment cover.
2. Slide channel switch to select channel 1. Ensure
you use a different channel for the other sensors
(2, 3).
3. Insert the batteries, matching the polarities.
4. Press RESET after each battery change.
5. Replace the battery compartment cover.

EN
5
MAIN UNIT INSTALLATION
1. Remove the battery compartment.
2. Insert the batteries, matching the polarities.
3. Press RESET after each battery change.
The battery icon
may appear in the following
areas:
AREA MEANING
Main unit
environment area
Main unit batteries low
Remote sensor
environment area
Remote sensor batteries
low
NOTE
• We recommend that you use alkaline batteries with
this product for longer usage and lithium batteries in
temperatures below freezing.
• Batteries should not be exposed to excessive heat
such as sunshine or fire.
SYNCHRONISING AND PLACING SENSORS
The main unit will automatically search for new
sensor reset within the last 30 minutes. If unit failed to
synchronise with remote sensor, reset both the main
unit and sensor or try selecting a different channel (and
press RESET).
The remote sensor reception icons will show the following
status:
ICONS MEANING
Main unit is searching
for sensor(s)
A sensor has been
found and logged on
and “--.-“
No sensor found
Place the remote sensor within 30 m (98 ft) from the
main unit.
TIP
• When placing sensors, remember the intended
location for each sensor. Refer to channel switch
position (1, 2, 3) and match with channel icon
displayed directly above name tag.
• The transmission range may vary depending on
many factors. You may need to experiment with
various locations to get the best results.
For best results:
• Place the sensor out of direct sunlight and moisture.
• Position the sensor so that it faces the main unit,
minimizing obstructions such as doors, walls and
furniture.

EN
6
• Place the sensor in a location with a clear view to
the sky, away from metallic / electronic objects.
NAME TAGS
Name tags can be inserted in the main unit (see front
view diagram).
There are 3 blank name tags provided in this package.
You can write on the blank tags the name of the locations
where the sensors are being installed.
WEATHER FORECAST
This product forecasts the next 12 to 24 hours of weather
forecast within a 30-50 km (19-31 mile) radius.
Weather forecast area
ICON DESCRIPTION
Sunny
Partly cloudy
Cloudy
Rainy
Snowy
TEMPERATURE AND HUMIDITY
To toggle temperature unit:
• Using a thin blunt instrument, press °C / °F to toggle
between °C / °F.
MOLD ALERT
This product features moisture alert function to inform
users that there is a high risk of mold forming and should
therefore take preventive measures.
The mold alert icon
will flash when humidity is 60%
or above and will stop flashing when the humidity falls
below 60%.
TROUBLESHOOTING
DISPLAY AREA PROBLEM
LL.L Temperature
Reading is below
range
LL Humidity
HH.H Temperature
Reading is above
range
HH Humidity
--.- or --%
Temperature
and Humidity
Sensor is not
logged or does
not have humidity
function

EN
7
RESET
Using a thin blunt instrument, press RESET to return to
default settings.
SPECIFICATIONS
MAIN UNIT
TYPE DESCRIPTION
L x W x H
134 x 27 x 134 mm
(5.3 x 1.1 x 5.3 in)
Weight
240 g (8.46 oz)
without battery
Signal frequency 433 MHz
Temperature range
-5°C to 50°C
(23°F to 122°F)
Humidity range 25% - 95%
Power
4 x UM-4 (AAA) 1.5 V
batteries
REMOTE SENSOR (THGR122N)
TYPE DESCRIPTION
L x W x H
92 x 60 x 20 mm
(3.6 x 2.4 x 0.79 in)
Weight
60 g (2.11 oz)
without battery
Signal frequency 433 MHz
Number of channels 3
Transmission range 30 m (100 ft) unobstructed
Temperature range
-20°C to 60°C
(-4°F to 140°F)
Humidity range 25% - 95%
Power
2 x UM-4 (AAA) 1.5 V
battery
REMOTE SENSOR (THGN132N)
TYPE DESCRIPTION
L x W x H
96 x 50 x 22 mm
(3.8 x 1.9 x 0.9 in)
Weight
50 g (1.76 oz)
without battery
Signal frequency 433 MHz
Number of channels 3
Transmission range 30 m (100 ft) unobstructed
Temperature range
-20°C to 60°C
(-4°F to 140°F)
Humidity range 25% - 95%
Power 1 x UM-3 (AA) 1.5V battery

EN
8
PRECAUTIONS
• Do not subject the unit to excessive force, shock,
dust, temperature or humidity.
• Do not cover the ventilation holes with any items
such as newspapers, curtains etc.
• Do not immerse the unit in water. If you spill liquid
over it, dry it immediately with a soft, lint-free cloth.
• Do not clean the unit with abrasive or corrosive
materials.
• Do not tamper with the unit’s internal components.
This invalidates the warranty.
• Only use fresh batteries. Do not mix new and old
batteries.
• Images shown in this manual may differ from the
actual display.
• When disposing of this product, ensure it is collected
separately for special treatment and not as normal
household waste.
• Placement of this product on certain types of
wood may result in damage to its finish for which
Oregon Scientific will not be responsible. Consult
the furniture manufacturer’s care instructions for
information.
• The contents of this manual may not be reproduced
without the permission of the manufacturer.
• Do not dispose old batteries as unsorted municipal
waste. Collection of such waste separately for
special treatment is necessary.
• Please note that some units are equipped with a
battery safety strip. Remove the strip from the
battery compartment before first use.
• Should there be any discrepancy between the
English and other language versions, the English
version shall apply and prevail.
NOTE The technical specifications for this product and
the contents of the user manual are subject to change
without notice.
NOTE Features and accessories will not be available
in all countries. For more information, please contact
your local retailer.
ABOUT OREGON SCIENTIFIC
Visit our website www.oregonscientific.com to learn more
about Oregon Scientific products.
For any enquiry, please contact our Customer Services
at info@oregonscientific.com.
Oregon Scientific Global Distribution Limited reserves
the right to interpret and construe any contents, terms
and provisions in this user manual and to amend it, at
its sole discretion, at any time without prior notice.

EN
9
To the extent that there is any inconsistency between
the English version and any other language versions,
the English version shall prevail.
EU-DECLARATION OF CONFORMITY
Hereby, Oregon Scientific, declares that this Multi-zone
weather station (Model: RAR502) is in compliance with
the essential requirements and other relevant provisions
of Directive 1999/5/EC. A copy of the signed and dated
Declaration of Conformity is available on request via our
Oregon Scientific Customer Service.
COUNTRIES RTTE APPROVAL COMPLIED
All EU Countries, Switzerland CH
and Norway N
FCC STATEMENT
This device complies with Part 15 of the FCC Rules.
Operation is subject to the following two conditions: (1)
This device may not cause harmful interference, and
(2) This device must accept any interference received,
including interference that may cause undesired
operation.
WARNING
approved by the party responsible for compliance could
void the user’s authority to operate the equipment.
NOTE This equipment has been tested and found
to comply with the limits for a Class B digital device,
pursuant to Part 15 of the FCC Rules. These limits
are designed to provide reasonable protection against
harmful interference in a residential installation.
This equipment generates, uses and can radiate radio
frequency energy and, if not installed and used in
accordance with the instructions, may cause harmful
interference to radio communications. However, there
is no guarantee that interference will not occur in a
particular installation. If this equipment does cause
harmful interference to radio or television reception,
which can be determined by turning the equipment
off and on, the user is encouraged to try to correct the
interference by one or more of the following measures:
• Reorient or relocate the receiving antenna.
• Increase the separation between the equipment and
receiver.
• Connect the equipment into an outlet on a circuit
different from that to which the receiver is connected.

EN
10
• Consult the dealer or an experienced radio / TV
technician for help.
DECLARATION OF CONFORMITY
The following information is not to be used as contact
for support or sales. Please call our customer service
number (listed on our website at
com), or on the warranty card for this product) for all
inquiries instead.
We
Name:
Address: 10778 SW Manhasset Drive.
Tualatin, Oregon 97062 USA
Telephone No.: 1-800-853-8883
declare that the product
Product No.: RAR502
Product Name: Multi-zone weather station
Manufacturer: IDT Technology Limited
Address: Block C, 9/F, Kaiser Estate,
Phase 1,41 Man Yue St.,
Hung Hom, Kowloon,
Hong Kong
is in conformity with Part 15 of the FCC Rules.
Operation is subject to the following two conditions: 1)
This device may not cause harmful interference. 2) This
device must accept any interference received, including
interference that may cause undesired operation.
INFORMATION FOR USERS
Pursuant to and in accordance with Article 14 of
the Directive 2012/19/EU of the European
Parliament on waste electrical and electronic
equipment (WEEE), and pursuant to and in
accordance with Article 20 of the Directive 2006/66/EC
of the European Parliament on batteries and accumulators
and waste batteries.
The barred symbol of the rubbish bin shown on the
equipment indicates that, at the end of its useful life, the
product must be collected separately from other waste.
Please note that the batteries/rechargeable batteries
must be removed from the equipment before it is given
as waste.
To remove the batteries/accumulators refer to the speci-
that have reached the end of their useful life must be
given to waste disposal centers specializing in sepa-
rate collection of waste electrical and electronic equip-
ment, or given back to the dealer when purchasing a new
WEEE, pursuant to and in accordance with Article 14 as
implemented in the country.
The adequate separate collection for the subsequent
start-up of the equipment sent to be recycled, treated
and disposal of in an environmentally compatible way
contributes to preventing possible negative effects on
the environment and health and optimizes the recycling
and reuse of components making up the apparatus.
Abusive disposal of the product by the user involves ap-
plication of the administrative sanctions according to the
laws in force.

IT
1
Stazione Meteo Multizona
Modello: RAR502
MANUALE PER L’UTENTE
INDICE
Panoramica ................................................................2
Vista anteriore .........................................................2
Vista posteriore .......................................................3
Sensore ...................................................................3
Accessori – da acquistare separatamente ..............4
Operazioni preliminari ..............................................4
Impostazione del sensore remoto ...........................4
Installazione dell’unità principale ............................4
Sincronizzazione e collocazione dei sensori ...........5
Etichette distintive ...................................................6
Previsioni meteorologiche .......................................6
Temperatura e umidità ..............................................6
Allarme muffa ..........................................................6
Risoluzione dei problemi .........................................7
Reset ...........................................................................7
Specifiche tecniche ...................................................7
Precauzioni ................................................................8
Informazioni su Oregon Scientific ...........................9
Dichiarazione di conformitá UE ...............................9
Informazione agli utenti ..........................................10

IT
2
PANORAMICA
VISTA ANTERIORE
6
5
4
3
2
1
1. Previsioni meteorologiche
2.
: allarme muffa
3. Batterie dell’unità principale in esaurimento
4. Temperatura e umidità della zona in cui è collocata
l’unità
5. Temperatura e umidità della zona in cui è collocato
il sensore
6. Etichette distintive personalizzabili

IT
3
VISTA POSTERIORE
1
4
5
2
3
1. Foro per fissaggio a parete
2. Vano batterie
3. Supporto da tavolo pieghevole
4. °C / °F: consente di selezionare l’unità di misura
della temperatura
5. RESET: consente di ripristinare i valori predefiniti
dell’unità
SENSORE
Questo prodotto può funzionare con un numero
massimo di 3 sensori contemporaneamente per rilevare
la temperatura e l’umidità relativa in diversi punti
dell’abitazione.
Nella confezione viene fornito un set completo di 3 sensori
remoti, mentre è possibile acquistare separatamente altri
sensori remoti opzionali senza fili.
THGR122N
Questo sensore visualizza in modo pratico temperatura
e umidità, cosa che lo rende particolarmente adatto
per essere collocato in punti dove si possono vedere
istantaneamente i dati, senza dover fare ogni volta
riferimento all’unità principale, ad esempio nella camera
dei bambini.
2
1
3
4
5
6

IT
4
1. Display LCD
2. Indicatore LED
3. Foro per fissaggio a parete
4. Foro RESET
5. Selettore CHANNEL
6. Vano batterie
THGN132N
1
2
3
4
5
1. Indicatore LED
2. Foro per fissaggio a parete
3. Vano batterie
4. Foro RESET
5. Selettore CHANNEL
ACCESSORI – DA ACQUISTARE
SEPARATAMENTE
È possibile acquistare separatamente sensori remoti
senza fili aggiuntivi come quelli sottoelencati. Per ulteriori
informazioni, rivolgersi al proprio rivenditore.*
-THGR122N / THGN122N
- THGN132N
* Caratteristiche e accessori non disponibili in tutti i paesi.
OPERAZIONI PRELIMINARI
IMPOSTAZIONE DEL SENSORE REMOTO
1. Fase applicabile solo al sensore THGR122N:
Aprire il vano batterie con un cacciavite Phillips.
2. Spostare la levetta del canale per selezionare il
canale 1. Utilizzare un canale diverso per ogni
sensore (2, 3).
3. Inserire le batterie, rispettando la polarità indicata.
4. Premere RESET dopo ogni sostituzione di batteria.
5. Riposizionare la copertura del vano batterie.
INSTALLAZIONE DELL’UNITÀ PRINCIPALE
1. Togliere la copertura del vano batterie.
2. Inserire le batterie, rispettando la polarità indicata.
3. Premere RESET dopo ogni sostituzione di batteria.

IT
5
L’icona della batteria può apparire nelle seguenti
aree:
AREA SIGNIFICATO
Area ambiente unità
principale
Batterie dell’unità
principale in esaurimento
Area ambiente
sensore remoto
Batterie del sensore
remoto in esaurimento
NOTA
• Per un uso prolungato del prodotto, si consiglia
di utilizzare batterie alcaline, mentre in caso di
temperature inferiori allo zero si consiglia l’uso di
batterie al litio.
• Non eporre le batterie ad eccessive fonti di calore,
quali sole o fuoco.
SINCRONIZZAZIONE E COLLOCAZIONE DEI
SENSORI
L’unità principale eseguirà automaticamente la ricerca di
un sensore azzerato negli ultimi 30 minuti. Se l’unità non
riesce a sincronizzarsi con il sensore remoto, azzerare
l’unità principale e il sensore o cercare di selezionare un
canale diverso (e premere RESET).
Le icone della ricezione del sensore remoto indicano uno
dei seguenti stati:
ICONE SIGNIFICATO
L’unità principale è alla
ricerca del/i sensore/i
È stato rilevato e
agganciato un sensore
e “--.-“
Non è stato rilevato
nessun sensore
Posizionare il sensore remoto entro 30 m dall’unità
principale.
SUGGERIMENTO
• Quando si posizionano i sensori, ricordare la
collocazione di ognuno di essi. Vedere la posizione
della levetta del canale (1, 2, 3) e farla corrispondere
con l’icona del canale
visualizzata sopra
l’etichetta distintiva.
• Il campo di trasmissione può variare in base a molti
fattori. E possibile dover provare diverse posizioni
prima di ottenere i risultati migliori.
Per risultati migliori:
• Tenere il sensore lontano dalla luce diretta del sole
e umidità.
• Posizionare il sensore di fronte all’unità principale,
riducendo le interferenze quali porte, pareti e mobili.

IT
6
• Posizionare il sensore in un luogo in cui sia
possible vedere il cielo, lontano da oggetti metallici/
elettronici.
ETICHETTE DISTINTIVE
È possibile applicare etichette distintive nell’unità
principale (vedere il disegno della vista anteriore).
Nella confezione vengono fornite 3 etichette distintive in
bianco. L’utente può scrivere sulle etichette in bianco i
punti in cui vengono posizionati i sensori.
PREVISIONI METEOROLOGICHE
Questo prodotto è in grado di mostrare le previsioni
meteorologiche per le successive 12-24 ore entro un
raggio di 30-50 km.
Area previsioni meteorologiche
ICONA DESCRIZIONE
Sereno
Parzialmente nuvoloso
Nuvoloso
Pioggia
Neve
TEMPERATURA E UMIDITÀ
Alternanza delle unità di misura della temperatura:
• Con un oggetto dalla punta smussata, premere
°C / °F per alternare °C / °F.
ALLARME MUFFA
Questo prodotto dispone della funzione di allarme muffa
che informa gli utenti dell’elevato rischio di formazione
di muffa e che è pertanto necessario adottare misure
preventive.
Se l’umidità è pari o superiore al 60%, appare l’icona di
allarme muffa
, che smette di lampeggiare quando il
livello di umidità scende al di sotto del 60%.

IT
7
RISOLUZIONE DEI PROBLEMI
VISUALIZZAZIONE AREA PROBLEMA
LL.L Temperatura
La
misurazione
è al di sotto
della fascia di
rilevazione
LL Umidità
HH.H Temperatura
La
misurazione
è al di sopra
della fascia di
rilevazione
HH Umidità
-.- oppure -%
Temperatura
e umidità
Il sensore non
è agganciato
o non dispone
della funzione
di rilevazione
dell’umidità
RESET
Con uno strumento dalla punta smussata, premere
RESET per ripristinare le impostazioni predefinite.
SPECIFICHE TECNICHE
UNITA’ PRINCIPALE
TIPO DESCRIZIONE
Lung x Larg X Alt
134 x 27 x 134 mm
(5,3 x 1,1 x 5,3 in)
Peso
240 g (8,46 oz)
senza batteria
Frequenza segnale 433 MHz
Campo di misurazione
della temperatura
da -5°C a 50°C
Campo di misurazione
umidità
25% - 95%
Alimentazione
4 batterie UM-4 (AAA) da
1,5 V
UNITA’ REMOTA (THGR122N)
TIPO DESCRIZIONE
Lung x Larg X Alt
92 x 60 x 20 mm
(3,6 x 2,4 x 0,79 in)
Peso
60 g (2.11 oz)
senza batteria

IT
8
Frequenza segnale 433 MHz
N. di canali 3
Campo di
trasmissione
30 m (100 ft) in campo
aperto
Campo di misurazione
della temperatura
da -20°C a 60°C
(da -4°F a 140°F)
Campo di
misurazione umidità
25% - 95%
Alimentazione
2 batterie UM-4 (AAA) da
1,5 V
UNITA’ REMOTA (THGN132N)
TIPO DESCRIZIONE
Lung x Larg X Alt
96 x 50 x 22 mm
(3,8 x 1,9 x 0,9 in)
Peso
50 g (1.76 oz)
senza batteria
Frequenza segnale 433 MHz
N. di canali 3
Campo di
trasmissione
30 m (100 ft) in campo
aperto
Campo di misurazione
della temperatura
da -20°C a 60°C
(da -4°F a 140°F)
Campo di
misurazione umidità
25% - 95%
Alimentazione
1 batteria UM-3 (AA) da
1,5 V
PRECAUZIONI
• Non sottoporre il prodotto a forza eccessiva, urti,
polvere, sbalzi eccessivi di temperatura o umidità.
• Non otturare i fori di aerazione con oggetti come
giornali, tende, etc.
• Non immergere l’unità in acqua. Se si versa del
liquido sul prodotto, asciugarlo immediatamente
con un panno morbido e liscio.
• Non pulire l’unità con materiali abrasivi o corrosivi.
• Non manomettere i componenti interni. In questo
modo si invalida la garanzia.
• Oregon Scientific declina ogni responsabilità
per eventuali danni alle finiture causati dal
posizionamento del prodotto su determinati tipi di
legno. Consultare le istruzioni fornite dal fabbricante
del mobile per ulteriori informazioni.
• Le immagini del manuale possono differire dalla
realtà.

IT
9
• Il contenuto di questo manuale non può essere
ristampato senza l’autorizzazione del fabbricante.
• Utilizzare solo batterie nuove. Non mescolare
batterie nuove con batterie vecchie.
• Al momento dello smaltimento del prodotto,
attenersi alla nota relativa in allegato.
• Non smaltire le batterie vecchie come rifiuto
indifferenziato. È necessario che questo rifiuto
venga smaltito mediante raccolta differenziata per
essere trattato in modo idoneo.
• Alcune unità sono dotate di una striscia di sicurezza
per le batterie. Rimuovere la striscia dal vano
batterie prima del primo utilizzo.
• In caso di discrepanze tra la versione inglese e
quelle in altre lingue, si applicherà e prevarrà la
versione inglese.
NOTA Le specifiche tecniche del prodotto e il contenuto
del manuale per l’utente possono essere modificati senza
preavviso.
NOTA Caratteristiche e accessori non disponibili in tutti
i paesi. Per ulteriori informazioni, rivolgersi al proprio
rivenditore.
INFORMAZIONI SU OREGON SCIENTIFIC
Per ulteriori informazioni sui prodotti Oregon Scientific,
visitate il nostro sito web www.oregonscientific.com.
Per richiedere informazioni, contattate il nostro Servizio
Clienti all’indirizzo info@oregonscientific.com.
Oregon Scientific Global Distribution Limited si riserva
il diritto di interpretare e definire eventuali contenuti,
termini e disposizioni contenuti in questo manuale per
l’utente e di modificarli, a sua esclusiva discrezione, in
qualsiasi momento e senza preavviso. Nella misura in
cui risultassero incongruenze tra la versione in inglese
e quelle in altre lingue, farà fede la versione in inglese.
DICHIARAZIONE DI CONFORMITÁ UE
Con la presente Oregon Scientific dichiara che questo
prodotto (modello: RAR502) è conforme ai requisiti
essenziali ed alle altre disposizioni pertinenti stabilite
dalla direttiva 1999/5/CE. Una copia firmata e datata della
Dichiarazione di Conformità è disponibile, su richiesta,
tramite il servizio clienti della Oregon Scientific.
PAESI CONFORMI ALLA DIRETTIVA R&TTE
Tutti I Paesi UE, Svizzera CH
e Norvegia N
1/90