
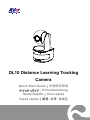
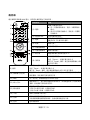
DL10 Distance Learning Tracking
Camera
Quick Start Guide
│
快速使用指南
クイック・ガイド│
Schnellanleitung
Guide Rapide
│
Guía rápida
Guida rapida
│빠른 시작 가이드

English ............................................................................................. 1
繁體中文 ........................................................................................... 8
日本語 ............................................................................................ 15
Deutsch .......................................................................................... 22
Français ......................................................................................... 29
Español .......................................................................................... 36
Italiano ........................................................................................... 43
한국어 ............................................................................................ 50

English-1
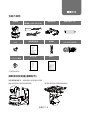
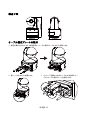
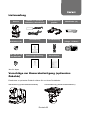
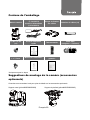
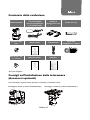
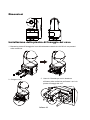
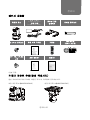
Package Contents
Camera Unit
Power Adapter
(1.2 m/3.93 ft)
Power Cord
(1.83 m/6.00 ft)
Cable Fixing
Plate Cable Ties (x3)
M2 x 4mm
Screws (x2)
Quick Start Guide Remote Control USB Cable
(Length: 1.5 m/4.92 ft)
1/4”-20, L=7.5mm
Screw User Manual* Warranty Card*
*Only for Japan
Camera Mount Suggestions (Optional Accessories)
For details on optional accessories, consult your local dealer.
Wall mount (Part#60S5000000AB)
Ceiling mount (Part#60S5000000AC)

English-2
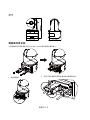
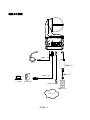
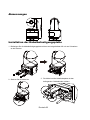
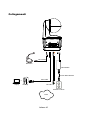
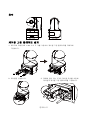
Dimension
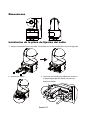
Cable Fixing Plate Installation
1. Secure the cable fixing plate to the camera with two M2 x 4 mm screws in the package.
2. Plug in cables.
3. Use 3 cable ties in the package to secure
the cables and cable fixing plate.

English-3
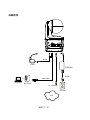
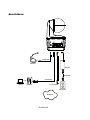
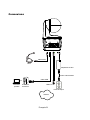
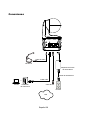
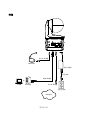
Connections
RJ-45 cable
USB cable
Power outlet
Power adaptor
Power cord
Desktop
Microphone
Audio cable
Laptop
or
Network

English-4
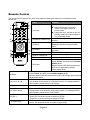
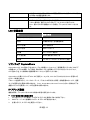
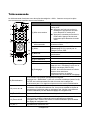
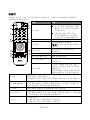
Remote Control
The remote control requires two “AAA” size batteries. Make sure batteries are installed properly
before use.
Name Function
(1) Power
Turn the unit on/standby/privacy:
Press once to turn on privacy
mode. Press again to turn off
privacy mode.
Long press for 3 seconds to turn on
standby mode. Short press again to
turn off standby mode.
(2) Remote Control LED
It will be on when pressing other
buttons.
(3) Menu
Open and exit the OSD menu.
[Note] DL10 does not support OSD
menu.
(4) Switch
Switch from presenter to another
presenter.
(5) Auto Tracking On
Turn on auto tracking.
(6) Auto Tracking Off
Turn off auto tracking.
(7) Number buttons
Use for setting the preset position 0~9.
(8) Preset
To set a preset position:
Press “Preset” and then press “
Number
button (0~9)”.
Remote control LED and camera button
LED will not light when pressing
Preset button alone.
(9) Reset
To cancel a pre-configured preset position:
Press “Reset” and then press “Number button (0~9)”.
Remote control LED and camera button LED will not light
when pressing
Reset button alone.
(10)
▲,▼,◄, & ►
Pan and tilt the camera. Pan/Tilt speed by remote control is fixed. You
may change pan/tilt speed by using web browser. For setting details of
web browser, please refer to user manual.
(11) Enter Use the Enter button to send the camera to the Home position.
(12) Zoom In/Out
Zoom in/out. Zoom in/out speed by remote control is fixed. You may
change zoom in/out speed by using web browser. For setting details of
web browser, please refer to user manual.
(13) EV +/-
EV level adjustment.
*Press EV+ for three seconds to switch on RTMP.
*Press EV- for three seconds to switch off RTMP.
(14) Upper Body
Tracking mode switches to Presenter Mode when pressing Upper Body
button, and presenter's size on screen is upper body.

English-5
(15) Full Body
Tracking mode switches to Presenter Mode when also pressing Full
Body button, and presenter's size on screen is full body.
Upper Body focuses on the presenter from his/her knees to the top of
the head whereas the Full Body captures the whole outline of the
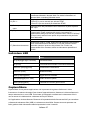
presenter from his/her feet to the top of the head.
(16) Zone
Tracking mode switches to Zone Mode when pressing Zone button.
(17) Camera Select
CAM1 to CAM4 buttons. Select a camera to operate. Once a camera is
selected, the CAM button LED will be on when pressing other buttons.
If only one AVer camera is connected, then the default is CAM1.
LED Indicator
LED Status
Blue (Blinking every 2 seconds) Tracking On
Blue (Solid) Normal Operation and Tracking Off
Orange (Blinking) Camera Initialization
Orange (Solid) Standby Mode
Red (Blinking) Firmware Update
Purple (Blinking for 3 times) RTMP being switched on or off
Green (Blinking) Gesture control command received
CaptureShare
CaptureShare is a powerful application that lets you easily record video, livestream, and capture
still images during distance learning and real-time video conferencing via a USB cable. It can help
teachers turn AVer cameras into an even more effective distance learning collaboration tool.
Use the included application called “AVer Camera Setting Tool” to remotely control AVer cameras
(USB) or AVer virtual cameras. This tool allows easy manipulation of the camera via settings such
as Pan/Tilt/Zoom control, recalling and saving presets, turn on/off auto tracking as well as select
the tracking modes. You can also easily control your camera while using popular video
conferencing tools such as Zoom, Google Meet, and Microsoft Teams.
IP Address Setup
DL cameras’ default setting is DHCP on.
If there is DHCP environment
1. Connect your camera to the internet and wait for your camera to get IP address.
2. From your server, you can find your new camera IP address.
3. If necessary, modify the IP address.

English-6
Or if you want to configure by yourself
1. Use the remote control and press the button “8” eight times to switch to Static IP mode.
2. The default IP for the camera would be set to 192.168.1.168.
3. Set up your computer with static IP 192.168.1.x and then type in 192.168.1.168 in your web
browser to access the camera.
AVer PTZ Management
When your camera is all setup on the network, you can download our free camera control and
management software AVer PTZ Management. This software enables complete control of its
devices on Windows PCs and laptops. And it offers convenient and simultaneous control of up to
128 cameras.
AVer PTZ Control Panel
AVer PTZ Control Panel puts you in charge of camera controls in an easy user interface within your
internal network. It gives you access to live video and audio streams from AVer Pro AV and DL
Series cameras on an iPad or iPhone, and it allows you to control the camera’s capture and PTZ
functions. You can even enable or disable tracking features like Presenter, Zone, or Hybrid mode,
store and call up to 256 presets. With the AVer PTZ Control Panel, there’s no need for complicated
controllers, heavy software applications, or professional AV operators to run your AVer PTZ
cameras.
AVer OBS Plugin for PTZ Cameras
AVer OBS Plugin for PTZ Cameras is free software that you can set up dockable camera controls
inside your OBS interface for AVer Pro AV and DL Series cameras. This application includes
camera controls for pan, tilt, zoom, and presets of your camera; it also makes your live streams
smarter by triggering different tracking features includes Presenter, Zone, and Hybrid mode.

English-7
WARNING:
This is a class A product. In a domestic environment this product may cause radio interference
in which case the user may be required to take adequate measures.
CAUTION:
Risk of explosion if battery is replaced by an incorrect type.
Dispose of used batteries in a safe and proper manner.
COPYRIGHT
© 2021 AVer Information Inc. All rights reserved.
MORE HELP
For FAQs, technical support, software and user manual download, please visit:
Headquarters
Download Center: https://www.aver.com/download-center
Technical Support: https://www.aver.com/technical-support
Europe Branch Office
Download Center: https://www.avereurope.com/download-center
Technical Support: https://www.avereurope.com/technical-support
Contact Information
Headquarters
AVer Information Inc.
https://www.aver.com
8F, No.157, Da-An Rd., Tucheng Dist., New Taipei City 23673, Taiwan
Tel: +886 (2) 2269 8535
Europe Branch Office
AVer Information Europe B.V.
https://www.avereurope.com
Westblaak 134, 3012 KM, Rotterdam, The Netherlands
Tel: +31 (0) 10 7600 550
Technical support: eu.rma@aver.com
Japan Branch Office
アバー・インフォメーション株式会社
https://jp.aver.com
〒160-0023 日本東京都新宿区西新宿 3-2-26 立花新宿ビル 7 階
Tel: +81 (0) 3 5989 0290
テクニカル・サポート: Support.EDU.J[email protected]
Vietnam Branch Office
Công ty TNHH AVer Information (Việt Nam)
Tầng 5, 596 Nguyễn Đình Chiểu, P.3, Quận 3, Thành phố Hồ Chí Minh 700000, Việt Nam
Tel: +84 (0) 28 22 539 211

繁體中文-8
包裝內容物
攝影機 變壓器 (1.2 公尺/3.93 呎)
電源線 (1.83 公尺/6 呎) 電線固定板 電線束線帶 (x3)
M2 x 4mm 螺絲
(x2) 快速使用指南 遙控器 USB 連接線
(1.5 公尺/4.92 呎)
1/4”-20,
L=7.5mm 螺絲 使用手冊* 保固卡*
*只有日本使用。
攝影機安裝建議(選購配件)
如需購買選購配件,請洽詢您所在區域的代理商。
壁掛支架(料號: 60S5000000AB) 吸頂支架(料號: 60S5000000AC)

繁體中文-9
尺寸
電線固定板安裝
1. 將電線固定板用兩顆配件包內的 M2 x 4 mm 螺絲鎖緊在攝影機上。.
2. 連接連接線。
3. 使用三條束線固定帶固定連接線和電線固定板。

繁體中文-10
設備連接
網路
麥克風
RJ-45網路線
USB 連接線
電源插座
電源變壓器
電源線
音源線
桌上型電腦
或
筆記型電腦

繁體中文-11
遙控器
遙控器需安裝兩顆 AAA 電池,使用前先確認電池已妥善安裝。
按鈕名稱 功能
(1) 電源
開機/待機/隱私模式:
按一次開啟隱私模式。再按一次關閉隱私
模式。
長按 3秒開啟待機模式。再短按一次關閉
待機模式。
(2) 遙控器 LED 按其他鍵時會亮燈。
(3) 選單 開啟/退出 OSD 選單。
[註] DL10 不支援 OSD 選單。
(4) 對換 追蹤切換。
(5) 自動追蹤啟動 啟動自動追蹤。
(6) 自動追蹤關閉 關閉自動追蹤。
(7) 數字鍵 調整攝影機的預設點位置 0~9。
(8) 預設點
如欲儲存預設點:
先按「Preset」,接著按數字鍵 0~9
當只按「Preset」鍵時,遙控器與攝影機的
LED
指示燈不會亮
(9) 重設
如欲取消之前設定過的預設點:
先按「Reset」,接著按數字鍵 0~9
當只按「Reset」鍵時,遙控器與攝影機的 LED 指示燈不會亮
(10) 攝影機方向控制 調整鏡頭左右/上下
。遙控器的調整速度為固定的。如需調整速度可利用網
頁瀏覽器。設定細節可參考使用手冊。
(11) 確認 按下該按鈕,攝影機將返回 Home 位置。
(12) 縮小/放大 調整影像大小
。遙控器的調整速度為固定的。如需調整速度可利用網頁瀏
覽器。設定細節可參考使用手冊。
(13) 曝光補償
調整曝光補償的設定。
*按住 EV+鍵3秒鐘,以開啟 RTMP.
*按住 EV-鍵3秒鐘,以關閉 RTMP.
(14) 半身 螢幕上講者顯示為半身。
(15) 全身 螢幕上講者顯示為全身。
半身追蹤範圍是從膝蓋到頭部,全身追蹤則是全身入鏡。
(16) 區域 區域追蹤模式

繁體中文-12
(17) 攝影機選擇 選擇欲操作的攝影機 : 1~4 號。LED 燈就會亮起。若僅有一台 AVer 攝
影機,預設即攝影機 1 號。
LED 指示燈
顯示 狀態
藍光 (每2秒閃爍一次) 自動追蹤啟動
藍光 (恆亮) 正常操作且自動追蹤關閉
橘光 (閃爍) 攝影機初始化
橘光 (恆亮) 待機中
紅光 (閃爍) 韌體更新
紫光 (閃爍 3次) 開啟或關閉 RTMP
綠光 (閃爍) 手勢控制識別成功
CaptureShare
CaptureShare 軟體通過 USB 連接線,可設定攝影機、現場錄影、線上直播、影像擷取,及使用註
記功能。此功能強大應用程式可幫助老師將 AVer 攝影機變成更加有效的遠距學習協作工具。
[註]如果老師需要將 DL 追蹤攝影機作為網路攝影機或用於教學,可使用提供的 USB 連接線將攝影機
連接到電腦,打開視訊協作應用程式(例如 Zoom、Skype 或Microsoft®Teams),然後選擇 DL
追蹤攝影機作為視訊來源即可使用。
IP 位址設定
DL 系列攝影機出廠設定為動態 IP。
若您的網路配置為動態 IP
1. 攝影機接上網路,等待攝影機取得 IP。
2. 從你的伺服器控制站台,可找到剛剛新增的攝影機 IP。
3. 若有需要,請自行修改您要的 IP。
若您的網路配置為靜態 IP
1. 使用遙控器按下數字鍵 8八次,攝影機會切回靜態 IP 模式。
2. 攝影機出廠設定 IP 為192.168.1.168。
3. 設定攝影機靜態 IP 為192.168.1.x,接著在瀏覽器輸入 192.168.1.168 連線攝影機。
AVer PTZ Management
當攝影機在網路上完成所有設定後,您可以下載我們免費的攝影機控制和管理軟體 AVer PTZ
Management。此軟體可運行於 Windows PC 和筆記型電腦上控制攝影機,提供方便且同時控制多
達128 個攝影機的功能。

繁體中文-13
AVer PTZ Control Panel
透過 AVer PTZ Control Panel 簡單直覺的使用者介面,您可在 iPad 或iPhone 上控制內網攝影機功
能,享受 Pro AV 及DL 系列攝影機的即時影音串流、拍攝快照、操作 PTZ。您可開啟或關閉自動追
蹤,自由切換講者、區域或複合追蹤模式;您亦可儲存及呼叫多達 256 個預設點。AVer PTZ Control
Panel 讓您擺脫傳統複雜的控制器與應用軟體,更不用聘請額外的操作人員。
AVer OBS Plugin for PTZ Cameras
透過免費軟體 AVer OBS Plugin for PTZ Cameras,您可在 OBS 使用者介面上,串接 Pro AV 及DL
系列攝影機,進行 PTZ 與預設點控制。您亦可開啟自動追蹤,自由切換講者、區域或複合追蹤模式,
為OBS 玩家提供影像新玩法。
遙控器電池安全資訊
- 請將電池存放在涼爽與乾燥的位置。
- 不要將電量用盡的電池棄置在家庭廢棄物中。請將電池棄置在特定回收處,或送回原購買的商店。
- 如果長時間不使用電池,請將其取出。電池漏液與腐蝕可能會損壞遙控器,請以安全方式棄置電
池。
- 不可混用新舊電池。
- 不可混用不同類型的電池:鹼性、標準(碳鋅)或可充電(鎳鎘)電池。
- 不可將電池棄置於火源中。
- 請勿嘗試讓電池端子短路。
資訊
軟體和使用者手冊下載,請到下面網址:
https://www.aver.com/download-center
常見問題、技術支援,請到下面網址:
https://www.aver.com/technical-support
連絡資訊
圓展科技股份有限公司
https://www.aver.com
新北市 236 土城區大安路 157 號8樓
電話:(02) 2269-8535
警告使用者
這是甲類的資訊產品,在居住的環境中使用時,可能會造成射頻干擾,
在這種情況下,使用者會被要求採取某些適當的對策。
版權聲明
© 2021 AVer Information Inc. 保留所有權利

繁體中文-14
單元Unit
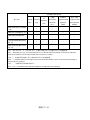
限用物質及其化學符號
鉛Lead
(Pb)
汞Mercury
(Hg)
鎘
Cadmium
(Cd)
六價鉻
Hexavalent
chromium
(Cr
+6
)
多溴聯苯
Polybrominated
biphenyls
(PBB)
多溴二苯醚
Polybrominated
diphenyl ethers
(PBDE)
電路板及零組件(電子料或電機
料…等) - ○ ○ ○ ○ ○
塑膠組件
(
外殼或導電泡棉
…
等
)
○
○
○
○
○
○
金屬組件(鐵殼或鐵條或螺柱…
等) - ○ ○ ○ ○ ○
配件(電源供應器或遙控器或電
纜線
…
等
)
- ○ ○ ○ ○ ○
紙製品及包裝件(紙盒或手冊或
泡殼…等) ○ ○ ○ ○ ○ ○
備考 1.〝超出 0.1 wt %〞及〝超出 0.01 wt %〞係指限用物質之百分比含量超出百分比含量基準值。
Note 1:“Exceeding 0.1 wt %” and “exceeding 0.01 wt %” indicate that the percentage content of the restricted
substance exceeds the reference percentage value of presence condition.
備考 2.〝○〞係指該項限用物質之百分比含量未超出百分比含量基準值。
Note 2:“○” indicates that the percentage content of the restricted substance does not exceed the percentage of
reference value of presence.
備考 3.〝-〞係指該項限用物質為排除項目。
Note 3
:
The “−” indicates that the restricted substance corresponds to the exemption.

日本語-15
パッケージ同梱物
カメラ本体
電源アダプタ (1.2m)
電源ケーブル (1.83m)
ケーブル
固定プレート
ケーブル固定タイ (x4)
M2 x 4mm ネジ (x2)
クイックガイド
操作リモコン
USB ケーブル
(長さ:1.5m)
1/4”-20, L=7.5mm ネ
ジ
ユーザーマニュアル*
製品保証書*
*日本のみ同梱
カメラ取付時に使用するカメラマウント(オプション品)
本オプション品のご購入については、弊社販売代理店までお問合せください。
壁設置用マウント(型番 60S5000000AB)
天吊用マウント(型番 60S5000000AC)

日本語-16
製品寸法
ケーブル固定プレートの取付
1. 製品付属の M2x4mm ねじ 2個を使用し、ケーブル固定プレートをカメラに固定します。
2. 各ケーブルをカメラに接続します。
3. パッケージ同梱の 3本のケーブルタイを使用しケー
ブルとケーブル固定プレートを固定します。

日本語-17
機器との接続
ネットワーク
マイク
LANケーブル RJ45
USBケーブル
電源コンセント
電源アダプタ
電源ケーブル
音声ケーブル
デスクトップPC
or
ノートパソコン

日本語-18
操作リモコン
リモコンには単4電池が 2本必要です。
リモコン初回利用時、電池が正しく取り付けられていることを確認してください。
名称
機能
(1) Power
電源オン/スタンバイ/プライバシー:
機器が電源オンの状態で短く押すとプラ
イバシーモードになります。もう一度短く
押すとプライバシーモードが解除されま
す。
3秒間長押しでスタンバイモードに入りま
す。短く押すと、スタンバイモードが解除
されます。
(2) Remote Control LED ボタン操作時この LED が発光します。
(3) Menu
OSD メニューを表示または非表示にします。
[注]
DL10 はOSD 表示非対応
(4) Switch
プレゼンターを別のプレゼンターに切り替えます。
(5) Auto Tracking On 自動追尾をオンにします。
(6) Auto Tracking Off 自動追尾をオフにします。
(7) Number buttons プリセット位置 0〜9の設定に使用します。
(8) Preset
「プリセット位置を設定するには:「プリセット」を
押して「数字ボタン(0〜9)」を押します。
プリセットボタンだけを押すと、リモコンの LED
とカメラボタンの LED が点灯しません。
(9) Reset
「事前設定されたプリセット位置をキャンセルするには:「リセット」を押して「数
字ボタン(0〜9)」を押します。
リセットボタンを単独で押すと、リモコンの LED とカメラボタンの LED が点灯
しません。
(10)
▲,▼,◄, & ►
カメラのパン・チルト操作を行います。
リモコン操作によるパン・チルトの速度は固定です。
パン・チルトの速度は Web 管理画面から変更できます。
設定方法の詳細については、ユーザーマニュアルを参照してください。
(11) Enter Enter ボタンを押すと、カメラ位置はホームポジションに戻ります。
(12) Zoom In/Out ズームイン・アウトを行います。リモコン操作によるズームイン・アウトの速度
は固定です。ズームイン・アウトの速度は Web 管理画面から変更できます。
設定方法の詳細については、ユーザーマニュアルを参照してください。
(13) EV +/- EV(露出)レベルを調整します。
*EV+ ボタン 3秒長押し→RTMP 開始
*EV- ボタン 3秒長押し→RTMP 終了
(14) Upper Body プレゼンターの撮影範囲を上半身のみに指定します。
(15) Full Body プレゼンターの撮影範囲を全身に指定します。
La pagina si sta caricando...
La pagina si sta caricando...
La pagina si sta caricando...
La pagina si sta caricando...
La pagina si sta caricando...
La pagina si sta caricando...
La pagina si sta caricando...
La pagina si sta caricando...
La pagina si sta caricando...
La pagina si sta caricando...
La pagina si sta caricando...
La pagina si sta caricando...
La pagina si sta caricando...
La pagina si sta caricando...
La pagina si sta caricando...
La pagina si sta caricando...
La pagina si sta caricando...
La pagina si sta caricando...
La pagina si sta caricando...
La pagina si sta caricando...
La pagina si sta caricando...
La pagina si sta caricando...
La pagina si sta caricando...
La pagina si sta caricando...
La pagina si sta caricando...
La pagina si sta caricando...
La pagina si sta caricando...
La pagina si sta caricando...
La pagina si sta caricando...
La pagina si sta caricando...
La pagina si sta caricando...
La pagina si sta caricando...
La pagina si sta caricando...
La pagina si sta caricando...
La pagina si sta caricando...
La pagina si sta caricando...
La pagina si sta caricando...
La pagina si sta caricando...
La pagina si sta caricando...
-
 1
1
-
 2
2
-
 3
3
-
 4
4
-
 5
5
-
 6
6
-
 7
7
-
 8
8
-
 9
9
-
 10
10
-
 11
11
-
 12
12
-
 13
13
-
 14
14
-
 15
15
-
 16
16
-
 17
17
-
 18
18
-
 19
19
-
 20
20
-
 21
21
-
 22
22
-
 23
23
-
 24
24
-
 25
25
-
 26
26
-
 27
27
-
 28
28
-
 29
29
-
 30
30
-
 31
31
-
 32
32
-
 33
33
-
 34
34
-
 35
35
-
 36
36
-
 37
37
-
 38
38
-
 39
39
-
 40
40
-
 41
41
-
 42
42
-
 43
43
-
 44
44
-
 45
45
-
 46
46
-
 47
47
-
 48
48
-
 49
49
-
 50
50
-
 51
51
-
 52
52
-
 53
53
-
 54
54
-
 55
55
-
 56
56
-
 57
57
-
 58
58
-
 59
59


in altre lingue
- français: AVer DL10 Mode d'emploi
- español: AVer DL10 Guía del usuario
- Deutsch: AVer DL10 Benutzerhandbuch
- 日本語: AVer DL10 ユーザーガイド
Altri documenti
-
Comelit IPPTZ130IRA Manuale utente
-
Trendnet TV-IP460PI Guida utente
-
-
Trendnet TV-IP440PI Guida utente
-
urmet H.265 Series IP Camera Guida utente
-
 Ctronics 680C 2K 4MP Light Bulb Security Camera Manuale utente
-
Vitek VT-PTZ40WH Manuale utente
-
Trendnet TV-IP420P Guida utente
-
