
SUP PUMP / SUP-PUMPE / POMPE POUR SUP
CSP 12 A1
POMPE POUR SUP
Traduction des instructions d’origine
SUP-PUMPE
Originalbetriebsanleitung
SUP PUMP
Translation of the original instructions
PUMPA NA SUP PADDLEBOARD
Překlad originálního provozního návodu
SUP-POMP
Vertaling van de originele gebruiksaanwijzing
SUP PUMPA
Preklad originálneho návodu na obsluhu
POMPKA DO DESKI SUP
Tłumaczenie oryginalnej instrukcji obsługi
INFLADOR SUP
Traducción del manual de instrucciones original
PUMPE TIL SUP-BOARD
Oversættelse af den originale driftsvejledning
POMPA SUP
Traduzione delle istruzioni d’uso originali
SUP PUMPA
Az originál használati utasítás fordítása TLAČILKA ZA SUP
Prevod originalnega navodila za uporabo
ПОМПА ЗА SUP БОРД
Превод на оригиналното ръководство за експлоатация
POMPĂ SUP
Traducerea instrucţiunilor de utilizare original
ΤΡΟΜΠΑ ΦΟΥΣΚΩΤΗΣ
ΣΑΝΙΔΑΣ SUP
Μετάφραση των αυθεντικών οδηγιών λειτουργίας
SUP PUMPA
Prijevod originalnih uputa za uporabu
IAN 406450_2207

GB / IE Translation of the original instructions Page 1
DE / AT / CH Originalbetriebsanleitung Seite 11
FR / BE Traduction des instructions d’origine Page 23
NL / BE Vertaling van de originele gebruiksaanwijzing Pagina 37
CZ Překlad originálního provozního návodu Strana 49
PL Tłumaczenie oryginalnej instrukcji obsługi Strona 61
SK Preklad originálneho návodu na obsluhu Strana 73
ES Traducción del manual de instrucciones original Página 85
DK Oversættelse af den originale driftsvejledning Side 97
IT Traduzione delle istruzioni d’uso originali Pagina 107
HU Az originál használati utasítás fordítása Oldal 119
SI Prevod originalnega navodila za uporabo Stran 131
HR Prijevod originalnih uputa za uporabu Stranica 141
RO Traducerea instrucţiunilor de utilizare original Pagina 151
BG Превод на оригиналното ръководство за експлоатация Cтраница 163
GR Μετάφραση των αυθεντικών οδηγιών λειτουργίας Σελίδα 175


CSP 12 A1 GB│IE │ 1 ■
Contents
Introduction ............................................................2
Intended use ........................................................................2
Features ...........................................................................2
Package contents ....................................................................2
Technical specifications ...............................................................2
General Power Tool Safety Warnings ......................................3
1. Work area safety ..................................................................3
2. Electrical safety ...................................................................3
3. Personal safety ....................................................................4
4. Power tool use and care ............................................................4
5. Service ..........................................................................5
Appliance-specific safety instructions .....................................................5
Before use .............................................................5
Operation ............................................................. 5
Display ............................................................................5
Setting the pressure ..................................................................6
Switching on and off .................................................................6
Setting up .............................................................6
Inflating/deflating ...................................................................6
Attachments ........................................................................6
Changing the fuse ...................................................................6
Maintenance and cleaning ................................................7
Troubleshooting ........................................................7
Storage ...............................................................7
Disposal ............................................................... 7
Kompernass Handels GmbH warranty .....................................8
Service ................................................................ 9
Importer ..............................................................9
Translation of the original Conformity Declaration ...........................10

CSP 12 A1
■ 2 │ GB│IE
SUP PUMP CSP 12 A1
Introduction
Congratulations on the purchase of your new
appliance. You have selected a high-quality product.
The operating instructions are part of this product.
They contain important information about safety,
usage and disposal. Before using the product, please
familiarise yourself with all operating and safety
instructions. Use the product only as described and
for the specified range of applications. Please also
pass these operating instructions on to any future
owner.
Intended use
This appliance is designed for inflating SUP boards
in conjunction with the supplied adapter. The appli-
ance is not suitable for the operation of pneumatic
tools. Any other usage or modification of the appli-
ance is deemed to be improper and carries a
significant risk of accidents. The manufacturer
accepts no responsibility for damage resulting from
improper use. The appliance is not intended for
commercial use.
NOTE
► Store these operating instructions in the imme-
diate vicinity of the appliance and make them
available to all operators.
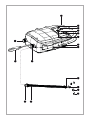
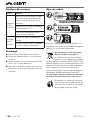
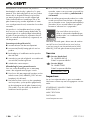
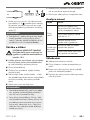
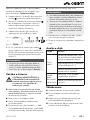
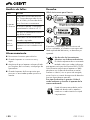
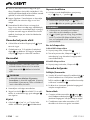
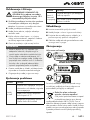
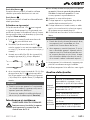
Features
Carrying handle
Selection button
"−" button
"+" button
ON/OFF switch
Display
4x feet on the underside of the appliance
Elastic band
Deflation connection
12 V Vehicle connector plug
Inflation connection
Adapter connection for the hose
High-pressure attachment
Mini-Boston valve adapter
Boston valve adapter
Hose
Lock connection for the hose
Package contents
1 SUP pump (incl. 12 V vehicle connector plug
and connection hose)
1 Boston valve adapter
1 mini-Boston valve adapter
1 high-pressure attachment (middle silicone seal
pre-assembled, small and large seals also
included)
1 set of operating instructions
Technical specifications
Nominal voltage 12 V , 110 W (DC)
Rated Speed 3500 rpm
Operating pressure Max. 1.38 bar (20 PSI)
Air flow rate (pump) approx. 350 l/min
Operating mode S2: Short-term operation
with constant load, for a
duration of 10 minutes.
Weight 1.68 kg
Vehicle connector plug
Fuse 15 A

CSP 12 A1 GB│IE │ 3 ■
Noise information
Measured value for noise determined accordingly
EN 62841-1 and EN 1012-1.
The A-weighted noise level in the workplace is
typically:
Sound pressure level
(at the operator station) LpA = 84.4 dB (A)
Uncertainty K = 3 dB (A)
According to 2000/14/EC and 2005/88/EC:
Sound power level measured LWA = 86.2 dB (A)
Uncertainty K = 2.02 dB (A)
Sound power level guaranteed LWA = 88 dB (A)
Wear ear muffs!
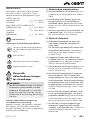
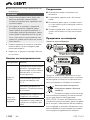
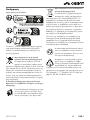
Explanation of the symbols on the appliance
Read the original operating instructions
and safety instructions before initial
operation!
Wear ear muffs!
Danger from hot surfaces!
Do not expose to the rain!
General Power Tool
Safety Warnings
WARNING!
►Read all safety warnings, instructions,
illustrations and specifications provided
with this power tool. Failure to follow all
instructions listed below may result in electric
shock, fire and/or serious injury.
Save all warnings and instructions for future
reference.
The term „power tool“ in the warnings refers to
your mains-operated (corded) power tool or battery-
operated (cordless) power tool.
1. Work area safety
a) Keep work area clean and well lit. Cluttered
or dark areas invite accidents.
b) Do not operate power tools in explosive
atmospheres, such as in the presence of
flammable liquids, gases or dust. Power tools
create sparks which may ignite the dust or
fumes.
c) Keep children and bystanders away while
operating a power tool. Distractions can cause
you to lose control.
2. Electrical safety
a) Power tool plugs must match the outlet. Never
modify the plug in any way. Do not use any
adapter plugs with earthed (grounded)
power tools. Unmodified plugs and matching
outlets will reduce risk of electric shock.
b) Avoid body contact with earthed or grounded
surfaces, such as pipes, radiators, ranges and
refrigerators. There is an increased risk of elec-
tric shock if your body is earthed or grounded.
c) Do not expose power tools to rain or wet
conditions. Water entering a power tool will
increase the risk of electric shock.
d) Do not abuse the cord. Never use the cord
for carrying, pulling or unplugging the power
tool. Keep cord away from heat, oil, sharp
edges or moving parts. Damaged or entangled
cords increase the risk of electric shock.
e) When operating a power tool outdoors, use
an extension cord suitable for outdoor use.
Use of a cord suitable for outdoor use reduces
the risk of electric shock.
f) If operating a power tool in a damp location
is unavoidable, use a residual current device
(RCD) protected supply. Use of an RCD
reduces the risk of electric shock.

CSP 12 A1
■ 4 │ GB│IE
3. Personal safety
a) Stay alert, watch what you are doing and use
common sense when operating a power tool.
Do not use a power tool while you are tired
or under the influence of drugs, alcohol or
medication. A moment of inattention while
operating power tools may result in serious
personal injury.
b) Use personal protective equipment. Always
wear eye protection.
Protective equipment such
as a dust mask, non-slip safety shoes, hard hat or
hearing protection used for appropriate condi-
tions will reduce personal injuries.
c) Prevent unintentional starting. Ensure the
switch is in the off-position before connecting
to power source and/or battery pack, picking
up or carrying the tool. Carrying power tools
with your finger on the switch or energising
power tools that have the switch on invites
accidents.
d) Remove any adjusting key or wrench before
turning the power tool on. A wrench or a key
left attached to a rotating part of the power tool
may result in personal injury.
e) Do not overreach. Keep proper footing and
balance at all times. This enables better control
of the power tool in unexpected situations.
f) Dress properly. Do not wear loose clothing or
jewellery. Keep your hair and clothing away
from moving parts. Loose clothes, jewellery or
long hair can be caught in moving parts.
g) If devices are provided for the connection of
dust extraction and collection facilities, ensure
these are connected and properly used. Use
of dust collection can reduce dust-related haz-
ards.
h) Do not let familiarity gained from frequent
use of tools allow you to become complacent
and ignore tool safety principles. A careless
action can cause severe injury within a fraction
of a second.
4. Power tool use and care
a) Do not force the power tool. Use the correct
power tool for your application. The correct
power tool will do the job better and safer at
the rate for which it was designed.
b) Do not use the power tool if the switch does
not turn it on and off. Any power tool that
cannot be controlled with the switch is dangerous
and must be repaired.
c) Disconnect the plug from the power source
and/or remove the battery pack, if detacha-
ble, from the power tool before making any
adjustments, changing accessories, or storing
power tools. Such preventive safety measures
reduce the risk of starting the power tool acci-
dentally.
d) Store idle power tools out of the reach of
children and do not allow persons unfamiliar
with the power tool or these instructions to
operate the power tool. Power tools are dan-
gerous in the hands of untrained users.
e) Maintain power tools and accessories. Check
for misalignment or binding of moving parts,
breakage of parts and any other condition
that may affect the power tool’s operation.
If damaged, have the power tool repaired
before use. Many accidents are caused by
poorly maintained power tools.
f) Keep cutting tools sharp and clean. Properly
maintained cutting tools with sharp cutting
edges are less likely to bind and are easier to
control.
g) Use the power tool, accessories and tool bits
etc. in accordance with these instructions,
taking into account the working conditions
and the work to be performed. Use of the
power tool for operations different from those
intended could result in a hazardous situation.
h) Keep handles and grasping surfaces dry,
clean and free from oil and grease. Slippery
handles and grasping surfaces do not allow for
safe handling and control of the tool in unex-
pected situations.

CSP 12 A1 GB│IE │ 5 ■
5. Service
a) Have your power tool serviced by a qualified
repair person using only identical replace-
ment parts. This will ensure that the safety of
the power tool is maintained.
b) Always arrange for the replacement of the
plug or the power cord to be carried out by
the manufacturer of the tool or its customer
service department. This will ensure that the
safety of the power tool is maintained.
Appliance-specific safety instructions
■ This appliance may not be used by children
or people with reduced physical, sensory or
mental capabilities or a lack of experience and
knowledge. Do not allow children to use the
appliance as a toy. Cleaning and user mainte-
nance tasks may not be carried out by children.
■ Children should be kept away from this appli-
ance.
■ Avoid using the appliance at temperatures
below 5°C.
■ Do not expose the appliance to rain and do not
submerse it in water.
■ Never leave the appliance unsupervised while it
is in use.
■ Caution! Operate the compressor for short
periods only. The appliance may overheat if
operated for longer than 10 minutes. Switch the
appliance off immediately and allow it to cool
down for at least 10 min.
■ Risk of injury! Do not pump any objects up to
more than the intended pressure. They could
burst and cause injuries and/or material
damage.
■ Never use the appliance for purposes other
than those for which it was designed.
■ Do not use this product if the hose is damaged.
Replace a damaged hose immediately.
■ Do not pull out the hose while inflating as the
high pressure can cause injuries.
■ To avoid risks, do not direct the inflation inlet
towards your body.
■ The appliance must always be kept clean,
dry and free from oil or grease.
■ Never use petrol or other flammable liquids to
clean the appliance! Vapours remaining in the
appliance can be ignited by sparks and cause
the appliance to explode.
■ Remain alert at all times! Do not use the appli-
ance if you are distracted or feeling unwell.
■ Before use, check the cigarette lighter to make
sure there is no rust or residue in it. If the cigarette
lighter socket has poor electrical conductivity,
this may cause the product or the power source
to overheat, resulting in damage to the product.
Before use
♦ Pick up and carry the appliance using the
carrying handle .
♦ Plug the 12 V vehicle connector plug into a
suitable socket in your vehicle. The display
lights up and the appliance is ready for use.
Operation
NOTE
► The appliance vibrates during operation.
Therefore, always put it down during opera-
tion. There are four feet on the bottom of
the appliance for this purpose.
ATTENTION!
►This appliance is not designed for continuous
operation. The appliance may be used for a
maximum of 10 minutes continuous operation.
Allow the appliance to cool down completely
and then try using it again.
♦ Select the accessories you need.
♦ Remove the hose from the appliance. This
is secured for transport and storage with the
elastic band .
Display
♦ You can switch between "bar" and "psi" on the
display by pressing the selection button .

CSP 12 A1
■ 6 │ GB│IE
Setting the pressure
♦ Press the "+" button or the "-" button to
set the desired pressure.
TIP
► If you press and hold down the "+" button
or the "-" button , the pressure setting
changes quickly.
NOTE
► The compressor switches off automatically
when the preset pressure has been reached.
► The display flashes quickly to remind you
to switch off the appliance, otherwise it will
be switched off by the overheating protection.
Switching on and off
Switching on the appliance
♦ Press the ON/OFF switch .
♦ Press and hold the ON/OFF switch for about
3 seconds to switch directly to high-pressure
mode.
Switching off the appliance
♦ Press the ON/OFF switch again.
Setting up
Inflating/deflating
♦ Fit the locking connection of the hose onto
the desired adapter. To inflate, use the inflation
connection . To deflate, use the deflation
connection .
♦ Turn it clockwise until it is fixed firmly in place.
Attachments
♦ Screw the adapter onto the adapter
connection of the hose anticlockwise until it
is fixed firmly in place.
♦ Screw the adapter or onto the adapter
connection of the hose clockwise until it is
fixed firmly in place.
♦ Push the desired adapter into your SUP board
and follow the manufacturer's instructions.
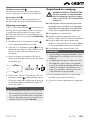
High-pressure attachment
The high-pressure attachment makes it easier to
fill SUP boards.
The middle seal, which is preassembled on the
adapter, is used as standard.
If air leaks occur during operation, please use the
thickest gasket. If you cannot insert the attachment
into the object, please use the thinnest seal.
Mini-Boston valve adapter
The mini-Boston valve adapter can be used to
inflate small inflatable mattresses.
Boston valve adapter
The Boston valve adapter can be used to inflate
various inflatable mattresses.
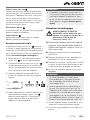
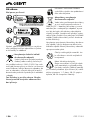
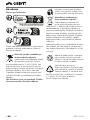
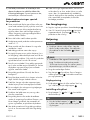
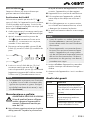
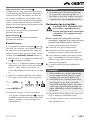
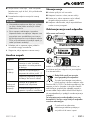
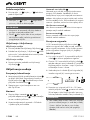
Changing the fuse
The 12 V vehicle connector plug contains a
fuse. If the appliance is not working, the fuse may
be defective. Exchange the defective fuse for a
replacement fuse of the same type (see also sec-
tion Technical data).
♦ To do this, pull the 12 V vehicle connector
plug out of the cigarette lighter socket.
♦ Open the 12 V vehicle connector plug by
carefully unscrewing the grooved screw insert
(C) anticlockwise (using pliers if necessary) and
removing it.
♦ Now, remove the plug tip (B) from the fuse (A),
remove the fuse (A) and place it to one side.
♦ Now insert a new 15 A fuse into the 12 V
vehicle connector plug , place the plug tip
(B) onto the slightly protruding end of the fuse
and screw the previously removed screw insert
(C) back in.
NOTE
► If the appliance still does not work or the fuse
blows again immediately, the appliance is
defective. Please contact the Service Hotline
(see section Service).

CSP 12 A1 GB│IE │ 7 ■
Maintenance and cleaning
WARNING! RISK OF INJURY! Switch
the appliance off and unplug the
12 V vehicle connector plug before
starting any work on the appliance.
■Do not use any sharp objects to clean the
appliance. Do not allow any liquids to get
into the appliance. Otherwise, the appliance
could be damaged.
■ The appliance is maintenance-free.
■ Clean the appliance regularly, preferably imme-
diately after use.
■ Clean the housing with a dry cloth – do not use
petrol, solvents or cleaners that can attack the
plastic.
■ Never obstruct the ventilation openings.
NOTE
► You can order replacement parts that are not
listed (such as adapter nozzles, switches)
via our Service Hotline.
► This appliance is maintenance free. Never
open the appliance. The appliance may only
be repaired by an authorised service centre
or Customer Service. If one of the faults listed
below occurs, note the following:
♦ Allow the appliance to cool down and wait a
short while for the residual energy to neutralise.
♦ Ensure that the appliance is in good working
condition.
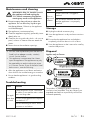
Troubleshooting
Fault Solution
The appli-
ance does
not work
Check the power source. Check that
all cables, fuses and the mains socket
are in working order.
Do not use the appliance at tempera-
tures below 5°C.
Avoid overheating the motor. Allow
the motor to cool down.
Fault Solution
Slow or
abnormal
inflation
Check if the hose is clogged or
cracked.
The connection between the hose
and the appliance is not properly
installed.
Storage
■ Unplug the vehicle connector plug.
■ Store the appliance in a dry and secure environ-
ment.
■ Ensure that the appliance has cooled down
completely, otherwise there is a risk of burns.
■ Store the appliance so that it cannot be used by
unauthorised persons.
Disposal
Applies only to France
The product, its packaging and the operating
instructions are recyclable. They are subject to an
extended manufacturer responsibility and will be
collected separately.

CSP 12 A1
■ 8 │ GB│IE
Do not dispose of power tools
in your normal domestic waste!
The adjacent symbol of a crossed-out
dustbin means that this appliance is
subject to Directive 2012/19/EU. This directive
states that this appliance may not be disposed of in
the normal household waste at the end of its useful
life, but must be taken to specially set-up collection
locations, recycling depots or disposal companies.
The disposal is free of charge for the user.
Protect the environment and dispose of this
appliance properly.
Your local community or municipal
authorities can provide information on
how to dispose of the worn-out product.
Do not dispose of batteries in
your normal household waste!
Defective or worn-out rechargeable
batteries must be recycled according to
Directive 2006/66/EC. Batteries/rechargeable
batteries must be treated as hazardous waste and
must therefore be disposed of in an environmentally
sound manner by appropriate bodies (dealers,
specialist dealers, public municipal bodies, com-
mercial disposal companies). Batteries/recharge-
able batteries may contain toxic heavy metals.
For this reason, do not dispose of batteries/
rechargeable batteries in domestic waste. Take
them to a specialist collection point. Only return
batteries that are fully discharged.
The packaging is made from environ-
mentally friendly material and can be
disposed of at your local recycling plant.
Dispose of the packaging in an
environmentally friendly manner.
Note the labelling on the packaging
and separate the packaging material
components for disposal if necessary. The packag-
ing material is labelled with abbreviations (a) and
numbers (b) with the following meanings:
1–7: plastics, 20–22: paper and cardboard,
80–98: composites.
Kompernass Handels GmbH
warranty
Dear Customer,
This appliance has a 3-year warranty valid from
the date of purchase. If this product has any faults,
you, the buyer, have certain statutory rights. Your
statutory rights are not restricted in any way by the
warranty described below.
Warranty conditions
The warranty period starts on the date of purchase.
Please keep your receipt in a safe place. This will
be required as proof of purchase.
If any material or manufacturing fault occurs within
three years of the date of purchase of the product,
we will either repair or replace the product for you
or refund the purchase price (at our discretion).
This warranty service requires that you present the
defective appliance and the proof of purchase
(receipt) within the three-year warranty period,
along with a brief written description of the fault
and of when it occurred.
If the defect is covered by the warranty, your
product will either be repaired or replaced by us.
The repair or replacement of a product does not
signify the beginning of a new warranty period.
X 12 V and X 20 V Team Series battery packs
come with a 3-year warranty valid from the date
of purchase.
Warranty period and statutory claims
for defects
The warranty period is not prolonged by repairs
effected under the warranty. This also applies to
replaced and repaired components. Any damage
and defects present at the time of purchase must
be reported immediately after unpacking. Repairs
carried out after expiry of the warranty period shall
be subject to a fee.

CSP 12 A1 GB│IE │ 9 ■
Scope of the warranty
This appliance has been manufactured in accord-
ance with strict quality guidelines and inspected
meticulously prior to delivery.
The warranty covers material faults or production
faults. The warranty does not extend to product
parts subject to normal wear and tear or to fragile
parts which could be considered as consumable
parts such as switches or parts made of glass.
The warranty does not apply if the product has
been damaged, improperly used or improperly
maintained. The directions in the operating instruc-
tions for the product regarding proper use of the
product are to be strictly followed. Uses and
actions that are discouraged in the operating
instructions or which are warned against must be
avoided.
This product is intended solely for private use and
not for commercial purposes. The warranty shall
be deemed void in cases of misuse or improper
handling, use of force and modifications / repairs
which have not been carried out by one of our
authorised Service centres.
The warranty period does not apply to
■ Normal reduction of the battery capacity
over time
■ Commercial use of the product
■ Damage to or alteration of the product by the
customer
■ Non-compliance with safety and maintenance
instructions, operating errors
■ Damage caused by natural hazards
Warranty claim procedure
To ensure quick processing of your case, please
observe the following instructions:
■ Please have the till receipt and the item number
(IAN) 406450_2207 available as proof of
purchase.
■ You will find the item number on the type plate
on the product, an engraving on the product,
on the front page of the operating instructions
(below left) or on the sticker on the rear or
bottom of the product.
■ If functional or other defects occur, please
contact the service department listed either by
telephone or by e-mail.
■ You can return a defective product to us free of
charge to the service address that will be pro-
vided to you. Ensure that you enclose the proof
of purchase (till receipt) and information about
what the defect is and when it occurred.
You can download these instructions
along with many other manuals,
product videos and installation
software at www.lidl-service.com.
This QR code will take you directly to the Lidl
service page (www.lidl-service.com) where you
can open your operating instructions by entering
the item number (IAN) 406450_2207.
Service
Service Great Britain
Tel.: 0800 404 7657
E-Mail: [email protected]
Service Ireland
Tel.: 1800 101010
E-Mail: [email protected]
IAN 406450_2207
Importer
Please note that the following address is not the
service address. Please use the service address
provided in the operating instructions.
KOMPERNASS HANDELS GMBH
BURGSTRASSE 21
44867 BOCHUM
GERMANY
www.kompernass.com

CSP 12 A1
■ 10 │ GB│IE
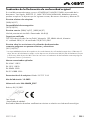
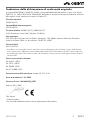
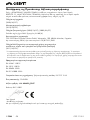
Translation of the original Conformity Declaration
We, KOMPERNASS HANDELS GMBH, document officer: Mr Semi Uguzlu, BURGSTR. 21,
44867 BOCHUM, GERMANY, hereby declare that this product complies with the following standards,
normative documents and EC directives:
Machinery Directive
(2006/42/EC)
EMC (Electromagnetic Compatibility)
(2014/30/EU)
Outdoor directive (2000/14/EC), (2005/88/EC)
Sound power level LWA: Guaranteed: 88 dB (A)
Notified body
TÜV SÜD Industrie Product Service GmbH, Westendstr. 199, 80686 Munich, Germany
Notified no.: 0036, Certificate no.: OR/017831/005
RoHS Directive
(2011/65/EU)*
* The manufacturer bears the full responsibility for compliance with this conformity declaration. The subject of the
declaration described above meets the requirements of Directive 2011/65/EU of the European Parliament and
Council of 8 June 2011 on the limitations of use of certain dangerous substances in electrical and electronic
appliances.
Applied harmonised standards
EN 62841-1:2015
EN 1012-1:2010
EN 50498: 2010
EN IEC 63000: 2018
Type designation of machine: SUP pump CSP 12 A1
Year of manufacture: 10–2022
Serial number: IAN 406450_2207
Bochum, 06/12/2021
Semi Uguzlu
- Quality Manager -
We reserve the right to make technical changes in the context of further product development.

DE│AT│CH │ 11 ■
CSP 12 A1
Inhaltsverzeichnis
Einleitung .............................................................12
Bestimmungsgemäßer Gebrauch .......................................................12
Ausstattung ........................................................................12
Lieferumfang .......................................................................12
Technische Daten ...................................................................12
Allgemeine Sicherheitshinweise für Elektrowerkzeuge .......................13
1. Arbeitsplatzsicherheit ..............................................................13
2. Elektrische Sicherheit ..............................................................13
3. Sicherheit von Personen ............................................................14
4. Verwendung und Behandlung desElektrowerkzeugs .....................................14
5. Service .........................................................................15
Gerätespezifische Sicherheits hinweise ...................................................15
Vor der Inbetriebnahme ................................................16
Bedienung ............................................................16
Display-Anzeige ....................................................................16
Einstellung des Druckes ..............................................................16
Ein- und ausschalten .................................................................16
Inbetriebnahme .......................................................16
Aufpumpen/Entlüften ................................................................16
Aufsätze ..........................................................................16
Sicherungswechsel ..................................................................17
Wartung und Reinigung .................................................17
Fehleranalyse .........................................................18
Lagerung .............................................................18
Entsorgung ...........................................................18
Garantie der Kompernaß Handels GmbH ..................................20
Service ............................................................... 21
Importeur ............................................................21

■ 12 │ DE│AT│CH CSP 12 A1
SUP-PUMPE CSP 12 A1
Einleitung
Wir beglückwünschen Sie zum Kauf Ihres neuen
Gerätes. Sie haben sich damit für ein hochwertiges
Produkt entschieden. Die Bedienungsanleitung ist
Teil dieses Produkts. Sie enthält wichtige Hinweise
für Sicherheit, Gebrauch und Entsorgung. Machen
Sie sich vor der Benutzung des Produkts mit allen
Bedien- und Sicherheitshinweisen vertraut. Benut-
zen Sie das Produkt nur wie beschrieben und für
die angegebenen Einsatzbereiche. Händigen Sie
alle Unterlagen bei Weitergabe des Produkts an
Dritte mit aus.
Bestimmungsgemäßer Gebrauch
Das Gerät ist zum Aufpumpen von SUP-Boards
unter Verwendung der mitgelieferten Adapter ge-
eignet. Das Gerät ist nicht geeignet zum Betrieb
von Druckluftwerkzeugen. Jede andere Verwen-
dung oder Veränderung des Gerätes gilt als nicht
bestimmungsgemäß und birgt erhebliche Unfall-
gefahren.
Für aus bestimmungswidriger Verwendung ent-
standene Schäden übernehmen wir keine Haftung.
Das Gerät ist nicht für den gewerblichen Einsatz
bestimmt.
HINWEIS
► Die Bedienungsanleitung muss ständig in
unmittelbarer Nähe des Gerätes auf bewahrt
werden und dem Bedienpersonal zur Verfü-
gung stehen.
Ausstattung
Tragegriff
Wahltaste
Taste „‒“
Taste „+“
EIN-/AUS-Schalter
Display
4x Standfüße an der Geräteunterseite
Gummiband
Entlüftungsanschluss
12V Kfz-Anschlussstecker
Befüllungsanschluss
Adapteranschluss des Schlauches
Aufsatz für Hochdruck
Mini-Boston-Aufsatz
Boston-Aufsatz
Schlauch
Verriegelungsanschluss des Schlauches
Lieferumfang
1 SUP-Pumpe (inkl. 12V Kfz-Anschlussstecker
und Anschlussschlauch)
1 Boston-Aufsatz
1 Mini-Boston-Aufsatz
1 Aufsatz für Hochdruck (mittlere Silikon
Dichtung vormontiert, kleine und große
Dichtung zusätzlich enthalten)
1 Betriebsanleitung
Technische Daten
Nennspannung 12 V , 110 W
(Gleichstrom)
Nenndrehzahl 3500 U/min
Betriebsdruck max. 1,38 bar (20 PSI)
Luftstrom (Luftpumpe) ca. 350l/min
Betriebsart S2: Kurzzeitbetrieb mit
konstanter Belastung, bei
einer Dauer von 10 Minu-
ten.
Gewicht 1,68 kg

DE│AT│CH │ 13 ■
CSP 12 A1
Kfz-Anschlussstecker
Sicherung 15 A
Geräuschinformationen
Messwert für Geräusch ermittelt entsprechend
EN62841-1 und EN1012-1.
Der A-gewichtete Geräuschpegel am Arbeitsplatz
beträgt typischerweise:
Schalldruckpegel
(am Bedienerplatz) LPA = 84,4 dB (A)
Unsicherheit K = 3 dB (A)
Gemäß 2000/14/EG und 2005/88/EG:
Schallleistungspegel gemessen LWA = 86,2 dB (A)
Unsicherheit K = 2,02 dB (A)
Schallleistungspegel garantiert LWA = 88 dB (A)
Gehörschutz tragen!
Erläuterungen der Hinweisschilder auf dem
Gerät
Vor Inbetriebnahme Originalbetriebs-
anleitung und Sicherheitshinweise lesen!
Gehörschutz tragen!
Gefährdung durch heiße Oberflächen!
Nicht dem Regen aussetzen!
Allgemeine
Sicherheitshinweise für
Elektrowerkzeuge
WARNUNG!
►Lesen Sie alle Sicherheitshinweise, Anwei-
sungen, Bebilderungen und technischen
Daten, mit denen dieses Elektrowerkzeug
versehen ist. Versäumnisse bei der Einhaltung
der nachfolgenden Anweisungen können
elektrischen Schlag, Brand und/oder schwere
Verletzungen verursachen.
Bewahren Sie alle Sicherheitshinweise und
Anweisungen für die Zukunft auf.
Der in den Sicherheitshinweisen verwendete Begriff
„Elektrowerkzeug“ bezieht sich auf netzbetriebene
Elektrowerkzeuge (mit Netzleitung) und auf akku-
betriebene Elektrowerkzeuge (ohne Netzleitung).
1. Arbeitsplatzsicherheit
a) Halten Sie Ihren Arbeitsbereich sauber und
gut beleuchtet. Unordnung und unbeleuchtete
Arbeitsbereiche können zu Unfällen führen.
b) Arbeiten Sie mit dem Elektrowerkzeug nicht
in explosionsgefährdeter Umgebung, in der
sich brennbare Flüssigkeiten, Gase oder
Stäube befinden. Elektrowerkzeuge erzeugen
Funken, die den Staub oder die Dämpfe ent-
zünden können.
c) Halten Sie Kinder und andere Personen
während der Benutzung des Elektrowerk-
zeugs fern. Bei Ablenkung können Sie die
Kontrolle über das Elektrowerkzeug verlieren.
2. Elektrische Sicherheit
a) Der Anschlussstecker des Elektrowerkzeugs
muss in die Steckdose passen. Der Stecker
darf in keiner Weise verändert werden. Ver-
wenden Sie keine Adapterstecker gemeinsam
mit schutzgeerdeten Elektrowerkzeugen. Un-
veränderte Stecker und passende Steck dosen
verringern das Risiko eines elektrischen Schlages.
b) Vermeiden Sie Körperkontakt mit geerdeten
Oberflächen wie von Rohren, Heizungen,
Herden und Kühlschränken. Es besteht ein er-
höhtes Risiko durch elektrischen Schlag, wenn
Ihr Körper geerdet ist.
c) Halten Sie Elektrowerkzeuge von Regen
oder Nässe fern. Das Eindringen von Wasser
in ein Elektrowerkzeug erhöht das Risiko eines
elek trischen Schlages.
d) Zweckentfremden Sie die Anschlussleitung
nicht, um das Elektrowerkzeug zu tragen,
aufzuhängen oder um den Stecker aus der
Steckdose zu ziehen. Halten Sie die Anschluss-
leitung fern von Hitze, Öl, scharfen Kanten
oder sich bewegenden Teilen. Beschädigte
oder verwickelte Anschlussleitungen erhöhen
das Risiko eines elektrischen Schlages.

■ 14 │ DE│AT│CH CSP 12 A1
e) Wenn Sie mit einem Elektrowerkzeug im
Freien arbeiten, verwenden Sie nur Verlänge-
rungsleitungen, die auch für den Außenbe-
reich geeignet sind. Die Anwendung einer für
den Außenbereich geeigneten Verlängerungs-
leitung verringert das Risiko eines elektrischen
Schlages.
f) Wenn der Betrieb des Elektrowerkzeugs in
feuchter Umgebung nicht vermeidbar ist, ver-
wenden Sie einen Fehlerstromschutzschalter.
Der Einsatz eines Fehlerstromschutzschalters ver-
mindert das Risiko eines elektrischen Schlages.
3. Sicherheit von Personen
a) Seien Sie aufmerksam, achten Sie darauf,
was Sie tun, und gehen Sie mit Vernunft an
die Arbeit mit einem Elektrowerkzeug. Be-
nutzen Sie kein Elektrowerkzeug, wenn Sie
müde sind oder unter dem Einfluss von Drogen,
Alkohol oder Medikamenten stehen. Ein
Moment der Unachtsamkeit beim Gebrauch
des Elektrowerk zeugs kann zu ernsthaften Ver-
letzungen führen.
b) T
ragen Sie persönliche Schutzausrüstung und
immer eine Schutzbrille. Das Tragen persönlicher
Schutzausrüstung, wie Staubmaske, rutschfeste
Sicherheitsschuhe, Schutzhelm oder Gehörschutz,
je nach Art und Einsatz des Elektrowerkzeugs,
verringert das Risiko von Verletzungen.
c) Vermeiden Sie eine unbeabsichtigte Inbetrieb -
nahme. Vergewissern Sie sich, dass das Elek-
trowerkzeug ausgeschaltet ist, bevor Sie es
an die Stromversorgung und/oder den Akku
anschließen, es aufnehmen oder tragen.
Wenn Sie beim Tragen des Elektrowerkzeugs
den Finger am Schalter haben oder das Elektro-
werkzeug eingeschaltet an die Stromversorgung
anschließen, kann dies zu Unfällen führen.
d) Entfernen Sie Einstellwerkzeuge oder Schrau-
benschlüssel, bevor Sie das Elektrowerkzeug
einschalten. Ein Werkzeug oder Schlüssel, der
sich in einem drehenden Teil des Elektrowerk-
zeugs befindet, kann zu Verletzungen führen.
e) Vermeiden Sie eine abnormale Körper-
haltung. Sorgen Sie für einen sicheren Stand
und halten Sie jederzeit das Gleichgewicht.
Dadurch können Sie das Elektrowerkzeug in
unerwarteten Situationen besser kontrollieren.
f) Tragen Sie geeignete Kleidung. Tragen Sie
keine weite Kleidung oder Schmuck. Halten
Sie Haare und Kleidung fern von sich be-
wegenden Teilen. Lockere Kleidung, Schmuck
oder lange Haare können von sich bewegenden
Teilen erfasst werden.
g) Wenn Staubabsaug- und -auffangeinrichtungen
montiert werden können, sind diese anzu-
schließen und richtig zu verwenden. Die
Verwendung einer Staubabsaugung kann
Gefährdungen durch Staub verringern.
h) Wiegen Sie sich nicht in falscher Sicherheit
und setzen Sie sich nicht über die Sicherheits-
regeln für Elektrowerkzeuge hinweg, auch
wenn Sie nach vielfachem Gebrauch mit dem
Elektrowerkzeug vertraut sind. Achtloses
Handeln kann binnen Sekundenbruchteilen zu
schweren Verletzungen führen.
4. Verwendung und Behandlung
desElektrowerkzeugs
a) Überlasten Sie das Elektrowerkzeug nicht.
Verwenden Sie für Ihre Arbeit das dafür be-
stimmte Elektrowerkzeug. Mit dem passenden
Elektrowerkzeug arbeiten Sie besser und sicherer
im angegebenen Leistungsbereich.
b) Benutzen Sie kein Elektrowerkzeug, dessen
Schalter defekt ist. Ein Elektrowerkzeug, das
sich nicht mehr ein- oder ausschalten lässt, ist
gefährlich und muss repariert werden.
c) Ziehen Sie den Stecker aus der Steckdose
und / oder entfernen Sie den abnehmbaren
Akku, bevor Sie Geräteeinstellungen vor-
nehmen, Einsatzwerkzeugteile wechseln oder
das Elektrowerkzeug weglegen. Diese Vor-
sichtsmaßnahme verhindert den unbeabsichtig-
ten Start des Elektrowerkzeugs.

DE│AT│CH │ 15 ■
CSP 12 A1
d) Bewahren Sie unbenutzte Elektrowerkzeuge
außerhalb der Reichweite von Kindern auf.
Lassen Sie keine Personen das Elektrowerk-
zeug benutzen, die mit diesem nicht vertraut
sind oder diese Anweisungen nicht gelesen
haben. Elektrowerkzeuge sind gefährlich, wenn
sie von unerfahrenen Personen benutzt werden.
e) Pflegen Sie Elektrowerkzeuge und Einsatz-
werkzeug mit Sorgfalt. Kontrollieren Sie, ob
bewegliche Teile einwandfrei funktionieren
und nicht klemmen, ob Teile gebrochen oder
so beschädigt sind, dass die Funktion des
Elektrowerkzeugs beeinträchtigt ist. Lassen
Sie beschädigte Teile vor dem Einsatz des
Elektrowerkzeuges reparieren. Viele Unfälle
haben ihre Ursache in schlecht gewarteten
Elektrowerkzeugen.
f) Halten Sie Schneidwerkzeuge scharf und
sauber. Sorgfältig gepflegte Schneidwerkzeuge
mit scharfen Schneidkanten verklemmen sich
weniger und sind leichter zu führen.
g) Verwenden Sie Elektrowerkzeug, Einsatz-
werkzeug, Einsatzwerkzeuge usw. entspre-
chend diesen Anweisungen. Berücksichtigen
Sie dabei die Arbeitsbedingungen und die
auszuführende Tätigkeit. Der Gebrauch von
Elektrowerkzeugen für andere als die vorge-
sehenen Anwendungen kann zu gefährlichen
Situationen führen.
h) Halten Sie Griffe und Griffflächen trocken,
sauber und frei von Öl und Fett. Rutschige
Griffe und Griffflächen erlauben keine sichere
Bedienung und Kontrolle des Elektrowerkzeugs
in unvorhergesehenen Situationen.
5. Service
a) Lassen Sie Ihr Elektrowerkzeug nur von qua-
lifiziertem Fachpersonal und nur mit Original-
Ersatzteilen reparieren. Damit wird sicherge-
stellt, dass die Sicherheit des Elektrowerkzeugs
erhalten bleibt.
b) Lassen Sie den Austausch des Steckers oder
der Anschlussleitung immer vom Hersteller des
Elektrowerkzeugs oder seinem Kundendienst
ausführen. Damit wird sichergestellt, dass die
Sicherheit des Elektrowerkzeugs erhalten bleibt.
Gerätespezifische
Sicherheits hinweise
■ Dieses Gerät kann nicht von Kindern sowie von
Personen mit verringerten physischen, senso-
rischen oder mentalen Fähigkeiten oder Magel
an Erfahrung und Wissen benutzt werden.
Kinder dürfen nicht mit dem Gerät spielen.
Reinigung und Benutzerwartung dürfen nicht
von Kindern durchgeführt werden.
■ Kinder sollten von diesem Gerät ferngehalten
werden.
■ Vermeiden Sie den Einsatz des Gerätes
bei Temperaturen unter +5°C.
■ Dieses Gerät darf weder dem Regen ausgesetzt
werden, noch in Wasser getaucht werden.
■ Lassen Sie das Gerät nie unbeaufsichtigt ar-
beiten.
■ Vorsicht! Betreiben Sie den Kompressor nur für
kurze Zeit. Ein langer, ununterbrochener Betrieb
von mehr als 10 Min. überhitzt das Gerät.
Schalten Sie das Gerät sofort aus und lassen
Sie es min. 10 Min. abkühlen.
■ Verletzungsgefahr! Lassen Sie die aufzupum-
penden Gegenstände nicht über den für sie
vorgesehenen Druck aufpumpen. Diese können
platzen und zu Verletzungen und/oder mate-
riellen Schäden führen.
■ Verwenden Sie das Gerät niemals zweckent-
fremdet.
■ Verwenden Sie dieses Produkt nicht, wenn der
Schlauch beschädigt ist, und wechseln Sie den
Schlauch sofort.
■ Ziehen Sie den Schlauch beim Aufpumpen nicht
heraus, da der Druck den Körper verletzen
kann.
■ Um ein Risiko zu vermeiden, darf sich der Auf-
blaseinlass nicht in Richtung Körper befinden.
■ Das Gerät muss stets sauber, trocken und frei
von Öl oder Schmierfetten sein.
■ Verwenden Sie zur Reinigung des Gerätes
niemals Benzin oder andere entflammbare
Flüssigkeiten! Im Gerät verbliebene Dämpfe
können durch Funken entzündet werden und
zur Explosion des Gerätes führen.

■ 16 │ DE│AT│CH CSP 12 A1
■ Seien Sie aufmerksam! Benutzen Sie das Gerät
in keinem Fall, wenn Sie unkonzentriert sind
oder sich unwohl fühlen.
■ Überprüfen Sie vor dem Gebrauch den Ziga-
rettenanzünder, um sicherzustellen, dass sich
darin kein Rost oder Rückstände befinden. Die
Steckdose mit Zigarettenanzünder mit schlechter
elektrischer Leitfähigkeit kann zu einer Überhit-
zung des Produkts oder der Stromquelle führen,
wodurch das Produkt beschädigt wird.
Vor der Inbetriebnahme
♦ Nehmen und tragen Sie das Gerät am Trage-
griff .
♦ Stecken Sie den 12 V Kfz-Anschlussstecker
in eine geeignete Zigarettenanzünder-Buchse.
Das Display leuchtet und das Gerät ist
Einsatzbereit.
Bedienung
HINWEIS
► Das Gerät vibriert während des Betriebs.
Legen Sie es deshalb während des Betriebs
hin. An der Unterseite des Gerätes befinden
sich hierfür vier Standfüße .
ACHTUNG!
►Das Gerät ist nicht für den Dauereinsatz
geeignet. Das Gerät maximal 10 Minuten im
Dauerbetrieb verwenden. Nehmen Sie das
Gerät wieder in Betrieb, wenn es abgekühlt ist.
♦ Verwenden Sie das benötigte Zubehör.
♦ Entnehmen Sie den Schlauch vom Gerät.
Dieser ist zum Transport und zur Lagerung mit
einem Gummiband gesichert.
Display-Anzeige
♦ In dem Display können Sie zwischen
„bar“, „psi“ wechseln, durch Be tätigen der
Wahltaste .
Einstellung des Druckes
♦ Betätigen Sie die Taste „+“ oder die
Taste „–“ um den gewünschten Druck ein-
zustellen.
TIPP
► Wenn Sie die Taste„+“ oder die
Taste „–“ lang gedrückt halten, ändert
sich der Druck schnell.
HINWEIS
► Der Kompressor schaltet automatisch ab,
wenn der voreingestellte Druck erreicht wurde.
► Das Display blinkt schnell, um Sie daran
zu erinnern, das Gerät abzuschalten, da es
sonst durch den Überhitzungsschutz abge-
schaltet wird.
Ein- und ausschalten
Gerät einschalten
♦ Drücken Sie den EIN-/AUS-Schalter .
♦ Halten Sie den EIN-/AUS-Schalter für ca. 3
Sekunden gedrückt, um direkt in den Hochdruck-
modus zu wechseln.
Gerät ausschalten
♦ Drücken Sie erneut den EIN-/AUS-Schalter .
Inbetriebnahme
Aufpumpen/Entlüften
♦ Montieren Sie den Verriegelungsanschluss des
Schlauches auf den gewünschten Anschluss.
Zum Aufpumpen nehmen Sie den Befüllungs-
anschluss . Zum Entlüften nehmen Sie den
Entlüftungsanschluss .
♦ Drehen Sie Ihn im Uhrzeigersinn fest.
Aufsätze
♦ Drehen Sie den Aufsatz auf den
Adapteranschluss des Schlauches gegen
den Uhrzeigersinn fest, bis er fixiert ist.
♦ Drehen Sie den Aufsatz oder auf den
Adapteranschluss des Schlauches im
Uhrzeigersinn fest, bis er fixiert ist.
♦ Stecken Sie den jeweiligen Aufsatz in Ihr SUP-
Board und folgen Sie den Angaben des Her-
stellers.

DE│AT│CH │ 17 ■
CSP 12 A1
Aufsatz für Hochdruck
Der Aufsatz für Hochdruck ermöglicht ein einfaches
Befüllen von SUP-Boards.
Standardmäßig wird die mittlere Dichtung ver-
wendet, die auf dem Adapter vormontiert ist.
Wenn während des Betriebs Luftleckagen auftreten,
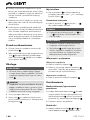
verwenden Sie bitte die dickste Dichtung.
Wenn Sie den Aufsatz nicht in das Objekt einsetzen
können, verwenden Sie bitte die dünnste Dichtung.
Mini-Boston-Aufsatz
Der Mini-Boston-Aufsatz kann zum Aufpumpen
von kleineren Luftmatratzen verwendet werden.
Boston-Aufsatz
Der Boston-Aufsatz kann zum Befüllen von unter-
schiedlichen Luftmatratzen verwendet werden.
Sicherungswechsel
Im 12 V Kfz-Anschlussstecker befindet sich eine
Sicherung. Sollte das Gerät nicht funktionieren,
könnte die Sicherung defekt sein. Dann wechseln
Sie diese gegen eine Ersatzsicherung gleichen Typs
aus (siehe auch Kapitel Technische Daten).
♦ Ziehen Sie dazu den 12 V Kfz-Anschluss-
stecker aus der Zigarettenanzünder-Buchse.
♦ Öffnen Sie den 12 V Kfz-Anschlussstecker ,
indem Sie den geriffelten Schraubeinsatz (C)
ggf. mit einer Zange vorsichtig gegen den
Uhrzeigersinn aufdrehen und abnehmen.
♦ Jetzt nehmen Sie die Steckerspitze (B) von der
Sicherung (A) ab, nehmen die Sicherung (A)
heraus und legen sie zur Seite.
♦ Setzen Sie nun eine neue 15 A Sicherung in
den 12V Kfz-Anschlussstecker ein, setzen
die Steckerspitze (B) auf das leicht herausragen-
de Ende der Sicherung auf und drehen den
zuvor herausgenommenen Schraubeinsatz (C)
wieder ein.
HINWEIS
► Funktioniert das Gerät weiterhin nicht, oder
brennt die neue Sicherung auch gleich
wieder durch, liegt ein Gerätedefekt vor.
Wenden Sie sich dann an die Service-Hotline
(siehe Kapitel Service).
Wartung und Reinigung
WARNUNG! VERLETZUNGSGEFAHR!
Schalten Sie vor allen Arbeiten am
Gerät das Gerät aus und ziehen Sie
den 12V Kfz-Anschlussstecker.
■Verwenden Sie keine scharfen Gegenstände
zur Reinigung des Gerätes. Es dürfen keine
Flüssigkeiten in das Innere des Gerätes ge-
langen. Andernfalls kann das Gerät beschädigt
werden.
■ Das Gerät ist wartungsfrei.
■ Reinigen Sie das Gerät regelmäßig, am besten
immer direkt nach Abschluss der Arbeit.
■ Reinigen Sie das Gehäuse mit einem trockenen
Tuch – verwenden Sie auf keinen Fall Benzin,
Lösungsmittel oder Reiniger, die Kunststoff an-
greifen.
■ Lüftungsöffnungen müssen immer frei sein.
HINWEIS
► Nicht aufgeführte Ersatzteile (z. B. Adapter-
düsen, Schalter) können Sie über unsere
Service-Hotline bestellen.
► Für dieses Gerät ist keine Wartung not-
wendig. Öffnen Sie das Gerät keinesfalls.
Das Gerät darf nur von einer autorisierten
Service- Niederlassung bzw. dem Kunden-
dienst re pariert werden. Sollte einer der unten
beschriebenen Fehler auftreten ist folgendes
zu beachten:
♦ Lassen Sie das Gerät abkühlen und warten
Sie eine kurze Zeit, um die Restenergie zu neu-
tralisieren.
♦ Stellen Sie sicher, dass sich das Gerät in einem
sicheren Zustand befindet.
La pagina si sta caricando...
La pagina si sta caricando...
La pagina si sta caricando...
La pagina si sta caricando...
La pagina si sta caricando...
La pagina si sta caricando...
La pagina si sta caricando...
La pagina si sta caricando...
La pagina si sta caricando...
La pagina si sta caricando...
La pagina si sta caricando...
La pagina si sta caricando...
La pagina si sta caricando...
La pagina si sta caricando...
La pagina si sta caricando...
La pagina si sta caricando...
La pagina si sta caricando...
La pagina si sta caricando...
La pagina si sta caricando...
La pagina si sta caricando...
La pagina si sta caricando...
La pagina si sta caricando...
La pagina si sta caricando...
La pagina si sta caricando...
La pagina si sta caricando...
La pagina si sta caricando...
La pagina si sta caricando...
La pagina si sta caricando...
La pagina si sta caricando...
La pagina si sta caricando...
La pagina si sta caricando...
La pagina si sta caricando...
La pagina si sta caricando...
La pagina si sta caricando...
La pagina si sta caricando...
La pagina si sta caricando...
La pagina si sta caricando...
La pagina si sta caricando...
La pagina si sta caricando...
La pagina si sta caricando...
La pagina si sta caricando...
La pagina si sta caricando...
La pagina si sta caricando...
La pagina si sta caricando...
La pagina si sta caricando...
La pagina si sta caricando...
La pagina si sta caricando...
La pagina si sta caricando...
La pagina si sta caricando...
La pagina si sta caricando...
La pagina si sta caricando...
La pagina si sta caricando...
La pagina si sta caricando...
La pagina si sta caricando...
La pagina si sta caricando...
La pagina si sta caricando...
La pagina si sta caricando...
La pagina si sta caricando...
La pagina si sta caricando...
La pagina si sta caricando...
La pagina si sta caricando...
La pagina si sta caricando...
La pagina si sta caricando...
La pagina si sta caricando...
La pagina si sta caricando...
La pagina si sta caricando...
La pagina si sta caricando...
La pagina si sta caricando...
La pagina si sta caricando...
La pagina si sta caricando...
La pagina si sta caricando...
La pagina si sta caricando...
La pagina si sta caricando...
La pagina si sta caricando...
La pagina si sta caricando...
La pagina si sta caricando...
La pagina si sta caricando...
La pagina si sta caricando...
La pagina si sta caricando...
La pagina si sta caricando...
La pagina si sta caricando...
La pagina si sta caricando...
La pagina si sta caricando...
La pagina si sta caricando...
La pagina si sta caricando...
La pagina si sta caricando...
La pagina si sta caricando...
La pagina si sta caricando...
La pagina si sta caricando...
La pagina si sta caricando...
La pagina si sta caricando...
La pagina si sta caricando...
La pagina si sta caricando...
La pagina si sta caricando...
La pagina si sta caricando...
La pagina si sta caricando...
La pagina si sta caricando...
La pagina si sta caricando...
La pagina si sta caricando...
La pagina si sta caricando...
La pagina si sta caricando...
La pagina si sta caricando...
La pagina si sta caricando...
La pagina si sta caricando...
La pagina si sta caricando...
La pagina si sta caricando...
La pagina si sta caricando...
La pagina si sta caricando...
La pagina si sta caricando...
La pagina si sta caricando...
La pagina si sta caricando...
La pagina si sta caricando...
La pagina si sta caricando...
La pagina si sta caricando...
La pagina si sta caricando...
La pagina si sta caricando...
La pagina si sta caricando...
La pagina si sta caricando...
La pagina si sta caricando...
La pagina si sta caricando...
La pagina si sta caricando...
La pagina si sta caricando...
La pagina si sta caricando...
La pagina si sta caricando...
La pagina si sta caricando...
La pagina si sta caricando...
La pagina si sta caricando...
La pagina si sta caricando...
La pagina si sta caricando...
La pagina si sta caricando...
La pagina si sta caricando...
La pagina si sta caricando...
La pagina si sta caricando...
La pagina si sta caricando...
La pagina si sta caricando...
La pagina si sta caricando...
La pagina si sta caricando...
La pagina si sta caricando...
La pagina si sta caricando...
La pagina si sta caricando...
La pagina si sta caricando...
La pagina si sta caricando...
La pagina si sta caricando...
La pagina si sta caricando...
La pagina si sta caricando...
La pagina si sta caricando...
La pagina si sta caricando...
La pagina si sta caricando...
La pagina si sta caricando...
La pagina si sta caricando...
La pagina si sta caricando...
La pagina si sta caricando...
La pagina si sta caricando...
La pagina si sta caricando...
La pagina si sta caricando...
La pagina si sta caricando...
La pagina si sta caricando...
La pagina si sta caricando...
La pagina si sta caricando...
La pagina si sta caricando...
La pagina si sta caricando...
La pagina si sta caricando...
La pagina si sta caricando...
La pagina si sta caricando...
La pagina si sta caricando...
La pagina si sta caricando...
La pagina si sta caricando...
La pagina si sta caricando...
La pagina si sta caricando...
La pagina si sta caricando...
-
 1
1
-
 2
2
-
 3
3
-
 4
4
-
 5
5
-
 6
6
-
 7
7
-
 8
8
-
 9
9
-
 10
10
-
 11
11
-
 12
12
-
 13
13
-
 14
14
-
 15
15
-
 16
16
-
 17
17
-
 18
18
-
 19
19
-
 20
20
-
 21
21
-
 22
22
-
 23
23
-
 24
24
-
 25
25
-
 26
26
-
 27
27
-
 28
28
-
 29
29
-
 30
30
-
 31
31
-
 32
32
-
 33
33
-
 34
34
-
 35
35
-
 36
36
-
 37
37
-
 38
38
-
 39
39
-
 40
40
-
 41
41
-
 42
42
-
 43
43
-
 44
44
-
 45
45
-
 46
46
-
 47
47
-
 48
48
-
 49
49
-
 50
50
-
 51
51
-
 52
52
-
 53
53
-
 54
54
-
 55
55
-
 56
56
-
 57
57
-
 58
58
-
 59
59
-
 60
60
-
 61
61
-
 62
62
-
 63
63
-
 64
64
-
 65
65
-
 66
66
-
 67
67
-
 68
68
-
 69
69
-
 70
70
-
 71
71
-
 72
72
-
 73
73
-
 74
74
-
 75
75
-
 76
76
-
 77
77
-
 78
78
-
 79
79
-
 80
80
-
 81
81
-
 82
82
-
 83
83
-
 84
84
-
 85
85
-
 86
86
-
 87
87
-
 88
88
-
 89
89
-
 90
90
-
 91
91
-
 92
92
-
 93
93
-
 94
94
-
 95
95
-
 96
96
-
 97
97
-
 98
98
-
 99
99
-
 100
100
-
 101
101
-
 102
102
-
 103
103
-
 104
104
-
 105
105
-
 106
106
-
 107
107
-
 108
108
-
 109
109
-
 110
110
-
 111
111
-
 112
112
-
 113
113
-
 114
114
-
 115
115
-
 116
116
-
 117
117
-
 118
118
-
 119
119
-
 120
120
-
 121
121
-
 122
122
-
 123
123
-
 124
124
-
 125
125
-
 126
126
-
 127
127
-
 128
128
-
 129
129
-
 130
130
-
 131
131
-
 132
132
-
 133
133
-
 134
134
-
 135
135
-
 136
136
-
 137
137
-
 138
138
-
 139
139
-
 140
140
-
 141
141
-
 142
142
-
 143
143
-
 144
144
-
 145
145
-
 146
146
-
 147
147
-
 148
148
-
 149
149
-
 150
150
-
 151
151
-
 152
152
-
 153
153
-
 154
154
-
 155
155
-
 156
156
-
 157
157
-
 158
158
-
 159
159
-
 160
160
-
 161
161
-
 162
162
-
 163
163
-
 164
164
-
 165
165
-
 166
166
-
 167
167
-
 168
168
-
 169
169
-
 170
170
-
 171
171
-
 172
172
-
 173
173
-
 174
174
-
 175
175
-
 176
176
-
 177
177
-
 178
178
-
 179
179
-
 180
180
-
 181
181
-
 182
182
-
 183
183
-
 184
184
-
 185
185
-
 186
186
-
 187
187
-
 188
188
-
 189
189
-
 190
190


in altre lingue
- français: Crivit CSP 12 A1 Manuel utilisateur
- slovenčina: Crivit CSP 12 A1 Používateľská príručka
- română: Crivit CSP 12 A1 Manual de utilizare
Altri documenti
-
Parkside PKZ 180 B2 Translation Of The Original Instructions
-
Parkside PDSS 13 D4 Manuale utente
-
Parkside PKZ 180 C3 Translation Of The Original Instructions
-
Parkside PKZ 180 C5 Translation Of The Original Instructions
-
Vonroc CR501AC Manuale utente
-
Miller BLUE STAR 2E Manuale del proprietario
-
-
Parkside PASSK 20-Li A1 Translation Of The Original Instructions
-
-