
Quick Start Guide
ENGLISH
DEUTSCH
FRANÇAIS
ITALIANO
ESPAÑOL
Your specialist retailer - Ihr Fachhändler -
Votre distributeur - Su distribuidor - Il tuo rivenditore:
© 2013 snom technology AG
v1.03
www.snom.com
snom technology AG
Wittestr. 30 G
13509 Berlin, Deutschland
Tel. +49 30 39 83 3-0
Fax +49 30 39 83 31 11
snom technology, Inc.
18 Commerce Way, Suite 6000
Woburn, MA 01801, USA
Tel. 781-569-2044
Fax 978-998-7883
snom UK Ltd
Amethyst House, Meadowcroft Way
Leigh Business Park, Leigh
Manchester WN7 3XZ, UK
Tel. +44 169 348 7500
Fax +44 169 348 7509
snom France SARL
6 Parc des fontenelles
78870 Bailly, France
Tel. +33 1 80 87 62 87
Fax +33 1 80 87 62 88
snom technology SRL
Via A. Lusardi 10
20122 Milano, Italia
Tel +39 02 00611212
Fax +39 02 93661864
snom technology Ltd.
Rm. A2, 3F, No. 37, Ln. 258
Ruiguang Rd., Neihu Dist.
Taipei City 114, Taiwan
Tel +886-2-8751-1120
Fax +886-2-8751-1130

2
© 2012 snom technology AG
snom technology AG
Charlottenstr. 68-71
10117 Berlin, Deutschland
Tel. +49 30 39 83 3-0
Fax +49 30 39 83 31 11
snom technology, Inc.
18 Commerce Way, Suite 6000
Woburn, MA 01801, USA
Tel. 781-569-2044
Fax 978-998-7883
snom UK Ltd
Amethyst House, Meadowcroft Way
Leigh Business Park, Leigh
Manchester, WN7 3XZ, UK
Tel. +44 169 348 7500
Fax +44 169 348 7509
snom France SARL
6 Parc des fontenelles
78870 Bailly, France
Tel. +33 1 80 87 62 87
Fax +33 1 80 87 62 88
snom technology SRL
Via A. Lusardi 10
20122 Milano, Italia
Tel +39 02 00611212
Fax +39 02 93661864
snom technology Ltd.
Rm. A2, 3F, No. 37, Ln. 258
Ruiguang Rd., Neihu Dist.
Taipei City 114, Taiwan
Tel +886-2-8751-1120
Fax +886-2-8751-1130

3
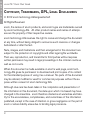
ENGLISH ............................................................................................... 5
DEUTSCH ............................................................................................. 21
FRANÇAIS ............................................................................................ 39
ITALIANO .............................................................................................. 57
ESPAÑOL .............................................................................................. 75
APPENDIX ANHANG ANNEXE APENDICE ANEXO
GNU General Public License ............................................................ 92

snom PA1 Quick Start Guide
4
E
N
G
L
I
S
H

snom PA1 Quick Start Guide
5
E
N
G
L
I
S
H
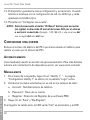
This is the quick start guide to the installation, setup, and
operation of the snom PA1, an announcement system designed for
easy access via web interface. The PA1 reduces installation time
and creates a secure and centralized announcement network.
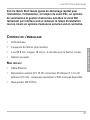
DElivEry cONtENt
• Base unit
• 2 brackets for wall mounting (pre-assembled)
• 4 screws (Ø 8 mm, length 16 mm) + 4 expansion anchors for wall
mounting
• Cable set (4 cables)
• Drill template for wall mounting
NOt iNcluDED iN DElivEry:
• Ethernet cable
• External power supply (5 V 10 W, DC plug - inner Ø 2.1 mm, outer Ø
5.5 mm) - needed only if no PoE available
• Loudspeaker 4W 8 Ohm

snom PA1 Quick Start Guide
6
E
N
G
L
I
S
H
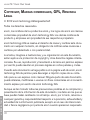
cOpyright, traDEmarks, gpl, lEgal DisclaimErs
© 2012 snom technology Aktiengesellschaft
All Rights Reserved.
snom, the names of snom products, and snom logos are trademarks owned
by snom technology AG. All other product names and names of enterpri-
ses are the property of their respective owners.
snom technology AG reserves the right to revise and change this document
at any time, without being obliged to announce such revisions or changes
beforehand or after the fact.
Texts, images, and illustrations and their arrangement in this document are
subject to the protection of copyrights and other legal rights worldwide.
Their use, reproduction, and transmittal to third parties without express
written permission may result in legal proceedings in the criminal courts as
well as civil courts.
When this document is made available on snom’s web page, snom tech-
nology AG gives its permission to download and print copies of its content
for the intended purpose of using it as a manual. No parts of this document
may be altered, modified or used for commercial purposes without the ex-
press written consent of snom technology AG.
Although due care has been taken in the compilation and presentation of
the information in this document, the data upon which it is based may have
changed in the meantime. snom therefore disclaims all warranties and liabi-
lity for the accurateness, completeness, and currentness of the information
published, except in the case of intention or gross negligence on the part of
snom or where liability arises due to binding legal provisions.

snom PA1 Quick Start Guide
7
E
N
G
L
I
S
H
Our firmware includes some source code that may be used and modified by
anyone and everyone under the GNU Public License (GPL) (see Appendix
on page Seite 92), provided they, in turn, make it available to everyone else
with the same licensing agreement. Please go to http://www.snom.com/
en/support/download/gpl-quellcode/ for the original GPL license and the
source code of components licensed under GPL and used in snom pro-
ducts.

snom PA1 Quick Start Guide
8
E
N
G
L
I
S
H
impOrtaNt iNfOrmatiON
Please read the instructions on safety and disposal and on how to set up
and use the device before using it and also give them to other users to read
or inform those users of their contents. Save this manual and do not give
the device to third parties without it.
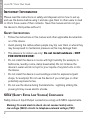
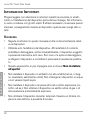
safEty iNstructiONs
• Follow the instructions in this manual and other applicable documentati-
on of the device.
• Avoid placing the cables where people may trip over them or where they
may be exposed to mechanical pressure as this may damage them.
• This device is for indoor use only! Do not install outdoors - NOT
FOR OUTDOOR USE!
• Do not install the device in rooms with high humidity (for example, in
bathrooms, laundry rooms, damp basements). Do not immerse the
device in water and do not spill or pour liquids of any kind onto or into
the device.
• Do not install the device in surroundings at risk for explosions (paint
shops, for example). Do not use the device if you smell gas or other
potentially explosive fumes.
• Do not use the device during thunderstorms. Lightning striking the
power grid may cause electric shocks.
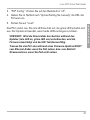
sElv (safEty EXtra lOw vOltagE) cOmpliaNcE
Safety status of Input/Output connections comply with SELV requirements.
Warning: To avoid electric shock, do not connect safety extra-
low voltage (SELV) circuits to telephone-network voltage (TNV)

snom PA1 Quick Start Guide
9
E
N
G
L
I
S
H
circuits. LAN ports contain SELV circuits, and PSTN ports contain
TNV circuits. Some LAN and PSTN ports both use RJ-45 (8P8C)
connectors. Use caution when connecting cables.
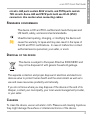
staNDarDs cONfOrmaNcE
This device is CE and FCC-certified and meets European and
US health, safety, and environmental standards.
Unauthorized opening, changing, or modifying the device will
cause the warranty to lapse and may also result in the lapse of
the CE and FCC certifications. In case of malfunction contact
authorized service personnel, your seller, or snom.
DispOsal Of thE DEvicE
This device is subject to European Directive 2002/96/EC and
may not be disposed of with general household garbage.
The separate collection and proper disposal of electrical and electronic
devices serve to protect human health and the environment as well as to
use and reuse resources prudently and rationally.
If you do not know where you may dispose of the device at the end of its
lifespan, contact your municipality, your local waste management provider,
or your seller.
clEaNiNg
To clean the device, use an anti-static cloth. Please avoid cleaning liquids as
they might damage the surface or internal electronics of the device.

snom PA1 Quick Start Guide
10
E
N
G
L
I
S
H
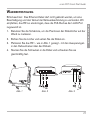
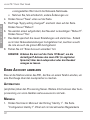
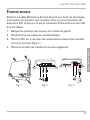
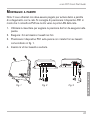
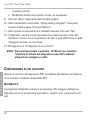
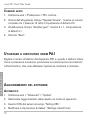
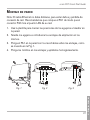
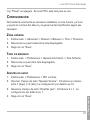
wall mOuNtiNg
Note: The Ethernet cable must not be bent to avoid damage and loss of
the network connection. We recommend that you place the PA1so that the
PoE connector is facing toward the LAN port in your network.
1. Use the template to mark the positions of the holes to be drilled in the
wall.
2. Drill the holes and insert the expansion anchors in the holes.
3. Place the PA1on the wall with the cut-outs above the anchors as shown
in Fig. 1.
4. Place the screws in the anchors and tighten them evenly.
Fig. 1 Fig. 2 Fig. 3

snom PA1 Quick Start Guide
11
E
N
G
L
I
S
H
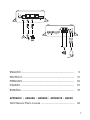
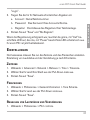
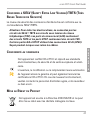
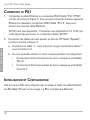
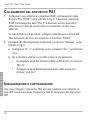
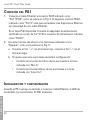
cONNEctiNg thE pa1
1. Plug the Ethernet cable into the RJ45 connector labelled "Port 1POE",
as shown in Fig. 2. The second RJ45 connector labelled "Port 2" is for
daisy-chaining further Ethernet devices without the need for another
Ethernet cable.
If no PoE available: Connect a snom-approved 5 V 10 W power
adapter to the power connector labelled "5V DC".
2. Connect the loudspeaker wires to the speaker terminals labelled
"Speaker", as shown in Fig. 3.
a. Connect the "+" wire with the red terminal, connect the "-" wire with
the black terminal.
b. If you want to use a headset during the setup:
• Connect the headset's microphone plug to the jack labelled
"Mic-In".
• Connect the headset's speaker plug to the jack labelled
"Line-Out".
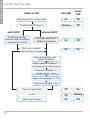
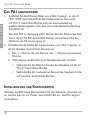
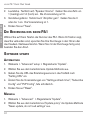
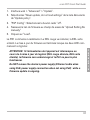
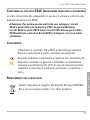
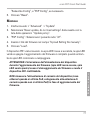
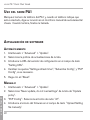
iNitializatiON aND cONfiguratiON
After the PA1 has been connected to the network via Ethernet cable, the
red power LED will light up. The PA1 begins to boot.

snom PA1 Quick Start Guide
12
E
N
G
L
I
S
H
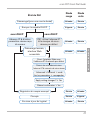
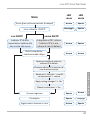
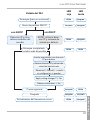
Red LED
Green
LED
Blinking
On Off
Off
OnOn
On Off
On Off
Blinking
Off
OnOff
Booting up (for a short time)
Sending DHCP request
without DHCP
Start-up complete,
web interface available
with DHCP
IP address & other
network-related settings
received from server
PA1 uses default IP
address & netmask
Status of PA1
Open web interface with
default IP address
Obtain network IP address
and netmask from administrator
Advanced > Network >
change settings > Save
Apply setting changes? > Yes
Reboot confi rmation > Yes
Updating fi rmware
In call
Account registered

snom PA1 Quick Start Guide
13
E
N
G
L
I
S
H
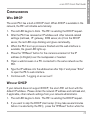
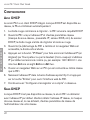
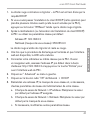
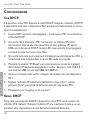
cONfiguratiON
with Dhcp
The snom PA1 has a built-in DHCP client. When DHCP is available in the
network, the PA1 will initialize automatically.
1. The red LED begins to blink. The PA1 is sending the DHCP request.
2. After the PA1 has received an IP address and other network-related
settings (netmask, IP gateway, DNS server, etc.) from the DHCP
server, the red LED stops blinking and glows red steadily.
3. When the PA1 boot up process is finished and the web interface is
available, the green LED lights up.
4. Press the "IP/Reset" button for the oral announcement of the IP
address (in English) over the loudspeaker or headset.
5. Open a web browser on a PC connected to the same network as the
PA1.
6. Type the IP address into the address bar after http:// and press "Enter"
to open the PA1's web interface.
7. Continue with "Logging on an account".
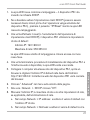
withOut Dhcp
If your network does not support DHCP, the snom PA1 will boot with the
default IP address. Please obtain the network IP address and netmask and,
if applicable, other network settings from your network administrator.
1. The red LED begins to blink. The PA1 is sending the DHCP request.
2. If you want to skip the DHCP client setup (it may take several minutes
before it is aborted by the PA1), press the "IP/Reset" button while the

snom PA1 Quick Start Guide
14
E
N
G
L
I
S
H
red power LED is blinking.
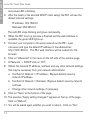
3. After the reset (or the aborted DHCP client setup) the PA1 will use the
default network settings:
IP address: 192.168.0.2
Netmask: 255.255.0.0
The red LED stops blinking and glows red steadily.
4. When the PA1 boot up process is finished and the web interface is
available, the green LED lights up.
5. Connect your computer to the same network as the PA1, open
a browser and type the default IP address in the address bar:
http://192.168.0.2. The PA1 web interface will be loaded into the
browser.
6. Click on "Advanced" in the menu on the left side of the window page.
7. At Network > DHCP click on "Off".
8. Obtain the network IP address, netmask, and any other network settings
that may be necessary from your network administrator.
a. Text field of Network > IP address: Replace default value by
network IP address.
b. Text field of Network > Netmask: Replace default value by network
netmask.
c. Change other network settings, if necessary.
9. Click on "Save" at the bottom of the page.
10. The question "Apply setting changes?" appears at the top of the page.
Click on "Reboot".
11. You will be asked again whether you wish to reboot. Click on "Yes".

snom PA1 Quick Start Guide
15
E
N
G
L
I
S
H
12. Device will save new settings and restart. When the start-up with the
network settings is complete, the red and the green LED will both be
glowing steadily.
13. Continue with "Logging on an account".
NOTE: Press the "IP/Reset" button briefly to hear the current IP
Address of the snom PA1 (in English) over the connected
loudspeaker or in the headset.
lOggiNg ON aN accOuNt
This is the PA1's phone number you dial from a phone to make an an-
nouncement over the PA1's loudspeaker.
autOmatically
(recommended) by using the provisioning server. For more details on auto
provisioning snom devices see www.snom.com/wiki .
maNually
1. In the menu on the left, click on "Identity 1" setup. The page
"Configuration Identity 1" opens with the "Login" tab active.
2. Enter the data required by your network in the text fields:
a. Account: Name/phone number.
b. Password: Password for your account.
c. Registrar: Registrar address of your PBX software.
3. Click on "Save" and "Re-Register".
If the registration has been successful, the green "Call" LED will light up, the
red "Power" LED will turn off. Your snom PA1 is ready for operation.

snom PA1 Quick Start Guide
16
E
N
G
L
I
S
H
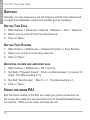
sEttiNgs
Normally, it is only necessary to set the timezone and the tone scheme and
to adjust the loudspeaker volume and amplifier gain as necessary.
sEttiNg timE zONE
1. Web interface > Advanced > Network > Behavior > Time > Timezone.
2. Select your country/city from the drop-down list.
3. Click on "Save".
sEttiNg tONE schEmE
1. Web interface > Preferences > General Information > Tone Scheme.
2. Select your country from the drop-down list.
3. Click on "Save".
aDjustiNg vOlumE aND amplifiEr gaiN
1. Web interface > Preferences > PA1 controls.
2. Text field of "Speaker Volume": Enter a number between 1 (low) and 14
(high). The default setting is 10.
3. Text field "Amplifier gain": Enter 0 or 1. The default setting is 1.
4. Click on "Save".
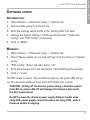
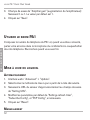
usiNg thE sNOm pa1
Dial the phone number of the PA1 and, when your phone shows that you
are connected, speak your announcement into its handset/headset/casing
microphone. When you are done, terminate the call.

snom PA1 Quick Start Guide
17
E
N
G
L
I
S
H
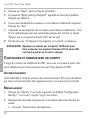
sOftwarE upDatE
autOmatically
1. Web interface > "Advanced" setup > "Update" tab.
2. Select update policy from the list box.
3. Enter the settings server's URL in the "Setting URL" text field.
4. Change the default settings of "Settings refresh timer", "Subscribe
Config", and "PnP Config", if necessary.
5. Click on "Reset".
maNually
1. Web interface > "Advanced" setup > "Update" tab.
2. Select "Never update, do not load settings" from the list box of "Update
policy".
3. "PnP Config": Select the radio button "off".
4. Enter the firmware link in the text field of "Upload Setting file manually"
5. Click on "Load".
The PA1 starts to reboot. The red LED will light up, the green LED will go
out. The firmware update is done when both LEDs start to blink.
CAUTION: Cutting off the device's power during a firmware update
(red LED on, green LED off) will damage the firmware and render
the PA1 inoperational.
Do NOT remove the device's power supply (Ethernet cable when
using PoE, power supply connection when not using PoE) while a
firmware update is ongoing.

snom PA1 Quick Start Guide
18
E
N
G
L
I
S
H
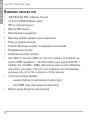
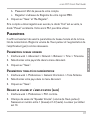
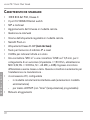
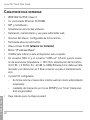
staNDarD fEaturE list
• IEEE 802.3af PoE compliant, Class 3
• 2 port 10/100Mb Ethernet switch
• SIP or multicast support
• Remote SW update
• Network/web management
• Remotely settable speaker volume adjustment
• Push-on speaker terminals
• Class D 4W power amplifier (loudspeaker not included)
• IP address/reset button
• Call/network activity indicator
• One "MIC in" and one "LINE out" 3.5 mm connector for headset con-
nection (SPK impedance = 150 Ohm, MIC power supply 3.3V, RL =
2 KOhm, S= -42 dB (+-2dB)). Microphone input must be differential
and without grounding. This port is for installation and maintainance
purposes only, not for the connection of other devices.
• 4 I/O pins remotely settable
- via web interface (in administrator mode only) or
- with DTMF tones (with programmable timer)
• Robust casing design for wall mounting

snom PA1 Quick Start Guide
19
E
N
G
L
I
S
H
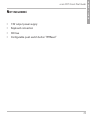
NOt iNcluDED:
• 12V output power supply
• Keyboard connection
• I2C bus
• Configurable push switch button "IP/Reset"

snom PA1 Quick Start Guide
20
D
E
U
T
S
C
H
La pagina si sta caricando...
La pagina si sta caricando...
La pagina si sta caricando...
La pagina si sta caricando...
La pagina si sta caricando...
La pagina si sta caricando...
La pagina si sta caricando...
La pagina si sta caricando...
La pagina si sta caricando...
La pagina si sta caricando...
La pagina si sta caricando...
La pagina si sta caricando...
La pagina si sta caricando...
La pagina si sta caricando...
La pagina si sta caricando...
La pagina si sta caricando...
La pagina si sta caricando...
La pagina si sta caricando...
La pagina si sta caricando...
La pagina si sta caricando...
La pagina si sta caricando...
La pagina si sta caricando...
La pagina si sta caricando...
La pagina si sta caricando...
La pagina si sta caricando...
La pagina si sta caricando...
La pagina si sta caricando...
La pagina si sta caricando...
La pagina si sta caricando...
La pagina si sta caricando...
La pagina si sta caricando...
La pagina si sta caricando...
La pagina si sta caricando...
La pagina si sta caricando...
La pagina si sta caricando...
La pagina si sta caricando...
La pagina si sta caricando...
La pagina si sta caricando...
La pagina si sta caricando...
La pagina si sta caricando...
La pagina si sta caricando...
La pagina si sta caricando...
La pagina si sta caricando...
La pagina si sta caricando...
La pagina si sta caricando...
La pagina si sta caricando...
La pagina si sta caricando...
La pagina si sta caricando...
La pagina si sta caricando...
La pagina si sta caricando...
La pagina si sta caricando...
La pagina si sta caricando...
La pagina si sta caricando...
La pagina si sta caricando...
La pagina si sta caricando...
La pagina si sta caricando...
La pagina si sta caricando...
La pagina si sta caricando...
La pagina si sta caricando...
La pagina si sta caricando...
La pagina si sta caricando...
La pagina si sta caricando...
La pagina si sta caricando...
La pagina si sta caricando...
La pagina si sta caricando...
La pagina si sta caricando...
La pagina si sta caricando...
La pagina si sta caricando...
La pagina si sta caricando...
La pagina si sta caricando...
La pagina si sta caricando...
La pagina si sta caricando...
La pagina si sta caricando...
La pagina si sta caricando...
La pagina si sta caricando...
La pagina si sta caricando...
La pagina si sta caricando...
La pagina si sta caricando...
La pagina si sta caricando...
La pagina si sta caricando...
-
 1
1
-
 2
2
-
 3
3
-
 4
4
-
 5
5
-
 6
6
-
 7
7
-
 8
8
-
 9
9
-
 10
10
-
 11
11
-
 12
12
-
 13
13
-
 14
14
-
 15
15
-
 16
16
-
 17
17
-
 18
18
-
 19
19
-
 20
20
-
 21
21
-
 22
22
-
 23
23
-
 24
24
-
 25
25
-
 26
26
-
 27
27
-
 28
28
-
 29
29
-
 30
30
-
 31
31
-
 32
32
-
 33
33
-
 34
34
-
 35
35
-
 36
36
-
 37
37
-
 38
38
-
 39
39
-
 40
40
-
 41
41
-
 42
42
-
 43
43
-
 44
44
-
 45
45
-
 46
46
-
 47
47
-
 48
48
-
 49
49
-
 50
50
-
 51
51
-
 52
52
-
 53
53
-
 54
54
-
 55
55
-
 56
56
-
 57
57
-
 58
58
-
 59
59
-
 60
60
-
 61
61
-
 62
62
-
 63
63
-
 64
64
-
 65
65
-
 66
66
-
 67
67
-
 68
68
-
 69
69
-
 70
70
-
 71
71
-
 72
72
-
 73
73
-
 74
74
-
 75
75
-
 76
76
-
 77
77
-
 78
78
-
 79
79
-
 80
80
-
 81
81
-
 82
82
-
 83
83
-
 84
84
-
 85
85
-
 86
86
-
 87
87
-
 88
88
-
 89
89
-
 90
90
-
 91
91
-
 92
92
-
 93
93
-
 94
94
-
 95
95
-
 96
96
-
 97
97
-
 98
98
-
 99
99
-
 100
100


Documenti correlati
-
Snom PA1 Quick Installation Guide
-
Snom Vision Guida Rapida
-
Snom PA1+ Quick Installation Guide
-
Snom Vodafone 821 Guida Rapida
-
Snom M300 Quick Installation Guide
-
Snom 870 Quick Installation Guide
-
Snom D715 Guida Rapida
-
Snom 720 Quick Installation Guide
-
Snom D725 Quick Installation Guide
-