Motorola 5200 - MicroTAC Cell Phone Manuale utente
- Categoria
- Cellulari
- Tipo
- Manuale utente
Questo manuale è adatto anche per

MOTOROLA and the Stylized M Logo are registered in the US Patent & Trademark Office. The use of wireless
devices and their accessories may be prohibited or restricted in certain areas. Always obey the laws and
regulations on the use of these products. The Bluetooth trademarks are owned by their proprietor and used by
Motorola, Inc. under license. VELCRO is a registered trademark of Velcro Industries B.V. Nokia is a trademark
or registered trademark of Nokia Corporation. Sony is a trademark or registered trademark of Sony Corporation.
Ericsson is a trademark or registered trademark of Telefonaktiebolaget LM Ericsson. All other product or service
names are the property of their respective owners.© Motorola, Inc. 2007
PN: 6803578F04 - Printed in the EU
motorola.com

T805
MOTOSTART
Phone-Based
Navigation System T805
featuring MOTONAV
TM


1
Figure 1
2
1
(A)
(B) (C)
(D)
(E)
(F)

2
1
2
3
4
Figure 2
Figure 3

3
General information
European Union Directives Conformance Statement
Hereby, Motorola Inc., declares that this T805 is in compliance with the essential requirements and
other relevant provisions of Directive 1999/5/EC.
You can view your product’s Declaration of Conformity (DoC) to Directive 1999/5/EC (the R&TTE Directive) at www.
motorola.com/rtte.
Caring for the Environment by Recycling
When you see this symbol on a Motorola product, do not dispose the product with household waste.
Recycling Mobile Phones and Accessories
Do not dispose of mobile phones or electrical accessories, such as chargers or headsets, with your household
waste. In some countries or regions, collection systems are set up to handle electrical and electronic waste items.
Contact your regional authorities for more details. If collection systems aren’t available, return unwanted mobile
phones or electrical accessories to any Motorola Approved Service Centre in your region.
FCC Notice to Users
Users are not permitted to make changes or modify the device in any way. Changes or modifications not expressly
approved by the party responsible for compliance could void the user’s authority to operate the equipment. See-
47-CFR-Sec.-15.21.
This device complies with part 15 of the FCC Rules. Operation is subject to the following two conditions: (1) This
device may not cause harmful interference, and (2) this device must accept any interference received, including
interference that may cause undesired operation. See-47-CFR-Sec.-15.19(3).
Before you begin
Before you get started, familiarize yourself with the components of your new Phone-Based Navigation System
T805 featuring MOTONAV™.
The following items are provided in the box included with your system:
• Bluetooth
®
GPS receiver
• Dash mounting hardware
• Belt mounting hardware*
• Car charger
• Universal phone holder
• MOTONAV activation voucher
* Belt holder not available in all regions.
The following item must be purchased separately to complete the full phone-based navigation system
experience:
• Compatible Bluetooth phone with data service subscription from your service provider.
English

4
Warning
Traffic laws and current traffic conditions must always be observed and take precedence over the instructions
issued by the navigation system.
The user should be aware of situations where current traffic conditions and the instructions from the navigation
system may be in conflict.
The use of the navigation system does not relieve the user of his/her responsibilities. The user is ultimately
responsible for the vehicle under his/her control and should be aware of the surroundings at all times. For traffic
safety reasons, it is recommended that routes should be planned in a stationary vehicle before starting a trip.
Privacy: Operation of the navigation system requires that the user’s position be sent to a central server for use
in certain features of MOTONAV. The server is operated by Jentro Technologies GmbH, a Motorola-approved
service provider (www.jentro.com). This information will only be used to provide the requested service and will
not be shared with any additional third parties. Users who prefer not to permit such tracking and monitoring
should avoid using the navigation system.
Responsability: Certain features of MOTONAV require wireless network data access. The user is responsible
for all data access charges.
MOTOROLA IS NOT RESPONSIBLE FOR ANY DIRECT, INDIRECT, INCIDENTAL, CONSEQUENTIAL, EXEMPLARY,
SPECIAL, OR PUNITIVE DAMAGES, OR OTHER DAMAGE ARISING OUT OF THE USE OF, OR INABILITY TO USE,
THIS PRODUCT. THIS INCLUDES DAMAGE TO PROPERTY AND, TO THE EXTENT PERMITTED BY LAW, DAMAGES
FOR PERSONAL INJURY AND DEATH.
Laws in some areas prohibit the use of a cellular phone when driving a motor vehicle. Please use the utmost care
in using your cellular phone safely under all circumstances. It is the responsibility of each cellular phone user to
be aware of and abide by any and all local laws and ordinances, which may restrict the use of cellular phones.
MOTONAV website
This Quick Start Guide provides step-by-step instructions for installing, setting up and starting your navigation
system.
For additional details, go to the MOTONAV website: www.hellomoto.com/motonav
The MOTONAV website has:
• detailed, step-by-step guides by phone type and/or service provider on installing, setting up, and starting
MOTONAV
• troubleshooting assistance for problems with installing and setting up MOTONAV
• the latest MOTONAV news and updates
• destination entry tools for added convenience
• user profile management tools
• options for purchasing additional service
English

5
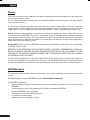
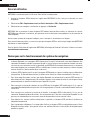
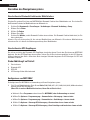
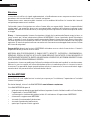
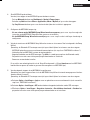
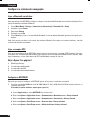
Secure phone and Bluetooth GPS receiver
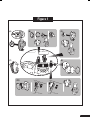
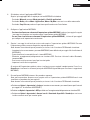
See figure 1 on page 1.
Secure phone in car
You can safely secure your phone in your car using the universal phone holder included with your navigation
system. With the universal phone holder, you have three options for securing your phone. Each option is
described below along with detailed illustrations to the right.
•
To secure your phone to the dashboard using the phone holder and extension arm, first place the four
legs into the slots on the holder and slide down to lock into place as shown by (A). Then, affix the enclosed
circular disc to your dash or center console and attach the suction cup on the extension arm to the disc
(push down on lever) as shown by (B). Place your phone in the phone holder and squeeze the sides together.
To release your phone from the holder, push button on the left side.
• To secure your phone to the windshield using the phone holder and extension arm, first place the four legs
into the slots on the holder and slide down to lock into place as shown by (A). Then, attach the suction cup
on the extension arm to the windshield (push down on lever) as shown by (C). Place your phone in the phone
holder and squeeze the sides together. To release your phone from the holder, push button on the left side.
•
To secure your phone to the front of the dashboard using only the phone holder, first affix the enclosed
adhesive or VELCRO
®
strips to both the phone holder and the desired location on the front of the dashboard
as shown by (D). Then, firmly attach the phone holder to dashboard using the VELCRO strips. Place your
phone in the phone holder and squeeze the sides together. To release your phone from the holder, push
button on the left side.
Tips for using the universal phone holder to secure your phone in your car:
• If the sides of the phone holder block buttons on the side of your phone, remove the L–shaped legs and insert
into the groove on the opposite side of the phone holder.
• To help keep the L–shaped legs in place, insert the enclosed rubber strip into the groove on either side of the
feet.
• If your phone is wide, insert one side of the phone first, then gently press the other side into place so that the
foam pads are not damaged.
• To minimize vibration when using the extension arm, rest the base of the phone holder on your dashboard.
• If needed, an extra set of foam pads are included for the phone holder.
Secure GPS receiver
You can safely secure your Bluetooth GPS receiver on the dashboard in your car or onto your belt*.
•
To secure your GPS receiver to the dashboard in your car, first affix adhesive, VELCRO, or rubber pad onto
bottom of holder, then slide GPS receiver onto other side holder as shown by (E). Once assembled, secure
the GPS receiver by affixing the adhesive or VELCRO on the bottom of the holder to your dashboard (or if you
used the rubber pad, place on the dashboard).
• To secure your GPS receiver onto your belt, insert the GPS receiver into the belt clip holder following
numbered steps as shown by (F). Once the GPS receiver is inside the belt clip holder, use belt clip to place
onto your belt.
* Belt holder not available in all regions.
English

6
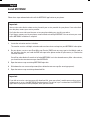
Install MOTONAV
Follow these steps to download and install the MOTONAV application on your phone.
Important:
You must be subscribed to a data service plan with your service provider for your phone. If not subscribed
to a data plan, contact your service provider.
Verify that the correct date and time are set on your phone before you start this procedure.
If you have a memory card in your phone, remove it before installing MOTONAV. You can reinsert your card
when MOTONAV installation is complete.
1 Locate the activation voucher in the box.
The voucher contains a 20-digit activation code used to activate and register your MOTONAV subscription.
2 On your phone, create a new Short Message Service (SMS) text message, type in the 20-digit code on
the activation voucher, and send the SMS message to the phone number of your country as listed on the
activation voucher.
You will be subscribed to 12 months of unlimited MOTONAV use in the selected country. After a few minutes,
you should receive two text messages from MOTONAV.
3 Open the text message containing MOTONAV login data.
4 Write down the user name and password, then delete the text message (for security purposes).
5 Open the text message containing a download link.
Important:
If you did not receive a text message with download link, open your phone’s web browser and go to get.
motonav.net to access the MOTONAV Download page. Proceed to step 7 to download the MOTONAV
application to your phone. When prompted, enter your user name.
English

7
Important:
You must be subscribed to a data service plan with your service provider for your phone. If not subscribed
to a data plan, contact your service provider.
Verify that the correct date and time are set on your phone before you start this procedure.
If you have a memory card in your phone, remove it before installing MOTONAV. You can reinsert your card
when MOTONAV installation is complete.
Important:
If you did not receive a text message with download link, open your phone’s web browser and go to get.
motonav.net to access the MOTONAV Download page. Proceed to step 7 to download the MOTONAV
application to your phone. When prompted, enter your user name.
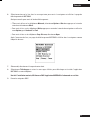
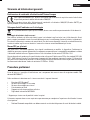
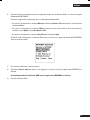
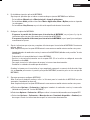
6 Select/open link in the text message to open web browser and view the MOTONAV Download page.
Use the following tips to open the download link:
• To open link on
Motorola phones, select Options > Go To or press center key and select Go To.
• To open link on
Nokia phones, press center of Navigation key or use Options menu, then Use detail or
Find.
• To open link on
Sony Ericsson phones, select Open.
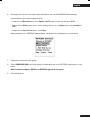
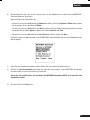
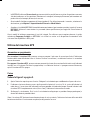
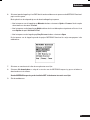
Upon opening the link, a MOTONAV Download page is displayed in the web browser as shown below:
7 If prompted, select preferred language.
8 Select DOWNLOAD NOW and follow prompts to download and install MOTONAV application on your
phone.
When installation completes, DO NOT start MOTONAV application if prompted.
9 Close web browser.
English

8
Set up navigation system
Start Bluetooth on phone
Before setting up MOTONAV, ensure the Bluetooth feature is turned on in your phone. To turn on Bluetooth on
Motorola phones:
1 Press (Main Menu) > Settings > Connection (or Connectivity) > Bluetooth Link > Setup.
2 Scroll to Power
3 Select Change
4 Scroll to On
5 Press Select to turn on the Bluetooth feature. The Bluetooth feature remains on until you turn the feature off
Note: These steps are for most Motorola phones. For all other phones, see your phone’s user guide.
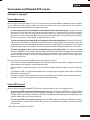
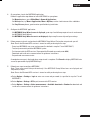
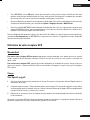
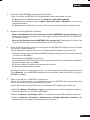
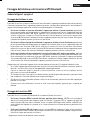
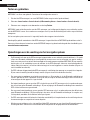
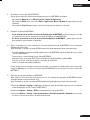
Turn on GPS receiver
To begin setting up MOTONAV, you must first turn on the Bluetooth GPS receiver. To turn on your GPS receiver,
press and hold the Power button until the Battery Status indicator is lit. After a few moments, both the GPS and
Bluetooth indicator lights begin flashing.
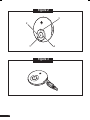
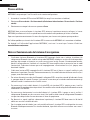
See figure 2 on page 2.
1 Power button
2 Bluetooth indicator light
3 GPS indicator light
4 Battery status indicator light
Configure MOTONAV
Follow these steps to configure MOTONAV to operate with your navigation system.
1 If using a Nokia series 40 phone (5200, 5300, 6111, 6211, 6230i, 6233, 6234, 6280, and others), perform the
following steps:
(For all other phones, go to step 2.)
a Go to Applications and highlight MOTONAV (but do not start it).
b Select Options > Application access > Communication > Network access > Always allowed.
c Select Options > Application access > Communication > Connectivity > Always allowed.
d Select Options > Data/Phone access > Read user data > Always allowed.
e Select Options > Data/Phone access > Add and edit data > Always allowed.
English

9
2 On your phone, launch the MOTONAV application.
Follow the applicable steps below to launch MOTONAV on your phone:
- On
Motorola phones, press (Main Menu) > Games & Applications.
- On
Nokia phones, try Menu > Applications, Menu > My Own, or take a look into one of the subfolders.
- On
Sony Ericsson phones, go to location specified during installation.
3 Configure the MOTONAV application:
- I
f a MOTONAV Setup Wizard screen is displayed, go to step 4 and follow prompts to launch and execute
the MOTONAV Setup Wizard.
-
If a MOTONAV Setup Wizard screen is not displayed, skip to step 5 to manually configure settings.
4 Follow prompts to launch and perform the MOTONAV Setup Wizard. During the setup wizard. you will:
Note: Ensure the Bluetooth GPS receiver is turned on while performing these steps.
- Enter/save MOTONAV user name and password (as defined in step 4 of “Install MOTONAV”).
- Test/verify connectivity with the MOTONAV system.
- Pair/connect with the GPS receiver. (If prompted for Bluetooth passcode, enter 0000).
- Download and install voice announcements for guidance instructions.
- Set preferred measurement units.
A completion message is displayed when setup wizard is complete. Click
Cancel to display MOTONAV main
screen (or proceed to display MOTONAV tips).
5 Follow these steps to configure MOTONAV:
Note: These steps need to be performed only if the MOTONAV Setup Wizard was not displayed and
completed (in step 4).
Note: Ensure the Bluetooth GPS receiver is turned on while performing these steps.
a Select
Options > Settings > Login to enter user name and password (as specified in step 4 of “Install
MOTONAV”).
b Select Options > Settings > GPS to pair/connect with GPS receiver.
c Select Options > Settings > Voice announcements > Available downloads > Standard to download and
install voice announcements for guidance instructions.
English

10
Test and use
MOTONAV is now ready for use. To verify correct configuration:
1 Turn on GPS receiver and launch MOTONAV (if not already running on your phone).
2 Select
Local search > Current Location (or Select Destination > Local search > Current Location).
3 Select a category to search and press
Search.
MOTONAV should connect to your GPS receiver, obtain your current position, connect to the MOTONAV server
to do the search, and then present a list of the nearest matches on your phone.
After you have successfully set up your navigation system, you don’t need to repeat these steps.
For daily use, ensure that your GPS receiver is turned ON and MOTONAV is running on your phone.
For details on using the MOTONAV application, download the user guide at: www.hellomoto.com/motonav
Notes on navigation system operation
• The Bluetooth indicator light on the GPS receiver flashes until connected with your phone. A Bluetooth
connection is established only when a service that requires position (such as a route, map, or local search)
is requested by MOTONAV. During normal operation, because connection between your phone and GPS
receiver is established only when needed (not continuous), the indicator light changes between flashing and
steadily lit (or turns off as described below).
• The GPS indicator light flashes until the GPS receiver locks onto satellite signals and can determine your
position. During normal operation, the indicator light remains steadily lit (or turns off as described below).
• To avoid distraction, once Bluetooth is connected and GPS is acquired, both status lights turn off after 10
seconds. Press the Power button to momentarily turn on indicator lights and confirm that the unit is on.
• To conserve battery charge, GPS circuitry in the GPS receiver turns off if there is no Bluetooth connection
for over five minutes. A change in Bluetooth connection status turns the GPS circuitry back on.
• To further conserve battery charge, the GPS receiver turns off if there is no Bluetooth connection for over
60 minutes. A change in Bluetooth connection status or a press of the Power button resets the power off
timer.
• To lock onto satellite signals and determine position, the GPS receiver should be outside buildings with a
clear view of the sky.
• With most phones, you will not be able to use the GPS receiver and a Bluetooth hands-free device at the
same time. You can use a wired headset or the speakerphone to take calls
• In MOTONAV, use
Local Search to find businesses and points of interest near your current location or your
destination (or another location). Select the category (for example, Restaurant) and/or enter a keyword (for
example, steak) to search for.
English

11
• Some phone models support Pedestrian routing. To use while walking, select your destination, then select
Options > Route Settings > Activate Pedestrian Mode.
• Login to the MOTONAV website (www.hellomoto.com/motonav) to enter locations and manage your
MOTONAV account. Use your user name and password (as specified in step 4 of «Install MOTONAV»).
Some phone models support Travel Alerts. To use while driving, select Travel Companion on MOTONAV and you
will be alerted if a speed camera is in your vicinity. Not available in all countries
Using your GPS receiver
Turning on & off
To turn your GPS receiver on, press and hold the Power button until the Battery Status indicator light is lit. When
powering on, the three indicator lights are lit in succession.
To turn your GPS receiver off, press and hold the Power button until all three indicator lights are lit. When
powering off, the three indicator lights are turned off in succession, then the GPS receiver is turned off.
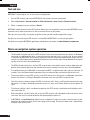
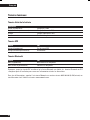
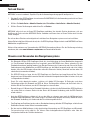
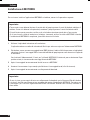
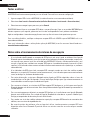
Charging
See figure 3 on page 2.
1 Open flap covering the charge connector. Plug the Motorola car charger into the charge connector.
2 The indicator light turns red or amber when the battery is charging. If the battery charge is very low, it may
take some time for the indicator light to turn on. When the GPS receiver battery is fully charged (up to 4
hours), the indicator light turns green.
3 Disconnect the charger. (Leaving the charger plugged in for an extended period may reduce the lifetime of
the battery.)
Note: The GPS receiver will operate normally while charging; however, the battery status indicator light will not
indicate full charge (green) when power is on.
English

12
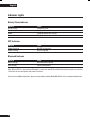
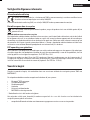
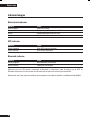
Indicator Lights
Battery Status Indicator
Indicator Status
Red (flashing) Charge very low
Red (steady) Charging (below 10% charge)
Amber Charging (above 10% charge)
Green Charging complete
GPS Indicator
Indicator Status
Amber (flashing) No GPS fix acquired
Amber (steady) GPS fix acquired
Bluetooth Indicator
Indicator Status
Blue (flashing) Not connected to phone
Blue (steady) Connected to phone
Note: When GPS fix is acquired and Bluetooth is connected, both GPS and Bluetooth indicator lights turn off after
10 seconds to conserve power and avoid distraction.
If you have any additional questions, please call your hotline number (0870-9010-555) or visit us at www.hellomoto.com.
English

13
Informations générales
Déclaration de conformité aux directives de l’Union Européenne
Par la présente Motorola Inc., déclare que l’appareil T805 est conforme aux exigences essentielles et
aux autres dispositions pertinentes de la directive 1999/5/EC.
Vous pouvez consulter la Déclaration de conformité de votre produit à la Directive 1999/5/EC (la Directive R&TTE) à
l’adresse www.motorola.com/rtte.
Protection de l’environnement par le recyclage
Lorsqu’un produit Motorola arbore ce symbole, ne le jetez pas dans votre poubelle.
Recyclage des téléphones portables et accessoires
Ne jetez aucun téléphone portable ou accessoire électrique, comme un chargeur ou un kit piéton, dans
votre poubelle. Des systèmes de collecte permettant de traiter les déchets électriques et électroniques sont
progressivement mis en place. Renseignez-vous localement pour plus d’informations. En l’absence de système
de collecte, renvoyez les téléphones portables et accessoires électriques à l’un des Centres de Service agréé
par Motorola le plus proche.
Avis aux utilisateurs
L’utilisateur n’a le droit d’apporter ni changement ni modification à l’appareil, de quelque façon que ce soit. Le
droit de l’utilisateur de faire usage de l’appareil peut être annulé par des changements ou modifications non
expressément approuvés par l’entité en charge de la conformité de l’appareil aux normes. Voir 47 CFR Sec.15.21.
Cet appareil est conforme à la clause 15 des règlements de la FCC. Son fonctionnement est sujet aux deux conditions
suivantes : (1) cet appareil ne doit pas causer d’interférence nuisible, et (2) cet appareil doit accepter toute
interférence, y compris l’interférence pouvant causer un fonctionnement inapproprié. Voir 47 CFR Sec.15.19 (3).
Avant de commencer
Avant de commencer, prenez le temps de découvrir les composants de votre nouveau système de navigation
pour téléphone portable T805 doté de l’application MOTONAV™.
Le coffret de votre système comprend les éléments suivants :
• Récepteur GPS Bluetooth
®
• Support de fixation au tableau de bord
• Support de fixation à la ceinture*
• Chargeur de véhicule
• Support universel de téléphone
• Formulaire d’activation MOTONAV
* Support de fixation à la ceinture disponible selon offre.
L’élément suivant (vendu séparément) permettra à votre téléphone portable d’obtenir le maximum du système
de navigation :
• Téléphone compatible Bluetooth avec abonnement au service de données proposé par votre opérateur.
Français

14
Avertissement
Les conditions de circulation et la réglementation routière doivent toujours être respectées en priorité. Les
instructions données avec le système de navigation sont secondaires.
L’utilisateur doit savoir que dans certains cas, les conditions de circulation et les instructions du système de
navigation peuvent ne pas être compatibles.
L’utilisation du système de navigation ne dégage pas l’utilisateur de ses responsabilités. L’utilisateur est le seul
responsable du contrôle de son véhicule et il doit resté vigilent en permanence. Pour des raisons de sécurité
routière, il est recommandé de programmer le trajet avec le véhicule à l’arrêt avant le départ.
Confidentialité : pour que le système de navigation fonctionne, la position de l’utilisateur doit être transmise au
serveur central afin d’obtenir certaines options de MOTONAV. Jentro Technologies GmbH, un opérateur agréé
par Motorola (www.jentro.com) est le gestionnaire du serveur. Cette information n’est utilisée que pour le service
demandé et ne sera en aucun cas transmise à un tiers. Les utilisateurs qui préfèrent ne pas autoriser un tel suivi
et contrôle doivent éviter d’utiliser le système de navigation.
Responsabilité : certaines options de MOTONAV nécessitent un accès de données au réseau sans fil.
L’utilisateur prend à sa charge tous les coûts d’accès aux données.
MOTOROLA NE PEUT ÊTRE TENU POUR RESPONSABLE DES DOMMAGES DIRECTS, ACCIDENTELS, INDIRECTS,
DOMMAGES-INTÉRÊTS EXEMPLAIRES, PARTICULIERS OU PUNITIFS OU AUTRES DOMMAGES SURVENUS
EN DEHORS DE L’UTILISATION, OU À CAUSE DE L’INCAPACITÉ DE L’UTILISATION, DE CET APPAREIL. CECI
INCLUT LES DOMMAGES À LA PROPRIÉTÉ ET, DANS LES LIMITES AUTORISÉES PAR LA LOI, LES DOMMAGES
PROVOQUÉS PAR BLESSURES ET DÉCÈS.
Les lois dans certaines régions interdisent l’utilisation de téléphone cellulaire pendant la conduite d’un véhicule.
En toutes circonstances, prenez toutes les précautions nécessaires pour utiliser votre téléphone cellulaire. Il en
est de la responsabilité de chaque utilisateur de téléphone cellulaire de connaître et de se conformer aux lois et
aux règlements locaux, qui limitent l’utilisation de téléphones cellulaires.
Site Web MOTONAV
Ce guide de référence rapide vous donne les instructions étape par étape pour l’installation, la configuration et
le démarrage de votre système de navigation.
Pour plus de détails, consultez le site Web MOTONAV : www.hellomoto.com/motonav
Vous trouverez sur le site MOTONAV :
• Les guides détaillés, étape par étape, par type de téléphone et/ou opérateur traitant de l’installation, de la
configuration et du démarrage de MOTONAV.
• L’assistance au dépannage pour les problèmes d’installation et de configuration de MOTONAV
• Les dernières nouvelles et mises à jour MOTONAV
• Les outils de saisie de destination pour simplifier l’installation
• Les outils de gestion de profil utilisateur
• Les options d’achat de service supplémentaire
Français

15
Installation du téléphone et du récepteur GPS Bluetooth
Voir figure 1, page 1.
Installation du téléphone dans le véhicule
Grâce au support de téléphone compris avec votre système de navigation, vous pouvez installer correctement
votre téléphone. Avec le support, vous avez trois options pour installer votre téléphone. Les descriptions de
chaque option se trouvent ci-dessous et les illustrations détaillées à droite.
•
Pour installer votre téléphone sur le tableau de bord en utilisant le support et le bras d’extension, placez
d’abord les quatre pattes dans les fentes sur le support et faites-le glisser vers le bas pour le bloquer,
comme indiqué Figure (A). Puis, posez le disque sur votre tableau de bord ou sur la console centrale et fixez
la ventouse sur le bras d’extension au disque (en poussant le levier) comme indiqué Figure (B). Placez votre
téléphone dans le support et serrez des deux côtés. Pour dégager votre téléphone du support, poussez le
bouton sur le côté gauche.
•
Pour installer votre téléphone sur le pare-brise en utilisant le support et le bras d’extension, , placez
d’abord les quatre pattes dans les fentes sur le support et faites-le glisser vers le bas pour le bloquer, comme
indiqué Figure (A). Puis, fixez la ventouse sur le bras d’extension au pare-brise (en poussant le levier) comme
indiqué Figure (C). Placez votre téléphone dans le support et serrez des deux côtés. Pour dégager votre
téléphone du support, poussez le bouton sur le côté gauche.
• Pour installer votre téléphone sur l’avant du tableau de bord en utilisant uniquement le support, posez
d’abord l’adhésif proposé ou des bandes VELCRO
®
sur le support et à l’emplacement désiré sur l’avant du
tableau de bord comme indiqué Figure (D). Puis, fixez fermement le support au tableau de bord en utilisant
les bandes VELCRO. Placez votre téléphone dans le support et serrez des deux côtés. Pour dégager votre
téléphone du support, poussez le bouton sur le côté gauche.
Conseils d’utilisation du support pour installer le téléphone dans votre véhicule :
• Si les côtés du support bloquent les boutons sur le côté de votre téléphone, retirez les pattes en L et insérez-
les dans la rainure sur le côté opposé du support.
• Pour garder les pattes en L en place, insérez la bande caoutchouc proposée dans la rainure sur un des côtés
de la partie inférieure.
• Si votre téléphone est large, insérez un des côté du téléphone d’abord, puis enfoncez légèrement l’autre
côté en place pour que les patins en mousse ne soient pas endommagés.
• Pour éviter au maximum les vibrations en utilisant le bras d’extension, faites reposer la base du support sur
votre tableau de bord.
• Si nécessaire, un jeu supplémentaire de patins en mousse pour le support est inclus.
Installation du récepteur GPS
Vous pouvez installer de façon fiable votre récepteur GPS Bluetooth sur le tableau de bord de votre véhicule ou
sur votre ceinture.
•
Pour installer votre récepteur GPS sur le tableau de bord de votre véhicule, , posez d’abord l’adhésif, le
Velcro ou le tampon en caoutchouc sur le bas du support, puis glissez le récepteur GPS sur l’autre côté
du support comme indiqué Figure (E). Une fois assemblé, fixez le récepteur GPS en posant l’adhésif ou le
VELCRO sur le bas du support de votre tableau de bord (ou si vous utilisez le patin en caoutchouc, placez-le
sur le tableau de bord).
• Pour installer votre récepteur GPS à la ceinture, insérez le récepteur GPS dans le support de l’agrafe de
ceinture en suivant les étapes comme indiqué Figure (F). Une fois le récepteur GPS dans le support du clip
de ceinture, utilisez le clip pour le placer sur votre ceinture.
* Support de fixation à la ceinture disponible selon offre.
Français

16
Installation de l’application MOTONAV
Suivez ces étapes pour télécharger et installer l’application MOTONAV sur votre téléphone.
Important :
Vous devez vous abonner au plan de service de données (plan data) de l’opérateur de votre téléphone. Si
vous n’êtes pas abonné à un plan de données, contactez votre opérateur.
Avant de commencer cette procédure, vérifiez l’exactitude de l’heure et de la date sur votre téléphone.
Si vous avez une carte mémoire dans votre téléphone, retirez-la avant d’installer MOTONAV. Vos pouvez
réinsérer votre carte une fois l’installation de MOTONAV terminée.
1 Recherchez le formulaire d’activation dans le coffret.
Le formulaire contient un code d’activation à 20 caractères permettant d’activer et enregistrer votre
abonnement MOTONAV.
2 Sur votre téléphone, créez un nouveau SMS, tapez le code à 20 caractères et envoyez le SMS au numéro de
téléphone correspondant à votre pays et listé sur le formulaire.
Vous aurez un abonnement illimité de 12 mois à MOTONAV dans le pays sélectionné. Après quelques
minutes, vous recevrez deux messages texte de MOTONAV.
3 Ouvrez le message texte contenant les données d’ouverture de session MOTONAV.
4 Notez le nom d’utilisateur et le mot de passe, puis effacez le message texte (pour des raisons de sécurité).
5 Ouvrez le message texte contenant un lien à télécharger.
Important :
Si vous ne recevez pas de message texte avec le lien à télécharger, ouvrez le navigateur de votre téléphone
et recherchez motonav.net pour accéder à la page MOTONAV. Passez à l’étape 7 pour télécharger
l’application MOTONAV sur votre téléphone. Une fois demandé, saisissez votre nom d’utilisateur.
Français

17
Important :
Vous devez vous abonner au plan de service de données (plan data) de l’opérateur de votre téléphone. Si
vous n’êtes pas abonné à un plan de données, contactez votre opérateur.
Avant de commencer cette procédure, vérifiez l’exactitude de l’heure et de la date sur votre téléphone.
Si vous avez une carte mémoire dans votre téléphone, retirez-la avant d’installer MOTONAV. Vos pouvez
réinsérer votre carte une fois l’installation de MOTONAV terminée.
Important :
Si vous ne recevez pas de message texte avec le lien à télécharger, ouvrez le navigateur de votre téléphone
et recherchez motonav.net pour accéder à la page MOTONAV. Passez à l’étape 7 pour télécharger
l’application MOTONAV sur votre téléphone. Une fois demandé, saisissez votre nom d’utilisateur.
6 Sélectionnez/ouvrez le lien dans le message texte pour ouvrir le navigateur et afficher la page de
téléchargement de MOTONAV.
Quelques conseils pour ouvrir le lien de téléchargement :
• TPour ouvrir le lien sur les téléphones
Motorola, sélectionnez Options > Aller à ou appuyez sur la touche
centrale et sélectionnez Aller à.
• Pour ouvrir le lien sur les téléphones
Nokia, appuyez au centre de la touche de navigation ou utilisez le
menu Options, puis Use detail ou Find.
• Pour ouvrir le lien sur les téléphones
Sony Ericsson, sélectionnez Open.
Après l’ouverture du lien, une page de téléchargement MOTONAV s’affiche dans le navigateur comme
indiqué ci-dessous :
7 Si demandé, sélectionnez la langue de votre choix.
8 Sélectionnez Téléchargez et suivez les messages affichés pour télécharger et installer l’application
MOTONAV sur votre téléphone.
Une fois l’installation terminée, NE démarrez PAS l’application MOTONAV si la demande en est faite.
9 Fermez le navigateur WAP.
Français
La pagina sta caricando ...
La pagina sta caricando ...
La pagina sta caricando ...
La pagina sta caricando ...
La pagina sta caricando ...
La pagina sta caricando ...
La pagina sta caricando ...
La pagina sta caricando ...
La pagina sta caricando ...
La pagina sta caricando ...
La pagina sta caricando ...
La pagina sta caricando ...
La pagina sta caricando ...
La pagina sta caricando ...
La pagina sta caricando ...
La pagina sta caricando ...
La pagina sta caricando ...
La pagina sta caricando ...
La pagina sta caricando ...
La pagina sta caricando ...
La pagina sta caricando ...
La pagina sta caricando ...
La pagina sta caricando ...
La pagina sta caricando ...
La pagina sta caricando ...
La pagina sta caricando ...
La pagina sta caricando ...
La pagina sta caricando ...
La pagina sta caricando ...
La pagina sta caricando ...
La pagina sta caricando ...
La pagina sta caricando ...
La pagina sta caricando ...
La pagina sta caricando ...
La pagina sta caricando ...
La pagina sta caricando ...
La pagina sta caricando ...
La pagina sta caricando ...
La pagina sta caricando ...
La pagina sta caricando ...
La pagina sta caricando ...
La pagina sta caricando ...
La pagina sta caricando ...
La pagina sta caricando ...
La pagina sta caricando ...
La pagina sta caricando ...
La pagina sta caricando ...
La pagina sta caricando ...
La pagina sta caricando ...
La pagina sta caricando ...
La pagina sta caricando ...
La pagina sta caricando ...
La pagina sta caricando ...
La pagina sta caricando ...
La pagina sta caricando ...
La pagina sta caricando ...
-
 1
1
-
 2
2
-
 3
3
-
 4
4
-
 5
5
-
 6
6
-
 7
7
-
 8
8
-
 9
9
-
 10
10
-
 11
11
-
 12
12
-
 13
13
-
 14
14
-
 15
15
-
 16
16
-
 17
17
-
 18
18
-
 19
19
-
 20
20
-
 21
21
-
 22
22
-
 23
23
-
 24
24
-
 25
25
-
 26
26
-
 27
27
-
 28
28
-
 29
29
-
 30
30
-
 31
31
-
 32
32
-
 33
33
-
 34
34
-
 35
35
-
 36
36
-
 37
37
-
 38
38
-
 39
39
-
 40
40
-
 41
41
-
 42
42
-
 43
43
-
 44
44
-
 45
45
-
 46
46
-
 47
47
-
 48
48
-
 49
49
-
 50
50
-
 51
51
-
 52
52
-
 53
53
-
 54
54
-
 55
55
-
 56
56
-
 57
57
-
 58
58
-
 59
59
-
 60
60
-
 61
61
-
 62
62
-
 63
63
-
 64
64
-
 65
65
-
 66
66
-
 67
67
-
 68
68
-
 69
69
-
 70
70
-
 71
71
-
 72
72
-
 73
73
-
 74
74
-
 75
75
-
 76
76


Motorola 5200 - MicroTAC Cell Phone Manuale utente
- Categoria
- Cellulari
- Tipo
- Manuale utente
- Questo manuale è adatto anche per
in altre lingue
- English: Motorola 5200 - MicroTAC Cell Phone User manual
- français: Motorola 5200 - MicroTAC Cell Phone Manuel utilisateur
- español: Motorola 5200 - MicroTAC Cell Phone Manual de usuario
- Deutsch: Motorola 5200 - MicroTAC Cell Phone Benutzerhandbuch
- Nederlands: Motorola 5200 - MicroTAC Cell Phone Handleiding
- português: Motorola 5200 - MicroTAC Cell Phone Manual do usuário
