Rockford Fosgate PUNCH PMX-BTUR Installation & Operation Manual
- Tipo
- Installation & Operation Manual

Installation & Operation
PMX-BTUR
UNIVERSAL BLUETOOTH
REMOTE
ROCKFORDFOSGATE.COM
600 South Rockford Drive • Tempe, Arizona 85281 United States
Direct: (480) 967-3565 • Toll Free: (800) 669-9899
Printed In China
092517
1230-61814-01-A
Installation assistance available at:
www.rockfordfosgate.com/rech

2
Dear Customer,
Congratulations on your purchase of the world’s finest brand of
audio products. At Rockford Fosgate we are fanatics about musical
reproduction at its best, and we are pleased you chose our product.
Through years of engineering expertise, hand craftsmanship and
critical testing procedures, we have created a wide range of products
that reproduce music with all the clarity and richness you deserve.
For maximum performance we recommend you have your new
Rockford Fosgate product installed by an Authorized Rockford Fosgate
Dealer, as we provide specialized training through Rockford Technical
Training Institute (RTTI). Please read your warranty and retain your
receipt and original carton for possible future use.
Great product and competent installations are only a piece of the
puzzle when it comes to your system. Make sure that your installer is
using 100% authentic installation accessories from Rockford Fosgate
in your installation. Rockford Fosgate has everything from RCA cables
and speaker wire to power wire and battery connectors. Insist on it!
After all, your new system deserves nothing but the best.
To add the finishing touch to your new Rockford Fosgate image, order
your Rockford accessories, which include everything from T-shirts
to hats.
Visit our web site for the latest information on all Rockford products;
www.rockfordfosgate.com
or, in the U.S. call 1-800-669-9899 or FAX 1-800-398-3985. For all other
countries, call +001-480-967-3565 or FAX +001-480-966-3983.
Table of Contents
If, after reading your manual, you still have questions regarding this product,
we recommend that you see your Rockford Fosgate dealer. If you need further
assistance, you can call us direct at 1-800-669-9899. Be sure to have your
serial number, model number and date of purchase available when you call.
Safety
This symbol with “WARNING” is intended
to alert the user to the presence of important
instructions. Failure to heed the instructions
will result in severe injury or death.
This symbol with “CAUTION” is intended to
alert the user to the presence of important
instructions. Failure to heed the instructions
can result in injury or unit damage.
To prevent injury and damage to the unit,
please read and follow the instructions in this manual. We want you to enjoy
this system, not get a headache.
If you feel unsure about installing this system yourself, have it installed by a
qualified Rockford Fosgate technician.
Before installation, disconnect the battery negative (-) terminal to prevent
damage to the unit, fire and/or possible injury.
FCC Compliance Statement
This equipment has been tested and found to comply with the limits for a
Class B digital device, pursuant to part 15 of the FCC Rules. These limits are
designed to provide more reasonable protection against harmful interference
in a residential installation.
Operation is subjected to the following two conditions: (1) This device
may not cause harmful interference, and (2) the device must accept any
interference received, including interference that may cause undesired
operation.
This equipment generates, uses, and can radiate radio frequency energy
and, if not installed and used in accordance with the instructions, may
cause harmful interference to radio communications. However, there is
no guarantee that interference will not occur in a particular installation.
If this equipment does cause harmful interference to radio or television
reception, which can be determined by turning the equipment off and on,
you are encouraged to try to correct the interference by one of the following
measures:
• Reorient or relocate the receiving antenna.
• Increase the separation between the equipment and receiver.
• Connect the equipment into an outlet on a circuit different from that to
which the receiver is connected.
• Consult the dealer or an experienced radio/TV technician for help
Introduction
PRACTICE SAFE SOUND
Continuous exposure to sound pressure levels over 100dB
may cause permanent hearing loss. High powered auto sound
systems may produce sound pressure levels well over 130dB.
Use common sense and practice safe sound.
2 Introduction
3 Specifications
4 Design Features and Functions
5 Battery Installation and Mounting Options
6 Troubleshooting
7-22 French, Spanish, German and Italian
23 Limited Warranty Information
©2018 Rockford Corporation. All Rights Reserved. PUNCH® and associated logos where applicable, are registered trademarks of Rockford Corporation in the United States and/or
other countries. The Bluetooth
®
word mark and logos are registered trademarks owned by Bluetooth SIG, Inc. and any use of such marks by Rockford Corporation is under license. All
other trademarks are the property of their respective owners. Specifications subject to change without notice.

3
Specifications
CEA 2006
Power ratings on Rockford Fosgate source units conform to CEA-2006 industry standards. These guide-
lines mean your source unit’s output power ratings are REAL POWER numbers, not inflated marketing
ratings.
Model PMX-BTUR
Operating Voltage 2.4V - 3.3V
Bluetooth BLE4.2
Battery CR2032
Pairing Instructions
Press any button on the remote to wake it up. Open the bluetooth setting menu in the device you wish to pair to. Toggle your devices bluetooth
to on if it is not already. Ensure your decive is in searching mode and is looking for devices to pair to. In the available devices menu, look for
PMX-BTUR and select it. Once your device finds the remote, it will ask if you would like to pair with the remote. If it is the first time pairing with
this device, the remote will appear as accessory for IOS or XX:XX:XX:XX for Android (X’s will be different for each PMX-BTUR unit). You will see
three (3) green flashes from the LED then select pair and exit the settings menu. .
Un-Pairing Instructions
Open the bluetooth setting menu in the device you wish to un-pair with. Select PMX-BTUR from the menu then select forget device. The red LED
will flash twice (2) confirming the device is now successfully un-paired.
Once the remote is forgotten from the original device, press buttons 6-1-2-3 (Home Vol+ Vol- Play/Pause) within 3 seconds. If successful, the
LED will illuminate yellow then green. The remotes history is now cleared so it can be paired to a new device. Follow pairing instructions above
on new device.
Home Button LEDs
Green LED: The green LED will illuminate green for 1.5 seconds when a new battery has been installed.
Green LED: The green LED will blink three (3) times right before the user pressed pair on device.
Yellow then Green LED: Remote has been successfully cleared of its bluetooth history.
Red LED: The red LED will blink two (2) times when the remote is forgotten.
Red LED: Once the remotes battery has depleted to 35% or less, the red LED will come on solid and remain on..
Compatible Devices
Rockford Fosgate PMX-1 (See PMX-1 manual for feature set when paired directly with PMX-BTUR).
iPhone Models (IOS 10 and above): 5, 5C, 5S, 6, 6 Plus, 6S, 6S Plus, 7, 7 Plus, 8, 8 Plus, X.
iPod Models: Touch (5th gen.), Touch (6th gen.)
Android (BT 5.0 and above): Bluetooth® Media Only.
Remote Wake Up/Sleep
After 15 seconds, if no buttons are pressed, the remote will automatically go into sleep mode to preserve battery life. To wake it back up, simply
press any button on the remote once.
Update Procedure
Periodically, an update may become available for the PMX-BTUR. To install the update onto your remote, simply open your mobile device, go to
the Rockford Fosgate App and follow the instructions on screen.
Contents
• PMX-BTUR
• Steering Wheel Mount
• Standalone Hard Cover
• Soft Back Cover
• Velcro Tab
• Spare CR2032 Battery

4
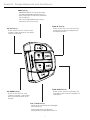
Design Features and Functions
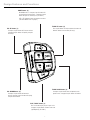
TRACK UP button (5)
Pressing this button will skip forward to the next track.
Hold this button to fast forward (IOS only).
HOME button (6)
INCOMING CALLS: Short pressing this button will
answer/hang up incoming calls. Long pressing this
button will reject an incoming call. (IOS ONLY)
LEDs: LED Indicator shows confirmation and status
(see Home Button LEDs on page 3).
VOL UP button (1)
Short pressing this button will increase volume.
Long pressing this button will quickly ramp the
volume up.
TRACK DOWN button (4)
Short pressing this button once will go back to the
previous track. Long pressing this button will rewind.
PLAY / PAUSE button (3)
Press this button to play or pause your music.
Long pressing this button activates hands free
(speakerphone) (IOS ONLY)
VOL DOWN Button (2)
Short pressing this button will decrease
volume. Long pressing this button will quickly
ramp the volume down.

5
Battery Installation and Mounting Options
(-)
Fig. 2
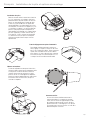
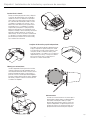
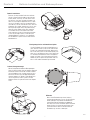
Battery Installation
Remove rubber back cover and locate the (2) philips
head screws on the side of the unit nearest to the track
up and track down buttons. Loosen both screws and
gently pull out the battery tray. Insert (1) CR2032 into
the tray with the domed (-) of the battery facing up.
You will notice on the underside of the tray there is a
(+) molded into the tray. Make sure the positive + (flat
side) of the battery is facing the same direction as the
label on the tray. Slide the tray back into the unit and
tighten the (2) phillips head screws. The LED will
illuminate green for 1.5 seconds once the battery is
installed to confirm the battery is good and the unit
is operational.
Steering Wheel/Bar Mount
Using the included velcro mounting adapter, hold the
rubber side of adapter against the left hand inside of
the steering wheel. Wrap the velcro strap around the
wheel then insert it through the groove on the opposite
side of the adapter. Wrap the straps extra slack around
the wheel and secure it to the velcro. Finally, slide the
unit into the adapter.
Release Tab and Standalone Option
To release the remote from the steering wheel mount,
push the tab on the underside of the unit in the direc-
tion the arrow is pointing. While holding the tab, pull
the unit straight up and out of the mount. If the unit is
going to be used standalone and not fixed, included
is a flat cover that slides on to the unit making it a
mobile remote.
Back Cover
When using the remote with the steering/bar mount,
you will need to attach the back cover. This will cover
the battery tray and the back of the remote when not
using it in the standalone option. Simply press the
rubber studs into the existing holes on the back of the
remote to secure it.:

6
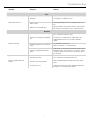
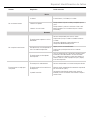
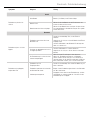
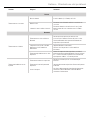
Symptom Diagnosis Remedy
Basic
Remote does not turn on
No battery Insert battery (1 X CR2032) into unit.
Battery is dead
Remove the old battery from unit and replace it with a new
one.
Battery was installed backwards
Remove the battery and reinstall it with the + side of the bat-
tery facing the same direction as the + symbol on the tray.
Bluetooth
Remote will not pair
Remote is not showing up in bluetooth
list
Press any button to wake the unit up.
Ensure there is a healthy battery installed into the unit.
Toggle bluetooth off then on in the devices bluetooth
settings.
Device being paired to is not in pairing
mode
Turn bluetooth off then back on.
Make sure the device is in searching mode.
Remote is already paired to another
device
Go to settings on your device and forget the remote from the
bluetooths history. Press buttons 6-1-2-3 within 3 seconds
and wait for 3 green flashes from the LED then press pair on
the new device.
Remote is paired but does not
respond
Remote went to sleep Press any button on the remote to wake it up.
Remote is out of range of device
Move remote/device within the 30 ft range of one another.
(10m).
Connection was lost
Unpair the device from the remote, Toggle the bluetooth off
then back on. Try re-pairing to the remote.
Troubleshooting

7
Spécifications
CEA 2006
Les puissances nominales sur les unités de source Rockford Fosgate sont conformes aux normes
industrielles CEA-2006. Ces directives signifient que les puissances nominales de sortie de l'unité de
source sont des chiffres de PUISSANCE RÉELLE non pas des valeurs de marketing gonflées.
Modèle PMX-BTUR
Tension de fonctionnement 2.4V-3.3V
Bluetooth BLE4.2
Pile CR2032
Instructions d'appairage
Appuyer sur n'importe quel bouton de la télécommande pour la réveiller. Ouvrir le menu de paramètres
bluetooth dans le périphérique avec lequel vous souhaitez effectuer l'appairage. Basculer le bluetooth du
périphérique sur On s'il ne l'est pas déjà. S'assurer que le périphérique se trouve en mode recherche et
cherche les périphériques avec lesquels s'appairer. Dans le menu de périphériques disponibles, chercher
PMX-BTUR et le sélectionner. Une fois que le périphérique trouve la télécommande, il demandera si on
souhaite appairer avec la télécommande. La DEL clignotera trois (3) fois en vert, ensuite sélectionner
appairer et quitter le menu des paramètres.
Instructions sur la suppression d'appairage
Ouvrir le menu de paramètres bluetooth dans le périphérique avec lequel on souhaite le séparer.
Sélectionner PMX-BTUR à partir du menu puis sélectionner Oublier périphérique. La DEL rouge
clignotera deux (2) fois pour confirmer que le périphérique est maintenant non appairé avec succès.
Une fois la télécommande oubliée du périphérique d'origine, appuyer sur les boutons 6-1-2-3 (Home
Vol+ Vol- Play/Pause) dans les 3 secondes. En cas de succès, la DEL s'allumera en jaune puis en
vert. L'historique de la télécommande étant désormais effacé, elle peut être appairée à un nouveau
périphérique. Suivre les instructions d'appairage ci-dessus sur le nouveau périphérique.
DEL du bouton d'accueil
DEL verte: La DEL verte s'allumera en vert pendant 1,5 seconde lors de l'installation d'une nouvelle pile.
DEL verte: La DEL verte clignotera trois (3) fois juste avant que l'utilisateur a appuyé sur appairer sur le
périphérique.
DEL jaune puis verte. La télécommande a bien été effacée de son historique bluetooth.
DEL rouge: La DEL rouge clignotera deux (2) fois lorsque la télécommande est oubliée.
DEL rouge: Une fois que la pile de la télécommande est déchargée à 35% ou moins, la DEL rouge
s'allumera en continu et restera allumée..
Périphériques compatibles
Rockford Fosgate PMX-1 (Voir le manuel PMX-1 pour configuration des fonctions quand appairé avec
PMX-BTUR).
Modèles iPhone (IOS 10 et supérieur): 5, 5C, 5S, 6, 6 Plus, 6S, 6S Plus, 7, 7 Plus, 8, 8 Plus, X.
Modèles iPod : Touch (5è gén.), Touch (6è gén.)
Android (BT 5.0 et supérieur): Média Bluetooth® uniquement.
Réveil/Veille de la télécommande
Au bout de 15 secondes, si aucun bouton n'a été appuyé, la télécommande passera automatiquement
en mode veille pour préserver la vie de la pile. Pour la réveiller, il suffit d'appuyer une fois sur n'importe
quel bouton sur la télécommande.
Procédure de mise à jour
Une mise à jour peut périodiquement devenir disponible pour le PMX-BTUR. Pour installer la mise à jour
sur la télécommande, il suffit d'ouvrir le périphérique mobile, d'aller à Rockford Fosgate App et de suivre
les instructions à l'écran.
Français

8
Caractéristiques de conception et fonctionsFrançais
Bouton TRACK UP (Piste haut) (5)
Appuyer sur ce bouton pour avancer à la piste suivante.
Maintenir ce bouton enfoncé pour une avance rapide
(IOS UNIQUEMENT).
Bouton HOME (Accueil) (6)
APPELS ENTRANTS : Une brève pression sur ce
bouton répondra/raccrochera aux appels entrants.
Une pression longue rejettera un appel entrant. (IOS
UNIQUEMENT)
DEL Le voyant DEL montre la confirmation et l'état
(voir les DEL du bouton Home (Accueil) à la page 3).
Bouton VOL UP (Volume haut) (1)
Une pression brève sur ce bouton augmentera
le volume. Une pression longue sur ce bouton
augmentera rapidement le volume.
Bouton TRACK DOWN (Piste bas) (4)
Une pression brève sur ce bouton de revenir à la
chanson précédente. Maintenir ce bouton enfoncé pour
rembobiner.
Bouton PLAY/PAUSE (Lecture/Pause) (3)
Appuyer sur ce bouton pour jouer ou pauser la
musique.
Un appui long sur ce bouton active les mains libres
Mains libres (haut-parleur) (IOS UNIQUEMENT)
Bouton VOL DOWN (Volume bas) (2)
Une pression brève sur ce bouton diminuera
le volume. Une pression longue sur ce bouton
diminuera rapidement le volume.

9
Installation de la pile et options de montage
Français
(-)
Fig. 2
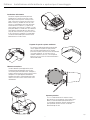
Installation des piles
Retirer le couvercle arrière en caoutchouc et localiser
les (2) vis cruciformes sur le côté de l'unité le plus
proche des boutons de piste haut/bas. Desserrer les
deux vis et sortir délicatement le support des piles.
Insérer une (1) pile CR2032 dans le support avec
l'extrémité bombée (-) de la pile dirigée vers le haut.
On remarquera sur le dessous du support qu'il y a un
(+) moulé dans le support. S'assurer que l'extrémité
positive + (côté plat) de la pile est dirigée dans la
même direction que l'étiquette sur le support. Refaire
glisser le support dans l'unité et serrer les deux (2)
vis cruciformes. La DEL s'allumera en vert pendant
1,5 seconde une fois que la pile est installée pour
confirmer que la pile est bonne et que l'unité est
opérationnelle.
Monture volant/barre
À l'aide de l'adaptateur de montage en Velcro inclus,
maintenir le côté en caoutchouc de l'adaptateur contre
la main gauche à l'intérieur du volant. Enrouler la
sangle en Velcro autour du volant puis l'insérer à
travers la rainure sur la côté opposé de l'adaptateur.
Enrouler la longueur additionnelle de la sangle autour
du volant et la fixer au Velcro. Enfin, faire glisser
l'unité dans l'adaptateur.
Patte de dégagement et option d'autonomie
Pour dégager la télécommande de la monture sur
volant, appuyer sur la patte sur le dessous de l'unité
dans le sens indiqué par la flèche. Tout en maintenant
la patte, tirer l'unité droit vers le haut et en dehors
de la monture. Si l'unité va être utilisée en autonome
et non fixée, faire glisser le couvercle plat inclus sur
l'unité pour en faire une télécommande mobile.
Couverture arrière
Lors de l'utilisation de la télécommande avec la
monture volant/barre, il faut attacher le couvercle
arrière. Celui-ci couvrira le support de pile et le dos
de la télécommande lorsqu'elle n'est pas utilisée en
option d'autonomie. Il suffit d'appuyer sur les goujons
en caoutchouc dans les trous existants sur la dos de la
télécommande pour le sécuriser.

10
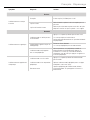
Symptôme Diagnostic Solution
De base
La télécommande ne se met pas
en marche
Pas de pile Insérer une pile (1 X CR2032) dans l'unité.
La pile est morte
Retirer la batterie usagée de l'unité et la remplacer par une
pile neuve.
La pile a été installée à l'envers
Retirer la pile et la remettre en place avec le côté + de la pile
dirigé dans le même sens que le symbole + sur le support.
Bluetooth
La télécommande ne s'appaire pas.
La télécommande ne s'affiche pas dans
la liste bluetooth
Appuyer sur n'importe quel bouton pour rallumer l’unité.
S'assurer que la pile de l'unité est bonne.
Activer et désactiver bluetooth dans les paramètres bluetooth
des périphériques.
Le périphérique à appairer n'est pas en
mode appairage
Éteindre et rallumer bluetooth.
S'assurer que le périphérique est en mode recherche.
La télécommande est déjà appairée
avec un autre périphérique
Aller aux paramètres sur le périphérique et oublier la
télécommande de l'historique bluetooth. Appuyer sur
les boutons 6-1-2-3 dans les 3 secondes et attendre 3
clignotements verts de la DEL puis appuyer sur appairer sur
le nouveau périphérique.
La télécommande est appairée mais
ne répond pas
La télécommande s'est mis en veille
Appuyer sur n'importe quel bouton de la télécommande
pour la réveiller.
La télécommande est hors de portée du
périphérique
Déplacer la télécommande/le périphérique dans une plage
de 30 pieds l'un de l'autre. (10m).
Perte de connexion
Séparer le périphérique de la télécommande, éteindre
et rallumer bluetooth. Essayer d'appairer à nouveau à la
télécommande.
DépannageFrançais

11
Especificaciones
CEA 2006
Las potencias nominales en las unidades fuente de Rockford Fosgate cumplen con las normas CEA-2006
de la industria. Estas directrices quieren decir que las potencias nominales de salida de la unidad fuente
son cifras de POTENCIA REAL y no valores nominales inflados por el marketing.
Modelo PMX-BTUR
Voltaje de funcionamiento 2.4V -3.3V
Bluetooth BLE4.2
Batería CR2032
Instrucciones de acoplamiento
Presione cualquier botón en el control remoto para despertarlo. Abra el menú de configuración de
bluetooth en el dispositivo con el que desea acoplar. Conmute sus dispositivos de bluetooth a la
posición de encendido (on) si aún no lo ha hecho. Asegúrese de que su dispositivo esté en el modo
de búsqueda y esté buscando dispositivos a los que pueda acoplarse. En el menú de dispositivos
disponibles, busque PMX-BTUR y selecciónelo. Una vez que su dispositivo encuentre el control remoto,
le preguntará si desea acoplarlo con el control remoto. Verá tres (3) destellos verdes desde el LED, luego
seleccione "pair" (acoplar) y salga del menú de configuración. .
Instrucciones para desacoplar
Abra el menú de configuración de bluetooth en el dispositivo que desea desacoplar. Seleccione PMX-
BTUR del menú y luego seleccione "forget device" (olvidar dispositivo). El LED rojo parpadeará dos
veces (2) confirmando que el dispositivo ya no está acoplado.
Una vez que el control remoto se ha olvidado del dispositivo original, presione los botones 6-1-2-3
(Home Vol+ Vol- Play/Pause (Inicio Vol + Vol-Reproducir/Pausa)) dentro de 3 segundos. Si tiene éxito,
el LED se iluminará en amarillo y luego en verde. El historial de controles remotos ahora se borra para
que pueda acoplarse a un nuevo dispositivo. Siga las instrucciones de acoplamiento anteriores en un
dispositivo nuevo.
LED del botón Home (origen)
LED verde: El LED verde se iluminará color verde durante 1.5 segundos cuando se ha instalado una
batería nueva.
LED verde: El LED verde parpadeará tres (3) veces justo antes de que el usuario presione "pair" (acoplar)
en el dispositivo
LED amarillo luego verde: El control remoto se borró exitosamente de su historial de bluetooth.
LED rojo: El LED rojo parpadeará dos (2) veces cuando se olvida el control remoto.
LED rojo: Una vez que la batería de los controles remotos se haya agotado al 35% o menos, el LED rojo
se encenderá y permanecerá encendido.
Dispositivos compatibles
Rockford Fosgate PMX-1 (Consulte el manual del PMX-1 para ver el conjunto de características cuando
se acopla directamente con el PMX-BTUR).
Modelos de iPhone (IOS 10 y superior): 5, 5C, 5S, 6, 6 Plus, 6S, 6S Plus, 7, 7 Plus, 8, 8 Plus, X.
Modelos de iPod: Touch (5th gen.), Touch (6th gen.)
Android (BT 5.0 y superior): Solamente Bluetooth® Media.
Wake Up (activar)/Sleep (dormir) el controlo remoto
Si no se presiona ningún botón después de segundos, el control remoto pasará automáticamente al
modo "sleep" (dormir) para preservar la vida útil de la batería. Para activarlo, simplemente presione una
vez cualquier botón en el control remoto.
Procedimiento de actualización
Periódicamente, es posible que haya una actualización disponible para el PMX-BTUR. Para instalar
la actualización en su control remoto, simplemente abra su dispositivo móvil, vaya a la aplicación de
Rockford Fosgate y siga las instrucciones en la pantalla.
Français Español

12
Características y funcionalidad del diseñoEspañol Español
Botón TRACK UP (5)
Al presionar este botón saltará a la pista
siguiente. Mantenga presionado este botón
para avanzar rápidamente (SOLAMENTE IOS).
Botón HOME (6)
LLAMADAS ENTRANTES: Si presiona brevemente este
botón, responderá/colgará las llamadas entrantes. Si
presiona prolongadamente este botón, rechazará una
llamada entrante. (SOLAMENTE IOS)
LED: El indicador de LED muestra la confirmación y
el estado (consulte los LED del botón Home (inicio)
en la página 3).
Botón VOL UP (1)
Si presiona brevemente este botón aumentará
el volumen. Si presiona prolongadamente este
botón, aumentará rápidamente el volumen.
Botón TRACK DOWN (4)
Presionar brevemente este botón volverán a la canción
anterior. Mantenga presionado este botón
para rebobinar
Botón PLAY/PAUSE (REPRODUCCIÓN/PAUSA) (3)
Presione este botón para reproducir o pausar su música.
Al presionar prolongadamente este botón se activan las
manos libres (speakerphone) (SOLAMENTE IOS)
Botón VOL DOWN (2)
Presionar brevemente este botón disminuirá
el volumen. Si presiona prolongadamente este
botón, reducirá rápidamente el volumen.

13
Instalación de la batería y opciones de montaje
Español
(-)
Fig. 2
Instalación de la batería
Extraiga la cubierta posterior de caucho y ubique los
(2) tornillos de cabeza Phillips en el costado de la
unidad más cercana a los botones de seguimiento
hacia arriba y hacia abajo. Afloje los dos tornillos y
tire suavemente de la bandeja de la batería. Inserte
(1) CR2032 en la bandeja con la cúpula (-) de la
batería hacia arriba. Notará que en la parte inferior
de la bandeja hay un (+) moldeado en la bandeja.
Asegúrese de que el positivo + (lado plano) de la
batería esté orientado en la misma dirección que la
etiqueta en la bandeja. Deslice la bandeja nuevamente
dentro de la unidad y apriete los (2) tornillos de
cabeza Phillips. El LED se iluminará en verde durante
1.5 segundos una vez que la batería esté instalada
para confirmar que la batería está en buen estado y
que la unidad está funcionando.
Montaje para volante/barra
Usando el adaptador de montaje de velcro incluido,
sostenga el lado de caucho del adaptador contra la
mano izquierda dentro del volante. Envuelva la correa
de velcro alrededor del volante y luego insértela a
través de la ranura en el lado opuesto del adaptador.
Envuelva la holgura adicional de las correas alrededor
del volante y asegúrela al velcro. Finalmente, deslice
la unidad en el adaptador.
Lengüeta de liberación y opción independiente
Para liberar el control remoto del soporte del volante,
empuje la lengüeta en la parte inferior de la unidad
en la dirección que señala la flecha. Mientras sujeta
la lengüeta, tire de la unidad hacia arriba y hacia
afuera del soporte. Si la unidad se va a usar de forma
independiente y no está fija, se incluye una cubierta
plana que se desliza hacia la unidad, lo que la
convierte en un control remoto móvil.
Cubierta trasera
Cuando use el control remoto con la montura para la
dirección/barra, deberá colocar la cubierta posterior.
Esto cubrirá la bandeja de la batería y la parte
posterior del control remoto cuando no se utiliza en
la opción independiente. Simplemente presione los
vástagos de caucho en los orificios existentes en la
parte posterior del control remoto para asegurarlo:

14
Síntoma Diagnóstico Acción correctiva
Básica
No se enciende el remoto
Sin batería Inserte la batería (1 X CR2032) en la unidad.
La batería está agotada
Extraiga la batería vieja de la unidad y reemplácela por una
nueva.
La batería se instaló al revés
Extraiga la batería y vuelva a instalarla con el lado + de la
batería orientado en la misma dirección que el símbolo +
de la bandeja.
Bluetooth
No se acopla el control remoto
El control remoto no aparece en la lista
de bluetooth
Presione cualquier botón para activar la unidad.
Asegúrese de que haya una batería saludable instalada en
la unidad.
Desconecte el bluetooth y luego enciéndalo en la
configuración Bluetooth del dispositivo.
El dispositivo que se está acoplando no
está en el modo de acoplamiento.
Apague y vuelva a encender Bluetooth.
Asegúrese de que el dispositivo esté en el modo de
búsqueda.
El control remoto ya está acoplado a
otro dispositivo
Vaya a la configuración en su dispositivo y olvide el control
remoto del historial de bluetooths. Presione los botones
6-1-2-3 dentro de 3 segundos y espere a que aparezcan 3
destellos verdes en el LED, luego presione "pair" (acoplar)
en el nuevo dispositivo.
El control remoto se acopla pero
no responde
El remoto pasó al modo de dormir Presione cualquier botón en el control remoto para activarlo.
El control remoto está fuera del alcance
del dispositivo
Mueva el control remoto/dispositivo dentro del rango de 30
pies el uno del otro. (10 m).
Se perdió la conexión
Desacople el dispositivo del control remoto, apague el
bluetooth y vuelva a encenderlo. Trate de volver a acoplar al
control remoto.
Identificación de fallasEspañol

15
Technische Daten
CEA 2006
Die Leistungsangaben für Rockford Fosgate Source-Geräte entsprechen den Industriestandards CEA-2006.
Diese Richtlinien bedeuten, dass die Ausgangsleistungen Ihres Source-Geräts REELLEN Leistungsangaben
entsprechen und keine überhöhten Marketingbewertungen sind.
Modell PMX-BTUR
Betriebsspannung 2.4V-3.3
Bluetooth BLE4.2
Akku CR2032
Anleitungen zum Koppeln (Pairing)
Drücken Sie eine beliebige Taste auf der Fernbedienung, um diese zu aktivieren. Öffnen Sie das
Bluetooth-Einrichtungsmenü im Gerät, das Sie koppeln möchten. Schalten Sie die Bluetooth-Verbindung
Ihres Geräts ein, wenn diese nicht automatisch aktiviert ist. Stellen Sie sicher, dass sich Ihr Gerät im
Suchmodus befindet und nach Geräten zum Koppeln sucht. In Menü mit den verfügbaren Geräten suchen
Sie nach PMX-BTUR und wählen Sie es aus. Sobald Ihr Gerät die Fernbedienung findet, wird es Sie
fragen, ob Sie dieses mit der Fernbedienung koppeln möchten. Nachdem die LED-Anzeige drei (3) Mal
grün blinkt, wählen Sie „Pair“ und schließen Sie das Einstellungsmenü. .
Anleitungen zum Entkoppeln (Un-Pairing)
Öffnen Sie das Bluetooth-Einrichtungsmenü im Gerät, das Sie entkoppeln möchten. Wählen Sie PMX-
BTUR im Menü, und anschließend „Gerät vergessen“. Die rote LED-Anzeige blinkt zwei (2) Mal und
bestätigt, dass das Gerät erfolgreich entkoppelt wurde.
Sobald die Fernbedienung vom ursprünglichen Gerät vergessen wurde, drücken Sie die Tasten 6-1-2-3
(Home Vol+ Vol- Play/Pause) innerhalb von 3 Sekunden. Bei erfolgreicher Ausführung leuchtet die
LED-Anzeige zuerst gelb und dann grün. Der Verlauf der Fernbedienung ist jetzt gelöscht, so dass diese
mit einem neuen Gerät gekoppelt werden kann. Folgen Sie den Anleitungen zum Koppeln oben auf dem
neuen Gerät.
Home-Taste LEDs
Grüne LED: Die grüne LED-Anzeige leuchtet grün fur 1,5 Sekunden, wenn ein neues Akku eingesetzt
wurde.
Grüne LED: Die grüne LED-Anzeige blinkt drei (3) Mal, kurz bevor der Benutzer „Pair“ auf dem Gerät
gedrückt hat.
Gelbe, dann grüne LED: Die Fernbedienung hat erfolgreich ihren Bluetooth-Verlauf gelöscht.
Rote LED: Die rote LED-Anzeige blinkt zwei (2) Mal, wenn die Fernbedienung vergessen wurde.
Rote LED: Sobald die Akkuladung unter 35 % fällt, leuchtet die rote LED-Anzeige dauerhaft und bleibt
eingeschaltet.
Kompatible Geräte:
Rockford Fosgate PMX-1 (siehe PMX-1 Handbuch für die Einstellung der Funktion bei direkter Kopplung
mit PMX-BTUR).
iPhone-Modelle (IOS 10 und höher): 5, 5C, 5S, 6, 6 Plus, 6S, 6S Plus, 7, 7 Plus, 8, 8 Plus, X.
iPod-Modelle: Touch (5. Gen.), Touch (6. Gen.)
Android (BT 5.0 und höher): Nur Bluetooth® Media.
Fernbedienung Aktivieren/Energiesparmodus
Wenn keine Tasten gedrückt werden, stellt sich die Fernbedienung nach 15 Sekunden automatisch auf
den Energiesparmodus ein, um die Akkulaufzeit zu verlängern. Um sie wieder zu aktivieren, drücken Sie
einfach einmal eine beliebige Taste auf der Fernbedienung.
Aktualisierungsvorgang
Von Zeit zu Zeit ist für PMX-BTUR eine Aktualisierung verfügbar. Um die Aktualisierung auf Ihrer
Fernbedienung zu installieren, öffnen Sie einfach Ihr Mobilgerät, gehen Sie zur Rockford Fosgate App
und folgen Sie den Anleitungen auf dem Bildschirm.
Deutsch

16
Design-Elemente und FunktionenDeutsch
TRACK-UP-Taste (5)
Drücken Sie diese Taste, um zum nächsten Titel zu
springen. Halten Sie diese Taste gedrückt für den
Schnellvorlauf (NUR IOS).
HOME-Taste (6)
EINGEHENDE ANRUFE: Ein kurzes Drücken dieser
Taste beantwortet/beendet eingehende Anrufe. Ein
langes Drücken dieser Taste lehnt einen eingehenden
Anruf ab. (NUR IOS)
LEDs: LED-Anzeige zeigt Bestätigung und Status
(siehe Home-Taste LEDs auf Seite 3).
VOL-UP-Taste (1)
Drücken Sie diese Taste kurz, um die Lautstärke
zu erhöhen. Langes Drücken dieser Taste wird die
Lautstärke schnell erhöht.
TRACK-DOWN-Taste (4)
Drücken Sie diese Taste kurz zum vorherigen Titel
zurückzugehen. Halten Sie diese Taste gedrückt, um
zurückzuspulen.
PLAY- / PAUSE-Taste (3)
Drücken Sie diese Taste für die Musik-Wiedergabe
oder Unterbrechung.
Langes Drücken dieser Taste aktiviert die
Freisprechfunktion (Freisprechtelefon) (NUR IOS)
VOL-DOWN-Taste (2)
Drücken Sie diese Taste kurz, um die
Lautstärke zu verringern. Langes Drücken
dieser Taste wird die Lautstärke schnell
verringern.

17
Batterie-Installation und Einbauoptionen
Deutsch
(-)
Abb. 2
Batterie-Installation
Entfernen Sie die gummierte Rückseite und finden
Sie die (2) Kreuzschlitzschrauben auf der Seite der
Einheit, die den Track-Up- und Track-Down-Tasten
am nächsten sind. Lösen Sie beide Schrauben und
ziehen Sie vorsichtig das Batteriefach heraus. Legen
Sie eine (1) CR2032 in das Fach mit dem Minuspol
nach oben ein. Auf der Unterseite des Fachs sehen ein
eingefrästes Plussymbol. Vergewissern Sie sich, dass
der Pluspol (die flache Seite) in dieselbe Richtung
zeigt, die auf dem Etikett auf dem Fach angezeigt
ist. Schieben Sie das Fach wieder in die Einheit
hinein und ziehen Sie die (2) Kreuzschlitzschrauben
an. Die LED-Anzeige leuchtet 1,5 Sekunden grün,
sobald die Batterie installiert ist, um zu bestätigen,
dass die Batterie in gutem Zustand und die Einheit
betriebsbereit ist.
Lenkrad-/Stangenmontage
Mit dem mitgelieferten Klettband-Montageadapter
halten Sie die gummierte Seite des Adapters gegen die
linke Hand auf der Innenseite des Lenkrads. Wickeln
Sie das Klettband um das Lenkrad und führen Sie es
dann durch die Öffnung auf die gegenüberliegende
Seite des Adapters ein. Wickeln Sie die Bänder lose
um das Lenkrad und sichern Sie diese mit dem
Klettband. Führen Sie jetzt die Einheit in den Adapter
hinein.
Entriegelungslasche und Standalone-Option
Um die Fernbedienung von der Lenkradhalterung zu
lösen, drücken Sie die Lasche auf der Unterseite der
Einheit in die angezeigte Pfeilrichtung. Während Sie
die Lasche halten, ziehen Sie die Einheit gerade nach
oben und aus der Halterung heraus. Wenn die Einheit
als Standalone verwendet und nicht fest angebracht
werden soll, finden Sie im Lieferumfang eine flache
Abdeckung, die auf die Einheit geschoben wird und
diese in eine mobile Fernbedienung verwandelt.
Rückseite
Wenn Sie die Fernbedienung mit der Lenkrad-/
Stangenmontage benutzen, müssen Sie die Rückseite
wieder anbringen. Damit werden das Batteriefach
und die Rückseite der Fernbedienung abgedeckt,
wenn diese nicht in der Standalone-Option verwendet
werden. Drücken Sie einfach die gummierten Stifte
in die vorhandenen Löcher auf der Rückseite der
Fernbedienung, um diese zu befestigen.

18
Symptome Diagnose Lösung
Grund
Fernbedienung schaltet sich
nicht ein
Keine Batterie Batterie (1 X CR2032) in die Einheit einlegen.
Batterie ist leer
Nehmen Sie die alte Batterie von der Einheit heraus und
ersetzen Sie diese mit einer neuen.
Batterie wurde falsch herum eingelegt
Nehmen Sie die Batterie heraus und legen Sie diese mit der
Plusseite der Batterie in dieselbe Richtung des Plussymbols
auf dem Fach hinein.
Bluetooth
Fernbedienung lässt sich nicht
koppeln
Fernbedienung erscheint nicht in der
Bluetooth-Liste
Drücken Sie eine beliebige Taste, um die Einheit zu
aktivieren.
Vergewissern Sie sich, dass eine volle Batterie in die Einheit
eingelegt wurde.
Schalten Sie Bluetooth in den Bluetooth-Einstellungen des
Geräts aus und dann ein.
Das Gerät, das gekoppelt wird. Ist nicht
im Kopplungs-Modus
Schalten Sie Bluetooth aus und dann wieder ein.
Vergewissern Sie sich, dass sich das Gerät im Suchmodus
befindet.
Die Fernbedienung ist schon mit einem
anderen Gerät gekoppelt
Gehen Sie zu den Einstellungen in Ihrem Gerät und
wählen Sie „Fernbedienung vergessen“ im Bluetooth-
Verlauf. Drücken Sie die Tasten 6-1-2-3 innerhalb von 3
Sekunden,warten Sie, bis die LED-Anzeige drei (3) Mal grün
blinkt, und drücken Sie dann „Pair“ auf dem neuen Gerät.
Fernbedienung ist gekoppelt,
reagiert aber nicht
Fernbedienung ist im
Energiesparmodus
Drücken Sie eine beliebige Taste auf der Fernbedienung, um
diese zu aktivieren.
Fernbedienung befindet sich außerhalb
der Reichweite des Geräts
Bringen Sie die Fernbedienung/das Gerät in eine Reichweite
von 10 m voneinander.
Verbindung wurde getrennt
Entkoppeln Sie das Gerät von der Fernbedienung. Schalten
Sie Bluetooth aus und dann wieder ein. Versuchen Sie die
Fernbedienung neu zu koppeln.
FehlerbehebungDeutsch

19
Dati tecnici
CEA 2006
La potenza nominale delle unità di fonte Rockford Fosgate è conforme agli standard del settore CEA-
2006. Queste linee guida significano che la potenza nominale in uscita dell’unità di fonte è un numero di
POTENZA REALE, e non una valutazione esagerata a scopi di marketing.
Modello PMX-BTUR
Tensione operativa 2.4V-3.3V
Bluetooth BLE4.2
Batteria CR2032
Istruzioni di abbinamento (pairing)
Premere un pulsante qualsiasi sul telecomando per riattivarlo. Aprire il menu per le impostazioni
Bluetooth sul dispositivo che si desidera abbinare. Attivare il Bluetooth del dispositivo se non è già
attivato. Assicurarsi che il dispositivo sia in modalità di rilevamento e stia rilevando i dispositivi con cui
abbinarsi. Nel menu dei dispositivi disponibili cercare PMX-BTUR e selezionarlo. Quando il dispositivo
ha trovato il telecomando verrà chiesto se si desidera associarlo con il telecomando. Il LED lampeggia
in verde con una sequenza di tre (3) flash. Quindi selezionare “Associa” (Pair) e uscire dal menu delle
impostazioni. .
Istruzioni per l’annullamento dell’abbinamento (un-pairing)
Aprire il menu per le impostazioni Bluetooth sul dispositivo con il quale si desidera annullare
l’abbinamento. Selezionare PMX-BTUR dal menu e quindi “Ignora dispositivo”. Il LED lampeggia in
rosso con una sequenza di due (2) flash confermando che il dispositivo non è più abbinato.
Dopo che il telecomando è ignorato sul dispositivo originale, premere i pulsanti 6-1-2-3 (Home Vol+
Vol- Play/Pause) entro 3 secondi. A operazione riuscita il LED si illumina in giallo e poi in verde. La
cronologia del telecomando adesso è cancellata, e quindi il telecomando può essere abbinato con un
nuovo dispositivo. Seguire le istruzioni di abbinamento sopra con il nuovo dispositivo.
LED pulsante Home
LED verde Il LED verde si illumina in verde per 1,5 secondi dopo che è stata installata una nuova batteria.
LED verde Il LED lampeggia in verde per tre (3) volte appena prima che l’utente preme “Abbina” sul
dispositivo.
LED in giallo e poi in verde: La cronologia Bluetooth è stata cancellata dal telecomando.
LED rosso: Il LED lampeggia in rosso per due (2) volte quando il telecomando è cancellato dalla
cronologia.
LED rosso: Quando la batteria si è esaurita sotto il 35%, il LED rosso passa a luce fissa e rimane acceso.
Dispositivi compatibili
Rockford Fosgate PMX-1 (vedi manuale PMX-1 per la funzionalità impostata quando abbinato
direttamente con PMX-BTUR).
Modelli iPhone (IOS 10 e successive): 5, 5C, 5S, 6, 6 Plus, 6S, 6S Plus, 7, 7 Plus, 8, 8 Plus, X.
Modelli iPod: Touch (5a gen.), Touch (6a gen.)
Android (BT 5.0 e successive): Solo Bluetooth® Media.
Attivazione/Sospensione del telecomando
Se non si premono pulsanti, il telecomando andrà automaticamente in sospensione dopo 15 secondi
per preservare la durata della batteria. Per riattivarlo semplicemente premere qualsiasi pulsante sul
dispositivo una volta.
Procedure per l’aggiornamento
Di tanto in tanto sarà disponibile un aggiornamento per PMX-BTUR. Per installare l’aggiornamento nel
telecomando semplicemente aprire il dispositivo mobile, andare alla app Rockford Fosgate e seguire le
istruzioni sullo schermo.
Deutsch Italiano

20
Caratteristiche del design e funzioniItaliano
Pulsante TRACK UP (5)
Premere questo pulsante per passare al prossimo
brano. Tenere il pulsante premuto per l’avanzamento
rapido. (SOLO IOS)
Pulsante HOME (6)
CHIAMATE IN ARRIVO: Per rispondere/chiudere
chiamate in arrivo premere brevemente questo
pulsante. Per rifiutare una chiamata in arrivo premere
a lungo questo pulsante. (SOLO IOS)
LED: L’indicatore LED mostra conferma e stato (vedi
LED pulsante Home a pagina 3).
Pulsante VOL UP (1)
Premere brevemente questo pulsante per
aumentare il volume. Premere a lungo questo
pulsante per aumentare il volume velocemente.
Pulsante TRACK DOWN (4)
Premere brevemente questo pulsante per si riavvia il
brano precedente. Tenere premuto questo pulsante per
riavvolgere.
Pulsante PLAY / PAUSE (3)
Premere questo pulsante per riprodurre o sospendere
la musica.
Premendo a lungo questo pulsante si attivano le mani
libere (Vivavoce) (SOLO IOS)
Pulsante VOL DOWN (2)
Premere brevemente questo pulsante per
ridurre il volume. Premere a lungo questo
pulsante per ridurre il volume velocemente.
La pagina sta caricando ...
La pagina sta caricando ...
La pagina sta caricando ...
La pagina sta caricando ...
-
 1
1
-
 2
2
-
 3
3
-
 4
4
-
 5
5
-
 6
6
-
 7
7
-
 8
8
-
 9
9
-
 10
10
-
 11
11
-
 12
12
-
 13
13
-
 14
14
-
 15
15
-
 16
16
-
 17
17
-
 18
18
-
 19
19
-
 20
20
-
 21
21
-
 22
22
-
 23
23
-
 24
24


Rockford Fosgate PUNCH PMX-BTUR Installation & Operation Manual
- Tipo
- Installation & Operation Manual
in altre lingue
- English: Rockford Fosgate PUNCH PMX-BTUR
- français: Rockford Fosgate PUNCH PMX-BTUR
- español: Rockford Fosgate PUNCH PMX-BTUR
- Deutsch: Rockford Fosgate PUNCH PMX-BTUR
Documenti correlati
-
 Rockford Fosgate PMX-HD9813 Manuale del proprietario
-
 Rockford Fosgate PMX-0 Manuale del proprietario
-
Rockford Fosgate PMX-2 Manuale utente
-
 Rockford Fosgate PMX-3 Manuale utente
-
 Rockford Fosgate Polaris PMX-P2 Istruzioni per l'uso
-
 Rockford Fosgate Punch PMX-5 Manuale del proprietario
-
 Rockford Fosgate PUNCH PMX-BTUR Installation & Operation Manual
-
 Rockford Fosgate PMX-RGB Manuale utente
-
Rockford Fosgate M2-65B Installation & Operation Manual
-
 Rockford Fosgate Element Ready M2D2-10IB Installation & Operation Manual


