Ligra Qadro Manuale utente
- Categoria
- Schermi per proiezioni
- Tipo
- Manuale utente

SCHERMO QADRO - Istruzioni di montaggio
QADRO SCREEN - Assembling manual
Via Artigiani 29/31 - 29020 Vigolzone (PC) - Italy
Tel: +39-0523.872014 Fax: +39-0523.870089
E-mail: [email protected] - Web: www.ligra.it
Disimballaggio dello schermo
Assicurarsi che nessuna parte dello schermo sia stata dan-
neggiata durante il trasporto. Attenzione: si raccomanda di
non usare taglierini o oggetti appuntiti per aprire l’imballag-
gio contenente la tela da proiezione!
Unpacking the screen
Make sure that no part of the screen has been damages du-
ring the transport. Attention: we recommend not to use box
cutters or sharp objects to open the package containing the
projection screen!
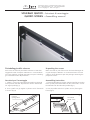
Istruzioni per il montaggio
1. Infilare i cursori nei singoli profili secondo le quantità di
asole presenti nella tela di proiezione. Infilare i bulloni M6
nei singoli profili (Fig.1)
2. Unire i profili con gli angolari in plastica ad “L” formando
la cornice (Fig.2)
Assembling instruction
1. Put the slide fasteners into the individual profiles according
to the quantity of the buttonholes on the screen fabric. Screw
the M6 bolts into the individual profiles (Fig.1)
2. Join the profiles with the “L” plastic corners, forming the
frame (Fig.2)
1 2
Cursore
Spring Hook
M6
Vite M6x8
M6x8 Screw

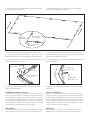
4. Montare la tela dello schermo preparata sulla cornice. usa-
re i cursori per fissarla. Agganciare prima i lati più corti. Con-
trollare e sistemare per accertarsi della planarità della tela.
5. Usare le viti M6x15 per fissare le piastre quadrate in ferro
all’angolo della cornice (Fig.4).
6. Usare il giusto senso per posizionare la cornice dello
schermo a parete (Fig.5).
4. Assemble the prepared screen fabric on the frame. Use
the slide fasteners to fix them. Fix short sides first. Check and
adjust to ensure the fabric flatness.
5. Use the M6x15 screws to fix the square steel plate to the
frame angle (Fig. 4).
6. Then use the right turning to fix the frame screen to the
wall (Fig. 5).
Installazione dello schermo
L’installazione può avvenire solo su una superficie verticale
(muro, parete divisoria etc.) tramite le due piastre che si tro-
vano nell’imballo. Dopo aver montato lo schermo, calcolia-
mo la distanza di fissaggio delle due piastre. Fare attenzione
ad utilizzare viti e tasselli adeguati alla parete che si utilizza
per il fissaggio e al peso dello schermo. Dopo aver montato
viti e tasselli alla parete agganciare lo schermo.
Screen installation
The screen can only be installed on a vertical surface (wall,
dividing panel etc.) using two plates contained in the packa-
ge. After having assembled the screen, calculate the fixing
disctance of the two plates. Take care to use screws and an-
chors suitable for the wall that you are attaching to and the
weight of the screen. After having mounted the screws and
anchors, hook the screen to the wall.
Attenzione!
L’azienda produttrice non si assume responsabilità per danni a
cose o persone causati da un uso improprio dello schermo.
Attention!
The manufaturer assumes no responsability for damage or
personal injury caused by the improper use of the screen.
4 5
Vite M6x15
M6x15 Screw
Cursore
Tela di proiezione
Screen fabric
Vite M5x50
M5x50 Screw
Tassello Ø8
Ø8 Plastic pipe
3. Inserire le barre di ferro Ø5 nelle asole della tel. Inserire
prima le barre più corte (Fig.3)
3. Insert the Ø5 steel bars in the slots in the screen fabric.
Insert the short steel bars first (Fig.3).
3
Dettaglio “A”
Detail “A”
Tela di proiezione
Screen fabric
Barra di ferro Ø5
Ø5 steel rod
19.02.2010
-
 1
1
-
 2
2


Ligra Qadro Manuale utente
- Categoria
- Schermi per proiezioni
- Tipo
- Manuale utente
in altre lingue
- English: Ligra Qadro User manual
Documenti correlati

Altri documenti
-
Electrolux IUSL1065CN Guida d'installazione
-
 Beninca VESN500 Istruzioni per l'uso
-
 Beninca Lady.SN Manuale del proprietario
-
Telcoma ACE Instruction Handbook Manual
-
Meiko WasteStar SC Istruzioni per l'uso
-
König TVS-KN-FSB010B specificazione
-
König TVS-KN-FSB010S specificazione
-
Zanussi ZX8550CIM Manuale utente
-
ATIKA ASP 5 N-UG Manuale del proprietario
-
Maserati Bora (Italian - English) Manuale del proprietario

