Black & Decker FX1000 Manuale utente
- Categoria
- Frullatori
- Tipo
- Manuale utente

FOOD PROCESSOR
FX1000
Please read through this booklet for safe and efficient use of the appliance.
We urge you to read the "Hint's" section and also follow all detailed
instructions even if you are familiar with using this appliance.
Keep this guide handy for future reference.
First Use Safety Recommendation
English Page 02
Farsi Page 29
Arabic Page 43

While using electrical appliances, in order to reduce the risk of fire, electric shock,
and/or injury to persons, basic safety precautions should be followed, including the
following:
• Read all instructions carefully, even if you are familiar with the appliance.
• To protect against the risk of electric shock, DO NOT IMMERSE the appliance,
cord set or plug in water or other liquids.
• To clean, wipe the exterior with a damp cloth.
• Close supervision is necessary when any appliance is used near children. Never
leave an appliance unattended when in use.
• If the supply cord is damaged, it must be replaced by the manufacturer or its
service agent or a similarly qualified person in order to avoid a hazard.
• Switch off and remove the plug from the power outlet when not in use before
assembling or disassembling parts, cleaning or carrying out any maintenance of
the appliance. Never pull the cord while unplugging out from power outlet.
• Do not operate the appliance if its damage in any manner. Return the complete
appliance to your nearest authorized service facility for examination, electrical
repair, mechanical repair or adjustments to avoid any hazard.
• The use of attachments or accessories not recommended or sold by this
appliance manufacturer may result in fire, electric shock or personal injury.
• Do not let the cord hang over the edge of a table, counter, or touch hot surfaces.
• Avoid touching hot surfaces, use handles and knobs.
• Do not operate or place any part of this appliance on or near any hot surfaces
(such as gas or electric burner or in a heated oven).
• Do not abuse the cord. Never carry the appliance by the cord or yank it to
disconnect it from the outlet; instead, grasp the plug and pull to disconnect.
• When using an extension cord with your appliance, make sure the extension cord
is correctly wired, and rated for its use.
• This product is intended for household use only.
• Do not attempt to repair the appliance yourself; instead, take it to your Black &
Decker-owned or Authorized Service Centre for repair.
IMPORTANT SAFEGUARDS
SAVE THESE INSTRUCTIONS
-2-
English

English
-3-
8
2
6
22
21
20
19
18
Fig A
Fig B
10
4
5
3
1

English
-4-
14 15
12
13
Fig C
9
2
1
16
11
17

English
-5-
35
36
31
7
32
33
34
37
38
24
25
26
30
27
23
28
29
Fig D
Fig E Fig F

English
-6-
Intended use
Your Black & Decker food processor has
been designed for preparing food and
beverage ingredients as described in this
manual. Do not use this appliance for any
other purpose. This product is intended for
indoor household use only.
Safety instructions
Warning! When using mains-powered
appliances, basic safety precautions,
including the following, should always be
followed to reduce the risk of fire, electric
shock, personal injury and material
damage.
Read all of this manual carefully
before using the appliance.
• The intended use is described in this
manual. The use of any accessory or
attachment or the performance of any
operation with this appliance other than
those recommended in this instruction
manual may present a risk of personal
injury.
• Retain this manual for future reference.
Using your appliance
• Make sure that the appliance is switched
off before connecting to or
disconnecting from the power supply.
• Always take care when using the
appliance.
• Do not use the appliance outdoors.
• Always protect the motor unit from water
or excessive humidity.
• Do not operate the appliance if your
hands are wet.
• Do not operate the appliance if you are
barefoot.
• Do not touch moving parts. Keep long
hair and loose clothing out of the way of
the moving parts.
• Guide the power supply cord neatly so it
does not hang over the edge of a
worktop and cannot be caught
accidentally or tripped over.
• Never pull the power supply cord to
disconnect the plug from the socket.
Keep the power supply cord away from
heat, oil and sharp edges.
• Switch off and wait for the motor to stop
running before disconnecting the
appliance from the power supply.
• Never detach any part or accessory while
the appliance is still connected to the
power supply. Always disconnect the
appliance from the power supply first.
• If the power supply cord is damaged
during use, disconnect the appliance
from the power supply immediately. Do
not touch the power supply cord before
disconnecting from the power supply.
• Disconnect the appliance from the power
supply when not in use, before fitting or
removing parts and before cleaning.
• Misuse could cause an injury.
• Keep loose clothing, hair, jewellery etc.
away from moving parts.
• Care is needed when handling cutting
blades, especially when removing the
blades and during cleaning.

English
-7-
Safety of others
• Do not allow children or any person
unfamiliar with these instructions to use
the appliance.
• Do not allow children or animals to
come near the work area or to touch the
appliance or power supply cord.
• Close supervision is necessary when the
appliance is used near children.
• This appliance is not intended for use by
persons (including children) with
reduced physical, sensory or mental
capabilities, or lack of experience and
knowledge, unless they have been give
supervision or instruction concerning
use of the appliance by a person
responsible for their safety.
• Children must be supervised to make
sure that they do not play with the
appliance.
After use
• Switch off the appliance before cleaning,
changing accessories or approaching
parts which move in use.
• Switch off and remove the plug from the
socket before leaving the appliance
unattended and before changing,
cleaning or inspecting any parts of the
appliance.
• When not in use, the appliance should
be stored in a dry place. Children should
not have access to stored appliances.
Inspection and repairs
• Before use, check the appliance for
damaged or defective parts. Check for
breakage of parts, damage to switches
and any other conditions that may affect
its operation.
• Do not use the appliance if any part is
damaged or defective.
• Have any damaged or defective parts
repaired or replaced by an authorised
repair agent.
• Before use, check the power supply cord
for signs of damage, ageing and wear.
• Do not use the appliance if the power
supply cord or mains plug is damaged or
defective.
• If the supply cord is damaged, it must be
replaced by the manufacturer or an
authorised Black & Decker Service
Centre in order to avoid a hazard.
• Never attempt to remove or replace any
parts other than those specified in this
manual.
Electrical Safety
This tool is double insulated in
accordance with EN60335;
therefore no earth wire is required.Always
check that the power supply corresponds to
the voltage on the rating plate.
To avoid the risk of electric shock,
do not immerse the cord, plug or
motor unit in water or other liquid.
Unpacking
• Remove all packaging from the
appliance.
• Clean the appliance before first use.

English
-8-
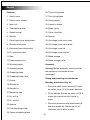
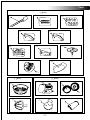
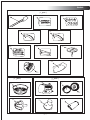
Features
1 Safety cover
2 Safety cover release
3 Main unit
4 Turbo/pulse button
5 Speed control
6 Spindle
7 Centrifugal Juicer attachment
8 Blender attachment
9 Processor bowl attachment
10 Dry mill attachment
11 Bowl
12 Food processor lid
13 Whisking blade
14 Kneading blade
15 Chopping blade
16 Chopping blade cover
17 Pusher
18 Blender jar
19 Blender lid
20 Measuring cap
21 Dry mill jar
22 Dry mill lid
23 Spatula
24 Fine shredding blade
25 Coarse shredding blade
26 Thick slicing blade
27 Thin slicing blade
28 Grating blade
29 French fry blade
30 Blade carrier
31 Citrus juice filter
32 Reamer
33 Centrifugal juicer sieve inner
34 Centrifugal juicer seive outer
35 Centrifugal juicer lid
36 Centrifugal juicer pusher
37 Blade storage
38 Blade storage cover
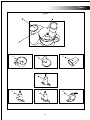
Assembly
Warning! Before assembly, make sure that
the appliance is switched off and
unplugged.
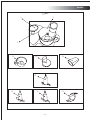
Fitting and removing an attachment
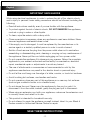
Blending attachment (fig. A)
• Press the safety cover release (2) & raise
the safety cover (1) to the open position.
• Fit the blender (8) onto the main unit (3) &
rotate anti-clockwise until it locks in
place.
• Place the processor bowl attachment (9)
over the spindle (6). Rotate the lid (12)
clockwise until it locks in place.

English
-9-
Note: The blender will not operate if the
processor lid is not locked in position.
• To remove the blender attachment, turn
the appliance off & wait until all parts
come to a complete stop then remove
the processor lid (12).
• Rotate the blender in a clock-wise
direction & lift it from the appliance.
• Close the safety cover (1) & press it
down until it locks in place.
Note: Do not fit any attachments to the
bowl attachment (9) when using the
blender attachment.
Note: Never operate the blender when
empty.
Mill Attachment (fig. B)
• Press the safety cover release (2) & raise
the safety cover (1) to the open position.
• With the ingredients in the mill
attachment (10), place it onto the main
unit (3) & rotate the lid (22)
anti-clockwise until it locks in place.
• Place the processor bowl attachment (9)
over the spindle (6). Rotate the lid (12)
clockwise until it locks in place.
Note: The mill will not operate if the
processor lid is not locked in position.
• To remove the mill attachment, turn the
appliance off & wait until all parts come
to a complete stop then remove the
processor lid (12).
• Rotate the mill in a clock-wise direction
& lift it from the appliance.
• Close the safety cover (1) & press it down
until it locks in place.
Note: Do not fit any attachments to the bowl
attachment (9) when using the mill
attachment.
Note: Never operate the mill when empty.
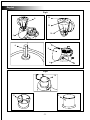
Whisk, Kneading & Chopping Blade
Attachments (fig. C)
• Close the safety cover (1) & press it down
until it locks in place.
• Place the processor bowl attachment (9)
over the spindle (6).
• Fit the required attachment (13, 14 or 15)
over the spindle (6), rotating it to ensure it
drops into place.
• Place the lid (12) onto the bowl (11) &
rotate clockwise until it locks in place.
• Fit the pusher (17) into the hole in the lid
(12).
• To remove the attachment, turn the
appliance off & wait until all parts come
to a complete stop then remove the
processor lid (12).
• Lift the whisk from the appliance.
Note: Never use the whisk for kneading
dough
Note: Always leave the pusher in place
when an attachment is fitted in the bowl.
Note: The appliance will not operate if the
will not operate if the lid (35) is not locked in
position.
Note: Care must be taken when handling
the sharp cutting blades, emptying the bowl
and during cleaning.

English
-10-
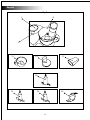
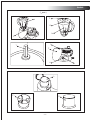
Citrus Juicer Attachment ( Fig E)
• Close the safety cover (1) & press it
down until it locks in place.
• Place the processor bowl (11) over the
spindle (6).
• Fit the citrus filter (31) over the spindle
(6) & rotate it anti-clockwise until it locks
in place.
• Fit the reamer (32) over the spindle.
• To remove the attachment, turn the
appliance off & wait until all parts come
to a complete stop then rotate it in a
clockwise direction & lift it from the
appliance.
Note: The citrus juicer will not operate if the
filter (31) is not locked in position.
Centrifugal Juicer Attachment (Fig F)
• Close the safety cover (1) & press it
down
• Place the processor bowl (11) over the
spindle (6).
• Fit the sieve parts (33 & 34) together &
place them inside the processor bowl
(11).
• Fit the centrifugal juicer lid (35) onto the
bowl & rotate anti-clockwise until it
locks in place. Place the pusher (36) into
the hole in the lid.
• To remove the attachment, turn the
appliance off & wait until all parts come
to a complete stop. Rotate the lid (35) in
a clockwise direction & lift it from the
appliance.
• Remove the filter.
Note: The centrifugal juicer will not operate
if the will not operate if the lid (35) is not
locked in position.
Note: Always leave the pusher in place
when an attachment is fitted in the bowl.
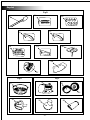
Shredding, Slicing, Grating & Chipping
Blade Attachment (Fig D)
• Close the safety cover (1) & press it down
• Place the processor bowl (11) over the
spindle (6).
• Fit the required blade (24, 25, 26, 27, 28
or 29) to the blade carrier. The short,
straight edge of the blade should be
inserted into the rectangular hole in the
carrier first then the curved edge should
be carefully pressed down until it locks in
place.
• Fit the blade carrier (30) over the spindle.
• Place the lid (12) onto the bowl (11) &
rotate clockwise until it locks in place.
• Fit the pusher (17) into the hole in the lid
(12).
• To remove the attachment, turn the
appliance off & wait until all parts come
to a complete stop then remove the
processor lid (12).
• Using the 2 holes provided, lift the carrier
from the appliance.
Note: Always leave the pusher in place
when an attachment is fitted in the bowl.
Note: The appliance will not operate if the
will not operate if the lid (35) is not locked in
position.
Note: Care must be taken when handling
the sharp cutting blades, emptying the bowl
and during cleaning.

English
-11-
Blade Storage (Fig D)
• Place each of the 6 blades (24, 25, 26,
27, 28 or 29) into the slots in the blade
storage (37).
• Fit the cover (38) over the blades.
• The blade storage can be placed on top
of the processor lid (35) for storage.
Use
Blending (Fig A)
• Place the ingredients in the blender.
• Press the lid (19) onto the jar (18) &
insert the measuring cap (20) into the
hole in the lid.
• Attach the blender & processing bowl to
the main unit.
• Connect the appliance to a suitable
electrical supply.
• The blender can be operated by rotating
the speed control (5) to the required
speed or by pressing the “Turbo / Pulse”
button (4).
Note: Always operate the blender with the
lid in place.
Note: When blending warm liquids, loosen
the measuring cap (20).
Note: Never operate the blender with more
than 1000ml of liquid or when empty.
Mill (Fig B)
• Place the ingredients in the mill jar (21).
• Assemble the lid (22) to the jar then fit
the assembled mill and processor bowl
& lid to the main unit.
• Connect the appliance to a suitable
electrical supply.
• The mill should be operated by pressing
the “Turbo / Pulse” button (4).
• Do not operate the appliance
continuously for more than 1 minute.
• After operating continuously for 1
minute, let it cool down for at least 1-2
minutes before operating it again.
Food Guide
Ingredients Runtime Speed Qty
Pepper/Coffee beans 15-25 sec 10 40 gms
Pulses 25-35 sec 15 50 gms
Whisk, Kneading & Chopping Blade (Fig
C)
• Fit the processor bowl (11) onto the main
unit (3).
• Fit the whisk (13), kneading blade (14) or
chopping blade (15) over the spindle (6).
• Add the ingredients to the bowl & fit the
lid (12).
• Connect the appliance to a suitable
electrical supply.
• The appliance can be operated by
rotating the speed control (5) to the
required speed, or pressing the “Turbo /
Pulse” button (4).
• Use the food pusher (10) to add food into
the processor bowl (12) through the hole
in the lid (12).
• When the processing is complete,
remove the blade from the bowl before
removing the processed ingredients.
• After cleaning, always replace the
protective cover (14) on the metal
chopping blade (15).

English
-12-
Note: Care must be taken when handling
the sharp cutting blades, emptying the
bowl and during cleaning.
Note: Always handle the chopping blade
(15) by its central plastic part.
Note: When kneading dough, do not
operate the machine longer than 20
seconds. Wait at least 2 minutes before
operating the machine again.
Note: When whisking, use maximum
speed.
Citrus Juicer Attachment (Fig E)
• Fit the processor bowl (11) onto the
main unit (3) & assemble the citrus
juicer.
• Cut the fruit in half.
• Connect the appliance to a suitable
electrical supply.
• Rotate the speed control (5) to the
minimum setting.
• Gently press the cut face of the fruit
onto the reamer (32).
• When juicing is completed, turn off the
appliance & wait until all parts come to a
complete stop.
• Remove the reamer & filter.
• Remove the bowl (11) & pour the juice
into a suitable container.
Note: The citrus juicer should only be
operated at minimum speed.
Centrifugal Juicer Attachment (Fig F)
• Fit the processor bowl (11) onto the
main unit (3) & assemble the centrifugal
juicer.
• Connect the appliance to a suitable
electrical supply.
• Rotate the speed control (5) a medium
setting for soft fruits & the maximum
setting for hard fruits.
• Insert the ingredient into the hole in the
lid. The pusher (36) can be used to guide
the ingredients onto the filter.
• If the juice extractor becomes clogged
during use, turn the processor off and
remove the pulp using the spatula.
Note: Always use the pusher (36) to guide
the ingredients.
Note: Never insert fingers in to the hole in
the lid.
Note: Do not use the appliance if the
rotating sieve is damaged.
Shredding, Slicing, Grating & Chipping
Blade Attachment (Fig D)
• Assemble the required blade & fit the
bowl & assembled blade carrier to the
appliance.
• Fit the lid.
• Connect the appliance to a suitable
electrical supply
• Rotate the speed control (5) to the
maximum setting.
• Using the pusher (36), press the
ingredients down towards the blade.
Note: Always use the pusher (36) to guide
the ingredients.
Note: Never insert fingers in to the hole in
the lid.
Note: Do not over-fill the bowl
Note: Care must be taken when handling
the sharp cutting blades, emptying the bowl
and during cleaning.

English
-13-
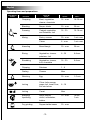
Chopping Meat, vegetables 15 - max 15-20 sec
cheese, chocolate
Blending Soups, drinks 20 - max 20 sec
Pureeing Cooked vegetables 15 - 20 10-15 sec
and Potatoes, fruit
Mixing Pastry, scones 20 - max 1 min max
Cakes 5 - max 1 min max
Kneading Bread dough 20 - max 20 sec
Slicing Vegetables, cheese, 5 - 20 5-6 sec
potatoes, fruit
Shredding Vegetables, cheese, 15 - 20 5-6 sec
fruit, chocolate
Chipping Potatoes 1 - 5
Grating Cheese Max
Whisking Egg 20 - max 1-2 min
Citrus fruits orange,
Juicing grape fruit, lemon lime, 5 - 15
cut into halves
Juicing Carrot Max
Blending/ Soup, purees, 20 - max 15 sec
liquidising drinks, milkshakes, 1 min
batters
Dry grinding Pepper/coffee beans 20 - max
Attachment
Function
Types Of
Speed Times
& Tools Food
Operating times and preparations

Switching on and off
• To operate the appliance for a short
time, press the “Turbo / pulse” button
(4). The appliance will stop operating
once the “Turbo / pulse” button is
released.
• For continuous operation, rotate the
speed control (5) to the required speed.
The appliance will stop operating once
the control is returned to the “0” (Off)
position.
• For an additional burst of speed, the
“Turbo / pulse” button can be pressed
for a short time during processing. To
return to the previous speed, release the
button.
Warning! Do not operate the appliance
continuously for more than the specified
times. After operating the appliance up to
the times stated, allow it to cool down to
room temperature before operating it again.
Warning! After switching off always allow
the motor to stop before approaching the
blade.
Cleaning and maintenance
Warning! Switch the appliance off and
unplug it before cleaning or maintenance.
Be careful when cleaning the blades; they
are sharp.
Warning! Do not immerse the appliance,
the cord set or the plug in water or any
other liquid.
Wash the attachments in warm soapy
water and dry well.
• Wipe the main unit (3) with a damp cloth.
Do not use any abrasive or
solvent-based cleaner. Ensure the unit is
dry before re-use.
• Always clean the appliance immediately
after use. Do not let food dry on to the
blades as this will make cleaning difficult.
Technical Data
English
-14-
FX1000
Voltage Vdc 230
Power input W 1000
Weight kg 4.9

Black & Decker provides a 2 Year Warranty for this product from the date of purchase against
defects due to defective materials or workmanship. Motor/element burn-outs due to voltage
fluctuations are not covered under warranty. If the product should become defective within
the warranty period, Black & Decker will repair or (at Black & Decker's discretion) replace it
free of charge.
The warranty provisions do not cover failure due to accident, misuse, abuse, negligence or
non observation of local regulations on the part of the user. Equally, the warranty provisions
do not apply where the appliance has been serviced by a person not authorized by Black &
Decker or serviced with non-approved parts and this has contributed to the fault of the
product. Superseded models without a replacement equivalent will either be repaired or (at
Black & Decker's discretion) replaced with another product of similar retail value.
UPON PURCHASE
Fill in the Warranty Registration Card with the original Authorized Dealer's stamp (indicating
date of purchase) and attach your purchase receipt to it. Retain in case of claims in the future.
MAKING A CLAIM
Take your defective product together with the Warranty Registration Card & purchase receipt
to your local service Centre. You can either do this in person or send it freight prepaid. If
mailing or shipping your appliance, ensure that it is packed carefully in a sturdy carton with
enough packing material to prevent damage. Include a note describing the problem to the
service Centre and be sure to give your return address.
DESIGNED FOR DOMESTIC PURPOSES ONLY.
BLACK & DECKER HOME APPLIANCE 2 YEAR WARRANTY
English
-15-
Protecting the environment
Separate collection. This product must not be disposed of with normal household
waste.
Should you find one day that your Black & Decker product needs replacement, or if it is of no
further use to you, do not dispose it off with other household waste. Make this product
available for separate collection.
Separate collection of used products and packaging allows materials to be recycled
and used again. Use of recycled materials helps prevent environmental pollution and
reduces the demand for raw materials.
Local regulations may provide for separate collection of electrical products from the
household, at municipal waste sites or by the retailer when you purchase a new product.
Black & Decker provides a facility for the collection and recycling of Black & Decker products
once they have reached the end of their working life. To take advantage of this service please
return your product to any authorised repair agent who will collect them on our behalf. You
can check the location of your nearest authorised repair agent by contacting your local Black
& Decker office at the address indicated in this manual. A list of authorised Black & Decker
repair agents and full details of our after-sales service and contact are available on the
Internet at: www.2helpU.com

-61-
°Kp «≤b œØd «¥s ±∫Bu‰ ¸« °t ±b‹ 2 ßU‰ «“ ¢U¸¥a îd¥b œ¸ °d«°d «¥d«œ«‹ ≤U®v «“ îd«°v ∞u«“ ¥U îDU≥UÈ ßUîX ¢CLOs ±v ØMb.
ßuî∑s ±u¢u¸ °d «£d ≤ußU≤U‹ °d‚ ®NdÈ ±ALu‰ «¥s {LU≤X ≤Lv ®uœ. œ¸ Åu¸¢OJt œß∑~UÁ œ¸ îö‰ ±b‹ {LU≤X îd«» ®uœ, °Kp «≤b
œØd ¬≤d« °t Åö•b¥b îuœ Ë °Du¸ ±πU≤v ¢FLOd Ë ¥U ÆDFU‹ ¬≤d« ¢Fu¥i îu«≥b ≤Luœ.
«¥s {LU≤X, «¥d«œ«‹ •UÅKt °d «£d ¢BUœ·, ´b «ß∑HUœÁ Å∫O`, «ß∑HUœÁ ¨Kj, °v ±∂Uô¢v ¥U ´b ¢u§t °t Æu«≤Os ±∫Kv œ¸ §U¥v Øt ±U∞p
œß∑~UÁ œ¸ ¬Ê ßJu≤X œ«¸œ ¸« œ¸ °d ≤Lv ÖOdœ. °~u≤t «È ±AU°t, œ¸ Åu¸¢OJt œß∑~UÁ ¢ußj ¢FLOd ÖU≥v ¨Od «“ ±d«Øe ¢FLOd ±πU“ °Kp «≤b
œØd ßdË¥f ®bÁ °U®b Ë ¥U œ¸ ßdË¥f ¬Ê ÆDFU‹ ¨Od «ÅKv °JU¸ ¸≠∑t Øt ±Mπd °t îd«°v œß∑~UÁ ®bÁ °U®b, {LU≤X œß∑~UÁ «“ «´∑∂U¸
îU¸Ã ±v ®uœ. ±b‰ ≥UÈ Æb¥Lv Øt ±AU°t ®UÊ °d«È §U¥~e¥Mv œ¥~d ±u§uœ ≤Lv °U®b, ¢FLOd ®bÁ ¥U °t Åö•b¥b °Kp «≤b œØd °U ±∫Bu∞
v œ¥~d °U «¸“‘ ±AU°t §U¥~e¥s îu«≥Mb ®b.
°t ≥M~UÂ îd¥b
≠d £∂X {LU≤∑MU±t ¸« Äd ≤LuœÁ «“ ≠dË®MbÁ ±∫Bu‰ °ªu«≥Ob ¢U ¬≤d« °U –Ød ¢U¸¥a îd¥b ±∫Bu‰ ±Nd ≤LuœÁ Ë ¸ßOb îd¥b ¸« ≤Oe °t ¬Ê «∞
BU‚ ≤LU¥b. ØU¸‹ {LU≤X ¸« §NX ±d«§FU‹ °FbÈ •Hk ≤LUzOb.
¸Ë‘ ±DU∞∂t
ËßOKt ±FOu» îuœ ¸« °t ≥Ld«Á ØU¸‹ {LU≤X Ë ¸ßOb îd¥b ¬Ê °t ≤eœ|J∑d¥s ±dØe ßdË¥f ±πU“ ±∫q ßJu≤X îuœ °∂d¥b. ®LU ±v ¢u«≤Ob
«¥MJU¸ ¸« ±º∑IOLU ¥U ¢ußj ÄOp ÄOg Ädœ«“ «≤πU œ≥Ob. œ¸ Åu¸¢OJt œß∑~UÁ îuœ ¸« °U ĺX Ë ¥U ÄOp «¸ßU‰ ±v ≤LUzOb ¬≤d« œ«îq |p ØU¸¢s
±∫Jr Æd«¸ œ«œÁ Ë «©d«· ¬Ê ¸« °U ±u«œ ±ªBu’ °º∑t °MbÈ Äd ØMOb ¢U «“ ¬ßOV ¸ßObÊ °t œß∑~UÁ °t ≥M~U •Lq §KuÖOdÈ ®uœ. °t ≥Ld«Á
œß∑~UÁ ¢u{O∫v ±ª∑Bd «“ «¥d«œ ¬Ê ¸« ≥r «¸ßU‰ ≤LuœÁ Ë –Ød ¬œ¸” ÖOd≤bÁ ¸« ≤Oe ≠d«±u‘ ≤MLUzOb.
©d«•v ®bÁ ¢MNU §NX ±BU¸· îU≤~v
{LU≤∑MU±t 2 ßU∞t ∞u«“ îU≤~v °Kp «≤b œØd
•HU™X «“ ±∫Oj “¥ºX
«¥s ËßOKt ¸« ≤∂U¥b ±U≤Mb œ¥~d “°U∞t ≥UÈ ´UœÈ ±Me‰ °b˸ «≤b«îX °KJt °U¥b ¬≤d« «“ œ¥~d “°U∞t ≥U ±πe« ≤Luœ.
œ¸ Åu¸¢OJt ¥JdË“ ±∫Bu‰ °Kp «≤b œØd ®LU œ¥~d °JU¸¢UÊ ≤OU±b ¥U îu«ß∑Ob ¬≤d« °U ÇOe œ¥~dÈ §U¥~e¥s ≤LUzOb, ¬≤
d« °U œ¥~d “°U∞t ≥UÈ ´UœÈ ±Me‰ °b˸ ≤OU≤b«“¥b °KJt ¬≤d« §NX §Ll ¬Ë¸È «“ œ¥~d “°U∞t ≥U ±πe« ≤LUzOb.
§b«ßU“È ±∫Buô‹ Ë °º∑t °MbÈ ≥U °U´Y ±v Ödœœ ¢U °∑u«Ê ¬≤NU ¸« °U“¥U≠X ≤Luœ Ë ±πbœ« ±u¸œ «ß∑HUœÁ Æd«¸
œ«œ. «ß∑HUœÁ «“ ∞u«“ °U“¥U≠∑v «“ ¬∞uœÖv ±∫Oj “¥ºX ØUß∑t Ë ≤OU“ °t ±u«œ îU ¸« ≤Oe ØU≥g îu«≥b œ«œ.
±LJs «ßX œ¸ Æu«≤Os ±∫Kv ±∫q ßJu≤X ¢UÊ «±JUÊ §Ll ¬Ë¸È ∞u«“ «∞J∑d¥Jv ±Me‰ œ¸ «±UØs îUÅv ¢ußj ®Ndœ«¸È ¥U
≠dË®MbÁ ¢πNOe«‹ œ¸ ≤Ed Öd≠∑t ®bÁ °U®b.
ØLáU≤v °Kp «≤b œØd ¢ºNOö¢v ¸« §NX §Ll ¬Ë¸È Ë °U“¥U≠X ±∫Buô‹ ±∑FKo °t ®LU ( ≥M~U±v Øt °t ÄU¥UÊ ´Ld ØU¸È
îuœ ¸ßObÁ °U®Mb) ¸« «¸«zt ±v ≤LU¥b. §NX °NdÁ ±MbÈ «“ «¥s «±JUÊ ∞DHUÎ ±∫Bu‰ îuœ ¸« °t ≥d Øb«Â «“ ≤LU¥MbÖv ≥UÈ
¢FLOd ±πU“ ±U ¢∫u¥q œ≥Ob Ë ¬≤NU ±∫Buô‹ ¸« °t ≤OU°X «“ ±U ¢∫u¥q îu«≥Mb Öd≠X. §NX ¥U≠∑s ≤eœ¥p ¢d¥s ±dØe
¢FLOd ±πU“ œ¸ ±∫q ßJu≤X ¢UÊ °U œ≠∑d ±∫Kv °Kp «≤b œØd œ¸ ¬œ¸” ≥U¥v Øt œ¸ «¥s ¸«≥MLU –Ød Ödœ¥bÁ «≤b ¢LU”
•UÅq ≤LUzOb. §NX œ¸¥U≠X ∞OºX ØU±q Ë §ezOU‹ ≤LU¥MbÖv ≥UÈ îb±U‹ Äf «“ ≠dË‘ °Kp «≤b œØd Ë ®LU¸Á ≥UÈ
¢LU” ¬≤NU °t ¬œ¸” «¥M∑d≤∑v moc.Upleh2.www ±d«§Ft ≤LUzOb.
Farsi

-71-
ﻩﺎﮕﺘﺳﺩ ﻥﺩﺮﮐ ﺵﻮﻣﺎﺧ ﻭ ﻦﺷﻭﺭ ﻩﻮﺤﻧ
،ﻩﺎﺗﻮﮐ ﺕﺪﻣ ﮏﯾ ﯼﺍﺮﺑ ﻩﺎﮕﺘﺳﺩ ﺯﺍ ﻩﺩﺎﻔﺘﺳﺍ ﯼﺍﺮﺑ •
ﺩﺍﺯﺁ ﺎﺑ .ﺪﯿﻫﺩ ﺭﺎﺸﻓ ﺍﺭ (٤) "Turbo / pulse" ﻪﻤﮔﺩ
،"Turbo / pulse" ﻪﻤﮔﺩ ﯼﻭﺭ ﺯﺍ ﺖﺸﮕﻧﺍ ﻥﺩﺮﮐ
.ﺪﺷ ﺪﻫﺍﻮﺧ ﻒﻗﻮﺘﻣ ﻩﺎﮕﺘﺳﺩ
ﻝﺮﺘﻨﮐ ﻪﻤﮔﺩ ،ﻩﺎﮕﺘﺳﺩ ﺯﺍ ﺭﺍﺩ ﻪﻣﺍﺩﺍ ﻩﺩﺎﻔﺘﺳﺍ ﺖﻬﺟ •
ﻪﺑ .ﺪﯿﻧﺎﺧﺮﭽﺑ ﺮﻈﻧ ﺩﺭﻮﻣ ﺖﻋﺮﺳ ﯼﻭﺭ ﺍﺭ (٥) ﺖﻋﺮﺳ
ﯼﻭﺭ ﺖﻋﺮﺳ
ﻝﺮﺘﻨﮐ ﻪﻤﮔﺩ ﻥﺪﻧﺍﺩﺮﮔﺯﺎﺑ ﻡﺎﮕﻨﻫ
ﺪﻫﺍﻮﺧ ﻒﻗﻮﺘﻣ ﻩﺎﮕﺘﺳﺩ (ﺵﻮﻣﺎﺧ ) "0 " ﺖﯿﻌﺿﻭ
.ﺪﺷ
ﻝﺎﻠﺧ ﺭﺩ ﻥﺍﻮﺗ ﯽﻣ ،ﻩﺎﮕﺘﺳﺩ ﺕﺭﺪﻗ ﺶﯾﺍﺰﻓﺍ ﯼﺍﺮﺑ •
ﯼﺍﺮﺑ ﺍﺭ "Turbo / pulse" ﻪﻤﮔﺩ ﻩﺎﮕﺘﺳﺩ ﺭﺎﮐ ﺕﺪﻣ
ﺖﻋﺮﺳ ﻪﺑ ﺖﺸﮔﺯﺎﺑ ﯼﺍﺮﺑ .ﺩﺍﺩ ﺭﺎﺸﻓ ﯽﻫﺎﺗﻮﮐ ﺕﺪﻣ
.ﺪﯾﺭﺍﺩﺮﺑ ﻪﻤﮔﺩ ﯼﻭﺭ ﺯﺍ ﺍﺭ ﺩﻮﺧ ﺖﺸﮕﻧﺍ ، ﯽﻠﺒﻗ
ﺕﺪﻣ ﯼﺍﺮﺑ ﻡﻭﺍﺪﻣ ﺭﻮﻄﺑ ﻩﺎﮕﺘﺳﺩ ﺯﺍ ﺰﮔﺮﻫ !ﻪﺟﻮﺗ •
ﻩﺩﺎﻔﺘﺳﺍ ﻩﺪﺷ ﺺﺨﺸﻣ ﻪﭽﻧﺁ ﺯﺍ ﺶﯿﺑ ﯽﯾﺎﻫ ﻥﺎﻣﺯ
ﻥﺎﻣﺯ ﺕﺪﻣ ﯼﺍﺮﺑ ﻩﺎﮕﺘﺳﺩ ﺯﺍ ﻩﺩﺎﻔﺘﺳﺍ ﺯﺍ ﺲﭘ .ﺪﯿﻨﮑﻧ
ﺎﺗ ﺪﯿﻫﺩ ﺖﺣﺍﺮﺘﺳﺍ ﯽﻤﮐ ﻥﺁ ﻪﺑ ،ﻩﺪﺷ ﺺﺨﺸﻣ ﯼﺎﻫ
.ﺩﻮﺷ ﻩﺩﺎﻣﺁ ﺩﺪﺠﻣ ﻩﺩﺎﻔﺘﺳﺍ ﯼﺍﺮﺑ ﻭ ﻩﺪﺷ ﮏﻨﺧ
ﺯﺍ ﻞﺒﻗ ﻭ ﻩﺎﮕﺘﺳﺩ ﻥﺩﺮﮐ ﺵﻮﻣﺎﺧ ﺯﺍ ﺲﭘ !ﻪﺟﻮﺗ •
ﺭﻮﺗﻮﻣ ﺎﺗ ﺪﯿﻨﮐ ﺮﺒﺻ ﻪﺸﯿﻤﻫ ،ﺎﻫ ﻪﻐﯿﺗ ﻪﺑ ﻥﺩﺯ ﺖﺳﺩ
.ﺩﻮﺷ ﻒﻗﻮﺘﻣ ﻩﺎﮕﺘﺳﺩ
ﻩﺎﮕﺘﺳﺩ ﺯﺍ ﯼﺭﺍﺪﻬﮕﻧ ﻭ ﻥﺩﺮﮐ ﺰﯿﻤﺗ ﻩﻮﺤﻧ
ﻭ ﺖﺒﻗﺍﺮﻣ ﺎﯾ ﻭ ﻥﺩﺮﮐ ﺰﯿﻤﺗ ﻪﺑ ﻡﺍﺪﻗﺍ ﺯﺍ ﺶﯿﭘ !ﻪﺟﻮﺗ
ﻕﺮﺑ ﺯﺍ ﻭ ﻩﺩﺮﮐ ﺵﻮﻣﺎﺧ ﺍﺮﻧﺁ ،ﻩﺎﮕﺘﺳﺩ ﺯﺍ ﯼﺭﺍﺪﻬﮕﻧ
ﺪﯿﻨﮐ ﺖﻗﺩ ﺎﻫ ﻪﻐﯿﺗ ﻥﺩﺮﮐ ﺰﯿﻤﺗ ﻡﺎﮕﻨﻫ ﻪﺑ.ﺪﯿﻨﮐ ﺝﺭﺎﺧ
.ﺪﻨﺘﺴﻫ ﺰﯿﺗ ﺎﻫ ﻪﻐﯿﺗ ﺍﺮﯾﺯ
ﺍﺭ ﻥﺁ ﻪﺧﺎﺷ
ﻭﺩ ﺎﯾ ﻭ ﻕﺮﺑ ﻢﯿﺳ ،ﻩﺎﮕﺘﺳﺩ ﺰﮔﺮﻫ !ﻪﺟﻮﺗ
.ﺪﯿﻨﮑﻧ ﺭﻭ ﻪﻃﻮﻏ ﺕﺎﻌﯾﺎﻣ ﺮﯾﺎﺳ ﺎﯾ ﻭ ﺏﺁ ﺭﺩ
ﻭ ﻡﺮﮔ ﺏﺁ ﺎﺑ ﺍﺭ ﻩﺎﮕﺘﺳﺩ ﯽﺒﻧﺎﺟ ﯼﺎﻫ ﺶﺨﺑ ﻭ ﺕﺎﻌﻄﻗ
.ﺪﯿﻨﮐ ﮏﺸﺧ ﻞﻣﺎﮐ ﺭﻮﻄﺑ ﻭ ﻪﺘﺴﺷ ﻥﻮﺑﺎﺻ
ﺏﻮﻃﺮﻣ ﻪﭼﺭﺎﭘ ﮏﯾ ﺎﺑ ﺍﺭ (۳) ﻩﺎﮕﺘﺳﺩ ﯽﻠﺻﺍ ﻪﻧﺪﺑ •
ﻩﺪﻨﯾﺎﺳ ﻉﻮﻧ ﺯﺍ ﻩﺪﻨﯾﻮﺷ ﻪﻧﻮﮕﭽﯿﻫ
ﺯﺍ ﺰﮔﺮﻫ .ﺪﯿﻨﮐ ﺰﯿﻤﺗ
ﻩﺩﺎﻔﺘﺳﺍ ﺯﺍ ﺶﯿﭘ .ﺪﯿﻨﮑﻧ ﻩﺩﺎﻔﺘﺳﺍ ﻝﺎﻠﺣ ﻉﻮﻧ ﺯﺍ ﺎﯾ ﻭ
ﻥﺎﻨﯿﻤﻃﺍ ﻥﺁ ﻥﺩﻮﺑ ﮏﺸﺧ ﺯﺍ ﯽﻠﺻﺍ ﻪﻧﺪﺑ ﺯﺍ ﺩﺪﺠﻣ
.ﺪﯿﻨﮐ ﻞﺻﺎﺣ
ﺰﯿﻤﺗ ﻩﺩﺎﻔﺘﺳﺍ ﺯﺍ ﺲﭘ ﻪﻠﺻﺎﻓﺎﻠﺑ ﺍﺭ ﻩﺎﮕﺘﺳﺩ ﻪﺸﯿﻤﻫ •
ﯼﺎﻫ ﻪﻐﯿﺗ ﯼﻭﺭ ﯽﯾﺍﺬﻏ ﺩﺍﻮﻣ ﺎﺗ ﺪﯿﻫﺪﻧ ﻩﺯﺎﺟﺍ .ﺪﯿﻨﮐ
ﺮﺗ ﺖﺨﺳ ﺐﺟﻮﻣ ﺭﺎﮑﻨﯾﺍ ﺍﺮﯾﺯ ،ﺪﻧﻮﺷ ﮏﺸﺧ ﻩﺎﮕﺘﺳﺩ
.
ﺩﻮﺷ ﯽﻣ ﻩﺎﮕﺘﺳﺩ ﻥﺩﺮﮐ ﺰﯿﻤﺗ ﻥﺪﺷ
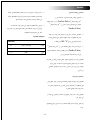
ﻩﺎﮕﺘﺳﺩ ﯽﻨﻓ ﺕﺎﺼﺨﺸﻣ
FX1000
230 ô°TÉÑe QÉ«J âdƒa ó¡édG
1000 äGh ábÉ£dG πNóe
4^9 ºéc ¿RƒdG
Farsi

-81-
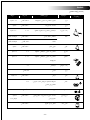
ﯽﯾﺍﺬﻏ ﺩﺍﻮﻣ ﯼﺯﺎﺳ ﻩﺩﺎﻣﺁ ﺖﻬﺟ ﻡﺯﺎﻟ ﻥﺎﻣﺯ ﺕﺪﻣ ﻭ ﻩﻮﺤﻧ
ﻪﯿﻧﺎﺛ ۱۵-۲۰ ۱۵ -ﺮﺜﮐﺍﺪﺣ ﺕﺎﻠﮑﺷ ،ﺮﯿﻨﭘ ،ﺕﺎﺠﯾﺰﺒﺳ ،ﺖﺷﻮﮔ ﻥﺩﺮﮐ ﺩﺮﺧ
ﻪﯿﻧﺎﺛ ۲۰ ۲۰ -ﺮﺜﮐﺍﺪﺣ ﺎﻫ ﯽﻧﺪﯿﺷﻮﻧ ،ﭖﻮﺳ ﻥﺩﺮﮐ ﻁﻮﻠﺨﻣ
ﻪﯿﻧﺎﺛ ۱۰-۲۵ ۱۵-۲۰ ﻩﺪﺷ ﻪﺘﺨﭘ ﯽﻨﯿﻣﺯ ﺐﯿﺳ ﻭ ﺕﺎﺠﯾﺰﺒﺳ ﻩﺭﻮﭘ ﻪﯿﻬﺗ
ﻪﻘﯿﻗﺩ ﮏﯾ ﺮﺜﮐﺍﺪﺣ ۲۰ - ﺮﺜﮐﺍﺪﺣ ﻪﭼﻮﻠﮐ ،ﯽﻨﯾﺮﯿﺷ ﻥﺩﺯ ﻢﻫ
ﻪﻘﯿﻗﺩ ﮏﯾ ﺮﺜﮐﺍﺪﺣ ۵ -ﺮﺜﮐﺍﺪﺣ ﮏﯿﮐ
ﻪﯿﻧﺎﺛ ۲۰ ۲۰ -ﺮﺜﮐﺍﺪﺣ ﻥﺎﻧ ﺮﯿﻤﺧ ﯽﻧﺯ ﺮﯿﻤﺧ
ﻪﯿﻧﺎﺛ ۵-۶
۵-۲۰ ﻩﻮﯿﻣ ،ﯽﻨﯿﻣﺯ ﺐﯿﺳ ﺮﯿﻨﭘ ،ﺕﺎﺠﯾﺰﺒﺳ ﻥﺩﺍﺩ ﺵﺮﺑ
ﻪﯿﻧﺎﺛ ۵-۶ ۱۵-۲۰ ﺕﺎﻠﮑﺷ ،ﻩﻮﯿﻣ ﺮﯿﻨﭘ ،ﺕﺎﺠﯾﺰﺒﺳ ﻥﺩﺮﮐ ﺰﯾﺭ
۱-۵ ﯽﻨﯿﻣﺯ ﺐﯿﺳ ﻥﺩﺮﮐ ﻪﻗﺭﻭ
ﺮﺜﮐﺍﺪﺣ ﺮﯿﻨﭘ ﻥﺩﺮﮐ ﻩﺪﻧﺭ
۱-۲ ۲۰-ﺮﺜﮐﺍﺪﺣ ﻍﺮﻣ ﻢﺨﺗ ﻦﺘﺧﺍﺪﻧﺍ ﻒﭘ ﻭ ﻥﺩﺯ
۵-۱۵ ﻮﻤﯿﻟ ،ﺕﻭﺮﻓ ﭗﯾﺮﮔ،ﻝﺎﻘﺗﺮﭘ ،ﺕﺎﺒﮐﺮﻣ ﯼﺮﯿﮔ ﻩﻮﯿﻤﺑﺁ
ﺪﻧﻮﺷ ﻩﺩﺍﺩ ﺵﺮﺑ ﻪﻤﯿﻧ ﻭﺩ ﻪﺑ
ﺮﺜﮐﺍﺪﺣ ﺞﯾﻮﻫ
ﯼﺮﯿﮔ ﻩﻮﯿﻤﺑﺁ
ﻪﯿﻧﺎﺛ ۱۵ ۲۰ -ﺮﺜﮐﺍﺪﺣ ،ﯽﻧﺪﯿﺷﻮﻧ،ﻩﺭﻮﭘ ،ﭖﻮﺳ /ﻥﺩﺮﮐ ﻁﻮﻠﺨﻣ
ﻪﻘﯿﻗﺩ ۱ ﺮﯿﻤﺧ،ﻊﯾﺎﻣ ﯽﻨﺘﺴﺑ ﯼﺯﺎﺳ ﻊﯾﺎﻣ
۲۰ -ﺮﺜﮐﺍﺪﺣ ﻩﻮﻬﻗ ﯼﺎﻫ ﻪﻧﺍﺩ /ﻞﻔﻠﻓ ﮏﺸﺧ ﺏﺎﯿﺳﺁ
ﻥﺎﻣﺯ ﺕﺪﻣ ﺖﻋﺮﺳ ﯽﯾﺍﺬﻏ ﻩﺩﺎﻣ ﻉﻮﻧ ﺩﺮﮐﺭﺎﮐ ﯽﺒﻧﺎﺟ ﻪﻌﻄﻗ ﻉﻮﻧ
Farsi

-91-
Farsi
ﺰﯿﺗ ﯼﺎﻫ ﻪﻐﯿﺗ ﺎﺑ ﻥﺩﺮﮐ ﺭﺎﮐ ﻡﺎﮕﻨﻫ ﻪﺑ :ﻪﺟﻮﺗ
ﺭﺩ ﻦﯿﻨﭽﻤﻫ ﻭ ﻪﺳﺎﮐ ﻥﺩﺮﮐ ﯽﻟﺎﺧ ، ﺵﺮﺑ ﺹﻮﺼﺨﻣ
.ﺩﺮﮐ ﺖﻗﺩ ﺪﯾﺎﺑ ﻪﺸﯿﻤﻫ، ﻥﺩﺮﮐ ﺰﯿﻤﺗ ﺕﺪﻣ ﻝﻮﻃ
ﺶﺨﺑ ﺎﺑ ﺍﺭ (۱۵) ﻥﺩﺮﮐ ﺩﺮﺧ ﺹﻮﺼﺨﻣ ﻪﻐﯿﺗ ﻪﺸﯿﻤﻫ
.ﺪﯾﺮﯿﮕﺑ ﺖﺳﺩ ﻪﺑ ﻥﺁ ﯽﮑﯿﺘﺳﺎﻠﭘ
ﺶﯿﺑ ﺕﺪﻣ ﻪﺑ ﻩﺎﮕﺘﺳﺩ ﺯﺍ ،ﯽﻧﺯ ﺮﯿﻤﺧ ﻡﺎﮕﻨﻫ ﻪﺑ :
ﻪﺟﻮﺗ
ﻦﺘﺧﺍﺪﻧﺍ ﺭﺎﮑﺑ ﺯﺍ ﺶﯿﭘ .ﺪﯿﻨﮑﻧ ﻩﺩﺎﻔﺘﺳﺍ ﻪﯿﻧﺎﺛ ۲۰ ﺯﺍ
ﻥﺁ ﻪﺑ ﻪﯿﻧﺎﺛ ۲۰ ﺕﺪﻣ ﻪﺑ ﻞﻗﺍﺪﺣ ﻩﺎﮕﺘﺳﺩ ﺩﺪﺠﻣ
.ﺪﯿﻫﺩ ﺖﺣﺍﺮﺘﺳﺍ
ﺖﻋﺮﺳ ﺮﺜﮐﺍﺪﺣ ﺯﺍ ،ﻥﺩﺍﺩ ﻒﭘ ﻭ ﻥﺩﺯ ﻡﺎﮕﻨﻫ ﻪﺑ :ﻪﺘﮑﻧ
.ﺪﯿﻨﮐ ﻩﺩﺎﻔﺘﺳﺍ
(ﻩ ﻞﮑﺷ ) (ﺕﺎﺒﮐﺮﻣ ﺹﻮﺼﺨﻣ ) ﺮﯿﮔ ﻩﻮﯿﻣ ﺏﺁ
ﻪﻧﺪﺑ ﯼﻭﺭ ﺍﺭ (۱۱) ﺯﺎﺳ ﺍﺬﻏ ﺹﻮﺼﺨﻣ ﻪﺳﺎﮐ •
ﻩﻮﯿﻤﺑﺁ ﯼﺎﻫ ﺶﺨﺑ ﻭ ﻩﺩﺍﺩ ﺭﺍﺮﻗ (۳) ﻩﺎﮕﺘﺳﺩ ﯽﻠﺻﺍ
.ﺪﯿﻨﮐ ﺭﺍﻮﺳ ﻢﻫ ﯼﻭﺭ ﺍﺭ ﺮﯿﮔ
ﺪﯿﻫﺩ ﺵﺮﺑ ﻪﻤﯿﻧ ﻭﺩ ﻪﺑ ﺍﺭ ﺕﺎﺒﮐﺮﻣ •
.ﺪﯿﻨﮐ ﻞﺻﻭ ﺐﺳﺎﻨﻣ ﻕﺮﺑ ﻪﯾﺬﻐﺗ ﻊﺒﻨﻣ ﻪﺑ ﺍﺭ ﻩﺎﮕﺘﺳﺩ •
ﻞﻗﺍﺪﺣ ﺖﻋﺮﺳ ﯼﻭﺭ ﺍﺭ (۵) ﺖﻋﺮﺳ ﻝﺮﺘﻨﮐ ﻪﻤﮔﺩ •
.ﺪﯿﻫﺩ ﺭﺍﺮﻗ
ﻩﺎﮕﺘﺳﺩ ﺮﺳ ﯼﻭﺭ ﺍﺭ ﺕﺎﺒﮐﺮﻣ ﻩﺩﺭﻮﺧ ﺵﺮﺑ ﺖﻤﺳ •
.ﺪﯿﻫﺩ ﺭﺍﺮﻗ (۳۲) ﺮﯿﮔ ﻩﻮﯿﻤﺑﺁ
ﻩﺎﮕﺘﺳﺩ ،ﺪﯿﺳﺭ ﻡﺎﻤﺗﺍ ﻪﺑ ﯼﺮﯿﮔ ﻩﻮﯿﻤﺑﺁ ﻪﮐ ﯽﻣﺎﮕﻨﻫ •
ﯼﺎﻫ ﺶﺨﺑ ﺎﺗ ﺪﯿﻨﮐ ﺮﺒﺻ ﻭ ﻩﺩﺮﮐ ﺵﻮﻣﺎﺧ ﺍﺭ
.ﺪﻧﻮﺷ ﻒﻗﻮﺘﻣ ﻥﺁ ﮎﺮﺤﺘﻣ
ﻩﺎﮕﺘﺳﺩ ﺯﺍ ﺍﺭ ﺮﺘﻠﯿﻓ ﻭ ﯼﺮﯿﮔ ﻩﻮﯿﻤﺑﺁ ﺹﻮﺼﺨﻣ ﺮﺳ •
.ﺪﯿﻨﮐ ﺝﺭﺎﺧ
ﻩﻮﯿﻤﺑﺁ ﻪﺘﺷﺍﺩﺮﺑ ﻩﺎﮕﺘﺳﺩ ﯼﻭﺭ ﺯﺍ ﺍﺭ (۱۱) ﻪﺳﺎﮐ •
ﺪﯾﺰﯾﺮﺑ ﺐﺳﺎﻨﻣ ﻑﺮﻇ ﺭﺩ ﺍﺭ ﻩﺪﺷ ﻪﯿﻬﺗ
ﺍﺭ (۵) ﺖﻋﺮﺳ ﻝﺮﺘﻨﮐ ﻪﻤﮔﺩ ،ﻡﺮﻧ ﯼﺎﻫ ﻩﻮﯿﻣ ﯼﺍﺮﺑ •
ﺍﺮﻧﺁ ﺖﻔﺳ ﯼﺎﻫ ﻩﻮﯿﻣ ﯼﺍﺮﺑ ﻭ ﻞﻗﺍﺪﺣ ﺖﻋﺮﺳ ﯼﻭﺭ
.ﺪﯿﻫﺩ ﺭﺍﺮﻗ ﺮﺜﮐﺍﺪﺣ ﺖﻋﺮﺳ ﯼﻭﺭ
ﺏﺭﺩ ﯼﻭﺭ ﻪﻧﺯﻭﺭ ﻞﺧﺍﺩ ﺯﺍ ﺍﺭ ﯽﯾﺍﺬﻏ ﺩﺍﻮﻣ ﻭ ﺎﻫ ﻩﻮﯿﻣ •
(۳۶) ﻩﺪﻧﺭﺎﺸﻓ ﻪﺘﺳﺩ ﺯﺍ .ﺪﯿﻨﮐ ﻪﻓﺎﺿﺍ ﻩﺎﮕﺘﺳﺩ ﻪﺑ
ﻩﺩﺎﻔﺘﺳﺍ ﺮﺘﻠﯿﻓ ﺖﻤﺳ ﻪﺑ ﯽﯾﺍﺬﻏ ﺩﺍﻮﻣ ﺖﯾﺍﺪﻫ
ﯼﺍﺮﺑ
.ﺪﯿﻨﮐ
،ﺮﯿﮔ ﻩﻮﯿﻤﺑﺁ ﻥﺪﺷ ﻒﻗﻮﺘﻣ ﻭ ﯽﮕﺘﻓﺮﮔ ﺕﺭﻮﺻ ﺭﺩ •
ﺮﯿﮕﻔﮐ ﮏﻤﮐ ﻪﺑ ﻭ ﻩﺩﺮﮐ ﻒﻗﻮﺘﻣ ﺍﺭ ﺯﺎﺳ ﺍﺬﻏ ﻩﺎﮕﺘﺳﺩ
ﺍﺭ ﻩﺪﻧﺎﻣ ﯽﻗﺎﺑ ﻩﻮﯿﻣ ﻪﻟﺎﻔﺗ ،ﻩﺎﮕﺘﺳﺩ ﺎﺑ ﻩﺪﺷ ﻪﺋﺍﺭﺍ
.ﺪﯿﻨﮐ ﺝﺭﺎﺧ
ﺩﺍﻮﻣ ﺖﯾﺍﺪﻫ ﯼﺍﺮﺑ (۳۶) ﻩﺪﻧﺭﺎﺸﻓ ﻪﺘﺳﺩ ﺯﺍ ﻪﺸﯿﻤﻫ :ﻪﺟﻮﺗ
.ﺪﯿﻨﮐ ﻩﺩﺎﻔﺘﺳﺍ ﺎﻫ ﻪﻐﯿﺗ ﺖﻤﺳ ﻪﺑ ﯽﯾﺍﺬﻏ
ﺏﺭﺩ ﯼﻭﺭ
ﻪﻧﺯﻭﺭ ﻞﺧﺍﺩ ﺭﺩ ﺩﻮﺧ ﻥﺎﺘﺸﮕﻧﺍ ﺰﮔﺮﻫ :ﻪﺟﻮﺗ
.ﺪﯿﻨﮑﻧ
ﺯﺍ ﻩﺪﻨﺧﺮﭼ ﮏﻟﺍ ﯽﮔﺪﯾﺩ ﻪﻣﺪﺻ ﺕﺭﻮﺻ ﺭﺩ : ﻪﺟﻮﺗ
ﺪﯿﻨﮑﻧ ﻩﺩﺎﻔﺘﺳﺍ ﻩﺎﮕﺘﺳﺩ
ﻩﺪﻧﺭ ،ﻥﺩﺍﺩ ﺵﺮﺑ ،ﻥﺩﺮﮐ ﺩﺮﺧ ﺹﻮﺼﺨﻣ ﯼﺎﻫ ﻪﻐﯿﺗ
(ﺩ ﻞﮑﺷ ) ﻥﺩﺮﮐ ﺰﯾﺭ ﻭ ﻥﺩﺮﮐ
ﺭﺍﺮﻗ ﻪﻐﯿﺗ ﻞﻣﺎﺣ ﻞﺧﺍﺩ ﺭﺩ ﺍﺭ ﺩﻮﺧ ﺮﻈﻧ ﺩﺭﻮﻣ ﻪﻐﯿﺗ •
ﺭﺍﺮﻗ ﻩﺎﮕﺘﺳﺩ ﻞﺧﺍﺩ ﺭﺩ ﺍﺭ ﻪﻋﻮﻤﺠﻣ ﺲﭙﺳ ﻭ ﻩﺩﺍﺩ
.ﺪﯿﻫﺩ
.ﺪﯿﻫﺩ ﺭﺍﺮﻗ ﺩﻮﺧ ﯼﺎﺟ ﺮﺳ ﺭﺩ ﺍﺭ ﺏﺭﺩ •
.ﺪﯿﻨﮐ ﻞﺻﻭ ﺐﺳﺎﻨﻣ ﻪﯾﺬﻐﺗ ﻊﺒﻨﻣ ﻪﺑ ﺍﺭ ﻩﺎﮕﺘﺳﺩ •
ﺭﺍﺮﻗ ﺮﺜﮐﺍﺪﺣ ﺖﻋﺮﺳ ﯼﻭﺭ ﺍﺭ (۵) ﺖﻋﺮﺳ ﻝﺮﺘﻨﮐ ﻪﻤﮔﺩ •
.ﺪﯿﻫﺩ
ﻪﺑ ﺍﺭ ﯽﯾﺍﺬﻏ ﺩﺍﻮﻣ (۳۶) ﻩﺪﻧﺭﺎﺸﻓ ﻪﺘﺳﺩ ﺯﺍ ﻩﺩﺎﻔﺘﺳﺍ ﺎﺑ •
.ﺪﯿﻨﮐ ﺖﯾﺍﺪﻫ ﺎﻫ ﻪﻐﯿﺗ ﺖﻤﺳ
ﺯﺍ ﻪﺸﯿﻤﻫ ﻦﯿﺋﺎﭘ ﻪﺑ ﯽﯾﺍﺬﻏ ﺩﺍﻮﻣ ﻥﺩﺍﺩ ﺭﺎﺸﻓ ﯼﺍﺮﺑ :ﻪﺟﻮﺗ
.ﺪﯿﻨﮐ ﻩﺩﺎﻔﺘﺳﺍ (۳۶) ﻩﺪﻧﺭﺎﺸﻓ ﻪﺘﺳﺩ
ﯼﻭﺭ ﻪﻧﺯﻭﺭ ﻞﺧﺍﺩ ﺭﺩ ﺍﺭ ﺩﻮﺧ ﻥﺎﺘﺸﮕﻧﺍ ﺰﮔﺮﻫ :ﻪﺟﻮﺗ
.ﺪﯿﻨﮑﻧ ﺩﺭﺍﻭ ﻩﺎﮕﺘﺳﺩ ﺏﺭﺩ
ﺪﯿﻨﮐ ﯼﺭﺍﺩ ﺩﻮﺧ ﻩﺎﮕﺘﺳﺩ ﺪﺣ ﺯﺍ ﺶﯿﺑ ﻥﺩﺮﮐ ﺮﭘ ﺯﺍ :ﻪﺟﻮﺗ
ﺹﻮﺼﺨﻣ ﺰﯿﺗ ﯼﺎﻫ ﻪﻐﯿﺗ ﺎﺑ ﻥﺩﺮﮐ ﺭﺎﮐ ﻡﺎﮕﻨﻫ ﻪﺑ :ﻪﺟﻮﺗ
ﺰﯿﻤﺗ ﺕﺪﻣ ﻝﻮﻃ ﺭﺩ ﻦﯿﻨﭽﻤﻫ ﻭ ﻪﺳﺎﮐ ﻥﺩﺮﮐ ﯽﻟﺎﺧ ، ﺵﺮﺑ
.ﺩﺮﮐ ﺖﻗﺩ ﺪﯾﺎﺑ ﻪﺸﯿﻤﻫ، ﻥﺩﺮﮐ

Farsi
-02-
(ﺩ ﻞﮑﺷ ) ﺎﻫ ﻪﻐﯿﺗ ﯼﺭﺍﺪﻬﮕﻧ ﺹﻮﺼﺨﻣ ﻪﻈﻔﺤﻣ
( ۲۹ ﺎﯾ ۲۸ ،۲۷ ،۲۶ ،۲۵ ،۲۴) ﻪﻐﯿﺗ ﺶﺷ ﯽﻣﺎﻤﺗ •
ﺶﺨﺑ ﺭﺩ ﻩﺪﺷ ﻪﯿﺒﻌﺗ ﯼﺎﻫ ﺥﺍﺭﻮﺳ ﻞﺧﺍﺩ ﺭﺩ ﺍﺭ
.ﺪﯿﻫﺩ ﺭﺍﺮﻗ (۳۷) ﺎﻫ ﻪﻐﯿﺗ ﯼﺭﺍﺪﻬﮕﻧ
.ﺪﯿﻫﺩ ﺭﺍﺮﻗ ﺎﻫ ﻪﻐﯿﺗ ﯼﻭﺭ ﺍﺭ (۳۸) ﻆﻓﺎﺤﻣ ﺶﮐﻭﺭ •
ﯼﺭﺩ ﯼﻭﺭ ﻥﺍﻮﺗ ﯽﻣ ﺍﺭ ﺎﻫ ﻪﻐﯿﺗ ﯼﺭﺍﺪﻬﮕﻧ
ﺶﺨﺑ •
.ﺩﺮﮐ ﯼﺭﺍﺪﻬﮕﻧ (۳۵) ﺯﺎﺳ ﺍﺬﻏ ﻩﺎﮕﺘﺳﺩ
ﻩﺩﺎﻔﺘﺳﺍ ﻩﻮﺤﻧ
(ﻒﻟﺍ ﻞﮑﺷ ) ﻥﺩﺮﮐ ﻁﻮﻠﺨﻣ
.ﺪﯾﺰﯾﺮﺑ ﻦﮐ ﻁﻮﻠﺨﻣ ﻞﺧﺍﺩ ﺭﺩ ﺍﺭ ﯽﯾﺍﺬﻏ ﺩﺍﻮﻣ •
ﻪﻧﺎﻤﯿﭘ ﻭ ﻩﺩﺍﺩ ﺭﺍﺮﻗ (۱۸) ﭺﺭﺎﭘ ﯼﻭﺭ ﺍﺭ (۱۹) ﺏﺭﺩ •
.ﺪﯿﻫﺩ ﺭﺍﺮﻗ ﺏﺭﺩ ﯼﻭﺭ ﻪﻧﺯﻭﺭ ﻞﺧﺍﺩ ﺭﺩ ﺍﺭ (۲۰)
ﻪﻧﺪﺑ ﻪﺑ ﺍﺭ ﺯﺎﺳ ﺍﺬﻏ ﻩﺎﮕﺘﺳﺩ ﻪﺳﺎﮐ ﻭ ﻦﮐ ﻁﻮﻠﺨﻣ •
.ﺪﯿﻨﮐ ﻞﺻﻭ ﻥﺁ ﯽﻠﺻﺍ
ﻞﺻﻭ ﺐﺳﺎﻨﻣ ﯽﮑﯾﺮﺘﮑﻟﺍ ﻪﯾﺬﻐﺗ ﻊﺒﻨﻣ ﻪﺑ ﺍﺭ ﻩﺎﮕﺘﺳﺩ •
.ﺪﯿﻨﮐ
ﺖﻋﺮﺳ ﯼﻭﺭ (۵) ﺖﻋﺮﺳ ﻝﺮﺘﻨﮐ ﻪﻤﮔﺩ ﻥﺪﻧﺎﺧﺮﭼ ﺎﺑ •
Turbo / " ﻪﻤﮔﺩ ﻥﺩﺍﺩ ﺭﺎﺸﻓ ﺎﺑ ﺎﯾ ﻭ ﺮﻈﻧ ﺩﺭﻮﻣ
.ﺩﺮﮐ ﺪﻫﺍﻮﺧ ﺭﺎﮑﺑ ﻉﻭﺮﺷ ﻩﺎﮕﺘﺳﺩ (۴) "Pulse
ﺭﺎﮑﺑ ﺍﺭ ﻦﮐ ﻁﻮﻠﺨﻣ ﯽﻧﺎﻣﺯ ﻂﻘﻓ ﻪﺸﯿﻤﻫ :ﻪﺟﻮﺗ
ﻪﺘﻓﺮﮔ ﺭﺍﺮﻗ ﺩﻮﺧ ﯼﺎﺟ ﺮﺳ ﺭﺩ ﻥﺁ ﺏﺭﺩ ﻪﮐ ﺪﯾﺯﺍﺪﻧﺎﯿﺑ
.ﺪﺷﺎﺑ
ﺮﺳ ،ﻍﺍﺩ ﺕﺎﻌﯾﺎﻣ ﻥﺩﺮﮐ ﻁﻮﻠﺨﻣ ﻡﺎﮕﻨﻫ ﻪﺑ :ﻪﺟﻮﺗ
ﺪﯾﺭﺍﺬﮕﺑ ﯽﻟﺎﺧ ﺍﺭ ﻪﻧﺎﻤﯿﭘ
ﺶﯿﺑ ﺎﯾ ﻭ ﺖﺳﺍ ﯽﻟﺎﺧ ﻦﮐ ﻁﻮﻠﺨﻣ ﻪﮐ ﯽﻣﺎﮕﻨﻫ : ﻪﺟﻮﺗ
ﻩﺎﮕﺘﺳﺩ ﺰﮔﺮﻫ ،ﺩﺭﺍﺩ ﺭﺍﺮﻗ ﻥﺁ ﻞﺧﺍﺩ ﺭﺩ ﻊﯾﺎﻣ ﺮﺘﯿﻟ ۱۰۰۰ ﺯﺍ
.ﺪﯿﻫﺪﻧ ﺭﺍﺮﻗ ﻩﺩﺎﻔﺘﺳﺍ ﺩﺭﻮﻣ ﻭ ﻪﺘﺧﺍﺪﻧﺎﯿﻧ ﺭﺎﮑﺑ ﺍﺭ
(ﺏ ﻞﮑﺷ ) ﺏﺎﯿﺳﺁ
(۲۱) ﻦﮐ ﺏﺎﯿﺳﺁ ﻪﻈﻔﺤﻣ ﻞﺧﺍﺩ ﺭﺩ ﺍﺭ ﯽﯾﺍﺬﻏ ﺩﺍﻮﻣ •
.ﺪﯾﺰﯾﺮﺑ
ﺲﭙﺳ ﻭ ﻩﺩﺍﺩ ﺭﺍﺮﻗ ﻪﻈﻔﺤﻣ ﯼﻭﺭ ﺍﺭ (۲۲) ﺏﺭﺩ •
ﺭﺍﺮﻗ ﻩﺎﮕﺘﺳﺩ ﯽﻠﺻﺍ ﻪﻧﺪﺑ ﯼﻭﺭ ﺍﺭ ﻥﺁ ﺏﺭﺩ ﻭ ﺏﺎﯿﺳﺁ
.ﺪﯿﻫﺩ
.ﺪﯿﻨﮐ ﻞﺻﻭ ﺐﺳﺎﻨﻣ ﻕﺮﺑ ﻪﯾﺬﻐﺗ ﻊﺒﻨﻣ ﻪﺑ ﺍﺭ ﻩﺎﮕﺘﺳﺩ •
ﺏﺎﯿﺳﺁ (۴) "Turbo / Pulse " ﻪﻤﮔﺩ ﻥﺩﺍﺩ ﺭﺎﺸﻓ ﺎﺑ •
.ﺩﺮﮐ ﺪﻫﺍﻮﺧ
ﺭﺎﮑﺑ ﻉﻭﺮﺷ
ﺯﺍ ﺶﯿﺑ ﺕﺪﻣ ﯼﺍﺮﺑ ﻡﻭﺍﺪﻣ ﺭﻮﻄﺑ ﺍﺭ ﻩﺎﮕﺘﺳﺩ ﺰﮔﺮﻫ •
.ﺪﯿﻫﺪﻧ ﺭﺍﺮﻗ ﻩﺩﺎﻔﺘﺳﺍ ﺩﺭﻮﻣ ﻪﻘﯿﻗﺩ ﮏﯾ
ﻞﻗﺍﺪﺣ ﻪﻘﯿﻗﺩ ﮏﯾ ﺕﺪﻣ ﻪﺑ ﻩﺎﮕﺘﺳﺩ ﻥﺩﺮﮐ ﺭﺎﮐ ﺯﺍ ﺲﭘ •
ﯼﺍﺮﺑ ﺎﺗ ﺪﯿﻫﺩ ﺖﺣﺍﺮﺘﺳﺍ ﻥﺁ ﻪﺑ ﻪﻘﯿﻗﺩ ۲ ﺎﺗ ۱ ﺕﺪﻣ ﻪﺑ
.ﺩﻮﺷ ﻩﺩﺎﻣﺁ ﺩﺪﺠﻣ ﻩﺩﺎﻔﺘﺳﺍ
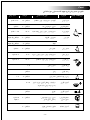
ﯽﯾﺍﺬﻏ ﺩﺍﻮﻣ ﻪﯿﻬﺗ ﯼﺎﻤﻨﻫﺍﺭ
ﯽﯾﺍﺬﻏ ﻩﺩﺎﻣ ﻉﻮﻧ
ﻥﺯﻭ
ﺖﻋﺮﺳ ﻩﺎﮕﺘﺳﺩ ﺭﺎﮐ ﻥﺎﻣﺯ ﺕﺪﻣ
ﻡﺮﮔ ۴۰ ۱۰ ﻪﯿﻧﺎﺛ ۱۵-۲۵ ﻩﻮﻬﻗ ﻭ ﻞﻔﻠﻓ ﯼﺎﻫ ﻪﻧﺍﺩ
ﻡﺮﮔ ۵۰ ۱۵ ﻪﯿﻧﺎﺛ ۲۵-۳۵ ﺲﻟﺎﭘ
ﺩﺮﺧ ﻭ ،ﻥﺩﺯ ﺮﯿﻤﺧ ،ﻥﺩﺯ ﻢﻫ ﺹﻮﺼﺨﻣ ﯼﺎﻫ ﻪﻐﯿﺗ
(ﺝ ﻞﮑﺷ ) ﻥﺩﺮﮐ
ﯽﻠﺻﺍ ﻪﻧﺪﺑ ﯼﻭﺭ ﺍﺭ ﺯﺎﺳ ﺍﺬﻏ ﻩﺎﮕﺘﺳﺩ ﻪﺳﺎﮐ •
. (۳) ﺪﯿﻫﺩ ﺭﺍﺮﻗ ﻩﺎﮕﺘﺳﺩ
ﻪﻐﯿﺗ ، (۱۳) ﻦﺘﺧﺍﺪﻧﺍ ﻒﭘ ﻭ ﻥﺩﺯ ﺹﻮﺼﺨﻣ ﻪﻐﯿﺗ •
ﺩﺮﺧ ﺹﻮﺼﺨﻣ ﻪﻐﯿﺗ ﺎﯾ (۱۴) ﯽﻧﺯ ﺮﯿﻤﺧ ﺹﻮﺼﺨﻣ
.ﺪﯿﻫﺩ ﺭﺍﺮﻗ (۶) ﺭﻮﺤﻣ ﯼﻭﺭ ﺍﺭ (۱۵) ﻥﺩﺮﮐ
ﺍﺭ (۱۲) ﺏﺭﺩ ﻭ ﻪﺘﺨﯾﺭ ﻪﺳﺎﮐ ﻞﺧﺍﺩ ﺍﺭ ﯽﯾﺍﺬﻏ ﺩﺍﻮﻣ •
.ﺪﯿﻫﺩ ﺭﺍﺮﻗ ﺩﻮﺧ ﯼﺎﺟ ﺮﺳ
.ﺪﯿﻨﮐ ﻞﺻﻭ ﺐﺳﺎﻨﻣ ﻕﺮﺑ ﻪﯾﺬﻐﺗ ﻊﺒﻨﻣ ﻪﺑ ﺍﺭ ﻩﺎﮕﺘﺳﺩ •
ﺖﻋﺮﺳ ﯼﻭﺭ (۵) ﺖﻋﺮﺳ ﻝﺮﺘﻨﮐ ﻪﻤﮔﺩ ﻥﺪﻧﺎﺧﺮﭼ ﺎﺑ •
Turbo / " ﻪﻤﮔﺩ ﻥﺩﺍﺩ ﺭﺎﺸﻓ ﺎﺑ ﺎﯾ ﻭ ﺮﻈﻧ ﺩﺭﻮﻣ
.ﺩﺮﮐ ﺪﻫﺍﻮﺧ ﺭﺎﮑﺑ ﻉﻭﺮﺷ ﻩﺎﮕﺘﺳﺩ (۴) "Pulse
ﻪﻓﺎﺿﺍ ﯼﺍﺮﺑ (۱۰) ﻩﺪﻧﺭﺎﺸﻓ ﻪﺘﺳﺩ ﺯﺍ ﺪﯿﻧﺍﻮﺗ ﯽﻣ ﺎﻤﺷ •
ﺯﺎﺳ ﺍﺬﻏ ﻩﺎﮕﺘﺳﺩ ﻪﺳﺎﮐ ﻞﺧﺍﺩ ﻪﺑ ﯽﯾﺍﺬﻏ ﺩﺍﻮﻣ ﻥﺩﺮﮐ
.ﺪﯿﻨﮐ ﻩﺩﺎﻔﺘﺳﺍ ﻥﺁ ﯼﻭﺭ ﺩﻮﺟﻮﻣ ﻪﻧﺯﻭﺭ ﻖﯾﺮﻃ ﺯﺍ (۱۲)
ﺝﺭﺎﺧ ﺯﺍ ﺶﯿﭘ ،ﺪﺷ ﻩﺩﺎﻣﺁ ﯽﯾﺍﺬﻏ ﺩﺍﻮﻣ ﻪﮐ ﯽﻣﺎﮕﻨﻫ •
.ﺪﯿﻨﮐ ﺝﺭﺎﺧ ﻪﺳﺎﮐ ﺯﺍ ﺍﺭ ﻪﻐﯿﺗ ، ﯽﯾﺍﺬﻏ ﺩﺍﻮﻣ ﻥﺩﺮﮐ
ﻆﻓﺎﺤﻣ ﺵﻮﭘﺭﺩ ﻪﺸﯿﻤﻫ ،ﻩﺎﮕﺘﺳﺩ ﻥﺩﺮﮐ ﺰﯿﻤﺗ ﺯﺍ ﺲﭘ •
.ﺪﯿﻫﺩ ﺭﺍﺮﻗ (۱۵) ﯼﺰﻠﻓ ﻥﺩﺮﮐﺩﺮﺧ ﻪﻐﯿﺗ ﯼﻭﺭ ﺍﺭ (۱۴)
La pagina si sta caricando...
La pagina si sta caricando...
La pagina si sta caricando...
La pagina si sta caricando...
La pagina si sta caricando...
La pagina si sta caricando...
La pagina si sta caricando...
La pagina si sta caricando...
La pagina si sta caricando...
La pagina si sta caricando...
La pagina si sta caricando...
La pagina si sta caricando...
La pagina si sta caricando...
La pagina si sta caricando...
La pagina si sta caricando...
La pagina si sta caricando...
La pagina si sta caricando...
La pagina si sta caricando...
La pagina si sta caricando...
La pagina si sta caricando...
La pagina si sta caricando...
La pagina si sta caricando...
La pagina si sta caricando...
La pagina si sta caricando...
-
 1
1
-
 2
2
-
 3
3
-
 4
4
-
 5
5
-
 6
6
-
 7
7
-
 8
8
-
 9
9
-
 10
10
-
 11
11
-
 12
12
-
 13
13
-
 14
14
-
 15
15
-
 16
16
-
 17
17
-
 18
18
-
 19
19
-
 20
20
-
 21
21
-
 22
22
-
 23
23
-
 24
24
-
 25
25
-
 26
26
-
 27
27
-
 28
28
-
 29
29
-
 30
30
-
 31
31
-
 32
32
-
 33
33
-
 34
34
-
 35
35
-
 36
36
-
 37
37
-
 38
38
-
 39
39
-
 40
40
-
 41
41
-
 42
42
-
 43
43
-
 44
44


Black & Decker FX1000 Manuale utente
- Categoria
- Frullatori
- Tipo
- Manuale utente
Documenti correlati
Altri documenti
-
Kenwood FP971 Manuale del proprietario
-
-
Kenwood FP734 Manuale del proprietario
-
Kenwood FP 733 Manuale utente
-
-
Kenwood FP691A Manuale utente
-
-
Samsung GE614ST Manuale utente
-
Panasonic MK-F500W Operating Instructions Manual
-