Lindy HDMI 4 Port Multi-View Switch Manuale utente
- Categoria
- Interruttori video
- Tipo
- Manuale utente

© LINDY Group - SECOND EDITION (March 2019)
HDMI 4x1 Multi-View Switch
User Manual English
Benutzerhandbuch Deutsch
Manuel Utilisateur Français
Manuale Italiano
No. 38150
lindy.com
Tested to Comply with
FCC Standards
For Home and Office Use!


User Manual English
Introduction
Thank you for purchasing the LINDY HDMI 4x1 Multi-View Switch. This product has been designed to
provide trouble free, reliable operation. It benefits from both a LINDY 2 year warranty and free lifetime
technical support. To ensure correct use, please read this manual carefully and retain it for future
reference.
The LINDY HDMI 4x1 Multi-View Switch is a high performance video switch which allows signals from
four different Full HD sources to be integrated for simultaneous display on a single monitor. It can
seamlessly switch between each of the connected inputs and features three different viewing modes and
supports the independent switching of audio signals. This flexible, cost effective switch has been
designed to be used in a number of different applications, such as:
▪ Digital Presentation
▪ CCTV Surveillance & Control
▪ Conference & Meeting Room
Package Contents
▪ HDMI 4x1 Multi-view Switch
▪ IR Remote control with CR2025 battery
▪ Multi-Country Power Supply 12VDC 2A (UK, Euro, US & AUS)
▪ LINDY User Manual
Features
▪ Integrates 4 Full HD 1080p signals for display on a single HDMI display
▪ Supports 4 viewing modes; Quadview, Picture & Picture, Dual Video and Standard
▪ Seamless switching between inputs/viewing modes
▪ Independent switching of audio and video signals
Specification
▪ Supports 4 viewing modes:
▪ Standard
▪ Quadview/Multi-Window Display
▪ Picture and Picture
▪ Dual video
▪ HDMI 1.3a, HDCP 1.2 and DVI 1.0 Compliant
▪ Supports input resolutions up to 1920x1080p 60Hz 4:4:4 8bit
▪ Output resolution: 1920x1080p 60Hz 4:4:4 8bit or 1280x720p 60Hz 4:4:4 8bit
▪ Supports cable lengths of up to 15m in/out using 26 AWG cable
▪ Independent switching of audio
▪ Connectors:
▪ Inputs: 4 x HDMI Type A Female
▪ Output: 1 x HDMI Type A Female
▪ Seamless switching between inputs/viewing modes
▪ Audio Pass-through: 2 channel PCM
▪ Supports IR remote control and on-panel control
▪ Power Consumption: 6W
▪ Operating Temperature: 0
0
C – 40
0
C
▪ Storage Temperature: -20
0
C – 60
0
C
▪ Operating Humidity: 20%-90% RH (non-condensing)
▪ Storage Humidity: 40%-60% RH

User Manual English
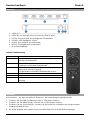
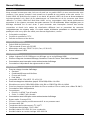
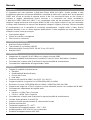
Overview
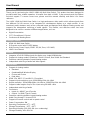
1. HDMI OUT: For connection to a HDMI display
2. HDMI IN1-4: For connection of HDMI source equipment
3. DC12V: For connection of the supplied 12VDC power supply
4. POWER: LED Power indicator
5. AUDIO: Audio mode switch
6. VIDEO: Video mode switch
7. IR: IR receiver
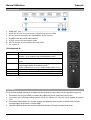
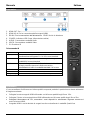
IR Remote
Button
Operation
IN1/2/3/4
Directly switch from any display mode to input 1-4 in
standard/full screen mode
◄ / ►
Cycle through the connected inputs in standard/full
screen mode
Audio
Switch the audio independently from the video signal,
each press cycles to the next input.
Toggles audio on/off in standard full screen mode
Mode
Cycle though the viewing modes
Quadview
Directly switch to the quadview viewing mode
720p/1080p
Switch between output scaling modes
Installation
We recommend the use of good quality cables with this product, especially when using longer lengths.
▪ Connect your HDMI source devices using good quality cables of up to 15m in length.
▪ Connect your HDMI display/projector using a good quality cable of up to 15m in length.
▪ Connect the supplied 12V power supply, power on your devices and select the relevant input on the
HDMI display.
▪ The HDMI output of all sources is now shown directly on the screen in a Quad View layout.

User Manual English
Operation
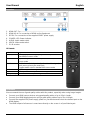
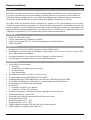
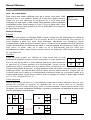
OSD – On screen display
In each of the viewing modes offered by the switch you will see the OSD appear
in the top left of the picture for each input whenever you make a change to the
video channel, viewing mode or audio channel. The OSD will stay on for a few
seconds and then disappear. In the example shown, CH1 is the video channel,
the ♪ icon denotes that the audio source is from CH1 and 1920x1080P is the
resolution of the input video signal.
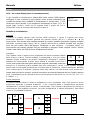
Viewing Modes
Standard
Displays a single input on the connected HDMI display, the input can be selected using the
corresponding input button (IN1-4) or ◄ / ► button on the remote control. To return to standard mode
from another viewing mode simply select the required input using the input button (IN1-4). When
standard mode is being used only audio from the selected input can be used, there is no option to switch
to audio from another input. The audio button on the switch or remote control can be used to turn audio
on/off; when audio is on the on the ♪ icon will be visible in the OSD next to the channel indicator.
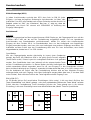
Quadview
All four inputs are displayed at the same time in a quadrant layout as shown.
The layout of the quadview mode is preset and cannot be adjusted. The
quadview mode can be accessed directly by pressing the quadview button on
the remote at any time. When quadview mode is being used the audio channel
in use will be from the most recently used channel, so for example if you switch
from input 1 directly to quadview mode then the audio from input 1 will be used, this is denoted by the ♪
icon being displayed in the OSD of that input as shown above. Pressing the audio button on the switch
or remote control will switch the audio to the next input with each press and then after input 4 to audio off
(no ♪ icon is displayed) before returning to input 1 with the next press e.g. 2 > 3 > 4 > Mute > 1.
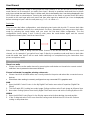
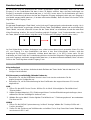
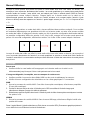
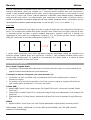
Picture and picture
Within picture and picture mode there are five different configurations as shown below, they can be
accessed by pressing the quadview and then mode buttons or by repeatedly pressing the mode button
on the switch or remote control. Each press of the mode button cycles to the next configuration, the first
configuration is available by pressing the mode button when in quadview mode.
1
2
3
4
♪
1
2
♪
3
4
2
3
♪
4
1
3
4
♪
1
2
4
1
♪
2
3
3
4
2
1
♪
CH1
1920x1080P
♪

User Manual English
When picture and picture mode is being used the audio channel in use will be from the most recently
used channel, so for example if you switch from input 1 directly to quadview mode and then to picture
and picture mode the audio from input 1 will be used, this is denoted by the ♪ icon being displayed in the
OSD of that input as shown above. Pressing the audio button on the switch or remote control will switch
the audio to the next input with each press and then after input 4 to audio off (no ♪ icon is displayed)
before returning to input 1 with the next press e.g. 2 > 3 > 4 > Mute > 1.
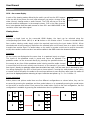
Dual video
There are two dual video configurations, each displaying two inputs side by side. To access dual video
mode press quadview and then the mode button six times, alternatively you may access dual video
mode by pressing the mode button until you reach the first dual mode configuration. The first
configuration shows inputs 1 and 2 side by side, press the mode button again and the second
configuration shows inputs 3 and 4 as shown below.
When dual video mode is being used the audio channel in use will be from the most recently used
channel, so for example if you switch from input 3 directly to quadview mode and then to dual video
mode the audio from input 3 will be used. Audio switching can completed using the instructions from
picture and picture mode.
Troubleshooting
There is no audio
• Please check the active audio channel by pressing the audio button on the switch or remote control
until the ♪ icon is present in the correct channel.
Picture is distorted, incomplete, missing colours etc.
• Please check that all HDMI cables are correctly seated in the ports and reboot the connected source
devices.
• Check that video scaling is correctly configured on any connected PC’s graphics card:
AMD
1. Open the AMD Control Centre. In the My Digital Flat Panels menu select Properties (Digital Flat-
Panel).
2. Tick the Enable GPU scaling box under Image Scaling and then select Scale image to full panel size.
3. Now select Scaling Options from the My Digital Flat Panels menu and set the Scaling Options to 0%.
NVIDIA
1. Open the NVIDIA Control Panel. In the Display menu select Adjust desktop size and position.
2. In the Scaling tab select Full Screen from the scaling mode list and then GPU from the Perform
scaling on drop down box.
2 1 4 3
♪

Benutzerhandbuch Deutsch
Einführung
Wir freuen uns, dass Ihre Wahl auf ein LINDY-Produkt gefallen ist und danken Ihnen für Ihr Vertrauen.
Sie können sich jederzeit auf unsere Produkte und einen guten Service verlassen. Dieser HDMI 4x1
Multi-View Switch unterliegt einer 2-Jahres LINDY Herstellergarantie und lebenslangem, kostenlosen
technischen Support. Bitte lesen Sie diese Anleitung sorgfältig und bewahren Sie sie auf.
Der LINDY HDMI 4x1 Multi-View Switch ermöglicht es, Signale von vier verschiedenen Full HD Quellen
simultan auf einem Display auszugeben. Er unterstützt unterbrechungsfreies Umschalten zwischen den
einzelnen Quellen, drei verschiedene Ansichtsmodi und die unabhängige Auswahl des Audiosignals. Mit
seinen flexiblen Einstellungsmöglichkeiten kann dieser Switch in viele Bereichen eingesetzt werden, z.B.
in digitalen Präsentationen, CCTV Überwachung oder Konferenzraumsteuerung.
Lieferumfang
▪ HDMI 4x1 Multi-View Switch
▪ Infrarot-Fernbedienung mit Batterie (CR2025)
▪ Multi-Country Netzteil 12V DC 2A (mit Steckadaptern für UK/EU/US/AUS)
▪ LINDY Handbuch
Eigenschaften
▪ Ausgabe von vier Full HD 1080p Signalen auf einem HDMI Display
▪ Unterstützt vier Ansichtsmodi: Quad-Modus (Unterteilung in vier Fenster), Picture & Picture (PiP),
Dual Video-Modus und Standard
▪ Unterbrechungsloses Umschalten zwischen Eingangs- und Ansichtsmodi
▪ Unabhängiges Umschalten zwischen Audio- und Videosignalen
Spezifikationen
▪ Unterstützt vier Ansichtsmodi:
▪ Standard
▪ Quad-Modus (Unterteilung in vier Fenster)
▪ PiP (Bild-in-Bild)
▪ Dual Video-Modus
▪ Kompatibel mit HDMI 1.3a, HDCP 1.2 und DVI 1.0
▪ Eingangsauflösung bis 1920x1080p 60Hz 4:4:4 8Bit
▪ Ausgangsauflösung: 1920x1080p 60Hz 4:4:4 8Bit oder 1280x720p 60Hz 4:4:4 8Bit
▪ Unterstützt Kabellängen bis 15m (in/out) bei Verwendung eines AWG26-Kabels
▪ Unabhängiges Umschalten des Audiosignals
▪ Anschlüsse:
▪ Eingänge: 4 x HDMI Typ A Buchse
▪ Ausgang: 1 x HDMI Type A Buchse
▪ Unterbrechungsloses Umschalten zwischen Eingangs- und Ansichtsmodi
▪ Audio-Weiterleitung: 2 Kanal-PCM
▪ Steuerbar über Infrarot-Fernbedienung und Tasten am Switch
▪ Leistungsaufnahme: 6W
▪ Betriebstemperatur: 0
0
C – 40
0
C
▪ Lagertemperatur: -20
0
C – 60
0
C
▪ Luftfeuchtigkeit im Betrieb: 20%-90% RH (nicht kondensierend)
▪ Luftfeuchtigkeit bei Lagerung: 40%-60% RH

Benutzerhandbuch Deutsch
Übersicht
1. HDMI OUT: HDMI Ausgang für den Anschluss eines HDMI Displays
2. HDMI IN1-4: Eingängen zum Anschluss der HDMI Quellen
3. DC12V: Zum Anschluss des beiliegenden 12V Netzteils
4. POWER: LED-Anzeige für “Power”
5. AUDIO: Umschalttaste für Audiomodus
6. VIDEO: Umschalttaste für Videomodus
7. IR: Infrarotempfänger
Infrarot-Fernbedienung
Taste
IN1/2/3/4
Umschalten vom Displaymodus auf Eingang 1-4 im
Standard-/Vollbildmodus
◄ / ►
Hin- und Herschalten zwischen den angeschlossenen
Eingängen im Standard-/Vollbildmodus
Audio
Schaltet das Audio- unabhängig vom Videosignal um,
jeweils zum nächsten Eingang.
Schaltet Audio im Standard-/Vollbildmodus ein/aus.
Mode
Schaltet durch die verschiedenen Ansichtsmodi
Quad-Modus
Umschalten zum Quad-Modus
720p/1080p
Umschalten zwischen den Skalierungsoptionen am
Ausgang
Installation
Wir empfehlen – vor allem bei größeren Distanzen - die Verwendung hochwertiger Kabel.
▪ Schließen Sie die HDMI Quellgeräte mit bis zu 15m langen Kabel an.
▪ Schließen Sie das HDMI Display mit einem bis zu 15m langem Kabel an.
▪ Schließen Sie das 12V Netzteil an, schalten Sie die Geräte ein und wählen den entsprechenden
Eingang am HDMI Display.
▪ Die HDMI Ausgabe aller Quellen wird nun auf dem Bildschirm im Quad-Modus angezeigt.

Benutzerhandbuch Deutsch
Betrieb
Bildschirmanzeige (OSD)
In jedem Ansichtsmodus erscheint das OSD oben links im Bild für jeden
Eingang – und zwar bei jeglicher Änderung im Ansichtsmodus, im Video- oder
Audiokanal. Das OSD verschwindet nach einigen Sekunden aus der Ansicht. Im
Beispiel rechts ist “CH1” der Videokanal, das Icon “♪” zeigt an, dass die
Audioquelle vom Kanal CH1 stammt und 1920x1080P ist Auflösung des
Eingangs-Videosignals.
Ansichtsmodi
Standard
Zeigt ein Eingangssignal auf dem angeschlossenen HDMI Display an, die Eingangsquelle kann mit den
Schaltern IN1-4 oder ◄ / ► auf der Fernbedienung ausgewählt werden. Um von irgendeinem
Ansichtsmodus zum Standardmodus zurückzukommen, wählen Sie einfach den entsprechenden
Eingang mit dem Schalter IN1-4. Im Standardmodus kann nur das Audiosignal vom zugehörigen
Eingang verwendet werden, man kann nicht zum Audiosignal eines anderen Eingangs umschalten. Die
Audiotaste auf dem Switch bzw. der Fernbedienung dient zum Ein- bzw. Ausschalten; wenn Audio
eingeschaltet ist, ist das Icon “♪” im OSD sichtbar.
Quad-Modus
Alle vier Eingangssignale werden gleichzeitig im Layout eines Quadranten
gezeigt, das heißt, der Bildschirm wird in vier gleich große Fenster aufgeteilt
(siehe Grafik rechts). Dieses Layout ist voreingestellt und kann nicht geändert
werden. Den Quad-Modus kann man jederzeit mit der entsprechenden Taste
auf der Fernbedienung einstellen. In diesem Modus wird das Audiosignal des
zuletzt verwendeten Kanals verwendet: wenn Sie z.B. vom Eingang 1 in den Quad-Modus schalten,
dann wird das Audiosignal von Eingang 1 verwendet (sichtbar durch das Icon „♪“ im OSD). Immer wenn
Sie die Audiotaste am Switch oder der Fernbedienung drücken wird auf den folgenden Eingang
weitergeschaltet und nach Eingang 4 wird das Audiosignal ausgeschaltet (das Icon „♪“ ist dann nicht
mehr sichtbar). Beim nächsten Drücken der Taste folgt dann wieder Eingang 1 usw.
Bild-in-Bild (PiP)
Im PiP-Modus gibt es fünf verschiedene Einstellungen (siehe unten), in die man durch Drücken der
Taste “Quad-Modus” und “Mode” gelangt - oder durch wiederholtes Drücken der Taste “Mode” auf dem
Switch oder der Fernbedienung. Durch einmaliges Drücken der Taste gelangt man in die nächste
Einstellung, in die erste Einstellung kommt man durch Drücken der „Mode“-Taste im Quad-Modus.
1
2
3
4
♪
1
2
♪
3
4
2
3
♪
4
1
3
4
♪
1
2
4
1
♪
2
3
3
4
2
1
♪
CH1
1920x1080P
♪

Benutzerhandbuch Deutsch
Im PiP-Modus wird das Audiosignal des zuletzt verwendeten Signals verwendet, wenn Sie z.B. vom
Eingang 1 in den Quad-Modus und dann in den PiP-Modus schalten, dann wird das Audiosignal von
Eingang 1 verwendet (sichtbar durch das Icon „♪“ im OSD). Immer wenn Sie die Audiotaste am Switch
oder der Fernbedienung drücken wird auf den folgenden Eingang weitergeschaltet und nach Eingang 4
wird Audio ausgeschaltet (das Icon „♪“ ist dann nicht mehr sichtbar). Beim nächsten Drücken der Taste
folgt dann wieder Eingang 1 usw.
Dual Video
Es gibt zwei Einstellungen “Dual Video”, wobei jede zwei Eingangssignale nebeneinander anzeigt. Um in
den Dual Video-Modus zu gelangen drücken Sie die Taste “Quad-Modus” einmal und anschließend die
Taste “Mode” sechsmal. Alternativ können Sie die Taste “Mode” so oft drücken, bis sie die erste Dual
Video-Einstellung erhalten. Die erste Einstellung zeigt die Eingänge 1 und 2 nebeneinander; wenn Sie
die Taste „Mode“ erneut drücken zeigt die zweite Einstellung die Eingänge 3 und 4 (siehe unten).
Im Dual Video-Mode wird das Audiosignal vom zuletzt verwendeten Kanal verwendet. Wenn Sie also
z.B. von Eingang 3 in den Quad-Modus und dann in den Dual Video-Modus schalten, wird das
Audiosignal von Eingang 3 verwendet. sichtbar durch das Icon „♪“ im OSD). Immer wenn Sie die
Audiotaste am Switch oder der Fernbedienung drücken wird auf den folgenden Eingang weitergeschaltet
und nach Eingang 4 wird Audio ausgeschaltet (das Icon „♪“ ist dann nicht mehr sichtbar). Beim nächsten
Drücken der Taste folgt dann wieder Eingang 1 usw.
Fehlersuche
Kein Audiosignal
• Überprüfen Sie den aktiven Audiokanal durch Drücken der Taste “Audio” bis sich das Icon “♪” im
richtigen Kanal befindet.
Bild ist verzerrt, unvollständig, fehlende Farben etc.
• Überprüfen Sie, ob alle HDMI Kabel korrekt in den Ports stecken und starten Sie die
angeschlossenen Quellgeräte neu.
• Überprüfen Sie, ob die Videoskalierung bei den Grafikkarten der angeschlossenen PCs korrekt
eingestellt ist:
AMD
1. Öffnen Sie das AMD Control Center. Wählen Sie im Menü “Meine digitalen Flachbildschirme”
“Eigenschaften“.
2. Setzen Sie den Haken bei „GPU-Skalierung aktivieren” bei den Bildskalierungseinstellungen, dann
wählen Sie “Bild auf Vollbildgröße skalieren“ aus.
3. Wählen Sie nun im Menü “ Meine digitalen Flachbildschirme ” “Skalierungsoptionen” aus und setzen
Sie diese auf 0%.
NVIDIA
1. Öffnen Sie die NVIDIA Systemsteuerung. Im Menü “Anzeige” wählen Sie “ Desktop-Größe und –
Position einstellen”.
2. Stellen Sie die Skalierung auf Vollbildmodus und wählen Sie im Drop Down-Menü unter “Skalierung
vornehmen mit GPU“ aus.
2 1 4 3
♪

Manuel Utilisateur Français
Introduction
Nous sommes heureux que votre choix se soit porté sur un produit LINDY et vous remercions de votre
confiance. Vous pouvez compter à tout moment sur la qualité de nos produits et de notre service. Ce
Switch HDMI 4x1 Multi-View est soumis à une durée de garantie LINDY de 2 ans et d’une assistance
technique gratuite à vie. Merci de lire attentivement ces instructions et de les conserver pour future
référence. Le Switch HDMI 4x1 Multi-View LINDY est un commutateur vidéo hautes performances
permettant à des signaux provenant de quatre sources Full HD différentes d’être intégrées pour un
affichage simultané sur un seul écran. Il peut commuter sans interruption chacune des entrées
connectées et fournit trois modes de visualisation différents tout en permettant de commuter
indépendamment les signaux audio. Ce switch souple d’utilisation possédant un excellent rapport
qualité/prix a été conçu pour être utilisé pour diverses applications, comme :
▪ Présentation numérique
▪ Contrôle et surveillance CCTV
▪ Salle de conférence et de réunion
Contenu de l’emballage
▪ Switch HDMI 4x1 Multi-view
▪ Télécommande IR avec pile CR2025
▪ Alimentation multi-pays 12VDC 2A (UK, Euro, US & AUS)
▪ Manuel utilisateur LINDY
Caractéristiques
▪ Intègre 4 signaux Full HD 1080p pour un affichage sur un seul affichage HDMI
▪ Prise en charge de 4 modes d’affichage; Quadview, Picture & Picture, Dual Vidéo et Standard
▪ Commutation sans interruption entre entrées/modes d’affichage
▪ Commutation indépendante des signaux audio et vidéo
Spécifications
▪ Prend en charge 4 modes d’affichage:
▪ Standard
▪ Quadview/affichage multi fenêtres
▪ Picture and Picture
▪ Dual Vidéo
▪ Compatible HDMI 1.3a, HDCP 1.2 et DVI 1.0
▪ Prend en charge les résolutions jusqu’à 1920x1080p 60Hz 4:4:4 8bit
▪ Résolutions en sortie: 1920x1080p 60Hz 4:4:4 8bit ou 1280x720p 60Hz 4:4:4 8bit
▪ Prend en charge les longueurs de câbles de 15m en entrée et 15m en sortie (avec câbles 26 AWG)
▪ Commutation audio indépendante
▪ Connectiques:
▪ Entrées: 4 x HDMI Type A femelle
▪ Sortie: 1 x HDMI Type A femelle
▪ Commutation sans interruption entre entrées/modes d’affichage
▪ Bypass audio: 2 canaux PCM
▪ Prise en charge contrôle par télécommande IR et sur panneau avant
▪ Consommation: 6W
▪ Température de fonctionnement: 0
0
C à 40
0
C
▪ Température de stockage: -20
0
C à 60
0
C
▪ Humidité relative: 20%-90% RH (non condensée)
▪ Humidité relative en cas de stockage: 40%-60% RH

Manuel Utilisateur Français
Vue d’ensemble
1. HDMI OUT: pour la connexion d’un affichage HDMI
2. HDMI IN1-4: pour la connexion des équipements sources HDMI
3. DC12V: pour la connexion de l’alimentation 12VDC fournie
4. POWER: indicateur LED d’alimentation
5. AUDIO: bouton de commutation audio
6. VIDEO: bouton de commutation du mode vidéo
7. IR: capteur IR
Télécommande IR
Bouton
Fonction
IN1/2/3/4
Commute directement de chaque mode d’affichage sur
l’entrée 1-4 en mode d’écran standard/plein écran
◄ / ►
Passe d’une entrée à l’autre en mode standard/plein
écran
Audio
Commute l’audio indépendamment du signal vidéo,
chaque appui passe à l’entrée suivante.
Active ou désactive le son en mode standard/plein écran
Mode
Passe d’un mode d’affichage à l’autre
Quadview
Commute directement en mode d’affichage quadview
720p/1080p
Commute entre les modes 720/1080p en sortie
Installation
Nous recommandons l’utilisation de câbles de bonne qualité, surtout pour les plus grandes longueurs.
▪ Connectez vos sources HDMI en utilisant des câbles de bonne qualité de jusqu’à 15m.
▪ Connectez votre affichage/vidéoprojecteur HDMI en utilisant un câble de bonne qualité de jusqu’à
15m.
▪ Connectez l’alimentation 12V fournie, mettez vos appareils sous tension et sélectionnez l’entrée
correspondante à afficher sur l’écran HDMI.
▪ La sortie HDMI de toutes les sources s’affiche à présent à l’écran en mode Quad View.

Manuel Utilisateur Français
Utilisation
OSD – On screen display
Dans chacun des modes d’affichage offert par le switch, vous verrez l’OSD
apparaitre dans le coin supérieur gauche de l’image pour chaque entrée à
chaque fois que vous effectuerez un changement sur le canal vidéo, mode
d’affichage ou canal audio. L’OSD restera visible pendant quelques secondes
et disparaitra ensuite. Dans l’exemple ci-contre, CH1 est le canal vidéo, l’icône
♪ inique que la source audio provident de CH1 et 1920x1080P est la résolution
du signal vidéo en entrée.
Modes d’affichages
Standard
Affiche une seule entrée sur l’affichage HDMI connecté, l’entrée peut être sélectionnée en utilisant le
bouton d’entrée correspondant (IN1-4) ou les boutons ◄ / ► de la télécommande. Pour retourner en
mode standard à partir d’un autre mode d’affichage, sélectionnez tout simplement l’entrée
correspondante à l’aide des boutons d’entrée (IN1-4). Lorsque le mode standard est utilisé l’audio de
l’entrée sélectionnée peut uniquement être utilisé, il n’est pas possible de commuter sur l’audio d’une
autre source. Le bouton audio sur le switch ou sur la télécommande peut être utilisé pour
active/désactiver l’audio; lorsque l’audio est activé l’icône ♪ est visible dans l’OSD à côté de l’indicateur
de canal vidéo actif.
Quadview
Toutes les quatre entrées sont affichées en même temps dans un mode
d’affichage en quadrant comme ci-contre. La disposition en mode quadview est
fixe et ne peut être modifiée. Le mode quadview peut être accéder directement
en appuyant sur le bouton quadview de la télécommande. Lorsque le mode
quadview est utilisé le canal audio actif est le dernier utilisé, par exemple si vous
commuter directement de l’entrée 1 au mode quadview l’audio de l’entrée 1 sera alors utilisé, ceci est
indiqué par l’icône ♪ qui s’affiche dans l’OSD de l’entrée (comme indiqué ci-dessus). Chaque appui sur
le bouton audio sur le switch ou la télécommande commutera l’audio sur la prochaine entrée et le
coupera après l’entrée 4 (pas d’icone ♪ affiché) avant de repasser sur l’entrée 1 après l’appui suivant
(ex. 2 > 3 > 4 > Coupure du son > 1).
Picture and picture
Dans le mode picture and picture il y a cinq différentes configurations comme indiquées ci-dessous, elles
peuvent être accédées en appuyant sur quadview puis sur le bouton mode ou en appuyant
successivement sur le bouton mode sur le switch ou la télécommande. Chaque appui du bouton mode
fait passer à une autre configuration d’affichage, la première configuration est disponible le bouton mode
lors d’un affichage en mode quadview.
1
2
3
4
♪
1
2
♪
3
4
2
3
♪
4
1
3
4
♪
1
2
4
1
♪
2
3
3
4
2
1
♪
CH1
1920x1080P
♪

Manuel Utilisateur Français
Lorsque le mode picture and picture est utilisé le canal audio actif sera celui utilisé en dernier, par
exemple si vous commuter directement de l’entrée 1 en mode quadview et en mode picture and picture
ensuite l’audio de l’entrée 1 sera utilisé, ceci est indiqué par l’icône ♪ affichée dans l’OSD de l’entrée
correspondante comme indiqué ci-dessus. Chaque appui sur le bouton audio sur le switch ou la
télécommande permet de basculer l’audio sur l’entrée suivante et le coupera après l’entrée 4 (pas
d’icone ♪ affiché) avant de repasser sur l’entrée 1 après l’appui suivant (ex. 2 > 3 > 4 > Coupure du son
> 1).
Dual vidéo
Il y a deux configurations en mode dual vidéo, chacune affichant deux entrées contiguës. Pour accéder
au mode dual vidéo appuyez sur quadview et six fois sur le bouton mode, en outre vous pouvez accéder
au mode dual vidéo en appuyant le bouton mode une fois la première configuration dual mode atteinte.
La première configuration affiche les entrées 1 et 2 côte à côte, un appui sur le bouton mode permet de
passer à la seconde configuration, affichant les entrées 3 et 4 côte à côte comme indiqué ci-dessous.
Lorsque le mode dual vidéo est utilisé le canal audio utilisé sera celui utilisé en dernier, par exemple si
vous commuter directement de l’entrée 3 en mode quadview et ensuite en mode dual vidéo l’audio de
l’entrée 3 sera utilisé. La commutation audio peut être effectuée à l’aide des instructions du mode picture
and picture.
Dépannage
Aucun son
• Veuillez vérifier le canal audio actif en appuyant sur le bouton audio sur le switch ou la
télécommande jusqu’à ce que l’icône ♪ soit présente sur le bon canal.
L’image est dégradée, incomplète, avec un manque de couleurs etc.
• Veuillez contrôler la connexion des câbles HDMI sur les ports et redémarrez les sources.
• Vérifiez la bonne configuration des résolutions sur les cartes graphiques PC connectées:
AMD
1. Ouvrez le panneau de contrôle AMD. Sous Mes écrans plats numériques, sélectionnez propriétés
(Ecran plat numérique).
2. Cochez le bouton Activer la mise à l’échelle par le GPU sous Mise à l’échelle image puis
sélectionnez Adapter l’image à la taille du panneau.
3. Sélectionnez ensuite Options de mise à l’échelle à partir de Mes écrans plats numériques et mettez
les options à 0%.
NVIDIA
1. Ouvrez le panneau de contrôle NVIDIA. Dans le menu Affichage, sélectionnez Régler la taille et la
position du bureau.
Dans l’onglet Mise à l’échelle sélectionnez Plein écran et ensuite GPU (Processeur graphique) dans le
menu déroulant sous Effectuer la mise à l’échelle sur.
2 1 4 3
♪

Manuale Italiano
Introduzione
Vi ringraziamo per aver acquistato il Multi-View Switch HDMI 4x1 LINDY. Questo prodotto è stato
progettato per garantirvi la massima affidabilità e semplicità di utilizzo ed è coperto da 2 anni di garanzia
LINDY oltre che da un servizio di supporto tecnico a vita. Per assicurarvi di farne un uso corretto vi
invitiamo a leggere attentamente questo manuale e a conservarlo per future consultazioni.
Il Multi-View Switch HDMI 4x1 LINDY è un commutatore video ad alte prestazioni che consente di
integrare i segnali provenienti da 4 sorgenti HDMI Full HD su un singolo schermo. Esso può commutare
in tempo reale (Seamless) fra ciascuno dei dispositivi collegati in ingresso e fornisce 3 diverse modalità
di visualizzazione con la possibilità di commutare separatamente i segnali Audio e Video. Questo
apparata flessibile e con un ottimo rapporto qualità-prezzo è stato progettato per essere utilizzato in
molteplici contesti come per esempio:
▪ Presentazioni digitali
▪ Sistemi di controllo e sorveglianza
▪ Sale riunione e conferenze
Contenuto della confezione
▪ Multi-View Switch HDMI 4x1
▪ Telecomando IR con batteria CR2025
▪ Alimentatore Multi-Country 12VDC 2A (UK, Euro, US & AUS)
▪ Manuale LINDY
Caratteristiche
▪ Integrazione di 4 segnali Full HD 1080p su un singolo schermo HDMI
▪ Supporta 4 modalità di visualizzazione: Quadview, Picture & Picture, Dual Video e Standard
▪ Commutazione in tempo reale (Seamless) fra ingressi/modalità di visualizzazione
▪ Commutazione indipendente dei segnali audio e video
Specifiche
▪ Supporto 4 modalità di visualizzazione:
▪ Standard
▪ Quadview/Multi-Window Display
▪ Picture and Picture
▪ Dual video
▪ Conforme alle specifiche HDMI 1.3a, HDCP 1.2 e DVI 1.0
▪ Supporto risoluzioni in ingresso fino a 1920x1080p 60Hz 4:4:4 8bit
▪ Risoluzione in uscita: 1920x1080p 60Hz 4:4:4 8bit o 1280x720p 60Hz 4:4:4 8bit
▪ Supporta cavi lunghi fino a 15m (in ingresso e uscita) utilizzando versioni con conduttori da 26 AWG
▪ Commutazione indipendente del segnale audio
▪ Connettori
▪ Ingressi: 4 x HDMI Tipo A Femmina
▪ Uscita: 1 x HDMI Tipo A Femmina
▪ Commutazione in tempo reale (Seamless) fra ingressi/modalità di visualizzazione
▪ Formato Audio passante: 2 canali PCM
▪ Supporto controllo via telecomando IR e dal pannello frontale
▪ Potenza assorbita: 6W
▪ Temperatura operativa: 0
0
C – 40
0
C
▪ Temperatura di immagazzinamento: -20
0
C – 60
0
C
▪ Umidità operativa: 20%-90% RH (non-condensata)
▪ Umidità di immagazzinamento: 40%-60% Installazione

Manuale Italiano
Panoramica
1. HDMI OUT: Per la connessione dello schermo HDMI
2. HDMI IN1-4: Per la connessione delle sorgenti HDMI
3. DC12V: Per la connessione dell’alimentatore 12VDC fornito in dotazione
4. POWER: Indicatore LED Power (alimentazione attiva)
5. AUDIO: Commutatore modalità Audio
6. VIDEO: Commutatore modalità Video
7. IR: Ricevitore IR
Telecomando IR
Pulsante
Funzione
IN1/2/3/4
Commutazione diretta da qualsiasi modalità di
visualizzazione all’ingresso 1-4 in full screen/standard
◄ / ►
Commuta in sequenza fra le varie sorgenti collegate in
modalità full screen/standard
Audio
Commuta il segnale audio indipendentemente dal video:
ad ogni pressione passa al canale successivo.
Attiva/disattiva l’audio in modalità standard / full screen
Mode
Commuta fra le varie modalità di visualizzazione
Quadview
Passa direttamente alla modalità Quadview
720p/1080p
Commuta fra le due risoluzioni in uscita disponibili
Installazione
Vi raccomandiamo di utilizzare cavi ottima qualità con questo prodotto in particolare se dovete utilizzarne
di lunghezza elevate.
▪ Collegate le vostre sorgenti HDMI utilizzando cavi di buona qualità lunghi fino a 15m.
▪ Collegate il Vostro schermo/proiettore HDMI utilizzando cavi di buona qualità lunghi fino a 15m.
▪ Collegate l’alimentatore da 12V, accendete i vostri dispositivi e selezionate l’ingresso corretto sul
vostro schermo HDMI.
▪ Il segnale HDMI in uscita da tutte le sorgenti verrà ora visualizzato in modalità Quad View.

Manuale Italiano
Utilizzo
OSD – On screen display (menù in sovraimpressione)
In ogni modalità di visualizzazione offerta dallo switch vedrete l’OSD apparire
nell’angolo in alto a sinistra di ogni ingresso anche quando effettuerete una
modifica del canale video, modalità di visualizzazione o canale audio. L’OSD
rimarrà per alcuni secondi e poi scomparirà. Nell’esempio a fianco “CH1” è il
canale video, l’icona ♪ indica che la sorgente audio è quella del CH1 e
1920x1080P indica la risoluzione del segnale in ingresso.
Modalità di visualizzazione
Standard
Visualizza un singolo ingresso sullo schermo HDMI connesso. Il canale in ingresso può essere
selezionato utilizzando il rispettivo pulsante del pannello frontale (IN1-4) o i pulsanti ◄ / ► sul
telecomando. Per ritornare alla modalità standard da un’altra modalità selezionate l’ingresso richiesto
utilizzando il pulsante degli ingressi (IN1-4). Quando selezionate la modalità standard sarà possibile
fruire del solo canale audio dell’ingresso visualizzato in quel momento. Il pulsante “Audio” sul
telecomando potrà essere utilizzato solo per accendere e spegnere l’audio. Quando l’audio è attivato
l’icona ♪ sarà visibile nell’OSD di fianco all’indicatore del canale.
Quadview
Tutti i quattro canali in ingresso sono visualizzate allo stesso momento indicato
dalla schema a fianco. Questa modalità è preimpostata e non può essere
regolata. Questa modalità è accessibile direttamente utilizzando il pulsante
quadview sul telecomando. Quando viene attivata la modalità Quad View il
canale audio selezionato sarà quello dell’ultima sorgente selezionata, quindi per
esempio se si seleziona questa modalità dopo aver selezionato il canale 1 nello modalità standard
questo sarà il canale audio preselezionato un volta entrato in Quad View. (indicato dall’icona ♪ dell’OSD
come indicato sopra). Premendo il pulsante Audio sullo switch o sul telecomando verrà selezionato il
canale audio successivo e dopo il canale 4 la pressione successiva disattiverà del tutto l’Audio (nessuna
icona ♪ visualizzata) per poi riprendere alle successive pressione dal canale 1 e così via. (Es, 1> 2 > 3 >
4 > Muto > 1…)
Picture and picture
In questa modalità esistono 5 diverse configurazioni come visualizzato sotto. Esse possono essere
selezionate premendo il pulsante QuadView e poi il pulsante Mode o semplicemente premendo
ripetutamente il pulsante Mode su swutch o telecomando. Ogni pressione del pulsante fa passare la
visualizzazione alla modalità successiva. (la prima configurazione si attiverà premendo il tasto Mode
mentre si è in modalità QuadView).
1
2
3
4
♪
1
2
♪
3
4
2
3
♪
4
1
3
4
♪
1
2
4
1
♪
2
3
3
4
2
1
♪
CH1
1920x1080P
♪

Manuale Italiano
Quando viene attivata la modalità Picture and Picture il canale audio selezionato sarà quello dell’ultima
sorgente selezionata, quindi per esempio se si seleziona questa modalità dopo aver selezionato il
canale 1 nello modalità standard questo sarà il canale audio preselezionato un volta entrato in Quad
View e poi in Picture and Picture (indicato dall’icona ♪ dell’OSD come indicato sopra). Premendo il
pulsante Audio sullo switch o sul telecomando verrà selezionato il canale audio successivo e dopo il
canale 4 la pressione successiva disattiverà del tutto l’Audio (nessuna icona ♪ visualizzata) per poi
riprendere alle successive pressione dal canale 1 e così via. (Es, 1> 2 > 3 > 4 > Muto > 1…)
Dual video
Ci sono due configurazioni Dual Video ciascuna in grado di visualizzare due sorgenti alla volta fianco a
fianco. Per accedere alla modalità Dual Video premete il tasto Quad View e poi quello mode per 6 volte.
In alternativa potete accedere a questa modalità premendo il pulsante mode fino a quando non
raggiungete la prima delle due configurazioni (sorgenti 1 e 2). Poi potrete premere ancora il pulsante
Mode per selezionare la seconda configurazione (ingressi 3 e 4).
Il canale audio selezionato sarà quello dell’ultima sorgente selezionata, quindi per esempio se si
seleziona questa modalità dopo aver selezionato il canale 1 nello modalità standard questo sarà il
canale audio preselezionato. La modalità di commutazione del canale Audio è la stessa di quella
utilizzata nella modalità Picture and Picture.
Risoluzione dei problemi
Non si sente il segnale Audio
• Controllate il canale audio attivo utilizzando il pulsante Audio sullo switch o sul telecomando fino a
quando l’icona ♪ sarà presente sul canale desiderato.
L’immagine è distorta, incompleta, con colori mancanti, ecc.
• Controllate che tutti i cavi HDMI siano correttamente inseriti nelle rispettive porte e provate a
riavviare le sorgenti.
• Controllate che la risoluzione impostata in uscita sia corretta e seguite le seguenti indicazioni per
ogni scheda grafica di qualsiasi PC connesso allo switch:
Schede AMD
1. Aprite l’AMD Control Centre. Nella sezione “My Digital Flat Panels” selezionate Proprietà (Digital
Flat-Panel).
2. Selezionate la casella Enable GPU scaling sotto Image Scaling e poi selezionate “Scale image to full
panel size”.
3. Ora selezionate le “Scaling Options” dal menù My Digital Flat Panels e impostate Scaling Options a
0%.
NVIDIA
1. Aprite l’NVIDIA Control Panel. Nel menù Display selezionate “Adjust desktop size and position”.
Nella scheda “Scaling” selezionate Full Screen dalla lista di modalità e poi GPU dalla casella di
selezione “Perform scaling”.
2 1 4 3
♪

CE/FCC Statement
CE Certification
This equipment complies with the requirements relating to Electromagnetic Compatibility Standards.
It has been manufactured under the scope of RoHS compliance.
CE Konformitätserklärung
Dieses Produkt entspricht den einschlägigen EMV Richtlinien der EU für IT-Equipment und darf nur
zusammen mit abgeschirmten Kabeln verwendet werden.
Diese Geräte wurden unter Berücksichtigung der RoHS Vorgaben hergestellt.
Die formelle Konformitätserklärung können wir Ihnen auf Anforderung zur Verfügung stellen
FCC Certification
This equipment has been tested and found to comply with the limits for a Class B digital device, pursuant
to part 15 of the FCC Rules. These limits are designed to provide reasonable protection against harmful
interference in a residential installation.
You are cautioned that changes or modification not expressly approved by the party responsible for
compliance could void your authority to operate the equipment.
This device complies with part 15 of the FCC Rules.
Operation is subject to the following two conditions:
1. This device may not cause harmful interference, and
2. This device must accept any interference received, including interference that may cause undesired
operation.
LINDY Herstellergarantie – Hinweis für Kunden in Deutschland
LINDY gewährt für dieses Produkt über die gesetzliche Regelung in Deutschland hinaus eine zweijährige
Herstellergarantie ab Kaufdatum. Die detaillierten Bedingungen dieser Garantie finden Sie auf der LINDY Website
aufgelistet bei den AGBs.
Hersteller / Manufacturer (EU):.
LINDY-Elektronik GmbH LINDY Electronics Ltd
Markircher Str. 20 Sadler Forster Way
68229 Mannheim Stockton-on-Tees, TS17 9JY
GERMANY United Kingdom
Email: info@lindy.com , T: +49 (0)621 470050 postmaster@lindy.co.uk , T: +44 (0)1642 754000

Recycling Information
WEEE (Waste of Electrical and Electronic Equipment),
Recycling of Electronic Products
Europe, United Kingdom
In 2006 the European Union introduced regulations (WEEE) for the collection and recycling of all waste electrical
and electronic equipment. It is no longer allowable to simply throw away electrical and electronic equipment.
Instead, these products must enter the recycling process.
Each individual EU member state has implemented the WEEE regulations into national law in slightly different
ways. Please follow your national law when you want to dispose of any electrical or electronic products. More
details can be obtained from your national WEEE recycling agency.
Battery Remark:
Do not put empty batteries in your domestic waste bin as they will not be recycled. Empty batteries can be returned
for recycling at our trade counter or at your local household recycling centre.
The raw materials enclosed in batteries such as Zinc, Iron and Nickel can be reused to a very large proportion. The
recycling of batteries and disused/obsolete electronic equipment is one of the most efficient environment protection
actions you can easily take.
Germany / Deutschland Rücknahme Elektroschrott und Batterie-Entsorgung
Die Europäische Union hat mit der WEEE Direktive Regelungen für die Verschrottung und das Recycling von
Elektro- und Elektronikprodukten geschaffen. Diese wurden im Elektro- und Elektronikgerätegesetz – ElektroG in
deutsches Recht umgesetzt. Das Entsorgen von Elektro- und Elektronikgeräten über die Hausmülltonne ist
verboten! Diese Geräte müssen den Sammel- und Rückgabesystemen zugeführt werden! Dort werden sie
kostenlos entgegen genommen. Die Kosten für den weiteren Recyclingprozess übernehmen die Gerätehersteller.
LINDY bietet deutschen Endverbrauchern ein kostenloses Rücknahmesystem an, beachten Sie bitte, dass
Batterien und Akkus den Produkten vor der Rückgabe an das Rücknahmesystem entnommen werden müssen und
über die Sammel- und Rückgabesysteme für Batterien separat entsorgt werden müssen. Ausführliche
Informationen zu diesen Themen finden Sie stets aktuell auf der LINDY Webseite im Fußbereich.
France
En 2006, l'union Européenne a introduit la nouvelle réglementation (DEEE) pour le recyclage de tout équipement
électrique et électronique.
Chaque Etat membre de l’ Union Européenne a mis en application la nouvelle réglementation DEEE de manières
légèrement différentes. Veuillez suivre le décret d’application correspondant à l’élimination des déchets électriques
ou électroniques de votre pays.
Remarque sur les piles et batteries
En tant que consommateur final, vous êtes tenus de restituer toutes les piles et batteries usagées. Il est clairement
interdit de les jeter avec les ordures ménagères ! Les piles et batteries contenant des substances nocives sont
marquées par le symbole ci-dessus. Vous pouvez déposer gratuitement vos piles ou batteries usagées dans les
centres de collecte de votre commune, dans nos succursales ou dans tous les points de vente de piles ou
batteries. Vous respecterez ainsi la loi et contribuerez à la protection de l'environnement !
Italy
Nel 2006 l’unione europea ha introdotto regolamentazioni (WEEE) per la raccolta e il riciclo di apparecchi elettrici
ed elettronici. Non è più consentito semplicemente gettare queste apparecchiature, devono essere riciclate. Ogni
stato membro dell’ EU ha tramutato le direttive WEEE in leggi statali in varie misure. Fare riferimento alle leggi del
proprio Stato quando si dispone di un apparecchio elettrico o elettronico.
Per ulteriori dettagli fare riferimento alla direttiva WEEE sul riciclaggio del proprio Stato.
LINDY No. 38150
2nd Edition, March 2019
lindy.com
Tested to Comply with
FCC Standards
For Home and Office Use!
-
 1
1
-
 2
2
-
 3
3
-
 4
4
-
 5
5
-
 6
6
-
 7
7
-
 8
8
-
 9
9
-
 10
10
-
 11
11
-
 12
12
-
 13
13
-
 14
14
-
 15
15
-
 16
16
-
 17
17
-
 18
18
-
 19
19
-
 20
20


Lindy HDMI 4 Port Multi-View Switch Manuale utente
- Categoria
- Interruttori video
- Tipo
- Manuale utente