Indesit 5106600005 Guida utente
- Categoria
- Frigoriferi
- Tipo
- Guida utente
Questo manuale è adatto anche per

Einbau-Kühlschrank
Réfrigérateur à encastrer
Frigorifero da incasso
Built-in refrigerator
Variofresh 60i
Perfect/Perfect 60i
Perfect V
Perfect eco
Perfect 60i eco
Optima 2/Optima 3
Magnum/Magnum 60i
Magnum eco
Magnum 60i eco
Bedienungsanleitung
Mode d’emploi
Istruzioni per l’uso
Instructions for use
V-ZUG AG

Liebe V-ZUG-Kundin, lieber V-ZUG-Kunde
Wir danken Ihnen, dass Sie sich für den Kauf eines unserer Produkte entschieden haben.
Ihr Gerät genügt hohen Ansprüchen und seine Bedienung ist einfach. Nehmen Sie sich trotzdem Zeit, diese Bedienungsanleitung zu
lesen. So werden Sie mit Ihrem Gerät vertraut und können es optimal und störungsfrei benutzen.
Text, Bild und Daten entsprechen dem technischen Stand des Gerätes zur Zeit der Drucklegung dieser Bedienungsanleitung.
Änderungen im Sinne der Weiterenwicklung bleiben vorbehalten.
Beachten Sie bitte die Sicherheitshinweise.
Gültigkeitsbereich
Die vorliegende Bedienungsanleitung gilt für folgendes Modell
Die Modellnummer entspricht den ersten 5 Ziffern auf dem Typenschild
Chère cliente, cher client V-ZUG
Nous vous remercions d’avoir porté votre choix sur l’un de nos produits.
Votre nouvel appareil répond aux exigences les plus élevées et son utilisation est des plus simples. Accordez-vous le temps néc essaire
pour lire attentivement ce mode d’emploi. Vous vous familiariserez ainsi avec votre appareil, ce qui vous permettra de l’utiliser de
manière optimale et sans dérangement.
Le texte, les illustrations et les données correspondent au niveau technique de l’appareil au moment de la mise sous presse de ce mode
d’emploi. Sous réserve de modifications dans le cadre du progrès technique.
Veuillez tenir compte des conseils de sécurité.
Domaine de validité
Le présent mode d’emploi est valable pour les modèles suivants
Le numéro de modèle correspond aux 5 premiers chiffers figurant sur la plaque signalétique
Cara cliente V-ZUG, caro cliente V-ZUG
Vi ringraziamo per aver scelto uno dei nostri prodotti.
Il vostro apparecchio soddisfa elevate esigenze, e il suo uso è molto semplice.
E’ tuttavia necessario che vi prendiate il tempo per leggere queste istruzioni per l’uso che vi permetteranno di comprendere meglio
l’apparecchio e di utilizzarlo in modo ottimale e senza problemi.
Testo, immagine e dati corrispondono al livello tecnico dell’apparecchio al momento della stampa di queste istruzioni per l’uso, con
riserva di modifiche intese come ulteriore sviluppo.
Vi preghiamo di attenervi alle osservazioni sulla sicurezza.
Campo di validità
Queste istruzioni per l’uso riguardano i seguenti modelli
Il numero del modello corrisponde alle prime 5 cifre sulla targhetta dei dati
Dear customer V-ZUG
Thank you for choosing one of our products.
Your appliance meets high requirements and it is very easy to use.
However, spend enough time on reading these operating instructions that will allow you to better understand the appliance and use it in
an optimal manner and without problems.
Text, image and data refer to the technical level of the appliance at the time of printing these operating instructions, which are subject to
changes for further development.
Please comply with safety remarks.
Validity range
These operating instructions refer to the following models
Model number can be identified by the first 5 digits on the data plate
© V-ZUG AG, CH-6301 Zug, 2012
Type No de modèle Système de mesure
KV60i
KP60i/KP60i eco
KPV
KP/KP eco/KPi/KPi eco
KO2i/KO3i
KMi/KMi eco
KM60i/KM60i eco
51006
51007/51008
51009
51010/51050/51011/51012
51014/51015
51024/51030
51025/51031
EURO 60
EURO 60
SMS 55
SMS 55
EURO 60 / SMS 55
SMS 55
EURO 60
Tipo Modello n°. Sistema di misura
KV60i
KP60i/KP60i eco
KPV
KP/KP eco/KPi/KPi eco
KO2i/KO3i
KMi/KMi eco
KM60i/KM60i eco
51006
51007/51008
51009
51010/51050/51011/51012
51014/51015
51024/51030
51025/51031
EURO 60
EURO 60
SMS 55
SMS 55
EURO 60 / SMS 55
SMS 55
EURO 60
Typ Modell-Nr. Masssystem
KV60i
KP60i/KP60i eco
KPV
KP/KP eco/KPi/KPi eco
KO2i/KO3i
KMi/KMi eco
KM60i/KM60i eco
51006
51007/51008
51009
51010/51050/51011/51012
51014/51015
51024/51030
51025/51031
EURO 60
EURO 60
SMS 55
SMS 55
EURO 60 / SMS 55
SMS 55
EURO 60
Type Model No. Measurement system
KV60i
KP60i/KP60i eco
KPV
KP/KP eco/KPi/KPi eco
KO2i/KO3i
KMi/KMi eco
KM60i/KM60i eco
51006
51007/51008
51009
51010/51050/51011/51012
51014/51015
51024/51030
51025/51031
EURO 60
EURO 60
SMS 55
SMS 55
EURO 60 / SMS 55
SMS 55
EURO 60

3
DEUTSCH Bedienungsanleitung Seite 4
FRANÇAIS Mode d’emploi Page 12
ITALIANO Istruzioni per l’uso Pagina 20
ENGLISH Instructions for use Page 28

28
Switching the appliance on
1. Connect the appliance to the mains supply.
2. When the appliance is plugged in at the
mains, the refrigerator compartment is
normally pre-set to an inside temperature of
5°C. When the control light A (Stand-by) is
lit, press symbol A.
Adjusting the temperature
Instructions on adjusting the temperature can
be found in the product information enclosed.
Note:
The following factors can affect the inside
temperature of the refrigerator: the room
temperature, how often the door is opened,
if warm food is placed inside, and if the
refrigerator is not installed in an appropriate
location. The temperatures can then deviate
from the values indicated on the control panel.
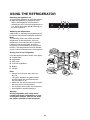
Storing food in the refrigerator:
Food should be stored as shown in the figure.
A Cooked food
B Vegetables
C Fish, meat
D Fruit and vegetables
E Bottles
F Cheese
Note:
• Alwayscoverfoodsothatitdoesnot
dry out.
• Thespacebetweentheglassshelves
and the inside rear panel ensures the
free circulation of air.
• Makesurethatstoredfooddoesnottouch
the rear panel of the refrigerator.
• Donotplacewarmfoodintherefrigerator.
• Storeliquidsinsealedcontainers.
Warning:
Storing vegetables with a high water
content can cause condensation to form
on the glass shelves. This will not affect
the proper operation of the refrigerator.
USING THE REFRIGERATOR

29
The appliance is equipped with a compartment
that ensures the proper storage of meat, fish
and poultry.
For this reason, the inside temperature of the
compartment is cooler than the rest of the
refrigerator.
This means that fresh food (meat and fish)
can be stored for a considerably longer period
without having to deep-freeze it and without
the food's nutritional value and freshness being
affected.
The optimum temperature of the Freshbox is
obtained from the average temperature setting.
Fruit and vegetables must not be stored in this
compartment as the temperature can drop
below 0°C causing the water contained in the
food to freeze.
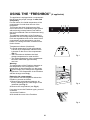
Temperature indicator (Variofresh)
The inside temperature of this compartment
is shown by a temperature indicator which
is located on the door of the compartment
(Fig. 1).
• Thecolouredareaindicatestheideal
storage temperature for meat and fish.
• Theinsidetemperatureofthecompartment
becomes stable after approximately
one hour.
Warning:
The temperature of the Freshbox depends on
the temperature of the refrigerator. If the
temperature of the refrigerator is in the range
, press button (C) to change the refrigerator
temperature. The temperature of the Freshbox
will then change accordingly.
Removing the compartment
If you wish to use the refrigerator without the
Freshbox, proceed as follows:
1. Remove the compartment fasteners; do
this by releasing the two side fixings on the
underside (see Fig. 3).
2. Remove the compartment (see Fig. 2).
If you want to use the Freshbox again, proceed
as follows:
1. Insert the Freshbox.
2. Re-install the cover of the Freshbox.
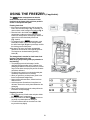
USING THE “FRESHBOX”
(if applicable)
Fig. 1
Fig. 2
Fig. 3

30
The Freshbox has been specially designed to stay at a low temperature and at the correct humidity
so that fresh food (for example meat, fish and winter vegetables) can be stored for longer.
Switching the compartment on and off
If the compartment is switched on, the inside temperature will be about 0°C.
The Freshbox can be switched on by pressing
the corresponding button (see figure) for at
least one second. The symbol lights up to
confirm it is switched on.
The illuminated symbol indicates that the
compartment for meat and fish is in operation.
To switch off the Freshbox, press the button
again for 1 second.
To ensure the Freshbox works properly:
- the refrigerator must be switched on,
- the temperature in the refrigerator must be between +2°C and +6°C,
- the compartment must be in its correct place so that it can be activated,
- the special functions (Stand-by, Cooling-Off, Vacation - if applicable) must be switched off.
If one of these special functions is selected, the Freshbox must be switched off manually. When
doing so, make sure that any fresh food stored inside is removed. If the compartment is not switched
off manually, it is automatically deactivated after approximately 8 hours.
Note:
- If the symbol does not switch on when the compartment is activated, check that the compartment
has been pushed in properly. If the symbol still does not light up, call the After-Sales Service.
- If the compartment is switched on and the drawer is opened, the symbol on the control panel may
automatically go out. Close the drawer and the symbol will light up again.
- Regardless of the status of the compartment, a quiet sound will be audible. This is completely
normal.
- If the compartment is switched off, its inside temperature will depend on the overall temperature
of the refrigerator. In this case, it is recommended to use the Freshbox to store cold-resistant fruit
and vegetables (forest fruits, apples, apricots, carrots, spinach, salad, etc.)
Note: if food with a high water content is stored in the Freshbox when it is switched on, this can
cause condensation to form on the shelves. If this happens, switch the Freshbox off temporarily.
When storing small items of food and containers in the Freshbox, make sure that they do not
accidentally fall in the space between the drawer and the rear panel of the refrigerator.
Removing the Freshbox:
The Freshbox can be taken out to make more room in the
refrigerator. To do this, proceed as follows:
- To make removal easier, it is recommended to empty
(and possibly remove) the two lower shelves.
- Switch off the compartment.
- Remove the drawer and the white plastic tray under the
compartment.
Note: The upper shelf and the side panels cannot be
removed.
Make sure when reinstalling the Freshbox that the white plastic tray under the compartment is put
back before inserting the drawer and switching on again. To optimise energy use, it is recommended
to switch off and remove the Freshbox.
Clean the compartment and its components regularly with a cloth and a solution of lukewarm water
and special neutral cleaning agent for cleaning the inside of refrigerators. Do not immerse the white
plastic shelf under the drawer in the water.
Remove the drawer prior to cleaning (including external cleaning), to interrupt the power
supply to the compartment.
Do not use any abrasive cleaners.
FRESHBOX (if applicable)

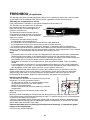
31
The freezer compartment can also be
used to freeze fresh food. The amount of fresh
food that can be frozen within a 24 hour period is
shown on the specification plate.
Freezing fresh food
• Ifthefreezercompartmenthasashelf,arrangethe
food to be frozen according to Fig. 1, otherwise, if it
does not have a shelf, arrange it according to Fig. 2.
• Placethefoodinthemiddleofthe
compartment, making sure that it does not touch
food that is already frozen and keeping a distance of
approx. 20 mm from the already frozen food
(Fig. 1 and 2).
• Forapplianceswitha
compartment, press
button (E) to switch on the Fast Freezing function;
the white control light (E) lights up and stays on while
the freezing process takes place.
•Afterapprox.26hours,thefunctionautomatically
switches off and the white control light (E) goes out.
The function can be deactivated by pressing
button (E).
The storage time in months for fresh frozen food
is given in the table on the right.
When buying deep-frozen goods, pay attention to
the following:
• Thepackagingmustnotbedamaged,asthis
might affect the preservation of the contents. If the
packaging is inflated or has wet patches, the product
may not have been stored properly and the contents
could have defrosted.
• Putdeep-frozengoodsinyourshoppingtrolleylast
and always transport them in a cool bag.
• Whenyougethome,putdeep-frozengoodsinthe
freezer compartment straight away.
• Neverrefreezedefrosteditems;insteadusethem
within 24 hours.
• Avoidtemperaturefluctuationsorkeepthemtoa
minimum. Observe the use-by date indicated on the
packaging.
• Whenstoringdeep-frozengoods,alwaysfollowthe
instructions on the packaging.
Preparing ice cubes
• Filltheicecubetray2/3withwaterandplaceinside
the
freezer compartment.
• Ifthetrayfreezestothebottom
, do not use
any sharp or pointed objects to dislodge it.
• Tomakeiteasiertotaketheicecubesoutofthe
tray, bend the tray slightly.
USING THE FREEZER (if applicable)
Fig. 1
Fig. 2

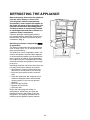
32
Before defrosting, disconnect the appliance
from the mains supply or switch it off.
The refrigerator defrosts automatically.
Occasionally, water droplets will appear on
the inside rear panel of the refrigerator; this
indicates the automatic defrosting phase.
The defrost water is automatically drained
to a drainage outlet and then collected in a
container where it evaporates.
Clean the drainage outlet regularly with the
tool supplied with the refrigerator to make sure
that the water can drain off continuously and
undisturbed. (Fig. 1)
Defrosting the freezer compartment
(if applicable)
The freezer compartment should be defrosted
once or twice a year, or if an excessively thick
layer of frost builds up.
The build-up of frost is completely normal. The
amount and speed of frost formation depends
on environmental conditions and how often the
door is opened. A build-up of frost particularly
in the upper part of the compartment is normal
and does not affect the operation of the freezer
in any way.
Defrosting should be carried out when there are
not many frozen items stored in the freezer.
• Openthedoor,removeallfooditemsand
store them in a cool place or in a cool bag.
• Leavethedooropensothatthefrostcan
melt.
• Cleantheinsideareawithaspongeanda
solution of lukewarm water and/or neutral
cleaning agent. Do not use any abrasive
cleaners.
• Rinseanddrycarefully.
• Replacethefooditems.
• Closethedoor.
Plug in the mains plug and switch on
the appliance. When doing so, follow the
instructions given in the section “Using the
refrigerator”. The settings activated prior to
switching off the appliance will be retained.
DEFROSTING THE APPLIANCE
Fig. 1

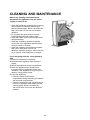
33
Before any cleaning and maintenance,
disconnect the appliance from the mains
supply or switch it off.
• Cleantherefrigeratorregularlywithasponge
and a solution of lukewarm water and/or
neutral cleaning agent. Rinse it and wipe dry
with a soft cloth. Do not use any abrasive
cleaners.
• Donotplacetheglassshelvesinwater,
instead clean them with a damp cloth.
• Cleantheinsideofthefreezercompartment
during defrosting.
• Cleantheventilationgridandcondenser
on the rear of the appliance regularly with a
vacuum cleaner or a brush.
• Cleantheoutsideoftheapplianceregularly
with a soft, damp cloth. Do not use
abrasives, abrasive sponges, stain removers
(e. g. acetone, trichlorethylene) or vinegar.
If you are going away for a long period of
time
1. Empty the refrigerator completely.
2. Disconnect the appliance from the mains
supply.
3. Defrost and clean the inside compartment.
4. Leave the appliance door slightly open
to prevent mould, unpleasant odours and
oxidation, if the appliance is not going to be
used for a long period of time.
5. Clean the appliance.
• Cleantheinsideofthefreezer
compartment during defrosting (for models
with a freezer compartment).
• Cleantherefrigeratorwithaspongeanda
solution of lukewarm water and/or neutral
cleaning agent. Rinse it and wipe dry
with a soft cloth. Do not use any abrasive
cleaners.
CLEANING AND MAINTENANCE

34
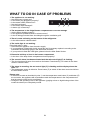
1. The appliance is not working.
• Hastherebeenapowercut?
• Isthemainsplugpluggedinproperly?
• Isthemasterswitchswitchedon?
• Hasthefuseblown?
• Isthemainscabledamaged?
• Isbutton(A)inStand-by?
2. The temperature in the fridge/freezer compartments is not cool enough.
• Arethedoorsshuttingproperly?
• Istheappliancepositionedclosetoaheatsource?
• Istheairbeingpreventedfromcirculatingthroughtheventilationgrid?
3. There is water collecting on the bottom of the refrigerator.
• Isthedefrostwateroutletblocked?
4. The inside light is not working.
First check point 1, then:
• Disconnecttheappliancefromthemainssupply.
• Ifyourapplianceisfittedwithabulb,checkthisandifnecessaryreplaceitaccordingtothe
instructions and drawings given in the data sheet enclosed.
• IfyourproductisfittedwithLEDlights,pleaseinformtheAfter-SalesService.
5. Excessive build-up of frost in the freezer compartment.
• Isthedoorofthedeep-freezecompartmentclosedproperly?
6. The acoustic alarm has been activated and the red control light (F) is flashing.
• Thedoorhasbeenleftopenformorethan2minutes.Pressbutton(F)toswitchoffthealarm
sound or close the door.
7. The alarm is sounding, the red control light (F) is flashing and the display shows the
letter “F”.
• Thetemperaturesensorisdefective.Pressbutton(F)toswitchoffthealarmsoundandinform
the After-Sales Service.
Please note:
• Ifthealarmsoundsasdescribedinpoint7,andthetemperatureresetbutton(C)andbutton(E)
are not active, the appliance will nevertheless retain the temperatures in the compartments so
that the storage of the food is not affected.
• Changesintheoperatingnoiseoftheappliance(gurglingnoisesorslighthissingnoisesofthe
coolant circulation) are completely normal.
WHAT TO DO IN CASE OF PROBLEMS

35
Before contacting the After-Sales Service:
1. Try to resolve the problem yourself (see
“Try to resolve the problem yourself first”).
2. Switch the appliance on and off to see if the
problem is still there. If the problem is still
there, switch the appliance off and switch it
back on again after an hour.
3. If the problem persists, inform the After-
Sales Service:
Please provide the following information:
• Natureofthefault
• Appliancemodel
• Servicenumber(thenumberaftertheword
SERVICE on the specification plate inside
the appliance)
• Yourfulladdress
• Yourtelephonenumberandareacode
Note:
if the door hinge is replaced by the After-
Sales Service, this does not fall under the
guarantee.
AFTER-SALES SERVICE
• Donotinstalltheapplianceclosetoa
heat source. Installation of the appliance
in a warm room, close to sources of heat
(radiators, ovens) or in direct sunlight
increases the power consumption and
should therefore be avoided.
• Ifthisisnotpossible,thefollowingminimum
distances must always be observed:
• 30cmfromcoaloroil-burningstoves;
• 3cmfromelectricand/orgascookers.
• Mountthespacers(ifsuppliedwith
the appliance) on the rear panel of the
condenser on the back of the appliance.
• Installtheapplianceinadryandwell-
ventilated location and level it if necessary
using the adjustable front feet.
• Cleantheinsidecompartment.
• Installtheaccessories.
Electrical connection
• Theelectricalconnectionsmustcomply
with local regulations.
• Informationonthevoltageandpower
consumption is given on the specification
plate inside the appliance.
• The appliance must be grounded
(earthed) by law. The manufacturer is
not liable for any injury to persons or
animals, or damage to property due
to non-compliance with the directions
given above.
• Iftheplugandsocketarenotofthesame
type, have the socket changed by a qualified
electrician.
• Donotuseextensionleadsormultiple
adapters.
Electrical disconnection
It must be possible to disconnect the appliance
by disconnecting the plug from the mains
supply or via an upstream two-pin switch.
INSTALLATION

Printed in Italy 09/12
J51006.010-0
4000 107 57276
V-ZUG AG
Industriestrasse 66, 6301 Zug
Tel. +41 (0)41 767 67 67, Fax +41 (0)41 767 61 61
[email protected], www.vzug.ch
Service-Center: Tel. 0800 850 850
FR IT GBDE
-
 1
1
-
 2
2
-
 3
3
-
 4
4
-
 5
5
-
 6
6
-
 7
7
-
 8
8
-
 9
9
-
 10
10
-
 11
11
-
 12
12


Indesit 5106600005 Guida utente
- Categoria
- Frigoriferi
- Tipo
- Guida utente
- Questo manuale è adatto anche per
in altre lingue
- English: Indesit 5106600005 User guide
Altri documenti
-
Whirlpool 5108000015 Guida utente
-
-
Whirlpool 5100900011 Guida d'installazione
-
Whirlpool 5105700015 Guida utente
-
AEG RCB83836TX Manuale utente
-
Electrolux SB339NCN Manuale utente
-
-
Electrolux SB338N_CN Manuale utente
-
Electrolux SB318N Manuale utente
-