

P2M038STD-Ver1.2
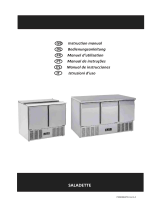
Instruction Manual
Bedienungsanleitung
Manuel d’utilisation
Manual de instrucciones
Manual de instruções
Istruzioni d’uso
GB
DE
FR
ES
PT
IT

1 P2M038STD-Ver1.2
GB

P2M038STD-Ver1.2 2
GB
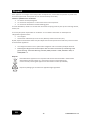
Dear Customer,
Congratulations on your purchase of this product.
Please take a few minutes before starting operation of the appliance and read the following operating
instructions.
Table of Contents
Product Overview ............................................................................................................... 3
Safety Tips ........................................................................................................................... 4
Intended Use ...................................................................................................................... 5
Location and Installation .................................................................................................... 6
Operation ............................................................................................................................ 7
Cleaning, Care & Maintenance ......................................................................................... 11
Optional Accessory ........................................................................................................... 12
Troubleshooting ................................................................................................................ 14
Disposal ............................................................................................................................. 15
Technical data ................................................................................................................... 16
Warranty ........................................................................................................................... 16

3 P2M038STD-Ver1.2
GB
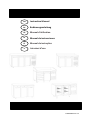
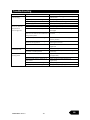
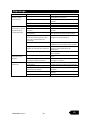
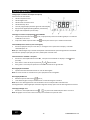
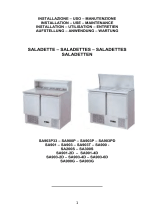
Product Overview
Article Description
2 Door Refrigerator
3 Door Refrigerator
4 Door Refrigerator
2 Door Freezer
3 Door Freezer
4 Door Freezer

P2M038STD-Ver1.2 4
GB
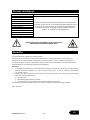
Safety Tips
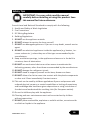
IMPORTANT: For your safety read the manual
carefully before installing or using this product. Save
this manual for future reference.
Consult Local and National Standards to comply with the following:
1. Health and Safety at Work Legislation
2. Fire Precautions
3. IEE Wiring Regulations
4. Building Regulations
5. DO NOT use the appliance outside.
6. DO NOT attempt to service the item yourself.
7. DO NOT use damaged appliances. If you are in any doubt, consult service
agent.
8. DO NOT use electrical appliances inside the appliance (e.g. heaters, ice-
cream makers etc.), unless they are of the type recommended by the
manufacturer.
9. Keep ventilation openings, in the appliance enclosure or in the built-in
structure, clear of obstruction.
10. DO NOT use mechanical devices or other means to accelerate the
defrosting process, other than those recommended by the manufacturer.
11. DO NOT damage the refrigerant circuit.
12. DO NOT stand or support yourself on the base, drawers or doors.
13. DO NOT allow oil or fat to come into contact with the plastic components
or door seal. Clean immediately if contact occurs.
14. This unit can be used by children aged above 8 years and persons with
reduced physical, sensory or mental capabilities or lacking of experience
and knowledge who have been given supervision or using instruction of
the device and understand the resulting risks (for European market).
15. Do not let children play with the appliance.
16. Cleaning and user maintenance must not be carried out by children
without supervision.
17. DO NOT place combustible, explosive or volatile articles, corrosive acids
or alkalis or liquids in the appliance.

5 P2M038STD-Ver1.2
GB
Safety Tips
18. DO NOT use this appliance to store medical supplies.
19. DO NOT use jet/pressure washers to clean the appliance.
20. DO NOT allow children to play with the packaging, and dispose plastic
bags safely.
21. Bottles that contain a high percentage of alcohol must be sealed and
placed vertically in the refrigerator.
22. Always carry, store and handle the appliance in a upright orientation and
move by holding the base of the appliance.
23. Always switch off and disconnect the power supply to the unit before
cleaning.
24. If the supply cord is damaged, it must be replaced by the manufacturer,
its service agent or similarly qualified persons in order to avoid a hazard.
25. This appliance is not intended for use by persons (including children) with
reduced physical, sensory or mental capabilities, or lack of experience and
knowledge, unless they have been given supervision or instruction
concerning use of the appliance by a person responsible for their safety
(for market beyond European).
26. Children should be supervised to ensure that they do not play with the
appliance.
27. For indoor use only. Not suitable for installation in an area where a water
jet could be used. Shall not be cleaned by a water jet.
28. To guarantee safe operation, ensure that the appliance is set up and
connected as described in the instruction manual.
29. Any repairs and work on the appliance should only be carried out by the
customer service department/ qualified technician.
30. The key to the electrical cabinet should be kept out of the reach of
children and users.
31. Do not store explosive substances such as aerosol cans with a flammable
propellant in this appliance.
Intended Use
Only use this appliance for cooling and storage of food and beverage for commercial purposes.

P2M038STD-Ver1.2 6
GB
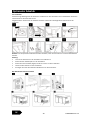
Location and Installation
Remove the appliance from the packaging. Make sure that all protective plastic film and coatings are
thoroughly removed from all surfaces. To prevent injury or damage to the unit, we recommend that the
appliance should be unpacked and set up by two people.
The climatic class can be found on the rating plate. It specifies the ambient temperatures at which the
appliance may be operated. The rating plate can be found inside the appliance.
Climate Class
Max. Ambient Temperature
Relative Humidity
3
25
60%
4
30
55%
5
40
40%
Maintain a distance of 20 cm (7 inches) between the appliance and walls or other objects for ventilation.
Increase this distance if the obstacle is a heat source.
The appliance should be placed on a solid flat and stable floor to reduce noise and vibration. Level the
appliance by adjusting the feet.
Avoid locating the unit in direct sunlight or near heat sources such as ovens or radiators.
Please make sure the appliance is properly ventilated.
Check that the power supply and voltage used comply with the details on the rating plate. The plug
must be accessible after installation.
Correctly connect and disconnect the plug. When inserting ensure the plug is fully engaged. While
unplugging hold the body of the plug. Never pull the supply cord directly.
If the unit is to be shut down for long period, switch it off and disconnect the plug from socket outlet.
Clean the appliance and leave the door open to prevent odour.
Important! For your personal safety, this appliance must be properly grounded (earthed). This
appliance is equipped with a cord having a grounding wire with a grounding plug. The plug must be
inserted into an outlet that is properly grounded and installed. Consult a qualified electrician or service
centre if you do not completely understand the grounding instructions. If doubt exits whether the
appliance is properly grounded, have a qualified electrician check the circuit to make sure the outlet is
properly grounded.
If the cable does not reach the nearest socket, either rearrange your store layout or ask a qualified
electrician to fix a new socket.
If power is cut off, wait for at least 3 minutes before restarting the appliance to avoid damaging the
compressor.
Slide the shelf/drawer into place.
Note: If the unit has not been stored or moved in an upright position, let it stand upright for
approximately 12 hours before operation.
Note: Before using the appliance for the first time, clean the shelves and interior with soapy water.

7 P2M038STD-Ver1.2
GB
Operation
Storing food
To get the best results from your appliance, follow these instructions:
Only store foodstuffs in the appliance when it has reached the correct operating temperature.
Do not place uncovered hot food or liquid inside the appliance.
Wrap or cover food where possible.
Do not obstruct the fan inside the appliance.
Avoid opening the doors for prolonged periods of time.
The food must be put into container before placed into cabinet or on the shelf. Food must not be
placed into food cabinet directly.
Turn on
Close the door of the appliance.
Ensure the power switch is set to [O] then connect to the power outlet.
Switch on the Power [I]. The current temperature within the appliance is displayed.
The on the control panel will flash to indicate a delay to compressor start.
Open/ Close the lid or drawer
The lid of the Sliding Top Saladette is multi positional
With the lid closed, slide the panel back into the half open position. This allows partial access to the
GN container trays.
Lift the lid up and back so the hinge settles into the support slot.
Lift the lid up and completely back so the GN container trays are completely exposed.
WARNING: The sliding lid does not have a locking mechanism. Always make sure that the lid is in the ‘half-
open’ position before opening.
WARNING: Do not pull the drawer out of its full open position to avoid any hurt.

P2M038STD-Ver1.2 8
GB
Operation
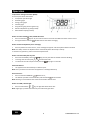
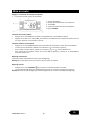
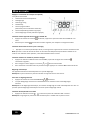
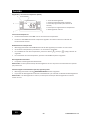
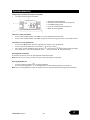
Temperature Setting and Control (Dixell)
The front panel of the thermostat display:
1. Defrost indicator
2. Compressor operation indicator
3. SET key
4. Temperature modification keys
5. Defrost button
How to see the set point
• Push and immediately release the SET key, the set point will be showed;
• Push and immediately release the SET key or wait about 15s to return to normal visualisation.
How to change the set point
• Push the SET key for more than 2 seconds to change the set point value;
• The value of the set point will be displayed and the “°C” starts blinking;
• To change the set value push the „ “ (up) or “ ” (down) arrows within 15s.
• To memorise the new set point value push the SET key again or wait 15s.
Automatic defrost
• The appliance will automatically run defrost cycles.
Note: The cycle starts from the time the appliance is initially powered up.
Manual Defrost:
• Press and hold the DEFROST button for 5 seconds.
• The defrost cycle will start immediately and the Defrost LED illuminates.
Note: Starting a manual defrost also resets the automatic defrost timer.

9 P2M038STD-Ver1.2
GB
Operation
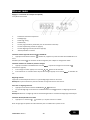
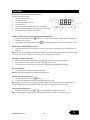
Temperature setting and control (EVCO)
The front panel of the thermostat
1. Compressor operation light
2. Defrosting light
3. Energy saving light
4. Stand-by light
5. Programming key (service agent only)
6. Machine On/Stand -by (keep pushed)
7. Manual defrost (keep pushed)
How to turn the machine in ON / STAND -BY status
Press and hold the key for 4s, the machine will turn from ON to STAND -BY status and vice-versa.
During the button hold the LED will blink to show status changing.
How to unlock the keyboard (»Loc» message)
Push any button for more than 2s, «UnL» message will appear and the keyboard will be unlocked.
Note: For safety reasons the keyboard locks automatically after 30s of keys inactivity.
To execute any operation, please unlock the keyboard first.
How to see and modify the set point
Push and immediately release the key, the set point will be showed and starts blinking;
To change the set value push or arrows within 20s.
To memorize the new set point value push the key again or wait 20s.
Automatic defrost
The appliance will automatically run defrost cycles.
Note: The cycle starts from the time the appliance is initially powered up.
Manual Defrost:
Press and hold the DEFROST button for 3s;
The defrost cycle will start immediately and the Defrost LED illuminates.
Note: Starting a manual defrost also resets the automatic defrost timer.
How to turn ON / OFF the light
Press and release the key, the light will switch ON or OFF.
Note: Light logo is present and active only for model with glass door.

P2M038STD-Ver1.2 10
GB
Operation
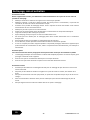
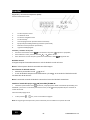
Temperature setting and control (EVCO)
The front panel of the thermostat
1. Compressor operation light
2. Defrosting light
3. Energy saving light
4. Stand-by light
5. Programming key (service agent only)
6. Machine On/Stand-by (keep pushed)
7. Manual defrost (keep pushed)
8. Light on/off
How to turn the machine in ON / STAND -BY status
Press and hold the key for 4s, the machine will turn from ON to STAND -BY status and vice-versa.
During the button hold the LED will blink to show status changing.
How to see and modify the set point
Push and immediately release the key, the set point will be showed and starts blinking;
To change the set value push or arrows within 20s.
To memorize the new set point value push the key again or wait 20s.
Automatic defrost
The appliance will automatically run defrost cycles.
Note: The cycle starts from the time the appliance is initially powered up.
Manual Defrost:
Press and hold the DEFROST button for 3s;
The defrost cycle will start immediately and the Defrost LED illuminates.
Note: Starting a manual defrost also resets the automatic defrost timer.
How to turn ON / OFF the light:
Press and release the key, the light will switch ON or OFF.
Note: Light logo is present and active only for model with glass door

11 P2M038STD-Ver1.2
GB
Cleaning, Care & Maintenance
Routine maintenance
Switch off and disconnect from the power supply before cleaning.
Clean the enclosure and interior of the appliance as often as possible.
Clean the unit with moist cloth. Never allow the switch, control panel, cable or plug to get wet.
Do not use abrasive cleaning agents. These can leave harmful residues. Use only mild soapy
water.
Clean the door seal with water only.
Ensure that no cleaning water penetrates into the electrical components.
Must not be cleaned by a water jet.
Always wipe dry after cleaning with soft cloth.
Do not allow water used in cleaning to run through the drain hole into the evaporation pan.
Take care when cleaning the rear of the appliance.
An agent or technician must carry out repairs if required.
If the appliance is to be left inactive for long periods, unplug the appliance after having turned
the switch to OFF position, empty the refrigerating compartment and clean thoroughly.
Special maintenance
The instructions given in the following paragraph can be followed from qualified technicians
Periodically clean the condenser using suitable tools (vacuum cleaner or soft brushes) can extend
the life of the appliance.
Check that the electrical connections are not loose.
Check that the thermostat and the sensor are in proper working order.
Marble Care
Do not use abrasive materials or detergents to clean the worktop. Wash with warm, soapy water.
Do not put hot or frozen material on the marble top to avoid break.
Wipe up any spillages as quickly as possible, particularly liquids such as lemon juice or vinegar.
Recommend the use of a chopping board to reduce the risk of damage to your worktop.
Dry thoroughly with a soft cloth after cleaning.

P2M038STD-Ver1.2 12
GB
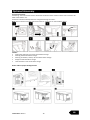
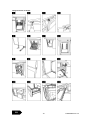
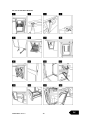
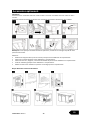
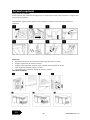
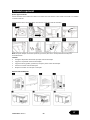
Optional Accessory
Four pieces of Castor
Positioning: Two castors with break to be fixed at the bottom front and two castors with no break to be
fixed at the bottom rear.
Procedure: Follow the 8 steps below to change the footings to casters.
Note: If you intend to purchase optional accessories, please ask our sales staff for advice.
Caution:
Unplug the appliance from main socket before change.
Securing the fork lift before change.
Securing all drawers, shelves, lids and doors before change.
Empty the cabinet before change.
Lock the brake on the caster after change.
How to slide out/open the Engine Plate

13 P2M038STD-Ver1.2
GB
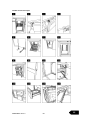
Change from Door to Drawer

P2M038STD-Ver1.2 14
GB
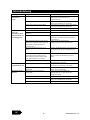
Troubleshooting
Fault
Potential Failure
Problem solving action
The appliance is
not working
The unit is not switched on
Check the unit is plugged in correctly and
switched on
Plug and/ or lead are damaged
Call your agent or qualified technician
Fuse in the plug has blown
Replace the fuse (UK Plug)
Power supply
Check power supply
The appliance
turns on, but the
temperature
is too high/ low
Too much ice on the evaporator
Defrost the appliance
Condenser blocked with dust
Call your agent or qualified technician
Doors are not shut properly
Check doors are shut and seals are not
damaged
Appliance is located near a heat
source or air flow to the condenser is
being interrupted
Move the refrigerator to a more suitable
location
Ambient temperature is too high
Increase ventilation or move appliance to a
cooler position
Unsuitable foodstuffs are being
stored in the appliance
Remove any excessive hot foodstuffs or
blockages to the fan
Appliance is overloaded
Reduce the amount of food stored in the
appliance
The appliance is
unusually loud
Loose nut/ screw
Check and tighten all nuts and screws
The appliance has not been installed
in a level or stable position
Check installation position and change if
necessary
The appliance is
leaking water
The appliance is not properly leveled
Adjust the screw feet to level the appliance
(if applicable)
The discharge outlet is blocked
Clear the discharge outlet
Movement of water to the drain is
obstructed
Clear the floor of the appliance (if
applicable)
The water container is damaged
Call your agent or qualified Technician
The drip tray is overflowing
Empty the drip tray (if applicable)

15 P2M038STD-Ver1.2
GB
Disposal
If the appliance is no longer of use and you wish to dispose of it, remove doors to prevent any small child
from be trapped inside. Then please do in an environmentally correct way.
Contact a qualified service technician:
1. To recover all Freon/refrigerant
2. To remove the compressor or remove the oil from the compressor
3. To remove the flammable insulation blowing gases
Then the distributor/ retailer can contact their local metal recycling center to pick up the remaining cabinet,
shelves, etc.
There may be special requirements or conditions. You can obtain information on the disposal of
refrigeration appliances from:
Your supplier
Government authorities (The local council, Ministry of the Environment, etc.)
By law, disposal of hazardous wastes may be subject to fines and imprisonment under the provisions of the
environmental regulations.
1. The refrigerant of this unit is a hydrocarbon refrigerant and is covered by the Kyoto Protocol.
2. Releasing the refrigerant to the atmosphere will harm the environment by contributing to the
global warming. The Global Warming Potential (GWP) of R134a is 1430, of R404a is 3922, of
R600a/R290 is 3.
Disposal
Discarded electric appliances are recyclable and should not be discarded in the domestic
waste! Please actively support us in conserving resources and protecting the
environment by returning this appliance to the collection centres (if available).
Dispose of packaging in accordance to applicable legal regulations.

P2M038STD-Ver1.2 16
GB
Technical data
Model
Refrigerator / Freezer (2 Door, 3 Door, 4 Door)
Climate Class
Please refer to the information indicated on the product. You will find
the information on the rating label on the back of the unit as well as
inside the cooling compartment. The circuit diagram is displayed on the
back of the unit as well as inside the cooling compartment
Refrigerant Gas
Refrigerant Charge
Temperature Range (°C)
Input Power
Rated Frequency
Rated Voltage
Internal volume
Net Weight
Gross Weight
Foaming Agent
External Dimension (mm)
CAUTION: RISK OF FIRE AND EXPLOSION WITH FLAMMABLE
REFRIGERANT R600a/R290.
Warranty
A statutory warranty applies for this product.
Damages caused by wrong treatment or operation, by false placement or storage, improper connection or
installation, as well as force or other external influences are not covered by this warranty. We recommend
careful reading of the operating instructions as it contains important information.
Note:
1. In case this product does not function correctly, please firstly check if there are other reasons, e.g. for
electrical appliances interruption of the power supply, or generally incorrect handling are the cause.
2. Please note that, where possible, the following documents or rather information should be provided
together with your faulty product:
Purchase receipt
Model description/ Type/ Brand
Describe the fault and problem as detailed as possible
In the case of a claim for guarantee or defects, please contact the seller.
GWL 8/14 EN

17 P2M038STD-Ver1.2
DE

P2M038STD-Ver1.2 18
DE
Übersetzung der Originalbetriebsanleitung
Sehr geehrte Kundin,
sehr geehrter Kunde,
herzlichen Glückwunsch zum Kauf dieses Produktes.
Bitte nehmen Sie sich einige Minuten Zeit, bevor Sie das Gerät in Betrieb nehmen und lesen Sie die
nachfolgende Gebrauchsanweisung durch.
Inhaltsverzeichnis
Produktübersicht .............................................................................................................. 19
Sicherheitshinweise .......................................................................................................... 20
Bestimmungsgemäßer Gebrauch ..................................................................................... 22
Platzierung und Installation .............................................................................................. 23
Funktion und Handhabung ............................................................................................... 24
Reinigung, Pflege und Wartung ........................................................................................ 28
Optionales Zubehör .......................................................................................................... 29
Fehlerbehebung ................................................................................................................ 31
Entsorgung ........................................................................................................................ 32
Technische Daten ............................................................................................................. 33
Gewährleistung ................................................................................................................. 33
La pagina si sta caricando...
La pagina si sta caricando...
La pagina si sta caricando...
La pagina si sta caricando...
La pagina si sta caricando...
La pagina si sta caricando...
La pagina si sta caricando...
La pagina si sta caricando...
La pagina si sta caricando...
La pagina si sta caricando...
La pagina si sta caricando...
La pagina si sta caricando...
La pagina si sta caricando...
La pagina si sta caricando...
La pagina si sta caricando...
La pagina si sta caricando...
La pagina si sta caricando...
La pagina si sta caricando...
La pagina si sta caricando...
La pagina si sta caricando...
La pagina si sta caricando...
La pagina si sta caricando...
La pagina si sta caricando...
La pagina si sta caricando...
La pagina si sta caricando...
La pagina si sta caricando...
La pagina si sta caricando...
La pagina si sta caricando...
La pagina si sta caricando...
La pagina si sta caricando...
La pagina si sta caricando...
La pagina si sta caricando...
La pagina si sta caricando...
La pagina si sta caricando...
La pagina si sta caricando...
La pagina si sta caricando...
La pagina si sta caricando...
La pagina si sta caricando...
La pagina si sta caricando...
La pagina si sta caricando...
La pagina si sta caricando...
La pagina si sta caricando...
La pagina si sta caricando...
La pagina si sta caricando...
La pagina si sta caricando...
La pagina si sta caricando...
La pagina si sta caricando...
La pagina si sta caricando...
La pagina si sta caricando...
La pagina si sta caricando...
La pagina si sta caricando...
La pagina si sta caricando...
La pagina si sta caricando...
La pagina si sta caricando...
La pagina si sta caricando...
La pagina si sta caricando...
La pagina si sta caricando...
La pagina si sta caricando...
La pagina si sta caricando...
La pagina si sta caricando...
La pagina si sta caricando...
La pagina si sta caricando...
La pagina si sta caricando...
La pagina si sta caricando...
La pagina si sta caricando...
La pagina si sta caricando...
La pagina si sta caricando...
La pagina si sta caricando...
La pagina si sta caricando...
La pagina si sta caricando...
La pagina si sta caricando...
La pagina si sta caricando...
La pagina si sta caricando...
La pagina si sta caricando...
La pagina si sta caricando...
La pagina si sta caricando...
La pagina si sta caricando...
La pagina si sta caricando...
La pagina si sta caricando...
La pagina si sta caricando...
La pagina si sta caricando...
La pagina si sta caricando...
La pagina si sta caricando...
-
 1
1
-
 2
2
-
 3
3
-
 4
4
-
 5
5
-
 6
6
-
 7
7
-
 8
8
-
 9
9
-
 10
10
-
 11
11
-
 12
12
-
 13
13
-
 14
14
-
 15
15
-
 16
16
-
 17
17
-
 18
18
-
 19
19
-
 20
20
-
 21
21
-
 22
22
-
 23
23
-
 24
24
-
 25
25
-
 26
26
-
 27
27
-
 28
28
-
 29
29
-
 30
30
-
 31
31
-
 32
32
-
 33
33
-
 34
34
-
 35
35
-
 36
36
-
 37
37
-
 38
38
-
 39
39
-
 40
40
-
 41
41
-
 42
42
-
 43
43
-
 44
44
-
 45
45
-
 46
46
-
 47
47
-
 48
48
-
 49
49
-
 50
50
-
 51
51
-
 52
52
-
 53
53
-
 54
54
-
 55
55
-
 56
56
-
 57
57
-
 58
58
-
 59
59
-
 60
60
-
 61
61
-
 62
62
-
 63
63
-
 64
64
-
 65
65
-
 66
66
-
 67
67
-
 68
68
-
 69
69
-
 70
70
-
 71
71
-
 72
72
-
 73
73
-
 74
74
-
 75
75
-
 76
76
-
 77
77
-
 78
78
-
 79
79
-
 80
80
-
 81
81
-
 82
82
-
 83
83
-
 84
84
-
 85
85
-
 86
86
-
 87
87
-
 88
88
-
 89
89
-
 90
90
-
 91
91
-
 92
92
-
 93
93
-
 94
94
-
 95
95
-
 96
96
-
 97
97
-
 98
98
-
 99
99
-
 100
100
-
 101
101
-
 102
102
-
 103
103


Casselin CTAR2P Manuale utente
- Tipo
- Manuale utente
- Questo manuale è adatto anche per
in altre lingue
- français: Casselin CTAR2P Manuel utilisateur
- español: Casselin CTAR2P Manual de usuario
- Deutsch: Casselin CTAR2P Benutzerhandbuch
- português: Casselin CTAR2P Manual do usuário
Documenti correlati
Altri documenti
-
 Gastrodomus SAQ90A Manuale del proprietario
-
Samsung SCC-RC130E Manuale utente
-
Cecotec 99 Bolero CoolMarket Chest Manuale utente
-
GGM Gastro Freezer ECO-GN 2-1-1400 Liters Manuale utente
-
 Gastrodomus SA903P Manuale del proprietario
-
 PRODIS HC410RSS Manuale del proprietario
-
GGM Gastro 20200326 Manuale utente
-
-
GGM Gastro AGG204ND Manuale del proprietario
-
Panasonic STRADA CN-GP50N Istruzioni per l'uso


