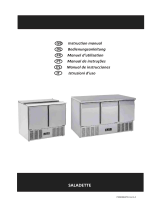
Gastrodomus SA903P Manuale del proprietario
- Tipo
- Manuale del proprietario

1
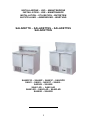
INSTALLAZIONE – USO – MANUTENZIONE
INSTALLATION – USE – MAINTENANCE
INSTALLATION – UTILISATION – ENTRETIEN
AUFSTELLUNG – ANWENDUNG – WARTUNG
SALADETTE – SALADETTES – SALADETTES
SALADETTEN
SA903P33 – SA900P – SA903P – SA903PD
SA901 – SA903 – SA903T – SA900 -
SA200S – SA300S
SA901-2D – SA901-4D
SA903-2D – SA903-4D – SA903-6D
SA900G – SA903G

2
INDICE
1. Introduzione
2. Diritti e responsabilità del costruttore
3. Movimentazione ed immagazzinaggio
4. Massa in servizio
5. Caratteristiche tecniche
6. Uso
7. Manutenzione
8. Comportamento in caso di guasto
9. Attività a cura del personale specializzato
10. Smaltimento
11. Figure e tabelle
12. Schemi elettrici
13. Dichiarazione di conformità CE
1. INTRODUZIONE
Questo apparecchio è stato realizzato negli interni, nell’estetica e nella
componentistica secondo le esigenze specifiche dei nostri clienti, è inoltre
stato controllato funzionalmente ed esteticamente in ogni sua parte prima
dell’invio definitivo. Usate quindi l’apparecchio attendendovi a quanto qui sotto
suggerito e rimarrà per lungo tempo al vostro servizio.
2. DIRITTI E RESPONSABILITA’ DEL COSTRUTTORE
È vietata la riproduzione parziale o totale delle presenti istruzioni senza
l’autorizzazione scritta della ditta. I disegni riprodotti sono di carattere
generale e possono essere difformi in alcuni particolari dall’apparecchio
consegnato. Il costruttore declina ogni responsabilità per danni causati a
persone o cose dovuti a: inosservanza di avvertenze ed istruzioni contenute
nel presente testo; inosservanza dei limiti di impiego dell’apparecchio; uso
improprio, errato, irragionevole o da parte del personale inesperto; uso non
conforme alle normative locali; modifiche non autorizzate e/o riparazioni
effettuate da personale non qualificato/autorizzato; utilizzo di
ricambi/accessori non originali; eventi eccezionali. Il costruttore si riserva

3
inoltre il diritto di apportare tutte le modifiche ritenute opportune senza alcun
preavviso.
3. MOVIMENTAZIONE ED IMMAGAZZINAGGIO
L’apparecchio è contenuto in un imballo costituito da un pianale in legno,
angolari rigidi, protezioni di polistirolo e film plastico. Pesi ed ingombri sono
indicati nella tabella CARATTERISTICHE TECNICHE del capitolo 11. In
attesa della collocazione definitiva immagazzinare in ambiente coperto a
temperatura compresa tra -25°/+55°C ed umidità relativa compresa tra
30/95%.
4. MESSA IN SERVIZIO
Leggere attentamente le etichette sull’apparecchio, non coprirle per nessuna
ragione e sostituirle immediatamente in caso venissero danneggiate. Non
togliere le protezioni o pannellature che richiedono l’uso di utensili per essere
rimosse.
Posizionamento
Assicurarsi che, dal punto di vista degli ingombri (vedi tabella capitolo 11), lo
spazio riservato all’apparecchio ne permetta il corretto utilizzo e la facile
manutenzione. Sistemare l’apparecchio in piano avvitando i piedini livellatori e
registrandoli, dopo avendo disimballato rimuovendo tutte le protezioni
predisposte dall’azienda. Per limitare il rischio di scarica elettrica statica
dovuta alla rimozione della plastica protettiva, si consiglia di rimuovere la
plastica lentamente e in piccoli pezzi. Spostare l’apparecchio sollevandolo
solo dal fondo inferiore esterno, per evitare di danneggiare i piedini di
appoggio e gli altri equipaggiamenti. Se l’apparecchio, durante la
movimentazione, è stato posizionato verticalmente, attendere dure ore prima
di procedere all’accensione dell’apparecchio. L’apparecchio non deve essere
installato in ambienti pericolosi, all’aria aperta o esposto a pioggia, lontano da
fonti di calore (termosifoni, faretti ecc..), al riparo dai raggi solari e da correnti
d’aria. L’aria deve circolare liberamente attraverso l’unità di condensa. Il
mancato rispetto delle condizioni riportati, porta ad una riduzione della
prestazione dell’apparecchio.
Pulizia iniziale
Prima dell’allacciamento alla rete elettrica pulire adeguatamente
l’apparecchio. Per le parti interne usare detersivi antibatterici, per le parti in
plastica è sufficiente utilizzare panni inumiditi. Asciugare con un panno
morbido e pulito. Non usare detersivi aggressivi, abrasivi ne solventi.
Posizionamento componenti ed accessori
Tutti gli accessori sostitutivi delle griglie possono essere messe negli appositi
supporti. Provvedere a sistemare i supporti griglie all’interno della cella nella
posizione più adatta all’uso.
Collegamento alla rete elettrica
Assicurarsi che l’impianto di alimentazione elettrico rispetti le leggi vigenti. Il
cavo di alimentazione deve essere ben steso (evitare arrotolamenti o

4
sovrapposizioni) in posizione non esposta ad eventuali urti o manomissioni,
non deve essere in prossimità di liquidi od acqua e di fonti di calore. Nel caso
si danneggiasse, farlo sostituire immediatamente da personale qualificato.
Evitare sempre l’uso di adattatori.
5. CARATTERISTICHE TECNICHE
Potenze assorbite ed ingombri
La potenza assorbita, gli ingombri esterni ed interni relativi ai vari modelli e
nelle varie configurazioni sono indicati nella tabella del capitolo 11.
Rumorosità e vibrazioni
Il livello sonoro degli apparecchi con unità condensatrice incorporate è
inferiore ai 70 dB. In condizioni normali l’apparecchio non genera vibrazioni
dannose all’ambiente circostante.
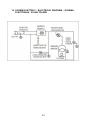
6. USO
Azionamento
Queste saladette sono azionate tramite degli interruttori ed una centralina
elettronica. Le operazioni consentite all’utente sono
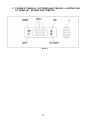
Accensione/spegnimento(fig. 1)
Premere l’interruttore n° 1 sul display apparirà la temperatura presente
nell’apparecchio al momento e si illumineranno il LED di funzionamento
compressore. In caso di interruzioni nell’erogazione dell’energia elettrica il
compressore si riavvierà in lieve ritardo.
Impostazione temperatura cella(fig. 1)
Premendo il tasto SET per un secondo si potrà leggere la temperatura
impostata. Volendo variare detta temperatura: premuto il tasto SET premere il
tasto▲ (UP) o il tasto▼ (DOWN) per far rispettivamente aumentare o
diminuire la temperatura inizialmente impostata, raggiunta la nuova
temperature confermarne il valore premendo di nuovo il tasto SET.
Visualizzazione codici allarme
La centralina segnala eventuali malfunzionamenti facendo lampeggiare sul
display i codici di allarme elencati di seguito: E0 lampeggiante.
Nel caso che sul display lampeggi il codice sopra riportato: prenderne nota,
spegnere la centralina e riaccenderla dopo pochi secondi. Si il codice allarme
dovesse rimanifestarsi, riprenderne nota e chiamare l’assistenza tecnica
segnalando il codice di allarme annotato.
Stoccaggio degli alimenti
Allo scopo di ottenere le migliori prestazioni della saladette è necessario
rispettare le seguenti indicazioni: introdurre la merce dopo che esso avrà
raggiunto la temperatura desiderata leggibile sul termometro; non introdurre al
suo interno cibi caldi o liquidi scoperti; confezionare o proteggere in altro
modo gli alimenti; non limitare la circolazione dell’aria all’interno con ostacoli
superfluidi; evitare frequenti e prolungate aperture degli sportelli/cassetti;
attendere alcuni istanti prima di riaprire lo sportello/cassetto appena chiuso.

5
Durante lo stoccaggio aprire e riempire un cassetto per volta, per eliminare
rischi di possibile ribaltamento dell’apparecchio.
Sbrinamento
Temporizzazione sbrinamento (fig.1)
La centralina avvia automaticamente 2 cicli di sbrinamento nelle 24 ore. Il
timer rileverà il tempo a partire dal momento della prima accensione. Per
effettuare un ciclo di sbrinamento manuale è sufficiente premere per 3
secondi il tasto sbrinamento (SBR), avverrà un immediato sbrinamento
automatico per le prossime 12 ore. Durante tale fase sul display si accenderà
la spia di sbrinamento. L’eliminazione acqua di sbrinamento è automatica in
tutti i modelli.
7. MANUTENZIONE
Pulizia periodica della cella e del condensatore
Prima di iniziare la pulizia spegnere l’apparecchio e scollegare la spina dalla
presa. Pulire almeno una volta alla settimana il vano interno seguendo le
indicazioni (vedi Pulizia iniziale). Pulire il condensatore almeno una volta alla
settimana. Prima di iniziare la pulizia, chiudere e proteggere la saladette.
Accedere al condensatore svitando la vite di bloccaggio della griglia di
protezione, poi asportare con una spazzola e con un aspirapolvere la polvere
depositata sulla superficie frontale del condensatore.
Inattività dell’apparecchio
Nei periodi di inattività scollegare la spina dalla presa, pulire accuratamente
come per una pulizia periodica e lasciare circolare l’aria nella cella coprendo
la saladette con un telo di stoffa.
8. COMPORTAMENTO IN CASO DI GUASTO
Se l’apparecchio non funziona controllare che:
la spina sia correttamente inserita nella presa;
il cavo di alimentazione non sia danneggiato.
Se la temperatura prestabilita non viene raggiunta controllare che:
l’interruttore di comando sia acceso;
la centralina sia ben regolata (vedi impostazione temperatura cella);
l’apparecchio non sia in fase di sbrinamento o in fase di recupero
post-sbrinamento;
l’evaporatore non sia ricoperto di ghiaccio (vedi sbrinamento);
il condensatore non sia intasato dalla polvere;
l’apparecchio non si trovi in prossimità di fonti di calore o la sua unità
condensatrice sia poco aerata;
gli alimenti stoccati o altri oggetti non impediscano la corretta chiusura
degli sportelli/cassetti;
l’apparecchio non lavori in condizioni anomale (inserimento di alimenti
caldi, in eccesso e/o maldisposti).

6
Se l’apparecchio perde acqua controllare che:
il dispositivo di eliminazione acqua non sia danneggiato, che lo
scarico sia stato ben canalizzato e che non sia ostruito;
l’apparecchio sia stato messo in piano.
Se l’apparecchio è rumoroso controllare che:
non ci siano viti o bulloni svitati;
l’apparecchio sia ben livellato e che i piedini appoggino stabilmente
sul pavimento.
Se dopo tutti questi controlli il malfunzionamento dovesse permanere è
opportuno rivolgersi all’assistenza tecnica, indicando la sigla del modello ed il
numero di matricola (ambedue rilevabili dalla targhetta dati tecnici) e gli
eventuali codici di allarme comparsi sul display della centralina.
9. ATTIVITA’ A CURA DI PERSONALE SPECIALIZZATO
Sostituzione di componenti
Prima di qualsiasi operazione di manutenzione scollegare la spina dalla rete
elettrica.
10. SMALTIMENTO
Lo smaltimento dell’apparecchio deve essere affidato a ditte specializzate di
settore secondo quanto previsto da leggi ed enti locali.
L’apparecchio è costituito da:
struttura in lamiera d’acciaio;
componenti e cablaggio elettrici;
compressore elettrico;
materiali plastici;
fluido frigorigeno da non disperdere nell’ambiente.
TUTTE LE RESPONSABILITA’ PER IL MANCATO RISPETTO DELLE
VIGENTI LEGGI LOCALI RICADRANNO SUL PROPRIETARIO.

7
INDEX
1 Introduction
2 Manufacturer’s retained rights and responsibility
3 Transportation and storage
4 Commissioning
5 Technical characteristics
6 Usage
7 Maintenance
8 Operation in the case of failures
9 Duties tob e undertaken by qualified engineer
10 Dismantling
11 Pictures and tables
12 Electrical diagram
13 Declaration of conformity CE
1. INTRODUCTION
This equipment has been produced be internally or externally in its
aesthetics and compensability, in response to the specific exigencies of
our clientele, furthermore it has been mechanically and aesthetically
checked in every aspect before despatch. For the correct utilisation of the
equipment, careful read the instructions. Observe all the recommendations
contained therein, consign this manual which constitutes an integral part of
the essence of the equipment to the end user who is requested to retain it
for future consultation. By observing these recommendations, you will
guarantee the extended trouble-free operation of the equipment.
2. MANUFACTURER’S RETAINED RIGHTS AND RESPONSIBILITY
It is forbidden to reproduce, partially or totally, these instructions without
the express authorisation oft he manufacturers. The drawings reproduced
may be considered as a general guide, and may vary in some particulars
to the equipment consigned. The manufacturers deny all responsibility to
third parties in consequence of: non observance oft he warnings and
instructions contained in the text; non observance of the parameters of
utilisation of the equipment; unreasonable or wrongful utilisation by un-
trained personnel; use non-conforming to local statutes; unauthorised
modifications and/or repairs undertaken by non-trained or authorised

8
personnel; utilisation of non original spares or accessories; exceptional
occurrences. The manufacturers reserve the right to introduce any
modification deemed necessary without warning.
3. TRANSPORTATION AND STORAGE
The equipment is wrapped in absorbent material and contained and fixed
within a wooden platform and stiff card-board corner, weights and
dimensions are reported in the table (pls. see chapter 11 TECHNICAL
CHARACTERISTICS). Whilst awaiting by definitive collection, these should
be stored within a protected and covered environment at a temperature
between -25° / +55°C, with ambient humidity between 30 to 95%.
4. COMMISSIONING
Carefully read the label on the equipment, do not cover for any reason
whatsoever, and replace them immediately if damaged. Do not remove
protection or panelling that require the usage of tools.
Positioning
Ensure that in respect oft he dimensions (pls. see table from chapter 11)
the space reserved for the equipment permits its correct utilisation and
ease of maintenance. After carefully unpacking the display case, remove
the protection film and all of the manufacturer’s material which safeguards
the item in transit. Place the cabinet on a flat surface and level it by
screwing and adjusting the levelling legs to ensure its efficient operation.
The cabinet must be lifted only form the exterior of the base to avoid the
possibility of damage. If the device has been positioned vertically (integral
condensing unit), wait two hours before activating it. The equipment must
not be installed within explosive ambience, in the open air or exposed to
rain, distant form heat sources (radiators, direct lighting, etc.) and
protected from direct sunlight and draughts. Air circulation must be freely
maintained around the condensing unit, be it integral or remote.
Inobservance of these specific conditions will detrimentally affect the
cabinet.
Initial cleaning
Bevor use all parts of the cabinet should be cleaned. For the internal parts
use an antibacterial detergent, for the plastic parts use a moistened cloth.
Dry with a soft clean cloth. Do not use harsh or abrasive solvents or
detergents.
Positioning of components and accessories
All the accessories that can replace the grills are insertable into the same
wall supports that the grills use. Position the grill supports inside the cell
with the spacing most suitable.
Electrical connection
Make sure the electrical supply system complies with applicable laws. The
power cord must be stretched (avoid twisting or overlapping) in a position
not exposed to possible knocks or tampering, should not be in the vicinity

9
of liquid or water and heat sources. If it is damaged, have it replaced
immediately by qualified personnel. Always avoid the use of adapters.
5. TECHNICAL CHARACTERISTICS
Absorbed ladings and dimensions
The power absorbed, the external and internal dimensions for the various
models and in various configurations are shown in the table from chapter
11.
Noise and vibration
The sound level of the equipment fitted with integral hermetic condensing
unit does not exceed 70dB. Under normal conditions the equipment does
not generate vibrations which affect the surroundings.
6. USE
Activation
These saladettes are activated by switches and an electronic control panel.
The operations available to the user are:
Startup/shutdown oft he unit (fig. 1)
Press the switch n°1, the present cell temperature will appear on the
display and both the LED of the compressor functioning and the LED of the
internal ventilator functioning (delayed) will light up. In case of power
supply interruption, the compressor will normally restart with a slight delay.
Setting the cell temperature (Abb.1)
By pressing the SET key (on the bottom right oft he display, it is possible to
read the set temperature. To vary the set temperature, once pressed the
SET key (LED 1 blinks), press within 15 seconds from the previous
operation, the ▲ key (UP) or the ▼key (DOWN) to increase or decrease
the set temperature until it reaches the new temperature desired.
Confirm the new set value by pressing the SET key within 10 seconds after
completing the previous operation. The flashing of the new value, for 2
seconds, confirms the acceptance and the memorization of the new
information.
Visualization of alarm codes
The control panel signals possible malfunctioning by flashing the alarm
codes listed below on the display: E0 flashing.
In case one code is visualized: take note, turn off the control panel and re-
start it after a few seconds. If the code should appear once again, take
note of the code and call the technical assistance.
Storage of food-stuffs
In order to obtain the best functioning of the case, it is necessary to
observe the following instructions: place the merchandise into the unit only
after it has reached the desired operating temperature given on the control
panel; do not place uncovered hot foods or liquids inside the unit; package
and protect foods when possible; do not limit the circulation of air inside the
cell with obstacles; avoid frequent or prolonged openings of the

10
doors/drawers; wait a few moments before reopening the door/drawers just
after it has been closed. During the stocking open and filling a drawer at
time to eliminate the risks of possible overbalancing of the counter.
Defrosting
Timing of defrosting (Abb.1)
The electronic control panel is pre-set to automatically execute 2 defrosting
cycles within twenty four hours. Its timer will reset to the time of the initial
first start-up. In order to modify the start time for the defrost cycle to the
desired time, it is sufficient to follow these directions, press the defrosting
key, for 3 seconds, the unit will start defrosting at that time, and another
cycle will follow 12 hours later. Automatic removal defrost system in all the
models.
7. MAINTENANCE
Periodic cleaning of cell and condenser
Before starting cleaning put the switch off and disconnect the plug. Is
important to clean the internal basin at least once a week by following the
directions see initial cleaning. Clean the condenser at least once a week.
Before starting cleaning, close and protect the unit. Access to the
condenser by loosening the locking screw of a protective grill, then remove
the dust which has deposited on the front surface of the condenser using a
broom or vacuum cleaner.
Inactivity oft he device
During periods of inactivity, put the switch off and disconnect the plug,
accurately clean the unit, as per periodic cleanings, allow air to circulate in
the cell by covering the unit with a material that allows the device to
transpire.
8. OPERATIONS IN THE CASE OF FAILURES
If the device is not functioning, make sure that:
the plug has been correctly inserted into the socket;
the supply cord is not damaged.
If the pre-set temperature is not reached make sure that:
the command switch is turned on;
the electronic control panel is correctly regulated (see setting the
cell temperature);
the device is neither in the defrosting phase nor the post-defrosting
phase;
the evaporator is not covered with frost;
the condenser is not blocked with dust;
the device is not located near heat sources or its condensing unit
is not well-aired;
the stored foods or other objects do not inhibit the proper closing of
doors/drawers;

11
the device is not working in anomalous conditions (overloaded,
loaded with hot food, or loaded in a way that prevents proper air
circulation).
If the device leaks water make sure that:
the water elimination device is not damaged, that the
discharge has been well channeled, and that is not blocked;
the device has been positioned at a flat level.
It the device is making a lot of noise make sure that:
does not have loose screws or bolts;
the device has been correctly leveled and the feet are fixed in a
stable position.
If after all these controls the malfunctioning continues, it is advisable to
contact the technical assistance, indicating the model trade name, the
serial number (both can be found on the technical data plate) and the
alarm codes appearing on the display oft he control panel.
9. DUTIES WHICH MUST BE UNDERTAKEN BY QUALIFIED
ENGINEER
Substitution of spares
Before commencing maintenance work disconnect the plug from the
mains.
10. DEMOLITION
The scrapping of the cabinet requires to be undertaken by specialized
company, licensed by the local authorities, and observing local statutes.
The cabinet consists of:
structure in steel plate;
electrical components and cables;
electrical compressor;
plastic materials;
refrigerant fluid which must not be discharged into the atmosphere.
ALL THE RESPONSIBILITY FOR THE FAILURE TO RESPECT THE
EXISTING LOCAL STATUTES ARE THE RESPONSIBILITY OF THE
OWNER.

12
INDEX
1. Introduction
2. Droit et responsabilités du constructeur
3. Manutention et stockage
4. Mise en service
5. Caractéristiques techniques
6. Utilisation
7. Entretien
8. Operations a effectuer en cas da pannes
9. Activités par la charge du personnel spécialisé
10. Démolition
11. Illustration et tabelle
12. Schéma electrique
13. Déclaration de conformité CE
1. INTRODUCTION
Cet appareil a été realize conformément aux exigences spécifiques de nos
clients tant pour son interne que pour son esthétique et ses composant
électroniques, de plus, fonctionnement et esthétique de chacun de ses
éléments ont été contrôlés avant sa sortie de l’usine. Utilisé comme conseillé
l’appareil restera longtemps à Votre service.
2. DROITS ET RESPONSABILITES DU CONSTRUCTEUR
Il est interdit de reproduire partiellement du totalement le mode d’emploi ci-
présent sans une autorisation écrite de la société. Les dessins reproduits
présentent un caractère général et certains détails peuvent être différents de
l’appareil livré. Le constructeur decline toute responsabilité pour d’éventuels
dommages corporels ou matériels dus: au non-respect des consignes et
instructions continues dans ce texte; au non respect des limites d’utilisation de
l’appareil; à une utilisation impropre, erronée, déraisonnable ou à une
utilisation de l’appareil par du personnel non qualifié; à une utilisation non
conforme aux normes en vigueur; à des modifications non autorisées et/ou à
des réparations effectue è es par du personnel non qualifié ou non autorisé; à
une utilisation de pièces de rechange ou d’accessoires non d’origine; à des

13
événements exceptionnels. En outré le constructeur se reserve le droit
d’apporter toute modification jugée opportune sans aucun préavis.
3. MANUTENTION ET STOCKAGE
L’appareil est conditionné dans un emballage constitué d’un socle en bois, de
cales de renforcement, de protections en polystyrene et d’un film plastique.
Poids et volumes sont indiquée dans le tableau ci-dessous et dans chapitre
11 CARACTERISTIQUES TECHNIQUES. Avant la mise en place définitive,
garder l’appareil dans un lieu couvert, à une température comprise entre -25°
/ +55°C et à un taux d’humidité compris entre 30 et 95%.
4. MISE EN SERVICE
Lire attentivement les étiquettes sur l’appareil, ne les couvrir sous aucun
prétexte et si nécessaire, les remplacer aussitôt qu’elles sont abimées.
N’enlever aucun panneau ou protection lorsque pour ce faire il est nécessaire
d’utiliser des outils spécifiques.
Positionnement
S’assurer que l’espace réservé à l’appareil en permette une utilisation
correcte et un entretien facile (voir le chapitre 11). Après avoir désemballé
l’appareil et enlevé toutes les protections mises par l’usine, le placer sur un
plan horizontal visser et régler les pieds de mise à niveau. Détacher et
enlever le film plastique protégeant la tôle par petits morceaux aux fins de
limiter la production d’électricité statique. Déplacer l’appareil en le soulevant
seulement par le plan inférieur externe, afin d’éviter d’endommager les pieds
d’appui ou tut autre partied l’appareil. Si l’appareil a été couché verticalement
pendant la mise en place, attendre deux heures avant pour procéder avec
l’activation de l’appareil. Tout emballage et protection enlevés doivent être
confiés aux centres de récupération appropriés conformément aux normes en
vigueur.
L’appareil ne doit être place dans un environnement présentant un risque
d’explosion, à l’air libre, exposé la pluie, loin de toute source de chaleur
(radiateurs, spots, etc.) et à l’abri des rayons solaires et des courants d’air.
L’air doit pouvoir circuler librement dans le groupe frigorifique. Ignorer les
conditions énumérées ci-dessus entrainera une diminution du rendement de
l’appareil.
Nettoyage initial
Avant d’effectuer le branchement électrique et d’utiliser l’appareil, le nettoyer
de façon adéquate. Pour les parties intérieures utiliser un détersif
antibactérien, pour toutes les parties en plastique des chiffons humides.
Essuyer avec un chiffon doux et propre. N’utiliser ni des détersifs agressifs ou
abrasifs, ni des solvants.
Positionnement des composants et des accessoires
Tous les accessories qui remplacent les grilles peuvent être insérés à la place
de celles-ci sur les supports prévus à cet effet. Installer les supports grilles à
l’intérieur du compartiment dans la meilleure position.

14
Branchement électrique
S’assurer que l’installation électrique. Le câble d’alimentation doit être bien
tendu (éviter qu’il ne s’enroulé ou ne se superpose), non exposé à d’éventuels
chocs, et ne doit pas être dans le voisinage de liquides, eau et une source de
chaleur ; s’il est endommage, le faire remplacer immédiatement par un
technicien spécialiste. Toujours éviter l’utilisation d’adaptateurs.
5. CARACTERISTIQUES TECHNIQUES
Puissances installées et volume
Les dimensions extérieures, intérieures, l’agencement de les différents
modèles dans leurs différentes configurations sont indiqués dans la tabelle du
chapitre 11.
Bruits et vibrations
Le niveau sonore des appareils avec groupe frigorifique loge est inférieur à 70
dB. Dans des conditions normales, l’appareil n’engendre aucune vibration
nuisible au milieu environnant.
6. UTILISATION
Mise en service
Ces saladettes sont actionnées au moyen des interrupteurs et d’une centrale
électronique. Les operations que l’usager peut effectuer sont
Allumage/extinction (fig. 1)
Presser l’interrupteur n°1, la température présente dans la saladette à cet
instant apparaitra sur l’écran et les témoins de fonctionnement compresseur
et le témoin de fonctionnement ventilateur interne (avec retard) s’allumeront.
Au cas où interviendraient des interruptions de réalimentation en énergie
électrique le compresseur se remettra en marche avec un certain retard.
Réglage de la température de la cellule (fig. 1)
En pressant la touche SET (à droite du visuel) on pourra lire la température
installée. Si l’on désire modifier la température: pressée la touche SET, (le
LED 1 clignote), presser, dans les 15 secondes après l’opération précédente,
la touche ▲(UP) ou la touche ▼(DOWN) pour faire respectivement
augmenter ou diminuer la température installée initialement, jusqu’à ce que
l’on parvienne à la nouvelle température. Confirmer la nouvelle valeur
installée en pressant la touch SET dans les 10 secondes qui suivent
l’exécution de l’opération précédente. Le clignotement de la nouvelle valeur
installée pendant 2 secondes confirme que la nouvelle donnée a été acceptée
et mémorisée.
Affichage des codes d’alarme
L'unité de commande signale les éventuels mauvais fonctionnements en
faisant clignoter sur le visuel les codes d’alarme dont la liste est fournie ci-
dessous: E0 clignot.
Si l’on constatait la visualisation d’un code : les noter, éteindre la centrale et la
rallumer après quelques secondes. Si le code se manifestaient de nouveau,

15
prendre à nouveau note et contacter l’assistance technique en signalant les
codes dont on a pris note.
Stockage des produits
Pour obtenir de le saladettes les meilleures prestations, il est nécessaire de
respecter les indications suivantes: introduire la marchandise dans l’appareil
après que celui-ci a atteint la température désirée que l’on peut lire sur l'unité
de commande; ne pas introduire à l’intérieur de le comptoir des aliments
chauds ou liquides découvert; confectionner ou protéger les aliments; ne pas
limiter la circulation de l’air à l’intérieur en créant des obstacles; éviter les
ouvertures de les portes/tiroirs fréquentes ou prolongées; attendre quelques
instants avant d’ouvrir de nouveau une porte/tiroirs à peine fermée. Au cours
du stockage, remplir un tiroir ouvert à la fois, pour éliminer les risques de
renversement possible de l'équipement.
Dégivrage
Temporisation du dégivrage (fig.1)
L'unité de commande met automatiquement en marche 2 cycles de dégivrage
dans le courant des 24 heures. Sa minuterie relèvera le temps à partir du
premier allumage. Pour modifier le temps de début de dégivrage au moment
désiré, il suffit de presser la touche dégivrage(SBR), pendant 3 secondes,
l’armoire effectuera immédiatement un dégivrage et le suivant adviendra 12
heures plus tard. Lors de cette phase le voyage de dégivrage s’allume.
L’élimination de dégivrage de l’eau est automatique dans tous les modèles.
7. ENTRETIEN
Nettoyage périodique de la cellule et du condensateur
Avant d’effectuer le nettoyage éteindre l’appareil et débrancher la fiche de sa
prise. Nettoyer au moins une fois par semaine tout l’ensemble du
compartiment interne en se conformant aux indications du voir Nettoyage
initial. Nettoyer le condensateur au moins une fois par semaine. Avant de
commencer le nettoyage, fermer et protéger la saladettes. Dévisser la vis de
blocage de la grille de protection pour accéder au condensateur, et enlever
ensuite à l’aide d’une brosse ou d’un aspirateur la poussière qui s’est déposé
sur la surface avant du condensateur.
Non utilisation de l’appareil
Pendant les périodes d’inactivité il est nécessaire de débrancher la fiche de
sa prise de courant, nettoyer les soigneusement comme pour un nettoyage
périodique, laisser circuler l’air dans le compartiment en couvrant l’appareil
avec un tissu qui laisse passer l’air.
8. OPERATIONS A EFFECTUER EN CAS DE PANNES
Si l’appareil ne fonctionne pas contrôler que:
la prise soit correctement branchée;
le câble d’alimentation ne soit pas endommagé.
Si la température présélectionnée n’est pas atteinte contrôler que:
l’interrupteur de commande est allumé;

16
la centrale est bien réglée (Réglage de la température de la cellule);
l’appareil n’est pas en phase de dégivrage ou en phase de récupe
ration post-dégivrage;
l’évaporateur n’est pas recouvert de glace;
le condensateur n’est pas bouché par la poussière;
l’appareil ne se trouve pas à proximité de sources de chaleur ou son
unité de condensation n’est pas insuffisamment aérée;
les aliments stockés ou autres objets n’empêchent pas la fermeture
correcte de les portes/tiroirs;
l’appareil ne travaille pas en conditions anormales (introduction de
marchandise chaude, en excès et/ou disposée de manière
incorrecte).
Si l’appareil présente des fuites d’eau contrôler que:
le dispositif d'élimination de l'eau n'est pas endommagé et
l’écoulement est bien canalisé;
l’appareil est bien mis à plat.
Si l’appareil fait du bruit contrôler que:
aucune vis ou boulons ne sont desserrées ;
l’appareil est bien nivelé et les pieds d’appui s’appuient de manière
stable sur le sol.
Si à l’issue de ces contrôles le mauvais fonctionnement devait persister, il est
opportun de s’adresser à l’assistance technique indiquant le code du modèle
et le numéro de matricule (figurant tous deux sur la plaque données
techniques) et les éventuels codes d’alarme qui sont apparus sur l’unité de
commande.
9. TACHE A LA CHARGE DU PERSONNEL SPECIALISE
Changement de pièces
Avant toute opération de maintenance débrancher la fiche de sa prise.
10. DEMOLITION
Le démolition de l’appareil doivent être confiées à des entreprises
spécialisées, conformément aux lois en vigueur. Composition de l’appareil:
une structure en acier ;
des composants et de câblages électriques ;
un compresseur électrique ;
des matériaux plastiques ;
des fluides frigorigènes à ne pas disperser dans l’environnement.
LE NON RESPECT DES LOIS EN VIGUEUR RELEVE DE L’ENTIERE
ESPONSABILITE DU PROPRIETAIRE.

17
INHALTSVERZEICHNIS
1. Einleitung
2. Rechte und pflichten des Herstellers
3. Transport und Lagerung
4. Inbetriebnahme
5. Technische Eigenschaften
6. Gebrauch
7. Wartung
8. Verhalten im störungsfall
9. Aufgaben des sachkundigen Personals
10. Abbau
11. Bilder und tabelle
12. Schaltpläne
13. Konformitätserklärung CE
1. EINLEITUNG
Dieses Gerät ist in Ausführung der Bauteillehre nach den Bedürfnissen und
Ansprüchen unserer Kunden realisiert worden. Darüber hinaus ist es auf
Funktion und Inhalt in allen Teilen vor dem endgültigen Versand zu
kontrollieren. Für einen korrekten Umgang mit dem Gerät lesen Sie
aufmerksam die Gebrauchsanweisung und beachten sie unbedingt alle
Vorschriften und Ratschläge.
2. RECHTE UND PFLICHTEN DES HERSTELLERS
Jede Art von Vervielfältigung der Gebrauchsanweisung ohne schriftliche
Genehmigung des Herstellers ist unzulässig. Die Darstellungen sind
allgemeinen Charakters und können in einigen Punkten vom jeweiligen Gerät
abweichen. Der Hersteller weist jegliche Verantwortung für Schäden zurück,
die durch Personen oder Dinge, wie folgt, verursacht werden: nichtbeachtung
der vorliegenden Gebrauchsanweisung; nichtbeachtung der
Verwendungsgrenzen des Gerätes; nicht vorgesehene Art des Gebrauchs
oder Gebrauch durch nicht geschultes Personal; nicht geeignete
Aufstellungsräumlichkeiten; nicht genehmigte Änderungen u/o Reparaturen
von nicht qualifiziertem Personal; kein Gebrauch von Originalersatzteilen;
ungewöhnliche Vorfälle. Der Hersteller hält sich darüber hinaus das Recht vor,
zweckmässige Änderungen ohne jegliche Vorankündigung am Gerät
vorzunehmen.
3. TRANSPORT UND LAGERUNG
Das Gerät ist mit einem Holzboden, festen Ecken, Styropor und
Plastikklebestreifen verpackt. Gewicht und Masse sind in der Tabelle

18
TECHNISCHE EIGENSCHAFTEN bei Kapitel 11 dargestellt. Bei eventueller
Lagerung muss das Gerät in einem geschlossenen Raum bei einer
Temperatur von -25° /+55°C gelagert werden, wobei die Luftfeuchtigkeit
zwischen 30 und 95% betragen darf.
4. INBETRIEBNAHME
Lesen Sie aufmerksam das Typenschild auf dem Gerät Überdecken Sei
dieses auf keinen Fall und im Falle einer Beschädigung ersetzen Sie dieses
umgehend. Keine Teile des Gerätes mit Hilfe von Werkzeug entfernen.
Entfernen Sie keine Schutzabdeckungen und roste.
Aufstellungsort
Überzeugen Sie sich, dass der vorgesehene Aufstellungsort genügend Raum
für einen ordnungsgemässen Gebrauch (siehe Tabelle bei Kapitel 11).
Nachdem Sie das Gerät ausgepackt und alle Schutzvorrichtungen beseitigt
haben, stellen Sie das Gerät so auf, das es Horizontal steht. Um eine
mögliche statische Aufladung zu vermeiden, die durch die Entfernung des
Plastikschutzfilms an den Gittern hervorgerufen werden kann, wird empfohlen,
den Schutzfilm langsam und in kleinen Stücken zu entfernen. Bewegen Sie
das Gerät nur durch aufheben an den unteren Boden seitlich, um
Beschädigungen an den Füssen und an der Ausstattung zu vermeiden. Falls
das Gerät während des Transports in vertikaler Lage steht, stellen Sie es
Horizontal auf und warten Sie zwei Std. bis Inbetriebnahme. Das Gerät darf
nicht in der Nähe von explosionsgefährdeten Körpern oder ausserhalb
geschossener Räume installiert werden; weit entfernt von Wärmequellen
(Heizkörpern, Öfen etc.) sowie geschützt vor Sonneneinstrahlung und starkem
Luftzug. Ausserdem muss der Bereich der eingebauten Kühlaggregat für die
Luftzirkulation frei sein. Nichtbeachtung der Aufstellungsregeln führt zu einer
Herabsetzung der Geräteleistung.
Erstreinigung
Vor dem Anschluss an das elektrische Netz und die Inbetriebnahme ist das
Gerät angemessen zu reinigen. Alle Innenteile mit einem bakterientötenden
Reiniger säubern, für die Glasteile verwenden Sie einen nicht scheuernden
Sprühreiniger. Die Plastikteile mit einem feuchten Tuch abwischen. Mit einem
weichen und sauberen Tuch abtrocknen. Benutzen Sie so wenig Wasser wie
möglich. Benützen Sie weder aggressive noch scheuernde Reinigungsmittel
oder Lösungsmittel.
Montage von Bestandteilen und Zubehör
Alle Zubehörteile, die die Gitter ersetzen, können an deren Stelle in die dazu
bestimmten Halterungen eingesetzt werden. Bringen Sie die Gitterhalterungen
am inneren der Zelle in der für den Gebrauch zweckmässigsten Position an.
Stromanschluss
Achten Sie darauf, die elektrische Versorgung System entspricht den
geltenden Gesetzen. Das stromversorgende Kabel, muss gerade verlaufen

19
(Aufrollungen und Überlagerungen sind zu vermeiden); es muss vor Stössen
oder Manipulierungen geschützt werden, Darf nicht in Berührung mit
Flüssigkeiten, Wasser und Wärmequellen kommen. In Falle eines Schadens
muss sofort vom qualifiziertes Personal ausgetauscht werden. Verwenden Sie
keine Adapter.
5. TECHNISCEH EIGENSCHAFTEN
Energieverbrauch und Masse
Energieverbrauch, Aussen- und Innenausstattung und Fassungsvermögen
der verschiedenen Modelle sind in der Tabelle bei Kapitel 11.
Geräusch- und Vibration Entwicklung
Der Schallpegel des Gäret mit eingebautem hermetischen Kondensator ist
kleiner als 70 dB. Unter normalen Bedingungen, entsteht für die Umgebung
keine störende Vibration.
6. GEBRAUCH
Inbetriebnahme
Dieses Gerät ist ausgestattet mit zwei Bedienungsschaltern und einer
elektronischen Zentrale. Die für den Benutzer genehmigten Operationen sind.
Ein- und Ausschalten (Abb. 1)
Drücken Sie den Schalter nr.1. Auf dem Display wird die momentane
Innentemperatur des Gerätes angezeigt, sowie die Funktionskontrollleuchten
des Kompressors und des inneren Ventilators (mit kleiner Verzögerung). Im
Falle einer Unterbrechung der Stromversorgung reaktiviert sich der
Kompressor mit kurzer Verzögerung.
Einstellen der Temperatur (Abb.1)
Wenn Sie die Taste SET drücken (rechts auf dem Display) können Sie die
gespeicherte Temperatur ablesen. Ändern der Temperatur: Die Taste SET
drücken LED 1 blinkt: innerhalb 15 Sekunden nach der vorhergehenden
Handlung die Taste ▲ (UP) oder die Taste ▼ (DOWN) drücken, um die
Temperatur im Vergleich zur anfänglich eingestellten Temperatur zu erhöhen
oder zu senken, bis die neue Temperatur erreicht wird.
Den neuen eingestellten Wert bestätigen, indem die Taste SET innerhalb 10
Sekunden nach dem Abschluss der vorhergehenden Handlung gedrückt wird.
Der neue eingestellte Wert blinkt für 2 Sekunden und bestätigt die
Akzeptierung und die Speicherung der neuen Angabe.
Alarmleuchtanzeige
Die Regeleinheit zeigt eine eventuelle Störung durch Aufleuchten der
folgenden Zeichen auf dem Display an: E0 Blinklicht.
Im Falle, dass auf dem Display eine der oben dargestellten Zeichen
aufleuchten, schalten sie die Kontrollzentrale ab und warten Sie einige
Sekunden bevor Sie wieder einschalten. Falls das Alarmzeichen noch
aufleuchtet, rufen Sie den technischen Kundendienst an und teilen Sie diesem
das Zeichen mit, welches die Störung anzeigt.

20
Lagerung der Nahrungsmittel
Um bessere Leistung der saladetten zu erhalten, ist es erforderlich, folgende
Anweisungen zu beachten: die Waren in das Geräte stellen, nachdem es die
gewünschte Temperatur auf der Regeleinheit erreicht hat; keine heissen
flüssigen offenliegenden Speisen in der Kühltheke stellen; die Nahrungsmittel
auf andere Art und Weise verpacken oder schützen; die Luftströmung in der
Kühltheke nicht durch Hindernisse beschränken; häufiges und anhaltendes
Öffnen der Türen/Schubladen vermeiden; einen Augenblick warten, bevor die
soeben geschlossenen Türen/Schubladen wieder geöffnet werden. Während
der Teilfüllung oder bzw. Komplettfüllung immer nur eine Schublade nach
dem andern öffnen um ein mögliches Umkippen zu vermeiden.
Abtauung
Regelbare Abtauung (Abb.1)
Innerhalb von 24 Std. wird das Gerät automatisch zwei Mal abgetaut. Die
Zeitschaltuhr schaltet sich im Moment der Ersteinschaltung ein. Falls Sie die
automatischen Abtauphasen zu ändern Zeiten wünschen, müssen Sie den
vorgesehenen Schalter (SBR) oder das Symbol für tauenden Schnee für ca. 3
Sekunden drücken, das Gerät wird sofort eine automatische Abtauung
einleiten und die nächste Abtauung wird nach 12 Std. stattfinden. Während
der Abtauphase leuchtet auf dem Display das Abtausymbol. Beseitigung der
automatischen Abtauung in allen Modellen.
7. WARTUNG
Regelmässige Reinigung
Vor der Reinigung den Stecker vom Gerät von der Steckdose herausnehmen.
Das Gerät mindestens einmal pro Woche die Innenteile reinigen. Es ist auch
nötig den Kondensator einmal wöchentlich zu reinigen. Vor der Reinigung den
Schrank schleissen. Das Schutzgitter abschrauben. Mit einer Bürste und
einem Staubsauger den abgelagerten Staub an der vorderen Oberfläche des
Kondensators entfernen.
Längere Ausserbetriebsetzung des Gerätes
Während der Nichtbenutzung des Gerätes ist es notwendig: die Stromzufuhr
unterbrechen und das Gerät sorgfältig säubern, wie bei einer der
regelmässigen Reinigungen (siehe Regelmässige Reinigung); die Luft in den
Saladetten zirkulieren lassen und mit einem Luftdurchlässigen Stoff
abdecken.
8. VERHALTEN IM STÖRUNGSFALL
Wenn das Gerät nicht funktioniert, kontrollieren Sie, dass:
ein korrekter Anschluss des Netzsteckers in der Steckdose besteht
das Stromkabel nicht beschädigt ist.
Wenn die gewünschte Innentemperatur nicht erreicht wird, kontrollieren
Sie, dass:
der Hauptschalter eingeschaltet und die Regeleinheit richtig
eingestellt ist (siehe Einstellen der Temperatur);
La pagina si sta caricando...
La pagina si sta caricando...
La pagina si sta caricando...
La pagina si sta caricando...
La pagina si sta caricando...
-
 1
1
-
 2
2
-
 3
3
-
 4
4
-
 5
5
-
 6
6
-
 7
7
-
 8
8
-
 9
9
-
 10
10
-
 11
11
-
 12
12
-
 13
13
-
 14
14
-
 15
15
-
 16
16
-
 17
17
-
 18
18
-
 19
19
-
 20
20
-
 21
21
-
 22
22
-
 23
23
-
 24
24
-
 25
25


Gastrodomus SA903P Manuale del proprietario
- Tipo
- Manuale del proprietario
in altre lingue
- English: Gastrodomus SA903P Owner's manual
- français: Gastrodomus SA903P Le manuel du propriétaire
- Deutsch: Gastrodomus SA903P Bedienungsanleitung