
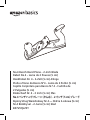
No.4 Bench Hand Plane - 2-Inch Blade
Rabot No4 - Lame de 2Pouces (5cm)
Handhobel Nr. 4 - 2-Zoll (5cm)-Klinge
Pialla a Mano da Banco N°4 - Lama da 2Pollici (5cm)
Cepillo Carpintero para Banco N.º 4 - Cuchilla de
2Pulgadas (5cm)
Blokschaaf Nr. 4 - 2 Inch (5 cm) Mes
No.4 ベンチハンドプレーン(かんな) - 2 インチ(5 cm)ブレード
Ręczny Strug Warsztatowy Nr4 — Ostrze 2-calowe (5cm)
Nr.4 Bänkhyvel - 2-tums (5cm) blad
B07V3QLZ5Y

English. . . . . . . . . . . . . . . . . . . . . . . . 3
Français . . . . . . . . . . . . . . . . . . . . . . 13
Deutsch . . . . . . . . . . . . . . . . . . . . . . 24
Italiano . . . . . . . . . . . . . . . . . . . . . . 35
Español . . . . . . . . . . . . . . . . . . . . . . 46
Nederlands . . . . . . . . . . . . . . . . . . . 57
日本語 . . . . . . . . . . . . . . . . . . . . . . . 68
Polski. . . . . . . . . . . . . . . . . . . . . . . . 80
Svenska . . . . . . . . . . . . . . . . . . . . . . 90

EN
3
Table of Contents
1. Important Safeguards ���������������������������������������������������������������������������� 4
2. Intended Use ����������������������������������������������������������������������������������������������� 5
3. Before First Use ����������������������������������������������������������������������������������������� 5
4. Tool Overview �������������������������������������������������������������������������������������������� 6
5. Assembly/Disassembly �������������������������������������������������������������������������� 7
6. Adjustment �������������������������������������������������������������������������������������������������� 7
7. Operation ����������������������������������������������������������������������������������������������������� 8
7�1 General rules ��������������������������������������������������������������������������������� 8
7�2 Working techniques �������������������������������������������������������������������� 9
8. Maintenance ����������������������������������������������������������������������������������������������� 9
8�1 De-rusting and rust protection ���������������������������������������������� 9
8�2 Sharpening the blade �������������������������������������������������������������� 10
8�3 Flattening the sole �������������������������������������������������������������������� 11
8�4 Storage ������������������������������������������������������������������������������������������ 11
9. Specications ������������������������������������������������������������������������������������������� 12
10. Feedback and Help ������������������������������������������������������������������������������� 12

EN
4
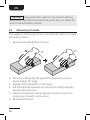
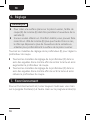
1. IMPORTANT SAFEGUARDS
Read these instructions carefully and retain them for
future use� If this tool is passed to a third party, then these
instructions must be included�
When using the tool, basic safety precautions should always be
followed to reduce the risk of injury including the following:
CAUTION Risk of cuts!
»Parts of this tool are are extremely sharp� Care must be taken
at all times when handling them� To avoid injury the tool
should always be held with two hands�
»This tool is not a toy� Children must always be supervised by an
adult when using the tool�
»Remain alert and use good judgment when using this tool� Do
not use this tool if you are in any way impaired by medications,
alcohol, drugs or fatigue�
»Dress appropriately and remove all jewelry, secure loose
clothing and tie up long hair before using this tool�
»There is a risk of splintering and dust formation during
woodworking� Wear appropriate protective clothing (e�g� work
gloves, dust mask, safety glasses, etc�)�
»Keep the blade sharp to avoid the plane catching on material
which may cause it to move in an unexpected way or cause
workpiece damage�
»Always check the workpiece for any metal (nails, screws,
staples, etc�) that could damage the cutting edge�
»Make sure that the workpiece is clamped or held securely�

EN
5
»Do not modify the tool in any way unless instructed by this
user manual�
2. Intended Use
»This tool is intended for woodworking, mainly for creating even
and plane surfaces�
»This tool is intended for household use only� It is not intended
for commercial use�
»No liability will be accepted for damages resulting from
improper use or non-compliance with these instructions�
3. Before First Use
DANGER Riskofsuocation!
»Keep any packaging materials away from children – these
materials are a potential source of danger, e.g. suocation.
»Check the tool for transport damages�
»Remove all the packing materials�
»Make sure the blade(E) is sharp and the sole(I) is at before
use. Sharpen the blade(E) and atten the sole(I) if necessary
(see section “Sharpening the blade” and “Flattening the sole”)�

EN
6
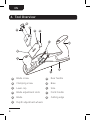
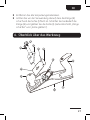
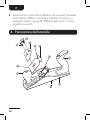
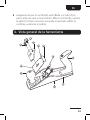
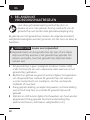
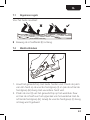
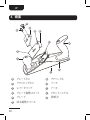
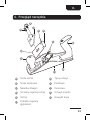
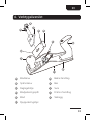
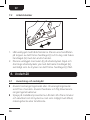
4. Tool Overview
AC
E
FG
H
I
J
K
D
B
ABlade screw GRear handle
BClamping screw HBase
CLever cap ISole
DBlade adjustment slots JFront handle
EBlade KCutting edge
FDepth adjustment wheels

EN
7
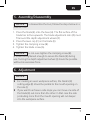
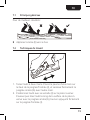
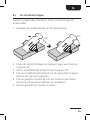
5. Assembly/Disassembly
NOTICE To disassemble the tool, follow the steps below in a
reverse order�
1� Place the blade(E) onto the base(H). The at surface of the
blade has to face upwards. The blade adjustment slots(D) must
t around the depth adjustment wheels(F).
2� Place the lever cap(C) on the blade(E).
3� Tighten the clamping screw(B)�
4� Tighten the blade screw(A)�
NOTICE Do not over-tighten the clamping screw (B)�
It should be tightened enough to secure the blade (E) during
use� Turning the depth adjustment wheel (I) should be possible
without an excessive force�
6. Adjustment
NOTICE
»For creating an even workpiece surface, the blade’s(E)
cutting edge(K) should be parallel to the mouth opening on
the sole (I)�
»If you want to achieve a side slope you can move one side of
the blade(E) out more than the other� In that case the side
protruding more from the mouth opening will cut deeper
into the workpiece surface�

EN
8
Turn the depth adjustment wheels(F) to adjust the depth of cut�
»Turn the depth adjustment wheels(F) clockwise to move the
blade in for increasing the cutting depth�
»Turn the depth adjustment wheels(F) counter-clockwise to
move the blade out for reducing the cutting depth�
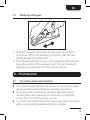
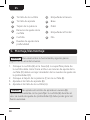
7. Operation
For a secure operation always hold the tool with one hand on the
front handle(J) and the other hand on the rear handle(G)�
7.1 General rules
For best results:
»Move the blade(E) downwards.

EN
9
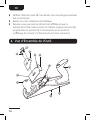
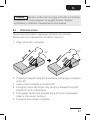
7.2 Working techniques
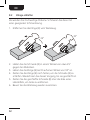
1� Hold the tool with both hands. Put the palm of one hand
on the top of the front handle(J), and rmly grab the rear
handle(G) with the other hand.
2� Place the tool with it’s sole(I) on the workpiece. Push and pull
along the surface of the workpiece with the rear handle(G),
while pressing down hard on the front handle(J).
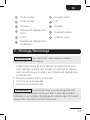
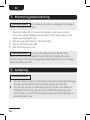
8. Maintenance
8.1 De-rusting and rust protection
»Use commercially available rust cleaner or citrus cleaner� Wear
gloves and follow manufacturer’s cleaning instructions�
»Spray the metal components� Let them stand for several
minutes then, using steel wool, brass brush or toothbrush,
scrub o as much of the rust as you can.
»To prevent the metal parts from rusting, keep them lubricated
with a commercially available lubrication solution�

EN
10
NOTICE Some lubrication solutions may interact with the
wood what may aect the look of the wood. Ask your dealer for
an accurate lubrication solution�
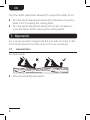
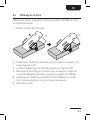
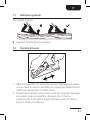
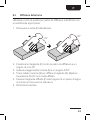
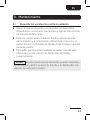
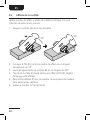
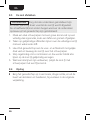
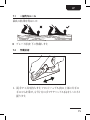
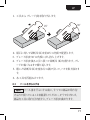
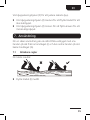
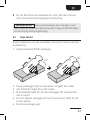
8.2 Sharpening the blade
Use quality oil sharpening stones� Lubricate them with an accurate
lubrication solution�
1� Remove the blade(E) from the tool�
25° 30°
2� Place the cutting edge (K) against the sharpening stone at
approximately 25° angle�
3� Slightly lift the blade (E) to a 30° angle.
4� Pull the blade(E) backwards to sharpen the cutting edge(K)�
Repeat until sharpened�
5� Draw the sharpened cutting edge (K) across the corner of a
scrap piece of wood to remove burr�
6� Reassemble the tool�

EN
11
8.3 Flattening the sole
NOTICE Make sure all parts are installed and in tension
before attening the sole (I)� Otherwise, the blade (E) becomes
ex once the parts are reinstalled to the tool.
1� Ax a coarse sandpaper to a dead-at surface, such as a
granite or cast iron table�
2� Draw lines across the entire sole(I) at regular intervals with a
permanent marker�
3� Holding the tool with even pressure at the front and back,
workthe sole(I) over the sandpaper�
4� Pause periodically to check and continue until all lines on the
sole(I) fade evenly�
5� When all lines are removed, polish the sole(I) by working it
over a ne sandpaper.
8.4 Storage
»Store in a cool and dry place away from children and pets,
ideally in original packaging�

EN
12
9. Specications
Body length: 9�7" (247 mm)
Blade width: 2" (51�2 mm)
Net weight: approx� 2�7 lbs (1�233 kg)
Dimensions (W x H x D): approx� 2�5 x 4�5 x 9�7"
(63 x 115 x 247 mm)
10. Feedback and Help
Love it? Hate it? Let us know with a customer review.
AmazonBasics is committed to delivering customer-driven tools
that live up to your high standards� We encourage you to write a
review sharing your experiences with the product�
US: amazon.com/review/review‑your‑purchases#
UK: amazon.co.uk/review/review‑your‑purchases#
US: amazon.com/gp/help/customer/contact‑us
UK: amazon.co.uk/gp/help/customer/contact‑us

FR
13
Table des matières
1. Mesures de Sécurité Importantes ������������������������������������������������� 14
2. Utilisation Prévue ����������������������������������������������������������������������������������� 15
3. Avant la Première Utilisation ����������������������������������������������������������� 15
4. Vue d’Ensemble de l’Outil ������������������������������������������������������������������ 16
5. Montage/Démontage ��������������������������������������������������������������������������� 17
6. Réglage �������������������������������������������������������������������������������������������������������� 18
7. Fonctionnement �������������������������������������������������������������������������������������� 18
7�1 Principes généraux �������������������������������������������������������������������� 19
7�2 Techniques de travail ��������������������������������������������������������������� 19
8. Entretien ����������������������������������������������������������������������������������������������������� 20
8�1 Élimination de la rouille et protection antirouille ��������� 20
8.2 Aûtagedelalame ������������������������������������������������������������������ 21
8�3 Aplanissement de la semelle ������������������������������������������������ 22
8�4 Rangement ����������������������������������������������������������������������������������� 22
9. Caractéristiques ��������������������������������������������������������������������������������������� 23
10. Vos Avis et Aide �������������������������������������������������������������������������������������� 23

FR
14
1. MESURES DE SÉCURITÉ IMPORTANTES
Veuillez lire attentivement les présentes instructions et les
conserverandepouvoirvousyréférerultérieurement.
En cas de cession de cet outil à un tiers, le présent manuel
d’utilisation doit également lui être remis�
Lors de l’utilisation de l’outil, vous devez toujours prendre des
mesuresdesécuritédebaseanderéduiretoutrisquede
blessures,parmilesquelles:
ATTENTION Risque de coupures !
»Certains éléments de cet outil sont extrêmement coupants�
Il convient d'être prudent à tout moment lors de leur
manipulation� Pour prévenir tout risque de blessure, l'outil doit
toujours être tenu à deux mains�
»Cetoutiln’estpasunjouet.Lesenfantsdoiventtoujoursêtre
surveillés par un adulte lorsqu'ils utilisent l'outil�
»Faites preuve de vigilance et de discernement lorsque vous
utilisez cet outil� N'utilisez pas cet outil si vos capacités sont
aectéesdequelquemanièrequecesoitpardesmédicaments,
del'alcool,desdroguesouparlafatigue.
»Habillez-vousdemanièreappropriéeetretireztousvosbijoux,
attachez les vêtements amples et les cheveux longs avant
d'utiliser cet outil�
»Il existe un risque de projection d'éclats et de dégagement
depoussièreslorsdutravaildubois.Portezleséquipements
de protection appropriés (comme des gants de manutention,
unmasqueantipoussière,deslunettesdeprotection,etc.).

FR
15
»Gardezlalamebienaûtéepouréviterquelabaseplane
nes'accrocheaumatériau,cequipourraitlafairebougerde
manièreinattendueouendommagerlapièceàusiner.
»Vérieztoujoursquelapièceàusinernecontientpasdemétal
(clous,vis,agrafes,etc.)susceptibled’endommagerl’arêtede
coupe de l'outil�
»Veillezàcequelapièceàusinersoitbiencaléedansunétauou
bien maintenue�
»Nemodiezl'outild'aucunemanière,àmoinsqueleprésent
manueld'utilisationnevousyinvite.
2. Utilisation Prévue
»Cet outil est destiné au travail du bois, principalement pour
créerdessurfacesplanesetrégulières.
»Cet outil est destiné à un usage exclusivement domestique�
Iln’estpasconçupourunusagecommercial.
»Toute responsabilité sera déclinée en cas de dommages
résultant d’une utilisation incorrecte de l’appareil ou du
non-respect de ces instructions�
3. Avant la Première Utilisation
DANGER Risque d’étouement !
»Maintenez tous les matériaux d'emballage hors de la portée
desenfants.Cesmatériauxconstituentunesourcededanger
potentielcommel’étouement.

FR
16
»Vériezl’étatdel’outilandedécelerdesdommageséventuels
dus au transport�
»Retirez tous les matériaux d'emballage�
»Assurez-vous que la lame(E)estbienaûtéeetquela
semelle(I)estbienplaneavantdel'utiliser.Aiguisezlalame(E)
etaplanissezlasemelle(I)sinécessaire (voir les sections
«Aûtagedelalame"et"Aplanissementdelasemelle»).
4. Vue d’Ensemble de l’Outil
AC
E
FG
H
I
J
K
D
B

FR
17
AVis de la lame GPoignéearrière
BVis de serrage HFût
CPresseur ISemelle
DRainures de réglage de la
lame JPoignéefrontale
ELame KArête de coupe
FMolettes de réglage de la
profondeur
5. Montage/Démontage
REMARQUE Pour démonter l'outil, suivez les étapes
suivantes dans l'ordre inverse�
1� Positionnez la lame(E) sur le fût(H).Lasurfaceplanedela
lame doit être orientée vers le haut� Les rainures de réglage
delalame(D)doivents'alignerauxmolettesderéglagedela
profondeur(F).
2� Placezlepresseur(C)surlalame(E).
3� Serrez la vis de serrage(B)�
4� Serrez la vis de la lame(A)�
REMARQUE Neserrezpastroplavisdeserrage(B).Elle
doitêtresusammentserréepourxerlalame(E)pendant
l'utilisation.Lesmolettesderéglagedelaprofondeur(I)doivent
pouvoirêtretournéessansforceexcessive.

FR
18
6. Réglage
REMARQUE
»Pourcréerunesurfaceplanesurlapièceàusiner,l’arêtede
coupe(K) de la lame(E)doitêtreparallèleàl'ouverturedela
semelle(I)�
»Si vous voulez obtenir un chanfreinlatéral,vouspouvezfaire
ressortir un côté de la lame(E)plusquel'autre.Danscecas,
le côté qui dépasse le plus de l'ouverture de la semelle va
entaillerplusprofondémentlasurfacedelapièceàusiner.
Tournez les molettesderéglagedelaprofondeur(F) pour régler la
profondeurdecoupe.
»Tournez les molettesderéglagedelaprofondeur(F)dansle
sensdesaiguillesd'unemontreanderentrerlalameetainsi
augmenterlaprofondeurdecoupe.
»Tournez les molettesderéglagedelaprofondeur(F)dansle
sensdesaiguillesd'unemontreandesortirlalameetainsi
réduirelaprofondeurdecoupe.
7. Fonctionnement
Pourunfonctionnementsûr,teneztoujoursl'outilavecunemain
surlapoignéefrontale(J)etl'autremainsurlapoignéearrière(G)�

FR
19
7.1 Principes généraux
Pourdemeilleursrésultats:
»déplacezlalame(E)verslebas.
7.2 Techniques de travail
1� Tenez l'outil à deux mains� Placez la paume d'une main sur
lehautdelapoignéefrontale(J),etsaisissezfermementla
poignéearrière(G)avecl'autremain.
2� Positionnezl'outilavecsasemelle(I)surlapièceàusiner.
Poussezpuistirezl'outillelongdelasurfacedelapièceà
usineraveclapoignéearrière(G),toutenappuyantfortement
surlapoignéefrontale(J).

FR
20
8. Entretien
8.1 Élimination de la rouille et protection antirouille
»Utilisezunnettoyantantirouilleouunnettoyantauxagrumes,
chacun disponible dans le commerce� Portez des gants et
suivezlesconsignesdenettoyagedufabricant.
»Aspergez les éléments métalliques� Laissez reposer plusieurs
minutes puis, à l'aide de laine d'acier, d'une brosse en laiton ou
d'une brosse à dents, enlevez autant de rouille que possible�
»Pour éviter que les éléments métalliques ne rouillent,
maintenez-leslubriésavecunlubriant disponible dans le
commerce�
REMARQUE Certainslubriantspeuventinteragiravecle
bois, ce qui peutaecterl'aspectdubois.Demandezàvotre
revendeur unlubriantadapté.
La pagina si sta caricando...
La pagina si sta caricando...
La pagina si sta caricando...
La pagina si sta caricando...
La pagina si sta caricando...
La pagina si sta caricando...
La pagina si sta caricando...
La pagina si sta caricando...
La pagina si sta caricando...
La pagina si sta caricando...
La pagina si sta caricando...
La pagina si sta caricando...
La pagina si sta caricando...
La pagina si sta caricando...
La pagina si sta caricando...
La pagina si sta caricando...
La pagina si sta caricando...
La pagina si sta caricando...
La pagina si sta caricando...
La pagina si sta caricando...
La pagina si sta caricando...
La pagina si sta caricando...
La pagina si sta caricando...
La pagina si sta caricando...
La pagina si sta caricando...
La pagina si sta caricando...
La pagina si sta caricando...
La pagina si sta caricando...
La pagina si sta caricando...
La pagina si sta caricando...
La pagina si sta caricando...
La pagina si sta caricando...
La pagina si sta caricando...
La pagina si sta caricando...
La pagina si sta caricando...
La pagina si sta caricando...
La pagina si sta caricando...
La pagina si sta caricando...
La pagina si sta caricando...
La pagina si sta caricando...
La pagina si sta caricando...
La pagina si sta caricando...
La pagina si sta caricando...
La pagina si sta caricando...
La pagina si sta caricando...
La pagina si sta caricando...
La pagina si sta caricando...
La pagina si sta caricando...
La pagina si sta caricando...
La pagina si sta caricando...
La pagina si sta caricando...
La pagina si sta caricando...
La pagina si sta caricando...
La pagina si sta caricando...
La pagina si sta caricando...
La pagina si sta caricando...
La pagina si sta caricando...
La pagina si sta caricando...
La pagina si sta caricando...
La pagina si sta caricando...
La pagina si sta caricando...
La pagina si sta caricando...
La pagina si sta caricando...
La pagina si sta caricando...
La pagina si sta caricando...
La pagina si sta caricando...
La pagina si sta caricando...
La pagina si sta caricando...
La pagina si sta caricando...
La pagina si sta caricando...
La pagina si sta caricando...
La pagina si sta caricando...
La pagina si sta caricando...
La pagina si sta caricando...
La pagina si sta caricando...
La pagina si sta caricando...
La pagina si sta caricando...
La pagina si sta caricando...
La pagina si sta caricando...
La pagina si sta caricando...
-
 1
1
-
 2
2
-
 3
3
-
 4
4
-
 5
5
-
 6
6
-
 7
7
-
 8
8
-
 9
9
-
 10
10
-
 11
11
-
 12
12
-
 13
13
-
 14
14
-
 15
15
-
 16
16
-
 17
17
-
 18
18
-
 19
19
-
 20
20
-
 21
21
-
 22
22
-
 23
23
-
 24
24
-
 25
25
-
 26
26
-
 27
27
-
 28
28
-
 29
29
-
 30
30
-
 31
31
-
 32
32
-
 33
33
-
 34
34
-
 35
35
-
 36
36
-
 37
37
-
 38
38
-
 39
39
-
 40
40
-
 41
41
-
 42
42
-
 43
43
-
 44
44
-
 45
45
-
 46
46
-
 47
47
-
 48
48
-
 49
49
-
 50
50
-
 51
51
-
 52
52
-
 53
53
-
 54
54
-
 55
55
-
 56
56
-
 57
57
-
 58
58
-
 59
59
-
 60
60
-
 61
61
-
 62
62
-
 63
63
-
 64
64
-
 65
65
-
 66
66
-
 67
67
-
 68
68
-
 69
69
-
 70
70
-
 71
71
-
 72
72
-
 73
73
-
 74
74
-
 75
75
-
 76
76
-
 77
77
-
 78
78
-
 79
79
-
 80
80
-
 81
81
-
 82
82
-
 83
83
-
 84
84
-
 85
85
-
 86
86
-
 87
87
-
 88
88
-
 89
89
-
 90
90
-
 91
91
-
 92
92
-
 93
93
-
 94
94
-
 95
95
-
 96
96
-
 97
97
-
 98
98
-
 99
99
-
 100
100


in altre lingue
Altri documenti
-
Constructor CTRSC710BC Manuale utente
-
Makita DBC260U Manuale del proprietario
-
-
Maktec MT191 Manuale utente
-
Ryobi EWS1150RS Manuale del proprietario
-
BLACK+DECKER BES701 Manuale utente
-
Dolmar MS-26 C Manuale del proprietario
-
Hitachi CH14DL Manuale utente
-
-
Black & Decker RSP1050 Manuale utente