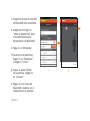
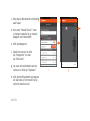
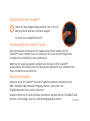
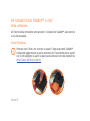
Sharper Image Luggage Locator Manuale del proprietario
- Tipo
- Manuale del proprietario

QuickStart Guide / Warranty
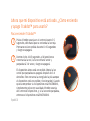
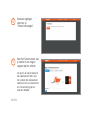
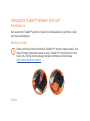
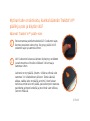
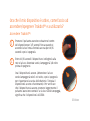
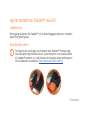
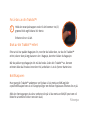
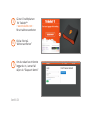
TRACK YOUR TRAVELING
LUGGAGE WORLDWIDE
Luggage
TM
TRACK YOUR TRAVELING
LUGGAGE WORLDWIDE
Luggage
TM

1 English
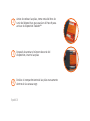
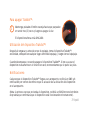
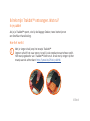
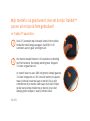
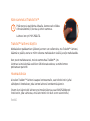
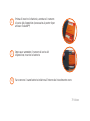
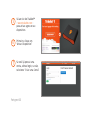
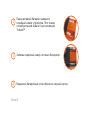
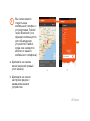
I received my Trakdot™. Now what?
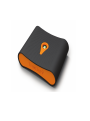
In your package
When first opening up your Trakdot™, you’ll find the Luggage Tracker, two batteries
and a QuickStart guide.
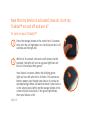
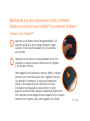
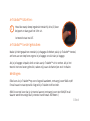
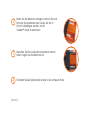
How it works
With your finger, Press and slide forward the Trakdot Orange Logo while you
lift up the front side of the black sleeve. The orange section of Trakdot comes
out, push forward the orange section with your finger from the back of the
device. http://youtu.be/Z9x0z_cdOH4
I received my Trakdot™. Now what?
1
Globatrac, LLC
16000 Ventura Blvd., Suite 1101
Encino, CA 91436, USA
1.855.558.8722
www.globatrac.com

English 2
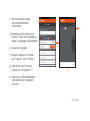
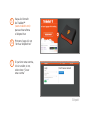
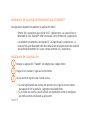
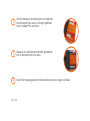
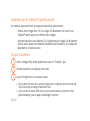
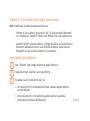
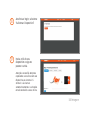
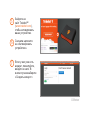
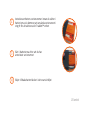
Before putting in the batteries, make a note of
the Device Serial # which you will use in Step 9
to activate your Trakdot™ device
After noting your Device Serial #, insert
the batteries
Slide the battery compartment back into the black casing
2
3
4

3 English
5
6
7
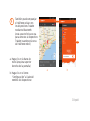
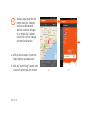
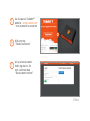
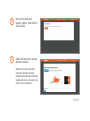
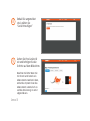
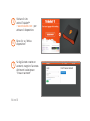
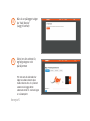
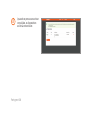
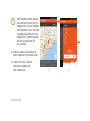
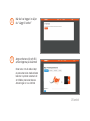
Go to the Trakdot™ website
– www.trakdot.com – to
now activate your device
First, click
“Activate Device”
if you already have an
account, please login,
otherwise select
“Create an account”
Before putting in the batteries, make a note of
the Device Serial # which you will use in Step 9
to activate your Trakdot™ device
After noting your Device Serial #, insert
the batteries
Slide the battery compartment back into the black casing

English 4
8
9
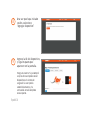
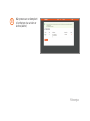
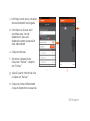
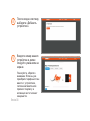
Once logged in, select
“Add Device”
Enter your device
ID, and follow the
steps on the screen
Please note:
If you have already
purchased subscription
plan with your device, the
system will automatically
assign the subscription,
and activation is complete
at that point.

5 English
Once the process is
complete, device will
show as Active
10

English 6
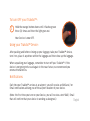
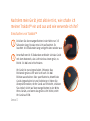
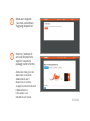
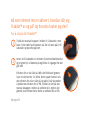
Hold the orange button down until it flashes green
three (3) times and then the light goes out.
Your Device is now OFF.
Now that my Device is activated, How do I turn my
Trakdot™ on and off and use it?
To turn on your Trakdot™
Press the orange button in the center for 3-5 seconds
only until the red light goes on. It will stay on for 10-15
seconds and then go out.
Within 10-15 seconds, the device will connect to the
network, the light will turn to a green light that will
blink 3-4 times and then go out.
Your Device is now on. (Note: the blinking green
light will turn off after the 3-4 blinks. This conserves
battery power even though your Device is turned on
and operating.) When you want to check if your Device
is ON, simply press lightly on the orange button in the
center of your Device and, if the green light blinks,
then your device is ON.
1
2

7 English
To turn OFF your Trakdot™:
Hold the orange button down until it flashes green
three (3) times and then the light goes out.
Your Device is now OFF.
Using your Trakdot™ Device:
After packing and before closing up your luggage, take your Trakdot™ device,
turn it on, place it anywhere within the luggage and then close up the luggage.
When unpacking your luggage, remember to turn off your Trakdot™. If the
device is not going to be used again in the near future, we recommend you
remove the batteries.
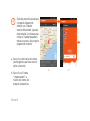
Notifications:
Each time our Trakdot™ arrives at an airport, you will receive an SMS and / or
Email notification advising you of the airport location of your device.
(Note: the first time you turn on your Device, you will receive a test SMS / Email
that will confirm that your device is working as designed.)
1
Now that my Device is activated, How do I turn my
Trakdot™ on and off and use it?
To turn on your Trakdot™
Press the orange button in the center for 3-5 seconds
only until the red light goes on. It will stay on for 10-15
seconds and then go out.
Within 10-15 seconds, the device will connect to the
network, the light will turn to a green light that will
blink 3-4 times and then go out.
Your Device is now on. (Note: the blinking green
light will turn off after the 3-4 blinks. This conserves
battery power even though your Device is turned on
and operating.) When you want to check if your Device
is ON, simply press lightly on the orange button in the
center of your Device and, if the green light blinks,
then your device is ON.

English 8
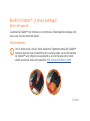
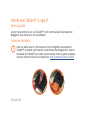
You can also pair your
mobile with your Trakdot
devices via Bluetooth:
(this feature is used to
detect your Trakdot
device when it’s in
near proximity to
your mobile handset)
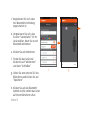
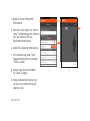
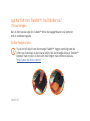
Installing the Trakdot™ App / Bluetooth:
The mobile app is supported on the following devices:
• iPhone 4S and higher that are running iOS 7 and higher. The Bluetooth
4.0 feature of Trakdot™ will only work with iPhone 4S and higher
• Android Devices with Android 2.3 (Gingerbread) and higher. The
Bluetooth feature will only work with Android devices that support
Blutooth 4.0 and are running Android 4.3 and higher
Installing the app:
Search for the “Trakdot” App in Google play or Apple Store
Click install and follow the instructions
Login or register a new account
a. If you are registering an account for the 1st time follow the instructions
on the screen and add your devices
b. If already have an account you can activate a new device and set-up
your notifications using the app
1
2
3

9 English
You can also pair your
mobile with your Trakdot
devices via Bluetooth:
(this feature is used to
detect your Trakdot
device when it’s in
near proximity to
your mobile handset)
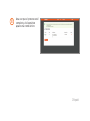
a. Click on the menu bar
(top right hand corner
of the screen)
b. Click on the “setting” icon
next to your device name
4
a b
Installing the Trakdot™ App / Bluetooth:
The mobile app is supported on the following devices:
• iPhone 4S and higher that are running iOS 7 and higher. The Bluetooth
4.0 feature of Trakdot™ will only work with iPhone 4S and higher
• Android Devices with Android 2.3 (Gingerbread) and higher. The
Bluetooth feature will only work with Android devices that support
Blutooth 4.0 and are running Android 4.3 and higher
Installing the app:
Search for the “Trakdot” App in Google play or Apple Store
Click install and follow the instructions
Login or register a new account
a. If you are registering an account for the 1st time follow the instructions
on the screen and add your devices
b. If already have an account you can activate a new device and set-up
your notifications using the app

English 10
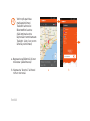
c. Make sure your Bluetooth
connection is on
d. Make sure you choose a
“device color” for your
device before pairing your
device with Bluetooth
e. Click Pair
f. Find the device and click
“Pair” and then “Close”
g. Go to the bottom of the
screen and click “Save”
h. Click on the Bluetooth icon
and you should see the
device on your screen
c g

11 English
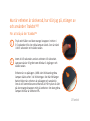
Battery Handling
DO NOT mix batteries with different chemistry types (for example, a zinc battery
with an alkaline battery). DO NOT mix new and used batteries. DO NOT leave
batteries installed in the product when not in use for long periods. Always remove
old, weak or worn-out batteries proptly and recycle or dispose of them in accordance
with local and national regulations.
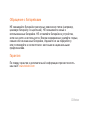
Warranty
For warranty and additional information please visit our website at:
www.trakdot.com

Français 12
I received my Trakdot™. Now what?
Dans votre paquet
Lorsque vous ouvrirez votre Trakdot™ pour la première fois, vous trouverez votre
tracker de bagage, deux piles et un guide QuickStart.
Voici comment il fonctionne
Avec votre doigt, appuyez sur le logo orange Trakdot™ et soulevez l’avant
du boîtier noir pour faire coulisser La partie orange du Trakdot™ hors du
boîtier. Avec votre doigt, faites avancer la partie orange par l’arrière.
http://youtu.be/Z9x0z_cdOH4
J’ai reçu mon Trakdot™. Que se passe-t-il maintenant?
1
Avant de mettre les piles, notez le # de série.
Vous en aurez besoin à l’étape 9 pour activer
votre appareil Trakdot™
Après avoir noté le # de série de votre appareil,
insérez les piles
Faites coulisser les piles dans le boîtier noir

13 Français
I received my Trakdot™. Now what?
Dans votre paquet
tracker de bagage, deux piles et un guide QuickStart.
Voici comment il fonctionne
Avec votre doigt, appuyez sur le logo orange Trakdot™ et soulevez l’avant
du boîtier noir pour faire coulisser La partie orange du Trakdot™ hors du
boîtier. Avec votre doigt, faites avancer la partie orange par l’arrière.
http://youtu.be/Z9x0z_cdOH4
J’ai reçu mon Trakdot™. Que se passe-t-il maintenant?
Avant de mettre les piles, notez le # de série.
Vous en aurez besoin à l’étape 9 pour activer
votre appareil Trakdot™
Après avoir noté le # de série de votre appareil,
insérez les piles
Faites coulisser les piles dans le boîtier noir
2
3
4

Français 14
5
6
7
Maintenant, allez sur le
site Web de Trakdot™:
www.trakdot.com, pour
activer votre appareil
Cliquez d’abord sur
“Activer l’appareil”
Si vous avez déjà un
compte, connectez-vous;
sinon, sélectionner
“Créer un compte”

15 Français
8
9
Une fois connecté,
sélectionnez “Ajouter
un appareil”
Saisissez l’identifiant de
votre appareil et suivez les
étapes affichées à l’écran
Il convient de noter que si
vous avez déjà souscrit à un
programme d’abonnement en
achetant votre appareil, le
système va automatiquement
lui attribuer l’abonnement et
l’activation est terminée à ce
moment là.

Français 16
Une fois la procédure
terminée, l’appareil
apparaît comme Actif
10
Appuyez sur le bouton central orange pendant 3 à 5
secondes jusqu’à ce que le voyant lumineux rouge
s’allume. Il reste allumé pendant 10 à 15 secondes
puis s’éteint.
L’appareil se connecte au réseau pendant ces 10 à 15
secondes. Le voyant lumineux devient vert et clignote
3 à 4 fois puis s’éteint.
Votre appareil est à présent en marche. (Note: le voyant
lumineux vert s’éteindra après avoir clignoté 3 à 4 fois.
Ceci permet d’économiser le temps de chargement
même si votre appareil est en marche et en cours
d’utilisation.) Lorsque vous voulez vérifier si votre
appareil est allumé (ON), appuyez simplement légèrement
sur le bouton central orange de votre appareil et si le voyant
lumineux vert clignote, alors votre appareil est allumé.

17 Français
Maintenant que mon appareil est activé, comment
allumer et éteindre mon Trakdot™ et comment l’utiliser?
Allumer votre Trakdot™
Appuyez sur le bouton central orange pendant 3 à 5
secondes jusqu’à ce que le voyant lumineux rouge
s’allume. Il reste allumé pendant 10 à 15 secondes
puis s’éteint.
L’appareil se connecte au réseau pendant ces 10 à 15
secondes. Le voyant lumineux devient vert et clignote
3 à 4 fois puis s’éteint.
Votre appareil est à présent en marche. (Note: le voyant
lumineux vert s’éteindra après avoir clignoté 3 à 4 fois.
Ceci permet d’économiser le temps de chargement
même si votre appareil est en marche et en cours
d’utilisation.) Lorsque vous voulez vérifier si votre
appareil est allumé (ON), appuyez simplement légèrement
sur le bouton central orange de votre appareil et si le voyant
lumineux vert clignote, alors votre appareil est allumé.
1
2

Français 18
Éteindre votre Trakdot™:
Maintenez le bouton orange enfoncé jusqu’à ce que le
voyant vert clignote trois (3) fois puis s’éteigne.
Votre appareil est maintenant éteint (OFF).
Utiliser votre appareil Trakdot™:
Après avoir fait vos bagages et avant de les fermer, prenez
votre appareil Trakdot™, allumez-le et mettez-le à l’intérieur de votre bagage
puis fermez-le.
Lorsque vous défaites vos bagages, n’oubliez pas d’éteindre votre Trakdot™. Si
vous n’avez pas besoin de réutiliser l’appareil dans un avenir proche, nous vous
recommandons de retirer les piles.
Notifications:
Vous recevrez un SMS et/ou une notification par e-mail à chaque fois que votre
bagage arrivera dans un aéroport. L’emplacement de l’aéroport où se trouve votre
bagage sera alors précisé.
(Note: lorsque vous allumerez votre appareil pour la première fois, vous recevrez
un SMS/e-mail test qui confirmera que votre appareil fonctionne normalement.)
1
• iPhone 4S et modèles ultérieurs qui utilisent le système d’exploitation iOS
7 ou les versions ultérieures. La fonctionnalité Bluetooth 4.0 de Trakdot™
fonctionnera uniquement avec l’iPhone 4S et les modèles ultérieurs
• Appareils Android 2.3 (Gingerbread) et ceux qui utilisent les versions
ultérieures. La fonctionnalité Bluetooth fonctionnera uniquement avec les
appareils Android qui prennent en charge le Bluetooth 4.0 et utilisent le
système d’exploitation Android 4.3 et les versions ultérieures
Recherchez l’application “Trakdot” sur Google play ou sur l’Apple Store
Cliquez sur Installer et suivez les instructions
Connectez-vous ou créez un nouveau compte
a. Si vous créez un compte pour la première fois, suivez les
instructions affichées à l’écran et ajoutez vos appareils
b. Si vous avez déjà un compte, vous pouvez activer un nouvel
appareil et configurer vos notifications à l’aide de l’application

19 Français
Éteindre votre Trakdot™:
Maintenez le bouton orange enfoncé jusqu’à ce que le
voyant vert clignote trois (3) fois puis s’éteigne.
Votre appareil est maintenant éteint (OFF).
Utiliser votre appareil Trakdot™:
Après avoir fait vos bagages et avant de les fermer, prenez
votre appareil Trakdot™, allumez-le et mettez-le à l’intérieur de votre bagage
puis fermez-le.
Lorsque vous défaites vos bagages, n’oubliez pas d’éteindre votre Trakdot™. Si
vous n’avez pas besoin de réutiliser l’appareil dans un avenir proche, nous vous
recommandons de retirer les piles.
Notifications:
Vous recevrez un SMS et/ou une notification par e-mail à chaque fois que votre
bagage sera alors précisé.
un SMS/e-mail test qui confirmera que votre appareil fonctionne normalement.)
Installation de l’application/Bluetooth Trakdot™:
L’application mobile est prise en charge sur les appareils suivants:
• iPhone 4S et modèles ultérieurs qui utilisent le système d’exploitation iOS
7 ou les versions ultérieures. La fonctionnalité Bluetooth 4.0 de Trakdot™
fonctionnera uniquement avec l’iPhone 4S et les modèles ultérieurs
• Appareils Android 2.3 (Gingerbread) et ceux qui utilisent les versions
ultérieures. La fonctionnalité Bluetooth fonctionnera uniquement avec les
appareils Android qui prennent en charge le Bluetooth 4.0 et utilisent le
système d’exploitation Android 4.3 et les versions ultérieures
Installation de l’application:
Recherchez l’application “Trakdot” sur Google play ou sur l’Apple Store
Cliquez sur Installer et suivez les instructions
Connectez-vous ou créez un nouveau compte
a. Si vous créez un compte pour la première fois, suivez les
instructions affichées à l’écran et ajoutez vos appareils
b. Si vous avez déjà un compte, vous pouvez activer un nouvel
appareil et configurer vos notifications à l’aide de l’application
1
2
3
La pagina sta caricando ...
La pagina sta caricando ...
La pagina sta caricando ...
La pagina sta caricando ...
La pagina sta caricando ...
La pagina sta caricando ...
La pagina sta caricando ...
La pagina sta caricando ...
La pagina sta caricando ...
La pagina sta caricando ...
La pagina sta caricando ...
La pagina sta caricando ...
La pagina sta caricando ...
La pagina sta caricando ...
La pagina sta caricando ...
La pagina sta caricando ...
La pagina sta caricando ...
La pagina sta caricando ...
La pagina sta caricando ...
La pagina sta caricando ...
La pagina sta caricando ...
La pagina sta caricando ...
La pagina sta caricando ...
La pagina sta caricando ...
La pagina sta caricando ...
La pagina sta caricando ...
La pagina sta caricando ...
La pagina sta caricando ...
La pagina sta caricando ...
La pagina sta caricando ...
La pagina sta caricando ...
La pagina sta caricando ...
La pagina sta caricando ...
La pagina sta caricando ...
La pagina sta caricando ...
La pagina sta caricando ...
La pagina sta caricando ...
La pagina sta caricando ...
La pagina sta caricando ...
La pagina sta caricando ...
La pagina sta caricando ...
La pagina sta caricando ...
La pagina sta caricando ...
La pagina sta caricando ...
La pagina sta caricando ...
La pagina sta caricando ...
La pagina sta caricando ...
La pagina sta caricando ...
La pagina sta caricando ...
La pagina sta caricando ...
La pagina sta caricando ...
La pagina sta caricando ...
La pagina sta caricando ...
La pagina sta caricando ...
La pagina sta caricando ...
La pagina sta caricando ...
La pagina sta caricando ...
La pagina sta caricando ...
La pagina sta caricando ...
La pagina sta caricando ...
La pagina sta caricando ...
La pagina sta caricando ...
La pagina sta caricando ...
La pagina sta caricando ...
La pagina sta caricando ...
La pagina sta caricando ...
La pagina sta caricando ...
La pagina sta caricando ...
La pagina sta caricando ...
La pagina sta caricando ...
La pagina sta caricando ...
La pagina sta caricando ...
La pagina sta caricando ...
La pagina sta caricando ...
La pagina sta caricando ...
La pagina sta caricando ...
La pagina sta caricando ...
La pagina sta caricando ...
La pagina sta caricando ...
La pagina sta caricando ...
La pagina sta caricando ...
La pagina sta caricando ...
La pagina sta caricando ...
La pagina sta caricando ...
La pagina sta caricando ...
La pagina sta caricando ...
La pagina sta caricando ...
La pagina sta caricando ...
La pagina sta caricando ...
La pagina sta caricando ...
La pagina sta caricando ...
La pagina sta caricando ...
La pagina sta caricando ...
La pagina sta caricando ...
La pagina sta caricando ...
La pagina sta caricando ...
La pagina sta caricando ...
La pagina sta caricando ...
La pagina sta caricando ...
La pagina sta caricando ...
La pagina sta caricando ...
La pagina sta caricando ...
La pagina sta caricando ...
La pagina sta caricando ...
La pagina sta caricando ...
La pagina sta caricando ...
La pagina sta caricando ...
La pagina sta caricando ...
La pagina sta caricando ...
La pagina sta caricando ...
La pagina sta caricando ...
La pagina sta caricando ...
La pagina sta caricando ...
La pagina sta caricando ...
-
 1
1
-
 2
2
-
 3
3
-
 4
4
-
 5
5
-
 6
6
-
 7
7
-
 8
8
-
 9
9
-
 10
10
-
 11
11
-
 12
12
-
 13
13
-
 14
14
-
 15
15
-
 16
16
-
 17
17
-
 18
18
-
 19
19
-
 20
20
-
 21
21
-
 22
22
-
 23
23
-
 24
24
-
 25
25
-
 26
26
-
 27
27
-
 28
28
-
 29
29
-
 30
30
-
 31
31
-
 32
32
-
 33
33
-
 34
34
-
 35
35
-
 36
36
-
 37
37
-
 38
38
-
 39
39
-
 40
40
-
 41
41
-
 42
42
-
 43
43
-
 44
44
-
 45
45
-
 46
46
-
 47
47
-
 48
48
-
 49
49
-
 50
50
-
 51
51
-
 52
52
-
 53
53
-
 54
54
-
 55
55
-
 56
56
-
 57
57
-
 58
58
-
 59
59
-
 60
60
-
 61
61
-
 62
62
-
 63
63
-
 64
64
-
 65
65
-
 66
66
-
 67
67
-
 68
68
-
 69
69
-
 70
70
-
 71
71
-
 72
72
-
 73
73
-
 74
74
-
 75
75
-
 76
76
-
 77
77
-
 78
78
-
 79
79
-
 80
80
-
 81
81
-
 82
82
-
 83
83
-
 84
84
-
 85
85
-
 86
86
-
 87
87
-
 88
88
-
 89
89
-
 90
90
-
 91
91
-
 92
92
-
 93
93
-
 94
94
-
 95
95
-
 96
96
-
 97
97
-
 98
98
-
 99
99
-
 100
100
-
 101
101
-
 102
102
-
 103
103
-
 104
104
-
 105
105
-
 106
106
-
 107
107
-
 108
108
-
 109
109
-
 110
110
-
 111
111
-
 112
112
-
 113
113
-
 114
114
-
 115
115
-
 116
116
-
 117
117
-
 118
118
-
 119
119
-
 120
120
-
 121
121
-
 122
122
-
 123
123
-
 124
124
-
 125
125
-
 126
126
-
 127
127
-
 128
128
-
 129
129
-
 130
130
-
 131
131
-
 132
132
-
 133
133
-
 134
134


Sharper Image Luggage Locator Manuale del proprietario
- Tipo
- Manuale del proprietario
in altre lingue
- français: Sharper Image Luggage Locator Le manuel du propriétaire
- Deutsch: Sharper Image Luggage Locator Bedienungsanleitung
- português: Sharper Image Luggage Locator Manual do proprietário
- dansk: Sharper Image Luggage Locator Brugervejledning
- eesti: Sharper Image Luggage Locator Omaniku manuaal
- svenska: Sharper Image Luggage Locator Bruksanvisning
Altri documenti
-
Sony WF-1000XM3 Noir Manuale del proprietario
-
-
Garmin GLO Manuale utente
-
Denver BFA-10PINK Manuale utente
-
Black & Decker RVA420B Manuale utente
-
Denver BFH-150 Manuale utente
-
Trust 19043 Guida d'installazione
-
-
JVC KV-V8 Supplementary Manual