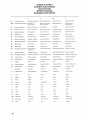
Rancilio epoca CD Use and Maintenance Manual
- Categoria
- Macchine da caffè
- Tipo
- Use and Maintenance Manual
Questo manuale è adatto anche per

epoca
USE AND MAINTENANCE
· S
· CD
· DE
version 2.0

1
EPOCA
Use & Maintenance
The operations marked by this symbol
are to be undertaken exclusively by an
authorized technician.
The operations marked by this symbol
are to be undertaken by the user.
CONTENTS
Machine identification data................................. 2
1. General Safety Rules.................................... 3
2. Description.................................................... 3
2.1. Specifications and Composition............... 4
2.2. Machine Equipment................................. 6
2.3. Mechanical Protective Devices................ 6
2.4. Electrical Safety Devices.............. ........... 6
2.5. Aerial Moise............................................. 6
2.6. Vibrations................................................. 6
3. Technical Data............................................... 6
3.1. Dimensions and Weights......................... 6
4. Use.................................................................. 7
4.1. Precautionary Measures.......................... 7
5. Transport....................................................... 8
5.1. Packaging................................................ 8
5.2. Inspection Upon Receipt.......................... 8
6. Installation..................................................... 8
6.1. Connections Made By User..................... 8
6.1.1. Water Supply........................................ 8
6.1.2. Electric Supply...................................... 9
6.2. Preliminary Operations............................ 9
6.3. Connections............................................. 9
7. Operation....................................................... 10
7.1. Controls................................................... 10
7.2. Control Instruments................................. 11
7.3. Starting Up............................................... 11
8. Use.................................................................. 12
8.1. Preparing Coffee...................................... 12
8.2. Preparing Cappuccino.............................. 12
8.3. Heating a Beverage.................................. 12
8.4. Preparing Tea........................................... 13
9. Adjusting and Setting Dosage...................... 13
9.1. For DE models.......................................... 13
9.1.1. Adjusting the Dose................................. 13
10. Maintenance................................................. 13
10.1. Daily........................................................ 13
10.2. Weekly.................................................... 13
10.3. Periodically.............................................. 14
10.3.1. Water Renewal..................................... 14
10.3.2. Softener Regeneration......................... 14
11. Storing the Machine..................................... 15
12. Troubleshooting........................................... 15
©2003
Rancilio macchine per caffè, S.p.A.
Rancilio North America, Inc.

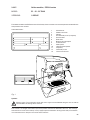
2
NAME: EPOCA series espresso machine
MODEL: DE - S - CD
VERSIONS: 2 GROUPS
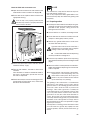
The label illustrated below corresponds to the identification
label placed on the machine(Fig. 2 - pos. A).
Label identification:
Fig. 1
Fig. 2
1 Manufacturer
2 Model and version
3 Voltage
4 EC conformity mark(if required)
5 Serial number
6 Boiler data
7 Wattage
8 Protection level
9 Motor power
10 Heating element power
11 Frequency
12 Conformity marks
13 Year of manufacture
Symbols
Warning symbol. The instructions marked by this symbol must be followed with great care in order
to avoid accidents or damage to the machine.

3
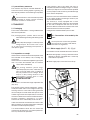
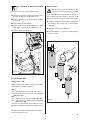
1. GENERAL SAFETY RULES
Do not leave the packing materials(plastic bags,
expanded polystyrene, nails, cardboard, etc.) within
reach of children, as these items are potential
sources of danger.
Verify that the data on the machine corresponds
to that of the electrical supply network before
connecting the equipment.
Electrical adaptors, multiple sockets, and/or
extensions must not be used.
Request an accurate update of the available
power by an electrician. The electrical outlet
must have the following safety features:
- efficient grounding connection
- wiring suitable for wattage capacity
- efficient grounding protection circuit
breaker
Install the machine on a water repellent surface
(laminate, steel, ceramic, etc.) away from heat
sources(oven, stove, fireplace, etc.) and where
the temperature will not fall below 41º F.
KEEP WARM.
Do not leave the machine exposed to harmful
atmospheric agents or place it in damp rooms,
such as bathrooms.
Do not obstruct the suction or dispersion grilles
and do not cover with cloths, etc.
Store the packed machine in a dry place. Do not
expose to harmful atmospheric agents. Do not
store where temperatures may fall below 41º F.
Do not stack more than three items of the same
kind. Do not place heavy items on the packaging.
In an emergency - such as the machine catching
on fire, unusual noises coming from the machine,
overheating, etc.---IMMEDIATELY disconnect the
power and close water taps(and gas taps, if
applicable).
Use only authorized spare parts in order to avoid
compromising the safety and proper functioning
of the machine.
Equipment installed incorrectly can cause
damage to people and items for which the
manufacturer cannot be considered
responsible.
2. DESCRIPTION
The machines in the EPOCA series have been
designed to prepare espresso coffee and hot
beverages.
A positive-displacement pump inside the machine
powers the heater in which the water is heated. By
pressing the appropriate buttons, water is supplied
to the spouts in the form of hot water or steam,
according to choice.
The water to be used for beverages is supplied
directly from the water supply, pressurized by the
pump, and immediately heated by the steam
produced in the boiler.
The machine is composed of a steel structure
onto which the mechanical and electrical components
are fitted. These are completely covered with panels
made of painted polyurethane and stainless steel.
The beverages are dispensed at the front of the
machine, where all the buttons, control devices,
and dispensers are located.
There is a cup-warming plate on top of the machine.

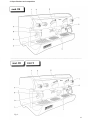
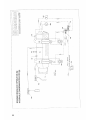
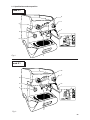
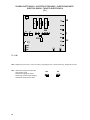
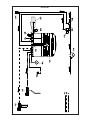
2.1 Specifications and composition
Fig. 3
4

5
ABCD
E
D
E
no yes 2 2 1
CD/S
yes no 2 2 1
Legend:
A Semiautomatic system; manual dispensing
start and stop.
B Automatic system; electronic control of coffee
and hot water doses dispensed.
C Number of coffee dispensing units(groups).
D Number of steam spouts.
E Number of hot water spouts.
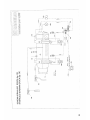
Cup warmer available upon request.
1 Steam knob
2 Steam spout
3 Hot water knob
4 Hot water spout
5 Coffee dispensing unit(group)
6 Coffee dispensing touchpad
7 Manual water fill valve
8 Level indicator
9 Gauge(boiler pressure)
10 Power on-off switch and LED
11 Element switch and LED
12 Cup warmer switch and LED
M
od
e
l
Fig. 4

6
2.2. Machine equipment
2 GROUP
1 dose filter holder
1
2 dose filter holder
2
Filters
3
Blind filter for backflushing
1
1 mt. supply pipe
1
1,5 mt. supply pipe
1
1,5 mt. drainage pipe
1
Supply pipe adapters
1
Blind disks for cleaning
2
Doser and tamper
1
Instruction manual
1
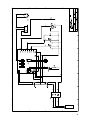
Wiring diagram
1
2.3. Mechanical protective devices
The machine is equipped with the following
protective devices:
· Complete paneling protection of all the parts
subject to heat; and of the steam and hot water
supplier.
· Cup-warmer plate supplied with a tray to collect
drips of water from freshly washed cups.
· Work surface with grill and tray to collect
spilled liquids.
· Expansion valve in the hydraulic system and
valve on to boiler to avoid overpressure.
· Anti-siphon valve on the hydraulic system to
avoid backflow to the main supply.
2.4. Power safety devices
The safety devices provided are:
· 5V low tension push buttons on the DE control
key panel.
· Thermal protection on the pump motor.
· High limit for element protection.
2.5. Aerial noise
Noise level in the working place does not usually
exceed 70dB(A).
2.6. Vibrations
The machine is supplied with rubber vibration
dampening feet. In normal working conditions,
the machine does not produce vibrations
harmful to the operator or the equipment.
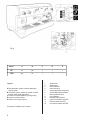
3. TECHNICAL DATA
3.1. Dimensions and weights
2
GROUP
A
31"
B
30"
C
22"
D
16"
H
19"
Boiler capacity in liters
11
Machine weight lbs
121
Water inlet (BSPT)
3/8"
Ømm drainage
14
Packaging
Volume
13
Dimensions W x D x H
35x27x28
Gross weight lbs
148

7
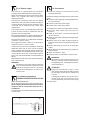
The user must NOT:
· touch the hot surfaces and dispensing areas;
· pour or spill liquids on the cup warmer shelf;
· put his hands under the spouts during use;
· transport the machine or perform maintainence
operations while the plug is connected or while the
machine is hot;
· wash the machine with water or steam jet;
· completely or partially immerse the machine in water;
· use the machine if the power cord is damaged;
· touch the machine while hands or feet are are wet
or damp;
· use the machine when there are children in close
proximity;
· allow the machine to be used by children or untrained
persons;
· obstruct the suction or dispersal grilles with cloth or
any other thing;
· use the machine if it is wet or very damp.
4.1. Precautionary measures
This machine may only be used with foodstuffs. It
cannot be used for heating liquids or cooking any
other kind of product that could damage and or
pollute it.
The manufacturer cannot be held responsible for
damage to people or things caused by unsuitable,
incorrect, or irrational use.
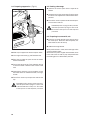
Fig. 5
You will find all the technical data for
power usage on the machine ID label
(See Fig.1)
Machines provided with gas heating have a
standard connection kit to carry out the following
connections with:
- direct solid pipe
- copper and double cone pipe
- rubber support
Gas connections must be made in
compliance with local safety regulations.
4. USE
The machine has been designed, manufactured,
and protected to be used to make espresso
coffee and hot beverages(tea, cappuccino, etc.).
Any other use is considered unsuitable and
therefore dangerous.
The manufacturer cannot be held
responsible for any damages caused
to people or things due to unsuitable,
incorrect, or irriational use of the machine.
The operator must always follow the instructions
contained in this manual. In the case of a failure
or if the machine is not working properly, switch
it off and do not attempt any direct repair. Call
an authorized service center.

8
6. INSTALLATION
5. TRANSPORT
5.1 Packaging
The machine is delivered in a strong cardboard box
with internal protection.
The packaging bears symbols which must be
observed during handling and stocking of the item.
Always keep the package in a vertical position
during transport. Do not turn it over or lay it on
its side. Avoid bumping and exposure to
harmful atmospheric agents.
5.2. Inspection on receipt
Verify that the machine received corresponds to
the one indicated on the delivery receipt, including
any accessories.
Examine it for any damage during transport. If
damaged, inform the forwarder and our customer
service office immediately.
The packing elements(plastic bags, expanded
polystyrene, nails, cardboard, etc.) must not
be left within reach of children, as they are
potential sources of danger. Dispose of the
packing elements properly in accord with
local ordinances and regulations.
6.1 Connections to be made by the user
Hook-up must be carried out by qualified
personnel in full accordance with federal,
state, and local regulations.
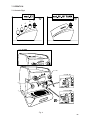
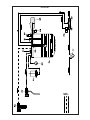
6.1.1 Water supply (Fig. 6)
Connections must be installed close to the machine.
· Water drainage pipe 1, having a minimun internal
diameter of 2", equipped with a water-trap
accessible for inspection.
· Water supply pipe 2, with a 3/8"G cut-off trap.
The machine is fitted with height adjustable rear feet.
The surface must be level, dry, smooth, strong, and
stable; and at a height of approximately 44" from the
floor.
It does not need to be anchored to the surface and it
does not require and technical operations to dampen
vibrations in order to operate properly.
It is recommended to leave enough free space
around the machine to facilitate its use and to
perform any necessary maintenance.
If the machine is wet or very damp, wait until it is
completely dry before installing or using it. Before
performing such work, the qualified service technician
should examine the unit for any possible damage to
the electrical components.
Reserve an area near the machine for the installation
of the coffee grinders and dosing machines(see
relevant instructions).
The machine is usually equipped with a water
softener, which must be connected by the user in
compliance with local laws. When installing the
softener, refer to its user manual for instructions.
A knock box or dreg drawer should be obtained
and conveniently placed for use.

9
6.2. Preliminary operations
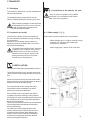
ANTI-SIPHON VALVE CLIP REMOVAL
WARNING:
If the supply cable is damaged, it must be
replaced by the manufacturer or by an
authorized technician /electrician to prevent
any risks to the user.
6.3. CONNECTIONS
·Place the machine on the horizontal surface
previously prepared.
Before connecting, thoroughly flush the main water pipes:
· Leave the water supply taps running at full pressure
for several minutes.
· Connect to the main water supply.
· Connect the machine to the socket.
· Connect the gas pipe(SYSTEM model).
Thoroughly flush all the water pipes of the machine:
·Leave the water supply taps running at full pressure
for several minutes.
·Switch on main switch 1: wait until the boiler fills
up to the set level.
·Switch on main switch 2 to begin heating the water
in the boiler.
·Operate each group in order to allow the water to
flow for about one minute; repeat the operation twice.
·Dispense steam from the steam jets for about one
minute.
·Dispense hot water for about one minute; repeat the
operation twice.
·Switch off switches 1 and 2.
·Empty the water from the boiler(see point 10.3).
IMPORTANT
If water is not dispensed from the machine for over
24 hours, flush the internal components before
beginning work, repeating the operations as
described above.
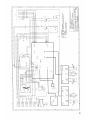
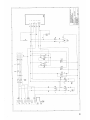
6.1.2. Electrical supply
Fig. 8
On top of the boiler there is an anti-siphon valve.
When installing the machine, make sure to remove
the plastic fork (Fig.8 - A) and check that the pin
(Fig.8 - B) is not blocked.
This operation is VERY important to ensure the
proper performance of the machine.
ATTENTION
If, during the installation, the machine goes into
security mode(the on/off selection on the touch
pad is flashing), reset the machine using the main
power switch.
The machine is supplied ready for connection
according to the required electrical specifications.
Before connecting the machine, make sure that
the plate details(Fig.1) comply with the electrical
distribution network.
The electrical power cord must be directly plugged
into the outlet in compliance with local regulations.
Verify that the grounding system is efficient and in
compliance with current legal requirements and codes.
Also, the surge protection system and circuit
breakers must be in accordance with the current,
local regulations.
Use a power cable that complies with local standards
with a grounding wire.
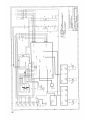
For three-phase power use a cable with:
5 conductors(3 phases + neutral + ground)
For single-phase power use a cable with:
3 conductors(phase + neutral + ground)
In both cases it is necessary to provide an automatic
differential switch (Fig.6) at the start of the power
cable, complete with the magnetic release elements
in accordance with the ID plate details(Fig.1). The
contacts must have an opening of at least 3mm, and
a dispersed current protection of 30 mA.
Remember that each machine must be fitted with its
own safety elements.

7. OPERATION
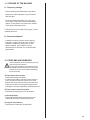
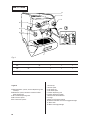
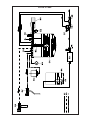
7.1 Controls Fig.8
Fig. 8
10

11
7.2. Control Instruments (Fig. 8)
9 Gauge with mobile needle on a fixed dial with a
scale and color indicators.
Visual control of the boiler pressure.
10 Minimum and maximum water level indicator.
Visual control of water level in boiler(green LED).
12 Cup warmer switch (optional).
7.3. Starting up
Turn on the water supply tap 2 (Fig. 6).
Push the main switch 1; the pump is activated to
fill the boiler.
When the water reaches the correct level, the
pump stops. Then push the main switch 2 to begin
heating the water in the boiler.
Wait for the machine to reach its working pressure,
(gauge needle 9 in green area), and for the machine
to reach its correct thermal balance.
1. Main switch
Two-position switch with LED.
Push the switch(LED on), the machine is
powered(except for the element), and the pump
is turned on to fill the boiler.
2. Boiler resistance switch
Two-position switch with LED.
Push the switch(LED on), and power is supplied
to the element for heating the boiler water.
3-4. Coffee dispensing switch (mod. CD)
Press and release the button(LED on), coffee
is continuously dispensed. Press and release
the button again and coffee stops.
5. Coffee dispensing electronic panel (mod. DE)
This panel features 5 buttons for each dispenser:
Four buttons for dispensing the programmed
coffee dose.
One button for:
- Stopping coffee dispensing
- Starting continuous coffee dispensing
- Initializing dose programming(hold button
for 8-10 seconds)
Each time coffee is dispensed, the LED of the
relative button lights up.
During dose programming, the LED of the 5th button
flashes rapidly
6. Hot water supply knob
Turn in a counter-clockwise direction to open;
and clockwise to close the tap.
7. Steam supply knob
Turn in a counter-clockwise direction to open;
and clockwise to close the tap.
8. Supplemental manual water supply valve
Positioned under the drip-tray. Press down to fill
the boiler manually.
Safety Devices
Dispensing cannot begin until the machine has
reached the operating pressure or temperature.
Dispensing will stop each time the boiler
pressure drops too low.

12
8. USE
If ground coffee is left on the rim of the filter,
a leak tight seal is not ensured, and water or
coffee grounds may leak out of the filter.
Lock the filter-holder into the dispensing group firmly
to obtain a leak tight seal.
Place the cups under the spouts; begin dispensing
using control 3 or button panel 4 according to model
(Fig. 8).
When the coffee has been poured, leave the filter
holder attached to the dispensing group until the
next coffee is required.
When pouring, beware of the hot parts of the
machine, especially the coffee dispensing
units and the steam and hot water spouts. Do
not put your hands under the spouts or the
groups while they are operating.
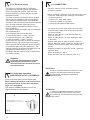
8.2. Preparing cappuccino (Fig. 9)
· Make a cup of cappuccino with the espresso coffee.
· Use a tall, narrow frothing pitcher, half-filled with milk.
· Place the pitcher under the spout so that the nozzle
touches the bottom.
· Turn the steam knob and lower the pitcher so that
the nozzle is just under the surface of the milk.
· Now slowly lower the pitcher as the foam rises,
always keeping the nozzle slightly immersed in the
milk until you have sufficient froth.
· Turn off the steam knob and pour the frothed milk
into the waiting cappuccino cup.
Immediately after carrying out this operation, clean
the spout with a sponge or a clean cloth so that the
milk does not dry on it. Be careful - the spout is hot
and may burn your hand.
8.3. Heating a beverage
Immerse the steam spout into the liquid to be
heated.
Gradually turn the steam knob(Fig.8 - 7); the
steam that disperses into the liquid heats it to
the desired temperature.
Turn off the steam knob when the desired temperature
has been reached.
Immediately after carrying out this operation, clean
the spout with a sponge or a clean cloth so that the
milk does not dry on it. Be careful - the spout is hot
and may burn your hand.
Fig. 9
The machine's top shelf is a cup warming plate on
which cups are kept heated and ready for use.
This feature is very important to obtain good coffee
as the pre-warmed cups prevent the coffee from
cooling too quickly.
8.1. Preparing coffee
· Unclamp the filter-holder from the dispensing unit
and knock out any grounds into the receptacle
provided for purpose, making sure not to damage
rim of the filter.
· Use the filter for 1 or 2 coffees, according to need.
· Fill the filter with coffee, level it off, and press down
gently with the tamper.
· Remove any ground coffee that clings to the rim
of the filter after tamping.
Proper grinding of coffee beans is of fundamental
importance to producing good coffee. The granular
texture of the fresh grounds should be such that it
takes 25-30 seconds to produce the beverage. If the
coffee grounds are too coarse, the coffee will be pale
in color and weak in flavor, with only a very small
amount of white crema. If the grounds are too fine,
the coffee will be dark with no crema. Good coffee
can only be made if the beans are freshly and
uniformly ground by sharp grinding burrs. Then the
coffee must be measured out into uniform doses of
approximately 6 grams each.
Freshly ground coffee beans are very important
because they quickly lose their aromatic qualities
once they've been ground, and the fats present in
the beans become rancid.

13
8.4 Preparing tea, camomile, etc.
Place the receptacle under the hot water spout and
use the dispensing control according to the model
(Fig.9). When the desired quantity has been obtained
turn off the switch.
Add the beverage desired.
When purified water is used, these beverages often
assume a darker color.
If you would prefer a lighter colored drink, draw fresh
water from an ordinary tap and proceed with the
heating phase as described in point 8.3.
9. ADJUSTMENT AND SETTING OF THE
DOSE (DE model)
It is possible to adjust the dose of coffee and hot
water dispensed by electronically controlled models.
9.1. Adjusting the dose
The quantity of coffee and hot water dispensed can
be adjusted using the button panel or the hot water
controls.
1. Press the E button on any button panel and
hold it down for 8-10 seconds until water stops
flowing from the dispensing unit and the LED of
the continuous flow button on the first button
panel on the left begins flashing.
2. It is necessary to make 1 or 2 trial cups in order
to make adjustments to dispense the correct
amount of coffee in the cup.
3. Put the filter-holder(with ground coffee) on the
left unit and the cup under the spout.
4. Operate the selected button(i.e. button A for
one small cup).
5. Once the required coffee amount in the cup has
been reached, press the stop button A. Coffee
will stop pouring and the microprocessor will
store the dose.
6. Press the continuous button E again. The LED
will go out and the machine will store the new
quantity.
7. Make the coffee and check the cup amount in
order to check that programming is correct.
If some doses have to be changed(A-B-C-D), once
at point 5 repeat the instructions in points 3-4-5 for
each dose, remembering to use the filter-holder with
the appropriate dose filter and freshly ground coffee.
Then carry out point 6 and repeat point 7 to check all
changed doses.
If all units are to be programmed with the same
doses, you are finished. If the dosage of another
group is to be changed, proceed as indicated in the
above mentioned points 1-7, using only the button
panel of the selected group.
Fig. 10
10. MAINTENANCE
10.1. Daily
Use a clean sponge or cloth that does not leave lint
or fluff(preferably cotton or linen).
Carefully clean the outside surface, following the
grain of the satin finish on the parts in stainless steel.
Clean the steam and hot waterspouts. Check that
the nozzles are not encrusted. If they become
encrusted, be careful not to scratch or damage them
by scraping too hard while cleaning.
Clean the spray units and the seals under the casing
of the group heads using the special brush supplied.
Remove the filter-holders of the machine and remove
the filters and the clamp which secures the filter. Use
a brush to remove any coffee deposits and rinse with
hot water in order to dissolve any oily deposits.
10.2. Weekly
Operations to be carried out with the machine
operating and under pressure.
Place the supplied blind filter in the filter-holder,
put a spoonfill of powder detergent specifically
manufactured for coffee machines, and fit the
filter-holder in the group to be cleaned.
Press the coffee dispensing button and draw water
for approximately 30 seconds.
Maintenance operations have to be carried out
when the machine is off and cold and the plug
is disconnected. Some weekly cleaning
operations must be performed while the machine
is operating.
Do not clean the machine by using metal or
abrasive devices, such as steel wool, metal
brushes, needles, etc., or general detergents
(alcohol, solvents, etc.).
When necessary, use special detergents for
coffee machines that can be bought in
specialized service centers.

14
Fig. 12
Stop and start dispensing several times until clean
water comes out of the discharge unit tube.
Remove the filter-holder, take out the blind filter, and
insert a normal filter. Replace the filter-holder on the
group and rinse by dispensing water several times.
Make a coffee to eliminate any unpleasant taste.
CLEANING THE AIR FILTER AND DELIVERY HEADS
This operation must be carried out when the machine is
off and cold:
· Prepare a solution of 4 sachets of detergent powder,
Code 69000124, dissolved in a liter of boiling water
in a stainless steel, plastic, or glass container(NOT
ALUMINUM OR IRON).
· Remove the filters and immerse them with the filter
holders in the prepared solution, leaving them for at
least 10-20 minutes(all night is recommended).
· Remove them from the container and rinse them
thoroughly in running water.
· Remove the cup rack(Fig.11 - 1), slide out the drip
tray and clean them both.
· Check and clean the drainage sump of
Fig.12 - 3, removing any sludge with a spoon.
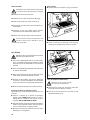
10.3. Periodic maintainance
Operation to be carried out with
machine under pressure.
·Discharge the water from the boiler (about 4 litres)
with hot water delivery switch 6.
·Wait until the machine has re-heated before use.
10.3.1. Replenishing water in the boiler
(To be carried out by qualified personnel)
· Turn off the machine and wait for the pressure in the
boiler to diminish(gauge needle on "0").
· Using a wrench(Fig.12 -1), firmly hold the outlet pipe
(Fig.12 -2) situated near the drainage sump while
loosening the hexagonal sealing screw(Fig.12 - 4) by
three turns at the most.
· Drain off the water and tighten the screw.
· Refill the boiler(see paragraph 7.3.)
10.3.2. Softener Regeneration
For Rancilio Softener Model DP-2 & DP-4
Regenerate the water softener within the time limits
specified for the softener as follows:
DP2
1 regeneration per month for 500 coffees/day;
2 regenerations per month(once a fortnight) for
1000 coffees/day.
DP4
1 regeneration per month for 1000 coffees/day;
2 regenerations per month(once a fortnight) for
2000 coffees/day.
This table has been drawn up according to a water
hardness of 25 degrees calculated on the French
scale.
See the documentation included with the softener
for instructions on how to use your softener.
Fig. 11

15
11. STORAGE OF THE MACHINE
A - Temporary storage
· Perform cleaning and maintenance operations.
· Wind up the cable and fasten it to the machine
with duct tape.
· Cover the machine and place it in a dry room.
Do not leave it exposed to harmful atmospheric
agents. Do not allow it to be touched by children
or any other untrained persons.
To disconnect from the main power supply, consult
qualified personnel.
B - Permanent disposal
· In addition to carrying out the above steps for
temporary storage; cut off the cord, pack the
machine in cardboard, polystyrene, or other
packing material, and consign it to a firm
authorized for its disposal or to a second-hand
goods dealer.
12. PROBLEMS AND REMEDIES
Check operations to be carried out by the user
with the plug disconnected.
For any type of problem or inconvenience not
specifically indicated, disconnect the plug and
contact our service center without attempting
any direct repairs.
A) The machine does not start:
- Check that the plug is connected.
- In case of power failure, wait for the power to return.
Then check to see if the fuse is blown; if the circuit
breaker need to be reset; and if the main power is on.
- Check the condition of the plug and the power cord.
If damaged, have them replaced by qualified personnel.
B) There is water under the machine:
- Check that the drainage tray is not obstructed.
C) Slow dispensing:
- Check that the filters and group heads are clean.
- Check that the coffee is not too finely ground.
D) Irregular steam delivery:
- Check that the nozzles are not obstructed.

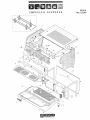
epoca
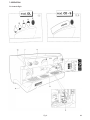
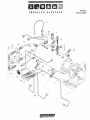
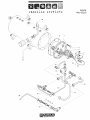
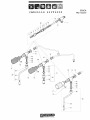
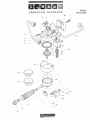
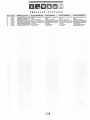
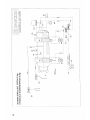
PARTS BREAKDOWN
· CD
· DE
version 1.01


La pagina sta caricando ...
La pagina sta caricando ...
La pagina sta caricando ...
La pagina sta caricando ...
La pagina sta caricando ...
La pagina sta caricando ...
La pagina sta caricando ...
La pagina sta caricando ...
La pagina sta caricando ...
La pagina sta caricando ...
La pagina sta caricando ...
La pagina sta caricando ...
La pagina sta caricando ...
La pagina sta caricando ...
La pagina sta caricando ...
La pagina sta caricando ...
La pagina sta caricando ...
La pagina sta caricando ...
La pagina sta caricando ...
La pagina sta caricando ...
La pagina sta caricando ...
La pagina sta caricando ...
La pagina sta caricando ...
La pagina sta caricando ...
La pagina sta caricando ...
La pagina sta caricando ...
La pagina sta caricando ...
La pagina sta caricando ...
La pagina sta caricando ...
La pagina sta caricando ...
La pagina sta caricando ...
La pagina sta caricando ...
La pagina sta caricando ...
La pagina sta caricando ...
La pagina sta caricando ...
La pagina sta caricando ...
La pagina sta caricando ...
La pagina sta caricando ...
La pagina sta caricando ...
La pagina sta caricando ...
La pagina sta caricando ...
La pagina sta caricando ...
La pagina sta caricando ...
La pagina sta caricando ...
La pagina sta caricando ...
La pagina sta caricando ...
La pagina sta caricando ...
La pagina sta caricando ...
La pagina sta caricando ...
La pagina sta caricando ...
La pagina sta caricando ...
La pagina sta caricando ...
-
 1
1
-
 2
2
-
 3
3
-
 4
4
-
 5
5
-
 6
6
-
 7
7
-
 8
8
-
 9
9
-
 10
10
-
 11
11
-
 12
12
-
 13
13
-
 14
14
-
 15
15
-
 16
16
-
 17
17
-
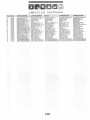 18
18
-
 19
19
-
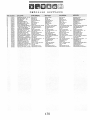 20
20
-
 21
21
-
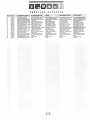 22
22
-
 23
23
-
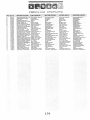 24
24
-
 25
25
-
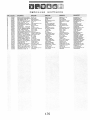 26
26
-
 27
27
-
 28
28
-
 29
29
-
 30
30
-
 31
31
-
 32
32
-
 33
33
-
 34
34
-
 35
35
-
 36
36
-
 37
37
-
 38
38
-
 39
39
-
 40
40
-
 41
41
-
 42
42
-
 43
43
-
 44
44
-
 45
45
-
 46
46
-
 47
47
-
 48
48
-
 49
49
-
 50
50
-
 51
51
-
 52
52
-
 53
53
-
 54
54
-
 55
55
-
 56
56
-
 57
57
-
 58
58
-
 59
59
-
 60
60
-
 61
61
-
 62
62
-
 63
63
-
 64
64
-
 65
65
-
 66
66
-
 67
67
-
 68
68
-
 69
69
-
 70
70
-
 71
71
-
 72
72


Rancilio epoca CD Use and Maintenance Manual
- Categoria
- Macchine da caffè
- Tipo
- Use and Maintenance Manual
- Questo manuale è adatto anche per
in altre lingue
- English: Rancilio epoca CD
Documenti correlati
-
Rancilio EPOCA E Use and Maintenance Manual
-
-
-
-
-
-
-
-
-
Altri documenti
-
ELEKTRA Professional espresso coffee machines Manuale utente
-
Gaggia DECO Tecnichal Service Manual
-
Alpina SF-2809 Instructions For Use Manual
-
Bialetti Mukka Express Instructions Manual
-
Saeco Coffee Makers SG200E Manuale utente
-
Chattanooga M2 Manuale utente
-
Franke Flair Manuale utente
-
Prime TWINDOSE 20 Manuale utente