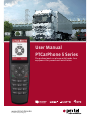
Pei tel PTCarPhone 5 Series Manuale utente
- Categoria
- Telefoni
- Tipo
- Manuale utente

User Manual
PTCarPhone 5 Series
The professional car phone with hands-free
equipment for permanent installation
www.ptcarphone.de
A member of the peiker group

Page 2 of 46
User Manual PTCarPhone 5 Series
Table of Contents
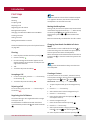
Introduction .................................................................................................................................4
Safety Instructions ...........................................................................................................................4
Instructions for Use ..........................................................................................................................5
PTCarPhone 5 Series - Models .................................................................................................................5
About this User Manual ......................................................................................................................6
Icons for Warning Messages and Notices .....................................................................................................6
Menu Navigation .............................................................................................................................7
Calling up the Start Menu Items ..............................................................................................................7
Selection Lists ................................................................................................................................7
Display Symbols ..............................................................................................................................8
Turning the Device On and Off ................................................................................................................8
First Steps ....................................................................................................................................9
General Tips .................................................................................................................................10
Editors .......................................................................................................................................11
Character Tables .............................................................................................................................12
Connection Plan ..........................................................................................................................13
Precautionary Measures and Installation ......................................................................................14
Precautionary Measures. . . . . . . . . . . . . . . . . . . . . . . . . . . . . . . . . . . . . . . . . . . . . . . . . . . . . . . . . . . . . . . . . . . . . . . . . . . . . . . . . . . . . . . . . . . . . . . . . . . . . . . . . . . . . . . . . . . . .14
Microphone Mounting ......................................................................................................................14
Accessory Mounting .........................................................................................................................15
Additional Required Hardware ..............................................................................................................15
Instructions for Mounting ............................................................................................................15
Sequence of Installation. . . . . . . . . . . . . . . . . . . . . . . . . . . . . . . . . . . . . . . . . . . . . . . . . . . . . . . . . . . . . . . . . . . . . . . . . . . . . . . . . . . . . . . . . . . . . . . . . . . . . . . . . . . . . . . . . . . . . 16
Setting up the PTCarPhone ...........................................................................................................17
Inserting the SIM Card .......................................................................................................................17
Inputting PIN ................................................................................................................................17
Setting the Delay Time ......................................................................................................................17
Turning on Virtual Ignition ..................................................................................................................17
Adjusting Display Brightness ...............................................................................................................17
System Menu ...............................................................................................................................18
Calling-up the Device Info ...................................................................................................................18
Performing a Software Update (OTA: Over-the-Air) ...........................................................................................18
Access to the System Conguration Menu ..................................................................................................18
Conguration of the USB Interface ..........................................................................................................19
Setting up Usage Restrictions (Operation Modes) ...........................................................................................19
Changing the Delay Timer ...................................................................................................................20
Activation of the Virtual Ignition ............................................................................................................20
Resetting the PTCarPhone to Factory Defaults ..............................................................................................20
Digital Inputs and Outputs (I/Os) ............................................................................................................21
Speed Dial Menu ..........................................................................................................................22
Adding Speed Dial Numbers .................................................................................................................22
Deleting a Speed Dial Number ...............................................................................................................22
Using a Speed Dial Number ..................................................................................................................22
Settings Menu .............................................................................................................................23
Adjusting Display and Keypad Illumination .................................................................................................23
Adjusting the Display Brightness ............................................................................................................23
Call Settings .................................................................................................................................23
Calling Line Identication Restriction .......................................................................................................24
Call Waiting ..................................................................................................................................24
Automatic Answer ...........................................................................................................................24
Incoming Call ................................................................................................................................25
Call Duration Display ........................................................................................................................25
Setting up a Call Divert ......................................................................................................................25
Enabling the SMS Signal Tone ...............................................................................................................25
Adjusting the Ringer Volume ................................................................................................................25
Selecting a Ring Tone Melody ...............................................................................................................26
Security Codes ...............................................................................................................................26
Select a PIN Code Request Mode ............................................................................................................26
Changing the Security Codes ................................................................................................................27
Automatic Network Selection ...............................................................................................................27
Selecting a Mobile Phone Network ..........................................................................................................27
Internet Access Conguration ...............................................................................................................28
Setting Date and Time .......................................................................................................................28

Page 3 of 46
User Manual PTCarPhone 5 Series
Table of Contents
Imprint
© 2015 pei tel Communications GmbH. All rights reserved.
pei tel Communications GmbH, Rheinstr. 15 A, 14513 Teltow, Germany
pei tel reserves the right to modify these instructions at any time, to correct typing mistakes or to add new functions in the
course of technical progress or further development. Every current version of these instructions can be found on the Internet
at http://www.ptcarphone.de/en/downloads.
Legal Notes
pei tel accepts no liability for maintaining settings, data or text messages saved on the PTCarPhone. Some of the services, com-
pany names and trademarks given in these instructions are the property of the respective trademark owners.
Changing Date and Time Display Modes .....................................................................................................29
Language Selection ..........................................................................................................................29
Phone Book Settings ........................................................................................................................29
Access Memory Status .......................................................................................................................30
Copying Phone Numbers from the SIM Card to the Phone Book .............................................................................30
Sorting Contacts by First Name or Surname .................................................................................................31
Setting up Direct Call ........................................................................................................................31
Accessing SMS Settings ......................................................................................................................31
Phone Book Menu ........................................................................................................................32
Editing Contacts in the Phone Book .........................................................................................................32
SMS Menu ...................................................................................................................................33
Writing an SMS Message ....................................................................................................................33
Opening Received SMS Messages. . . . . . . . . . . . . . . . . . . . . . . . . . . . . . . . . . . . . . . . . . . . . . . . . . . . . . . . . . . . . . . . . . . . . . . . . . . . . . . . . . . . . . . . . . . . . . . . . . . . . . . . . . . .34
Deleting SMS Messages .....................................................................................................................34
Replying to SMS Messages ..................................................................................................................34
Forwarding SMS Messages ..................................................................................................................34
Calling a Phone Number Retrieved from an SMS Message ...................................................................................34
Saving a Phone Number from an SMS Message ..............................................................................................35
Saving SMS Messages .......................................................................................................................35
Retrieving the Memory Status ...............................................................................................................35
Opening Saved SMS Messages ..............................................................................................................35
Call Register Menu .......................................................................................................................36
Opening the Call Register. . . . . . . . . . . . . . . . . . . . . . . . . . . . . . . . . . . . . . . . . . . . . . . . . . . . . . . . . . . . . . . . . . . . . . . . . . . . . . . . . . . . . . . . . . . . . . . . . . . . . . . . . . . . . . . . . . . . 36
Saving a Phone Number from the Call Register ..............................................................................................36
Calling a Phone Number from the Call Register .............................................................................................36
Sending an SMS Message to a Phone Number from the Call Register ........................................................................36
Redialling ....................................................................................................................................37
Deleting Call Register Lists ..................................................................................................................37
Additional Information ................................................................................................................38
Features of the GPS Module .................................................................................................................38
Setting the time via GPS .....................................................................................................................38
The second handset .........................................................................................................................38
Using the PTCarPhone as a Modem ..........................................................................................................38
Scope of supply ..............................................................................................................................39
Accessories ..................................................................................................................................39
Care and Cleaning Tips ......................................................................................................................39
Technical Data ...............................................................................................................................39
Technical Details of the Connections ........................................................................................................40
Disposal .....................................................................................................................................40
Declaration of Conformity ...................................................................................................................40
Support .......................................................................................................................................41
Support .....................................................................................................................................41
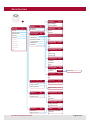
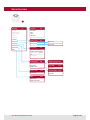
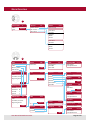
Menu Overview. . . . . . . . . . . . . . . . . . . . . . . . . . . . . . . . . . . . . . . . . . . . . . . . . . . . . . . . . . . . . . . . . . . . . . . . . . . . . . . . . . . . . . . . . . . . . . . . . . . . . . . . . . . . . . . . . . . . . . . . . . . .42
Version: 14.10.2015

Page 4 of 46
User Manual PTCarPhone 5 Series
Introduction
Safety Instructions
Emergency Call 112/911/999
There is no guarantee that the emergency call will
function in all situations!
For this reason you should not depend only on the
device for crucial communication (e.g., medical
emergencies).
You can only telephone with the device when it
is turned on and in an area with sufcient signal
strength.
Emergency calls can only be made with a SIM card
activated by the mobile phone service provider. In
some circumstances you cannot be connected in
all mobile phone networks.
It is possible that emergency calls can also not be
made when certain network services and/or tele-
phone functions are activated or deactivated.
Trafc Safety
Phoning while driving can distract from trafc and
cause accidents! The same is true for using other
functions of the telephone.
Only use the hand-free function of the device while
driving. The handset must only be used when the
engine is turned off. The hands-free equipment is
only active if the handset is in its cradle.
Always fasten the handset in its cradle; do not lay
the handset on the seat or anywhere that it could
move in the event of a collision or sudden braking.
Please follow the current laws of the country
where you are located.
Operating Environment
When using the telephone, observe the legal reg-
ulations and local restrictions. Turn off the device
wherever you are requested by the appropriate
warnings, e.g. near fuel and/or ammable chemi-
cals.
Health
The function of medical devices, such as a heart
pacemaker, can be disturbed. Therefore always
keep a minimum distance of 20 cm between the
antenna of this device and the pacemaker. During
a conversation hold the phone on the ear farther
away from the pacemaker. For more information
consult your doctor.
If interfering noises occur in connection with a
hearing aid, please contact the manufacturer of
the hearing aid or your hearing care professional.
The PTCarPhone is Not a Toy
Do not let children play with the PTCarPhone. The
spiral cable of the handset or swallowed small
parts can lead to suffocation!
Take Care of your Hearing
Only set the volume as loud as necessary and avoid
exposing your hearing to loud volumes over a
longer period of time.
Do Not Drown Out Warning Signals
Awareness of the warning signals of others on the
road must not be adversely affected by the tele-
phone. Set the volume of the telephone appropri-
ately so that you can always be clearly aware of
warning signals from the surroundings, for exam-
ple horns and sirens.
Safe Installation
Avoid mounting all components in the deployment
area of the airbag. Fasten the PTCarPhone and ac-
cessories sufciently so that in the case of sudden,
hard braking they cannot cause damage ying
around. Use the included fastening material or
suitable materials for the corresponding surfaces
for this.

Page 5 of 46
User Manual PTCarPhone 5 Series
Introduction
Instructions for Use
Electronic Devices
High frequency signals can adversely affect the
function of improperly installed or insufciently
shielded electronic systems in the vehicle in cer-
tain circumstances.
Accessories
Only use accessories that are approved for use on
this device. The use of non-approved accessories
voids the warranty. Ask your dealer or the manu-
facturer about approved accessories.
Service, Installation and Repairs
Only qualied specialists may service, install
and/or repair this device. The device must not be
opened. Any manipulation on the device is not
allowed and voids the warranty.
PTCarPhone 5 Series - Models
Feature PTCarPhone 510 PTCarPhone 520 PTCarPhone 530
Technology Quad band GSM, GPRS Quad band GSM, GPRS/
Edge, UMTS/HSPA+
Quad band GSM, GPRS/
Edge, UMTS/HSPA+
GSM 850, 900, 1800, 1900 MHz 850, 900, 1800, 1900 MHz 850, 900, 1800, 1900 MHz
UMTS (3G) - 800/850, 900, 2100 MHz 800/850, 900, AWS 1700,
1900, 2100 MHz
Audio Clear Voice & Sound
Technology™
Clear Voice & Sound
Technology™
Clear Voice & Sound
Technology™
Audio + - HD Voice HD Voice
Positioning - - GPS tracking
UMTS modem - PTCarPhone as modem via USB PTCarPhone as modem via USB
Network Services
Some functions of this device are designated as
network services. Network services are added ser-
vices that are made available by the mobile phone
service provider at the request of the user.
Before the user can use these, authorization must
be given for the use of these services from the mo-
bile phone service provider. Some networks may
not support all services and/or functions.
Environmental Inuences: Water & Dust
The PTCarPhone and all accessories are neither
dustproof nor waterproof. Make sure that the
PTCarPhone is always protected from moisture and
from water penetrating the vehicle. Regular clean-
ing of exposed accessory parts and the interior of
the vehicle can prevent the penetration of dust
particles in the housing. A soft, lint-free, dry cloth
is suitable for cleaning.

Page 6 of 46
User Manual PTCarPhone 5 Series
Introduction
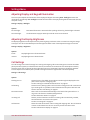
About this User Manual
This user manual describes the PTCarPhone 5 Series
with the software versions v.5.01.03 (PTCarPhone 5) and
v.01.14 (HA59) and previous versions. Future rmware
versions might contain features that are not included
in this user manual.
Depiction of Keys and Icons
Keys and icons (e.g. or ) might change in this user
manual as well as on the phone display their colour
(for example black turns into white), to assure their
visibility and legibility on changing backgrounds.
Function key symbols are printed in this user manual
using the font Helvetica Neue e.g. System, Speed D.
Step-by-Step Instructions
The chapter First Steps describes important and com-
prehensive operations in Step-by-Step format.
Once you are familiar with the main features of the
PTCarPhone, it will be easy for you to follow the
pattern of menu paths, which are used in the other
chapters. Example:
Main menu > sub menu > sub menu
Bold printed terms of the menu paths are menu points,
text in italic are instructions and regular printed text
stands for keys. Example:
Main menu > sub menu > device code input > sub menu
> function key Options > call key
Icons for Warning Messages and
Notices
Hazard symbol: Warning
Marks danger of injury and life
Hazard symbol: Caution
Danger of destruction of the product and other
objects
Advice symbol: Notice
Marks important notices for hassle free usage of
the product.
Advice symbol: Tip
Marks information worth knowing on handling
the product.
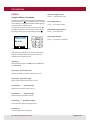
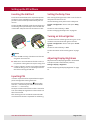
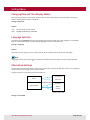
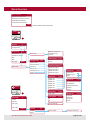
General Drawing
Provider
System Speed D.
10:26
Function
keys
Navigation
keys
Input
keys
Call key
End key
Function
symbols
Navigation
symbol
Toolbar
Display

Page 7 of 46
User Manual PTCarPhone 5 Series
Introduction
Menu Navigation
Navigating the phone menu is done using the navi-
gation keys (up , down , right , left ) and the
function keys (also know as soft keys).
The respective function of the function keys is shown
on the bottom of the display on the left and right
side of the navigation symbol. The function symbols
change as needed (e. g. System, Speed D., OK, Cancel,
Back, Name).
The navigation symbol indicates, which navigation
keys are currently active.
The call key is used for establishing outgoing calls
or accepting incoming calls.
The end key / is used for ending calls, turning the
phone on and off and returning to the start screen
when navigating through the phone menu.
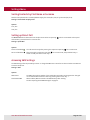
Function keys
Navigation keys
Call key
End key
Function symbols
Navigation symbols
System Speed D.
Calling up the Start Menu Items
The start menu items Settings [], Phone book [],
SMS [] and Call register [] are called up using the
four navigation keys.
The system and speed dial menus can be opened from
the start menu with the System and Speed D. function
keys.
Selection Lists
One or more options can be chosen, activated or
deactivated from the selection lists. Control the
desired option with the navigation keys and select
your choice with the OK function key.
Selected option
Not selected option
Settings
SMS
Phone book
Time
Call register
Network provider
System Speed D.
Provider
10:30

Page 8 of 46
User Manual PTCarPhone 5 Series
Introduction
Display Symbols
Symbol Description
Signal strength low
Signal strength high
Data transmission via the GPRS or
EDGE network
Data transmission via the UMTS,
HSDPA and HSPA+ network
GPS: No satellite
, GPS: 2D-Fix, 3D-Fix
Private mode, phoning using handset
Hands-free mode, phoning via hands-
free system
Microphone mute (MUTE)
New text message (SMS)
ashing Only one free SMS storage location
Volume low
Volume high
Phone book entry - Business
Phone book entry - Mobile
Phone book entry - Private
Phone number
Date
Time
Active navigation keys
Turning the Device On and Off
The PTCarPhone is automatically started when the
vehicle ignition is turned on.
If the Virtual Ignition function is activated (see also
“Activation of the Virtual Ignition” on page 20), the
PTCarPhone starts when the engine is turned on. The
PTCarPhone turns off when the ignition or the engine
is turned off and after the subsequent delay time (see
also “Changing the Delay Timer” on page 20) has
elapsed.
Independently of this, the PTCarPhone can also be
turned on or off by holding down the end key /
for an extended time.

Page 9 of 46
User Manual PTCarPhone 5 Series
Introduction
First Steps
Content
Phoning
Accepting a Call
Rejecting a Call
Regulating the Call Volume
Muting the Microphone
Changing from Hands-free Mode to Private Mode
Creating a Contact
Calling a Contact
Adding Phone Number to Contact
Please nd detailed descriptions of all phone features
on page 18 ff.
Phoning
1. Enter the phone number with the input keys .
2. Press the call key .
3. First the message “Dial number” appears on the
display and after the connection is made, the mes-
sage “Connected with”.
4. Talk.
5. To end the call press the end key .
Accepting a Call
1. For an incoming call, press the Accept function key
or the call key .
2. To end the call press the end key .
Rejecting a Call
For an incoming call, press the Cancel function key or
the end key .
Regulating the Call Volume
The volume during a call is regulated with the naviga-
tion keys and .
The PTCarPhone can differentiate with the volume
control between private mode and hands-free mode
.
NOTE:
In private mode the volume of the handset loudspeak-
er is regulated. However, the volume of the external
loudspeaker is set in hands-free mode.
Muting the Microphone
During a call, the active microphone can be muted and
reactivated using the function key MUTE. When muted,
the mute symbol appears instead of the data
transmission symbols or in the toolbar of the
display.
Mute is automatically cancelled after the call is ended.
Changing from Hands-free Mode to Private
Mode
If the handset is in the cradle hands-free mode is
active and calls go over the hands-free system (hands-
free microphone and external loudspeaker).
When the handset is lifted the PTCarPhone switches to
private mode , i.e. from the hands-free system to the
handset.
NOTE:
For ring tones the PTCarPhone always uses the exter-
nal loudspeaker.
Creating a Contact
A contact consists of “First name”, “Surname” and up
to three phone numbers, which can be assigned to the
categories business , mobile or private .
Phone book > function key Options > Add contact
1. To open the phone book, press the navigation key
.
2. Press the Options function key.
3. Select “Add contact” with the navigation key .
4. Press the OK function key.
5. Enter the rst name with the input keys (also
see Chapter “Editors”).
6. Press the navigation key .
7. Enter the surname with the input keys .
8. Press the Next function key.
9. Select a phone number category (business ,
mobile or private ) with the navigation key .
10. Enter the phone number with the input keys .

Page 10 of 46
User Manual PTCarPhone 5 Series
Introduction
11. This process is repeated for more phone numbers if
necessary.
12. End the process with the OK function key. The mes-
sage “Entry saved” is displayed.
Calling a Contact
Phone book > paging > Call key
1. Press the navigation key , the phone book opens.
2. Scroll with the navigation keys and until the
contact to be called is marked.
3. Press the call key , the phone book entry for the
selected contact opens.
4. Select the desired phone number with the naviga-
tion keys and (business , mobile or
private ).
5. Press the OK function key.
6. First the message “Dial number” appears on the
display and after the connection the message “Con-
nected with”.
NOTE:
When you take the handset out of the cradle, a call can
be made in private mode with the handset. When
the handset is hung in the cradle, hands-free mode
is activated.
Adding Phone Number to Contact
Phone book > function key Options > Edit contact
1. To open the phone book, press the navigation key
.
2. Scroll with the navigation keys and , to select
the contact.
TIP:
The phone book shortens when you input the rst
letter, or several letters, of the searched name with the
input keys .
3. Push the Options function key when the desired
contact is marked.
4. Select “Edit contact” with the navigation key .
5. Press the OK key.
6. Press the Next function key.
7. Select a free phone number category with the
navigation keys and (business , mobile or
private ).
8. Enter the new phone number with the input keys .
9. Press the OK key. Editing is completed and the
contact is saved.
General Tips
Always enter phone numbers as follows
+[country code][local area code][phone number]
Example: +491711234567890
Inserting special characters (* and P) for pauses and
other functions: By repeatedly pressing the * key,
pauses and other functions can be initialised.
The symbols represent the following functions:
* = For GSM commands, device codes or DTMF
tones (example: *#06# or *135#)
P = Sends the “pause” command via DTMF

Page 11 of 46
User Manual PTCarPhone 5 Series
Introduction
Editors
Using the Editors in Text Mode
The editors are used for the input of text and numbers
with the input keys of the handset. In the top right
of the display it is displayed whether numbers (123) or
letters (abc, Abc or ABC) are input.
To input letters and punctuation marks you can page
through the available letters and punctuation marks
by briey pushing the corresponding input key .
Example: Input window with input key 2
During the input a black bar is shown on the bottom
edge of the display, which displays the characters
available for the input key used.
Input key #
Change between upper case ABC, lower case abc and
capitalized Abc.
Input keys 0 - 9, press key briey
Output according to character table left of cursor
Input keys 0 - 9, press key longer
Direct output of the character left of cursor
Function key Delete, press key briey
Delete the character left of the cursor
Function key Delete, press key longer
Delete the entire text eld contents
Function key Back (Text eld is empty)
Leave the editor without saving the data
Function key OK
Leave the editor with saving data
Editor abc
Bär in Bä_
abc2äåáâàãçæ
Editor abc
Upwards navigation key
Cursor _ in the previous rows
Left navigation key
Cursor _ one character back
Downwards navigation key
Cursor _ in the next rows
Right navigation key
Cursor _ one character forwards

Page 12 of 46
User Manual PTCarPhone 5 Series
Introduction
Character Tables
Lower Case Mode
Key 1x2x3x4x5x6x7x8x9x10x11x12x13x14x
1. , ' ? ! ” 1– ( ) / : _
2a b c 2ä å à æ
3d e f 3é è ¤
4g h i 4ì
5j k l 5$
6m n o 6ö ñ ò ø
7p q r s 7ß
8t u v 8ü ù
9w x y z 9
0. , =
** # ; < > & @ £ ¿ ~
Upper Case Mode
Key 1x2x3x4x5x6x7x8x9x10x11x12x13x14x
1. , ' ? ! ” 1– ( ) / : _
2A B C 2Ä Å Ç Æ
3D E F 3ɤ
4G H I 4
5J K L 5$
6M N O 6ÖÑØ
7P Q R S 7ß ¥
8T U V 8Ü
9W X Y Z 9
0+ = 0
** # ; < > & @ £ ¿ ~

Page 13 of 46
User Manual PTCarPhone 5 Series
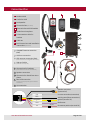
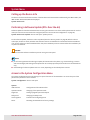
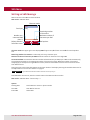
Connection Plan
1
2
3
4
5
6
7
8
4
Handset HA59
Cradle for HA59
Loudspeaker
Electronics box (not shown)
Electronics box with GPS module
Hands-free microphone
2.5 m extension cable for
handset
Cable set
Brief instructions and installation
instructions (not shown)
1 2 3
C
B
GSM/UMTS antenna connection
(FME)
Cable set connection
GPS antenna connection (SMA)
(Electronics box with integrated GPS module)
SIM card holder
(Valid SIM card required)
D
C
B
A
1
1
6
Connections for handsets
(both handset connections are identical)
Speaker connection
Connection for hands-free micro-
phone
Mini USB connection
(only for service purposes; optional modem
connection)
I/O connection
4
3
2
1
5
7
2
3
45
B
5
A
D
3
4
Speaker connection
(symmetrical)
Line-out connection (accessories)
Vehicle ground (short connection!)
Ignition (terminal 15)
Radio mute
Permanent positive (terminal 30)
S2 (2 A)
S1 (5 A)
grey
black
yellow/black
violet
red

Page 14 of 46
User Manual PTCarPhone 5 Series
Precautionary Measures and Installation
Precautionary Measures
CAUTION:
Non-compliance with these instructions can cause
damage to the device and to the vehicle.
Qualied installation personnel
The device must only be installed in the vehicle and
serviced by qualied specialists.
Consequences of incorrect installation
Incorrect installation can cause damage to the vehi-
cle. Incorrect assembly or service can have hazardous
consequences and can void the warranty and possibly
the operating permit of your vehicle.
Airbag
With vehicles that are equipped with an airbag, re-
member that the airbag lls with a strong force. Do not
install any components in the area impacted by the
lled airbag.
Antennas
Before start-up of the device, the GSM or UMTS anten-
na and the GPS antenna, for a device with integrated
GPS module, must be connected (antennas are not
included in the scope of supply). The device must not
be operated without antenna(s), since this can lead to
the destruction of the device.
Connection to the power supply of the vehicle
In some cases settings must be done in modern vehi-
cles after attaching the battery. Absolutely be sure to
refer to the operating manual of your vehicle for this.
Environmental inuences
The PTCarPhone and all accessories are not water-
proof. Make sure that the PTCarPhone is always pro-
tected from moisture penetrating the vehicle. Prevent
penetration of dust particles in the housing by clean-
ing regularly.
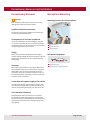
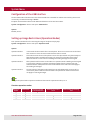
Microphone Mounting
Mounting location for the microphone
Microphone alignment
A
C
B
Optimum position
Alternative position
Limited suitability
A
C
B
1
Maximum sensitivity
Adhesive tape for smooth (at) surfaces
1
2
2

Page 15 of 46
User Manual PTCarPhone 5 Series
Instructions for Mounting
Types of connection:
Additional Required Hardware
GSM or UMTS antenna
Model-specic GSM or UMTS antenna with FME con-
nection (not in scope of supply).
GPS antenna for devices with optional GPS
GPS antenna with SMA connection (not included in the
scope of supply). Power supply: 3.3 V, max. 50 mA;
SIM card
Mini SIM card with mobile phone contract with phone
and data plan. This is available from your mobile
phone provider.
TIPS:
If the PTCarPhone should be operated with the
same telephone number as the mobile phone of
the user, it is recommended to use a so-called
multi SIM card. For this, contact your mobile phone
provider.
It is recommended to make sure before assembly,
whether the electronics box should be positioned
so that easy access to the SIM card is provided.
Screws and adhesive tape
Depending on the installation situation it can be
necessary to fasten the electronics box, the handset
and the accessories with other fastening material than
that which is partially supplied. Please do not forget:
Safety rst! Nevertheless, it is recommended to pay
attention to aesthetics.
Key connection
I/O
GND
Relay connection
UB+
I/O
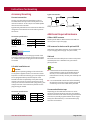
Accessory Mounting
Line-out connection
The line-out cable offers the possibility to link-up
the PTCarPhone directly to the sound system or the
radio of the vehicle. In this case, the included speaker
doesn’t need to be installed.
A galvanically isolated line-out connection enables the
integration of the PTCarPhone to the audio system of
the vehicle.
Connection specications:
4321
8765
1 LSPK - (blk) 5 LSPK + (wht)
2 Line-out - (gy) 6 Line-out + (gy)
3 GND (blk) 7 Ignition (yl/blk)
4 Permanent
positive (rd)
8 Radio mute (vi)
Cable set connection
(Top view)
The crimped contacts of the two grey strands of the
accessory package are pushed into the two free slots
no. 2 and 6 of the cable set plug and can be extended
as needed.
I/O cable installation set
CAUTION:
The respective operating voltage of the vehicle elec-
trical system is applied to the I/O connection. Please
keep this in mind when selecting your I/O components.
The six programmable inputs and outputs of the
PTCarPhone offer the possibility of the phone being
used as a control unit for vehicle accessories. The ac-
cessory set contains 12 strands and a plug housing. The
crimped contacts of the strands are pushed into the
plug housing as needed.
Connection specications:
12
654321
11 10 9 8 7
PIN Signal
1, 2, 3 GND
4, 5, 6 U
B
+
7 to 12 I/O 1 to 6
I/O connection (Top view)

Page 16 of 46
User Manual PTCarPhone 5 Series
Assembly Instructions
Sequence of Installation
1. Become familiar with the connections (see also
“Connection Plan” on page 13). Disconnect the
negative terminal of the vehicle battery while
following the safety instructions of the vehicle
manufacturer.
2. Select the installation locations for the electronics
box, handset, loudspeaker, hands-free microphone
and the antenna(s), paying attention to the cable
lengths and installation instructions and mount
the components.
When drilling holes make sure that the vehicle is
not damaged. Use cable bushings on sharp-edged
holes.
3. Install the included hands-free microphone. Make
sure that air ow from the vents is not in the di-
rection of the microphone. Also refer to “Mounting
locations for the microphone” on page 14.
Then install the loudspeaker (a good location is
the passenger footwell). During installation of the
microphone and loudspeaker make sure of suf-
ciently large spatial separation, to avoid acoustic
feedback.
4. Connect the power supply cable (red) on the perma-
nent positive and the ignition input (yellow/black)
to the ignition *, if present. Do not connect the igni-
tion input (yellow/black) onto permanent positive,
since this limits the scope of function of the device
(see also “Changing the Delay Timer” on page 20).
Connection of the ground cable is done directly
to the vehicle battery, the central ground point
(ground block) or a part of the vehicle body.
* For vehicles without ignition wiring it is recom-
mended at the end of the installation to activate
the “Virtual ignition” function.
5. Connect the violet cable with the mute input of
the car radio. This ensures automatic radio mute
switching for incoming and outgoing calls.
6. Insulate unused cables so no short circuits can
occur.
7. Connect the individual components of the device
with each other using the plug and screw connec-
tions (see connection diagram on page 13).
8. Check the total installation and insert a valid SIM
card. Connect the vehicle battery.
9. For vehicles with ignition wiring: Turn on the
ignition. The device now turns on and requests the
input of the PIN (if this was not deactivated on the
SIM card).
For vehicles without ignition wiring: Turn the
device on with the end key / on the handset.
10. Enter the PIN. The telephone is now registered in
the network.
11. Make a call in order to check the basic functions.
12. Check whether there is new software available and
if necessary perform a software update. Download-
ing of software updates can incur costs, depending
on the mobile phone contract.
See also “Performing a Software Update (OTA: Over-
the-Air)” on page 18.
13. If desired, make personal settings on the device
(see chapter “Setting up the PTCarPhone” on page
17) and nish the installation.

Page 17 of 46
User Manual PTCarPhone 5 Series
Inserting the SIM Card
A valid and activated SIM card is required to operate
the device. This is available from your mobile phone
provider. It saves all the important data of your con-
nection.
To open the SIM card holder, push the round button in
the housing with a pointed object. Place the SIM card
in the holder and push it back in the electronics box.
NOTES:
Insert the SIM card only if the device and the vehi-
cle ignition are turned off.
Make sure to insert the SIM card holder in the cor-
rect position. Closing does not require strong force.
If a piece of plastic remains on the edge of the SIM
card when taking it out, it is necessary to remove
this before inserting the SIM card.
Inputting PIN
If a PIN is required it will be requested with an appro-
priate message when starting the device.
Enter the PIN using the input keys and conrm
with the OK function key. Corrections can be made
with the Delete function key.
PIN input is shown with asterisks so that it cannot be
seen. The subsequent registration in the network can
take a few seconds.
After entering an incorrect PIN three times the SIM
card is blocked. The PUK is requested for unblocking.
Setting up the PTCarPhone
Setting the Delay Time
After turning off the ignition the device runs for the set
delay time and then turns off.
Use the following menu path to set the delay time:
System > Conguration > device code input > Delay
timer
The device code at delivery is: 0000
See also “Changing the Delay Timer” on page 20.
Turning on Virtual Ignition
In modern vehicles without ignition wiring it is recom-
mended to activate the Virtual ignition function.
System > Conguration > device code input > Virtual
ignition
The device code at delivery is: 0000
See also “Activation of the Virtual Ignition” on page
20.
Adjusting Display Brightness
Adjustment of the display brightness in illuminated
state (Active) and in dimmed state (Inactive).
Settings > Display > Brightness
See also “Adjusting the Display Brightness” on page
23.

Page 18 of 46
User Manual PTCarPhone 5 Series
System Menu
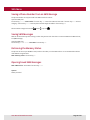
Calling-up the Device Info
The device info lists the software versions of the handsets and the PTCarPhone. Additionally, the IMEI number, the
IMSI number and the MCC/MNC are displayed.
System > Device Info
Performing a Software Update (OTA: Over-the-Air)
Software update for handset and PTCarPhone are using the internet access of the mobile phone network. For this
reason, the internet access needs to be congured (see also “Internet Access Conguration” on page 28).
System > Device Info > Update > device code input > update process
For the software update, the device code is requested (see also “Security Codes” on page 26). After the device
code input, the device checks, whether new software versions are available for the handset and the PTCarPhone.
If so, the new software is downloaded and after that, the installation process is started. After the installation, the
car phone is rebooted.
CAUTION:
Make sure that the software installation process never gets interrupted.
NOTES:
pei tel cannot guarantee that during an update, all data stored on the phone (e.g. customised logo, contacts
and text messages) and settings will be preserved. Do not keep important phone numbers on the PTCarPhone
only.
Downloading of software updates can incur costs, depending on the mobile phone contract.
Access to the System Conguration Menu
The system conguration menu lists settings for special functions of the PTCarPhone. To access this part of the
phone menu, the device code is needed.
System > Conguration > device code input
Options
USB interface: Conguration of the USB interface
Operation mode: Changing of the operation mode
Digital I/O: Setting up digital inputs and outputs
Delay timer: Changing the delay timer
Virtual Ignition: Activation of the digital ignition
Reset: Resetting the PTCarPhone to factory settings

Page 19 of 46
User Manual PTCarPhone 5 Series
System Menu
Conguration of the USB Interface
The mini USB socket of the electronics box of the PTCarPhone is intended for maintenance works by service tech-
nicians only. The standard setting is Service.
Exception are PTCarPhone devices with UMTS modules that can be used as a modem.
System > Conguration > device code input > USB interface
Options
Modem, Service
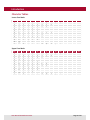
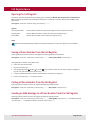
Setting up Usage Restrictions (Operation Modes)
Four operation modes allow for restricting the usage of the phone step by step.
System > Conguration > device code input > Operation mode
Options
Operation mode 0: In this mode the device works like a normal phone. There are no restrictions on the hand-
set’s menu tree. This is the active mode when the device is issued.
Operation mode 1: This mode restricts the use of the phone in terms of its phone book. Only the already con-
gured phone book is available and copying of contacts from the SIM card is locked.
There are however no restrictions on dialling and sending messages via the keypad.
Operation mode 2: All the phone book functions are the same as in operation mode 1. Dialling via the keypad
is restricted to emergency numbers and phone numbers from the phone book. Only
enabled numbers of the phone book can still be dialled. These restrictions also apply to
the sending of messages.
Operation mode 3: The restrictions of operation mode 2 apply here as well. Additionally, receiving calls is
restricted to phone numbers which are listed in the phone book. These restrictions do
not apply to receiving messages.
TIP:
Congure the phone book in operation mode 0 and then switch to operation mode 1, 2 or 3.
Overview operation modes
Operation
modes
Phone book Copying contacts
from the SIM card
Dialling restrictions
exist
Restrictions on receiving
calls
0x x
1x
2x x
3x x x

Page 20 of 46
User Manual PTCarPhone 5 Series
System Menu
NOTE:
In operation mode 1, 2 and 3 the phone can only be used restrictively. This is a security feature, which is especially
suitable for eet vehicles as a cost-saving measure.
Changing the Delay Timer
The delay time starts, when the ignition is switched off. If a key on the phone is pressed during the delay time, the
delay timer restarts.
System > Conguration > device code input > Delay timer
Options
0 min (the device is powered down, when the ignition is turned off), 5 min, 15 min, 1 h, 2 h, 4 h, 8 h, 12 h, 1 d, 7 d, 10 d
or 30 d (min = minute/s; h = hour/s; d = day/s)
NOTE:
When the feature Virtual Ignition was activated, the delay time starts after switching off the engine of the vehicle.
Activation of the Virtual Ignition
If the PTCarPhone was installed correctly, it powers up automatically when the ignition of the vehicle is started.
For modern vehicles without ignition wiring, the feature Virtual Ignition is intended. The Virtual Ignition detects
changes in the power supply and powers the PTCarPhone up, when the engine is started.
System > Conguration > device code input > Virtual Ignition
Options
On: Automatic detection of the ignition
Off: Ignition over the true ignition contact (terminal 15)
NOTE:
This setting needs to be done only once, during the PTCarPhone installation.
Resetting the PTCarPhone to Factory Defaults
System > Conguration > device code input > Reset
Options
No, Yes (conrmation message)
CAUTION:
The phone will be reset to factory defaults. All data and settings stored on the phone will be deleted!
La pagina si sta caricando...
La pagina si sta caricando...
La pagina si sta caricando...
La pagina si sta caricando...
La pagina si sta caricando...
La pagina si sta caricando...
La pagina si sta caricando...
La pagina si sta caricando...
La pagina si sta caricando...
La pagina si sta caricando...
La pagina si sta caricando...
La pagina si sta caricando...
La pagina si sta caricando...
La pagina si sta caricando...
La pagina si sta caricando...
La pagina si sta caricando...
La pagina si sta caricando...
La pagina si sta caricando...
La pagina si sta caricando...
La pagina si sta caricando...
La pagina si sta caricando...
La pagina si sta caricando...
La pagina si sta caricando...
La pagina si sta caricando...
La pagina si sta caricando...
La pagina si sta caricando...
-
 1
1
-
 2
2
-
 3
3
-
 4
4
-
 5
5
-
 6
6
-
 7
7
-
 8
8
-
 9
9
-
 10
10
-
 11
11
-
 12
12
-
 13
13
-
 14
14
-
 15
15
-
 16
16
-
 17
17
-
 18
18
-
 19
19
-
 20
20
-
 21
21
-
 22
22
-
 23
23
-
 24
24
-
 25
25
-
 26
26
-
 27
27
-
 28
28
-
 29
29
-
 30
30
-
 31
31
-
 32
32
-
 33
33
-
 34
34
-
 35
35
-
 36
36
-
 37
37
-
 38
38
-
 39
39
-
 40
40
-
 41
41
-
 42
42
-
 43
43
-
 44
44
-
 45
45
-
 46
46


Pei tel PTCarPhone 5 Series Manuale utente
- Categoria
- Telefoni
- Tipo
- Manuale utente
in altre lingue
Altri documenti
-
Mercedes-Benz COMAND Manuale utente
-
-
Pirelli Cell Phone DP-L10 Manuale utente
-
-
Pantech Reveal Manuale utente
-
-
Siemens Mobile CF62T Manuale utente
-
LG KT610.AHITBK Manuale utente
-
LG F2400.ACZEOR Manuale utente
-