

2
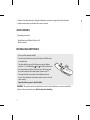
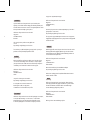
ACCESSORIES
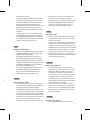
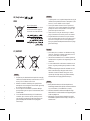
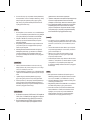
The remote control image shown may differ from the actual product.
(Depending upon country)
Magic Remote and Alkaline Batteries (AA) Owner’s manual
ꔈ
Contents in this manual may be changed without prior notice due to upgrade of product functions.
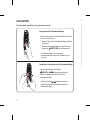
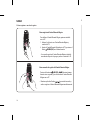
BATTERY
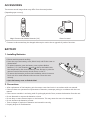
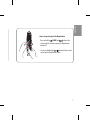
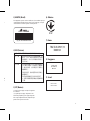
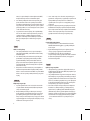
1. Installing Batteries
ꔈ
Please read this manual carefully.
ꔈ
Press the top of the battery cover, slide it back, and lift the cover as
shown below.
ꔈ
To replace batteries, open the battery cover, replace alkaline
batteries (1.5 V, AA) matching and ends to the label inside
the compartment, and close the battery cover. Be sure to point the
remote control at the remote control sensor on the TV.
ꔈ
To remove the batteries, perform the installation actions in reverse.
Don’t mix old or used batteries with new ones. Close the cover
securely.
ꔈ
Open the battery cover to find the label.
2. Precautions
ꔈ
After replacement of the batteries, pair the remote control and use it in accordance with user manual.
ꔈ
If the unit does not operate after replacement of batteries, reattempt pairing in accordance with the user
manual.
ꔈ
If the remote controller is not being used for prolonged period of time, remove the batteries from the unit.
ꔈ
Do not dismantle or expose the batteries to heat.
ꔈ
Do not drop or exert extreme impact on the batteries. This may cause the case to be damaged.
ꔈ
Do not immerse the batteries in water.
ꔈ
There is danger of explosion if batteries are inserted incorrectly.
ꔈ
Properly dispose of used batteries.

3
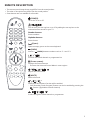
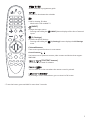
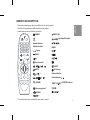
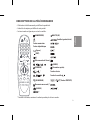
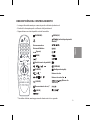
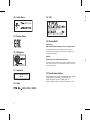
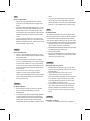
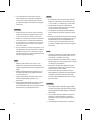
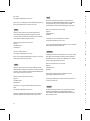
REMOTE DESCRIPTION
ꔈ
The remote control image shown may differ from the actual product.
ꔈ
The order of description may differ from the actual product.
ꔈ
Some buttons are not available for all models.
(POWER)
Turns the TV on or off.
You can turn your set-top box on or off by adding the set-top box to the
universal remote control for your TV.
Number buttons
Enters numbers.
Alphabet buttons
Enters letters.
(Space)
Opens an empty space on the screen keyboard.
(DASH)
Inserts a (DASH) between numbers such as 2-1 and 2-2.
Accesses the saved channels or programmes list.
(Screen remote)
Displays the Screen Remote.
-
Accesses the Universal Control Menu in some regions.
Adjusts the volume level.
(MUTE)
Mutes all sounds.
Video/audio descriptions function will be enabled.
-
SAP (Secondary Audio Program) Feature can also be enabled by pressing the
button. (Applicable to North America)
Scrolls through the saved channels or programmes.

4
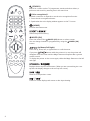
(SEARCH)
Search for content such as TV programmes, movies and other videos, or
perform a web search by entering text in the search bar.
(Voice recognition) *
Network connection is required to use the voice recognition function.
1. Press the voice recognition button.
2. Speak when the voice display window appears on the TV screen.
(HOME)
Accesses the Home menu.
Shows the previous history.
WHEEL (OK)
Press the center of the WHEEL (OK) button to select a menu.
You can change channels or programmes by using the WHEEL (OK)
button.
(up/down/left/right)
Press the up, down, left, or right button to scroll the menu.
If you press buttons while the pointer is in use, the pointer will
disappear from the screen and the Magic Remote will operate like a general
remote control.
To display the pointer on the screen again, shake the Magic Remote to the left
and right.
Displays the set-top box Home menu. (When you are not watching via a set-
top box: the display changes to the set-top box screen.)
Returns to the previous screen.
Clears on-screen displays and returns to last input viewing.

5
Shows channels or programmes guide.
Activates or deactivates the subtitles.
Used for viewing 3D video.
-
Works with a 3D-enabled TV.
(INPUT)
Changes the input source.
-
Pressing and holding the (INPUT) button displays all the lists of external
inputs.
(Q. Settings)
Accesses the Quick Settings.
-
Pressing and holding the (Q. Settings) button displays the All Settings
menu.
Coloured buttons
These access special functions in some menus.
Control buttons ( )
You have access to premium content, video content and devices that support
SIMPLINK.
(TELETEXT buttons)
These buttons are used for teletext.
You can zoom in on the area where the remote control is pointed.
By zooming in on the selected area, you can view it in full screen.
* To use the button, press and hold for more than 3 seconds.

6
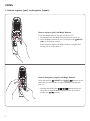
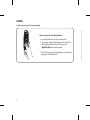
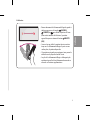
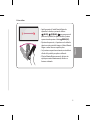
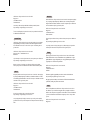
USING
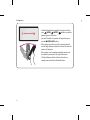
1. How to register (pair) or deregister (unpair)
How to register (pair) the Magic Remote
To use the Magic Remote, first pair it with your TV.
1. Put batteries into the Magic Remote and turn the TV on.
2. Point the Magic Remote at your TV and press the WHEEL
(OK) on the remote control.
-
If the TV fails to register the Magic Remote, try again after
turning the TV off and back on.
How to deregister (unpair) the Magic Remote
Press and hold the (HOME) and buttons at the
same time for five seconds, to unpair the Magic Remote with
your TV.
ꔈ
Pressing and holding the button will let you
cancel and re-register Magic Remote at once. (In some TV
models, use button.)

7
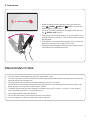
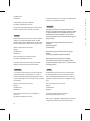
2. How to use
ꔈ
Shake the Magic Remote slightly to the right and left or
press (HOME), (INPUT), buttons to make the
pointer appear on the screen.
(In some TV models, the pointer will appear when you turn
the WHEEL (OK) button.)
ꔈ
If the pointer has not been used for a certain period of time
or Magic Remote is placed on a flat surface, then the pointer
will disappear.
ꔈ
If the pointer is not responding smoothly, you can reset the
pointer by moving it to the edge of the screen.
ꔈ
The Magic Remote depletes batteries faster than a normal
remote due to the additional features.
PRECAUTIONS TO TAKE
ꔈ
Use the remote control within the specified range (within 10 m).
You may experience communication failures when using the device outside the coverage area or if there are
obstacles within the coverage area.
ꔈ
You may experience communication failures depending on the accessories.
Devices such as a microwave oven and wireless LAN operate in the same frequency band (2.4 GHz) as the
Magic Remote. This may cause communication failures.
ꔈ
The Magic Remote may not work properly if a wireless router (AP) is within 1 m of the TV. Your wireless
router should be more than 1 m away from the TV.
ꔈ
Do not disassemble or heat the batteries.
ꔈ
Do not drop the battery. Avoid extreme shocks to the battery.
ꔈ
Inserting a battery in the wrong way may result in explosion.

8
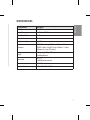
SPECIFICATIONS
CATEGORIES DETAILS
Model No. AN-MR650
Range of frequency 2.400 GHz to 2.4835 GHz
Output Power (Max.) 10 dBm
Channel 79 channels
Reception sensitivity -89.5 dBm
Dimensions (mm)
Width 48.3 x Length 183.5 x Thickness 33.7
(tolerance of ± 1 mm)
Weight
101.7 g ± 8 g
(excluding batteries)
Power source
AA 1.5 V,
2 alkaline batteries are used
Power consumption 300 mW
Operational temperature
range
0 °C to 60 °C
TABLE OF CONTENTS
ACCESSORIES 2
BATTERY 2
1. Installing Batteries 2
2. Precautions 2
REMOTE DESCRIPTION 3
USING 6
1. How to register or deregister 6
2. How to use 7
PRECAUTIONS TO TAKE 7
SPECIFICATIONS 8


www.lg.com
P/NO : MFL69375602 (1601-REV00)
AN-MR650
ENGLISH / FRANÇAIS / ESPAÑOL
QUICK START GUIDE
Magic Remote

2
• Contentsinthismanualmaybechangedwithoutpriornoticeduetoupgradeofproductfunctions.
• Completeinstructionsareincludedintheowner’smanual.
ACCESSORIES
(Dependingoncountry)
-
MagicRemoteandAlkalineBatteries(AA)
-
Owner’smanual
INSTALLING BATTERIES
• Pleasereadthismanualcarefully.
• Pressthetopofthebatterycover,slideitback,andliftthecover
asshownbelow.
• Toreplacebatteries,openthebatterycover,replacealkaline
batteries(1.5V,AA)matching
and endstothelabelinside
thecompartment,andclosethebatterycover.Besuretopoint
theremotecontrolattheremotecontrolsensorontheTV.
• Toremovethebatteries,performtheinstallationactionsin
reverse.Don’tmixoldorusedbatterieswithnewones.Closethe
coversecurely.
• Open the battery cover to find the label.
WARNING: ThisproductcontainschemicalsknowntotheStateofCaliforniatocausecancerandbirth
defectsorotherreproductiveharm.
Wash hands after handling
REMOTE DESCRIPTION
• Theremotecontrolimageshownmaydifferfromtheactualproduct.
• Theorderofdescriptionmaydifferfromtheactualproduct.
• Somebuttonsarenotavailableforallmodels.
(POWER)
WHEEL (OK)
(up/down/left/right)
Number buttons
Alphabet buttons
(Space)
(DASH)
(Screen remote)
(INPUT)
(MUTE)
(Q. Settings)
Coloured buttons
Control buttons ( )
(SEARCH)
(TELETEXT buttons)
(Voice recognition) *
(HOME)
*Tousethebutton,pressandholdformorethan3seconds.

3
ENGLISH
• Contentsinthismanualmaybechangedwithoutpriornoticeduetoupgradeofproductfunctions.
• Completeinstructionsareincludedintheowner’smanual.
ACCESSORIES
(Dependingoncountry)
-
MagicRemoteandAlkalineBatteries(AA)
-
Owner’smanual
INSTALLING BATTERIES
• Pleasereadthismanualcarefully.
• Pressthetopofthebatterycover,slideitback,andliftthecover
asshownbelow.
• Toreplacebatteries,openthebatterycover,replacealkaline
batteries(1.5V,AA)matching
and endstothelabelinside
thecompartment,andclosethebatterycover.Besuretopoint
theremotecontrolattheremotecontrolsensorontheTV.
• Toremovethebatteries,performtheinstallationactionsin
reverse.Don’tmixoldorusedbatterieswithnewones.Closethe
coversecurely.
• Open the battery cover to find the label.
WARNING: ThisproductcontainschemicalsknowntotheStateofCaliforniatocausecancerandbirth
defectsorotherreproductiveharm.
Wash hands after handling
REMOTE DESCRIPTION
• Theremotecontrolimageshownmaydifferfromtheactualproduct.
• Theorderofdescriptionmaydifferfromtheactualproduct.
• Somebuttonsarenotavailableforallmodels.
(POWER)
WHEEL (OK)
(up/down/left/right)
Number buttons
Alphabet buttons
(Space)
(DASH)
(Screen remote)
(INPUT)
(MUTE)
(Q. Settings)
Coloured buttons
Control buttons ( )
(SEARCH)
(TELETEXT buttons)
(Voice recognition) *
(HOME)
*Tousethebutton,pressandholdformorethan3seconds.

4
USING
1. How to register (pair) or deregister (unpair)
How to register (pair) the Magic Remote
TousetheMagicRemote,rstpairitwithyourTV.
1. PutbatteriesintotheMagicRemoteandturntheTVon.
2. PointtheMagicRemoteatyourTVandpressthe
WHEEL (OK)ontheremotecontrol.
-
IftheTVfailstoregistertheMagicRemote,tryagainafter
turningtheTVoffandbackon.
How to deregister (unpair) the Magic Remote
Pressandholdthe (HOME)and buttonsatthe
sametimeforveseconds,tounpairtheMagicRemote
withyourTV.
• Pressingandholdingthe
buttonwillletyoucancel
andre-registerMagicRemoteatonce.

5
ENGLISH
USING
1. How to register (pair) or deregister (unpair)
How to register (pair) the Magic Remote
TousetheMagicRemote,rstpairitwithyourTV.
1. PutbatteriesintotheMagicRemoteandturntheTVon.
2. PointtheMagicRemoteatyourTVandpressthe
WHEEL (OK)ontheremotecontrol.
-
IftheTVfailstoregistertheMagicRemote,tryagainafter
turningtheTVoffandbackon.
How to deregister (unpair) the Magic Remote
Pressandholdthe (HOME)and buttonsatthe
sametimeforveseconds,tounpairtheMagicRemote
withyourTV.
• Pressingandholdingthe
buttonwillletyoucancel
andre-registerMagicRemoteatonce.

6
2. How to use
• ShaketheMagicRemoteslightlytotherightandleftor
press (HOME), (INPUT), buttonstomakethe
pointerappearonthescreen.
(InsomeTVmodels,thepointerwillappearwhenyou
turnthe
WHEEL (OK)button.)
• Ifthepointerhasnotbeenusedforacertainperiodof
timeorMagicRemoteisplacedonaflatsurface,thenthe
pointerwilldisappear.
• Ifthepointerisnotrespondingsmoothly,youcanreset
thepointerbymovingittotheedgeofthescreen.
• TheMagicRemotedepletesbatteriesfasterthana
normalremoteduetotheadditionalfeatures.
SPECIFICATIONS
CATEGORIES DETAILS
ModelNo. AN-MR650
Rangeoffrequency 2.4GHzto2.4835GHz
OutputPower(Max.) 10dBm
Channel 79channels
Receptionsensitivity -89.5dBm
Dimensions
Width48.3mmxLength183.5mmxThickness33.7mm
(Width1.9inchesxLength7.2inchesxThickness1.3inches)
(toleranceof±1mm(0.03inches))
Weight
101.7g±8g(0.2lbs±0.01lbs)
(excludingbatteries)
Powersource
AA1.5V,
2alkalinebatteriesareused
Powerconsumption 300mW
Operationaltemperaturerange 0°Cto60°C(32°Fto140°F)

7
ENGLISH
2. How to use
• ShaketheMagicRemoteslightlytotherightandleftor
press (HOME), (INPUT), buttonstomakethe
pointerappearonthescreen.
(InsomeTVmodels,thepointerwillappearwhenyou
turnthe
WHEEL (OK)button.)
• Ifthepointerhasnotbeenusedforacertainperiodof
timeorMagicRemoteisplacedonaflatsurface,thenthe
pointerwilldisappear.
• Ifthepointerisnotrespondingsmoothly,youcanreset
thepointerbymovingittotheedgeofthescreen.
• TheMagicRemotedepletesbatteriesfasterthana
normalremoteduetotheadditionalfeatures.
SPECIFICATIONS
CATEGORIES DETAILS
ModelNo. AN-MR650
Rangeoffrequency 2.4GHzto2.4835GHz
OutputPower(Max.) 10dBm
Channel 79channels
Receptionsensitivity -89.5dBm
Dimensions
Width48.3mmxLength183.5mmxThickness33.7mm
(Width1.9inchesxLength7.2inchesxThickness1.3inches)
(toleranceof±1mm(0.03inches))
Weight
101.7g±8g(0.2lbs±0.01lbs)
(excludingbatteries)
Powersource
AA1.5V,
2alkalinebatteriesareused
Powerconsumption 300mW
Operationaltemperaturerange 0°Cto60°C(32°Fto140°F)

8
• Lecontenuduprésentmanuelpeutêtremodifiésanspréavispourrefléterlamiseàniveaudesfonctions
duproduit.
• Pourdeplusamplesrenseignements,reportez-vousaumanueld’utilisation.
ACCESSOIRES
(Selonlepays.)
-
TélécommandeMagicetpilesalcalines(AA)
-
Manueld'utilisation
INSERTION DES PILES
• Veuillezlireattentivementlemanuel.
• Appuyezsurledessusducouvercleducompartimentdespiles,
faites-leglisseretsoulevez-lecommesurl'illustrationci-contre.
• Pourchangerlespiles,ouvrezlecouvercledeleurcompartiment
etinsérezdespilesalcalines(AAde1,5volt)enfaisant
correspondreleursbornes
et auxindicationsdel'étiquette
àl'intérieurducompartiment,puisremettezlecouvercleen
place.Assurez-vousd'orienterlatélécommandeverslecapteur
detélécommandedutéléviseur.
• Pourretirerlespiles,suivezleprocessusci-dessusdansl'ordre
inverse.Nemélangezpasdevieillespilesoudespilesusagéeset
despilesneuves.Fermezsoigneusementlecouvercle.
• Ouvrez le couvercle des piles pour voir l'étiquette.
DESCRIPTION DE LA TÉLÉCOMMANDE
• L'illustrationdelatélécommandepeutdifférerduproduitréel.
• L’ordredeladescriptionpeutdifférerdevotreproduit.
• Certainestouchesnefigurentpassurtouslesmodèles.
(ALIMENTATION)
MOLETTE (OK)
(haut/bas/gauche/droite)
Touches numérotées
Touches alphabétiques
(Espace)
(TIRET)
(Télécommande de l’écran)
(SOURCE)
(SOURDINE)
(Paramètres rapides)
Touches colorées
Touches de contrôle ( )
(RECHERCHER)
(Touches TÉLÉTEXTE)
(Reconnaissance vocale) *
(ACCUEIL)
*Pourutiliserlatouche,maintenez-laenfoncéependantplusdetroissecondes.

9
FRANÇAIS
• Lecontenuduprésentmanuelpeutêtremodifiésanspréavispourrefléterlamiseàniveaudesfonctions
duproduit.
• Pourdeplusamplesrenseignements,reportez-vousaumanueld’utilisation.
ACCESSOIRES
(Selonlepays.)
-
TélécommandeMagicetpilesalcalines(AA)
-
Manueld'utilisation
INSERTION DES PILES
• Veuillezlireattentivementlemanuel.
• Appuyezsurledessusducouvercleducompartimentdespiles,
faites-leglisseretsoulevez-lecommesurl'illustrationci-contre.
• Pourchangerlespiles,ouvrezlecouvercledeleurcompartiment
etinsérezdespilesalcalines(AAde1,5volt)enfaisant
correspondreleursbornes
et auxindicationsdel'étiquette
àl'intérieurducompartiment,puisremettezlecouvercleen
place.Assurez-vousd'orienterlatélécommandeverslecapteur
detélécommandedutéléviseur.
• Pourretirerlespiles,suivezleprocessusci-dessusdansl'ordre
inverse.Nemélangezpasdevieillespilesoudespilesusagéeset
despilesneuves.Fermezsoigneusementlecouvercle.
• Ouvrez le couvercle des piles pour voir l'étiquette.
DESCRIPTION DE LA TÉLÉCOMMANDE
• L'illustrationdelatélécommandepeutdifférerduproduitréel.
• L’ordredeladescriptionpeutdifférerdevotreproduit.
• Certainestouchesnefigurentpassurtouslesmodèles.
(ALIMENTATION)
MOLETTE (OK)
(haut/bas/gauche/droite)
Touches numérotées
Touches alphabétiques
(Espace)
(TIRET)
(Télécommande de l’écran)
(SOURCE)
(SOURDINE)
(Paramètres rapides)
Touches colorées
Touches de contrôle ( )
(RECHERCHER)
(Touches TÉLÉTEXTE)
(Reconnaissance vocale) *
(ACCUEIL)
*Pourutiliserlatouche,maintenez-laenfoncéependantplusdetroissecondes.

10
UTILISATION
1. Enregistrement et annulation de l’enregistrement (association)
Enregistrement de la télécommandeMagic
AvantdepouvoirutiliserlatélécommandeMagic,vousdevez
l'associeràvotretéléviseur.
1. InsérezdespilesdanslatélécommandeMagicetallumez
letéléviseur.
2. PointezlatélécommandeMagicversvotretéléviseuret
appuyezsur
MOLETTE (OK)surlatélécommande.
-
Siletéléviseurn'arrivepasàenregistrerla
télécommandeMagic,éteignez-leetrallumez-le,puis
réessayez.
Annulation de l'enregistrement de la télécommandeMagic
Appuyezsimultanémentsurlestouches
(ACCUEIL)et pendantcinqsecondespour
annulerl'associationentrevotretéléviseuretla
télécommandeMagic.
• Maintenirlatouche
enfoncéevouspermet
d'annulerl'opérationetd'enregistrerdenouveaula
télécommandeMagic.
2. Utilisation
• RemuezdoucementlatélécommandeMagicdegaucheà
droiteouappuyezsurlestouches (ACCUEIL),
(SOURCE)ou pourafficherlepointeuràl'écran.
(Pourcertainsmodèlesdetéléviseurs,lepointeur
apparaîtlorsquevoustournezlebouton
MOLETTE
(OK).)
• Sivousn'avezpasutilisélepointeurdepuisuncertain
tempsousilatélécommandeMagicestposéesurune
surfaceplane,lepointeurdisparaîtra.
• Silepointeurnerépondpascorrectement,vouspouvezle
réinitialiserenleplaçantauborddel'écran.
• LespilesdelatélécommandeMagicsedéchargentplus
rapidementquecellesd'unetélécommandenormaleen
raisondesesfonctionssupplémentaires.

11
FRANÇAIS
UTILISATION
1. Enregistrement et annulation de l’enregistrement (association)
Enregistrement de la télécommandeMagic
AvantdepouvoirutiliserlatélécommandeMagic,vousdevez
l'associeràvotretéléviseur.
1. InsérezdespilesdanslatélécommandeMagicetallumez
letéléviseur.
2. PointezlatélécommandeMagicversvotretéléviseuret
appuyezsur
MOLETTE (OK)surlatélécommande.
-
Siletéléviseurn'arrivepasàenregistrerla
télécommandeMagic,éteignez-leetrallumez-le,puis
réessayez.
Annulation de l'enregistrement de la télécommandeMagic
Appuyezsimultanémentsurlestouches
(ACCUEIL)et pendantcinqsecondespour
annulerl'associationentrevotretéléviseuretla
télécommandeMagic.
• Maintenirlatouche
enfoncéevouspermet
d'annulerl'opérationetd'enregistrerdenouveaula
télécommandeMagic.
2. Utilisation
• RemuezdoucementlatélécommandeMagicdegaucheà
droiteouappuyezsurlestouches (ACCUEIL),
(SOURCE)ou pourafficherlepointeuràl'écran.
(Pourcertainsmodèlesdetéléviseurs,lepointeur
apparaîtlorsquevoustournezlebouton
MOLETTE
(OK).)
• Sivousn'avezpasutilisélepointeurdepuisuncertain
tempsousilatélécommandeMagicestposéesurune
surfaceplane,lepointeurdisparaîtra.
• Silepointeurnerépondpascorrectement,vouspouvezle
réinitialiserenleplaçantauborddel'écran.
• LespilesdelatélécommandeMagicsedéchargentplus
rapidementquecellesd'unetélécommandenormaleen
raisondesesfonctionssupplémentaires.
La pagina si sta caricando...
La pagina si sta caricando...
La pagina si sta caricando...
La pagina si sta caricando...
La pagina si sta caricando...
La pagina si sta caricando...
La pagina si sta caricando...
La pagina si sta caricando...
La pagina si sta caricando...
La pagina si sta caricando...
La pagina si sta caricando...
La pagina si sta caricando...
La pagina si sta caricando...
La pagina si sta caricando...
La pagina si sta caricando...
La pagina si sta caricando...
La pagina si sta caricando...
La pagina si sta caricando...
La pagina si sta caricando...
La pagina si sta caricando...
La pagina si sta caricando...
La pagina si sta caricando...
La pagina si sta caricando...
La pagina si sta caricando...
La pagina si sta caricando...
La pagina si sta caricando...
La pagina si sta caricando...
La pagina si sta caricando...
La pagina si sta caricando...
-
 1
1
-
 2
2
-
 3
3
-
 4
4
-
 5
5
-
 6
6
-
 7
7
-
 8
8
-
 9
9
-
 10
10
-
 11
11
-
 12
12
-
 13
13
-
 14
14
-
 15
15
-
 16
16
-
 17
17
-
 18
18
-
 19
19
-
 20
20
-
 21
21
-
 22
22
-
 23
23
-
 24
24
-
 25
25
-
 26
26
-
 27
27
-
 28
28
-
 29
29
-
 30
30
-
 31
31
-
 32
32
-
 33
33
-
 34
34
-
 35
35
-
 36
36
-
 37
37
-
 38
38
-
 39
39
-
 40
40
-
 41
41
-
 42
42
-
 43
43
-
 44
44
-
 45
45
-
 46
46
-
 47
47
-
 48
48
-
 49
49


in altre lingue
Documenti correlati
-
LG AN-GR700 Manuale del proprietario
-
LG LEC-005 Manuale del proprietario
-
LG AN-MR650 Manuale utente
-
-
-
LG LG ART52 Manuale utente
-
-
-
-
LG MR20GA Manuale del proprietario