TFA 60.2028.01 Manuale utente
- Categoria
- Orologi da tavolo
- Tipo
- Manuale utente
Questo manuale è adatto anche per

Bedienungsanleitung
Instruction manual
Mode d’emploi
Instrucciones de uso
Gebruiksaanwijzing
Istruzioni per l'uso
Kat. Nr. 60.2028.01
TFA_No. 60.2028_Anleitung_06_20 05.06.2020 11:13 Uhr Seite 1

32
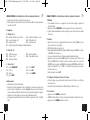
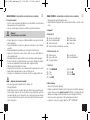
Fig. 1 Fig. 2
A 4
A 2 A 3 B 1
A 1
A 5 B 2 B 3 B 4A 6A 7
TFA_No. 60.2028_Anleitung_06_20 05.06.2020 11:13 Uhr Seite 2

4
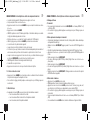
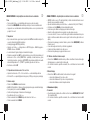
Fig. 3
C 1
C 6C 2 C 3 C 5C 4
C 7
B 4B 5 B 5
5
CHARGE-IT WIRELESS – Digitalwecker mit kabelloser Ladestation
Vielen Dank, dass Sie sich für dieses Gerät aus dem Hause TFA entschieden haben.
1. Bevor Sie mit dem Gerät arbeiten
• Lesen Sie sich bitte die Bedienungsanleitung genau durch.
So werden Sie mit Ihrem neuen Gerät vertraut, lernen alle Funktionen und Bestandteile kennen,
erfahren wichtige Details für die Inbetriebnahme und den Umgang mit dem Gerät und erhalten
Tipps für den Störungsfall.
• Durch die Beachtung der Bedienungsanleitung vermeiden Sie auch Beschädigungen des
Gerätes und die Gefährdung Ihrer gesetzlichen Mängelrechte durch Fehlgebrauch.
• Ebenso haften wir nicht für inkorrekte Messwerte und Folgen, die sich aus solchen ergeben
können.
• Für Schäden, die aus Nichtbeachtung dieser Bedienungsanleitung verursacht werden, über-
nehmen wir keine Haftung.
• Beachten Sie besonders die Sicherheitshinweise!
• Bewahren Sie diese Bedienungsanleitung gut auf!
2. Lieferumfang
• Digitaler Wecker
• Netzteil
• Bedienungsanleitung
3. Einsatzbereich und alle Vorteile Ihres neuen Gerätes auf einen Blick
• Induktive Ladestation (gemäß Qi-Standard) und USB-Ladefunktion für Mobilgeräte
• Farbdisplay mit 4 Helligkeitsstufen und automatischer Dimmfunktion
• Anzeige von Uhrzeit, Datum mit ausgeschriebenem Wochentag und Raumtemperatur
• Weckalarm mit ansteigendem Alarmton
• Snooze-Funktion mit einstellbarer Dauer (5 bis 120 Minuten)
• Stimmungslicht mit automatischem Farbwechsel oder direkter Farbwahl (Rot, Gelb, Grün, Cyan,
Dunkelblau, Lila, Weiß) in 4 Helligkeitsstufen
• Rutschfester Stand durch 4 Gummipads
TFA_No. 60.2028_Anleitung_06_20 05.06.2020 11:13 Uhr Seite 3

76
CHARGE-IT WIRELESS – Digitalwecker mit kabelloser Ladestation
4. Zu Ihrer Sicherheit
• Das Produkt ist ausschließlich für den oben beschriebenen Einsatzbereich geeignet. Verwenden
Sie das Produkt nicht anders, als in dieser Anleitung dargestellt wird.
• Das eigenmächtige Reparieren, Umbauen oder Verändern des Gerätes ist nicht gestattet.
Vorsicht!
Lebensgefahr durch Stromschlag!
• Schließen Sie das Gerät nur an eine vorschriftsmäßig installierte Steckdose mit einer geeigneten
Netzspannung an (siehe Typenschild).
• Die Steckdose muss nahe der Einrichtung angebracht und leicht zugänglich sein.
• Ziehen Sie sofort den Stecker aus der Steckdose, wenn eine Störung auftritt.
• Das Gerät und das Netzteil dürfen nicht mit Wasser oder Feuchtigkeit in Kontakt kommen. Nur
für den Betrieb in trockenen Innenräumen geeignet.
• Benutzen Sie das Gerät nicht, wenn Gehäuse oder Netzteil beschädigt sind.
• Bewahren Sie das Gerät außerhalb der Reichweite von Personen (auch Kindern) auf, die mögli-
che Gefahren im Umgang mit elektrischen Geräten nicht richtig einschätzen können.
• Verwenden Sie ausschließlich das mitgelieferte Netzteil.
•
Verbinden Sie erst das Kabel mit dem Gerät und stecken Sie dann den Netzstecker in die Steckdose.
• Ziehen Sie den Netzstecker nicht am Kabel aus der Steckdose.
• Verlegen Sie das Netzkabel so, dass es nicht mit scharfkantigen oder heißen Gegenständen in
Berührung kommt.
Wichtige Hinweise zur Produktsicherheit!
• Setzen Sie das Gerät keinen extremen Temperaturen, Vibrationen und Erschütterungen aus.
• Vor Feuchtigkeit schützen.
• Schützen Sie das Gerät beim Aufladen vor Überhitzung und sorgen Sie für ausreichende Belüf-
tung. Stellen Sie sicher, dass das Gerät auf einer harten, sauberen Oberfläche steht. Stellen Sie
das Gerät nicht auf Stoff, Teppich, Papier oder andere Gegenstände, die den Luftstrom behin-
dern könnten. Entfernen Sie Staub oder andere Hindernisse aus den Lüftungsschlitzen an der
Unterseite des Gerätes.
CHARGE-IT WIRELESS – Digitalwecker mit kabelloser Ladestation
• Legen Sie keine anderen Gegenstände auf das Ladepad.
• Wenden Sie beim Anschluss des USB-Steckers keine Gewalt an. Ein USB-Stecker passt nur in
einer Orientierung in den USB-Port.
5. Bestandteile
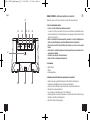
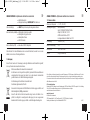
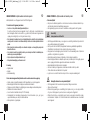
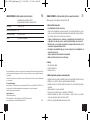
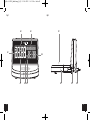
A: Display (Fig. 1):
A 1: Uhrzeit / Weckzeit A 2: Snooze-Symbol
A 3: Wochentag / Datum A 4: Temperatur / Datum
A 5: Alarmsymbol A 6: Ladekontrollleuchte
A 7: Symbol für Auto-Dimm-Funktion
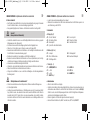
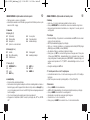
B: Gehäuse (Fig. 2+3):
B 1: Ladepad B 2: Stimmungslicht
B 3: Micro USB-Anschluss B 4: Anschluss Netzadapter
B 5: Belüftungsschlitze
C: Tasten (Fig. 3):
C 1: SNOOZE/LIGHT Taste C 2: GLOW Taste
C 3: – Taste C 4: SET Taste
C 5: + Taste C 6: ALARM Taste
C 7: RESET Knopf
6. Inbetriebnahme
• Ziehen Sie die Schutzfolie vom Display.
• Schließen Sie den Wecker mit dem beigefügten Netzteil an. Stecken Sie den Anschlussstecker in
den Anschluss und schließen Sie das Gerät mit dem Netzstecker am Stromnetz an. Wichtig!
Stellen Sie sicher, dass Ihre Netzspannung nicht mehr als 240 V beträgt! Andere Netzspannun-
gen können zur Beschädigung des Gerätes führen.
• Ein kurzer Signalton ertönt und alle Segmente werden kurz angezeigt.
• Das Gerät ist nun betriebsbereit. „HALLO” erscheint, dann „ZEIT” und „EINGEBEN”
TFA_No. 60.2028_Anleitung_06_20 05.06.2020 11:13 Uhr Seite 4

98
CHARGE-IT WIRELESS – Digitalwecker mit kabelloser Ladestation
7. Bedienung
• Halten Sie im Einstellmodus die + oder – Taste gedrückt, gelangen Sie in den Schnelllauf.
• Drücken Sie die SNOOZE/LIGHT Taste im Einstellmodus, um in den Normalmodus zurückzukehren.
• Wird 10 Sekunden lang keine Taste betätigt, wird der Einstellmodus automatisch verlassen.
7.1 Einstellungen
• Gleich nach der Inbetriebnahme oder wenn Sie die SET Taste im Normalmodus für drei Sekun-
den gedrückt halten, gelangen Sie in den Einstellmodus.
• DEUTSCH (Voreinstellung) blinkt im Display.
• Mit der + oder – Taste können Sie die Spracheinstellung für die Wochentage einstellen:
Deutsch – DEUTSCH, Englisch - ENGLISH, Spanisch – ESPANOL und Französisch – FRANCAIS.
• Haben Sie Deutsch ausgewählt, erscheint die Anzeige nun auf Deutsch.
• Drücken Sie die SET Taste noch einmal und Sie können nun nacheinander das 12- oder 24-
Stunden-Zeitsystem (Voreinstellung FORMAT 24 Hr), die Stunden, die Minuten, das Jahr, den
Monat, das Datum, das Datumsformat DATUM/MONAT oder MONAT/DATUM (Voreinstellung:
DATUM/MONAT) und die Temperatureinheit °C oder °F (Voreinstellung TEMP °C) ansteuern und
mit der + oder – Taste einstellen.
• Bestätigen Sie die Eingaben mit der SET Taste.
7.1.1 Einstellung des 24- oder 12- Stunden-Formats
• Im Einstellungsmodus können Sie mit der + oder – Taste zwischen dem 24 Stunden oder 12
Stunden-Format auswählen.
• Im 12-h-Format erscheint AM (vormittags) und PM (nachmittags) auf dem Display.
7.2 Alarmfunktion
• Drücken Sie die
ALARM
Taste im Normalmodus.
• ALARM und 6:30 Uhr (Voreinstellung) oder die zuletzt eingestellte Alarmzeit erscheinen auf dem
Display.
• Halten Sie die
ALARM
Taste für 3 Sekunden gedrückt.
• Das Alarmsymbol erscheint und die Stundenanzeige fängt an zu blinken.
• Sie können mit der
+ oder –
Taste die Stunden einstellen.
CHARGE-IT WIRELESS – Digitalwecker mit kabelloser Ladestation
• Drücken Sie die
ALARM
Taste noch einmal und Sie können nun die Minuten mit der
+ oder –
Taste
einstellen.
• Drücken Sie die
ALARM
Taste noch einmal.
• SNOOZE, das Snooze-Symbol und 10 Minuten (Voreinstellung) oder die zuletzt eingestellte Snoo-
ze-Dauer erscheinen auf dem Display.
• Stellen Sie mit der
+ oder –
Taste in 5er-Schritten die gewünschte Zeitdauer (5 bis 120 Minuten)
ein.
• Bestätigen Sie die Eingabe mit der
ALARM
Taste, um zur aktuellen Uhrzeit zurückzukehren.
• Das Alarmsymbol erscheint im Display und der Alarm ist aktiviert.
• Wenn die eingestellte Weckzeit erreicht ist, beginnt der Wecker zu klingeln.
• Wird der Alarm nicht unterbrochen, schaltet sich der ansteigende Weckton automatisch nach zwei
Minuten aus und aktiviert sich erneut zur gleichen Weckzeit wieder. Das Alarmsymbol bleibt im
Display stehen.
• Drücken Sie auf eine beliebige Taste, um den Alarmton auszuschalten oder drücken Sie die
SNOO-
ZE/ LIGHT
Taste, um die Snooze-Funktion zu aktivieren.
• SNOOZE erscheint und der Alarmton wird für die eingestellte Dauer unterbrochen.
• Die Zeitanzeige zählt die Minuten rückwärts.
• Drücken Sie eine beliebige Taste, um die Snooze-Funktion auszuschalten.
7.2.1 Alarm aktivieren oder deaktivieren
• Drücken Sie die ALARM Taste im Normalmodus, um die Alarmfunktion zu aktivieren oder zu
deaktivieren. Das Alarmsymbol erscheint oder verschwindet im Display.
• Um die Eingabe zu bestätigen, warten Sie kurz, bis die Anzeige wieder in den Normalmodus
zurückkehrt.
7.3 Displaymodus
• Schalten Sie im Normalmodus mit der SET Taste zwischen folgenden Anzeigen um:
• Ausgeschriebener Wochentag und Datum
• Ausgeschriebener Wochentag und Raumtemperatur
• Wochentag mit Datum und Raumtemperatur
TFA_No. 60.2028_Anleitung_06_20 05.06.2020 11:13 Uhr Seite 5

1110
CHARGE-IT WIRELESS – Digitalwecker mit kabelloser Ladestation
8. Displaybeleuchtung
8.1 Helligkeit
• Sie können mit der SNOOZE/LIGHT Taste die Helligkeit in 4 Stufen (LICHT 1-4) einstellen oder
ausschalten (AUS).
• Um die Eingabe zu bestätigen, warten Sie kurz, bis die Anzeige wieder in den Normalmodus
zurückkehrt.
8.2 Modus automatische Dimmfunktion
• Ist die automatische Dimmfunktion aktiviert, schaltet sich für den eingestellten Zeitraum auto-
matisch die schwache Displaybeleuchtung an.
•
Halten Sie die SNOOZE/LIGHT Taste für 2 Sekunden gedrückt. AUTO DIM erscheint auf dem Display.
• Standardgemäß ist die automatische Dimmfunktion deaktiviert. AUS blinkt auf dem Display.
• Drücken Sie die + oder – Taste, um die Funktion zu aktivieren (AN). Das AUTO DIM Symbol
erscheint auf dem Display.
• Bestätigen Sie mit der SNOOZE/LIGHT Taste.
• Die Startzeit blinkt (Voreinstellung START 22:00). Stellen Sie mit der + oder – Taste die Uhrzeit
(volle Stunden) ein.
• Bestätigen Sie mit der SNOOZE/LIGHT Taste.
• Die Endzeit blinkt (Voreinstellung HALT 6:00). Stellen Sie mit der + oder – Taste die Uhrzeit
(volle Stunden) ein.
• Bestätigen Sie die Eingaben mit der SNOOZE/LIGHT Taste. Die Anzeige kehrt wieder in den Nor-
malmodus zurück und das AUTO DIM Symbol bleibt stehen.
8.3 Stimmungslicht-Modus
• Drücken Sie die GLOW Taste im Normalmodus.
• ROT erscheint im Display und das Stimmungslicht leuchtet Rot.
• Drücken Sie die GLOW Taste noch einmal und Sie können nun nacheinander zwischen 7 Farben
(ROT, GELB, GRÜN, CYAN, DUNKELBLAU, LILA, WEISS) oder ständigem Farbwechsel (WECH-
SEL) wählen.
• Um die Eingabe zu bestätigen, warten Sie kurz, bis die Anzeige wieder in den Normalmodus
zurückkehrt.
CHARGE-IT WIRELESS – Digitalwecker mit kabelloser Ladestation
• Sie können mit der + oder – Taste die Helligkeit in 4 Stufen (LICHT 1-4) einstellen oder aus-
schalten (AUS).
• Halten Sie die GLOW Taste gedrückt, wird das Stimmungslicht ebenfalls ausgeschaltet.
9. Ladefunktion
9.1 Induktives Aufladen Ihres Mobiltelefons (gemäß Qi-Standard)
• Legen Sie Ihr Mobiltelefon auf die Plattform. Ihr Telefon sollte bündig und zentriert auf der Flä-
che aufliegen.
• Die blaue Ladekontrollleuchte erscheint mittig unter dem Display, wenn Ihr Mobiltelefon erfolg-
reich aufgeladen wird.
• Das Licht blinkt langsam, wenn Ihr Gerät nicht richtig positioniert ist oder wenn Ihr Gerät nicht
kompatibel mit dem Qi-Standard ist. Entfernen Sie eventuell Ihre Handyhülle.
• Die Kompatibilität kann je nach Telefonmodell variieren. Einzelheiten entnehmen Sie bitte dem
Handbuch Ihres Telefons.
9.2 Aufladen über USB
• Dieses Produkt verfügt auch über einen USB-Ladeanschluss für Geräte, die kein kabelloses
Laden unterstützen.
• Stecken Sie ein USB-Kabel (nicht inklusive) in den USB-Port des Weckers und verbinden Sie
das andere Ende mit Ihrem Mobilgerät. Stellen Sie sicher, dass die Ladestärke für Ihr mobiles
Gerät geeignet ist.
10. Pflege und Wartung
• Reinigen Sie das Gerät mit einem weichen, leicht feuchten Tuch. Keine Scheuer- oder Lösungs-
mittel verwenden!
• Ziehen Sie den Netzstecker, wenn Sie das Gerät längere Zeit nicht verwenden.
• Bewahren Sie Ihr Gerät an einem trockenen Platz auf.
11. Fehlerbeseitigung
Problem Lösung
Keine Anzeige ➜ Gerät mit Netzteil anschließen
TFA_No. 60.2028_Anleitung_06_20 05.06.2020 11:13 Uhr Seite 6

1312
CHARGE-IT WIRELESS – Digitalwecker mit kabelloser Ladestation
➜ Netzteil überprüfen
➜ Displaybeleuchtung mit SNOOZE/LIGHT Taste aktivieren
Unkorrekte Anzeige ➜ RESET Knopf mit einem spitzen Gegenstand drücken
Keine Ladefunktion (induktiv) ➜ Mobilgerät ist nicht qi-kompatibel
➜ Mobilgerät richtig positionieren
➜ Handyhülle entfernen
➜ USB-Port nutzen
Keine Ladefunktion (USB) ➜ Anschluss USB-Port überprüfen
Wenn Ihr Gerät trotz dieser Maßnahmen immer noch nicht funktioniert, wenden Sie sich an den
Händler, bei dem Sie das Produkt gekauft haben.
12. Entsorgung
Dieses Produkt wurde unter Verwendung hochwertiger Materialien und Bestandteile hergestellt,
die recycelt und wiederverwendet werden können.
Batterien und Akkus dürfen keinesfalls in den Hausmüll!
Als Verbraucher sind Sie gesetzlich verpflichtet, gebrauchte Batterien und Akkus zur
umweltgerechten Entsorgung beim Handel oder entsprechenden Sammelstellen
gemäß nationalen oder lokalen Bestimmungen abzugeben.
Die Bezeichnungen für enthaltene Schwermetalle sind:
Cd=Cadmium, Hg=Quecksilber, Pb=Blei
Dieses Gerät ist entsprechend der EU-Richtlinie über die Entsorgung von Elektro- und
Elektronik-Altgeräten (WEEE) gekennzeichnet.
Dieses Produkt darf nicht mit dem Hausmüll entsorgt werden. Der Nutzer ist ver-
pflichtet, das Altgerät zur umweltgerechten Entsorgung bei einer ausgewiesenen
Annahmestelle für die Entsorgung von Elektro- und Elektronikgeräten abzugeben.
CHARGE-IT WIRELESS – Digitalwecker mit kabelloser Ladestation
13. Technische Daten
Messbereich Temperatur 0…37°C (32…99°F)
Spannungsversorgung Netzteil (inklusive)
Input: 100-240V AC 50/60Hz 0,5A Max
Output: 5,0 V DC 2,5A, 12,5 W
Ø Effizienz im Betrieb: ≥80,21%
Leistungsaufnahme bei Nulllast: ≤0,10 W
Ladeausgang 1x USB Port (1A)
Kabellose Ladeleistung 5 W
Gehäusemaße 136 x 126 x 72 mm
Gewicht 223 g (nur das Gerät)
Diese Anleitung oder Auszüge daraus dürfen nur mit Zustimmung von TFA Dostmann veröffentlicht werden. Die techni-
schen Daten entsprechen dem Stand bei Drucklegung und können ohne vorherige Benachrichtigung geändert werden.
Die neuesten technischen Daten und Informationen zu Ihrem Produkt finden Sie auf unserer Homepage unter Eingabe der
Artikel-Nummer in das Suchfeld.
EU-Konformitätserklärung
Hiermit erklärt TFA Dostmann, dass der Funkanlagentyp 60.2028 der Richtlinie 2014/53/EU entspricht. Der vollständige
Text der EU-Konformitätserklärung ist unter der folgenden Internetadresse verfügbar:
www.tfa-dostmann.de/service/downloads/ce
www.tfa-dostmann.de
E-Mail: [email protected]
TFA Dostmann GmbH & Co.KG, Zum Ottersberg 12, D-97877 Wertheim, Deutschland
Handelsregister-Nummer: Reg. Gericht Mannheim HRA 570186 06/20
TFA_No. 60.2028_Anleitung_06_20 05.06.2020 11:13 Uhr Seite 7

1514
CHARGE-IT WIRELESS – Wireless charging alarm clock
Thank you for choosing this instrument from TFA.
1. Before you use this product
• Please make sure you read the instruction manual carefully.
This information will help you to familiarize yourself with your new device, to learn all of its
functions and parts, to find out important details about its first use and how to operate it and to
get advice in the event of a malfunction.
• Following and respecting the instructions in your manual will prevent damage to your instru-
ment and loss of your statutory rights arising from defects due to incorrect use.
• Likewise, we take no responsibility for any incorrect readings or for any consequences
resulting from them.
• We shall not be liable for any damage occurring as a result of non-following of these instruc-
tions.
• Please take particular note of the safety advice!
• Please keep this instruction manual safe for future reference.
2. Delivery contents
• Digital alarm clock
• Power adaptor
• Instruction manual
3. Range of application and all the benefits of your new instrument at a glance
• Inductive charging station (according to Qi standard) and USB charging function for mobile
devices
• Colour display with 4 brightness levels and automatic dimming function
• Indication of time, date with weekday written in full letters and room temperature
• Alarm with rising alarm tone
• Snooze function with adjustable interval (5 to 120 minutes)
• Mood light with automatic colour change or direct colour selection (red, yellow, green, cyan,
dark blue, purple, white) in 4 brightness levels
• Non-slip stand with 4 rubber pads
CHARGE-IT WIRELESS – Wireless charging alarm clock
4. For your safety
• This product is exclusively intended for the range of application described above. It should only
be used as described within these instructions.
• Unauthorized repairs, alterations or changes to the product are prohibited.
Caution!
Risk of electrocution!
• Plug the device only into a mains socket installed within your country’s electrical safety regula-
tions and with a correct mains voltage (see nameplate).
• The mains socket must be located near the equipment and it must be easily accessible.
• Unplug the device immediately if any fault occurs.
• The device and the power adapter must not come into contact with water or moisture. Only suit-
able for indoor use.
• Do not use the device if the housing or the power adapter are damaged.
• Keep the device out of reach of persons (including children) who cannot fully appreciate the
potential risks of handling electrical equipment.
• Only use the supplied power adapter.
• Connect the lead to the device first and then plug the power adapter into the socket.
• Do not pull the plug out of the socket by its cable.
• Route the mains cable so it does not come into contact with sharp-edged or hot objects.
Important information on product safety!
• Do not expose the device to extreme temperatures, vibrations or shocks.
• Protect it from moisture!
• Protect the device from overheating when charging and provide sufficient ventilation. Make sure
that the device is placed on a solid, clean surface. Do not place the device on cloth, carpet,
paper or other objects that could obstruct the ventilation. Remove dust or other obstacles from
the ventilation slots on the bottom of the unit.
• Do not place any other objects on the charging pad.
• Do not apply excessive force when connecting a USB cable. The USB plug fits only one way into
the USB port.
TFA_No. 60.2028_Anleitung_06_20 05.06.2020 11:13 Uhr Seite 8

1716
CHARGE-IT WIRELESS – Wireless charging alarm clock
5. Elements
A: Display (Fig. 1):
A 1: Time / wake up time A 2: Snooze symbol
A 3: Weekday / date A 4: Temperature / date
A 5: Alarm symbol A 6: Charging LED light
A 7: Symbol for auto-dim function
B: Housing (Fig. 2+3):
B 1: Charging pad B 2: Mood light
B 3: Micro USB port B 4: Power adaptor jack
B 5: Ventilation slots
C: Buttons (Fig. 3):
C 1: SNOOZE/LIGHT button C 2: GLOW button
C 3: – button C 4: SET button
C 5: + button C 6: ALARM button
C 7: RESET button
6. Getting started
• Remove the protective film from the display.
• Connect the attached power adapter to the alarm clock. Insert the power adapter pin into the
device jack and connect the plug to a wall socket. Important! Make sure that your household
voltage is no more than 240V! Otherwise your device may be damaged.
• The device will alert you with a beep and all segments will be displayed for a short moment.
• The device is ready for use. “HALLO” appears, then “ZEIT” and “EINGEBEN”.
7. Operation
• Press and hold the + or – button in setting mode for fast mode.
• Press the SNOOZE/LIGHT button in setting mode to return to normal mode.
• The device will automatically quit the setting mode if no button is pressed for 10 seconds.
CHARGE-IT WIRELESS – Wireless charging alarm clock
7.1 Settings
• After start-up or if you press and hold the SET button for three seconds in normal mode, you
will enter the setting mode.
• DEUTSCH (default) flashes on the display.
• Press the + or – button to set the day-of-the week language:
GERMAN – DEUTSCH, ENGLISH, SPANISH - ESPANOL and FRENCH – FRANCAIS.
• If you select English, the display will now appear in English.
• Press the SET button again to do the settings in the following sequence: the 12 - or 24 hour sys-
tem (FORMAT 24 Hr - default), the hours, the minutes, the year, the month and the date, the
month/day sequence DATE/MONTH or MONTH/DATE (DATE/MONTH - default) and the tempera-
ture unit °C or °F (TEMP °C - default). Press the + or – button to adjust it.
• Confirm the setting with the SET button.
7.1.1 24- or 12-hour system setting
• Press the + or – button in setting mode to choose the 12 HR or 24 HR system.
• In the 12-HR system AM (before noon) or PM (after noon) appears on the display.
7.2 Alarm function
• Press the
ALARM
button in normal mode.
• ALARM, 6:30 (default) or the last adjusted alarm time appear on the display.
• Press and hold the
ALARM
button for 3 seconds.
• The alarm symbol appears and the hour digit flashes.
• Press the
+ or –
button to adjust the hours.
• Press the
ALARM
button again and you can adjust the minutes with the
+ or –
button.
• Press the
ALARM
button again.
• SNOOZE, the snooze symbol and 10 min. (default) or the last adjusted snooze interval appear on
the display.
• Press the
+ or –
button to set the desired time duration – it adds 5 minutes at a time (5 to 120 min-
utes).
• Confirm the setting with the
ALARM
button and return to normal mode.
• The alarm symbol will appear on the display and the alarm is activated.
• When the adjusted alarm time is reached, the alarm rings.
TFA_No. 60.2028_Anleitung_06_20 05.06.2020 11:13 Uhr Seite 9

1918
CHARGE-IT WIRELESS – Wireless charging alarm clock
• If the alarm is not stopped manually, the ascending alarm tone automatically turns off after two
minutes and the alarm will be reactivated at the same set time on the following day. The alarm
symbol remains on the display.
• Press any button to turn off the alarm sound or press the
SNOOZE/LIGHT
button to activate the
snooze function.
• SNOOZE appears and the alarm will be interrupted for the set time.
• The time display counts down the minutes.
• Press any button to stop the snooze function.
7.2.1 Activate/deactivate alarm
• Press the ALARM button in normal mode, to activate or deactivate the alarm function. The alarm
symbol appears/disappears on the display.
• Wait some seconds until the display returns to normal mode to confirm the setting.
7.3 Display mode
• Each press on the SET button in normal mode will change the display between:
• Weekday written in full letters and date
• Weekday written in full letters and room temperature
• Date and weekday and room temperature
8. Display light
8.1 Brightness
• Press the SNOOZE/LIGHT button to adjust the brightness in 4 levels (BACKLIGHT 1-4) or to
switch it off (OFF).
• Wait some seconds until the display returns to normal mode to confirm the setting.
8.2 Automatic dimming mode
• If the auto-dim mode is activated, the weak backlight turns on automatically for the set time.
• Press and hold the SNOOZE/LIGHT button for 2 seconds. AUTO DIM appears on the display.
• By default, the automatic dimming function is disabled. OFF flashes on the display.
• To activate the function, press the + or – button (ON). The AUTO DIM symbol appears on the
display.
CHARGE-IT WIRELESS – Wireless charging alarm clock
• Confirm with the SNOOZE/LIGHT button.
• The start time flashes (START 10:00 PM default) Press the + or – button to set the time (full
hours).
• Confirm with the SNOOZE/LIGHT button.
• The end time flashes (STOP 6:00 AM default) Press the + or – button to set the time (full hours).
• Confirm the settings with the SNOOZE/LIGHT button. The display returns to normal mode and
the AUTO DIM symbol remains.
8.3 Mood light mode
• Press the GLOW button in normal mode.
• RED appears on the display and the mood light glows red.
• Press the GLOW button to choose between 7 colours (red, yellow, green, cyan, dark blue, pur-
ple, white) or continuous colour change (CYCLE).
• Wait some seconds until the display returns to normal mode to confirm the setting.
• Press the + or – button to adjust the brightness in 4 levels (LIGHT 1-4) or to switch it off (OFF).
• Pressing and holding the GLOW button will also turn off the mood light.
9. Charging function
9.1 Inductive charging of your mobile phone (according to Qi standard)
• Put your mobile phone on the platform. Your phone should sit flush and centred on the charg-
ing pad.
• The blue charging indicator light centrally below the display will be solid when your phone is
successfully charging.
• The light will flash slowly if your device is not positioned properly or if your device is not com-
patible with the wireless charging technology. You may need to remove your phone cover.
• Compatibility may vary based on phone model. Please check your phone’s manual for details.
9.2 Charging via USB
• This product also provides a USB charging port for devices that do not support wireless charg-
ing.
• Plug the USB cable (not included) into the USB port on the alarm clock and connect the other
end to your mobile device. Make sure that the charging rate is suitable for your mobile device.
TFA_No. 60.2028_Anleitung_06_20 05.06.2020 11:13 Uhr Seite 10

2120
CHARGE-IT WIRELESS – Wireless charging alarm clock
10. Care and maintenance
• Clean the instrument with a soft damp cloth. Do not use solvents or scouring agents.
• Pull out the plug of the socket if the device will not be used for an extended period of time.
• Store the device in a dry place.
11. Trouble shooting
Problem Solution
No display ➜ Connect the device to the power adapter
➜ Check the power adapter
➜ Press the SNOOZE/LIGHT button to activate the backlight
Incorrect indication ➜ Use a pin to press the RESET button
No charging function ➜ Phone is not Qi compatible
(wireless) ➜ Position the mobile device properly
➜ Remove the cover
➜ Use USB port
No charging function (USB) ➜ Check the USB port connection
If your device fails to work despite these measures, contact the retailer where you purchased the
product.
12. Waste disposal
This product has been manufactured using high-grade materials and components which can be
recycled and reused.
Never dispose of empty batteries and rechargeable batteries with ordinary household
waste.
As a consumer, you are required by law to take them to your retail store or to an
appropriate collection site depending on national or local regulations in order to pro-
tect the environment.
The symbols for the contained heavy metals are:
Cd = cadmium, Hg = mercury, Pb = lead
CHARGE-IT WIRELESS – Wireless charging alarm clock
This product is labelled in accordance with the EU Waste Electrical and Electronic
Equipment Directive (WEEE).
Please do not dispose of this product in ordinary household waste. As a consumer,
you are required to take end-of-life devices to a designated collection point for the
disposal of electrical and electronic equipment, in order to ensure environmentally-
compatible disposal.
13. Specifications
Measuring range temperature 0…37°C (32…99°F)
Power consumption: Power supply (included)
Input: 100-240V AC 50/60Hz 0.5A Max
Output: 5.0 V DC 2.5A, 12.5 W
Average active efficiency: ≥80.21%
No-load power consumption: ≤0.10 W
Charging output USB port (1A)
Wireless charger
power output 5 W
Housing dimension 136 x 126 x 72 mm
Weight 223 g (device only)
No part of this manual may be reproduced without written consent of TFA Dostmann. The technical data are correct at the
time of going to print and may change without prior notice. The latest technical data and information about this product
can be found in our homepage by simply entering the product number in the search box.
EU Declaration of conformity
Hereby, TFA Dostmann declares that the radio equipment type 60.2028 is in compliance with Directive 2014/53/EU. The
full text of the EU declaration of conformity is available at the following Internet address:
www.tfa-dostmann.de/service/downloads/ce
www.tfa-dostmann.de
E-Mail: [email protected]
TFA Dostmann GmbH & Co.KG, Zum Ottersberg 12, D-97877 Wertheim, Germany
Commercial registration number: Reg. Gericht Mannheim HRA 570186 06/20
TFA_No. 60.2028_Anleitung_06_20 05.06.2020 11:13 Uhr Seite 11

2322
CHARGE-IT WIRELESS – Réveil digital avec station de chargement à induction
Nous vous remercions d'avoir choisi l'appareil de la société TFA.
1. Avant d'utiliser votre appareil
• Veuillez lire attentivement le mode d'emploi.
Vous vous familiariserez ainsi avec votre nouvel appareil, vous découvrirez toutes les fonctions
et tous les éléments qui le composent, vous noterez les détails importants relatifs à sa mise en
service et vous lirez quelques conseils en cas de dysfonctionnement.
• En respectant ce mode d'emploi, vous éviterez d'endommager votre appareil et de perdre
vos droits légaux en cas de défaut si celui-ci résulte d’une utilisation non-conforme.
• De même, nous n’assumons aucune responsabilité pour des relevés incorrects et les consé-
quences qu’ils pourraient engendrer.
• Nous n'assumons aucune responsabilité pour des dommages qui auraient été causés par le
non-respect du présent mode d'emploi.
• Suivez bien toutes les consignes de sécurité !
• Conservez soigneusement le mode d'emploi !
2. Contenu de la livraison
• Réveil digital
• Adaptateur secteur
• Mode d'emploi
3. Aperçu du domaine d'utilisation et de tous les avantages de votre nouvel appareil
• Station de chargement à induction (compatible Qi) et fonction de chargement USB pour les
appareils mobiles
• Écran couleur avec 4 niveaux d’éclairage et ajustement automatique
• Affichage de l’heure, de la date et des jours de la semaine en toutes lettres ainsi que de la tem-
pérature ambiante
• Réveil avec volume progressif d'alarme
• Fonction de répétition avec intervalle réglable (de 5 à 120 minutes)
• Lumière d’ambiance avec changement de couleur automatique ou choix de couleur (rouge,
jaune, vert, cyan, bleu foncé, violet, blanc) dans 4 niveaux de luminosité
• Tient bien en place grâce à 4 pieds en gomme
CHARGE-IT WIRELESS – Réveil digital avec station de chargement à induction
4. Pour votre sécurité
• Le produit est destiné uniquement à l'utilisation décrite ci-dessus. N'utilisez jamais l’appareil à
d'autres fins que celles décrites dans le présent mode d'emploi.
• Vous ne devez en aucun cas réparer, démonter ou modifier l'appareil par vous-même.
Attention !
Danger de choc électrique !
• Branchez l'appareil uniquement sur une prise de courant réglementaire ayant une tension de
secteur appropriée (voir la plaque signalétique).
• La prise de courant doit être proche de l'équipement et facilement accessible.
• Retirez immédiatement la fiche de la prise en cas de défaut.
• L'appareil et l'adaptateur secteur ne doivent pas entrer en contact avec de l'eau ou de l'humidité.
Ils ne peuvent être utilisés que dans des locaux secs.
• N'utilisez pas l'appareil si le boîtier ou l'adaptateur secteur sont endommagés.
• Conservez le produit hors de la portée de personnes (enfants compris) inaptes à évaluer les ris-
ques possibles liés au maniement d'appareils électriques.
• Utilisez uniquement l'adaptateur secteur fourni.
• Commencez par brancher le cordon d'alimentation à l'appareil, branchez ensuite la fiche dans la
prise secteur.
• Pour débrancher, tirez sur la fiche et non sur le cordon d’alimentation.
• Placez le cordon d'alimentation de sorte qu'il n'entre pas en contact avec des objets tranchants
ou brûlants.
Conseils importants de sécurité du produit !
• Évitez d’exposer l’appareil à des températures extrêmes, à des vibrations ou à des chocs.
• Protégez-le contre l'humidité.
• Protégez l'appareil contre la surchauffe lors du chargement et veillez à une ventilation suffisante.
Assurez-vous que l'appareil est placé sur une surface dure et propre. Ne placez pas l'appareil sur
un chiffon, un tapis, du papier ou autres objets qui pourraient bloquer les ouvertures d'aération.
Enlevez la poussière ou des autres obstructions des ouvertures d'aération au bas de l'appareil.
TFA_No. 60.2028_Anleitung_06_20 05.06.2020 11:13 Uhr Seite 12

2524
CHARGE-IT WIRELESS – Réveil digital avec station de chargement à induction
• Ne placez aucun autre objet sur votre plateforme de charge.
• N’exercez aucune force pour brancher les fiches USB. Une fiche USB ne se branche que dans un
sens dans le port USB.
5. Composants
A : Affichage (Fig. 1) :
A 1 : Indication de l’heure / heure de réveil A 2 : Symbole de répétition « snooze »
A 3 : Jour de la semaine / date A 4 : Température / date
A 5 : Symbole de réveil A 6 : Voyant de charge
A 7 : Symbole d’ajustement automatique de l'intensité lumineuse
B : Boîtier (Fig. 2+3) :
B 1: Plateforme de charge B 2 : Lumière d’ambiance
B 3: Prise micro-USB B 4 : Prise adaptateur secteur
B 5: Ouvertures d'aération
C : Touches (Fig. 3) :
C 1 : Touche SNOOZE/LIGHT C 2 : Touche GLOW
C 3 : Touche – C 4 : Touche SET
C 5 : Touche + C 6 : Touche ALARME
C 7 : Bouton RESET
6. Mise en service
• Retirez le film de protection de l'affichage.
• Raccordez le réveil avec l’adaptateur secteur fourni. Branchez le connecteur sur la prise de l’ap-
pareil et la fiche de l'adaptateur sur le secteur. Important ! Assurez-vous que la tension de
réseau ne dépasse pas 240V. Une autre tension de réseau pourrait endommager votre appareil.
• Un signal sonore se fait entendre et tous les segments s'allument brièvement.
• Votre appareil est maintenant prêt à fonctionner. « HALLO » apparaît, puis « ZEIT » et « EINGE-
BEN ».
CHARGE-IT WIRELESS – Réveil digital avec station de chargement à induction
7. Utilisation
• Si vous maintenez la touche + ou – appuyée au cours d'un mode de réglage, vous passez en
déroulement rapide.
• Appuyez sur la touche SNOOZE/LIGHT en mode de réglage afin de repasser au mode normal.
• L'appareil quitte automatiquement le mode de réglage si aucune touche n’est pressée pendant
10 secondes.
7.1 Réglages
• Après la mise en service ou en appuyant pendant 3 secondes sur la touche SET en mode nor-
mal, vous passez en mode de réglage.
• DEUTSCH (par défaut) clignote sur l’écran.
• Réglez la langue allemande (DEUTSCH), anglaise (ENGLISH), espagnole (ESPANOL) ou françai-
se (FRANCAIS) avec la touche + ou –.
• Si vous avez sélectionné le français, l'affichage apparaîtra maintenant en français.
• Appuyez encore une fois sur la touche SET pour ajuster le système horaire de 12 heures ou de
24 heures (FORMAT 24 Hr par défaut), les heures, les minutes, l'année, le mois et la date,
DATE/MOIS (date européenne) ou MOIS/DATE (date américaine) (DATE/MOIS par défaut) et l'af-
fichage de la température °C ou °F (TEMP °C - par défaut). Vous pouvez régler ces valeurs à
l'aide de la touche + ou –.
• Validez au moyen de la touche SET.
7.1.1 Réglage de l'affichage de 12 heures et de 24 heures
• En mode de réglage, vous pouvez configurer le système horaire sur 12 heures ou sur 24 heures
avec la touche + ou –.
• En système 12 heures, AM (avant midi) ou PM (après-midi) est affiché sur l'écran.
7.2 Fonction réveil
• Appuyez sur la touche
ALARME
en mode normal.
• ALARME et 6:30 (par défaut) ou l'heure de réveil réglée précédemment sont affichés sur l'écran.
• Appuyez sur la touche
ALARME
pendant trois secondes.
TFA_No. 60.2028_Anleitung_06_20 05.06.2020 11:13 Uhr Seite 13

2726
CHARGE-IT WIRELESS – Réveil digital avec station de chargement à induction
• Le symbole de réveil apparaît et l’affichage des heures clignote sur l’écran.
• Vous pouvez ajuster l'heure avec la touche
+ ou –
.
• Appuyez une nouvelle fois sur la touche
ALARME
et vous pouvez ajuster les minutes avec la tou-
che
+ ou –
.
• Appuyez encore sur la touche
ALARME
.
• SNOOZE, le symbole de réveil et 10 minutes (par défaut) ou l’intervalle de minutes pour sommeil-
ler réglé précédemment apparaissent sur l’écran.
• Réglez avec la touche
+ ou –
par écarts de 5 la durée souhaitée (de 5 à 120 minutes).
• Validez le réglage au moyen de la touche
ALARME
pour retourner au mode normal.
• Le réveil est activé et le symbole d’alarme apparaît.
• Lorsque l'heure de réveil fixée est atteinte, le réveil se met à sonner.
• Si le réveil n'est pas coupé, l'alarme croissante s'arrêtera automatiquement après deux minutes et
sera de nouveau activé pour l'heure de réveil suivante. Le symbole de réveil reste à l'écran.
• Lorsque le réveil sonne, appuyez sur la touche de votre choix, pour éteindre l'alarme ou appuyez
sur la touche
SNOOZE/LIGHT
pour activer la fonction de répétition snooze.
• SNOOZE apparaît et l'alarme s'interrompt pendant l’intervalle réglé.
• L’écran affiche le compte à rebours.
• Appuyez sur une touche de votre choix pour éteindre la fonction de répétition.
7.2.1 Activer et désactiver le réveil
• Appuyez sur la touche ALARME en mode normal pour activer ou désactiver la fonction d'alarme.
Le symbole de réveil apparaît ou disparaît sur l'écran.
• Pour confirmer le réglage, patientez quelques secondes jusqu’à ce que l’affichage repasse en
mode normal.
7.3 Mode d'affichage
• En appuyant sur la touche SET vous pouvez choisir entre les indications suivantes :
• Jour de la semaine affiché en toutes lettres et date
• Jour de la semaine affiché en toutes lettres et température ambiante
• Jour de la semaine, date et température ambiante
CHARGE-IT WIRELESS – Réveil digital avec station de chargement à induction
8. Éclairage de l’écran
8.1 Luminosité
• Vous pouvez ajuster la luminosité avec la touche SNOOZE/LIGHT sur 4 niveaux (NIVEAU 1 à 4)
ou l'éteindre (OFF).
• Pour confirmer le réglage, patientez quelques secondes jusqu’à ce que l’affichage repasse en
mode normal.
8.2 Mode ajustement automatique de la luminosité
• Si l'ajustement automatique de la luminosité est activé, l'éclairage faible s'allume automatique-
ment pendant l’intervalle réglé.
• Maintenez la touche SNOOZE/LIGHT appuyée pendant 2 secondes. AUTO DIM apparaît sur
l'écran.
• Par défaut, l'ajustement automatique de la luminosité est désactivé. OFF clignote sur l'écran.
• Appuyez sur la touche + ou – pour activer la fonction (ON). Le symbole AUTO DIM apparaît sur
l'écran.
• Validez au moyen de la touche SNOOZE/LIGHT.
• L’horaire de début clignote (DEBUT 22:00 par défaut). Réglez l'heure avec la touche + ou –
(heure pleine).
• Validez au moyen de la touche SNOOZE/LIGHT.
• L’horaire d’arrêt clignote (ARRET 6:00 par défaut). Réglez l'heure avec la touche + ou – (heure
pleine).
• Validez au moyen de la touche SNOOZE/LIGHT. L'affichage revient au mode normal et le symbole
AUTO DIM continue à apparaître.
8.3 Mode lumière d’ambiance
• Appuyez sur la touche GLOW en mode normal.
• ROUGE apparaît sur l’écran et la lumière d’ambiance s’allume en rouge.
• Appuyez encore une fois sur la touche GLOW pour choisir entre 7 couleurs (rouge, jaune, vert,
cyan, bleu foncé, violet et blanc) ou un changement de couleur continu (CYCLE).
• Pour confirmer le réglage, patientez quelques secondes jusqu’à ce que l’affichage repasse en
mode normal.
• Vous pouvez ajuster la luminosité avec la touche + ou – sur 4 niveaux (NIVEAU 1-4) ou l'éteindre
(OFF).
• Si vous maintenez la touche GLOW enfoncée, la lumière d’ambiance est également éteinte.
TFA_No. 60.2028_Anleitung_06_20 05.06.2020 11:13 Uhr Seite 14

2928
CHARGE-IT WIRELESS – Réveil digital avec station de chargement à induction
9. Fonction de chargement
9.1 Chargement à induction de votre téléphone cellulaire (compatible Qi)
• Placez votre téléphone portable sur la plateforme. Votre téléphone doit être bien aligné et centré
sur la surface.
• Le voyant bleu de charge apparaît au centre sous l'écran lorsque votre téléphone portable est
correctement placé et se charge.
• La lumière clignote lentement si votre appareil n'est pas correctement positionné ou si votre
appareil n'est pas compatible avec le standard Qi. Retirez la protection de votre cellulaire si
nécessaire.
• La compatibilité peut varier selon le modèle de téléphone. Pour plus de détails, veuillez-vous
référer au manuel de votre téléphone.
9.2 Chargement via USB
• Ce produit dispose également d'un port de chargement USB pour les appareils qui ne permet-
tent pas le chargement sans fil.
• Branchez le cordon USB (non inclus) dans le port du réveil et raccordez l’autre bout du cordon
avec votre appareil mobile. Assurez-vous que la puissance de rechargement est adaptée à votre
appareil mobile.
10. Entretien et maintenance
• Pour le nettoyage de votre appareil, utilisez un chiffon doux et humide. N’utilisez pas de sol-
vants ou d'agents abrasifs !
• Retirez la fiche de la prise, si vous n'utilisez pas votre appareil pendant une durée prolongée.
• Conservez votre appareil dans un endroit sec.
11. Dépannage
Problème Solution
Aucun affichage ➜ Raccordez le dispositif avec l'adaptateur
➜ Vérifiez l'adaptateur secteur
➜ Appuyez sur la touche SNOOZE/LIGHT pour activer l'éclairage de
fond
CHARGE-IT WIRELESS – Réveil digital avec station de chargement à induction
Affichage incorrect ➜ Appuyez sur le bouton RESET à l'aide d'un objet pointu
Pas de fonction ➜ L'appareil mobile n'est pas compatible avec la technologie qi
de chargement (à induction) ➜ Placez l'appareil mobile en position correcte
➜ Retirez la protection de votre cellulaire
➜ Utilisez le port USB
Pas de fonction ➜ Vérifiez le branchement du port USB
de chargement (USB)
Si votre appareil ne fonctionne toujours pas malgré ces mesures, adressez-vous au vendeur chez
qui vous l'avez acheté.
12. Traitement des déchets
Ce produit a été fabriqué avec des matériaux de haute qualité qui peuvent être recyclés et réutilisés.
Les piles usagées ne doivent pas être jetées dans les détritus ménagers.
En tant qu'utilisateur, vous avez l'obligation légale de rapporter les piles et piles
rechargeables usagées à votre revendeur ou de les déposer dans une déchetterie
proche de votre domicile conformément à la réglementation nationale et locale.
Les métaux lourds sont désignés comme suit :
Cd=cadmium, Hg=mercure, Pb=plomb
Cet appareil est conforme aux normes de l'UE relatives au traitement des déchets élec-
triques et électroniques (WEEE).
L'appareil usagé ne doit pas être jeté dans les ordures ménagères. L’utilisateur s’en-
gage, pour le respect de l’environnement, à déposer l’appareil usagé dans un centre
de traitement agréé pour les déchets électriques et électroniques.
13. Caractéristiques techniques
Plage de mesure
température 0…37°C (32…99°F)
TFA_No. 60.2028_Anleitung_06_20 05.06.2020 11:13 Uhr Seite 15

3130
CHARGE-IT WIRELESS – Réveil digital avec station de chargement à induction
Alimentation Source d’alimentation (incluse)
Entrée : 100-240V AC 50/60Hz 0,5A Max
Sortie : 5,0 V DC 2,5A, 12,5 W
Rendement moyen en mode actif : ≥80,21%
Consommation électrique hors charge : ≤0,10 W
Sortie de charge 1x USB Port (1A)
Puissance de charge 5 W
Dimensions du boîtier 136 x 126 x 72 mm
Poids 223 g (appareil seulement)
La reproduction, même partielle, du présent mode d'emploi est strictement interdite sans l'accord explicite de TFA Dost-
mann. Les caractéristiques techniques de ce produit ont été actualisées au moment de l'impression et peuvent être modi-
fiées sans avis préalable.
Les dernières données techniques et les informations concernant votre produit peuvent être consultées en entrant le
numéro de l'article sur notre site Internet.
Déclaration de conformité UE
Le soussigné, TFA Dostmann, déclare que l'équipement radioélectrique du type 60.2028 est conforme à la directive
2014/53/UE. Le texte complet de la déclaration UE de conformité est disponible à l'adresse Internet suivante :
www.tfa-dostmann.de/service/downloads/ce
www.tfa-dostmann.de
E-Mail : [email protected]
TFA Dostmann GmbH & Co.KG, Zum Ottersberg 12, D-97877 Wertheim, Allemagne
Numéro d’enregistrement au registre du commerce : Reg. Gericht Mannheim HRA 570186 06/20
CHARGE-IT WIRELESS – Sveglia digitale con stazione di ricarica a induzione
Vi ringraziamo per aver scelto l'apparecchio della TFA.
1. Prima di utilizzare l'apparecchio
• Leggete attentamente le istruzioni per l'uso.
Avrete così modo di familiarizzare con il vostro nuovo apparecchio, di scoprirne tutte le funzioni
e le componenti, di apprendere importanti dettagli sulla sua messa in funzione, di acquisire
dimestichezza nel suo utilizzo e di usufruire di alcuni validi consigli da seguire in caso di guasti.
• Seguendo le istruzioni per l'uso, eviterete anche di danneggiare il prodotto e di pregiudica-
re, a causa di un utilizzo scorretto, i diritti del consumatore che vi spettano per legge.
• Allo stesso modo, non siamo responsabili per eventuali misurazioni errate e per le conse-
guenze che ne possono derivare.
• Decliniamo ogni responsabilità per i danni derivanti dal mancato rispetto delle presenti
istruzioni per l'uso.
• Prestate particolare attenzione alle misure di sicurezza!
• Conservate con cura queste istruzioni per l'uso.
2. La consegna include
• Sveglia digitale
• Alimentatore
• Istruzioni per l'uso
3. Tutte le applicazioni e tutti i vantaggi del vostro nuovo apparecchio
• Funzione di ricarica dei dispositivi mobili a induzione (secondo lo standard Qi) e attraverso
ingresso USB
• Display a colori con 4 livelli di luminosità e funzione automatica di oscuramento
• Indicazione dell’ora, della data con giorno della settimana scritto per esteso e temperatura
interna
• Allarme con suoneria crescente
• Funzione snooze con intervallo regolabile (da 5 a 120 minuti)
• Luce d’atmosfera con cambi di colore automatici o scelta diretta del colore (rosso, giallo, verde,
turchese, blu scuro, viola, bianco) con 4 livelli di luminosità
• Appoggio antiscivolo grazie a quattro gommini
TFA_No. 60.2028_Anleitung_06_20 05.06.2020 11:13 Uhr Seite 16

3332
CHARGE-IT WIRELESS – Sveglia digitale con stazione di ricarica a induzione
4. Per la vostra sicurezza
• Il prodotto è adatto esclusivamente agli utilizzi di cui sopra. Non utilizzate il prodotto in maniera
diversa da quanto descritto in queste istruzioni.
• Non sono consentite riparazioni, alterazioni o modifiche non autorizzate del dispositivo.
Attenzione!
Pericolo di morte per scossa elettrica!
• Collegare l'apparecchio solo ad una presa correttamente installata con una tensione di rete ade-
guata (vedi targhetta).
• La presa dell’alimentazione dovrebbe essere situata vicino al dispositivo ed essere facilmente
accessibile.
• Estraete immediatamente la spina dalla presa di corrente qualora rileviate un guasto.
• L'apparecchio e l’alimentatore non devono venire a contatto con acqua o umidità. Adatto solo
all'uso in ambienti asciutti.
• Non utilizzate il dispositivo qualora la struttura esterna o l’alimentatore risultino danneggiati.
• Conservate il dispositivo fuori dalla portata di persone (per esempio i bambini) che potrebbero
non riconoscere adeguatamente il rischio derivante dall’uso di apparecchi elettrici.
• Utilizzate esclusivamente l'adattatore in dotazione.
• Collegate prima il cavo al dispositivo e successivamente inserite la spina nella presa di corrente.
• Quando estraete la spina dalla presa di corrente, non tiratela per il cavo.
• Proteggete il cavo di alimentazione in modo da evitare il contatto con oggetti appuntiti o caldi.
Avvertenze sulla sicurezza del prodotto!
• Non esporre l'apparecchio a temperature estreme, vibrazioni e urti.
• Proteggere dall’umidità.
• Prestate attenzione a non far surriscaldare l'apparecchio durante la carica per garantire una suf-
ficiente areazione. Il dispositivo deve essere posizionato su una superficie dura e pulita. Non
posizionate il dispositivo su stoffa, su tappeti, su carta o su altri oggetti che possano impedire
la circolazione dell’aria. Rimuovete la polvere o altri ostacoli dalle bocchette d’aerazione sul lato
inferiore del dispositivo.
CHARGE-IT WIRELESS – Sveglia digitale con stazione di ricarica a induzione
• Non appoggiare altri oggetti sulla piastra di ricarica.
• Utilizzare delicatamente gli ingressi USB. Il caricatore USB entra soltanto se orientato corretta-
mente.
5. Componenti
A: Display (Fig. 1):
A 1: Orologio/orario della sveglia A 2: Simbolo snooze
A 3: Giorno della settimana/data A 4: Temperatura/data
A 5: Simbolo della sveglia A 6: Spia di carica
A 7: Simbolo della funzione automatica di oscuramento
B: Struttura esterna (Fig. 2+3):
B 1: Piastra di ricarica B 2: Luce d’atmosfera
B 3: Ingresso Micro-USB B 4: Presa dell'alimentatore
B 5: Bocchette d’aerazione
C: Tasti (Fig. 3):
C 1: Tasto SNOOZE/LIGHT C 2: Tasto GLOW
C 3: Tasto – C 4: Tasto SET
C 5: Tasto + C 6: Tasto SVEGLIA
C 7: Tasto RESET
6. Messa in funzione
• Rimuovete il foglio protettivo dal display.
• Collegare la sveglia tramite l'alimentatore fornito in dotazione. Inserire l'adattatore nella presa e
collegarlo ad una presa a terra. Avvertenza importante! Controllate che il voltaggio della vostra
abitazione non sia maggiore di 240V. Tensioni diverse possono danneggiare lo strumento.
• Viene emesso un breve segnale acustico e tutti i segmenti appaiono brevemente.
• L'apparecchio è pronto per l'uso. Appare “HALLO”, poi “ZEIT” e “EINSTELLEN”.
TFA_No. 60.2028_Anleitung_06_20 05.06.2020 11:13 Uhr Seite 17

3534
CHARGE-IT WIRELESS – Sveglia digitale con stazione di ricarica a induzione
7. Uso
• Tenere premuto il tasto + o – in modalità impostazione per procedere velocemente.
• Premere il tasto SNOOZE/LIGHT nella modalità impostazione per tornare in modalità normale.
• L'apparecchio esce automaticamente dalla modalità impostazione se non si preme alcun tasto
per più di 10 secondi.
7.1 Impostazioni
• Dopo la messa in funzione oppure tenendo premuto il tasto SET nella modalità normale per tre
secondi, si entra nella modalità di impostazione.
• Sul display lampeggia DEUTSCH (predefinita).
• Impostare con il tasto + o – la lingua tedesca – DEUTSCH, inglese – ENGLISH, spagnola –
ESPANOL e francese – FRANCAIS.
• Se avete selezionato l'inglese, il display verrà visualizzato in inglese.
• Premendo nuovamente il tasto SET è possibile modificare una dopo l'altra le impostazioni per il
sistema orario a 12 ore o a 24 ore (FORMAT 24 Hr - predefinita), ore, minuti, anno, mese, giorno,
formato data giorno/mese o mese/giorno (DATE/MONTH - impostazione predefinita) e la visualiz-
zazione della temperatura in °C o °F (TEMP °C - predefinita). Impostare con il tasto + o –.
• Confermare con il tasto SET.
7.1.1 Impostazione del sistema orario a 12 ore o a 24 ore
• Impostare il sistema orario di 12 - o 24-ore con il tasto + o – nella modalità impostazione.
• Nel formato 12 ore compare AM (prima di mezzogiorno) e PM (dopo mezzogiorno) sul display.
7.2 Funzione sveglia
• Premere il tasto
SVEGLIA
nella modalità normale.
• ALARM e 6:30 (predefinita) o l'ultima ora della sveglia impostata vengono visualizzati sul display.
• Tenere premuto per tre secondi il tasto
SVEGLIA
.
• Il simbolo della sveglia appare e l’indicazione dell’ora lampeggia.
• È possibile impostare l'ora con il tasto
+ o –
.
• Premere nuovamente il tasto
SVEGLIA
ed impostare i minuti con il tasto
+ o –
.
• Premere nuovamente il tasto
SVEGLIA
.
CHARGE-IT WIRELESS – Sveglia digitale con stazione di ricarica a induzione
• SNOOZE, il simbolo snooze e 10 minuti (predefinita) o l'ultimo intervallo della funzione snooze
impostato vengono visualizzato sul display.
• Impostare la durata desiderata per mezzo del tasto
+ o –
ad incrementi di 5 (da 5 a 120 minuti).
• Confermare con il tasto
SVEGLIA
per ritornare alla modalità normale.
• La funzione sveglia è attivata e sul display appare il simbolo della sveglia.
• Quando l'ora della sveglia inserito viene raggiunto, la sveglia comincia a suonare.
• Se non viene interrotto, il suono crescente della sveglia si disattiva automaticamente dopo due
minuti e si riattiva nuovamente alla stessa ora di sveglia. Il simbolo della sveglia resta fisso sul
display.
• Premere un tasto qualunque per arrestare l'allarme o premere il tasto
SNOOZE/LIGHT
per attivare
la funzione snooze.
• Il suono della sveglia verrà interrotto per l’intervallo programmato.
• L'indicatore del tempo indicherà il conto alla rovescia.
• Premere un tasto qualunque per spegnere la funzione snooze.
7.2.1 Attivare e disattivare la funzione sveglia
• Premere il tasto SVEGLIA in modalità normale per attivare o disattivare la funzione della sveglia.
Sul display appare o scompare il simbolo della sveglia.
• Per confermare la selezione, aspettate un momento, fino a che l’indicazione torna in modalità
normale.
7.3 Modalità display
• Premere il tasto SET in modalità normale, fino alla selezione tra i seguenti:
• Giorno della settimana scritto per esteso e data
• Giorno della settimana scritto per esteso e temperatura interna
• Giorno della settimana con data e temperatura interna
8. Illuminazione del display
8.1 Luminosità
• È possibile impostare la luminosità con 4 livelli con il tasto sensore SNOOZE/LIGHT (BACKLIGHT
1-4) o disattivarla (OFF).
• Per confermare la selezione, aspettate un momento, fino a che l’indicazione torna in modalità
normale.
TFA_No. 60.2028_Anleitung_06_20 05.06.2020 11:13 Uhr Seite 18

3736
CHARGE-IT WIRELESS – Sveglia digitale con stazione di ricarica a induzione
8.2 Modalità funzione automatica di oscuramento
• Quando la funzione automatica di oscuramento è attivata, si attiva automaticamente l'illumina-
zione debole per l’intervallo programmato.
• Tenere premuto per 2 secondi il tasto
SNOOZE/LIGHT
. Sul display appare AUTO DIM.
• Per impostazione predefinita, la funzione automatica di oscuramento è disattivata. OFF lampeg-
gia sul display.
• Premere il tasto + o – per attivare la funzione sveglia (ON). Il simbolo AUTO DIM appare sul
display.
• Confermare con il tasto
SNOOZE/LIGHT
.
• L'ora d'inizio lampeggia (START 22:00 predefinito). Impostare con il tasto + o – le ore (intere).
• Confermare con il tasto
SNOOZE/LIGHT
.
• L'ora di fino lampeggia (END 6:00 predefinito). Impostare con il tasto + o – le ore (intere).
• Confermare con il tasto
SNOOZE/LIGHT
. Il display ritorna alla modalità normale e il simbolo
AUTO DIM resta.
8.3 Modalità luce d’atmosfera
• Premere il tasto GLOW nella modalità normale.
• Sul display appare RED (predefinito) e la luce di atmosfera diventa rossa.
• Premere ancora una volta il tasto GLOW per scegliere tra 7 colori (rosso, giallo, verde, turchese,
blu scuro, viola, bianco) o cambio automatico di colore (CYCLE).
• Per confermare la selezione, aspettate un momento, fino a che l’indicazione torna in modalità
normale.
• È possibile impostare la luminosità con 4 livelli (LIGHT 1-4) con il tasto + o – o disattivarla
(OFF).
• Si tiene premuto il tasto GLOW, la luce d’atmosfera si spegne anche.
9. Funzione di ricarica
9.1 Ricarica dei dispositivi mobili a induzione (secondo lo standard Qi)
• Posizionare il cellulare sulla piattaforma. Il telefono deve trovarsi centrato sulla superficie.
• L'indicatore blu di carica appare al centro sotto il display quando il telefono cellulare è stato
caricato correttamente.
CHARGE-IT WIRELESS – Sveglia digitale con stazione di ricarica a induzione
• La luce lampeggia lentamente se il dispositivo non è posizionato correttamente o se il dispositi-
vo non è compatibile con lo standard Qi. Se necessario, rimuovi la custodia del telefono.
• La compatibilità può variare in base al modello del telefono. Per i dettagli, consultare il manuale
del telefono.
9.2 Ricarica via USB
• Questo prodotto è dotato di una porta di ricarica USB per dispositivi che non supportano la rica-
rica wireless.
• Inserite un cavo USB (non fornite) nella porta USB della sveglia e collegatelo al vostro dispositi-
vo mobile. Assicuratevi che la potenza di caricamento sia compatibile con il vostro dispositivo
mobile.
10. Cura e manutenzione
• Per pulire l'apparecchio utilizzare solo un panno morbido leggermente inumidito. Non usare
solventi o abrasivi.
• Staccare la spina, se non si utilizza l'apparecchio per un periodo prolungato.
• Collocare il dispositivo in un luogo asciutto.
11. Guasti
Problema Risoluzione del problema
Nessuna indicazione ➜ Collegare il dispositivo all’alimentatore
➜ Controllare l'alimentatore
➜ Premere il tasto SNOOZE/LIGHT per attivare la retroilluminazione
Indicazione non corretta ➜ Premere con un oggetto appuntito il tasto RESET
Nessuna funzione ➜ Il dispositivo mobile non è compatibile con qi
di ricarica (a induzione) ➜ Posizionare correttamente il dispositivo mobile
➜ Rimuovere il coperchio del cellulare
➜ Usare il port USB
Nessuna funzione ➜ Controllare la connessione porta USB
di ricarica (USB)
TFA_No. 60.2028_Anleitung_06_20 05.06.2020 11:13 Uhr Seite 19

3938
CHARGE-IT WIRELESS – Sveglia digitale con stazione di ricarica a induzione
Qualora il vostro apparecchio continui a non funzionare nonostante queste procedure, rivolgetevi
al rivenditore presso il quale lo avete acquistato.
12. Smaltimento
Questo prodotto è stato realizzato utilizzando materiali e componenti di alta qualità che possono
essere riciclati e riutilizzati.
È assolutamente vietato gettate le batterie tra i rifiuti domestici.
In qualità di consumatori, siete tenuti per legge a consegnare le batterie usate al
negoziante o ad altri enti preposti al riciclaggio in conformità alle vigenti disposizioni
nazionali o locali, ai fini di uno smaltimento ecologico.
Le sigle dei metalli pesanti contenuti sono:
Cd=cadmio, Hg=mercurio, Pb=piombo
Questo apparecchio è etichettato in conformità alla Direttiva UE sullo smaltimento delle
apparecchiature elettriche ed elettroniche (WEEE).
Questo prodotto non deve essere smaltito insieme ai rifiuti domestici. Il consumatore
è tenuto a consegnare il vecchio apparecchio presso un punto di raccolta per lo
smaltimento di apparecchiature elettriche ed elettroniche ai fini di uno smaltimento
ecologico.
13. Dati tecnici
Campo di misura
temperatura 0…37°C (32…99°F)
Alimentazione Alimentatore (fornito):
Ingresso 100-240V AC 50/60Hz 0,5A Max
Uscita 5,0 V DC 2,5A, 12,5 W
Rendimento medio in modo attivo: ≥80,21%
Potenza assorbita nella condizione a vuoto: ≤0,10 W
Uscita di ricarica 1x USB Port (1A)
Potenza di carica wireless 5 W
CHARGE-IT WIRELESS – Sveglia digitale con stazione di ricarica a induzione
Dimensioni esterne 136 x 126 x 72 mm
Peso 223 g (solo apparecchio)
È vietata la pubblicazione delle presenti istruzioni o di parti di esse senza una precedente autorizzazione della TFA
Dostmann. I dati tecnici corrispondono allo stato del prodotto al momento della stampa e possono cambiare senza pre-
avviso. È possibile trovare dati tecnici e informazioni aggiornate sul prodotto inserendo il numero di articolo sul nostro
sito.
Dichiarazione di conformità UE
Il fabbricante, TFA Dostmann, dichiara che il tipo di apparecchiatura radio 60.2028 è conforme alla direttiva 2014/53/UE.
Il testo completo della dichiarazione di conformità UE è disponibile al seguente indirizzo Internet:
www.tfa-dostmann.de/service/downloads/ce
www.tfa-dostmann.de
E-Mail: [email protected]
TFA Dostmann GmbH & Co.KG, Zum Ottersberg 12, D-97877 Wertheim, Germania
Numero di iscrizione nel registro delle imprese: Reg. Gericht Mannheim HRA 570186 06/20
TFA_No. 60.2028_Anleitung_06_20 05.06.2020 11:13 Uhr Seite 20
La pagina sta caricando ...
La pagina sta caricando ...
La pagina sta caricando ...
La pagina sta caricando ...
La pagina sta caricando ...
La pagina sta caricando ...
La pagina sta caricando ...
La pagina sta caricando ...
La pagina sta caricando ...
La pagina sta caricando ...
-
 1
1
-
 2
2
-
 3
3
-
 4
4
-
 5
5
-
 6
6
-
 7
7
-
 8
8
-
 9
9
-
 10
10
-
 11
11
-
 12
12
-
 13
13
-
 14
14
-
 15
15
-
 16
16
-
 17
17
-
 18
18
-
 19
19
-
 20
20
-
 21
21
-
 22
22
-
 23
23
-
 24
24
-
 25
25
-
 26
26
-
 27
27
-
 28
28
-
 29
29
-
 30
30


TFA 60.2028.01 Manuale utente
- Categoria
- Orologi da tavolo
- Tipo
- Manuale utente
- Questo manuale è adatto anche per
in altre lingue
- français: TFA 60.2028.01 Manuel utilisateur
- español: TFA 60.2028.01 Manual de usuario
- Deutsch: TFA 60.2028.01 Benutzerhandbuch
- Nederlands: TFA 60.2028.01 Handleiding
Documenti correlati
-
TFA Digital Alarm Clock with Luminous Digits TIME BLOCK Manuale utente
-
-
-
-
-
-
-
-
TFA Digital Alarm Clock with LED Digits Manuale utente
-