
FR
EN
NL
IT
DE
TR
RU
UK
PL
LT
LV
ET
KO
MASTERCHEF

B1
H
H1
I1
I2
I
I3
I4
B
C
A
D
E
F
G
J

1
Lisez attentivement le mode d’emploi avant la première utilisation de votre appareil:
une utilisation non conforme nous dégagerait de toute responsabilité.
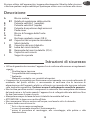
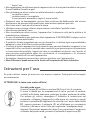
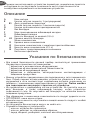
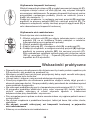
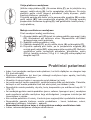
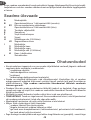
Description
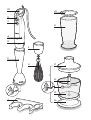
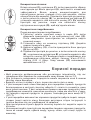
A
Bloc moteur
B Bouton mise en marche vitesse 1 (variable)
B1 Molette de réglage de la vitesse
C Bouton mise en marche vitesse 2 (rapide)
D Bouton d’éjection des accessoires
E Pied mixeur
F Bloc de fixation pour le fouet cuisinier
G Fouet cuisinier
H Bol mélangeur gradué (0,8 l)
H1 Couvercle du bol mélangeur
I Mini-hachoir
I1 Couvercle du mini-hachoir
I2 Couteau du mini-hachoir
I3 Bol du mini-hachoir (0,5 l)
I4 Couvercle anti-dérapant
J Support mural
Consignes de sécurité
• Pour votre sécurité, cet appareil est conforme aux normes et règlementations
applicables :
* directive basse tension,
* compatibilité électromagnétique,
* environnement,
* matériaux en contact avec les aliments.
• L’appareil est conçu pour fonctionner uniquement en courant alternatif. Vérifiez que
la tension d’alimentation indiquée sur l’étiquette signalétique de l’appareil
correspond bien à celle de votre installation électrique. Toute erreur de branchement
annule la garantie.
• Ne touchez jamais les pièces en mouvement. Ne manipulez jamais le couteau du pied
mixeur ou le fouet lorsque l’appareil est branché. Ne faites jamais fonctionner le pied
mixeur a vide.
• Manipulez toujours le couteau du mini-hachoir en le tenant par son axe.
• ATTENTION : Les lames sont très coupantes. Soyez prudent en retirant le couteau
du bol, en vidant le bol ou pendant le nettoyage.
• N’immergez pas le bloc moteur, ne le passez pas sous l’eau.
• Le mixeur doit être débranché :
* Si on le laisse sans surveillance,
* S’il a une anomalie pendant son fonctionnement,
* Avant chaque montage, démontage, nettoyage ou entretien.
* Après chaque utilisation.
FR

2
• Ne posez pas et n’utilisez pas cet appareil sur une plaque chaude ou à proximité
d’une flamme (cuisinière à gaz).
• Un appareil électroménager ne doit pas être utilisé :
* S’il est tombé par terre,
* S’il est détérioré ou incomplet,
* Si le cordon présente des anomalies ou détériorations visibles.
• Débranchez l’appareil avant de changer les accessoires ou de toucher les pièces en
mouvement.
• Si le câble d'alimentation est endommagé, il doit être remplacé par le fabricant, son
service après-vente ou une personne de qualification similaire afin d'éviter un danger.
• Ne débranchez jamais l’appareil en tirant sur le cordon.
• N’utilisez un prolongateur qu’après avoir vérifié que celui-ci est en parfait état.
• Ne laissez pas pendre le cordon.
• Ne démontez jamais l’appareil. Vous n’avez pas d’intervention autre que le nettoyage
et l’entretien usuels à effectuer.
• Dans ces cas et pour toutes autres réparations IL EST NECESSAIRE de vous adresser
à un réparateur agréé.
• Le produit a été conçu pour un usage domestique, il ne doit en aucun cas être l’objet
d’une utilisation professionnelle pour laquelle nous n’engageons ni notre garantie ni
notre responsabilité.
• Cet appareil n'est pas prévu pour être utilisé par des personnes (y compris les enfants)
dont les capacités physiques, sensorielles ou mentales sont réduites, ou des personnes
dénuées d'expérience ou de connaissance, sauf si elles ont pu bénéficier, par
l'intermédiaire d'une personne responsable de leur sécurité, d'une surveillance ou
d'instructions préalables concernant l'utilisation de l'appareil.
• Il convient de surveiller les enfants pour s'assurer qu'ils ne jouent pas avec l'appareil.
• N’utilisez pas le pied mixer ni le fouet cuisinier dans le bol du mini hachoir.
Mise en service
Avant la première utilisation, nettoyez vos accessoires à l’eau savonneuse. Rincez et
séchez-les soigneusement.
ATTENTION : les lames sont très coupantes.
"CLICK"
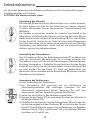
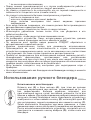
Utilisation du pied mixeur:
Insérez le pied (E) sur le bloc moteur (A) jusqu’au « clic » de
verrouillage.
Votre mixeur est idéal pour préparer les sauces, les soupes, les
cocktails, les milk-shakes, les mayonnaises, pâtes à crêpes, pâtes à
gaufres. Pour éviter les éclaboussures, plongez d’abord le pied mixeur
dans votre préparation, branchez l’appareil puis appuyez sur le
bouton (B) en réglant la vitesse à l’aide la molette B1, ou appuyez
sur le bouton (C) et effectuez un mouvement de rotation de bas en
haut pour améliorer le mixage des aliments. Après utilisation,
débranchez l’appareil, puis appuyez sur le bouton d’éjection (D) pour
démonter l’accessoire pied mixeur.

3
Utilisation du fouet cuisinier :
Introduisez le fouet cuisinier (G) dans le bloc de fixation (F), puis
emboîtez l’ensemble sur le bloc moteur (A) jusqu’au clic de
verrouillage. Avec le fouet cuisinier, vous pouvez réaliser des
préparations légères (pâtes a crêpes, blanc en neige, chantilly….).
Branchez l’appareil puis appuyez sur le bouton (B) en réglant la
vitesse à l’aide la molette B1, ou appuyez sur le bouton (C). Après
avoir débranché l’appareil, appuyez sur le bouton d’éjection (D) pour
démonter l’accessoire fouet cuisinier.
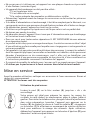
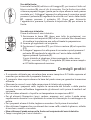
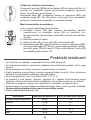
Utilisation du mini-hachoir :
Avant d’utiliser le mini hachoir:
1 - Placez le couteau (I2) (après avoir enlevé la protection de la lame)
avec précaution dans le bol (I3) sur l’axe central. N'oubliez pas de
remettre la protection une fois la préparation réalisée.
2 - Mettez les aliments dans le bol.
3 - Placez le couvercle (I1) puis le bloc moteur (A) sur le couvercle (I1).
4 - Branchez l’appareil puis appuyez sur le bouton (B) en réglant la
vitesse à l’aide la molette B1, ou appuyez sur le bouton (C). Le
mini-hachoir vous permet de hacher persil, condiments, viandes
(250 g), noisettes (100 g),…. Le bol (I3) doit être rempli au
maximum au 2/3.
"CLICK"
3
2
1
2/3
MAX
Conseils pratiques
• Le récipient que vous utilisez pour mixer ou fouetter doit être rempli au maximum au
2/3 pour éviter tout débordement.
• La préparation doit couvrir au minimum le bas du pied mixeur pour garantir
l’efficacité du mixage.
• Retirez les os et les nerfs de la viande avant de la mettre dans le récipient.
• Retirez le récipient de cuisson de la source de chaleur pour mixer des préparations
chaudes. Laissez refroidir un peu les aliments cuits avant de les placer dans le
récipient.
• Ne mixez pas des aliments, des liquides dont la température serait supérieure à 80°C
(175°F).
• Pour les aliments filandreux (poireaux, céleris, asperges, etc.…) nettoyez le pied
mixeur régulièrement en cours d’utilisation en suivant les consignes de sécurité pour
le démontage et le nettoyage.
• Pour les préparations à base de fruits, coupez et dénoyautez les fruits préalablement.
• N’utilisez pas l’appareil avec des aliments durs tels que café, glaçons, sucre, céréales,
chocolat.
• N’utilisez pas le pied mixeur ni le fouet cuisinier dans le bol du mini-hachoir.
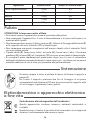
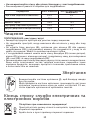
• Temps recommandé pour le mini hachoir :

4
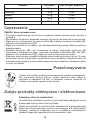
Participons à la protection de l’environnement !
Votre appareil contient de nombreux matériaux valorisables ou
recyclables.
Confiez celui-ci dans un point de collecte ou à défaut dans un autre
centre de service agréé pour que son traitement soit effectué.
Ingrédients Quantité max. Temps (en vitesse maxi)
Viande crue (coupée en morceaux) 250 g 8 s
Persil 50 g 8 s
Noisettes 100 g 10 s
Gruyère 150 g 10 s
Oignons 150 g 8 s
Nettoyage
ATTENTION : les lames sont très coupantes.
• Débranchez toujours l’appareil avant de le nettoyer.
• Ne mettez pas l’appareil, le câble d’alimentation ou la fiche dans l’eau ou tout autre
liquide.
• Ne mettez jamais au lave-vaisselle le bloc moteur (A), le bloc de fixation pour le fouet
cuisinier (F) et le couvercle du mini-hachoir (I1).
• Ne les plongez jamais dans l’eau ou sous l’eau courante. Nettoyez-les avec une
éponge humide.
• Le pied mixeur (E) (couteau vers le haut), le fouet cuisinier (G) (fouet vers le haut), bol
mélangeur gradué (H), le couteau (I2) et le bol mini-hachoir (I1) passent au lave-
vaisselle.
• Nous vous conseillons de nettoyer le pied du mixeur rapidement après chaque
utilisation. En cas de coloration des parties plastique par des aliments tels que les
carottes, frottez-les avec un chiffon imbibé d’huile alimentaire, puis procédez au
nettoyage habituel.
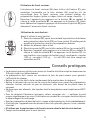
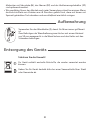
Rangement
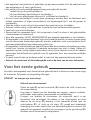
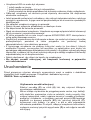
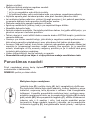
Utilisez le support mural
(J) pour avoir toujours votre mixeur à portée
de main.
Pour fixer votre support mural, percez vos deux points de fixation à
l’horizontale avec un écart de 59 mm puis placez le support sur vos vis
de fixation en respectant le sens.
Produit électrique ou électronique en fin de vie

5
Please read the operating instructions carefully before first using your appliance: we
may not be held responsible for any incorrect use of the appliance
.
Description
A Motor unit
B Speed 1 start button (variable)
B1 Speed control dial
C Speed 2 start button (high speed)
D Accessory ejection button
E Blender shaft
F Attachment unit for whisk
G Whisk
H Graduated blender bowl (0,8 l)
H1 Blender bowl lid
I Mini-chopper
I1 Mini-chopper lid
I2 Mini-chopper blade with blade protector
I3 Mini-chopper bowl (0,5 l)
I4 Non-slip mat
J Wall mount
Safety instructions
• For your own safety, this appliance is compliant with applicable standards and
regulations:
* low-voltage directive,
* electromagnetic compatibility,
* environment,
* materials in contact with food.
• It is designed to run only on alternating current. Please check before first use that
the mains power supply corresponds to that indicated on the appliance's rating plate.
Any error in connection will cancel the terms of the warranty.
• Never touch moving parts. Never handle the blender shaft blade or the whisk when
the appliance is connected. Never run the blender shaft without food.
• When handling the mini-chopper blade, always hold it by the axis.
• CAUTION: the blades are extremely sharp.
• Care is needed when removing the blade from the bowl, emptying the bowl and
during cleaning.
• Do not immerse the motor unit or put it under water.
• Unplug the blender:
* if it is left unattended,
* if it is not working correctly,
* before assembly, disassembly, cleaning or maintenance.
* after each use.
EN

6
• Switch off the appliance before changing accessories or touching parts which move
in use.
• Do not place or use this appliance on a hot plate or close to a flame (gas cooker).
• You must not use a household electrical appliance if:
* it has been dropped,
* it is damaged or incomplete,
* the power cord appears faulty or shows signs of damage.
• If the power supply cord is damaged, it must be replaced by an authorised service
centre to avoid any risk of danger.
• Never pull the power cord to unplug the appliance.
• Only use an extension cord if you have already checked that it is in good working
order.
• Do not let the power cord hang down.
• Do not disassemble the appliance. The only procedures you need to make are
cleaning and ordinary maintenance.
• For all other repairs, YOU MUST contact an authorised service centre.
• This product has been designed for domestic use only. Any commercial use,
inappropriate use or failure to comply with the instructions, the manufacturer accepts
no responsibility and the guarantee will not apply.
• This appliance is not intended for use by persons (including children) with reduced
physical, sensory or mental capabilities, or lack of experience and knowledge, unless
they have been given supervision or instruction concerning use of the appliance by a
person responsible for their safety. Children should be supervised to ensure that they
do not play with the appliance.
• Do not use the blender shaft or the whisk in the mini-chopper bowl.
Using your hand blender
"CLICK"
Using the blender shaft:
Insert the shaft (E) onto the motor unit (A) until you hear the “click”
that tells you it has locked.
Your blender is ideal to prepare sauces, soups, cocktails, milk-shakes,
mayonnaise, pancake mixes, waffle mixes.
To avoid splashing, first immerse the hand blender head into the
mixture, plug in the appliance and then press the button (B), using
the dial B1 to adjust the speed, or press the button (C), then move
the hand blender in a circular movement as well as up and down to
mix the ingredients thoroughly. After use, switch the appliance off,
unplug then press the ejection button (D) to remove the blender shaft
accessory.

7
Using the whisk:
Fit the whisk (G) into the attachment unit (F), then slot the
assembly onto the motor unit (A) until you hear the “click” that tells
you it has locked. You can use the whisk to make light preparations
(pancake mix, whip egg white, chantilly whipped cream, etc.). Plug
in the appliance and then press the button (B), using the dial B1 to
set the speed, or press the button (C). Unplug the appliance before
pressing the ejection button (D) to remove the whisk accessory.
Using the mini-chopper:
Before using the mini-chopper:
1. First remove the protector from the blade (I2) then fit it carefully
in the bowl (I3) on the central axis. Remember to replace the
protector once you have finished your preparation.
2. Place the bowl on the non-slip mat (I4). Put the food into the
bowl.
3. Place the lid (I1) and then the motor unit (A) on the lid (I1).
4. Plug in the appliance and then press the button (B), using the
dial B1 to set the speed, or press the button (C). Use the
mini-chopper to chop parsley, onion, garlic, meat (250 g),
hazelnuts (100 g), etc. The bowl (I3) should be 2/3 full at most.
"CLICK"
3
2
1
2/3
MAX
Practical hints
• You should never fill the bowl more than 2/3 full when blending or whippi
ng to avoid
spillages.
• The preparation must at least cover the lower part of the blender shaft for the
blending to be successful.
• Remove bone and gristle from meat before putting it in the bowl.
• When using the blender shaft to process hot preparations directly in the cooking pan,
remove the pan from the heat source first and leave to cool slightly. When blending
hot food in the mini-chopper bowl, leave them to cool for a while before putting them
in the bowl.
• Do not blend food and liquids at a temperature higher than 80°C (175°F).
• For fibrous foods (leeks, celery, asparagus, etc.) clean the blender shaft regularly
during use while following the safety instructions for disassembly and cleaning.
• For fruit-based preparations, first cut up the fruit and remove pips and stones.
• Do not use the appliance with hard food like coffee beans, ice cubes, sugar, cereals,
whole spices, grains and chocolate.
• Do not use the blender shaft or the whisk in the mini-chopper bowl.
• Recommended processing times for the mini-chopper:

8
Environment protection first !
Your appliance contains valuable materials which can be recovered or recycled.
Leave it at a local civic waste collection point.
Ingredients Max. quantity Time (in max speed)
Raw meat (cut into pieces) 250 g 8 s
Parsley 50 g 8 s
Walnuts 100 g 10 s
Gruyère cheese (cut into cubes) 150 g 10 s
Onions (cut into quarters) 150 g 8 s
Cleaning
CAUTION: the blades are extremely sharp.
• Always unplug the appliance before cleaning it.
• Do not put the appliance, power supply cord or plug into water or any other liquid.
• Never put the motor unit (A), the attachment unit for the whisk (F) or the
mini-chopper lid (I1) in the dishwasher. Never immerse them in water or put them
under the tap. Clean with a moist sponge.
• You can clean the blender shaft (E) (blade facing upwards), whisk (G) (whisk side
facing upwards), graduated mixing (H), blade (I2) and the mini-chopper bowl (I1) in
the dishwasher.
• We advise you to clean the blender shaft immediately after each use. If the plastic
parts become discoloured by food like carrots, rub them with a cloth soaked in cooking
oil and then clean as usual.
Storage
Use the wall mount (J) so you can always have your blender ready to hand.
To secure the wall mount, drill two attachment points horizontal to each
other with a gap of 59 mm then place the mount the right way up on the
attachment screws.
Electrical or electronic product at end of service
life
HELPLINE: If you have any product problems or queries, please contact our
Customer Relations Team first for expert help and advice:
0845 602 1454 - UK or (01) 677 4003 - Ireland or consult our website - www.tefal.co.uk

9
Lees de gebruiksaanwijzing zorgvuldig voor u het apparaat voor de eerste keer
gebruikt : wij zijn niet aansprakelijk als u het apparaat niet conform de voorschriften
hanteert.
Beschrijving
A Motorblok
B Aan/uit-knop snelheid 1 (variabel)
B1 Selectieknop toerental
C Aan/uit-knop snelheid 2 (snel)
D Eject-knop voor de accessoires
E Mixervoet
F Bevestigingsaccessoire voor de keukengarde
G Keukengarde
H Mengkom met maatverdeling (0,8 L)
H1 Deksel mengkom
I Mini hakmolen
I1 Deksel van de mini hakmolen
I2 Sikkelmes van de mini hakmolen
I3 Kom van de mini hakmolen (0,5 L)
I4 Anti-slip deksel
J Muurhouder
Veiligheidsvoorschriften
• Voor uw eigen veiligheid voldoet dit apparaat aan de toepasselijke normen en
voorschriften:
* laagspanningsrichtlijn,
* elektromagnetische compatibiliteit,
* milieu,
* materialen in contact met voedingsmiddelen.
• Dit apparaat is uitsluitend geschikt voor wisselstroom. Controleer of de netspanning,
aangegeven onder op uw apparaat, overeenkomt met de netspanning bij u thuis,
voordat u de stekker in het stopcontact steekt. Verkeerde aansluiting maakt de
garantie ongeldig.
• Raak nooit onderdelen aan die in beweging zijn. Raak nooit het sikkelmes van de
mixervoet of de garde aan als het apparaat aan staat. Zet de mixervoet nooit aan als
u er niets mee mixt.
• Pak het sikkelmes van de mini hakmolen altijd bij de as beet.
• OPGELET : de mesjes zijn zeer scherp!
• Het motorblok niet onderdompelen of onder de kraan houden.
• Haal de stekker altijd uit het stopcontact :
* indien men deze zonder toezicht laat.
* als het apparaat werkingsstoornissen vertoont.
* vóór monteren, demonteren, reiniging of onderhoud
.
* na gebruik.
NL

10
• Het apparaat niet plaatsen of gebruiken op een warme plaat of in de nabijheid van
een warmtebron of vlam (gasfornuis).
• Een elektrisch huishoudelijk apparaat mag niet gebruikt worden
* nadat het op de grond gevallen is.
* als het sikkelmes beschadigd of onvolledig is.
* als het snoer afwijkingen vertoont of zichtbaar beschadigd is.
• Als het snoer beschadigd is moet deze vervangen worden door de fabrikant, een
erkend reparateur of eigen servicedienst (zie bijgevoegde lijst), om elk gevaar te
voorkomen.
• Haal de stekker nooit uit het stopcontact door aan het snoer te trekken.
• Gebruik, indien nodig, uitsluitend een in perfecte staat verkerend verlengsnoer.
• Laat het snoer niet loshangen.
• Demonteer het apparaat nooit. Het enige wat u hoeft te doen is het gebruikelijke
schoonmaken en onderhoud.
• Voor alle reparaties IS HET NOODZAKELIJK een erkende reparateur in te schakelen.
• Dit apparaat is uitsluitend bestemd voor huishoudelijk gebruik, en mag in geen geval
voor professionele doeleinden gebruikt worden, waarvoor noch onze garantie noch
onze aansprakelijkheid van toepassing zullen zijn.
• Dit apparaat is niet bedoeld om gebruikt te worden door kinderen of andere personen,
indien hun fysieke, zintuiglijke of mentale vermogen hen niet in staat stellen dit
apparaat op een veilige wijze te gebruiken, tenzij zij van tevoren instructies hebben
ontvangen betreffende het gebruik van dit apparaat door een verantwoordelijke
persoon.
• Er moet toezicht zijn op kinderen zodat zij niet met het apparaat kunnen spelen.
• Gebruik de mixervoet of de keukengarde niet in de kom van de mini hakmolen.
Voor het eerste gebruik
Voordat u het apparaat voor de eerste keer gebruikt dient u de
accessoires in een sopje
af te wassen. Afspoelen en zorgvuldig afdrogen.
OPGELET : de mesjes zijn zeer scherp.
"CLICK"
Gebruik van de mixervoet:
Plaats de voet (E) op het motorblok (A) totdat u de « klik » hoort van
de vergrendeling.
Uw mixer is ideaal voor het bereiden van sauzen, soepen, cocktails,
milkshakes, mayonaises, pannenkoek- en wafelbeslag.
Dompel, om spatten te voorkomen, de mixervoet eerst in uw
bereiding, doe vervolgens de stekker in het stopcontact en druk
daarna op de knop (B) waarbij u het toerental afstelt met de
selectieknop B1, of druk op de toets (C), maak een draaiende
beweging van onder naar boven, om de bereiding beter te mixen. Na
gebruik het apparaat uitzetten en vervolgens op de eject-knop (D)
drukken om de mixervoet te verwijderen.

11
Gebruik van de keukengarde:
Plaats de keukengarde (G) in het bevestigingsblok (F), en zet het
geheel op het motorblok (A) tot u de klik van de vergrendeling hoort.
Met de keukengarde kunt u lichte bereidingen maken
(pannenkoekbeslag, Haagse bluf, slagroom…). Steek de stekker in het
stopcontact en druk daarna op de knop (B) waarbij u het toerental
afstelt met het kartelwieltje B1, of druk op de toets (C). Na het
apparaat uitgezet te hebben, drukt u op de eject-knop (D) om het
keukengarde accessoire te demonteren.
Gebruik van de mini hakmolen:
Voordat u de mini hakmolen gebruikt:
1 - Plaats het sikkelmes (I2) (na de beschermkap verwijderd te
hebben) voorzichtig in de kom (I3) op de centrale as. Vergeet niet
de beschermkap weer aan te brengen als u eenmaal klaar bent
met de bereiding.
2 - Doe de ingrediënten in de kom.
3 - Plaats het deksel (I1) en dan het motorblok (A) op het deksel (I1).
4 - Steek de stekker in het stopcontact en druk daarna op de knop (B)
waarbij u het toerental afstelt met het kartelwieltje B1, of druk op
de toets (C). Met de mini hakmolen kunt u peterselie, specerijen,
vlees (250 g), hazelnoten (100 g). De kom (I3) mag maximaal voor
2/3 gevuld worden.
"
CLICK"
3
2
1
2/3
MAX
Praktische adviezen
• De kom die u gebruikt om te mixen of te kloppen mag maximaal voor 2/3 g
evuld zijn
om te voorkomen dat de inhoud over de rand heen komt.
• De bereiding moet minimaal de onderkant van de mixervoet bedekken om te
garanderen dat het mixen efficiënt genoeg gebeurt.
• Verwijder bot en pezen van het vlees voordat u deze in de kom doet.
• Als u warme bereidingen wilt mixen moet u de pan niet op het vuur/de hete kookplaat
laten staan. Laat het gekookte voedsel een poosje staan, voordat u het overhevelt in
de kom die u gebruikt bij het mixen.
• Mix geen ingrediënten of vloeistoffen met een temperatuur boven de 80°C.
• Voor draderig voedsel (prei, selderij, asperges, enz.…) dient u de mixervoet regelmatig
tijdens gebruik schoon te maken. Volg hierbij de veiligheidsvoorschriften voor
demonteren en schoonmaken.
• Voor de bereidingen met fruit dient u de vruchten in stukken te snijden en eventuele
pitten vooraf te verwijderen.
• Gebruik het apparaat niet met harde ingrediënten zoals koffiebonen, ijsblokjes, suiker,
granen of chocola.
• Gebruik de mixervoet of de keukengarde niet in de kom van de mini hakmolen.
• Aanbevolen tijd voor de mini-hakker:

12
Laten we allemaal meedoen aan de bescherming van ons milieu !
Uw apparaat bevat veel materiaal dat voor recycling / hergebruik
geschikt is.
Lever het in bij een milieuvriendelijk verzamelpunt of bij onze
technische dienst.
Ingrediënten Max. hoeveelheid Tijd (maximale snelheid)
Vlees (in blokjes gesneden)
250 g 8 sec
Peterselie
50 g 8 sec
Hazelnoten
100 g 10 sec
Kaas
150 g 10 sec
Uien 150 g 8 sec
Schoonmaken
OPGELET
: de mesjes zijn zeer scherp.
• Haal altijd de stekker uit het stopcontact voordat u het apparaat schoonmaakt.
• Dompel het apparaat, het snoer of de stekker niet in water of een andere vloeistof.
• Plaats het motorblok (A), het bevestigingsblok voor de keukengarde (F) en het deksel
van de mini hakmolen (I1) nooit in de vaatwasmachine.
• Dompel ze nooit onder in water of houd ze nooit onder de kraan. Maak ze schoon
met een vochtige spons met wat afwasmiddel.
• De mixervoet (E) (sikkelmes naar boven), de keukengarde (G) (garde naar boven), de
mengkom met maatverdeling (H), het sikkelmes (I2) en de kom van de mini hakmolen
(I1) kunnen in de vaatwasmachine schoongemaakt worden.
• Wij raden u aan de mixervoet snel na elk gebruik schoon te maken. Bij verkleuring
van kunststof onderdelen door ingrediënten zoals wortel kunt u deze inwrijven met
een in slaolie gedrenkt doekje. Ga hierna over tot het schoonmaken zoals u dat
gewend bent. De verkleuring zal echter niet helemaal meer te verwijderen zijn.
Opbergen
Gebruik de muurhouder
(J) om uw mixer altijd binnen handbereik te
hebben.
Voor het bevestigen van de muurhouder boort u twee gaatjes op een
afstand van 59 mm van elkaar (horizontaal), en plaats dan de houder
op de bevestigingsschroeven (richting in acht nemen).
Einde levensduur van uw elektr(on)isch apparaat

13
Al primo utilizzo dell’apparecchio, leggere attentamente il libretto delle istruzioni:
si declina qualsiasi responsabilità per qualunque utilizzo non conforme alle stesse.
Descrizione
A
Blocco motore
B1 Rotella di regolazione della velocità
B Pulsante velocità 1 (variabile)
C Pulsante velocità 2 (rapida)
D Pulsante di espulsione degli accessori
E Piede mixer
F Blocco di fissaggio della frusta
G Frusta
H Bicchiere graduato mixer (0,8 L)
H1 Coperchio del recipiente miscelatore
I Mini-tritatutto
I1 Coperchio del mini-tritatutto
I2 Lama del mini-tritatutto
I3 Recipiente del mini-triutatutto (0,5 L)
I4 Coperchio anti-scivolo
J Supporto a parete
Istruzioni di sicurezza
• Al fine di garantire la sicurezza, l'apparecchio è conforme alle norme e ai regolamenti
vigenti:
* Direttiva bassa tensione
* Compatibilità elettromagnetica
* Ambiente
* Materiali a contatto con i prodotti alimentari.
• L’apparecchio è progettato per funzionare esclusivamente con corrente alternata. Al
momento del primo utilizzo, si raccomanda di verificare che la tensione di
alimentazione dell’impianto elettrico utilizzato corrisponda alla tensione indicata
sulla targhetta segnaletica. Qualsiasi errore di collegamento annulla la garanzia.
• Non toccare per alcun motivo i componenti in rotazione. Non manipolare mai la lama
del piede mixer o la frusta quando l’apparecchio è collegato alla rete elettrica. Non
far mai funzionare il mixer a vuoto.
• Manipolare sempre la lama del mini-tritatutto tenendola dall’asse.
• ATTENZIONE: le lame sono molto affilate.
• Non immergere il blocco motore nell’acqua, non lavarlo sotto il rubinetto.
• Il mixer deve essere disinserito:
* Se lo si lascia senza sorveglianza,
* in caso di anomalie durante il funzionamento,
* prima di procedere al montaggio, allo smontaggio, alla pulizia o alla
manutenzione,
IT

14
* dopo l’uso.
• Non appoggiare né utilizzare questo apparecchio su di una piastra calda o nei pressi
di una fiamma (fornello a gas).
• Non utilizzare per alcun motivo un elettrodomestico qualora:
* sia caduto a terra,
* sia deteriorato o incompleto,
* il cavo presenti anomalie o segni di usura visibili.
• Qualora il cavo sia danneggiato, occorre farlo sostituire dal fabbricante, dal servizio
assistenza o da una persona qualificata, onde evitare qualsiasi pericolo.
• Non tirare mai il cavo per disinserire la spina.
• Utilizzare una prolunga soltanto dopo averne controllato il perfetto stato.
• Non lasciare pendere il cavo.
• Non smontare per alcun motivo l’apparecchio. Intervenire solo per la pulizia e la
manutenzione ordinarie.
• In caso di anomalie e per qualsiasi altra riparazione, È NECESSARIO rivolgersi ad un
centro assistenza autorizzato.
• Il prodotto è stato progettato per un uso domestico; si declina ogni responsabilità e
garanzia in caso di utilizzo a scopo professionale.
• L’utilizzo di questo apparecchio non è previsto per persone (bambini compresi) le cui
capacità fisiche, sensoriali o mentali siano sminuite o per persone prive di esperienza
o conoscenza del prodotto, tranne nel caso in cui abbiano usufruito, con l’ausilio di
una persona responsabile della loro incolumità, di sorveglianza o di istruzioni
preliminari relative all’uso dell’apparecchio.
• Sorvegliare i bambini per accertarsi che non giochino con l’apparecchio.
• Non utilizzare il piede mixer né la frusta nel recipiente del mini-tritatutto.
Istruzioni per l’uso
Al primo utilizzo, lavare gli accessori con acqua e sapone. S
ciacquarli ed asciugarli
accuratamente.
ATTENZIONE: le lame sono molto affilate !
"CLICK"
Uso del piede mixer:
Inserire il piede (E) sul blocco motore (A) fino al clic di sicurezza.
Il mixer è ideale per la preparazione di salse, passati di verdura,
cocktail, milk-shake, maionese, pasta per le crêpe, pasta per le cialde.
Per evitare gli schizzi, immergere il frullatore a immersione nel
preparato, collegare l'apparecchio alla presa di corrente e quindi
premere il pulsante (B) regolando la velocità con l'aiuto della rotella
B1, oppure premere il pulsante (C) ed effettuare un movimento
rotatorio e dal basso verso l'alto per migliorare l'amalgama degli
alimenti. Disinserire l’apparecchio dopo l’uso; per estrarre l’accessorio
utilizzato dal piede mixer, premere il pulsante di espulsione (D).

15
Uso della frusta:
Inserire la frusta (G) nel blocco di fissaggio (F), poi inserire il tutto sul
blocco motore (A) sino al clic di sicurezza. Con la frusta, è possibile
ottenere preparati leggeri (pasta per le crêpe, albumi a neve, panna
montata, ecc.). Collegare l'apparecchio alla presa di corrente e quindi
premere il pulsante (B) regolando la velocità con l'aiuto della rotella
B1, oppure premere il pulsante (C). Dopo aver disinserito
l’apparecchio, premere il pulsante di espulsione (D) per estrarre la
frusta.
Uso del mini-tritatutto:
Prima di utilizzare il mini-tritatutto:
1. Posizionare la lama (I2) (dopo aver tolto la protezione) con
precauzione nel recipiente (I3) sull’ass e centrale. Non dimenticare
di rimettere la protezione una volta ultimata la preparazione.
2. Inserire gli ingredienti nel recipiente.
3. Posizionare il coperchio (I1), poi il blocco motore (A) sul coperchio
(I1).
4. Collegare l'apparecchio alla presa di corrente e quindi premere il
pulsante (B) regolando la velocità con l'aiuto della rotella B1,
oppure premere il pulsante (C).
Il mini-tritatutto è ideale per tritare prezzemolo, erbe, carne
(250 gr.), nocciole (100 gr.). Il recipiente (I3) deve essere riempito
ai 2/3 della capienza al massimo.
"CLICK"
3
2
1
2/3
MAX
Consigli pratici
• Il recipiente utilizzato per miscelare deve essere riempit
o ai 2/3 della capienza al
massimo, per evitare che il preparato fuoriesca.
• Il composto deve coprire almeno la base del piede mixer per garantire la massima
efficacia.
• Eliminare le ossa ed i nervi dalla carne prima di tritarla nel recipiente.
• Per miscelare i preparati caldi, togliere la casseruola dal fornello o dalla piastra
termica. Lasciare raffreddare leggermente gli alimenti cotti prima di metterli nel
recipiente.
• Non miscelare alimenti o liquidi la cui temperatura sia superiore a 80°C.
• Per gli alimenti filamentosi (porri, sedano, asparagi, ecc.) pulire il piede mixer
regolarmente durante l’uso rispettando le norme di sicurezza per lo smontaggio e la
pulizia.
• Per i preparati a base di frutta, tagliare e mondare i frutti prima di miscelarli.
• Non utilizzare l’apparecchio con alimenti duri come caffè, cubetti di ghiaccio, zollette
di zucchero, cereali o cioccolato.
• Non utilizzare il piede mixer né la frusta nel recipiente del mini-tritatutto.
• Tempi consigliati per il mini tritatutto :

16
Contribuiamo alla salvaguardia dell’ambiente !
Questo apparecchio contiene numerosi materiali valorizzabili o
riciclabili.
Smaltirlo presso il centro di raccolta rifiuti comunale o in un’apposita
discarica, conformemente alle norme in vigore.
Ingredienti Quantità max. Tempo (in velocità maxi)
Carne (Tagliata a pezzetti)
250 g 8 s
Prezzemolo
50 g 8 s
Nocciole
100 g 10 s
Groviera
150 g 10 s
Cipolle 150 g 8 s
Pulizia
ATTENZIONE: le lame sono molto affilate.
• Disinserire sempre l’apparecchio prima di procedere alla pulizia.
• Non immergere l’apparecchio, il cavo di alimentazione o la spina nell’acqua o in
qualsiasi altro liquido.
• Non lavare per alcun motivo il blocco motore (A), il blocco di fissaggio della frusta (F)
ed il coperchio del mini-tritatutto (I1) in lavastoviglie.
• Non immergere mai questi componenti nell’acqua o lavarli sotto il rubinetto. Pulirli
con una spugna umida.
• Il piede mixer (E) (lama verso l’alto), la frusta (G) (frusta verso l’alto), il bicchiere
graduato (H), la lama (I2) ed il recipiente (I1) possono essere lavati in lavastoviglie.
• Si consiglia di pulire rapidamente il piede mixer dopo l’uso. In caso di colorazione
delle parti di plastica causata da alimenti come carote, ecc., strofinare con un panno
morbido imbevuto di olio d’oliva, poi procedere alla pulizia abituale.
Sistemazione
Per avere sempre il mixer a portata di mano, utilizzare il supporto a
parete (J).
Per fissare il supporto, praticare due fori di fissaggio su un piano
orizzontale ad una distanza di 59 mm, poi posizionare il supporto sulle
viti di fissaggio, rispettando il senso giusto.
Elettrodomestico o apparecchio elettronico
a fine vita

17
Lesen Sie die Bedienungsanleitung vor dem ersten Gebrauch dieses Geräts
sorgfältig durch. Bei unsachgemäßer Verwendung übernehmen wir keine Haftung.
Beschreibung
A Motorblock
B Einschalter Stufe 1 (variabel)
B1 Drehknopf zum Einstellen der Geschwindigkeit
C Einschalter Stufe 2 (schnell)
D Auswurftaste für das Zubehör
E Mixstab
F Befestigungsaufsatz für den Schneebesen
G Schneebesen
H Mixbecher mit Messskala (0,8 Liter)
H1 Deckel des Mixbechers
I Zerkleinerer
I1 Deckel des Zerkleinerers
I2 Messerachse des Zerkleinerers
I3 Zerkleinerungsbehälter (0,5 Liter)
I4 Anti-Rutsch-Deckel
J Wandhalter
Sicherheitshinweise
• Zur Gewährleistung Ihrer Sicherheit entspricht das Gerät den geltenden Normen und
Bestimmungen:
* Niederspannungsrichtlinie,
* Elektromagnetische Verträglichkeit,
* Umwelt,
* Materialien, die mit Lebensmitteln in Berührung kommen.
• Es ist ausschließlich für die Verwendung von Wechselstrom geeignet. Vergewissern
Sie sich, dass die Spannung Ihrer Elektroinstallation mit der auf dem Typenschild des
Geräts angegebenen Spannung übereinstimmt. Bei fehlerhaftem Anschluss erlischt
die Garantie.
• Berühren Sie niemals die Messer und den Schneebesen, während diese sich in
Bewegung befinden. Kommen Sie niemals in Kontakt mit dem Messer des Mixstabs
oder dem Schneebesen, wenn das Gerät angeschlossen ist. Lassen Sie den Mixstab
niemals leer laufen. Gerät nicht auf dem Mixstab abstellen.
• Fassen Sie das Messer des Zerkleinerers immer an seiner Achse an.
• ACHTUNG: Die Messer sind sehr scharf.
• Bitte seien Sie besonders vorsichtig, wenn Sie die Klinge/das Messer aus der
Arbeitsschüssel entfernen, wenn Sie die Arbeitsschüssel entleeren oder reinigen.
• Tauchen Sie den Motorblock nicht in Wasser und halten Sie ihn nicht unter fließendes
Wasser.
DE

18
• In folgenden Situationen ist der Netzstecker zu ziehen:
* falls das Gerät unbeaufsichtigt bleibt,
* bei Funktionsstörungen,
* vor jedem Einsetzen und Abnehmen des Mixstabs oder Schneebesens, vor der
Reinigung oder Pflege,
* nach jedem Gebrauch.
• Schalten Sie das Gerät aus, bevor Sie das Zubehör auswechseln oder sich Teilen
nähern, die sich während des Gebrauchs in Bewegung befinden.
• Lassen Sie das Kabel niemals in die Nähe von oder in Berührung mit einer
Wärmequelle oder einer scharfen Kante kommen.
• Die Zuleitung darf nicht mit drehenden Teilen in Berührung kommen.
• Lassen Sie lange Haare, Schals, usw. während des Gebrauchs nicht über dem Gerät
hängen.
• Vorsicht beim Umgang mit heißen Speisen.
• Gerät nicht in heißem Fett verwenden (Spritz-, Verbrennungsgefahr).
• Arbeiten Sie mit dem Gerät nicht länger als 1 Min. ununterbrochen, und lassen Sie es
dann 5 Min. abkühlen.
• Verwenden Sie dieses Gerät nicht auf einer heißen Platte oder in der Nähe einer
offenen Flamme (Gasherd).
• Ziehen Sie den Stecker nie am Kabel aus der Steckdose.
• Verwenden Sie ein Verlängerungskabel nur dann, wenn es in ordnungsgemäßem
Zustand ist.
• Lassen Sie das Netzkabel nicht herunterhängen.
• Falls das Netzkabel beschädigt ist, muss es aus Sicherheitsgründen von einer vom
Hersteller autorisierten Servicestelle (Liste anbei) ersetzt werden.
• Ein Elektrogerät darf nicht in Betrieb genommen werden, wenn:
* es zu Boden gefallen ist,
* wenn es beschädigt oder unvollständig ist,
* wenn das Kabel sichtbare Unregelmäßikeiten oder Beschädigungen aufweist.
• Das Gerät nicht in seine Einzelteile zerlegen. Sie haben keine anderen Eingriffe als
die Reinigung und die übliche Instandhaltung durchzuführen.
• Reparaturen dürfen ausschließlich von einer autorisierten Servicestelle durchgeführt
werden.
• Das Produkt ist für den haushaltsüblichen und nicht für professionellen Gebrauch
bestimmt. Im Falle einer professionellen Nutzung gilt die Garantie nicht und es wird
keine Haftung übernommen. Verwenden Sie zu Ihrer eigenen Sicherheit nur original
Zubehör und Ersatzteile, passend zu Ihrem Gerät.
• Dieses Gerät darf nicht von Personen (einschließlich Kindern) mit verminderten
körperlichen, sensorischen oder geistigen Fähigkeiten benutzt werden. Dasselbe gilt
für Personen, die nicht die erforderliche Erfahrung und die erforderlichen Kenntnisse
besitzen, außer wenn sie von einer für ihre Sicherheit verantwortliche Person
beaufsichtigt werden oder wenn sie vorher Anweisungen bezüglich den Betrieb des
Geräts erhalten haben.
• Elektrogeräte sind kein Kinderspielzeug. Beaufsichtigen Sie Ihre Kinder, damit Sie
nicht mit dem Gerät spielen.
• Der Mixstab und der Schneebesen dürfen nicht im Arbeitsbehälter des
Zerkleinerers verwendet werden.
La pagina si sta caricando...
La pagina si sta caricando...
La pagina si sta caricando...
La pagina si sta caricando...
La pagina si sta caricando...
La pagina si sta caricando...
La pagina si sta caricando...
La pagina si sta caricando...
La pagina si sta caricando...
La pagina si sta caricando...
La pagina si sta caricando...
La pagina si sta caricando...
La pagina si sta caricando...
La pagina si sta caricando...
La pagina si sta caricando...
La pagina si sta caricando...
La pagina si sta caricando...
La pagina si sta caricando...
La pagina si sta caricando...
La pagina si sta caricando...
La pagina si sta caricando...
La pagina si sta caricando...
La pagina si sta caricando...
La pagina si sta caricando...
La pagina si sta caricando...
La pagina si sta caricando...
La pagina si sta caricando...
La pagina si sta caricando...
La pagina si sta caricando...
La pagina si sta caricando...
La pagina si sta caricando...
La pagina si sta caricando...
La pagina si sta caricando...
La pagina si sta caricando...
La pagina si sta caricando...
La pagina si sta caricando...
La pagina si sta caricando...
La pagina si sta caricando...
-
 1
1
-
 2
2
-
 3
3
-
 4
4
-
 5
5
-
 6
6
-
 7
7
-
 8
8
-
 9
9
-
 10
10
-
 11
11
-
 12
12
-
 13
13
-
 14
14
-
 15
15
-
 16
16
-
 17
17
-
 18
18
-
 19
19
-
 20
20
-
 21
21
-
 22
22
-
 23
23
-
 24
24
-
 25
25
-
 26
26
-
 27
27
-
 28
28
-
 29
29
-
 30
30
-
 31
31
-
 32
32
-
 33
33
-
 34
34
-
 35
35
-
 36
36
-
 37
37
-
 38
38
-
 39
39
-
 40
40
-
 41
41
-
 42
42
-
 43
43
-
 44
44
-
 45
45
-
 46
46
-
 47
47
-
 48
48
-
 49
49
-
 50
50
-
 51
51
-
 52
52
-
 53
53
-
 54
54
-
 55
55
-
 56
56
-
 57
57
-
 58
58


Tefal HB501850 Manuale utente
- Categoria
- Frullatori
- Tipo
- Manuale utente
in altre lingue
- English: Tefal HB501850 User manual
- français: Tefal HB501850 Manuel utilisateur
- Deutsch: Tefal HB501850 Benutzerhandbuch
- русский: Tefal HB501850 Руководство пользователя
- Nederlands: Tefal HB501850 Handleiding
- polski: Tefal HB501850 Instrukcja obsługi
- eesti: Tefal HB501850 Kasutusjuhend
- Türkçe: Tefal HB501850 Kullanım kılavuzu
Documenti correlati
Altri documenti
-
Moulinex DD306141 Manuale del proprietario
-
Tristar PD-8708 Manuale utente
-
 ZEEGMA Handy Chef Hand Blender Manuale utente
-
SEVERIN SM 3807 Istruzioni per l'uso
-
SEVERIN SM 3727 Manuale del proprietario
-
SEVERIN SM 3798 Manuale del proprietario
-
Redmond RHB-CB2932-E Manuale del proprietario
-
-
Redmond RHB-2939-E Manuale utente
-
