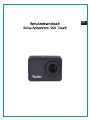
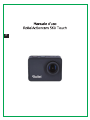
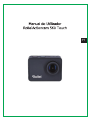
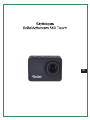
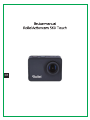
Rollei Actioncam 560 Touch Istruzioni per l'uso
- Tipo
- Istruzioni per l'uso


EN

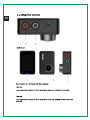
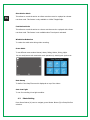
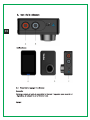
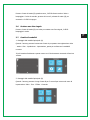
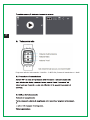
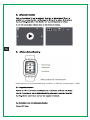
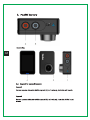
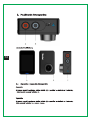
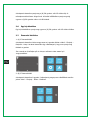
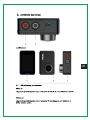
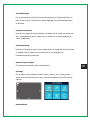
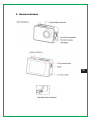
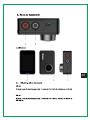
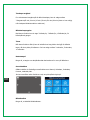
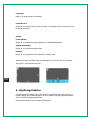
1. Key features
Video Resolution: 4K@60FPS, 4K@30FPS, 1440P@30FPS, 1080P@120FPS,
1080P@60FPS, 720P@240FPS, 720P@120FPS
Image Resolution: 20MP
2’’ TFT touch screen
3.8V/1100mAh removable Lithium-ion battery
Support Wi-Fi connection
Support 2.4G RF Remote Controller
Support MicroSD Card up to 64 GB
EN

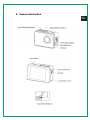
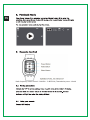
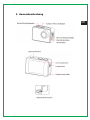
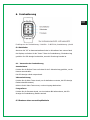
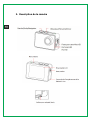
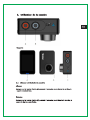
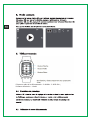
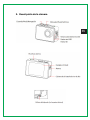
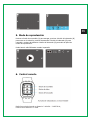
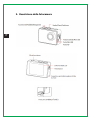
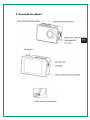
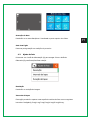
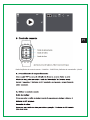
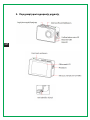
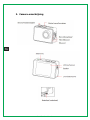
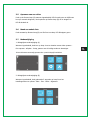
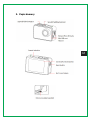
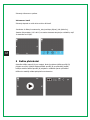
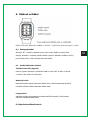
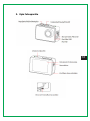
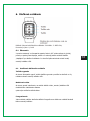
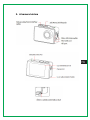
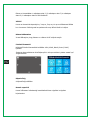
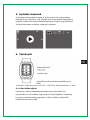
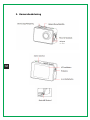
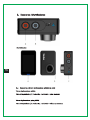
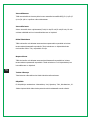
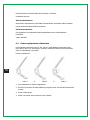
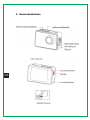
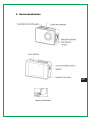
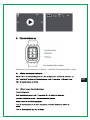
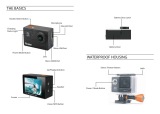
2. Camera description
EN

EN

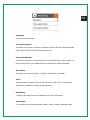
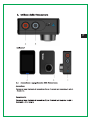
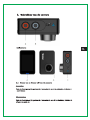
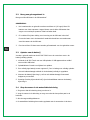
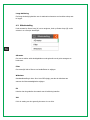
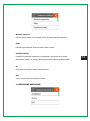
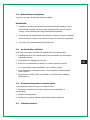
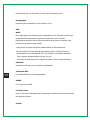
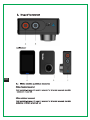
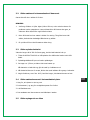
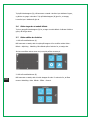
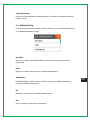
3.2 Insert a Memory Card
Insert a MicroSD card into the SD card slot.
NOTE:
1. We suggest to use Class 10 (or higher) Micro SD cards for s smooth recording.
Lower Class of the Micro SD Cards may cause the video blur or frame drops.
2. There is only one correct direction to insert the SD Card into the slot. Do not
force the card into the card slot as it may damage both the SD Card and camera.
3. A new Micro SD Card should be formatted before using.
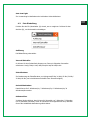
3.3 Charge the battery
Before using the AC 560 TOUCH for the first time, please fully charge the battery.
1. Connect the AC 560 TOUCH with an USB-charger or USB-device by Mini USB
cable.
2. Charging Indicator B turns red during charging.
3. A complete empty battery takes approximately 2.5 hours to get fully charged.
The red indicator turns off after the battery is fully charged.
4. When the battery is going to run empty, the red indicator B blinks twice a second.
5. Some functions, such as Wi-Fi, are unavailable if the battery is in lower condition.
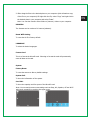
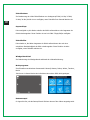
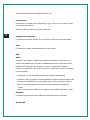
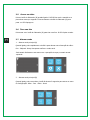
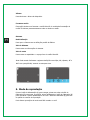
3.4 Insert camera into the waterproof case
1. Ensure the case is dry and clean.
2. Insert the camera and make sure the lens fits neatly in the lens cavity.
3. Close the locking clamps.
4. The waterproof case can be mounted, using the accessories in the box.
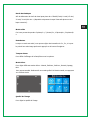
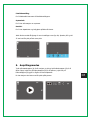
3.5 Record a video
Press Shutter button (B) when powered on, LED B turns green and keep blinking
twice a second; Press Shutter button (B) again to stop, and the LED B light turns off.
EN

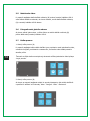
3.6 Shoot a single picture
Press Shutter button (B) once to shoot a single picture, LED B flashes green.
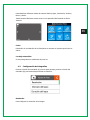
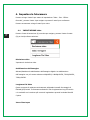
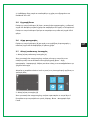
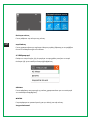
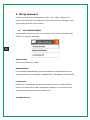
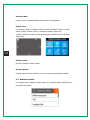
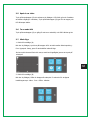
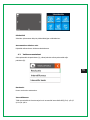
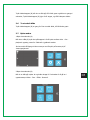
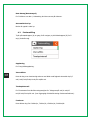
3.7 Mode Shift
1. Main mode shift (A)
When powered on, short press on button A to shift among Video Recording - Photo
Shot - Playback- Setting, pause to confirm on current mode.
You can easily access this menu with touch operation by touch the left arrow.
2. Main mode shift (B)
When powered on, long press on button B for 3 seconds to enter Setup menu: Video
- Photo - Effect - General.
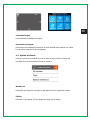
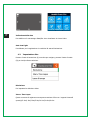
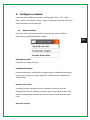
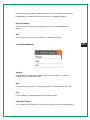
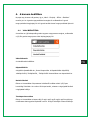
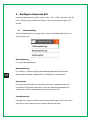
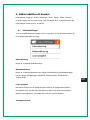
4. Setup your camera
Long press on Button B to enter Setup ”Video - Photo - Effect - General”, press
Button A to navigate and press Button B to confirm. Long press on Button B again to
exit.
EN

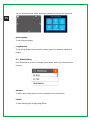
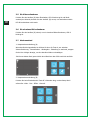
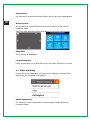
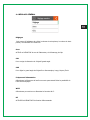
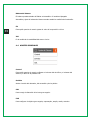
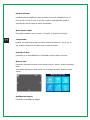
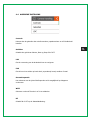
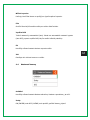
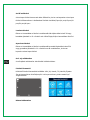
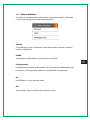
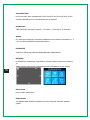
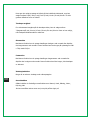
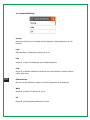
4.1 Video SETUP
Press Power Button (A) once to navigate, press Shutter Button (B) to Enter/Confirm
selection.
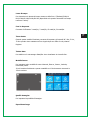
Video Resolution
To set the video resolution.
Image Stabilization
To activate/deactivate the digital image stabilization. Image stabilization can’t be
activated on 4K@60fps, 1080p@120fps, 720p@240fps, 720p@120fps.
Loop Recording
This allows to record continuously using footage intervals. The camera will delete the
oldest loop recording file and replace with the latest recording when the MicroSD
card is full.
Time Lapse Interval
This allows to record one frame at the set time interval of Off/0.5 Sec/1 Sec/3 Sec/5
Sec/10 Sec/30 Sec/60 Sec. The final video file will be stored.
Time Lapse Duration
To determine the video Timelapse duration of “Unlimited/5 Min/ 10 Min/ 15 Min/ 20
Min/ 30 Min/ 60 Min, only available when Time Lapse Photo Interval activate.
EN

Slow Motion Movie
This allows to record the action at a faster rate than usual or replayed at a slower
rate than usual. This feature is only available on 1280x 720p@120fps.
Fast Motion Movie
This allows to record the action at a slower rate than usual or replayed with a faster
rate than usual. This feature is not available when Time lapse is activated.
Wind Noise Reduction
To reduce the wind noise during video recording.
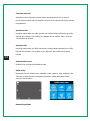
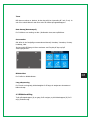
Scene Mode
To set different scene modes: Manual, Water, Riding, Winter, Diving, Night.
You can easily access this mode with touch operation by touching the right arrow.
Date Stamp
To define if the Date/Time mark is displayed on top of the videos.
Auto Low Light
To use for recording in low light condition.
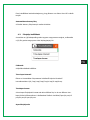
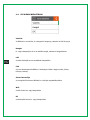
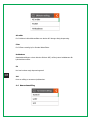
4.2 Photo Setting
Press Power Button (A) once to navigate, press Shutter Button (B) to Enter/Confirm
selection.
EN

Resolution
To set the image resolution.
Time Lapse Interval
This allows you to shoot a continuous sequence of photos with the following intervals
Off/0.5 Sec/1 Sec/3 Sec/5 Sec/10 Sec/30 Sec/60 Sec.
Time Lapse Duration
To determine the photo Time lapse duration of “Unlimited/5 Min/ 10 Min/ 15 Min/ 20
Min/ 30 Min/ 60 Min (only available when Time Lapse Photo Interval activated).
Photo Burst
This allows you to take 3 shots/1s, 7 shots/2s, 15 shots/4s, 30 shots/8s.
Timer
When this mode is enabled, it lets you set intervals of 3 Sec, 5 Sec, 10 Sec when a
single photo is taken after clicking the Record button.
Date Stamp
To define if the Date/Time mark is displayed at the top of the photos.
Scene Mode
To set different scene modes: Manual, Outdoor, Indoor, Portrait, Landscape, Night.
EN

You can easily access this modes with touch operation by touching the right arrow.
Picture Quality
To set the picture quality.
Long Exposure
To use a long-duration shutter speed to sharply capture the stationary elements of
images.
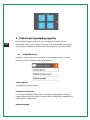
4.3 Effect Setting
Press Power Button (A) once to navigate, press Shutter Button (B) to Enter/Confirm
selection.
AE Meter
To define which image areas are used to calculate the correct exposure.
FILTER
To filter natural light to change image effects.
EN

White Balance
Factory default is Auto. If you switch Auto OFF, please adjust white balance when
lighting condition changes.
EV
This allows user to set the light exposure value.
ISO
This is the measurement of the sensor’s sensitivity to light.
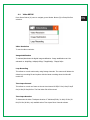
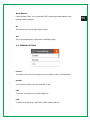
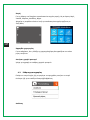
4.4 GENERAL SETTING
Control
This allows user to set the microphone volume, Speaker volume, LCD Brightness.
Sounds
Turns sound of Shutter, Boot-up, Beep OFF or ON.
LDC
To correct the distortion of the wide-angle lens.
FOV
To set the lens wide angle, Super Wide, Wide, Medium, Narrow.
EN

Power Frequency
Selecting the correct light frequency will avoid the possibility for strobing.
WIFI
Selecting to turn on or turn off the Wi-Fi function.
RF
Turn OFF or turn ON the remote control function.
Date & Time
This allows user to adjust the date &time.
Screen Saver
This will determine if the LCD will turn off after 1 min, 3 min, 5 min. Press any key to
turn the screen on.
Select OFF to keep the screen always ON.
Auto Power OFF
The camera turns OFF when not in use after a specified time.
Quick Record
The camera records automatically once power on.
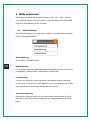
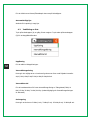
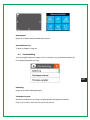
USB
MSDC
Use the USB cable to connect the camera to your computer, the camera will turn on
automatically. Enter into storage mode and your camera is used as an external
storage device. Alternatively, you can remove the MicroSD card and use a card
reader (not included) to achieve the same result.
1. Select the file(s) you want to transfer to your computer by highlighting them.
EN

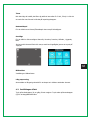
2. Either drag the files to the desired place on your computer (this will make a copy
of the file on your computer) OR right-click the file, select “Copy” and right-click in
the desired place in your computer and select “Paste”.
Note: You can also transfer entire folders of pictures / videos to your computer.
UVCMJPG
The Camera can be used as a PC camera (webcam).
Reset WiFi Setting
To reset the Wi-Fi to factory default.
LANGUAGE
To select the device languages.
Format Card
This is to format the MicroSD card. Choosing to format the card will permanently
erase all data on the card.
System
Factory Reset
To reset the camera to factory default settings.
System Info
To show the information of the system.
Card Info
To show the capacity and free space of the MicroSD card.
Note: You can easily access some settings such as Beep, Mic, Speaker, RF and Wi-Fi
with touch operation by touching the upper arrow.
EN

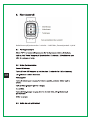
Radio frequency remote control: 2.400GHz - 2.4835 GHz; Transmission power: 1.6mW
EN

Press the Power OFF button and hold on for 3 seconds to turn off the camera, the
LED indicator turns off accordingly.
Video Record
Press the video button once to start recording, the LED indicator flickers twice also,
press the Video button again to stop.
Taking a photo
Press the Photo button once to take a single picture, the LED indicator of the remote
flickers twice.
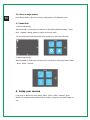
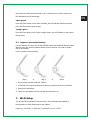
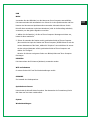
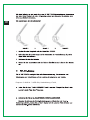
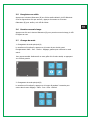
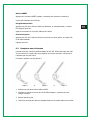
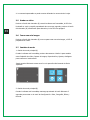
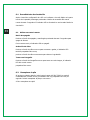
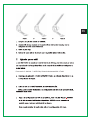
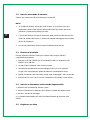
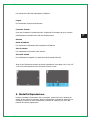
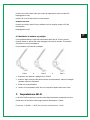
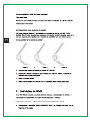
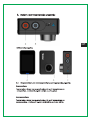
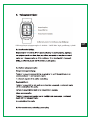
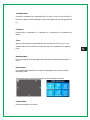
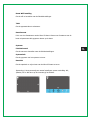
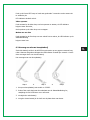
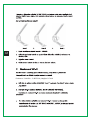
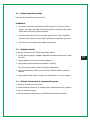
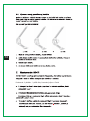
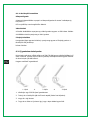
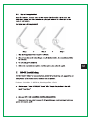
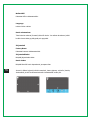
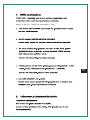
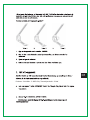
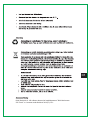
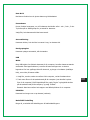
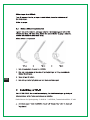
6.3 Replace a new button battery
Like any battery, the one in the AC 560 TOUCH remote will eventually become empty.
When it does, the red LED indicator flickers once per second. You need to replace
with a new battery.
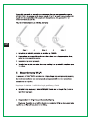
How to replace a button battery?
Step 1 Step 2 Step 3
1. Buy a button cell with model No. CR2032.
2. Screw the round cap at the bottom of remote, see above pictures for reference.
3. Remove the old battery.
4. Insert the new battery into the slot with the flat surface up.
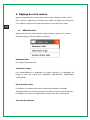
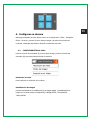
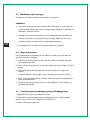
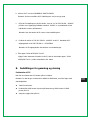
7. Wi-Fi Setup
The AC 560 TOUCH allows full camera control, live previewing and playback of
photos/videos on most Smart phones and Tablets.
Frequency: 2.400GHz - 2.4835 GHz; Transmission power: 17mW
EN

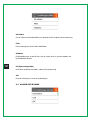
a. Download the App “Rollei AC550/560 Touch” from “Google Play Store” or from
the Apple “App Store”.
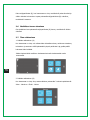
b. Activate Wi-Fi in the GENERAL SETUP MENU.
Note: You can easily access the Wi-Fi setting with touch operation by swiping up
c. Go to the Wi-Fi settings on your Phone, you will see “AC 560 TOUCH-XXXXXX” in
the list of available Wireless networks. “XXXXX” is a placeholder for the
individual number of the camera.
Note: You can change the Wi-Fi name in the menu setting.
d. Connect your Phone to the “AC 560 TOUCH-XXXXXX” via Wi-Fi. The default Wi-
Fi Password for the AC 560 TOUCH is: 1234567890.
Note: You can change the Wi-Fi password in the menu setting.
e. Open the app “Rollei AC550/560 Touch”
Important: Before connecting camera via Wi-Fi, you need to download the “Rollei
AC550/560 Touch” App on your smart phone or tablet.
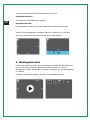
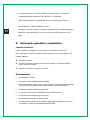
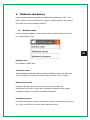
8. Saving and Viewing Options
Connecting to TV
You can display the camera LCD screen on a TV screen.
Note: You will need an extra Micro HDMI to HDMI cable, which is not included in the
standard package.
Turn the camera on;
Connect Mini HDMI end to the port on camera and HDMI end to HDMI port on
the TV;
Select the right source on the TV.
Cautions
Do not drop the camera.
EN

Do not place heavy objects on the camera.
Keep the camera away from water and liquids (unless equipped with waterproof
case). This may cause malfunction.
Recharge the battery via the USB cable.
The camera should not be in heat over 55°C.
Do not use the camera when it is low power.
Do not use the camera while it is in charging.
Do not attempt to open the case of the camera or modify it in any way. If the
camera has been detached, the warranty will be void.
Disposal
Dispose of packaging: For disposal, separate packaging into different types.
Cardboard and board must be disposed of as paper and foil must be recycled.
Disposal of Waste Electrical and Electronic Equipment and/or
Battery by users in private households in the European Union.
This symbol on the product or on the packaging indicates that this cannot be
disposed of as a household waste. You must dispose of your waste
equipment and/or battery by handling it over to the applicable take-back
scheme for the recycling of electrical and electronic equipment and/or battery.
For more information about recycling of this equipment and/or battery, please
contact your city office, the shop where you purchased the equipment or your
household waste disposal service. The recycling of materials will help to
conserve natural resources and ensure that it is recycled in a manner that
protects human health and environment.
Battery warning
Never dismantle, crush, or pierce the battery, or allow the battery to short-
circuit. Do not expose battery being placed in high temperature environment,
if battery leaks or bulges, stop continue to use.
Always charge using the charger. Risk of explosion if battery is replaced by
an incorrect type.
Keep the battery out of reach of children.
Batteries may explode if exposed to naked fire. Never dispose of batteries in
a fire.
Disposed of used batteries observing local regulations.
Before disposing the device, please remove the battery.
EN

The Rollei GmbH & Co. KG herewith declare, that the action camera "Rollei
Actioncam 560 Touch" complies with the directive 2014/53/EU:
The complete text of the EU Declaration of Conformity can be downloaded at the
following Internet address: www.rollei.com/EGK/ac560Touch
2011/65/EC RoHs Directive
2014/53/EU RED-Directive
EN

DE
La pagina si sta caricando...
La pagina si sta caricando...
La pagina si sta caricando...
La pagina si sta caricando...
La pagina si sta caricando...
La pagina si sta caricando...
La pagina si sta caricando...
La pagina si sta caricando...
La pagina si sta caricando...
La pagina si sta caricando...
La pagina si sta caricando...
La pagina si sta caricando...
La pagina si sta caricando...
La pagina si sta caricando...
La pagina si sta caricando...
La pagina si sta caricando...
La pagina si sta caricando...
La pagina si sta caricando...
La pagina si sta caricando...
La pagina si sta caricando...
La pagina si sta caricando...
La pagina si sta caricando...
La pagina si sta caricando...
La pagina si sta caricando...
La pagina si sta caricando...
La pagina si sta caricando...
La pagina si sta caricando...
La pagina si sta caricando...
La pagina si sta caricando...
La pagina si sta caricando...
La pagina si sta caricando...
La pagina si sta caricando...
La pagina si sta caricando...
La pagina si sta caricando...
La pagina si sta caricando...
La pagina si sta caricando...
La pagina si sta caricando...
La pagina si sta caricando...
La pagina si sta caricando...
La pagina si sta caricando...
La pagina si sta caricando...
La pagina si sta caricando...
La pagina si sta caricando...
La pagina si sta caricando...
La pagina si sta caricando...
La pagina si sta caricando...
La pagina si sta caricando...
La pagina si sta caricando...
La pagina si sta caricando...
La pagina si sta caricando...
La pagina si sta caricando...
La pagina si sta caricando...
La pagina si sta caricando...
La pagina si sta caricando...
La pagina si sta caricando...
La pagina si sta caricando...
La pagina si sta caricando...
La pagina si sta caricando...
La pagina si sta caricando...
La pagina si sta caricando...
La pagina si sta caricando...
La pagina si sta caricando...
La pagina si sta caricando...
La pagina si sta caricando...
La pagina si sta caricando...
La pagina si sta caricando...
La pagina si sta caricando...
La pagina si sta caricando...
La pagina si sta caricando...
La pagina si sta caricando...
La pagina si sta caricando...
La pagina si sta caricando...
La pagina si sta caricando...
La pagina si sta caricando...
La pagina si sta caricando...
La pagina si sta caricando...
La pagina si sta caricando...
La pagina si sta caricando...
La pagina si sta caricando...
La pagina si sta caricando...
La pagina si sta caricando...
La pagina si sta caricando...
La pagina si sta caricando...
La pagina si sta caricando...
La pagina si sta caricando...
La pagina si sta caricando...
La pagina si sta caricando...
La pagina si sta caricando...
La pagina si sta caricando...
La pagina si sta caricando...
La pagina si sta caricando...
La pagina si sta caricando...
La pagina si sta caricando...
La pagina si sta caricando...
La pagina si sta caricando...
La pagina si sta caricando...
La pagina si sta caricando...
La pagina si sta caricando...
La pagina si sta caricando...
La pagina si sta caricando...
La pagina si sta caricando...
La pagina si sta caricando...
La pagina si sta caricando...
La pagina si sta caricando...
La pagina si sta caricando...
La pagina si sta caricando...
La pagina si sta caricando...
La pagina si sta caricando...
La pagina si sta caricando...
La pagina si sta caricando...
La pagina si sta caricando...
La pagina si sta caricando...
La pagina si sta caricando...
La pagina si sta caricando...
La pagina si sta caricando...
La pagina si sta caricando...
La pagina si sta caricando...
La pagina si sta caricando...
La pagina si sta caricando...
La pagina si sta caricando...
La pagina si sta caricando...
La pagina si sta caricando...
La pagina si sta caricando...
La pagina si sta caricando...
La pagina si sta caricando...
La pagina si sta caricando...
La pagina si sta caricando...
La pagina si sta caricando...
La pagina si sta caricando...
La pagina si sta caricando...
La pagina si sta caricando...
La pagina si sta caricando...
La pagina si sta caricando...
La pagina si sta caricando...
La pagina si sta caricando...
La pagina si sta caricando...
La pagina si sta caricando...
La pagina si sta caricando...
La pagina si sta caricando...
La pagina si sta caricando...
La pagina si sta caricando...
La pagina si sta caricando...
La pagina si sta caricando...
La pagina si sta caricando...
La pagina si sta caricando...
La pagina si sta caricando...
La pagina si sta caricando...
La pagina si sta caricando...
La pagina si sta caricando...
La pagina si sta caricando...
La pagina si sta caricando...
La pagina si sta caricando...
La pagina si sta caricando...
La pagina si sta caricando...
La pagina si sta caricando...
La pagina si sta caricando...
La pagina si sta caricando...
La pagina si sta caricando...
La pagina si sta caricando...
La pagina si sta caricando...
La pagina si sta caricando...
La pagina si sta caricando...
La pagina si sta caricando...
La pagina si sta caricando...
La pagina si sta caricando...
La pagina si sta caricando...
La pagina si sta caricando...
La pagina si sta caricando...
La pagina si sta caricando...
La pagina si sta caricando...
La pagina si sta caricando...
La pagina si sta caricando...
La pagina si sta caricando...
La pagina si sta caricando...
La pagina si sta caricando...
La pagina si sta caricando...
La pagina si sta caricando...
La pagina si sta caricando...
La pagina si sta caricando...
La pagina si sta caricando...
La pagina si sta caricando...
La pagina si sta caricando...
La pagina si sta caricando...
La pagina si sta caricando...
La pagina si sta caricando...
La pagina si sta caricando...
La pagina si sta caricando...
La pagina si sta caricando...
La pagina si sta caricando...
La pagina si sta caricando...
La pagina si sta caricando...
La pagina si sta caricando...
La pagina si sta caricando...
La pagina si sta caricando...
La pagina si sta caricando...
La pagina si sta caricando...
La pagina si sta caricando...
La pagina si sta caricando...
La pagina si sta caricando...
La pagina si sta caricando...
La pagina si sta caricando...
La pagina si sta caricando...
La pagina si sta caricando...
La pagina si sta caricando...
La pagina si sta caricando...
La pagina si sta caricando...
La pagina si sta caricando...
La pagina si sta caricando...
La pagina si sta caricando...
La pagina si sta caricando...
La pagina si sta caricando...
La pagina si sta caricando...
La pagina si sta caricando...
La pagina si sta caricando...
La pagina si sta caricando...
La pagina si sta caricando...
La pagina si sta caricando...
La pagina si sta caricando...
La pagina si sta caricando...
La pagina si sta caricando...
La pagina si sta caricando...
La pagina si sta caricando...
La pagina si sta caricando...
La pagina si sta caricando...
La pagina si sta caricando...
La pagina si sta caricando...
La pagina si sta caricando...
La pagina si sta caricando...
La pagina si sta caricando...
La pagina si sta caricando...
La pagina si sta caricando...
La pagina si sta caricando...
La pagina si sta caricando...
La pagina si sta caricando...
La pagina si sta caricando...
La pagina si sta caricando...
La pagina si sta caricando...
La pagina si sta caricando...
La pagina si sta caricando...
La pagina si sta caricando...
La pagina si sta caricando...
La pagina si sta caricando...
La pagina si sta caricando...
La pagina si sta caricando...
La pagina si sta caricando...
La pagina si sta caricando...
La pagina si sta caricando...
La pagina si sta caricando...
La pagina si sta caricando...
La pagina si sta caricando...
La pagina si sta caricando...
La pagina si sta caricando...
La pagina si sta caricando...
La pagina si sta caricando...
La pagina si sta caricando...
La pagina si sta caricando...
La pagina si sta caricando...
La pagina si sta caricando...
La pagina si sta caricando...
La pagina si sta caricando...
La pagina si sta caricando...
La pagina si sta caricando...
La pagina si sta caricando...
La pagina si sta caricando...
La pagina si sta caricando...
La pagina si sta caricando...
-
 1
1
-
 2
2
-
 3
3
-
 4
4
-
 5
5
-
 6
6
-
 7
7
-
 8
8
-
 9
9
-
 10
10
-
 11
11
-
 12
12
-
 13
13
-
 14
14
-
 15
15
-
 16
16
-
 17
17
-
 18
18
-
 19
19
-
 20
20
-
 21
21
-
 22
22
-
 23
23
-
 24
24
-
 25
25
-
 26
26
-
 27
27
-
 28
28
-
 29
29
-
 30
30
-
 31
31
-
 32
32
-
 33
33
-
 34
34
-
 35
35
-
 36
36
-
 37
37
-
 38
38
-
 39
39
-
 40
40
-
 41
41
-
 42
42
-
 43
43
-
 44
44
-
 45
45
-
 46
46
-
 47
47
-
 48
48
-
 49
49
-
 50
50
-
 51
51
-
 52
52
-
 53
53
-
 54
54
-
 55
55
-
 56
56
-
 57
57
-
 58
58
-
 59
59
-
 60
60
-
 61
61
-
 62
62
-
 63
63
-
 64
64
-
 65
65
-
 66
66
-
 67
67
-
 68
68
-
 69
69
-
 70
70
-
 71
71
-
 72
72
-
 73
73
-
 74
74
-
 75
75
-
 76
76
-
 77
77
-
 78
78
-
 79
79
-
 80
80
-
 81
81
-
 82
82
-
 83
83
-
 84
84
-
 85
85
-
 86
86
-
 87
87
-
 88
88
-
 89
89
-
 90
90
-
 91
91
-
 92
92
-
 93
93
-
 94
94
-
 95
95
-
 96
96
-
 97
97
-
 98
98
-
 99
99
-
 100
100
-
 101
101
-
 102
102
-
 103
103
-
 104
104
-
 105
105
-
 106
106
-
 107
107
-
 108
108
-
 109
109
-
 110
110
-
 111
111
-
 112
112
-
 113
113
-
 114
114
-
 115
115
-
 116
116
-
 117
117
-
 118
118
-
 119
119
-
 120
120
-
 121
121
-
 122
122
-
 123
123
-
 124
124
-
 125
125
-
 126
126
-
 127
127
-
 128
128
-
 129
129
-
 130
130
-
 131
131
-
 132
132
-
 133
133
-
 134
134
-
 135
135
-
 136
136
-
 137
137
-
 138
138
-
 139
139
-
 140
140
-
 141
141
-
 142
142
-
 143
143
-
 144
144
-
 145
145
-
 146
146
-
 147
147
-
 148
148
-
 149
149
-
 150
150
-
 151
151
-
 152
152
-
 153
153
-
 154
154
-
 155
155
-
 156
156
-
 157
157
-
 158
158
-
 159
159
-
 160
160
-
 161
161
-
 162
162
-
 163
163
-
 164
164
-
 165
165
-
 166
166
-
 167
167
-
 168
168
-
 169
169
-
 170
170
-
 171
171
-
 172
172
-
 173
173
-
 174
174
-
 175
175
-
 176
176
-
 177
177
-
 178
178
-
 179
179
-
 180
180
-
 181
181
-
 182
182
-
 183
183
-
 184
184
-
 185
185
-
 186
186
-
 187
187
-
 188
188
-
 189
189
-
 190
190
-
 191
191
-
 192
192
-
 193
193
-
 194
194
-
 195
195
-
 196
196
-
 197
197
-
 198
198
-
 199
199
-
 200
200
-
 201
201
-
 202
202
-
 203
203
-
 204
204
-
 205
205
-
 206
206
-
 207
207
-
 208
208
-
 209
209
-
 210
210
-
 211
211
-
 212
212
-
 213
213
-
 214
214
-
 215
215
-
 216
216
-
 217
217
-
 218
218
-
 219
219
-
 220
220
-
 221
221
-
 222
222
-
 223
223
-
 224
224
-
 225
225
-
 226
226
-
 227
227
-
 228
228
-
 229
229
-
 230
230
-
 231
231
-
 232
232
-
 233
233
-
 234
234
-
 235
235
-
 236
236
-
 237
237
-
 238
238
-
 239
239
-
 240
240
-
 241
241
-
 242
242
-
 243
243
-
 244
244
-
 245
245
-
 246
246
-
 247
247
-
 248
248
-
 249
249
-
 250
250
-
 251
251
-
 252
252
-
 253
253
-
 254
254
-
 255
255
-
 256
256
-
 257
257
-
 258
258
-
 259
259
-
 260
260
-
 261
261
-
 262
262
-
 263
263
-
 264
264
-
 265
265
-
 266
266
-
 267
267
-
 268
268
-
 269
269
-
 270
270
-
 271
271
-
 272
272
-
 273
273
-
 274
274
-
 275
275
-
 276
276
-
 277
277
-
 278
278
-
 279
279
-
 280
280
-
 281
281
-
 282
282
-
 283
283
-
 284
284
-
 285
285
-
 286
286


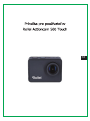
Rollei Actioncam 560 Touch Istruzioni per l'uso
- Tipo
- Istruzioni per l'uso
in altre lingue
- français: Rollei Actioncam 560 Touch Mode d'emploi
- Deutsch: Rollei Actioncam 560 Touch Bedienungsanleitung
- português: Rollei Actioncam 560 Touch Instruções de operação
- slovenčina: Rollei Actioncam 560 Touch Návod na používanie
- dansk: Rollei Actioncam 560 Touch Betjeningsvejledning
- svenska: Rollei Actioncam 560 Touch Bruksanvisningar
Documenti correlati
-
Rollei Actioncam 9s Plus Guida utente
-
-
-
Rollei AC500 Guida utente
-
-
 Rollei Actioncam Series User AC425 Guida Rapida
-
-
-
-

Altri documenti
-
Evolveo W8 Manuale utente
-
AKASO V50 Pro SE Manuale utente
-
National Geographic 9683500 Manuale del proprietario
-
Midland H7+ WIFI Action Kamera, Ultra HD 4K Manuale utente
-
BearDevil Black Manuale utente
-
-
NexiGo N940P Manuale utente
-
Brinno TLC200 Manuale utente
-
Evolveo strongvision mini Manuale del proprietario
-
Bahco BE210 Manuale utente