
75567_V7.1_10/07/2020
FR
2-11 / 60-64
www.gys.fr
EN
5 / 12-19 / 60-64
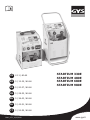
STARTIUM 330E
STARTIUM 480E
STARTIUM 680E
STARTIUM 980E
DE
5 / 20-27 / 60-64
ES
5 / 28-35 / 60-64
RU
5 / 36-43 / 60-64
NL
5 / 44-51 / 60-64
IT
5 / 52-59 / 60-64

2
STARTIUM 330E / 480E / 680E / 980E
FR
Notice originale
INSTRUCTIONS DE SÉCURITÉ
Ce manuel d’utilisation comprend des indications sur le
fonctionnement de votre appareil et les précautions à suivre pour
votre sécurité. Merci de le lire attentivement avant la première
utilisation et de le conserver soigneusement pour toute relecture
future. Ces instructions doivent être lues et bien comprises avant
toute opération. Toute modification ou maintenance non indiquée
dans le manuel ne doit pas être entreprise. Tout dommage corporel
ou matériel dû à une utilisation non-conforme aux instructions de
ce manuel ne pourra être retenu à la charge du fabricant. En cas
de problème ou d’incertitude, consulter une personne qualifiée
pour manier correctement l’appareil. Cet appareil doit être utilisé
uniquement pour faire de la recharge ou du démarrage dans les
limites indiquées sur l’appareil et le manuel. Il faut respecter les
instructions relatives à la sécurité. En cas d’utilisation inadéquate ou
dangereuse, le fabricant ne pourra être tenu responsable.
Appareil destiné à un usage à l’intérieur. Il ne doit pas être exposé
à la pluie.
Cet appareil peut être utilisé par des enfants âgés d’au moins 8 ans
et par des personnes ayant des capacités physiques, sensorielles
ou mentales réduites ou dénuées d’expérience ou de connaissance,
s’ils (si elles) sont correctement surveillé(e)s ou si des instructions
relatives à l’utilisation de l’appareil en toute sécurité leur ont été
données et si les risques encourus ont été appréhendés. Les enfants
ne doivent pas jouer avec l’appareil. Le nettoyage et l’entretien par
l’usager ne doivent pas être effectués par des enfants sans surveil-
lance.
A n’utiliser en aucun cas pour charger des piles ou des batteries
non-rechargeables.
Ne pas utiliser l’appareil, si le cordon d’alimentation ou la fiche de
secteur sont endommagés.
Ne jamais charger une batterie gelée ou endommagée.
Ne pas couvrir l’appareil.
Ne pas placer l’appareil à proximité d’une source de chaleur et à
des températures durablement élevées (supérieurs à 50°C).
Ne pas obstruer les ouvertures de ventilation. Se référer à la partie
installation avant d’utiliser l’appareil.
Le mode de fonctionnement ainsi que les restrictions applicables à
l’utilisation sont expliqués ci-après dans ce mode d’emploi.
Risque d’explosion et d’incendie!
Une batterie en charge peut émettre des gaz explosif.
• Pendant la charge, la batterie doit être placée dans un
emplacement bien aéré.
• Eviter les flammes et les étincelles. Ne pas fumer.
• Protéger les surfaces de contacts électriques de la batterie à
l’encontre des courts-circuits.

3
STARTIUM 330E / 480E / 680E / 980E
FR
Notice originale
Risque de projection d’acide !
• Porter des lunettes et des gants de protection.
• En cas de contact avec les yeux ou la peau, rincer immédiatement
à l’eau et consulter un médecin sans tarder.
Connexion / déconnexion :
• Déconnecter l’alimentation avant de brancher ou de débrancher
les connexions sur la batterie.
• La borne de la batterie non reliée au châssis doit être connectée la
première. L’autre connexion doit être effectuée sur le châssis loin
de la batterie et de la canalisation de combustible. Le chargeur
de batterie doit alors être raccordé au réseau.
• Après l’opération de charge, débrancher le chargeur de batterie
du réseau puis retirer la connexion du châssis et enfin la connexion
de la batterie, dans l’ordre indiqué.
Raccordement :
• Cet appareil doit être raccordé à un socle de prise de courant
relié à la terre.
• Cet appareil est muni d’une protection par fusible
• Le raccordement au réseau d’alimentation doit être effectué
conformément aux règles d’installation nationales.
680E et
980E
uniquement
• Ce matériel destiné aux environnements industriels (classe A)
n’est pas prévu pour être utilisé dans un site résidentiel où le
courant électrique est fourni par le réseau public d’alimentation
basse tension. Il peut y avoir des difficultés potentielles pour
assurer la compatibilité électromagnétique dans ces sites, à
cause des perturbations conduites, aussi bien que rayonnées à
fréquence radioélectrique.
680E et
980E
uniquement
• Ce matériel n’est pas conforme à la CEI 61000-3-
12 et est destiné à être raccordé à des réseaux basse
tension privés connectés au réseau public d’alimentation seule-
ment au niveau moyenne et haute tension. S’il est connecté à un
réseau public d’alimentation basse tension, il est de la respon-
sabilité de l’installateur ou de l’utilisateur du matériel de s’assu-
rer, en consultant l’opérateur du réseau de distribution, que le
matériel peut être connecté.
Entretien :
• Si le câble d’alimentation est endommagé, il doit être remplacé
par le fabricant, son service après-vente ou des personnes de
qualification similaire afin d’éviter un danger.
• L’entretien doit être effectué que par une personne qualifiée
• Avertissement ! Débrancher toujours la fiche de la prise secteur
avant d’effectuer des travaux sur l’appareil.

4
STARTIUM 330E / 480E / 680E / 980E
FR
Notice originale
• Si le fusible interne est fondu, il doit être remplacé par le fabri-
cant, son service après-vente ou des personnes de qualification
similaire afin d’éviter un danger.
• Régulièrement, enlever le capot et dépoussiérer à la soufflette.
En profiter pour faire vérifier la tenue des connexions électriques
avec un outil isolé par un personnel qualifié.
• N’utiliser en aucun cas des solvants ou autres produits nettoyants
agressifs
• Nettoyer les surfaces de l’appareil à l’aide d’un chiffon sec.
Réglementation :
• Appareil conforme aux directives européennes.
• La déclaration de conformité est disponible sur notre site internet.
• Marque de conformité EAC (Communauté économique
Eurasienne).
• Appareil conforme aux normes Marocaines.
• La déclaration Cم (CMIM) de conformité est disponible sur notre site
internet.
Mise au rebut :
• Ce matériel fait l’objet d’une collecte sélective. Ne pas jeter dans
une poubelle domestique.

5
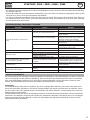
STARTIUM 330E / 480E / 680E / 980E
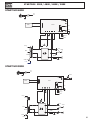
INTERFACE / INTERFACE / BEDIENFELD / INTERFAZ / ИНТЕРФЕЙС / BEDIENING/ INTERFACCIA
FR EN DE ES RU NL IT
1
Mode START ENGINE START ENGINE mode START ENGINE modus Modo START ENGINE Режим START ENGINE START ENGINE modus Modo START ENGINE
2
Afcheur Display Anzeige Marcador Индикатор Weergavescherm Schermo
3
LED afchage en
minute
LED display in minutes Anzeige in Minuten Indicación en minutos Индикация в минутах Weergave in minuut
LED visualizzazione in
minuti
4
LED afchage en volt LED display in volt Anzeige in Volt Indicación en voltios Индикация в Вольтах Weergave in Volt
LED visualizzazione in
volt
5
LED afchage en
pourcentage
LED display in percen-
tage
Anzeige in Prozent
Indicación en porcen-
taje
Индикация в
Процентах
Weergave in percent
LED visualizzazione in
percentuale
6
LED signalant une
erreur
LED signals an error Fehler-LED
LED que indica un
error
Светодиод,
указывающий ошибку
LED geeft een fout aan LED segnalando errore
7
LED signalant que la
batterie est en charge
(Les pinces sont sous
tension)
LED signals that the
battery is charging
(Voltage in the clamps)
LED signalisiert, dass
die Auswahl aktiv ist
(die Klemmen sind
unter Spannung)
LED que indica que la
selección está activa
(las pinzas están bajo
tensión)
Светодиод,
указывающий, что
выбор активирован
(зажимы под
напряжением)
De LED geeft aan
dat de selectie actief
is (De klemmen zijn
onder spanning)
LED segnalando che la
batteria è sotto carica
(i morsetti sono sotto
tensione)
8
LED signalant qu’une
batterie est branchée
en 24V
LED signals that a
battery is plugged
in 24V
LED die den Anschluss
an eine 24V-Batterie
anzeigt
LED que indica que
una batería está
conectada en 24V
Светодиод,
указывающий что
батарея подключена
в конфигурации 24 В
De LED geeft aan
dat de accu op 24V
aangesloten is.
LED segnalando che
una batteria è
collegata in 24V
9
Bouton START/STOP START/STOP button START/STOP-Taste Botón Start/Stop Кнопка START/STOP Selectie start knop Tasto START/STOP
10
LED signalant qu’une
batterie est branchée
en 12V
LED signals that a
battery is plugged
in 12V
LED die den Anschluss
an eine 12V-Batterie
anzeigt
LED que indica que
una batería esta
conectada en 12V
Светодиод,
указывающий что
батарея подключена
в конфигурации 12 В
De LED geeft aan
dat de accu op 12V
aangesloten is.
LED segnalando che
una batteria è
collegata in 12V
11
LED signalant que l’uti-
lisateur est en phase
de paramètrage
LED signals that the
user is in the settings
phase
LED die die Möglichkeit
der Einstellung anzeigt
LED modo de selección
Светодиод
выбранного режима.
LED selectie modus
LED segnalando che
l’utente è in fase di
regolazione
12
Bouton de sélection du
type de batterie et du
test de l’alternateur
Selection button for
battery type and alter-
nator test
Taste zur Einstellung
der Batterietyps
Botón de selección del
tipo de batería
Кнопка выбора типа
батареи.
Accu type selectie
knop
Tasto di selezione del
tipo di batteria e di
test dell’alternatore
13
Bouton de sélection de
l’allure de charge et du
mode START ENGINE
Selection button for
charging speed and
START ENGINE mode
Taste zur Einstellung
der Ladestärke
Botón de selección de
velocidad de carga
Кнопка выбора
скорости зарядки
Laad snelheid selectie
knop
Tasto di selezione della
velocità di carica e del
modo START ENGINE
14
Bouton TIMER TIMER button TIMER Taste Botón TIMER Кнопка TIMER TIMER knop Tasto TIMER
• Remarque : L’afcheur n’est pas un outil de mesure, il ne donne qu’une indication sur la tension. L’étalonnage n’est pas possible.
• NB : The display is not a measuring unit, it only gives a voltage indication. Calibration is not possible.
• Anmerkung: Die Anzeige ist kein Messgerät. Eine Kalibrierung ist nicht möglich.
• Nota: el marcador no es una herramienta de medida, solo indica sobre la tensión La calibración no es posible.
• Примечание: Индикатор не является инструментом измерения, он дает лишь информацию по напряжению. Калибровка не возможна.
• Opmerking: Het weergavescherm is geen meetinstrument, het geeft alleen een indicatie van de spanning. De kalibratie is niet mogelijk.
21
1011
12
14
13
9 8 7
3
4
5
6

6
STARTIUM 330E / 480E / 680E / 980E
FR
Notice originale
DESCRIPTION GÉNÉRALE
Les appareils STARTIUM sont destinés à la recharge et au démarrage des batteries au plomb, à électrolyte liquide ou
gel, 12V et 24V.
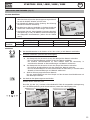
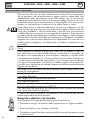
Montage de la poignée et des roues (uniquement pour les versions 480E, 680E et 980E) :
ALIMENTATION ÉLECTRIQUE
Vérier que l’alimentation et ses protections (fusibles) sont compatibles avec le courant nécessaire en utilisation.
L’appareil doit être placé de manière à ce que la prise de courant soit accessible.
Il doit être relié à une prise de courant AVEC terre et selon les recommandations suivantes :
STARTIUM 330E STARTIUM 480E STARTIUM 680E STARTIUM 980E
Tension secteur 230V - 1 ph 230V - 1 ph 230V - 1 ph 230V - 1 ph
Protection 16 A 16 A 16 A 16 A*
Puissance de
charge
800 W 1 700 W 2 000 W 2 000 W
démarrage
6 500 W 9 000 W 10 000 W 12 000 W
*Dans le cas où le démarrage d’un poids lourds est difcile, mettre une prise 20A (non livrée).
La section de câble recommandée en cas de rallonge : 3 x 2,5 mm².
RACCORDEMENT ET DÉBRANCHEMENT (cf p.5)
Avant tout raccordement
• Vérier que l’appareil n’est pas connecté au réseau
d’alimentation et que le bouton marche/arrêt est sur OFF.
• Localiser les 2 pôles + et - de la batterie. (Une inversion de
polarité peut endommager le fusible).
• Éloigner les câbles de toutes surfaces chauffantes ou
coupantes. Bien séparer les 2 câbles et éviter qu’ils soient
pincés.
• Vérier que la capacité de la batterie en Ampère-heure
et la tension en Volt sont compatibles avec le STARTIUM
(tableau ci-dessous).
STARTIUM 330E STARTIUM 480E STARTIUM 680E STARTIUM 980E
Capacité de
charge
12V 20 - 375 Ah 20 - 600 Ah 20 - 675 Ah 20 - 750 Ah
24V 20 - 300 Ah 20 - 450 Ah 20 - 525 Ah 20 - 525 Ah
Raccordement
1.
Brancher le connecteur sur la position «12 V» ou «24 V» du STARTIUM en fonction de la
batterie à charger ou démarrer.
2. Brancher les pinces (
plusieurs cas possibles
) :
a.
Batterie installée sur un véhicule avec un pôle négatif branché sur le chassis
- Brancher la pince rouge sur le pôle + de la batterie,
- Brancher la pince noire sur le châssis du véhicule, de façon à ce qu’elle soit éloignée
des canalisations de combustible (carburant, huile) et de la batterie.

7
STARTIUM 330E / 480E / 680E / 980E
FR
Notice originale
b.
Batterie installée sur un véhicule avec un pôle positif branché sur le chassis
- Brancher la pince noire sur le pôle négatif de la batterie.
- Brancher la pince rouge sur le châssis du véhicule, de façon à ce qu’elle soit éloignée
des canalisations de combustible et de la batterie.
c.
Batterie non-connectée au véhicule :
Brancher la pince rouge sur le pôle positif de la batterie et la pince noire sur le pôle
négatif de la batterie.
3. Brancher l’appareil au réseau d’alimentation.
4.
Appuyer sur le bouton ON / OFF.
Une LED, (8) ou (10), s’allume sur l’interface pour bien conrmer l’entrée choisie. Si la
tension choisie ne correspond pas à la tension de la batterie, la charge ne pourra pas
commencer.
STARTIUM 330E
STARTIUM 480E-680E-980E
Une fois branché, le STARTIUM donne des informations sur l’état de santé de la batterie.
L’afcheur (2) indique par alternance la tension réelle (4) et le pourcentage de charge (5).
12V 24V
100%
> 12,8 V > 25,6 V
...
11,8 V < tension < 12,8 V 23,6 V < tension < 25,6 V
0%
< 11,8 V < 23,6 V
5. Utiliser le STARTIUM en mode chargeur, démarreur ou test de l’alternateur.
Débranchement
6.
Après utilisation, réaliser dans l’ordre l’exacte opération inverse pour la phase de
débranchement.
UTILISATION EN MODE CHARGEUR (cf p.5)
1. Raccordement (p.7).
2. Sélectionner les paramètres adéquats : adapter la charge du STARTIUM à la batterie à recharger.
a. Choisir l’allure de charge ( - 13) en respectant la capacité de la batterie (tableau ci-dessous).
STARTIUM 330E STARTIUM 480E STARTIUM 680E STARTIUM 980E
12V 24V 12V 24V 12V 24V 12V 24V
Charge 1
20-75Ah
(5A)
20-75Ah
(5A)
20-75Ah
(5A)
20-75Ah
(5A)
20-75Ah
(5A)
20-75Ah
(5A)
20-75Ah
(5A)
20-75Ah
(5A)
Charge 2
40-150Ah
(10A)
40-150Ah
(10A)
60-225Ah
(15A)
40-150Ah
(10A)
60-225Ah
(15A)
60-225Ah
(15A)
85-300Ah
(20A)
60-225Ah
(15A)
Charge 3
60-225Ah
(15A)
60-225Ah
(15A)
130-450Ah
(30A)
60-225Ah
(15A)
130-450Ah
(30A)
100-375Ah
(25A)
170-600Ah
(40A)
130-450Ah
(30A)
Charge 4
100-375Ah
(25A)
85-300Ah
(20A)
170-600Ah
(40A) (boost)
130-450Ah
(30A) (boost)
200-675Ah
(45A) (boost)
150-525Ah
(35A) (boost)
210-750Ah
(50A) (boost)
150-525Ah
(35A) (boost)
b. Choisir le type de batterie ( - 12) :
Liquide, Gel, AGM, Start/Stop
. Dans le cas où le type de batterie n’est pas
connu, sélectionner
UNIVERSAL
par défaut.
3. Appuyer sur le bouton START/STOP (
- 9) pour lancer la charge.

8
STARTIUM 330E / 480E / 680E / 980E
FR
Notice originale
Trois témoins permettent d’indiquer que la batterie est en charge :
- La LED de charge ( - 7).
- L’afcheur (2) : il indique par alternance la tension et le pourcentage de charge (une évolution des deux valeurs doit
être constatée).
- Les LED d’afchage tension et pourcentage (4) et (5). Elles s’éclairent en continu et alternent au même rythme que
l’afcheur.
L’avancement de la charge est exprimé en %.
% Niveau de charge batterie Phase
0% Récupération de la batterie Phase de test
25% Début de charge
Boost
50% 50% de charge
75% Charge des % restant Absorption
100% Batterie chargée Floating
4. Blocage et arrêt de charge
La charge de la batterie ne commence pas quand :
- La tension de la batterie est inférieure à 1V.
- La tension de la batterie ne correspond pas à la tension choisie sur le chargeur.
La charge de la batterie s’arrête quand :
- Le bouton START/STOP est pressé de nouveau.
- La durée de charge en continu atteint 16h.
Une fois la batterie chargée, le STARTIUM maintient une tension d’entretien. La charge ne se coupe pas
pour compenser l’auto-décharge et maintenir la batterie chargée à 100%.
Dans le cas d’une batterie étanche, si le liquide entre en ébullition, cela signie que la batterie est
endommagée. Il est conseillé d’interrompre la charge au début de ce phénomène pour éviter tout risque
d’explosion.
- Il y a une coupure d’alimentation et la fonction «Redémarrage automatique» n’a pas été actionnée.
5. Fonctions du mode chargeur
a. Fonction «Redémarrage automatique»
En cas de coupure d’alimentation :
-
Lors d’une charge normale
, le STARTIUM s’éteint. Lorsqu’il se rallume il ne relance pas la charge. Il faut alors la
relancer manuellement.
-
Lors d’une charge avec la fonction «Redémarrage automatique»
, le STARTIUM s’éteint. Lorsqu’il se rallume il
relance automatiquement la charge.
Pour utiliser le mode «Redémarrage automatique» :
- Réaliser les étapes 1 et 2 d’une mise en charge normale.
- Au moment de lancer la charge (étape 3), effectuer un
appui long
(> 5 sec.) sur le bouton START/STOP ( - 9).
Un témoin permet de vérier que la charge est bien en mode «Redémarrage automatique» :
- Les LED d’afchage tension et pourcentage (4) et (5). Elles ne s’éclairent plus en continu comme lors d’une charge
normale mais clignotent.
Dans ce mode, pour arrêter la charge appuyer sur le bouton START/STOP ( - 9).
Une coupure d’alimentation ne coupera plus la charge.
b. Fonction «TIMER»
La fonction TIMER (14) permet de choisir un temps de charge réglable de 10 à 120 min. par pas de 10 min.
La charge de cette fonction TIMER est manuelle. Elle entraîne les différences suivantes :
- Quelque soit l’état de santé de la batterie (batterie sulfatée ou court-circuitée, tension < 1V), la charge
sera toujours lancée.
- La charge démarre même si le raccordement n’est pas bien effectué : pinces déconnectées ou en court-
circuit. Il y a donc un risque d’étincelles si les recommandations de raccordement ne sont pas respectées.

9
STARTIUM 330E / 480E / 680E / 980E
FR
Notice originale
Pour utiliser la fonction «TIMER» :
- Réaliser l’étape 1 d’une mise en charge normale.
- Lors de l’étape 2, choisir l’allure de charge ( - 13) en respectant la capacité de la batterie. Puis sélectionner à l’aide
du bouton de sélection (
- 12) la fonction «TIMER».
- Le bouton (14) permet de sélectionner le temps de charge souhaité de 10 à 120 min par pas de 10 min.
- Appuyer sur le bouton START / STOP ( - 9) pour lancer la charge.
Deux témoins permettent de vérier que la charge a bien été lancée :
- L’afcheur (n°2). Il indique par alternance la tension de la batterie en volts et le temps restant en minutes.
- Les LED d’afchage tension et minutes (3) et (4). Elles s’éclairent en continu et alternent au même rythme que
l’afcheur.
La charge s’arrête de plusieurs manières :
- Au bout du temps qui a été choisi.
- Lors d’une coupure d’alimentation
- En appuyant sur le bouton START/STOP.
c. charge de plusieurs batteries simultanément
Il est possible de charger plusieurs batteries simultanément en les connectant en parallèle. Les bornes positives reliées
à la pince rouge et les bornes négatives reliées à la pince noire. Ces batteries ou regroupement de batteries doivent
être de même tension 12 ou 24V.
La charge en série n’est pas recommandée.
UTILISATION EN MODE DÉMARREUR (cf p.5)
Ne pas déconnecter la batterie du véhicule. Le branchement de la batterie peut entraîner la perte
d’information et une éventuelle impossibilité de redémarrage.
1. Raccordement (p.7).
2.
Appuyer sur le bouton de sélection (
-
13) jusqu’à accéder au mode START ENGINE (1).
3. Lancer la précharge en appuyant sur le bouton START / STOP ( - 9).
• Le mode «START ENGINE» détecte les batteries sulfatées et refuse dans ce cas le démarrage.
L’appareil lance une désulfatation automatique avant tout démarrage an de protéger l’électronique
embarquée.
• Si la batterie est trop abimée (sulfatée par exemple), le chargeur bloque le démarrage. Dans ce cas, le
STARTIUM indique par intermittence « CIP » (Charge in Progress) et 0%. Cela signie que la récupération
de la batterie est en cours. Tant que l’abréviation «CIP» apparaît sur l’écran, il n’est pas possible de
démarrer le véhicule.
Temps de précharge conseillé en fonction de la capacité de la batterie.
Produit Capacité batterie Démarrage Capacité batterie Démarrage
STARTIUM 330E
50 - 60Ah Instantané 60 - 80Ah précharge 5 min
STARTIUM 480E
50 - 100Ah Instantané 100 -160 Ah précharge 5 min
STARTIUM 680E
50 - 160Ah Instantané 160 - 220 Ah précharge 5 min
STARTIUM 980E
50 - 220Ah Instantané 220 - 250 Ah précharge 5 min
4. Une fois la précharge effectuée, se rendre au poste de contrôle du véhicule. La fonction «démarreur» s’active au
moment où la première tentative de démarrage commence (en tournant la clé). La durée de la tentative doit être de
10 sec. maximum (un décompte apparaît sur l’afcheur).
Si votre moteur ne démarre pas, attendre 2 min. entre chaque tentative de démarrage.
Nb : Si le véhicule ne démarre pas, il peut avoir un problème autre qu’une batterie en mauvais état :
alternateur, bougie de préchauffage…

10
STARTIUM 330E / 480E / 680E / 980E
FR
Notice originale
TEST DE L’ALTERNATEUR (cf p.5)
Si la batterie du véhicule est régulièrement en panne, le problème peut provenir de l’alternateur.
Les STARTIUM disposent d’une fonction «test de l’alternateur» (
- 12). Elle permet d’afcher la capacité de charge
de l’alternateur en indiquant par intermittance la tension et le pourcentage.
Pour utiliser cette fonction le véhicule doit être en marche :
1. Raccordement (p.7).
2. Sélectionner la fonction «Test Alternator» à l’aide du bouton de sélection ( - 12).
3. L’afcheur indique un pourcentage. Il renseigne sur l’état de santé de l’alternateur selon le tableau suivant :
Entre 0 et 100% Défaut de sous charge, la batterie n’est pas correctement rechargée.
A 100% Alternateur correct.
Entre 100% et 200% Défaut de surcharge.
PROTECTIONS
Ces appareils ont été conçus avec un maximum de protections :
• Les pinces de charge sont entièrement isolées.
• Un fusible assure la protection contre l’inversion de polarité et les courts-circuits. Le remplacement demande une
intervention manuelle.
STARTIUM 330E STARTIUM 480E / 680E STARTIUM 980E
FUSE
100A
FUSE
200A
FUSE
250A
• La protection thermique est assurée par un thermostat (refroidissement environ 1/4h). Le voyant de défaut s’allume
en cas de surchauffe, l’afcheur indique «th».
• En cas de défaut de l’appareil, une protection thermique supplémentaire coupe l’alimentation du générateur sans
indication pour l’utilisateur. Mettre l’appareil dans un local aéré et attendre 15 minutes.
• En cas de défaut secteur, l’appareil se met en protection, seule la LED de défaut s’allume et l’afcheur indique «dEF».
Si le défaut est trop important un fusible interne protège le poste. Ce fusible doit être remplacé par un technicien SAV.
ANOMALIES, CAUSES, REMÈDES
Anomalies Causes Remèdes
La LED error s’allume Problème d’alimentation secteur. Vérier votre alimentation secteur.
La LED error s’allume et le Buzzer sonne
Pinces en court-circuit ou inversion de polarité.
Vérier si les fusibles ne sont pas fondu.
Ne pas mettre les pinces en court-circuit. Inver-
ser les polarités.
La batterie que vous souhaitez charger est
défaillante.
Contrôler à l’aide d’un voltmètre la tension à
ses bornes. Si cette tension monte instanta-
nément à plus de 2,5V par élément la batterie
peut être sulfatée ou endommagée.
Erreur tension (12 -24 V)
Vérier que la batterie est bien connectée en
12 ou 24V.
Batterie non présente ou <1V. Afchage : «BAt
HS»
Brancher une batterie.
Sélectionner TIMER si la batterie à une tension
<1V.
Suite à une utilisation intensive, votre appareil
s’est mis en coupure thermique. Afchage :
«th»
Patientez 1/4h pour laisser l’appareil refroidir.
Temps de charge désulfatation > 1h La batterie est irrécupérable. Changer la batterie.
Aucune LED ne s’allume
Défaut d’alimentation important Vérier votre alimentation.
Surchauffe du générateur, la protection ther-
mique «th» s’enclenche.
Aérer le local.
Le bouton marche/arrêt n’est pas enclenché. Enclencher le bouton marche/arrêt.
En mode START ENGINE, si l’afcheur indique
0%. Le démarrage est impossible.
La batterie est sulfatée, le démarrage est em-
pêché an de protéger l’électronique embar-
quée du véhicule.
Effectuer une recharge de la batterie avant de
relancer un START ENGINE.

11
STARTIUM 330E / 480E / 680E / 980E
FR
Notice originale
La batterie bouillonne.
La sélection de tension 12 ou 24V n’est pas
correcte.
Vérier la tension de votre batterie et la bran-
cher correctement.
La batterie a des éléments en court-circuit.
La batterie est irrécupérable, elle doit être
changée.
Étincelles aux pinces
Inversion de polarité Brancher les pinces dans le bon sens (+/+;-/-)
Mode timer actif Cf. Raccordement et débranchement
CONDITIONS DE GARANTIE
La garantie couvre tous défauts ou vices de fabrication pendant 2 ans, à compter de la date d’achat (pièces et main
d’oeuvre).
La garantie ne couvre pas :
• Toutes autres avaries dues au transport.
• L’usure normale des pièces (Ex. : câbles, pinces, etc.).
• Les incidents dus à un mauvais usage (erreur d’alimentation, chute, démontage).
• Les pannes liées à l’environnement (pollution, rouille, poussière).
En cas de panne, retourner l’appareil à votre distributeur, en y joignant :
- un justicatif d’achat daté (ticket de sortie de caisse, facture….)
- une note explicative de la panne.

12
STARTIUM 330E / 480E / 680E / 980E
EN
Translation of the original instructions
panne.
SAFETY INSTRUCTIONS
This manual includes guidelines on the operation of your device
and the precautions to follow for your own safety. Ensure it is read
carefully before first use and keep it handy for future reference.
These instructions should be read and understood before anyone
operates the product. Any modifications or maintenance that are
not specified in the manual should not be undertaken. The manufac-
turer is not liable for any injury or damage due to non-compliance
with the instruction manual. In case of problems or uncertainties,
please consult a qualified person that is able to handle the device
correctly. This device should only be used for charging and / or
start-up within the limits indicated on the device and in the manual.
The safety instructions must be followed. In case of improper or un-
safe use, the manufacturer cannot be held responsible.
Device suitable for indoor use only. Do not expose to rain or exces-
sive moisture.
This device may be used by children from age 8 and by persons
with reduced physical, sensory or mental capabilities or lack of ex-
perience and knowledge, provided that they are under supervision
or have been told how to use the device safely and are aware of
the potential risks. Children must not use the device as a plaything.
Cleaning and servicing tasks may not be carried out by children
unless they are supervised.
Do not use for charging non-rechargeable batteries
Do not operate the device with a damaged power supply cord or a
damaged mains plug.
Never charge a frozen or damaged battery.
Do not cover the device
Do not place the device near a fire or subject it to heat or to long-
term temperatures exceeding 50°C
Do not obstruct the cooling vents. Refer to the installation section
before operating the machine.
The automatic mode of operation and usage restrictions are ex-
plained below in these operating instructions.
Risk of explosion and re!
A battery being charged can emit explosive gas.
• During the charge, the battery must be placed in a well ventilated
area.
• Avoid flames and sparks. Do not smoke.
• Protect the electrical contacts of the battery against short-circuiting.
Acid projection hazard!
• Wear safety goggles and protective gloves.

13
STARTIUM 330E / 480E / 680E / 980E
EN
Translation of the original instructions
• If your eyes or skin come into contact with battery acid, rinse the
affected part of the body with plenty of water and seek imme-
diate medical assistance.
Connection / disconnection:
• Disconnect the power supply before connecting/disconnecting
the device to/from the battery
• The terminal of the battery that is not connected to the car frame
must be connected first. The other connection must be made on
the car frame, far from the battery and the fuel line. The battery
charger must be connected to the power supply network.
• After the charging process, disconnect the battery charger from
the power supply network and remove the connector from the
car frame and then the connector from the battery, in this order.
Connection:
• This device must be connected to an earthed power supply.
• This machine is fuse-protected.
• Connection to the mains must be made according to the natio-
nal installation regulations.
680E and
980E only
• This equipment is intended for industrial environments (class A)
and not for residential sites where the electric current is supplied
by the public low-voltage power supply network. There may be
potential difficulties in ensuring electromagnetic compatibility on
these sites, because of the conducted interferences, as well as
radiated radioelectrical frequency.
680E and
980E only
• This product does not comply with IEC 61000-3-12 and is in-
tended to be connected to private low voltage networks which
are connected to public supply network only at the medium and
high voltage level. If connected to a public low-voltage supply
network, it is the responsibility of the installer or user of the equip-
ment to ensure, by consulting the operator of the electrical distri-
bution network, that the hardware can be connected.
Maintenance:
• If the power supply cable is damaged, it must be replaced by the
manufacturer, its service agent or an equally qualified person.
• Service should be performed by a qualified person.
• Warning! Always remove the power plug from the wall socket
before carrying out any work on the device.
• If the internal fuse is blown, it must be replaced by the manufactu-
rer, its after-sales service or an equally qualified person.
• Regularly take off the cover and remove dust with an air gun.
Take the opportunity to have a qualified person check the electri-
cal connections with an insulated tool.
• Under no circumstances should solvents or other aggressive clea-
ning agents be used.

14
STARTIUM 330E / 480E / 680E / 980E
EN
Translation of the original instructions
• Clean the device’s surfaces with a soft, dry cloth.
Regulations
• The device complies with European Directive.
• The certificate of compliance is available on our website.
• EAC conformity mark (Eurasian Economic Commission)
• Equipment in conformity with Moroccan standards.
• The declaration Cم (CMIM) of conformity is available on our we-
bsite (see cover page).
Disposal:
• This product should be disposed of at an appropriate recycling
facility. Do not dispose of in domestic waste.
GENERAL DESCRIPTION
The STARTIUM range is designed to charge and start all common batteries including lead-acid , electrolyte or gel
batteries, 12V et 24V.
Assembling the handle and the wheels (only for 480E, 680E and 980E) :
POWER SUPPLY
Check that the power supply and its protection (fuses) are compatible with the current required by the machine. The
device must be positioned so that the socket is easily accessible. The machine must be connected to a socket WITH
earth according to the following recommendations:
STARTIUM 330E STARTIUM 480E STARTIUM 680E STARTIUM 980E
Mains voltage 230V - 1 ph 230V - 1 ph 230V - 1 ph 230V - 1 ph
Protection 16 A 16 A 16 A 16 A*
Charging
power
charge
800 W 1 700 W 2 000 W 2 000 W
Starting
6 500 W 9 000 W 10 000 W 12 000 W
*In the event that starting a HGV proves difcult , use a 20A plug (optional).
The recommended cross-section for an extension is : 3 x 2,5 mm².
CONNECTION AND DISCONNECTION (cf p.5)
Before any connection
• Before any connection to a vehicle battery, make sure
that the booster isn’t connected to the mains and that the
booster’s switch is set to OFF.
• Locate the + and - battery terminals. (polarity reversal can
damage the fuse).
• Keep the cables away from hot or sharp surfaces. Separate
the 2 cables properly and avoid pinching them.
• Check that the battery capacity (Ampere hour Ah) and
the voltage (Volt V)are compatible with your charger (see
table above).

15
STARTIUM 330E / 480E / 680E / 980E
EN
Translation of the original instructions
STARTIUM 330E STARTIUM 480E STARTIUM 680E STARTIUM 980E
Charging
capacity
12V 20 - 375 Ah 20 - 600 Ah 20 - 675 Ah 20 - 750 Ah
24V 20 - 300 Ah 20 - 450 Ah 20 - 525 Ah 20 - 525 Ah
Connection
1.
Plug the connector into the «12 V» or «24 V» position of the STARTIUM according to the
battery to be charged or started.
2. Connect the clamps (several possible cases):
a.
The negative terminal is plugged onto the car’s chassis :
- Connect the red clamp to the battery’s positive terminal.
- Connect the black clamp to the vehicle’s chassis, make sure it is a safe distance from
the battery and the fuel/exhaust pipe.
b.
The positive terminal plugged onto the car chassis, in this event :
- Connect the black clamp to the battery’s negative terminal.
- Connect the red clamp to the vehicle’s chassis, make sure it is a safe distance from
the battery and the fuel/exhaust pipe.
c.
Battery disconnected from the vehicle :
Connect the red clamp to the battery’s positive terminal and the black clamp to the
battery’s negative terminal.
3. Connect the device to the mains.
4.
Press the ON / OFF button.
A LED, (8) or (10) switches on under the corresponding interface to conrm the selected
voltage input. If the selected voltage does not match the battery voltage, the charge cannot
start.
STARTIUM 330E
STARTIUM 480E-680E-
980E
Once connected, the STARTIUM provides information on the battery’s health status. The
display (2) alternately indicates the actual voltage (4) and the percentage of charge (5).
12V 24V
100% > 12,8 V > 25,6 V
... 11,8 V < tension < 12,8 V 23,6 V < tension < 25,6 V
0% < 11,8 V < 23,6 V
5.
Use the STARTIUM in charger, starter or alternator test mode.
Disconnection
6. After use, carry out the exact reverse operation for the disconnection phase in order.

16
STARTIUM 330E / 480E / 680E / 980E
EN
Translation of the original instructions
USE IN CHARGER MODE (cf p.5)
1. Connection (p.15).
2. Select the appropriate parameters: adapt the STARTIUM charge to the battery to be recharged.
a. Select the charge speed ( - 13) with respect to the battery capacity (see table below).
STARTIUM 330E STARTIUM 480E STARTIUM 680E STARTIUM 980E
12V 24V 12V 24V 12V 24V 12V 24V
Charge 1
20-75Ah
(5A)
20-75Ah
(5A)
20-75Ah
(5A)
20-75Ah
(5A)
20-75Ah
(5A)
20-75Ah
(5A)
20-75Ah
(5A)
20-75Ah
(5A)
Charge 2
40-150Ah
(10A)
40-150Ah
(10A)
60-225Ah
(15A)
40-150Ah
(10A)
60-225Ah
(15A)
60-225Ah
(15A)
85-300Ah
(20A)
60-225Ah
(15A)
Charge 3
60-225Ah
(15A)
60-225Ah
(15A)
130-450Ah
(30A)
60-225Ah
(15A)
130-450Ah
(30A)
100-375Ah
(25A)
170-600Ah
(40A)
130-450Ah
(30A)
Charge 4
100-375Ah
(25A)
85-300Ah
(20A)
170-600Ah
(40A) (boost)
130-450Ah
(30A) (boost)
200-675Ah
(45A) (boost)
150-525Ah
(35A) (boost)
210-750Ah
(50A) (boost)
150-525Ah
(35A) (boost)
b. Choose the battery type ( - 12) :
Liquide, Gel, AGM, Start/Stop
. In the event that the battery type is unknown
(Liquid, Gel, AGM, Start/Stop), select the UNIVERSAL mode.
3. Press the START/STOP button (
- 9) to start the charge.
Three indicators show that the battery is charging :
- The charge LED ( - 7).
- The display (2) : It alternates between the battery voltage and the percentage of charge (an evolution of both
values should be noticed).
- The voltage and percentage LEDs (4 and 5). They remain on and alternate at the same time as the display.
The charge progression is shown in percentage (%).
% Battery charge level Phase
0% Battery charge level Testing phase
25% Charge start
Boost
50%
Charge at 50%
75% Charging the remaining % Absorption
100%
Charged battery Floating
4. Blocked and charge stop.
The battery charge does not start when :
- The battery voltage is inferior to 1V.
- The battery voltage does not match the voltage that is selected on the charger.
The battery charge stops when :
- The START/STOP button is pressed again.
- The continuous charge duration reaches 16h.
Once the battery is charged, the STARTIUM performs a oating/maintenance charge. The charge does
not stop to compensate for self-discharge and maintain the battery at a 100%.
If it is a sealed battery and if the liquid boils, it means the battery is damaged. Is this occurs, it is
recommanded to stop the charge to prevent any risk of explosion.
- The charger will stop if the « automatic restart » has not been activated.
5. Charger mode functions
a. Automatic restart feature:
In the event of a power cut :
- During a normal charge, the STARTIUM switches off. When it switches back on, it does not resume the charge. It
must be manually resumed.
- During a charge with the «Automatic restart» feature on, the STARTIUM switches off. When it switches back on, it
automatically resumes the charge.

17
STARTIUM 330E / 480E / 680E / 980E
EN
Translation of the original instructions
To use the «Automatic restart» mode :
- Perform steps 1 and 2 of normal loading.
- When starting the charge (step 3), press the START/STOP button ( - 9) for a long time (> 5 sec.). ( - 9).
An indicator helps to check if the charge is indeed in «Automatic restart» mode :
- The voltage and percentage LEDs (4 and 5). They do not stay on but will blink.
In this mode, Press the START/STOP button to stop the charge. ( - 9).
A power supply cut will not stop the charge from resuming.
b. TIMER feature
The TIMER feature (n°14) is used to set a charging time from 10 to 120 min (by steps of 10 min).
The charge when using the TIMER feature is manual. This has the following consequences :
- Whatever is the battery health status (sulfated, short circuited, voltage < 1V), the charge will always be
triggered.
- The charge starts even if the battery connection is faulty: clamps disconnected or in short circuit There
is a risk of sparks if the connection instructions are not observed.
To use the «TIMER» function:
- Perform step 1 of normal loading.
- In step 2, choose the charging rate ( - 13) while respecting the battery capacity. Then select the «TIMER» function
with the selection button (
- 12).
- The button (14) allows you to select the desired charging time from 10 to 120 min in 10 min steps.
- Press the START / STOP button ( - 9) to start the charge.
Two indicators can help to check that the charge has started :
- The display (n°2). -It alternates between the battery voltage and the remaining time in minutes.
- The voltage and minutes LEDs (3 and 4). They remain on and alternate at the same time as the display.
The charge may be be stopped in several ways :
- At the end of the selected time.
- When there is a power supply cut
- By pressing the START/STOP button.
c. charging several batteries simultaneously.
It is possible to charge several batteries simultaneously by connecting them in parallel. The positive terminals connected
to the red clamp and the negative terminals connected to the black clamp. These batteries or battery groups must be
of the same voltage, 12V or 24V.
Charging batteries in series is not recommended.
USE IN STARTER MODE (INTERFACE, P.5)
Do not disconnect the battery fom the vehicle. Connecting the battery can lead to the vehicle’s memory
loss and a potential impossibility to restart it.
1. Connection (p.15).
2. Press the selection button (
-
13) until you reach the START ENGINE mode (1).
3. Start the preload by pressing the START / STOP button ( - 9).
• The «START ENGINE» mode detects sulfated batteries and will thus refuse to start the vehicle. The
machine will automatically start the desulfating procedure in order to protect on-board electronics.
• If the battery is excessively damaged (e.g. sulfated), the charger will block the start. In this event, the
startium intermittently indicates « CIP » (Charge in Progress) and 0%. This means that battery recovery
is in progress. As long as «CIP» appears on the display, it is not possible to start the vehicle.
Make sure to follow the recommended precharge time, depending on the battery capacity.

18
STARTIUM 330E / 480E / 680E / 980E
EN
Translation of the original instructions
Product Battery capacity Starting Battery capacity Starting
STARTIUM 330E
50 - 60Ah Instantaneous 60 - 80Ah 5 min pre charge
STARTIUM 480E
50 - 100Ah Instantaneous 100 -160 Ah 5 min pre charge
STARTIUM 680E
50 - 160Ah Instantaneous 160 - 220 Ah 5 min pre charge
STARTIUM 980E
50 - 220Ah Instantaneous 220 - 250 Ah 5 min pre charge
4. Once the precharge is done, go to the vehicle’s dashboard. The «start» feature will activate when the rst attempt
to start is initiated (by turning the key). The attempt time must be for 10 secs maximum (a countdown appears on
the display).
If your engine does not start, wait 2 minutes between each start attempt.
Nb : If the vehicle does not start, it may be a problem other than a faulty battery e.g. alternator, glowplug…
ALTERNATOR TEST
If the vehicle battery is regularly out of order, the problem may come form the alternator.
The STARTIUMS have an «alternator test» feature (
- 12). It can show the alternator’s charge capacity by intermittently
displaying the voltage and the perrcentage.
To use this feature, the vehicle must be started :
1. Connection (p.15).
2. Select the «Test Alternator» function with the selection button ( - 12).
3. The display shows a percentage. It provides information on the alternator’s state of health according to the fol-
lowing table:
Between 0 and a 100% Undercharge fault, the battery is not correctly charged.
At a 100% Alternator all good.
Between a 100% and
200%
Overcharge fault.
PROTECTIONS
These clamps have been designed for maximum protection :
• The charging clamps are fully insulated.
• A fuse guarantees protection against polarity inversion and short circuits. Replacing it requires manual intervention.
STARTIUM 330E STARTIUM 480E / 680E STARTIUM 980E
FUSE
100A
FUSE
200A
FUSE
250A
• The thermal protection is monitored by a thermostat (cooling for approximately 1/4h). The fault indicator switches on,
the display shows «th».
• If the machine is faulty, an extra thermal protection cuts the machine’s power supply without further indications for
the user. Place the machine in a well ventilated area and wait 15 minutes.
• In the event of power supply fault, the machine will enter fault protection mode, The error LED switches on and the
display shows «dEF». If the fault is major, an internal fuse protects the machine. This fuse must be replaced by an
aftersales technician.

19
STARTIUM 330E / 480E / 680E / 980E
EN
Translation of the original instructions
TROUBLESHOOTING
Symptoms Causes Remedies
The error LED switches on Power supply problem. Check your mains power supply.
The error LED switches on and the buzzer
Clamps in short circuit or polarity inversion.
Check that the fuses have not melted.
Do not put the clamps in short circuit. Reverse
polarities.
The battery that you are trying to charge is
faulty.
Check the terminals’ voltage with a voltmeter.
If this voltage jumps instantaneously to 2.5V
per element, the battery may be sulfated or
damaged.
Voltage error (12 -24 V)
Check that the clamps are properly connected
in 12V or 24V.
Battery not connected or <1V. Display: «BAt
HS»
Connect a battery.
Select TIMER if the battery voltage is <1V.
Following intensive use, your device has ente-
red thermal protection mode. Display : «th»
Wait 1/4h so the device can cool down.
Desulphation charging time > 1h The battery cannot be recovered. Change the battery.
No LED switches on
Major power supply fault Check your mains power supply.
Machine overheat, the thermal protection «th»
activates.
Ventilate the area.
The start/stop button is not pressed. Press the start/stop button.
In START ENGINE mode, the display shows
0%. The start is impossible.
The batterty is sulfated, the machine will
automatically block the start in order to protect
on-board electronics.
Charge the battery before re attempting a
START ENGINE.
The battery boils.
The voltage selection 12V or 24V is incorrect.
Charge the battery before re attempting a
START ENGINE.
Your battery has elements in short circuit.
The battery cannot be recovered, it must be
changed.
Sparks at the clamps
Polarity reversal Connect the clamps the correct way (+/+;-/-)
Timer mode active Cf. Connection and disconnection
WARRANTY
The warranty covers faulty workmanship for 2 years from the date of purchase (parts and labour).
The warranty does not cover:
• Transit damage.
• Normal wear of parts (eg. : cables, clamps, etc..).
• Damages due to misuse (power supply error, dropping of equipment, disassembling).
• Environment related failures (pollution, rust, dust).
In case of failure, return the unit to your distributor together with:
- The proof of purchase (receipt etc ...)
- A description of the fault reported

20
STARTIUM 330E / 480E / 680E / 980E
DE
Übersetzung der Originalbetriebsanleitung
SICHERHEITSANWEISUNGEN
Diese Betriebsanleitung enthält Sicherheits- und Betriebshinweise.
Bitte lesen Sie diese Anleitung aufmerksam durch, bevor Sie das
Gerät zum ersten Mal benutzen und bewahren Sie diese sorgfältig
auf. Die Nichteinhaltung dieser Anweisungen und Hinweise kann
mitunter zu schweren Personen- und Sachschäden führen. Nehmen
Sie keine Wartungarbeiten oder Veränderungen am Gerät vor,
wenn diese nicht explizit in der Anleitung genannt werden. Der
Hersteller haftet nicht für Verletzungen oder Schäden, die durch
unsachgemäße Handhabung dieses Gerätes enstanden sind. Bei
Problemen oder Fragen zum korrekten Gebrauch dieses Gerätes,
wenden Sie sich bitte an entsprechend qualifiziertes und geschultes
Fachpersonal. Dieses Gerät darf ausschließlich zum Laden/Starten
für die in der Anleitung oder auf dem Gerät genannten Anforderun-
gen genutzt werden. Die Sicherheitshinweise müssen in jedem Fall
beachtet werden. Im Fall einer unangemessenen oder gefährlichen
Verwendung kann der Hersteller nicht haftbar gemacht werden
Schützen Sie das Gerät vor Feuchtigkeit und Nässe.
Schützen Sie das Gerät vor unbefugtem Gebrauch. Kinder unter 8
Jahren düfen nicht mit diesem Gerät spielen. Befinden sich Kinder
oder Personen mit eingeschränkten körperlichen oder geistigen
Fähigkeiten sowie Personen ohne explizite Erfahrung im Umgang
mit dem Produkt in der Nähe des Gerätes, sorgen Sie bitte für aus-
reichend Schutz und Kontrolle bei Benutzung des Gerätes.
Laden Sie nie defekte oder nicht aufladbare Batterien.
Benutzen Sie das Gerät nicht, wenn der Stecker, die Klemmen oder
das Zubehör defekt ist.
Laden Sie niemals eine beschädigte oder gefrorene Batterie.
Decken Sie das Gerät während der Nutzung nicht ab.
Lagern Sie das Gerät nicht in der Nähe einer Wärmequelle oder
bei dauerhaft hohen Temperaturen (über 50°C).
Blockieren Sie nicht die Belüftungsöffnungen des Gerätes. Bitte
beachten Sie den Punkt «Installation» der Betriebsanleitung vor
Gebrauch des Gerätes.
Der Automatik-Modus sowie die Einschränkungen bei der Benut-
zung werden nachfolgend in der Betriebsanleitung erklärt.
Explosions- und Brandgefahr!
Während des Ladevorgangs können explosive Gase entstehen.
• Während des Ladevorgangs muss die Batterie in einem gut belüf-
teten Bereich plaziert werden.
• Vermeiden Sie Funken und Flammen. Rauchen Sie nicht!
• Schützen Sie die Pole der Batterie vor Kurzschlüssen.
Es besteht die Gefahr von Säurespritzern!
La pagina si sta caricando...
La pagina si sta caricando...
La pagina si sta caricando...
La pagina si sta caricando...
La pagina si sta caricando...
La pagina si sta caricando...
La pagina si sta caricando...
La pagina si sta caricando...
La pagina si sta caricando...
La pagina si sta caricando...
La pagina si sta caricando...
La pagina si sta caricando...
La pagina si sta caricando...
La pagina si sta caricando...
La pagina si sta caricando...
La pagina si sta caricando...
La pagina si sta caricando...
La pagina si sta caricando...
La pagina si sta caricando...
La pagina si sta caricando...
La pagina si sta caricando...
La pagina si sta caricando...
La pagina si sta caricando...
La pagina si sta caricando...
La pagina si sta caricando...
La pagina si sta caricando...
La pagina si sta caricando...
La pagina si sta caricando...
La pagina si sta caricando...
La pagina si sta caricando...
La pagina si sta caricando...
La pagina si sta caricando...
La pagina si sta caricando...
La pagina si sta caricando...
La pagina si sta caricando...
La pagina si sta caricando...
La pagina si sta caricando...
La pagina si sta caricando...
La pagina si sta caricando...
La pagina si sta caricando...
La pagina si sta caricando...
La pagina si sta caricando...
La pagina si sta caricando...
La pagina si sta caricando...
-
 1
1
-
 2
2
-
 3
3
-
 4
4
-
 5
5
-
 6
6
-
 7
7
-
 8
8
-
 9
9
-
 10
10
-
 11
11
-
 12
12
-
 13
13
-
 14
14
-
 15
15
-
 16
16
-
 17
17
-
 18
18
-
 19
19
-
 20
20
-
 21
21
-
 22
22
-
 23
23
-
 24
24
-
 25
25
-
 26
26
-
 27
27
-
 28
28
-
 29
29
-
 30
30
-
 31
31
-
 32
32
-
 33
33
-
 34
34
-
 35
35
-
 36
36
-
 37
37
-
 38
38
-
 39
39
-
 40
40
-
 41
41
-
 42
42
-
 43
43
-
 44
44
-
 45
45
-
 46
46
-
 47
47
-
 48
48
-
 49
49
-
 50
50
-
 51
51
-
 52
52
-
 53
53
-
 54
54
-
 55
55
-
 56
56
-
 57
57
-
 58
58
-
 59
59
-
 60
60
-
 61
61
-
 62
62
-
 63
63
-
 64
64


GYS STARTIUM 330E Manuale del proprietario
- Tipo
- Manuale del proprietario
- Questo manuale è adatto anche per
in altre lingue
- français: GYS STARTIUM 330E Le manuel du propriétaire
- español: GYS STARTIUM 330E El manual del propietario
- Deutsch: GYS STARTIUM 330E Bedienungsanleitung
- Nederlands: GYS STARTIUM 330E de handleiding
Documenti correlati
-
GYS STARTIUM 480E Scheda dati
-
-
GYS START 200 Manuale del proprietario
-
GYS CT 210 Manuale del proprietario
-
GYS Wattmatic 170 Manuale del proprietario
-
GYS DIAG-STARTIUM 60-12 Manuale del proprietario
-
-
GYS STARTIUM 680E Scheda dati
-
GYS STARTIUM 980E Scheda dati
-
Altri documenti
-
BLACK DECKER BDSBC30A Manuale del proprietario
-
BLACK DECKER BDV1085 Manuale del proprietario
-
Beta 1498/120A Istruzioni per l'uso
-
NOCO BOOST PRO GB150 Guida utente
-
NOCO GB70 Manuale utente
-
-
Topdon TORNADO 30000 Manuale utente
-
Metronic CHARGEUR DE BATTERIES UNIVERSAL CHARGER Manuale del proprietario
-
Telair ACB 15A Manuale utente
-