La pagina si sta caricando...

2
I
GB
F
D
1 GENERALITÁ
1.1 INFORMAZIONI
GENERALI
1.2 SIMBOLOGIA
1.2.1Pittogrammi redazionali
1.2.2Pittogrammi relativi alla
sicurezza
1.3 USO PREVISTO
1.4 ELENCO COMPONENTI
A CORREDO
1.4.1Immagazzinamento
1.4.2Ricevimento e disimballo
2 INSTALLAZIONE
2.1 MODALITÀ DI
INSTALLAZIONE
2.1.1Dimensioni e caratteristiche
del locale dove installare il
climatizzatore
2.1.2 Scelta della posizione dove
installare il climatizzatore
2.2 MONTAGGIO
DELL’UNITÀ
2.2.1 Foratura della parete
2.2.2 Montaggio dei condotti
dell’aria e delle griglie esterne
2.2.3 Allacciamento elettrico
2.2.4Inserimento dell’apparecchio
sulla staffa
2.2.5Evacuazione dell’acqua di
condnsa in caso di
emergenza
2.3 MANUTENZIONE
PERIODICA
3 USO E MANUTENZIONE
(parte utente)
3.1 AVVERTENZE
3.2 DENOMINAZIONE DELLE
PARTI
3.2.1 Elementi unità
3.2.2Pannello comandi
3.3 RIMOZIONE DEL
TELECOMANDO
3.4 ACCENSIONE GENERALE E
GESTIONE DEL
FUNZIONAMENTO
3.5 INSERIMENTO DELLE
BATTERIE
3.6 TELECOMANDO
3.7 ACCENSIONE/SPEGNIMENTO
DELL’APPARECCHIO
(pulsante T1)
3.8 TASTO BENESSERE
(AUTOMATICO)
(pulsante T2)
3.9 FUNZIONAMENTO IN
RAFFREDDAMENTO
(pulsante T4)
3.10 FUNZIONAMENTO IN SOLA
DEUMIDIFICAZIONE
3.11 FUNZIONAMENTO IN SOLA
VENTILAZIONE
3.12 FUNZIONAMENTO IN
RISCALDAMENTO
6
6
12
12
12
14
14
16
16
18
18
18
20
20
20
24
28
30
32
34
36
36
38
38
38
40
40
44
46
48
48
50
50
52
52
1 GENERAL INFORMATION
1.1 GENERAL
INFORMATION
1.2 SYMBOLS
1.2.1 Editorial pictograms
1.2.2Safety pictograms
1.3 PROPER USE
1.4 LIST OF ACCESSORIES
SUPPLIED
1.4.1Storage
1.4.2 Receipt and unpacking
2 INSTALLATION
2.1 INSTRUCTIONS FOR
INSTALLATION
2.1.1Dimensions and features of
site where air conditioner is
installed
2.1.2Choice of best position for
installing the air conditioner
2.2 INSTALLATION OF THE
UNIT
2.2.1Drilling the wall
2.2.2Installation of air pipes and
external gratings
2.2.3 Power supply connection
2.2.4Fitting the unit on bracket
2.2.5 Evacuation of condensation
water in case of emergency
2.3 PERIODICAL
MAINTENANCE
3 USE AND MAINTENANCE
(for the user)
3.1 IMPORTANT
RECOMMENDATIONS
3.2 NAMES OF PARTS
3.2.1List of Units
3.2.2Control panel
3.3 REMOVING THE REMOTE
CONTROL
3.4 SWITCHING ON THE
APPLIANCE AND
FUNCTION MANAGEMENT
3.5 INSTALLING THE
BATTERIES
3.6 REMOTE CONTROL
3.7 SWITCHING THE UNIT ON
AND OFF (button T1)
3.8 WELL BEING MODE
(AUTOMATIC) (button T2)
3.9 COOLING FUNCTION
(button T4)
3.10 DEHUMIDIFIER ONLY
3.11 FAN ONLY
3.12 HEATING FUNCTION
1 GENERALITES
1.1 INFORMATIONS
GENERALES
1.2 SYMBOLOGIE
1.2.1 Pictogrammes rédactionnels
1.2.2 Pictogrammes concernant la
sécurité
1.3 UTILISATION PRÉVUE
1.4 LISTE DES COMPOSANTS
NECESSAIRES FOURNIS
1.4.1Stockage
1.4.2 Réception et déballage
2 INSTALLATION
2.1 MODE D’INSTALLATION
2.1.1Dimensions et
caractéristiques de la pièce
où le cli matiseur doit être
installé
2.1.2Choix de la position où
installer le climatiseur
2.2 MONTAGE DE L’UNITÉ
2.2.1 Perçage du mur
2.2.2Montage des conduits d'air et
des grilles extérieures
2.2.3Branchement électrique
2.2.4Fixation de l'appareil sur la
bride
2.2.5Evacuation de l'eau de
condensation en cas
d'urgence
2.3 ENTRETIEN PÉRIODIQUE
3 MODE D’EMPLI ET
ENTRETIEN (partie
utilisateur)
3.1 AVERTISSEMENTS
3.2 DÉNOMINATION
DES COMPOSANTS
3.2.1Liste unités
3.2.2 Tableau de commande
3.3 EXTRACTION DE LA
TÉLÉCOMMANDE
3.4 MISE EN MARCHE
GÉNÉRALE ET GESTION
DU FONCTIONNEMENT
3.5 INTRODUCTION DES
PILES
3.6 TÉLÉCOMMANDE
3.7 ACTIVATION/
DÉSACTIVATION DE
L’APPAREIL (touche T1)
3.8 TOUCHE CONFORT
(AUTOMATIQUE) (touche T2)
3.9 FONCTIONNEMENT EN
MODE REFROIDISSEMENT
(touche T4)
3.10 FONCTIONNEMENT EN
MODE DÉSHUMIDIFICATION
SEULEMENT
3.11 FONCTIONNEMENT EN
MODE VENTILATION
SEULEMENT
3.12 FONCTIONNEMENT EN
MODE CHAUFFAGE
1 ALLGEMEINES
1.1 ALLGEMEINE
INFORMATIONEN
1.2 BILDSYMBOLE
1.2.1Bildsymbole
1.2.2 Bildsymbole zur Sicherheit
1.3 VORGESEHENER
GEBRAUCH
1.4 LISTE DER
AUSSTATTUNGSELEMENTE
1.4.1Lagerung
1.4.2Annahme und Auspacken
2 INSTALLATION
2. 1 INSTALLATIONSBESTIMMUNGEN
2.1.1Abmessungen und
Eigenschaften des Raums, in
dem dem das Klimagerät
installiert wird
2.1.2Wahl der Stelle, an der das
Klimagerät installiert werden
soll
2.2 MONTAGE DER EINHEIT
2.2.1Durchführung der Bohrungen
2.2.2 Montage der Abluftkanäle und
der externen Gitter
2.2.3Elektrischer Anschluss
2.2.4Montage des Gerätes auf
dem Befestigungsbügel
2.2.5Entleerung des
Kondenswassers im Notfall
2.3 WARTUNG
3 GEBRAUCH UND
INSTANDHALTUNG
(Benutzer-Teil)
3.1 HINWEISE
3.2 BENENNUNG
DER KOMPONENTEN
3.2.1Bestandteile der Einheiten
3.2.2Bedienteil
3.3 ENTFERNEN DER
FERNBEDIENUNG
3.4 EINSCHALTEN UND
BETRIEBSSTEUERUNG
3.5 DAS EINSETZEN DER
BATTERIEN
3.6 DIE FERNBEDIENUNG
3.7 EINSCHALTEN/
AUSSCHALTEN DES
GERÄTES (Drucktaste T1)
3.8 (AUTOMATISCHE)
WOHLSEINTASTE
(Drucktaste T2)
3.9 KÜHLFUNKTION
(Drucktaste T4)
3.10 NUR
ENTFEUCHTUNGSFUNKTION
3.11 NUR LÜFTUNGSFUNKTION
3.12 HEIZBETRIEB
La pagina si sta caricando...
La pagina si sta caricando...
La pagina si sta caricando...

6
I
GB
F
D
1
1.1
GENERALITA’
INFORMAZIONI GENERALI
Desideriamo innanzitutto ringraziarVi
di avere deciso di accordare la
vostra preferenza ad un condiziona-
tore di nostra produzione.
Come potrete renderVi conto avete
effettuato una scelta vincente in
quanto avete acquistato un prodotto
che rappresenta lo stato dell’Arte
nella tecnologia della climatizzazio-
ne domestica.
Questo manuale è stato concepito
con l’obbiettivo di fornirVi tutte le
spiegazioni per essere in grado di
gestire al meglio il Vostro sistema di
climatizzazione.
Vi invitiamo quindi a leggerlo atten-
tamente prima di mettere in
funzione l’apparecchio.
Mettendo in atto i suggerimenti che
sono contenuti in questo manuale,
grazie al climatizzatore che avete
acquistato, potrete fruire senza
problemi di condizioni ambientali
ottimali con il minor investimento in
termini energetici.
ATTENZIONE
Il manuale è suddiviso in 3 sezioni o
capitoli:
CAP. 1 GENERALITÀ
Si rivolge all’installatore specializ-
zato e all’utente finale.
Contiene informazioni, dati tecnici e
avvertenze importanti che devono
essere conosciute prima di
installare e utilizzare il climatizzatore.
CAP. 2 INSTALLAZIONE
Si rivolge solo ed esclusivamente ad
un’installatore specializzato.
Contiene tutte le informazioni
necessarie al posizionamento e
montaggio del climatizzatore nel
luogo in cui va installato.
L’installazione del climatizzatore da
parte di personale non specializzato
fa decadere le condizioni di garan-
zia.
CAP. 3 USO E MANUTENZIONE
(parte utente)
Contiene le informazioni utili per
comprendere l’uso e la programma-
zione del climatizzatore e gli
interventi di manutenzione più co-
muni.
GENERAL INFORMATION
GENERAL INFORMATION
We wish to thank you, first of all, for
purchasing an air-conditioner produced
by our company.
We are sure you will be happy with it
because it represents the state of the
art in the technology of home air
conditioning.
This manual serves to provide you
with the instructions and explanations
you need to make the best possible
use of your air-conditioner.
We suggest that you read it carefully
before starting to use the appliance.
By following the instructions and
suggestions provided in the manual,
your air-conditioner will give you years
of smooth operation and comfort at
the lowest cost in terms of power
consumption.
ATTENTION
The manual is divided into 3 sections
or chapters:
CHAP. 1 GENERAL INFORMATION
Contains information for the
specialized installer and end user.
The information, technical data and
important warnings must be known
before installing and using the air-
conditioner.
CHAP. 2 INSTALLATION
Contains information exclusively
intended for the specialized installer.
The information contained in this
chapter is necessary for installation
of the air conditioner.
If the air-conditioner is installed by
personnel lacking the necessary
qualifications and specialization this
invalidates the warranty.
CHAP. 3 USE AND
MAINTENANCE (by user)
Contains all information and
instructions for proper use and
programming of the air-conditioner,
as well as instructions for simple
maintenance.
GENERALITES
INFORMATIONS GENERALES
Nous désirons avant tout vous
remercier pour avoir accordé la
préférence à un climatiseur de notre
production.
Comme vous pourrez le constater,
vous avez effectué un choix gagnant
en achetant un produit qui représente
ce qu’il y a de plus avancé dans la
technologie de la climatisation
domestique.
Ce manuel a été conçu afin de vous
fournir toutes les explications qui
vous permettrons de gérer au mieux
votre système de climatisation.
Nous vous invitons donc à le lire
attentivement avant de mettre votre
appareil en marche.
En suivant les instructions qui sont
contenues dans ce manuel, vous
pourrez profiter pendant des années
et sans problèmes, grâce au
climatiseur que vous venez d’acheter,
de conditions ambiantes optimales
avec un minimum d’investissement
en termes énergétiques.
ATTENTION
Le manuel est divisé en 3 sections ou
chapitres:
CHAP. 1 GENERALITES
Il s’adresse à l’installateur qualifié et
à l’utilisateur final.
Il contient des informations, des
données techniques et des
instructions importantes qui doivent
être connues avant d’installer et
d’utiliser le climatiseur.
CHAP. 2 INSTALLATION
Il s’adresse uniquement et
exclusivement à l’installateur qualifié.
Il contient toutes les informations
nécessaires à l’emplacement et au
montage du climatiseur à l’endroit où
il doit être installé. L’installation du
climatiseur par un personnel non
qualifié entraîne la perte d’effet des
conditions de garantie.
CHAP. 3 MODE D’EMPLOI ET
ENTRETIEN (partie
utilisateur)
Il contient les informations utiles pour
comprendre le mode d’emploi et la
programmation du climatiseur ainsi
que les interventions d’entretien les
plus courantes.
ALLGEMEINES
ALLGEMEINE INFORMATIONEN
Zunächst möchten wir Ihnen danken,
dass Sie sich für eine Klimaanlage
aus unserer Produktion entschieden
haben.
Sie werden sich davon überzeugen
können, mit dem Kauf dieses
Produktes eine gute Wahl getroffen
zu haben, denn es befindet sich im
Bereich der Klimatisierung von
Wohnhäusern auf dem neuesten
Stand der Technik.
Ziel dieses Benutzerhandbuchs ist
es, Ihnen alle notwendigen
Informationen zu liefern, damit Sie
Ihre Klimaanlage optimal einsetzen
können.
Wir empfehlen Ihnen daher, vor der
Inbetriebnahme des Geräts dieses
Benutzerhandbuch aufmerksam zu
lesen.
Wenn Sie sich an die hier gegebenen
Empfehlungen halten, können Sie mit
Hilfe dieser Klimaanlage für optimale
Raumbedingungen sorgen und sie
auch im energetischen Sinne optimal
nutzen.
ACHTUNG
Das Benutzerhandbuch ist in 3
Abschnitte oder Kapitel unterteilt:
KAP.1 ALLGEMEINES
Richtet sich an den Fachinstallateur
oder den Endbenutzer.
Enthält Informationen, technische
Angaben und wichtige Warnhinweise,
die bekannt sein müssen, bevor die
Klimaanlage installiert und benutzt
wird.
KAP. 2 INSTALLATION
Richtet sich ausschließlich an den
Fachinstallateur.
Enthält alle Informationen, die für die
Positionierung und Montage der Anlage
an dem dafür vorgesehenen Ort
notwendig sind.
Die Installation der Klimaanlage durch
nicht entsprechend qualifiziertes
Fachpersonal führt zum Verfall der
Garantie.
KAP. 3 GEBRAUCH UND
INSTANDHALTUNG
(Benutzer-Teil)
Enthält Informationen über den
Gebrauch und die Programmierung
der Klimaanlage sowie über
die gebräuchlichsten
Instandhaltungsarbeiten.
1
La pagina si sta caricando...

8
I
GB
F
D
Documento riservato ai termini di leg-
ge con divieto di riproduzione o di
trasmissione a terzi senza
esplicita autorizzazione della ditta
OLIMPIA SPLENDID.
Le macchine possono subire aggior-
namenti e quindi presentare
particolari diversi da quelli raffigurati,
senza per questo costituire
pregiudizio per i testi contenuti in que-
sto manuale.
Leggere attentamente il presente
manuale prima di procedere con
qualsiasi operazione (installazione,
manutenzione, uso) ed attenersi scru-
polosamente a quanto descritto nei
singoli capitoli.
LA DITTA COSTRUTTRICE
NON SI ASSUME RESPONSA-
BILITÀ PER DANNI A PERSO-
NE O COSE DERIVANTI DAL-
LA MANCATA OSSERVANZA
DELLE NORME CONTENUTE
NEL PRESENTE LIBRETTO.
La ditta costruttrice si riserva il
diritto di apportare modifiche in
qualsiasi momento ai propri modelli, fer-
mo restando le caratteristiche
essenziali descritte nel presente
manuale.
L’installazione e la manutenzione di
apparecchiature per la climatizzazione
come la presente potrebbero risultare
pericolose in quanto all’interno di
questi apparecchi è presente un gas
refrigerante sotto pressione e
componenti elettrici sotto tensione.
Pertanto l’installazione, il primo
avviamento e le successive fasi di
manutenzione devono essere esegui-
te esclusivamente da personale
autorizzato e qualificato.
Questa unità è conforme alle direttive
Europee ECC/73/23, ECC/89/336,
ECC 2002/96, ECC 2001/95 e suc-
cessive modificazioni.
Installazioni eseguite al di fuori delle
avvertenze fornite dal presente ma-
nuale e l’utilizzo al di fuori dei limiti di
temperatura prescritti fanno decade-
re la garanzia.
L’ordinaria manutenzione dei filtri, la
pulizia generale esterna possono
essere eseguite anche dall’utente, in
quanto non comportano operazioni
difficoltose o pericolose.
Durante il montaggio, e ad ogni
operazione di manutenzione, è
necessario osservare le precauzioni
citate nel presente manuale, e sulle
etichette apposte all’interno degli
apparecchi, nonché adottare ogni
precauzione suggerita dal comune
buonsenso e dalle Normative di
Sicurezza vigenti nel luogo d’installazio-
ne.
E’ necessario indossare sempre
guanti ed occhiali protettivi per
eseguire interventi sul lato refrigeran-
te degli apparecchi.
1
This document is restricted in use to
the terms of the law and may not be
copied or transferred to third parties
without the express authorization of
the manufacturer, OLIMPIA
SPLENDID.
Our machines are subject to change
and some parts may appear different
from the ones shown here, without
this affecting the text of the manual
in any way.
Read this manual carefully before
performing any operation (installation,
maintenance, use) and follow the
instructions contained in each chapter.
THE MANUFACTURER IS
NOT RESPONSIBLE FOR
DAMAGES TO PERSONS OR
PROPERTY CAUSED BY
FAILURE TO FOLLOW THE
INSTRUCTIONS IN THIS
MANUAL.
The manufacturer reserves the right
to make any changes it deems
advisable to its models, although the
essential features described in this
manual remain the same.
The installation and maintenance of
air-conditioners like this one may be
hazardous as they contain a cooling
gas under pressure as well as powered
parts.
Therefore, the installation, first startup
and subsequent maintenance should
be carried out exclusively by
authorized, qualified personnel.
This unit complies with European
Directives ECC/73/23, ECC/89/336,
ECC 2002/96, ECC 2001/95 and
subsequent amendments.
Failing to comply with the instructions
contained in this manual, and using
the unit with temperatures exceeding
the permissible temperature range
will invalidate the warranty.
Routine maintenance of the filters
and general external cleaning can be
done by the user as these operations
are not difficult or dangerous.
During installation and maintenance,
respect the precautions indicated in
the manual, and on the labels applied
inside the units, as well as all the
precautions suggested by good
sense and by the safety regulations
in effect in your country.
Always wear gloves and protective
goggles when performing any
operations on the refrigerating side of
the units.
Document réservé aux termes de la
loi avec interdiction de reproduction
ou de transmission à tiers sans
l’autorisation expresse de la société
OLIMPIA SPLENDID.
Les machines peuvent subir des
mises à jour et par conséquent
présenter des éléments différents de
ceux qui sont représentés, sans que
cela constitue pour autant un préjudice
pour les textes contenus dans ce
manuel.
Lire attentivement le présent manuel
avant de procéder à toute opération
(installation, entretien, utilisation) et
suivre scrupuleusement ce qui est
décrit dans chacun des chapitres.
LE FABRICANT DECLINE
TOUTE RESPONSABILITE EN
CAS DE DOMMAGES AUX
PERSONNES OU AUX BIENS
DERIVANT DU NON-RESPECT
DES NORMES CONTENUES
DANS LE PRESENT LIVRET.
Le fabricant se réserve le droit
d’apporter à tout moment des
modifications à ces modèles, tout en
conservant les caractéristiques
essentielles décrites dans le présent
manuel.
L’installation et l’entretien d’appareils
pour la climatisation comme celui
qui est décrit dans ce manuel pourraient
être dangereux étant donné qu’il se
trouve à l’intérieur de ces appareils un
gaz frigorigène sous pression ainsi que
des composants électriques sous
tension.
Par conséquent l’installation, la première
mise en route et les phases successives
d’entretien doivent être effectuées
exclusivement par un personnel agréé
et qualifié.
Cette unité est conforme aux
directives Européennes ECC/73/23,
ECC/89/336, ECC 2002/96, ECC
2001/95 et modifications
successives.
Les installations effectuées en
dehors des instructions fournies par
le présent manuel et l'utilisation en
dehors des limites de température
prescrites annulent la garantie.
L’entretien courant des filtres, le
nettoyage général extérieur peuvent
être effectués même par l’utilisateur,
étant donné que ces opérations ne
comportent pas de difficulté ou de
danger.
Lors du montage, et à chaque
opération d’entretien, il faut observer
les précautions citées dans le présent
manuel et sur les étiquettes mises à
l’intérieur des appareils, ainsi
qu’adopter toute les précautions
suggérées par le bon sens commun
et par les Normes de Sécurité en
vigueur sur le lieu de l’installation.
Il faut toujours mettre des gants et
chausser des lunettes de protection
pour effectuer les interventions sur le
côté réfrigérant des appareils.
Laut Gesetz ist dies ein vertrauliches
Dokument, daher gilt das Verbot der
Vervielfältigung oder Übermittlung an
Dritte ohne ausdrückliche Genehmigung
der Firma OLIMPIA SPLENDID.
An den Geräten können technische
Neuerungen vorgenommen werden, d.h.
Einzelteile können u.U. anders aussehen
als auf den Abbildungen, was jedoch
die Gültigkeit der Anweisungen in diesem
Benutzerhandbuch in keiner Weise
beeinträchtigt.
Bevor Sie mit einer Tätigkeit beginnen
(Installation, Instandhaltung, Gebrauch),
lesen Sie aufmerksam das vorliegende
Benutzerhandbuch und halten Sie sich
strengstens an die in den einzelnen
Kapiteln dargelegten Anweisungen.
DIE HERSTELLERFIRMA
ÜBERNIMMT KEINERLEI
VERANTWORTUNG FÜR
SCHÄDEN AN PERSONEN
ODER SACHEN, DIE DURCH
NICHTBEACHTUNG DER IM
VORLIEGENDEN
BENUTZERHANDBUCH
ENTHALTENEN
SICHERHEITSVORSCHRIFTEN
ENTSTEHEN.
Die Herstellerfirma behält sich das Recht
vor, an ihren Modellen jederzeit
Veränderungen vorzunehmen, wobei die
wesentlichen im vorliegenden
Benutzerhandbuch beschriebenen
Geräteeigenschaften unverändert
bleiben.
Die Installation und Instandhaltung von
Klimaanlagen wie der hier beschriebenen
können gefährlich sein, da sich im Inneren
der Anlagen ein unter Druck stehendes
Kühlgas befindet und sie zudem
elektrische Bauteile enthalten, die unter
Spannung stehen.
Daher dürfen die Installation, die erste
Inbetriebsetzung und die nachfolgenden
Instandhaltungsarbeiten ausschließlich
von autorisiertem und qualifiziertem Per-
sonal durchgeführt werden.
Dieses Gert entspricht den europäischen
Richtlinien ECC/73/23, ECC/89/336, ECC
2002/96, ECC 2001/95 und den
darauffolgenden Änderungen.
Installationen die nicht entsprechend den
im vorliegenden Handbuch enthaltenen
Anweisungen sowie der Einsatz unter
Nichtbeachtung der vorgeschriebenen
Temperaturgrenzen, geben keinerlei
Anspruch auf Garantie.
Die gewöhnliche Instandhaltung der Filter
und die allgemeine äußerliche Reinigung
können auch durch den Benutzer
durchgeführt werden, da sie keine
schwierigen oder gefährlichen Tätigkeiten
erfordern.
Während der Montage und bei sämtlichen
Instandhaltungstätigkeiten müssen die
Vorsichtsmaßnahmen eingehalten
werden, die in diesem Benutzerhandbuch
und auf den Schildern im Innern der Geräte
angeführt sind; außerdem müssen
sämtliche Vorsichtsmaßnahmen ergriffen
werden, die der gesunde
Menschenverstand gebietet und die durch
die am Installationsort geltenden
Sicherheitsbestimmungen vorgeschrieben
sind.
Bei Eingriffen an der Kühlseite der Geräte
sind stets Schutzhandschuhe und
Schutzbrille zu tragen.
La pagina si sta caricando...

10
I
GB
F
D
Air conditioners MUST NOT
be installed in places
containing inflammable
gasses, explosive gasses, or
in very humid environments
(laundries, greenhouses,
etc.), or in places where
there are machines that
generate very great heat.
In case of replacement of
parts, use only original
OLIMPIA SPLENDID parts.
IMPORTANT!
To prevent any risk of electrocution,
always disconnect the main circuit
breaker before making electric
connections or performing any
maintenance on the units.
The following instructions must be
made known to all personnel involved
in the machine’s transport and
installation.
Non immettere R-410A nell'atmosfe-
ra: l'R-410A è un gas serra fluorurato,
richiamato nel Protocollo di Kyoto, con
un Potenziale di Riscaldamento Glo-
bale (GWP)= 1975
DISPOSAL
This symbol on the product or its
packaging indicates that the
appliance cannot be treated as
normal domestic trash, but must be
handed in at a collection point for
recycling electric and electronic
appliances.
Your contribution to the correct
disposal of this product protects the
environment and the health of your
fellow men. Health and the
environment are endangered by
incorrect disposal.
Further information about the
recycling of this product can be
obtained from your local town hall,
your refuse collection service, or in
the store at which you bought the
product.
This regulation is valid only in EU
member states.
Les climatiseurs NE
DOIVENT PAS être installés
dans des pièces où il y a
présence de gaz
inflammables, gaz
explosifs, dans des
endroits très humides
(buanderies, serres, etc.),
ou dans des locaux où se
trouvent d’autres machines
produisant une importante
source de chaleur.
En cas de remplacement de
composants, utiliser
exclusivement des pièces
de rechange originales
OLIMPIA SPLENDID.
IMPORTANT!
Afin de prévenir tout risque
d’électrocution, il est indispensable de
couper le courant au disjoncteur
principal avant d’effectuer des
branchements électriques et toute
opération d’entretien sur les appareils.
Communiquer ces instructions à tout
le personnel concerné par le transport
et l’installation de la machine.
Ne pas émettre de R-410A dans
l'atmosphère: le R-410A est un gaz à
effet de serre fluoré, cité dans le
Protocole de Kyoto, avec un Pouvoir
de Réchauffement Global (GWP) égal
à 1975
ELIMINATION
Ce symbole apposé sur le produit ou
son emballage indique que ce produit
ne doit pas être jeté au titre des
ordures ménagères normales, mais
doit être remis à un centre de collecte
pour le recyclage des appareils
électriques et électroniques.
En contribuant à une élimination
correcte de ce produit, vous protégez
l'environnement et la santé d'autrui.
L'environnement et la santé sont mis
en danger par une élimination
incorrecte du produit.
Pour toutes informations
complémentaires concernant le
recyclage de ce produit, adressez-
vous à votre municipalité, votre
service des ordures ou au magasin
où vous avez acheté le produit.
Cette consigne n'est valable que pour
les états membres de l'UE.
Die Klimaanlagen DÜRFEN
NICHT in Räumen installiert
werden, in denen sich
entflammbare oder
explosive Gase befinden
oder in denen hohe
Feuchtigkeit herrscht
(Wäschereien,
Gewächshäuser usw.) oder
in Räumen, in denen sich
andere Geräte befinden, die
viel Wärme freisetzen.
Bei der Auswechslung von
Einzelteilen bitte
ausschließlich original
OLIMPIA SPLENDID-
Ersatzteile verwenden.
WICHTIG!
Um dem Risiko eines Stromschlags
vorzubeugen, muss unbedingt der
Hauptschalter ausgeschaltet werden,
bevor elektrische Anschlüsse
hergestellt oder
Instandhaltungsarbeiten an den
Geräten vorgenommen werden.
Das für den Transport und für die
Maschineninstallation zuständige
Personal ist von diesen Anweisungen
in Kenntnis zu setzen.
R-410A nicht in die Atmosphäre
auslassen: R-410A ist ein im Kyoto-
Protokoll verzeichnetes Fluorgasmit
mit einem globalem Treibhauspotential
(GWP) = 1975
ENTSORGUNG
Dieses Symbol auf dem Produkt oder
seiner Verpackung weist darauf hin,
dass dieses Produkt nicht als
normaler Haushaltsabfall zu
behandeln ist, sondern an einem
Sammelpunkt für das Recycling von
elektrischen und elektronischen
Geräten abgegeben werden muss.
Durch Ihren Beitrag zum korrekten
Entsorgen dieses Produktes
schützen Sie die Umwelt und die
Gesundheit Ihrer Mitmenschen.
Umwelt und Gesundheit werden
durch falsches Entsorgen gefährdet.
Weitere Informationen über das
Recycling dieses Produktes erhalten
Sie von Ihrem Rathaus, Ihrer
Müllabfuhr oder dem Geschäft, in
dem Sie das Produkt gekauft haben.
Diese Vorschrift ist nur gültig für
Mitgliedstaaten der EU.
1
I climatizzatori NON DEVONO
essere installati in ambien-
ti con presenza di gas
infiammabili, gas esplosivi,
in ambienti molto umidi
(lavanderie, serre, ecc.), o
in locali dove sono
presenti altri macchinari
che generano una forte
fonte di calore.
In caso di sostituzione di
componenti utilizzare
esclusivamente ricambi
originali OLIMPIA SPLENDID.
IMPORTANTE!
Per prevenire ogni rischio di
folgorazione è indispensabile
staccare l’interruttore generale
prima di effettuare collegamenti
elettrici ed ogni operazione di
manutenzione sugli apparecchi.
Rendere note a tutto il personale inte-
ressato al trasporto ed
all’installazione della macchina le
presenti istruzioni.
Non immettere R-410A nell'atmosfe-
ra: l'R-410A è un gas serra fluorurato,
richiamato nel Protocollo di Kyoto, con
un Potenziale di Riscaldamento Glo-
bale (GWP)= 1975
SMALTIMENTO
Il simbolo sul prodotto o sulla
confezione indica che il prodotto non
deve essere considerato come un
normale rifiuto domestico, ma deve
essere portato nel punto di raccolta
appropriato per il riciclaggio di
apparecchiature elettriche ed
elettroniche.
Provvedendo a smaltire questo
prodotto in modo appropriato, si
contribuisce a evitare potenziali
conseguenze negative per l’ambien-
te e per la salute, che potrebbero
derivare da uno smaltimento
inadeguato del prodotto.
Per informazioni più dettagliate sul
riciclaggio di questo prodotto,
contattare l’ufficio comunale, il
servizio locale di smaltimento rifiuti
o il negozio in cui è stato acquistato
il prodotto.
Questa disposizione è valida
solamente negli Stati membri dell’UE.
La pagina si sta caricando...

12
I
GB
F
D
SYMBOLS
The pictograms in the next chapter
provide the necessary information
for correct, safe use of the
machine in a rapid, unmistakable
way.
Editorial pictograms
Service
- Refers to situations in which you
should inform the SERVICE
department in the company:
CUSTOMER TECHNICAL SERVICE.
Index
- Paragraphs marked with this
symbol contain very important
information and recommendations,
particularly as regards safety.
Failure to comply with them may
result in:
- danger of injury to the operators
- loss of the warranty
- refusal of liability by the
manufacturer.
Raised hand
- Refers to actions that absolutely
must not be performed.
Safety pictograms
Danger of high voltage
- Signals to the personnel that the
operation described could cause
electrocution if not performed
according to the safety rules.
Generic danger
- Signals to the personnel that the
operation described could cause
physical injury if not performed
according to the safety rules.
Danger due to heat
- Signals to the personnel that the
operation described could cause
burns if not performed according
to the safety rules.
SYMBOLOGIE
Les pictogrammes reportés au
chapitre suivant permettent de fournir
rapidement et de manière univoque
les informations nécessaires pour
une utilisation correcte de la machine
dans des conditions de sécurité.
Pictogrammes rédactionnels
Service
- Indique des situations où il faut
informer le SERVICE interne de
la société:
SERVICE APRES-VENTE CLIENTS.
Index
- Les paragraphes précédés par ce
symbole contiennent des
informations et des prescriptions
très importantes, notamment pour
ce qui concerne la sécurité.
Le non-respect peut comporter:
- danger pour la sécurité des
opérateurs.
- perte de la garantie du contrat.
- dégagement de la responsabilité
du fabricant.
Main levée
- Indique les actions qu’il ne faut
absolument pas accomplir.
Pictogrammes concernant
la sécurité
Tension électrique dangereuse
- Signale au personnel concerné que
l’opération décrite présente, si elle
n’est pas effectuée conformément
aux normes de sécurité, le risque
de provoquer une décharge
électrique.
Danger général
- Signale au personnel concerné que
l’opération décrite présente, si elle
n’est pas effectuée conformément
aux normes de sécurité, le risque
de provoquer des dommages
physiques.
Danger de température élevée
- Signale au personnel concerné que
l’opération décrite présente, si elle
n’est pas effectuée conformément
aux normes de sécurité, le risque
de provoquer des brûlures par
contact avec des composants à
température élevée.
BILDSYMBOLE
Die im folgenden Kapitel aufgeführten
Bildsymbole liefern schnell und eindeutig
Informationen zum korrekten und
sicheren Gebrauch des Gerätes.
Bildsymbole
Kundendienst
- Kennzeichnet Situationen, in denen
der interne KUNDENDIENST der
Firma zu benachrichtigen ist:
KUNDENDIENST
Inhaltsverzeichnis
- Die Paragrafen, denen dieses
Symbol vorausgeht, enthalten sehr
wichtige Informationen und
Vorschriften, insbesondere
bezüglich der Sicherheit.
Die Nichtbeachtung dieser
Informationen und Vorschriften kann
dazu führen, dass:
- die Unversehrtheit des Personals
an den Geräten gefährdet ist
- die vertragliche Garantie verfällt
- die Herstellerfirma jede
Verantwortung ablehnt.
Erhobene Hand
- Kennzeichnet Handlungen, die
absolut verboten sind.
Bildsymbole zur Sicherheit
Gefährliche elektrische Spannung
- Zeigt dem betreffenden Personal
an, dass bei der beschriebenen
Tätigkeit die Gefahr eines
elektrischen Schlags besteht, wenn
diese nicht unter Beachtung der
Sicherheitsvorschriften
durchgeführt wird.
Allgemeine Gefahr
- Zeigt dem betreffenden Personal
an, dass bei der beschriebenen
Tätigkeit Verletzungsgefahr
besteht, wenn diese nicht unter
Beachtung der
Sicherheitsvorschriften
durchgeführt wird.
Gefahr durch starke Hitze
- Zeigt dem betreffenden Personal
an, dass bei der beschriebenen
Tätigkeit Verbrennungsgefahr durch
Berührung heißer Geräteteile
besteht, wenn diese nicht unter
Beachtung der
Sicherheitsvorschriften
durchgeführt wird.
1
SIMBOLOGIA
I pittogrammi riportati nel seguente
capitoloconsentono di fornire
rapidamente ed in modo univoco
informazioni necessarie alla corretta
utilizzazione della macchina in
condizioni di sicurezza.
Pittogrammi redazionali
Service
- Contrassegna situazioni nelle
quali si deve informare il SERVICE
aziendale interno:
SERVIZIO ASSISTENZA TECNICA
CLIENTI.
Indice
- I paragrafi preceduti da questo
simbolo contengono informazioni
e prescrizioni molto importanti,
particolarmente per quanto
riguarda la sicurezza.
Il mancato rispetto può comportare:
- pericolo per l'incolumità degli
operatori
- perdita della garanzia contrattua-
le
- declinazione di responsabilità da
parte della ditta costruttrice.
Mano alzata
- Contrassegna azioni che non si
devono assolutamente fare.
Pittogrammi relativi alla
sicurezza
Tensione elettrica pericolosa
- Segnala al personale interessato
che l'operazione descritta presen-
ta, se non effettuata nel rispetto
delle normative di sicurezza, il ri-
schio di subire uno shock elettri-
co.
Pericolo generico
- che l'operazione descritta presen-
ta, se non effettuata nel rispetto
delle normative di sicurezza, il
rischio di subire danni fisici.
Pericolo di forte calore
- delle normative di sicurezza,
il rischio di subire bruciature per
contatto con componenti con
elevata temperatura.
1.2
1.2.1
1.2.2
La pagina si sta caricando...

14
I
GB
F
D
1.3
1.4
1
USO PREVISTO
Il climatizzatore deve essere utilizza-
to esclusivamente per produrre aria
calda o fredda (a scelta) con il solo
scopo di rendere confortevole la tem-
peratura nell’ambiente.
Un uso improprio dell’ apparecchiatu-
ra con eventuali danni causati a per-
sone, cose o animali esulano
l’OLIMPIA SPLENDID da ogni re-
sponsabilità.
ELENCO COMPONENTI A
CORREDO
Le unità che compongono il sistema
di climatizzazione vengono confezio-
nate singolarmente in imballo di
cartone.
Gli imballi possono essere trasporta-
ti, per singole unità, a mano da due
addetti, oppure caricate su carrello
trasportatore anche accatastate per
un numero massimo di tre confezioni.
La fornitura comprende le
parti precisate nella se-
guente tabella. Prima di pas-
sare al montaggio è bene
accertarsi di averle tutte a
portata di mano.
A - Staffa per ancoraggio a parete
B - Griglie esterne per l’entrata e
l’uscita dell’aria (n.2) comprensi-
ve di catenelle
C - Tubi da introdurre nei fori
praticati a parete (n.2) da 50 cm
- lunghezza
D - Flangia interna di fissaggio tubi
(n.2)
E - Kit viti e tasselli
F - Libretti uso e manutenzione +
garanzia
G - Dima di carta per l’esecuzione
dei fori
H - Zoccolo (n.2)
I - Batterie
L - Chiave bloccaggio telecomando
PROPER USE
The air-conditioner should be used for
the exclusive purpose of producing
hot or cool air (on demand) for the sole
purpose of obtaining a comfortable
temperature in the room.
Improper use of the machine (outside
and inside units) causing damage to
persons, property or animals relieve
OLIMPIA SPLENDID of any liability.
LIST OF ACCESSORIES
SUPPLIED
The two units that make up the air-
conditioner are packed separately in
cartons.
Packaging may be transported per
single units, by hand by two authorized
persons, or loaded on a trolley, even
piling up to a maximum of three
packs.
The supply includes the
parts listed in the table
below. Before beginning to
assemble the unit, make
sure all the parts are within
easy reach.
A - Wall fastening bracket 1
B - External air intake/outlet grids
(2) complete with chains
C - 2 tubes to insert into holes on wall,
50 cm long
D - Pipe fastening inner flange 2
E - Kit of screws and anchor bolts
F - Manual of instructions for use
and maintenance, and warranty
G - Paper template to make holes
H - Shoe (n.2)
I - Batteries
L - Remote control locking key
UTILISATION PRÉVUE
Le climatiseur doit être utilisé
exclusivement pour produire de l’air
chaud ou froid (au choix) dans le seul
but de rendre agréable la température
ambiante.
Un usage impropre des appareils
(extérieur et intérieur) avec d’éventuels
dommages causés aux personnes,
aux biens ou aux animaux dégage la
société OLIMPIA SPLENDID de toute
responsabilité.
LISTE DES COMPOSANTS
NECESSAIRES FOURNIS
Les unités qui composent le système
de climatisation sont emballées
individuellement dans une caisse en
carton.
Les emballages peuvent être
transportées par unités individuelles
à la main par deux personnes ou
chargées sur un chariot transporteur,
même empilés à raison de trois
emballages au maximum.
La forniture comprend les
pièces précisées dans la
tableau suivant. Avant de
procéder au montage, il est
conseillé de s’assurer de
les avoir toutes à portée de
main.
A - Bride pour ancrage au mur
B - Grilles extérieures pour l'entrée
et la sortie de l'air (2) comprenant
les chaînes.
C - Tubes à introduire dans les trous
pratiqués au mur (2) de 50 cm de
long
D - Flasque intérieure de fixation
des tuyaux (n.2)
E - Kit vis et chevilles
F - Manuel d’instruction mode
d’emploi, montage et garantie
G - Gabarit en papier pour l’exécution
des trous
H - Plinthe (2)
I - Piles
L - Clef de blocage télécommande
VORGESEHENER
GEBRAUCH
Die Klimaanlage darf ausschließlich
dafür verwendet werden, warme oder
kalte Luft (nach Wahl) zu produzieren;
ihr einziger Verwendungszweck ist
der, die Raumtemperatur angenehm
zu temperieren.
OLIMPIA SPLENDID übernimmt
keinerlei Verantwortung für Schäden,
die durch zweckentfremdeten
Gebrauch der Anlage an Personen,
Sachen oder Tieren entstehen.
LISTE DER
AUSSTATTUNGSELEMENTE
Die Einheiten, aus denen die Klimaanlage
besteht, werden einzeln in Kartons
verpackt.
Die Verpackungen können einzeln von
zwei Angestellten von Hand oder auf
einem Transportwagen zu maximal drei
Einheiten aufeinandergestapelt
transportiert werden.
Die Lieferung umfasst die in
nachfolgender Tabelle
aufgeführten Teile. Bevor
man mit der Montage
beginnt, sollte man sich
davon überzeugen, dass
man alle Teile zur Hand
hat.
A - Bügel zur Verankerung in der Wand
B - Außengitter für das Ein- und
Ausströmen der Luft (2)
einschließlich Kette.
C - Rohre zum Einfügen in die
angebrachten Wandbohrungen
(Anzahl: 2) zu 50 cm Länge
D - Innenflansch zur Befestigung der
Rohre (2 Stück)
E - Satz Schrauben und Dübel
F - Instandhaltungs-und Garantie
Handbücher
G - Papierschablone zur Durchführung
der Bohrungen
H - Sockel (Anz. 2)
I - Batterien
L - Fernbedienungssicherungsschlüssel
MANUALE
AB
FDE
C
HI L
La pagina si sta caricando...

16
I
GB
F
D
1.4.1
1.4.2
Immagazzinamento
Immagazzinare le confezioni in
ambiente chiuso e protetto dagli agenti
atmosferici, isolate dal suolo tramite
traversine o pallet.
NON CAPOVOLGERE
L’IMBALLO.
Ricevimento e disimballo
L’imballo è costituito da materiale
adeguato ed eseguito da personale
esperto.
Le unità sono tutte controllate e
collaudate e vengono consegnate
complete ed in perfette condizioni,
tuttavia per il controllo della qualità dei
servizi di trasporto attenersi alle
seguenti avvertenze:
- al ricevimento degli imballi verifi-
care se la confezione risulta dan-
neggiata, in caso positivo ritirare la
merce con riserva, producendo
prove fotografiche ed eventuali
danni apparenti.
- disimballare verificando la
presenza dei singoli componenti
con gli elenchi d’imballo
- controllare che tutti i componenti
non abbiano subito danni durante
il trasporto; nel caso notificare
entro 3 giorni dal ricevimento gli
eventuali danni allo spedizioniere a
mezzo raccomandata r.r.
presentando documentazione
fotografica.
Analoga informazione inviarla
tramite fax anche a OLIMPIA
SPLENDID.
Nessuna informazion concernen-
te danni subiti potrà essere presa
in esame dopo 3 giorni dalla
consegna.
Nota importante:
Conservare l’imballo almeno per tutta
la durata del periodo di garanzia, per
eventuali spedizioni al centro di
assistenza in caso di riparazione.
Smaltire i componenti dell’imballo
secondo le normative vigenti sullo
smaltimento dei rifiuti.
Storage
Store the cartons in a closed
environment protected against
atmospheric agents and raised off
the floor by planks or a pallet.
TO NOT TURN THE
CARTON UPSIDE DOWN.
Receipt and unpacking
The packing is made of suitable
material and is done by expert
personnel.
The units are delivered complete and
in perfect condition, however we
suggest that you perform the following
controls of the quality of the shipping
service:
- on receipt of the cartons check
them for any damage and, if any is
found, accept the goods with
reservation, and keep
photographic evidence of any
damage found.
- unpack and check the contents
against the packing list.
- make sure none of the parts have
been damaged during shipment; in
case of damage you must report it
to the shipping
company within 3 days of receipt,
by registered letter with return
receipt,
presenting photographic
documentation.
Copy of notice should also be sent
by fax to OLIMPIA SPLENDID.
No notice of damage will be
accepted after 3 days from
delivery.
Important note:
Keep the packing at least through the
warranty period, in case you need to
ship the air-conditioner to the service
centre for repair.
Dispose of the packing materials in
compliance with the rules in effect for
waste disposal.
Stockage
Stocker les caisses dans un local
fermé et protégé des agents
atmosphériques, isolées du sol par
des traverses ou des palettes.
NE PAS RENVERSER
L’EMBALLAGE.
Réception et déballage
L’emballage est constitué de matériau
adéquat et effectué par un personnel
expert.
Les unités sont livrées complètes et
en parfaites conditions; suivre
cependant les instructions suivantes
pour le contrôle de la qualité des
services de transport:
- à la réception des emballages
vérifier si le carton est endommagé,
si c’est le cas retirer la marchandise
sous réserve, en produisant des
preuves photographiques des
éventuels dégâts apparents.
- déballer en vérifiant la présence de
chacun des composants avec les
listes d’emballage.
- contrôler qu’aucun composant n’a
subi de dommages pendant le
transport; dans le cas contraire,
notifier les éventuels dommages
au transporteur dans le délai de 3
jours à partir de la réception par
lettre recommandée avec accusé
de réception en présentant la
documentation photographique.
Envoyer aussi par fax cette même
information à OLIMPIA SPLENDID.
Aucune information concernant les
dommages subis ne pourra être
prise en considération au-delà de
3 jours après la livraison.
Note importante:
Conserver l’emballage au moins
pendant toute la durée de la période
de garantie, pour d’éventuelles
expéditions au centre du service après-
vente en cas de réparation.
Pour la mise au rebut des composants
de l’emballage, suivre les normes
locales relatives à l’élimination des
déchets en vigueur.
Lagerung
Die Verpackungen in geschlossener
und vor Witterungseinflüssen
geschützter Umgebung lagern; sie
müssen durch Schwellen oder
Paletten vom Boden getrennt sein.
DIE VERPACKUNG NICHT
AUF DEN KOPF STELLEN.
Annahme und Auspacken
Die Verpackung besteht aus
geeignetem Material; die Geräte
werden von qualifiziertem Personal
verpackt.
Die Einheiten sind alle kontrolliert und
geprüft und werden vollständig und in
einwandfreiem Zustand geliefert;
dennoch sollte man zur
Qualitätskontrolle des
Transportdienstes folgende Hinweise
beachten:
- Kontrollieren Sie bei Erhalt der
Verpackungen, ob die Lieferung
beschädigt ist. Sollte dies der Fall
sein, nehmen Sie die Ware unter
Vorbehalt an und fertigen Sie
Fotografien als Beweismittel
offensichtlicher Schäden an.
- Überprüfen Sie beim Auspacken
das Vorhandensein der einzelnen
Komponenten anhand der
Verpackungslisten.
- Prüfen Sie nach, dass keines der
Bestandteile beim Transport
beschädigt wurde; sollte dies jedoch
der Fall sein, teilen Sie die
eventuellen Schäden innerhalb von
3 Tagen nach Erhalt der Ware dem
Spediteur mittels Einschreiben mit
Rückschein mit und legen Sie die
Fotografien als Beweismittel bei.
Schicken Sie dieselben
Informationen per Fax auch an
OLIMPIA SPLENDID.
Später als 3 Tage nach Eingang der
Lieferung können
Schadensmeldungen nicht mehr
berücksichtigt werden.
Wichtiger Hinweis:
Bewahren Sie die Verpackung
mindestens über die gesamte Dauer
der Garantiezeit auf; falls etwas
repariert werden muss, kann sie zum
Einsenden von Teilen an den
Kundendienst benutzt werden.
Entsorgen Sie die Verpackungsteile
gemäß den geltenden
Abfallbeseitigungs-Vorschriften.
11
La pagina si sta caricando...

18
I
GB
F
D
MODALITÀ
D’INSTALLAZIONE
Per ottenere una buona riuscita
dell’installazione e prestazioni di
funzionamento ottimali, seguire
attentamente quanto indicato nel
presente manuale. La mancata
applicazione delle norme indicate,
che può causare mal funzionamento
delle apparecchiature, sollevano la
ditta OLIMPIA SPLENDID da ogni
forma di garanzia e da eventuali danni
causati a persone, animali o cose.
E’ importante che l’impianto
elettrico sia a norma, rispet-
to ai dati riportati nella sche-
da tecnica e sia provvisto di
una buona messa a terra.
Dimensioni e caratteristi-
che del locale dove installa-
re il climatizzatore
Prima di installare il climatizzatore è
indispensabile procedere ad un
calcolo dei carichi termici estivi.
Più questo computo è corretto e più
il prodotto assolverà pienamente la
sua funzione.
Per l’esecuzione dei calcoli dovete
riferirvi direttamente alle normative
in vigore (UNI rif. Legge 10/91) o a
tabelle, sia stampate che informati-
che, estrapolate dalle stesse norme.
Per applicazioni particolarmente
importanti Vi consigliamo di rivolgerVi
a studi termotecnici specializzati.
Per quanto possibile comunque
bisogna cercare di limitare i carichi
temici maggiori con i seguenti ac-
corgimenti: Su ampie vetrate espo-
ste al sole è opportuno che vi siano
tende interne o meglio mascherature
esterne (veneziane, verande, pelli-
cole rifrangenti ecc.)
Il locale condizionato deve rimanere
per il maggior tempo possibile
chiuso.
Evitare l’accensione di fari di tipo
alogeno con alti consumi o di altre
apparecchiature elettriche che
assorbano tanta energia (fornetti,
ferri da stiro a vapore, piastre per
cottura ecc).
2.1
2.1.1
INSTRUCTIONS FOR
INSTALLATION
To obtain the best results and optimum
performance, follow the instructions
for correct installation provided in this
manual. Failure to follow the
instructions and apply the rules
indicated may cause malfunction of
the appliance and relieves the
manufacturer, OLIMPIA SPLENDID
of any form of guarantee and liability
for damages to persons, animals or
property.
The electrical system must
comply with the regulations
and rating data in the
technical sheet, with good
grounding.
Dimensions and features of
site where air conditioner is
installed
Before installing the air conditioner,
it is essential to make an accurate
calculation of the heat load in
summer.
The more accurate this calculation
is made the better the air conditioner
will be able to do its job.
To make these calculations, refer
directly to the regulations in effect
(UNI ref. Law 10/91) or to the tables,
both printed and computerized, based
on those regulations.
For particularly significant
applications, we recommend
contacting expert heating engineers.
As far as possible, in any case, it is
important to try and reduce major
thermal loads by the following means:
Large glass panes exposed to
sunlight should be provided with
curtains on the inside or shades on
the outside (Venetian blinds,
verandas, refracting films, etc.)
The air-conditioned room should be
closed as much of the time as
possible.
Halogen spotlights or other electrical
equipment with high power
consumption should not be used in
the room (toasters, steam irons, hot
plates for cooking, etc.).
MODE D’INSTALLATION
Pour une bonne réussite de
l’installation et pour que les prestations
de fonctionnement soient optimales,
suivre attentivement les instructions
dans le présent manuel. Le non-
respect de l‘application des normes
indiquées, qui peut entraîner un
mauvais fonctionnement des
appareillages, dégage la société
OLIMPIA SPLENDID de toute forme
de garantie et des éventuels
dommages causés à des personnes,
animaux ou biens.
S’assurer que l’installation
électrique correspond aux
normes, respecte les
données reportées sur la
fiche technique et qu’elle
dispose d’une mise à la ter-
re adéquate.
Dimensions et
caractéristiques de la pièce
où le cli matiseur doit être
installé
Avant l'installation du climatiseur, il
est indispensable de procéder à un
calcul des charges thermiques d'été
relatives à la pièce concernée.
Plus ce calcul est correct et plus
votre climatiseur remplira sa fonction.
Pour l'exécution des calculs, vous
devrez vous référer directement aux
règlementations en vigueur (UNI réf.
Loi 10/91) ou aux tableaux, aussi
bien imprimés qu'informatiques,
extrapolés de ces mêmes normes.
Pour des applications
particulièrement importantes, nous
vous conseillons de vous adresser à
des bureaux d'études thermo-
techniques spécialisés.
Dans la mesure du possible, il faut essayer
de limiter, de toute façon, les charges
thermiques majeures en suivant ces
précautions.
Sur de grandes baies vitrées exposées
au soleil, il est opportun qu'il y ait des
rideaux à l'intérieur ou mieux encore, des
protections extérieures (stores vénitiens,
vérandas, pellicules réfractives, etc...)
La pièce climatisée doit rester le plus de
temps possible fermée.
Evitez d'allumer des lampes de type
halogène à grande consomation ou d'autres
appareillages électriques qui absorbent
une quantité importante d'énergie (petits
fours, fers à repasser à la vapeur, plaques
de cuisson, etc...).
INSTALLATIONSBESTIMMUNGEN
Befolgen Sie genauestens die
Anweisungen des vorliegenden
Benutzerhandbuchs, um die
Installation problemlos durchführen
und optimale Betriebsleistungen
erzielen zu können. Die
Nichtbeachtung der angeführten
Vorschriften kann zu
Funktionsstörungen der Anlage
führen und enthebt die Firma OLIMPIA
SPLENDID von jeder Pflicht zur
Garantieleistung und von der
Verantwortung für eventuelle Schäden
an Personen, Tieren oder Sachen.
Die elektrische Anlage muss
genormt sein, die in der
technischen Beschreibung
aufgeführten Daten
einhalten und mit einer
guten Erdleitung
ausgestattet sein.
Abmessungen und
Eigenschaften des Raums, in
dem dem das Klimagerät
installiert wird
Vor der Installation des Klimagerätes
ist eine Berechnung der benötigten
Kühlleistung für den Sommer
bezüglich des betreffenden Raums
durchzuführen.
Je genauer diese Berechnung ist, de-
sto effizienter ist die Arbeitsweise
des Gerätes. Für die Durchführung
der Berechnungen hat man sich auf
die Vorschriften der geltenden
Richtlinien (UNI Gesetz Nr. 10/91)
oder auf die Tabellen (auf Ausdrucken
oder Datenträgern), die ebenfalls in
den Richtlinien enthalten sind, zu
beziehen.
Im Falle von besonders komplexen
Installationen ist es empfehlenswert,
sich an kompetente Fachkräfte
(Wärmetechniker) zu wenden.
Nach Möglichkeit sollten höhere
Wärmeleistungen vermieden werden,
wobei Folgendes zu beachten ist: Bei
großflächigen Fenstern, die einer
starken Sonneneinstrahlung ausgesetzt
sind, sollten im Raum Vorhänge oder
auf der Außenseite des Gebäudes
Sonnenschutzvorrichtungen (Stores,
Veranden, lichtbrechende Folien, usw.)
angebracht werden.
Der klimatisierte Raum sollte möglichst
lange geschlossen bleiben.
Es sollten keine Halogenlampen mit
hohem Energieverbrauch oder andere
elektrische stromaufnehmende Geräte
(Öfen, Dampfbügeleisen, Kochfelder,
usw.) eingeschaltet werden.
12
La pagina si sta caricando...

20
I
GB
F
D
Scelta della posizione dove
installare il climatizzatore
La posizione di installazione deve
essere scelta a ridosso di una pa-
rete comunicante con l’esterno.
Avvertenza: Una volta individuata,
secondo i criteri precedentemente
esposti, la corretta posizione per
l’installazione occorre verificare
che nei punti dove avete intenzione
di praticare i fori non vi siano strut-
ture od impianti (travi , pilastri, tu-
bazioni idrauliche, cavi elettrici
ecc.) che impediscano l’esecuzio-
ne dei fori necessari all’installazio-
ne.
Controllate ancora una volta che
non sussistano ostacoli alla libera
circolazione dell’aria attraverso i
fori che andrete a praticare (piante
e relativo fogliame, doghe di
rivestimento, persiane, grate o
griglie troppo fitte ecc.).
MONTAGGIO DELL’UNITÀ
Foratura della parete
Questa operazione deve essere
eseguita utilizzando un’attrezzatura ap-
propriata che agevoli il vostro
lavoro e che eviti danni o disturbi eccessi-
vi al Vostro cliente. I migliori strumenti per
eseguire fori di grande diametro sulle pare-
ti sono degli speciali trapani (chiamati
“carotatrici”) con elevata coppia torcente e
con velocità di rotazione regolabile a
secondo del diametro del foro da
praticare.
Per evitare la diffusione di elevate quantità
di polvere e detriti in ambiente le “carotatrici”
si possono accoppiare a sistemi di aspira-
zione composti essenzialmente da un aspi-
rapolvere da collegare ad un’accessorio
(tipo ventosa) da mettere a ridosso della
punta di perforazione. Il nostro ufficio
“Service” Vi può dare ogni informazione e
ragguaglio in merito al reperimento di
queste apparecchiature.
2.1.2
2.2
2.2.1
Choice of best position for
installing the air conditioner
The air conditioner must be installed
on a wall that communicates with the
outside.
Caution: After determining the best
place for installation as described
above, check to make sure that the
wall can be drilled in that point
without interfering with other
structures or installations (beams,
piers, pipes, wires, etc.).
Check again to make sure there are
no obstacles to air circulation
through the holes to be drilled due to
plants and their leaves, slats or
panelling, blinds, gratings or grids too
dense, etc.).
INSTALLATION OF THE UNIT
Drilling the wall
This operation should be carried out
using the proper tools to facilitate
your work and prevent excess
damage or disturbance to your client.
The best tools for drilling large holes
in walls are special drills called core
borers with very high twisting torque
and adjustable rotation speed
depending on the diameter of the hole
to be drilled.
To prevent the creation of large
amounts of dust and rubble due to
drilling, the core borer can be fitted
with a vacuum system applied by
means of suction cups to the drilling
zone.
Our Service Department can give you
all necessary information to enable
you to find these devices.
Choix de la position où
installer le climatiseur
La position de l'installation doit être
choisie sur un mur communiquant
avec l'extérieur.
AVERTISSEMENT: Une fois
localisée la position correcte pour
l'installation, selon les critères
précédemment exposés, il vaut
vérifier qu'à l'endroit où vous avez
l'intention de percer des trous, il n'y
ait pas de structures ou
d'installations (poutres, piliers,
tuyauteries hydrauliques, câbles
électriques, etc ...) qui empêchent
l'exécution des trous nécessaires à
l'installation.
Contrôler encore une fois qu'il n'y
ait pas d'obstacles à la libre
circulation de l'air à travers les trous
que vous allez pratiquer (arbres et
leur feuillage, lambris, persiennes,
grillages ou grilles trop serrés, etc...).
MONTAGE DE L’UNITÉ
Perçage du mur
Cette opération doit être exécutée
en utilisant un outillage approprié
qui facilite votre travail et qui vous
évite des dommages et des
dérangements excessifs envers
votre client. Les meilleurs
instruments pour exécuter des trous
d'un grand diamètre dans les murs
sont des perceuses spécialisées
dotées d'une scie-trépan à couple
de torsion élevé et caractérisé par
une vitesse de rotation réglable selon
le diamètre du trou à pratiquer.
Pour éviter la diffusion d'une grande
quantité de poussière et de détritus
dans la pièce, les perceuses à scie-
trépan peuvent être reliées à des
systèmes d'aspiration composés
essentiellement d'un aspirateur doté
d'un accessoire (type ventouse) qu'il
faut placer au dessus du foret de
perforation.
Wahl der Stelle, an der das
Klimagerät installiert
werden soll
Das Gerät ist an einer zur Außenseite
des Gebäudes gerichteten Wand zu
installieren.
Hinweis: Nachdem unter
Berücksichtigung der zuvor
erläuterten Kriterien die Stelle, an der
das Klimagerät installiert werden
soll, gewählt wurde, ist zu überprüfen,
ob sich an der zu bohrenden Stelle in
der Wand Stahlträger, Wasserrohre,
Abwasserleitungen, elektr. Kabel
o.ä. befinden, die eine Bohrung
verhindern.
Nach der Erstellung der beiden
Bohrungen ist zu überprüfen, ob der
Außenluftansaug und die
Rückführung der Luft nach außen
nicht durch blattreiche Pflanzen,
Fassadenverkleidungen,
Fensterläden o.ä. behindert wird.
MONTAGE DER EINHEIT
Durchführung der Bohrungen
Die Bohrungen sind mit einem
geeigneten Bohrer durchzuführen, durch
den die Arbeit erleichtert und ein
übermäßig störender Lärm verhindert
wird oder zu große Beschädigungen an
der Wand vermieden werden.
Die besten Ergebnisse für dei Erstellung
von Bohrlöchern mit großem
Durchmesser erzielt man mit speziellen
Betonbohrern, die ein erhöhtes
Drehmoment und eine einstellbare
Drehzahl, je nach durchzuführendem
Lochdurchmesser, aufweisen.
Zur Vermeidung einer übermäßigen
Bildung von Staub und Bohrgut kann
der Bohrkopf mit einer
Absaugvorrichtung versehen werden, die
an einen Staubsauger angeschlossen
werden kann. Ihr Installateur nennt
Ihnen gerne Fachfirmen, die
Kernbohrungen durchführen.
12
La pagina si sta caricando...

22
I
GB
F
D
1
To drill the holes, proceed as follows:
Fasten the drilling template to the
wall leaving the necessary space
from the ceiling, floor and side walls
as shown on the template. Use
adhesive tape to fasten it in place.
Use a small drill or punch to mark,
with extreme care, the exact centre
of each of the holes to be drilled.
Using a core boring head measuring
at least 162 mm to drill the two holes
for entry and exit of the air.
The maximum length allowed for pipes
is 1 m. The pipes must be smooth on
the inside, and with a diameter of 160
mm. Pipes cannot be curved or bent.
It is necessary to use the grilles
provided, or grilles which keep the
same features.
Note: The holes should have a slight
outward inclination to prevent any
backflow of water from the pipes .
Most of the removed material is
expelled outwards, therefore make
sure that it does not hit any person
or object when it falls out.
In order to avoid as much as possible
outer plaster breaking, it is necessary
to proceed carefully with the last part
of hole execution, decreasing
pressure on core borers.
Make two 6 mm diameter holes in
correspondence with the anchor
points of the wall-fixing bracket using
the template provided.
Pour exécuter le perçage, procéder de
la façon suivante:
Placez le gabarit du perçage fourni contre
le mur en respectant les distances
minimums: par rapport au plafond, au
sol et aux murs latéraux, indiqués sur
ce gabarit. Celui-ci peut être maintenu
dans la bonne position avec du ruban
adhésif.
A l'aide d'une petite perceuse ou d'un
pointeur, tracez avec grand soin les
centres des différents trous à effectuer
avant leur réalisation.
Effectuez avec un foret scie-trépan d'un
diamètre minimum égal à 162 mm, les
deux trous pour l'entrée et la sortie de
l'air.
La longueur maximale admise pour
les tuyaux est de 1 m, les tuyaux
doivent être lisses à l'intérieur, d'un
diamètre égal à 160 mm et aucun
coude ne peut être réalisé.
Il faut utiliser les grilles fournies avec
la machine, ou bien des grilles qui
possèdent les mêmes
caractéristiques.
Avertissement: Ces trous doivent être
exécutés avec une légère inclinaison
vers l'extérieur pour empêcher
d'éventuelles rentrées d'eau par les
conduits.
La plus grande partie de la matière
enlevée est expulsée vers l’extérieur; il
faut donc veiller à ce qu’en tombant,
elle n’aille pas heurter les personnes ou
les objets se trouvant dessous.
Pour éviter le plus possible la rupture de
l'enduit extérieur, il faut procéder avec
beaucoup de soin pour l'exécution de la
partie finale du trou en diminuant un peu
la pression exercée sur la perceuse à
scie-trépan.
Percer deux orifices de 6 mm de
diamètre destinés à recevoir le
support de fixation murale, en utilisant
le gabarit fourni.
Für die Durchführung der Bohrungen ist
wie folgt vorzugehen:
Die mitgelieferte Bohrschablone an der
Wand positionieren, wobei die auf der
Schablone angegebenen
Mindestabstände zur Decke, zum
Fußboden und zu den seitlichen Wänden
zu berücksichtigen sind. Die
Bohrschablone kann durch Anbringen
von Klebeband gegen ein Verrutschen
geschützt werden. Mit einem kleinen
Bohrer oder einem Treiber die Mitte der
zu bohrenden Löcher sorgfältig anreißen.
Mit einem Bohrkopf AD 162 mm, die
zwei Löcher für den Luftein- und -austritt
bohren.
Die maximal zulässige Länge der
Rohrleitungen beträgt 1m; die
Rohrleitungen müssen innen glatt
sein, einen Durchmesser von 160
mm aufweisen und müssen ohne
Kurven verlegt werden.
Es müssen die mitgelieferten Gitter
oder andere Gitter die dieselben
Eigenschaften gewährleisten,
verwendet werden.
Hinweis: Diese Bohrungen sind mit einer
leichten Neigung zur Außenseite des
Gebäudes hin durchzuführen, damit keine
Feuchtigkeit (Regen) von außen eintreten
kann.
Das meiste abgetragene Material wird
nach außen hin ausgestoßen, es ist
daher dafür zu sorgen, dass es beim
Herunterfallen keine Personen oder
Gegenstände trifft.
Damit der Außenputz möglichst nicht
beschädigt wird, ist der letzte Bereich
des Lochs mit großer Sorgfalt
durchzuführen, indem man den auf den
Betonbohrer auszuübenden Druck
verringert.
Führen Sie die beiden 6-mm-
Bohrungen für die Verankerung des
Wandbefestigungsbügels unter
Verwendung der Bohrschablone aus.
Per eseguire la foratura procedere
come segue:
Collocare la dima di foratura
indotazione contro la parete rispet-
tando le distanze minime: dal soffit-
to, dal pavimento e dalle pareti late-
rali indicate sulla dima stessa che
può essere tenuta nella corretta po-
sizione con del nastro adesivo.
Tramite un piccolo trapano od un
punteruolo tracciate con estrema cura
il centro dei vari fori da praticare
prima della loro realizzazione.
Praticare, tramite una punta
carotatrice di diametro minimo pari a
162 mm i due fori per l’entrata e l’usci-
ta dell’aria.
La lunghezza massima consentita
per i tubi è di 1 m, i tubi devono essere
internamente lisci, di diametro pari a
160 mm e non possono essere ese-
guite curve.
E’ necessario utilizzare le griglie for-
nite in dotazione, oppure delle griglie
che mantengano le medesime carat-
teristiche.
Avvertenze: Questi fori devono
essere eseguiti con una leggera
inclinazione verso l’esterno per
impedire eventuali rientri di acqua dai
condotti.
La maggior parte del materiale
asportato viene espulso verso
l’esterno, pertanto occorre cautelar-
si che cadendo non colpisca
persone e oggetti sottostanti.
Per evitare il più possibile la rottura
dell’intonaco esterno occorre
procedere con molta cautela
all’esecuzione della parte finale del
foro allentando un po’ la pressione
esercitata sulla carotatrice.
Eseguire i due fori di diametro 6 mm
relativi all’ancoraggio della staffa di
fissaggio a parete utilizzando la dima
di foratura.
12
= =
= =
293
64
360
693
666
160
ø 6 mm
PER STAFFA
POUR LA BRIDE
FOR BRACKET
FUR DEN BUGEL
POR ESTRIBO
VOOR BEUGEL
DIMA DI FORATURA - GABARIT DE PERCAGE
DRILLING TEMPLATE - BOHRENSCHABLONE
PLANTILLA DE TALADRADO - BOORMAL
314MIN - 322 MAX
La pagina si sta caricando...

24
I
GB
F
D
2 3
Montage des conduits d'air
et des grilles extérieures
Une fois les trous exécutés, les
tuyaux en plastiques fournis avec
le climatiseur doivent être introduits
à l'intérieur de ces derniers. Le
tuyau avec isolement à l'intérieur
doit être introduit dans le trou de
gauche avec sa partie isolante vers
l'intérieur comme il est indiqué sur
l'étiquette prévue à cet effet.
Leur longueur doit être égale à
l'épaisseur du mur. Pour couper le
tuyau, il suffit d'utiliser une scie
normale. Une fois les tuyaux
coupés, vous devez introduire à
leurs extrémités les deux flasques
de fixation intérieures (fig. 2).
Le diamètre des tubes correspond
presque aux trous perçus à l’aide
du foret de carottage de diamètre
égal à 162 mm nominaux. Pour les
introduire, il faut les forcer
légèrement en utilisant dans les
cas les plus critiques un marteau
en caoutchouc ordinaire (fig.3). Le
fait d’avoir une grande précision
entre le diamètre intérieur du trou
et le diamètre extérieur du tube
empêche qu’il ne se crée des jeux
dangereux susceptibles de
provoquer des infiltrations
d’humidité ou des sifflements d’air.
Si l’introduction des tubes se fait
avec difficulté, nous vous
conseillons de passer plusieurs fois
la couronne de la carotteuse à
l’intérieur du trou de façon à élargir
légèrement le diamètre intérieur.
A présent vous pouvez faire passer
les tuyaux dans le mur et fixer les
flasques au moyen de 4 chevilles
de diamètre 6 en faisant attention
à ce que les deux trous de fixation
restent en position verticale.
Montage der Abluftkanäle
und der externen Gitter
Nach der Durchführung der
Bohrungen sind die mit dem Gerät
gelieferten gelieferten
Kunststoffrohre einzuschieben.
Das mit einer internen Isolierung
versehene Rohr ist in das links
Loch, mit der isolierten Seite nach
innen, einzuschieben (siehe hierzu
das entsprechende Etikett).
Die Länge der Bohrungen muss
gleich der Wandstärke sein. Für
die Kürzung des Rohrs in der
Länge ist eine Säge zu
verwenden. Nach dem Zuschnitt
der Rohre sind auf der Innenseite
die beiden Flansche einzufügen.
(Abb. 2).
Der Durchmesser der Rohre
entspricht fast den Bohrungen, die
mit dem Kernbohrer mit
Durchmesser von 162 mm nominal
durchgeführt werden. Sie müssen
daher unter Anwendung eines
leichten Drucks und ggf. unter
Zuhilfenahme eines gewöhnlichen
Gummihammers eingefügt werden
(Abb.3). Die erhöhte
Passgenauigkeit von
Innendurchmesser der Bohrung
und Außendurchmesser des Rohrs
verhindert gefährliches Spiel, was
zu Feuchtigkeitseinsickerungen
oder Luftdurchlässen führen
können. Falls das Einfügen des
Rohrs zu schwierig ist, empfehlen
wir, mit der Kernbohrerkrone den
Innendurchmesser der Bohrung
ein kleines bisschen zu
vergrößern.
Nun können die Rohre in die Wand
eingeschoben werden und die
Flansche mit je zwei Dübeln (6
mm), befestigt werden, wobei
darauf zu achten ist, dass sich
die zwei Befestigungslöcher in
vertikal Position befinden.
2.2.2
Montaggio dei condotti
dell’aria e delle griglie
esterne
Una volta eseguiti i fori, dentro agli
stessi, devono essere introdotti i
tubi in plastica dati in dotazione
con il climatizzatore. Il tubo con
isolamento interno deve essere in-
trodotto nel foro di sinistra con la
parte isolante verso l’interno come
evidenziato dall’apposita etichetta.
La loro lunghezza deve essere
uguale allo spessore del muro. Per
tagliare il tubo è sufficiente utiliz-
zare un normale seghetto.
Una volta tagliati i tubi dovete
introdurre alle loro estremità le due
flange di ancoraggio interno (fig.
2).
Il diametro dei tubi è quasi corri-
spondente ai fori che si praticano
con la punta carotatrice di diame-
tro pari a 162 mm nominali. Per
introdurli occorre quindi forzarli leg-
germente utilizzando nei casi più
critici un comune martello in
gomma (fig.3).
Il fatto di avere una elevata
precisione tra il diametro interno
del foro e quello esterno del tubo,
impedisce giochi pericolosi che
potrebbero generare infiltrazioni di
umidità o sibili d’aria. Nel caso che
l’inserimento fosse troppo forzato
Vi consigliamo di effettuare alcuni
passaggi con la corona della
carotatrice all’interno del foro in
modo da allargare leggermente il
diametro interno.
A questo punto potete inserire i tubi
nella parete e fissare le flange
mediante 4 tasselli diametro 6
facendo attenzione che i due fori
di fissaggio restino in posizione
verticale.
Installation of air pipes and
external gratings
After drilling the holes, the plastic
pipes supplied with the air
conditioner have to be fitted
through them. The pipe with
insulation on the inside has to be
fitted in the left-hand hole with the
insulated part toward the inside as
indicated on the label applied to it.
Their length must be the same as
the wall thickness. To cut the pipe,
a normal handsaw can be used.
After cutting the pipes, fit the ends
into the two internal anchoring
flanges (fig. 2).
The tube diameter is nearly the
same as those carried out using
the 162 mm nominal diameter core
drill. In order to introduce the
tubes, they must therefore be
forced slightly using, in the most
difficult cases, a normal rubber
hammer (fig. 3). Having the hole
internal diameter extremely similar
to the tube external diameter
avoids dangerous slacks which
may generate humidity infiltrations
or air noises. Should the insertion
prove to be too difficult, we
suggest you drill using the core
bit inside the hole so as to widen
the internal diameter slightly.
Next, fit the pipes into the holes
in the wall and fasten the flanges
with 4 anchor bolts with diameter
6, taking care to keep the two
fastening holes in a vertical
position.
12
La pagina si sta caricando...

26
I
GB
F
D
Per il posizionamento delle griglie
esterne agite come segue:
- Infilare l’occhiello piccolo, con
gambo lungo, della molla sul
perno del tappo (su ambedue i
componenti) (fig. 4).
- Infilare i due tappi (con molla), dalla
parte anteriore della griglia
esterna, sulle due sedi della
stessa, tirando fino allo scatto
(fig. 5) e attaccare le due catenelle
all’occhiello grande
della molla.
- Impugnate con una mano le due
catenelle collegate alla griglia.
- Ripiegate su se stesse le griglie
esterne impugnandole con la mano
libera nella parte di ripiegatura e
introducendo le dita all’interno delle
singole alette (fig. 6).
Introdurre il braccio nel tubo sino a
far sporgere completamente la gri-
glia all’esterno.
- Lasciate riaprire la griglia facendo
attenzione a trattenere le dita
all’interno delle alette.
- Ruotate la griglia sino a quando le
alette sono ben orizzontali e con
l’inclinazione rivolta verso l’ester-
no.
- Tirare la catenella, tensionando la
molla, ed agganciare l’anello della
catenella al perno della rosetta
interna (fig. 7).
- Tagliare con un tronchese le
maglie della catenella in eccesso
(fig. 8)
Avvertenza:
Usare esclusivamente le
griglie in dotazione, oppu-
re delle griglie che manten-
gano le medesime caratte-
ristiche.
7
To position the external grids, proceed
as follows:
- Fit the small eyelet of the spring,
with the long stem, on the cap pin
(on both components) (fig. 4).
- Fit the two caps (with spring),
from the front part of the
external grid, on the two housings,
pulling until a click is heard
(fig. 5) and attach the two
chains to the large eyelet of the
spring.
- Using one hand, grip the two
chains connected to the grid.
- Bend the external grids back,
gripping these with your free hand
where the bend is and introducing
your fingers inside the single fins
(fig. 6).
Introduce your arm into the pipe until
the grid protrudes completely
outwards.
- Allow the grid to reopen, being
careful to keep your fingers inside
the fins.
- Turn the grid until the fins are fully
horizontal and tilted towards the
outside.
- Pull the chain, tensioning the
spring, and fasten the ring of the
chain onto the pin of the inner
washer (fig. 7).
- Using a pair of nippers, cut the
excess chain links (fig. 8).
Warning:
Only use the grilles
provided, or grilles which
keep the same features.
Pour le positionnement des grilles
extérieures agissez de la façon
suivante:
- Introduisez le petit oeillet du
ressort, celui muni d'une longue
tige, sur l'axe du bouchon (sur les
deux composants) (fig. 4).
- Introduisez les deux bouchons
(avec ressort), face avant de la
grille extérieure, sur les deux
logements de celle-ci, en tirant
jusqu'à ce qu'il y ait un déclic (fig.
5) et accrochez les deux
chaînes au grand oeillet du ressort.
- Prenez d'une main les deux
chaînes reliées à la grille.
- Repliez les grilles extérieures sur
elles-mêmes en les prenant avec
la main libre du côté du repliement
et en introduisant les doigts à
l'intérieur de chacune des ailettes
(fig. 6).
Introduisez le bras dans le tuyau
jusqu'à ce que la grille sorte
complètement à l'extérieur.
- Laissez que la grille s'ouvre en
veillant à garder les doigts bien à
l'intérieur des ailettes.
- Tournez la grille jusqu'à ce que
les ailettes soient bien à
l'horizontale et avec l'inclinaison
tournée vers l'extérieur.
- Tirez la chaîne, en tendant le
ressort, et accrochez l'anneau de
la chaîne à l'axe de la rondelle
interne (fig. 7).
- Couper les maillons de la chaîne
en surplus au moyen d'une pince
coupante (fig. 8).
Avertissement :
Utiliser exclusivement les
grilles fournies avec la
machine, ou bien des
grilles qui possèdent les
mêmes caractéristiques.
Die Außengitter sind wie folgt
beschrieben zu positionieren:
- Die kleine mit langem Schaft
versehene Öse der Feder
auf den Stift des Stöpsels
schieben (bei beiden
Komponenten) (Abb. 4).
- Die zwei mit Feder versehenen
Stöpsel vom vorderen Teil des
Außengitters aus in die zwei Sitze
desselben einführen, an diesen bis
zu deren Einrasten ziehen
(Abb. 5) und die zwei Ketten in
die große Öse der Feder
einhängen.
- Mit einer Hand die zwei am Gitter
befestigten Ketten umfassen.
- Mit der freien Hand die
Außengitter an der Knicklinie
umbiegen und dabei die Finger
zwischen die einzelnen
Lamellen einführen (Abb. 6).
Den Arm in das Rohr einführen bis
das Außengitter vollkommen
übersteht.
- Das Gitter erneut öffnen, wobei
darauf zu achten ist, dass die
Finger nicht aus den Lamellen
gezogen werden.
- Das Gitter so drehen, dass die
Lamellen horizontal ausgerichtet
und nach außen geneigt sind.
- Die Feder durch Ziehen der Kette
spannen und das Kettenglied in
den Stift der Innenscheibe
einhaken (Abb. 7).
- Mit einer Schneidzange die
überschüssigen Glieder der Kette
abschneiden (Abb. 8).
Hinweis:
Es dürfen nur die
mitgelieferten Gitter oder
andere Gitter die dieselben
Eigenschaften gewährleisten,
verwendet werden.
12
La pagina si sta caricando...

28
I
GB
F
D
2.2.3
Power supply connection
The air conditioner is equipped with
a power supply cable and plug (Y-
type connection).
If it is installed near an outlet, you
need only plug it in.
WARNING: If the supply
cord is damaged,it must be
replaced by the
manufacturer, its service
agent or similary qualified
persons in order to avoid a
hazard.
In this case, it is important
to make sure the outlet to
which you are plugged in is
effectively grounded and
connected to the mains by
wiring of adequate size
(minimum 1.5 sq.mm. cross
section).
WARNING: In compliance
with the installation
prescriptions, the external
power line must be fitted
with an omnipolar
connection device with
rated capacity compatible
with the unit's maximum
absorbed power, and with
an opening of the contacts
which allows a complete
disconnection from the
power mains under the
conditions specified in
overvoltage category III.
Make all connections in
compliance with the laws in
effect.
Branchement électrique
Le climatiseur est équipé d'un câble
d'alimentation avec une fiche
(connexion de type Y). En cas
d'utilisation d'une prise de courant à
proximité de l'appareil, il suffit
seulement d'introduire la fiche.
AVERTISSEMENT: Si le
cordon d'alimentation est
abîmé, il doit être remplacé
parle constructeur ou par
son service d'assistance
technique ou, en tout état
de cause, par une personne
ayant une qualification
similaire, de façon à éviter
quelque risque que ce soit.
Même dans ce cas, il est de
toute façon préférable de
vérifier que la prise à
laquelle vous vous
branchez est dotée d'une
mise à la terre efficace et
d'un dimensionnement
adapté des câbles
d'alimentation (section
minimum de 1,5 mm²).
AVERTISSEMENT:
Conformément aux règles
d'installation, la ligne
d'alimentation externe doit
être dotée d'un dispositif de
connexion omnipolaire
ayant une portée nominale
compatible avec
l'absorption maximale de
l'appareil et avec une ouver-
ture des contacts
permettant une
déconnexion totale du
réseau selon les
conditions prévues par la
catégorie de surtension III.
Exécutez la connexion
selon les normes en
vigueur.
Elektrischer Anschluss
Das Klimagerät ist mit einem Netzkabel
mit Stecker ausgestattet (Anschluss
des Typs Y).
Ist in der Nähe des Gerätes eine
Steckdose installiert, braucht nur der
Stecker in diese gesteckt zu werden.
HINWEIS: Wenn das
Stromkabel beschädigt ist,
muss dieses zur Vermeidung
von Gefahren vom
Hersteller oder von dessen
Technischem Kundendienst
beziehungsweise durch
gleichermaßen
qualifiziertes Personal
ersetzt werden.
Auch in diesem Fall ist es
ratsam zu überprüfen, dass
die Steckdose mit einem
effizienten Erder und
entsprechend
dimensionierten
Speisekabeln
(Mindestquerschnitt 1.5
mm
2
) ausgestattet ist.
HINWEIS: Die äußere
Stromleitung muss gemäß
den Installationsvorschriften,
mit einer allpoligen
Anschlussvorrichtung
ausgestattet werden, deren
Nennleistung mit der
maximalen Stromaufnahme
des Geräts kompatibel ist und
deren Kontaktöffnung ein
vollständiges Ausschalten
des gesamten Netzes unter
den für die
Überspannungskategorie III
vorgesehenen Bedingungen
gestattet.
Den Anschluss laut den
geltenden Richtlinien
vornehmen.
2
Allacciamento elettrico
Il climatizzatore è dotato di un cavo
di alimentazione con spina (collega-
mento di tipo Y).
Nel caso di utilizzo di una presa di
corrente in prossimità dell’apparec-
chio non occorre fare altro che
introdurre la spina.
AVVERTENZA: Se il cavo di
alimentazione è danneggia-
to, deve essere sostituito
dal costruttore o dal suo
servizio di assistenza tec-
nica o comunque da una
persona con qualifica simi-
lare, in modo da prevenire
ogni rischio.
E’ comunque opportuno ve-
rificare che la presa alla qua-
le vi collegate sia dotata di
un’efficace messa a terra e
di un adeguato
dimensionamento dei cavi
di alimentazione (sezione
minima di 1,5 mm²).
AVVERTENZA: La linea di ali-
mentazione esterna, con-
formemente alle regole di
installazione, deve essere
provvista di un dispositivo
di disconnessione
onnipolare avente una por-
tata nominale compatibile
con l’assorbimento massi-
mo dell’apparecchio e con
un’apertura dei contatti tale
da consentire una
disconnessione completa
dalla rete nelle condizioni
previste dalla categoria di
sovratensione III.
Eseguite la connessione
secondo le norme vigenti.
La pagina si sta caricando...

30
I
GB
F
D
Inserimento dell’apparec-
chio sulla staffa
Controllare che la staffa di fissaggio
a parete sia stata posizionata
correttamente e agganciare il
climatizzatore. Sollevarlo leggermen-
te prendendolo ai lati della base
inferiore e appoggiarlo contro il muro.
Verificare che il climatizzatore si sia
agganciato alla staffa e appoggiarlo
sul pavimento. Prestare molta
attenzione in quanto la staffa non
deve sopportare il peso del
climatizzatore, ma deve solamente
impedire eventuali spostamenti
accidentali che potrebbero compro-
metterne il corretto allineamento con
i fori eseguiti nel muro. Se necessa-
rio regolare in altezza la posizione
del climatizzatore , utilizzando i
piedini regolabili di cui è dotata.
Alla fine del lavoro verificate con
cura che non rimangano fessure
dietro lo schienale dell’apparec-
chio (la guarnizione isolante deve
aderire bene alla parete) soprat-
tutto nella zona dei condotti di
entrata ed uscita dell’aria.
Una volta completata l’operazione di
installazione del climatizzatore
posizionate i due zoccoli estetici
infilandoli ad incastro sui piedi
inferiori (vedi figura 10).
2.2.4
9
Fitting the unit on bracket
Check that the wall-fixing bracket
has been correctly positioned and
hook up the conditioner. Lift it slightly,
holding it by the sides of the lower
base and rest it against the wall.
Check that the conditioner is hooked
onto the bracket and rest it on the
floor. Take great care because the
bracket must not support the weight
of the air conditioner but only prevent
any accidental movements that
could affect the correct aligning with
the holes made in the wall. If
necessary, adjust the height of the
conditioner using its adjustable feet.
When you have finished, inspect
carefully to make sure there are
no fissures at the back of the air
conditioner (the insulating gasket
must fit firmly against the wall)
particularly in the zone where air
enters and leaves the machine.
Once the installation of the air
conditioner has been completed,
place the two aesthetic shoes by
sliding them on to the lower feet (see
figure 10).
Fixation de l'appareil sur la
bride
S'assurer que le support de fixation
murale est placé correctement, puis
mettre le système de climatisation
en place. Le soulever légèrement en
le prenant par les côtés de la base
inférieure et le poser contre le mur.
S'assurer que le système de
climatisation est bien accroché à
l'étrier et le poser au sol. Veiller à ce
que le support ne supporte pas le
poids du système de climatisation: il
doit seulement empêcher tout
déplacement accidentel pouvant en
compromettre l'alignement correct
par rapport aux orifices percés dans
le mur. Si besoin est, régler en
hauteur la position du système de
climatisation, en utilisant les pieds
réglables dont il est doté.
Après avoir terminé le travail,
vérifiez avec soin qu'il ne reste
pas de fentes derrière l'appareil
(le joint étanche doit bien adhérer
au mur) surtout dans la zone des
conduits d'entrée et de sortie de
l'air.
Une fois terminée l'opération
d'installation du système de
climatisation, placer les deux plinthes
enjoliveuses en les encastrant sur
les pieds inférieurs (voir figure 10).
Montage des Gerätes auf
dem Befestigungsbügel
Stellen Sie sicher, dass der
Wandbefestigungsbügel korrekt
positioniert wurde und hängen Sie
die Klimaanlage ein. Heben Sie die
Klimaanlage leicht an, indem Sie
diese an den Seiten des unteren
Sockels ergreifen und stützen Sie
die Anlage gegen die Wand. Stellen
Sie sicher, dass die Klimaanlage am
Bügel eingehängt ist und setzen sie
auf den Fußboden. Beachten Sie
unbedingt, dass der Bügel nicht das
Gewicht der Klimaanlage aufnehmen
darf, sondern nur eventuelle,
unbeabsichtigte Verschiebungen
verhindern soll, welche die korrekte
Zentrierung mit den an der Wand
ausgeführten Bohrungen
beeinträchtigen könnte.
Regulieren Sie die Klimaanlage mit
Hilfe der verstellbaren Stützfüße
gegebenenfalls in der Höhe.
Nach Beenden dieser Arbeitsgänge
ist zu überprüfen, dass sich hinter
der Rückwand des Gerätes, vor
allem im Bereich der Luftein- und
-austrittsleitungen, keine Schlitze
gebildet haben (die als Isolierung
dienende Dichtung muss gut an
der Wand anliegen).
Positionieren Sie nach Abschluss der
Klimaanlageninstallation die beiden
Ziersockel zum Einspannen an den
unteren Füßen (siehe Abbildung 10).
12
La pagina si sta caricando...

32
I
GB
F
D
Evacuazione dell’acqua di
condensa in caso di
emergenza
Se si dovessero verificare delle
anomalie al sistema di
smaltimento dell'acqua di conden-
sa il climatizzatore si arresta com-
pletamente e tutti i leds eventual-
mente accesi si spegnerebbero.
Per far funzionare temporanea-
mente l'apparecchio in attesa del-
l'arrivo del centro di assistenza,
potete drenare l'acqua contenuta
nel climatizzatore eseguendo que-
ste operazioni:
- Mettere in posizione un conte-
nitore con una capienza di
almeno 1 litro nella parte
centrale inferiore sotto il
climatizzatore.
- Afferrare con il pollice e l'indice
di una mano il tappino in
gomma situato nella zona
centrale inferiore e sfilarlo dalla
sede (fig. 11).
- Raccogliere l'acqua nel
contenitore e rimettere il
tappo.
2.2.5
23
11
Evacuation of condensation
water in case of emergency
Should a fault occur in the
condensation water discharge
system, the air conditioner will
stop completely and all the LEDs
that are alight will switch-off. To
operate the unit temporarily while
waiting for the arrival of the service
technician, the water contained in
the air conditioner can be drained
by performing the following
operations:
- Place a container with a
capacity of at least 1 litre
centrally underneath the
conditioner.
- With the thumb and forefinger,
grasp the rubber stopper
located centrally in the lower
part of the conditioner and
remove it from its seat (fig. 11).
- Collect the water in the
container then replace the
stopper.
Evacuation de l'eau de
condensation en cas
d'urgence
En cas d'anomalies du système
d'élimination des condensats, le
système de climatisation s'arrête
complètement et tous les voyants
allumés s'éteignent. Pour faire
fonctionner provisoirement
l'appareil dans l'attente de l'arrivée
du réparateur, il est possible de
drainer l'eau présente dans le
système de climatisation en
effectuant les opérations
suivantes:
- Placer un récipient d'au moins
1 litre de contenance dans la
partie centrale inférieure sous
le système de climatisation.
- Saisir avec le pouce et l'index
d'une main le bouchon en
caoutchouc situé dans la zone
centrale inférieure et le sortir
de son logement (fig. 11).
- Recueillir l'eau dans le récipient
et remettre le bouchon en place.
Entleerung des
Kondenswassers im Notfall
Beim Eintreten einer Störung am
Kondenswasserableitsystem
schaltet die Klimaanlage
vollständig ab, und alle eventuell
leuchtenden Leds gehen aus.
Um das Gerät bis zum Eintreffen
des Kundendienstes provisorisch
zu betreiben, können Sie das in
der Klimaanlage enthaltene
Wasser wie folgt dränen:
- Positionieren Sie einen Behälter
mit einem Fassungsvermögen
von mindestens 1 Liter in den
mittleren unteren Teil unter der
Klimaanlage.
- Ergreifen Sie mit dem Daumen
und dem Zeigefinger einer Hand
den Gummistopfen im mittleren
unteren Berech und ziehen ihn
aus seinem Sitz (Abb. 11).
- Nehmen Sie das Wasser in den
Behälter auf und setzen Sie den
Stopfen wieder ein.
12
La pagina si sta caricando...

34
I
GB
F
D
PERIODICAL MAINTENANCE
Air conditioners of this type do not
require any particular routine
maintenance except:
- Cleaning or washing the room air
filter when the green led lights up
(see user manual).
- Cleaning of “external air” battery,
to be done as needed, depending
on the amount of dirt in the external
air, once or twice a year.
- Cleaning can be done using a
vacuum cleaner or soft brush,
taking particular care not to
damage the aluminium heat
exchanger baffles. It may be
necessary to use water and
detergents to remove heavily
encrusted dirt.
Before you leave the site of
installation you should gather up all
packing material and use a damp
cloth to remove any traces of dust
that may have deposited on the
machine during assembly .
These operations, though certainly
not essential, have a beneficial effect
as they enhance the professional
image of the installer in the eyes of
the client.
To prevent unnecessary calls by the
user, before you leave the site of
installation it is also a good idea to:
- Explain the contents of the
Instruction Manual to the user.
- Show him how to clean the filter.
- Explain when and how he should
contact the Service Department
2.3
MANUTENZIONE PERIODICA
I climatizzatori di questo tipo non
hanno bisogno di particolari opera-
zioni di manutenzione se non:
- La pulizia o il lavaggio del filtro
dell’aria ambiente ogni qualvolta
si illumina il relativo led di segna-
lazione di colore verde (vedi ma-
nuale uso).
- La pulizia della batteria “aria
esterna” da effettuare, a seconda
della quantità di sporco presente
nell’aria esterna, una o due volte
all’anno.
- La pulizia può essere eseguita con
un’aspirapolvere o con una
spazzola morbida facendo molta
attenzione a non rovinare le alette
in alluminio di scambio termico.
Per sporco molto incrostato é
necessario provvedere ad un
lavaggio con acqua e detergenti.
Prima di lasciare il cantiere è bene
raccogliere gli imballaggi ed elimina-
re con un panno umido ogni traccia
della sporcizia che si è depositata
sull’apparecchio durante il montag-
gio.
Queste operazioni, che a rigor di lo-
gica non sono strettamente indispen-
sabili, permettono tuttavia di aumen-
tare agli occhi dell’Utente l’immagi-
ne professionale di chi ha installato
l’apparecchio.
Per evitare inutili chiamate da parte
dell’Utente, prima di lasciare il can-
tiere è inoltre bene:
- Illustrargli i contenuti del Manuale
d’Istruzioni per l’Utente,
- Illustrargli le modalità con le quali
deve essere eseguita la pulizia del
filtro.
- Chiarirgli quando e come deve
interpellare il Servizio d’Assistenza.
ENTRETIEN PÉRIODIQUE
Les climatiseurs de ce type n'ont pas
besoin d'opérations d'entretien
particulières, à part:
- le nettoyage et le lavage du filtre
de l'air ambiant, chaque fois que
s'allume le voyant de signalisation
correspondant de couleur vert
(voir manuel d'utilisation).
- le nettoyage de la batterie "air
extérieur" à effectuer, selon la
quantité d'impuretés présentes
dans l'air extérieur, une ou deux
fois par an.
Le nettoyage peut être exécuté à
l'aide d'un aspirateur ou avec une
grosse brosse souple en faisant
très attention à ne pas abîmer les
lamelles en aluminium d'échange
thermique. Pour de la saleté très
incrustée, il faut procéder à un
lavage à l'eau et avec des
détergents.
Avant de quitter le chantier, il vaut
mieux ramasser les emballages et
éliminer avec un chiffon humide toute
trace de saleté qui s'est déposée sur
l'appareil pendant le montage.
Ces opérations, qui à la rigueur de
sont pas vraiment indispensables,
permettent toutefois d'augmenter,
aux yeux de l'utilisateur, l'image
professionnelle de celui qui a installé
l'appareil.
Afin d'éviter des appels inutiles de la
part de l'utilisateur, avant de quitter
le chantier, il vaut mieux en outre:
- lui illustrer le contenu du Manuel
d'Instructions pour l'Utilisateur,
- lui illustrer les modalité avec
lesquelles il faut exécuter le
nettoyage du filtre,
- lui expliquer quand et comment il
doit appeler le Service Après-
Vente.
WARTUNG
Raumklimageräte dieses Typs sind
weitgehend wartungsfrei. Dennoch
ist Folgendes zu beachten:
- Bei Aufleuchten der grün LED
(siehe Bedienungsanleitung) ist
der Raumluftfilter zu reinigen oder
auszuspülen.
- Der Außenluftwärmetauscher ist
je nach Verschmutzung der
Außenluft ein oder zwei Mal pro
Jahr zu reinigen.
- Die Reinigung kann mit einem
Staubsauger oder einer weichen
Bürste vorgenommen werden,
wobei vor allem darauf zu achten
ist, dass die Aluminiumrippen des
Wärmeaustauschers nicht
beschädigt werden. Bei stark
verkrustetem Schmutz ist der
Wärmetauscher mit Wasser und
Reinigungsmitteln zu reinigen.
Nach erfolgter Installation ist die
Verpackung aufzusammeln und das
Gerät mit einem feuchten Tuch zur
Entfernung der Schmutzspuren zu
reinigen.
Diese Arbeitsgänge sind zwar nicht
unbedingt erforderlich, doch
hinterlassen sie beim Kunden den
Eindruck, dass ein professioneller
Installateur am Werk war.
Zur Vermeidung von unnötigen
Telefonaten seitens des Benutzers
sollte/n diesem:
- der Inhalt der Bedienungsanleitung
erläutert werden,
- die für die Reinigung des Gerätes
erforderlichen Vorgänge erklärt
werden,
- erklärt werden, in welchen Fällen
der Kundendienst zu verständigen
ist.
12
La pagina si sta caricando...

36
I
GB
F
D
USO E MANUTENZIONE
(parte utente)
AVVERTENZE
L’installazione e l’allacciamento
elettrico dell’apparecchio devono
essere eseguite da personale
specializzato in possesso dei
requisiti previsti dalla legge 46/90.
Le istruzioni per l’installazione sono
contenute nell’apposito manuale.
Nessun oggetto od ostacolo struttu-
rale (arredi, tende, piante, fogliame,
tapparelle ecc.) dovrà mai ostruire il
normale deflusso dell’aria sia dalle
griglie interne che da quelle esterne.
Non appoggiarsi o peggio sedersi mai
sulla scocca del climatizzatore per
evitare gravi danni alle parti esterne.
Nel caso vi fossero perdite d’acqua
dall’apparecchio è necessario
spegnerlo immediatamente e
togliere l’alimentazione elettrica.
Chiamare quindi il centro assistenza
più vicino.
L’apparecchio non deve essere
installato in locali dove si sviluppano
gas esplosivi o dove vi sono
condizioni di umidità e temperatura
fuori dai limiti massimi definiti sul
manuale di installazione.
Pulire regolarmente il filtro dell’aria
come descritto nell’apposito paragra-
fo.
Questa apparecchiatura non deve
essere utilizzata da persone (compre-
si i bambini) con capacità mentali o
sensoriali ridotte, oppure prive di espe-
rienza e conoscenze, a meno che non
vi sia una supervisione, o non siano
state fornite loro le necessarie istru-
zioni per l'utilizzo del condizionatore, da
parte di una persona responsabile della
loro sicurezza.
I bambini devono essere sorvegliati per
evitare che giochino con il condiziona-
tore.
3
3.1
USE AND
MAINTENANCE
(for the user)
IMPORTANT
RECOMMENDATIONS
Installation and connection of the air
conditioner should be carried out by
specialized personnel in possession of
the qualifications specified in Law 46/
90.
The instructions for installation are
provided in the specific manual.
No structural object (furniture,
curtains, plants, leaves, blinds, etc.)
should ever obstruct the normal flow
of air from either the internal or external
gratings.
Never lean or, worse yet, sit on the
casing of the air conditioner as this
could cause serious damage to the
external parts.
If the unit leaks water, switch it off
immediately and disconnect it from the
power mains. Call the nearest service
centre.
The air conditioner must not be
installed in rooms where explosive
gasses develop or where there are
conditions of heat and humidity beyond
the maximum limits indicated in the
installation manual.
Clean the air filter periodically, as
described in the specific paragraph.
This appliance is not intended for use
by persons (including children) with
reduce physical sensory or mental
capabilities, or lack of experience and
knowledge, unless they have been
given supervision or instruction
concerning use of the appliance by a
person responsible for their safety.
Children should be supervised to
ensure that they do not play with the
appliance.
MODE D’EMPLI ET
ENTRETIEN
(partie utilisateur)
AVERTISSEMENTS
L’installation et le branchement
électrique de l’appareil doivent être
exécutés par un personnel spécialisé
possédant toutes les qualités
requises prévues par la loi 46/90. Les
instructions pour l’installation sont
contenues dans le manuel prévu à cet
effet.
Aucun objet ou obstacle structurel
(meubles, rideaux, arbres, feuillages,
stores etc.) ne devra jamais obstruer
le débit normal de l’air tant des grilles
intérieures que celles extérieures.
Ne jamais vous appuyer ou pire vous
asseoir sur la coque du climatiseur afin
d’éviter de graves dommages aux
parties extérieures.
Au cas où il y aurait des fuites d’eau de
l’appareil, il faut immédiatement
l’éteindre et couper l’alimentation
électrique. Appelez ensuite le centre
du Service après-vente le plus proche.
L’appareil ne doit pas être installé dans
des pièces où se développent des gaz
explosifs ou bien où il y a des
conditions d’humidité et une
température en dehors des limites
maximales définies dans le manuel
d’installation.
Nettoyez régulièrement le filtre à air
comme il est décrit dans le paragraphe
concerné.
Cet appareil ne doit pas être utilisé par
des personnes (y compris les enfants)
ayant des capacités mentales ou
sensorielles réduites, ou bien
dépourvues d'expérience et de
connaissance, à moins qu'il n'y ait une
supervision, ou qu'ils aient reçu les
instructions nécessaires pour
l'utilisateur de l'appareil d'une
personne responsable de leur
sécurité.
Les enfants doivent être surveillés
pour éviter qu'ils ne jouent avec le
climatiseur.
GEBRAUCH UND
INSTANDHALTUNG
(Benutzer-Teil)
HINWEISE
Die Installation und der elektrische
Anschluss dürfen ausschließlich von
qualifizierten Fachkräften
durchgeführt werden, die die vom
Gesetz Nr. 46/90 vorgeschriebenen
Anforderungen erfüllen. Die
Installationsanweisungen sind im
entsprechenden Handbuch enthalten.
Der aus den internen und externen
Gittern austretende Luftstrom darf
weder durch Gegenstände noch durch
Bauteile jeder Art (Möbel, Gardinen,
Pflanzen, Laubwerk, Rolläden, usw.)
behindert werden.
Zur Vermeidung von großen Schäden
an den äußeren Teilen darf das
Gehäuse auf keinen Fall als Sitz- oder
Ablagefläche benutzt werden.
Sollte aus dem Gerät Wasser
austreten, ist dieses sofort
auszuschalten und vom Stromnetz zu
trennen. Setzen Sie sich mit der
nächstgelegenen Kundendienststelle
in Verbindung.
Das Gerät darf nicht in Räumen
installiert werden, in denen sich
explosive Gase bilden oder in denen
Feuchtigkeits- und Temperaturwerte,
die die in der Installationsanleitung
angegebenen Grenzwerte
überschreiten, vorhanden sind.
Den Luftfilter, wie im entsprechenden
Kapitel beschrieben, in regelmäßigen
Zeitabständen reinigen.
Dieses Gerät ist nicht zur Bedienung
durch Personen (einschließlich
Kinder) mit verminderten physischen,
sensoriellen oder geistigen
Fähigkeiten beziehungsweise durch
Personen ohne entsprechende
Erfahrung oder Kenntnisse geeignet,
es sei denn, sie werden von einer für
ihre Sicherheit verantwortliche Person
überwacht oder in die Bedienung des
Gerätes eingewiesen.
Kinder sind durch einen Erwachsenen
zu beaufsichtigen, damit sie nicht mit
der Klimaanlage spielen.
13
La pagina si sta caricando...

38
I
GB
F
D
DENOMINAZIONE DELLE
PARTI
Elementi unità (fig. 12)
1) Apertura uscita aria.
2) Telecomando asportabile
3) Perno di bloccaggio telecomando
4) Consolle di visualizzazione della
funzione e degli allarmi.
5) Griglia di aspirazione aria.
6) Impugnature per l’estrazione del
filtro aria.
7) Raccordo in gomma con tappo
terminale per lo scarico
dell’acqua in caso di emergenza.
Pannello comandi (fig. 13)
1) Microtasto di servizio;
2) Led rosso Stand-by;
3) Led verde di segnalazione
dell’accensione del
climatizzatore;
4) Led arancio di segnalazione
dell’inserimento della
programmazione di
accensione e/o spegnimento;
5) Led verde di segnalazione della
macchina in funzionamento
automatico;
6) Area trasparente di ricezione
del segnale dal telecomando.
3.2
3.2.1
3.2.2
12
NAMES OF PARTS
List of Units (fig. 12)
1) Air outlet opening.
2) Removable remote control
3) Remote control locking pin
4) Alarm display console.
5) Air intake grating.
6) Grips for removal of air filter.
7) Rubber hose with cap on end for
evacuation of condensation water
in case of emergency.
Control panel (fig. 13)
1) Service microkey
2) Red Stand-by LED;
3) Green LED signalling the air
conditioner is switched on;
4) Orange LED signalling the
switch on and/or off program
is enabled;
5) Green LED signalling the
appliance is running in
automatic function;
6) Transparent remote control
signal reception zone.
DÉNOMINATION
DES COMPOSANTS
Liste unités (fig. 12)
1) Ouverture sortie d'air.
2) Télécommande amovible
3) Pivot de blocage de la
télécommande
4) Console de visualisation de la
fonction et des alarmes.
5) Grille d’aspiration d’air.
6) Tirette pour l’extraction du filtre à
air.
7) Embout en caoutchouc avec
bouchon terminal pour
l’écoulement de l’eau en cas
d’urgence.
Tableau de commande (fig.
13)
1) Microtouche de service;
2) Led rouge Stand-by;
3) Led verte de signalisation de
la mise en marche du
climatiseur;
4) Led orange de signalisation
de l’activation de la
programmation de mise en
marche et/ou arrêt;
5) Led verte de signalisation de
la machine en
fonctionnement automatique;
6) Zone transparente de
réception du signal de la
télécommande.
BENENNUNG
DER KOMPONENTEN
Bestandteile der Einheiten
(abb. 12)
1) Öffnung Luftausgang.
2) Abnehmbare Fernbedienung
3) Fernbedienungssicherungsbolzen
4) Display für die Anzeige der
Funktion und von Störmeldungen.
5) Luftansauggitter.
6) Griffe für das Herausziehen des
Luftfilters.
7) Plastikschlauch mit Endstopfen für
die Entleerung des Wassers im
Notfall.
Bedienteil (abb. 13)
1) Servicemikrotaste;
2) rote Kontrolllampe Stand-by;
3) grüne Kontrolllampe, die
anzeigt, dass das Gerät
eingeschaltet ist;
4) orangefarbene Kontrolllampe,
die anzeigt, dass die Einschalt-
bzw.
Ausschaltprogrammierung
eingegeben wurde;
5) grüne Kontrolllampe, die
anzeigt, dass das Gerät im
Automatikbetrieb arbeitet;
6) transparenter Empfangsbereich
für die Signale der
Fernbedienung.
13
6 14236 5
7
La pagina si sta caricando...

40
I
GB
F
D
RIMOZIONE DEL
TELECOMANDO
Per rimuovere il telecomando dal
climatizzatore è necessario
utilizzare l'apposita chiave fornita a
corredo. Inserire la chiave nella sede
posta sul pannello comandi e
ruotarla in senso antiorario di circa
90° (fig. 14). Estrarre il
telecomando dalla sede afferrandolo
per la parte posteriore e facendolo
leggermente ruotare su se stesso.
Per riposizionare il telecomando
nella sua sede eseguire
l'operazione inversa. Non è
necessario bloccare nuovamente il
telecomando con la chiave se non
lo ritenete necessario.
ACCENSIONE GENERALE E
GESTIONE DEL
FUNZIONAMENTO
Per poter gestire l’apparecchio
tramite il telecomando occorre
introdurre la spina di alimentazione
dell'apparecchio
nella presa dell'impianto. Per
trasmettere i comandi occorre
rivolgere la parte anteriore del
telecomando verso la consolle del
climatizzatore.
La ricezione del comando emesso
viene confermata dall’emissione di
una nota da parte del cicalino.
La distanza massima alla quale può
avvenire la ricezione dei comandi
corrisponde ad 8 metri circa.
3.3
3.4
REMOVING THE REMOTE
CONTROL
To remove the remote control from
the conditioner, use the special key
provided. Insert the key in the seat
located on the control panel and turn
it anticlockwise about 90° (fig.14).
Grasp the rear part of the remote
control and, turning it slightly,
extract it from its seat. To replace
the remote control in its seat, repeat
the same operation in reverse
order. It is not essential to lock the
remote control with the key again
unless this is deemed necessary.
SWITCHING ON THE
APPLIANCE AND
FUNCTION MANAGEMENT
To manage the appliance using the
remote control, insert the plug on
the appliance to the mains power
supply outlet.
To transmit signals from the remote
control to the appliance, point the
front part of the remote handset
towards the control panel on the air
conditioner.
Reception of the signal is
confirmed by a beep.
The maximum signal transmission
distance is about 8 metres.
EXTRACTION DE LA
TÉLÉCOMMANDE
Pour enlever la télécommande du
système de climatisation, il convient
d'utiliser la clef prévue à cet effet
fournie avec l'appareil. Insérer la clef
dans le logement situé sur le
panneau de commande et le tourner
dans le sens inverse de celui des
aiguilles d'une montre d'environ 90°
(fig. 14). Enlever la télécommande
de son logement en la saisissant
par l'arrière et en la faisant
légèrement tourner sur elle-même.
Pour remettre la télécommande en
place dans son logement, effectuer
l'opération inverse. Il n'est pas
nécessaire de bloquer à nouveau la
télécommande avec la clef.
MISE EN MARCHE
GÉNÉRALE ET GESTION DU
FONCTIONNEMENT
Il est nécessaire, pour gérer
l’appareil au moyen de la
télécommande, d’introduire la fiche
d’alimentation de l’appareil dans la
prise de l’installation. Pour
transmettre les commandes, diriger
la partie antérieure de la
télécommande vers la console du
climatiseur. La réception de la
commande est confirmée par
l’émission d’une note de la part du
vibreur sonore.
La distance maximale permettant
la réception des commandes
correspond à environ 8 mètres.
ENTFERNEN DER
FERNBEDIENUNG
Zur Entfernung der Fernsteuerung
von der Klimaanlage ist der eigens
mitgelieferte Schlüssel zu
verwenden. Stecken Se den
Schlüssel in den Sitz auf der
Bedientafel und drehen ihn um zirka
90° im Gegenuhrzeigersinn (Abb.
14). Ziehen Sie die Fernsteuerung
aus ihrem Sitz, indem Sie diese am
hinteren Teil ergreifen und leicht um
sich selbst drehen lassen. Führen
Sie zur Wiederpositionierung der
Fernbedienung in ihrem Sitz den
Vorgang in umgekehrter Reihenfolge
aus. Es ist nicht notwendig, die
Fernbedienung erneut mit dem
Schlüssel zu blockieren, wenn Sie
dies nicht für notwendig befinden.
EINSCHALTEN UND
BETRIEBSSTEUERUNG
Um das Gerät über die
Fernbedienung steuern zu können,
muss zunächst der
Gerätenetzstecker in die Steckdose
eingeführt werden.
Zur Übersendung der Befehle
richten Sie die Frontseite der
Fernbedienung auf die Konsole des
Klimagerätes. Ein Summton zeigt
an, dass der Befehl empfangen
wurde.
Der Höchstabstand, bei dem die
Befehle empfangen werden, beträgt
ca. 8 m.
13
14
La pagina si sta caricando...

42
I
GB
F
D
13
AVVERTENZE
Il telecomando fornito a corredo
dell’apparecchio è stato studiato in
modo da conferirgli la massima
robustezza ed un’eccezionale
funzionalità, comunque esso deve
essere maneggiato con alcune
cautele.
Evitare di:
- lasciarlo esposto alla
pioggia, versare liquidi
sulla sua tastiera o farlo
cadere in acqua;
- fargli subire forti urti o
lasciarlo cadere su
superfici dure,
- lasciarlo esposto ai raggi
solari,
- frapporre ostacoli tra il
telecomando e
l’apparecchio mentre si
usa il telecomando stesso.
Inoltre:
- nel caso in cui nello stesso
ambiente vengano usati altri
apparecchi dotati di
telecomando (TV, radio,
gruppi stereo, etc.), si
potrebbero verificare alcune
interferenze;
- le lampade elettroniche e
fluorescenti possono
interferire nelle
comunicazioni tra il
telecomando e l’apparecchio,
- estrarre le batterie in caso di
prolungato inutilizzo del
telecomando.
WARNINGS
Although the remote control handset
supplied with the appliance is
designed to be as robust and
practical to use as possible, please
handle with the due care and
attention.
Do not:
- expose to rain, spill any
liquids on the keypad or drop
in water,
- subject to violent knocks or
drop on hard surfaces,
- expose to sunlight,
- introduce obstacles between
the remote control and the
appliance while using the
remote control.
Furthermore:
- any other appliances in the
same room controlled by a
remote control (TV, radio,
stereo, etc.), may cause
interferences;
- electronic and fluorescent
lamps may interfere with the
signal transmission between
the remote control and the
appliance;
- remove the batteries if the
remote control is not used for
long periods.
INSTRUCTIONS
La télécommande fournie avec
l’appareil a été conçue pour être
dotée d’une extrême robustesse et
d’une fonctionnalité exceptionnelle.
Il faut cependant la manipuler en
adoptant quelques précautions.
Éviter :
- de la laisser sous la pluie, de
verser du liquide sur son
clavier ou de la faire tomber
dans l’eau,
- qu’elle ne subisse de gros
chocs ou qu’elle ne tombe
sur des surfaces dures,
- de l’exposer aux rayons du
soleil,
- d’interposer des obstacles
entre la télécommande et
l’appareil lors de l’utilisation
de la télécommande
ellemême.
En outre :
- des interférences pourraient se
produire en cas d’utilisation,
dans la même pièce, d’autres
appareils dotés de
télécommande (TV, radio,
chaînes stéréo, etc.);
- les lampes électroniques et
fluorescentes peuvent interférer
dans les communications entre
la télécommande et l’appareil;
- extraire les piles en cas de
nonutilisation prolongée de la
télécommande.
HINWEISE
Die Fernbedienung des Gerätes ist
so ausgelegt, dass eine maximale
Stabilität und optimale Funktionalität
gewährleistet werden kann; bei ihrer
Benutzung müssen jedoch einige
Vorsichtsmaßnahmen beachtet
werden.
So sollte man vermeiden:
- sie Regen auszusetzen,
Flüssigkeiten auf die Tastatur
zu gießen oder sie ins Wasser
fallen zu lassen;
- starke Stöße oder das
Herunterfallen auf harte
Oberflächen,
- Sonneneinstrahlung,
- Hindernisse zwischen dem
Gerät und der Fernsteuerung
während der Benutzung der
Fernsteuerung.
Beachten Sie außerdem:
- werden in demselben Raum
noch andere ferngesteuerte
Geräte benutzt (Fernsehgeräte,
Radio, Stereoanlagen usw.),
kann es zu gegenseitigen
Beeinträchtigungen kommen;
- elektronische und
Leuchtstofflampen können die
Kommunikation zwischen der
Fernbedienung und dem Gerät
beeinträchtigen;
- wird die Fernbedienung über
einen längeren Zeitraum nicht
benutzt, nehmen Sie die
Batterien heraus.
La pagina si sta caricando...
La pagina si sta caricando...
La pagina si sta caricando...
La pagina si sta caricando...
La pagina si sta caricando...
La pagina si sta caricando...
La pagina si sta caricando...
La pagina si sta caricando...
La pagina si sta caricando...
La pagina si sta caricando...
La pagina si sta caricando...
La pagina si sta caricando...
La pagina si sta caricando...
La pagina si sta caricando...
La pagina si sta caricando...
La pagina si sta caricando...
La pagina si sta caricando...
La pagina si sta caricando...
La pagina si sta caricando...
La pagina si sta caricando...
La pagina si sta caricando...
La pagina si sta caricando...
La pagina si sta caricando...
La pagina si sta caricando...
La pagina si sta caricando...
La pagina si sta caricando...
La pagina si sta caricando...
La pagina si sta caricando...
La pagina si sta caricando...
La pagina si sta caricando...
La pagina si sta caricando...
La pagina si sta caricando...
La pagina si sta caricando...
La pagina si sta caricando...
La pagina si sta caricando...
La pagina si sta caricando...
La pagina si sta caricando...
La pagina si sta caricando...
-
 1
1
-
 2
2
-
 3
3
-
 4
4
-
 5
5
-
 6
6
-
 7
7
-
 8
8
-
 9
9
-
 10
10
-
 11
11
-
 12
12
-
 13
13
-
 14
14
-
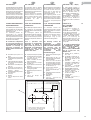 15
15
-
 16
16
-
 17
17
-
 18
18
-
 19
19
-
 20
20
-
 21
21
-
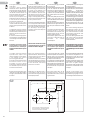 22
22
-
 23
23
-
 24
24
-
 25
25
-
 26
26
-
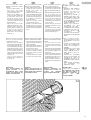 27
27
-
 28
28
-
 29
29
-
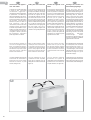 30
30
-
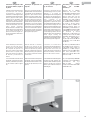 31
31
-
 32
32
-
 33
33
-
 34
34
-
 35
35
-
 36
36
-
 37
37
-
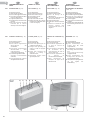 38
38
-
 39
39
-
 40
40
-
 41
41
-
 42
42
-
 43
43
-
 44
44
-
 45
45
-
 46
46
-
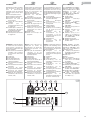 47
47
-
 48
48
-
 49
49
-
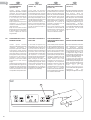 50
50
-
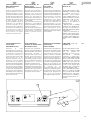 51
51
-
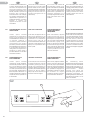 52
52
-
 53
53
-
 54
54
-
 55
55
-
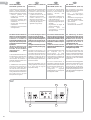 56
56
-
 57
57
-
 58
58
-
 59
59
-
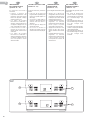 60
60
-
 61
61
-
 62
62
-
 63
63
-
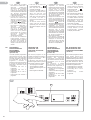 64
64
-
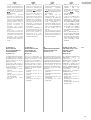 65
65
-
 66
66
-
 67
67
-
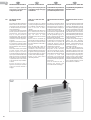 68
68
-
 69
69
-
 70
70
-
 71
71
-
 72
72
-
 73
73
-
 74
74
-
 75
75
-
 76
76
-
 77
77
-
 78
78
-
 79
79
-
 80
80


mundoclima UNICO EASY Manuale utente
- Tipo
- Manuale utente
- Questo manuale è adatto anche per
in altre lingue
- English: mundoclima UNICO EASY User manual
- français: mundoclima UNICO EASY Manuel utilisateur
- español: mundoclima UNICO EASY Manual de usuario
- Deutsch: mundoclima UNICO EASY Benutzerhandbuch
- Nederlands: mundoclima UNICO EASY Handleiding
- português: mundoclima UNICO EASY Manual do usuário
Altri documenti
-
 Olimpia Splendid UNICO EASY Manuale utente
-
 Olimpia Splendid Aquaria 16 Thermo Manuale utente
-
 Olimpia Splendid Issimo Pure 10 Manuale utente
-
Olimpia Splendid DOLCECLIMA compact 8 Manuale utente
-
-
 Olimpia Splendid Issimo 2 12 Manuale utente
-
 Olimpia Splendid SeccoProf 28-38 Manuale utente
-
 Olimpia Splendid Aquaria 16 Thermo Manuale utente
-
Olimpia Splendid Ellisse HP Manuale utente
-
 Olimpia Splendid DOLCECLIMA nano silent Manuale utente


