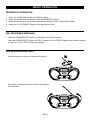
MPMan CS-U52 Manuale del proprietario
- Categoria
- Lettore CD
- Tipo
- Manuale del proprietario
Questo manuale è adatto anche per

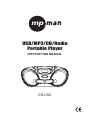
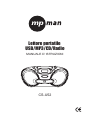
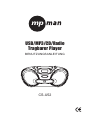
USB/MP3/CD/Radio
Portable Player
INSTRUCTION MANUAL
CS-U52

WARNING
1. WARNING Please refer the information on exterior bottom enclosure for electrical and safety
information before installing or operating the apparatus.
2. WARNING To reduce the risk of fire or electric shock, do not expose this apparatus to rain or
moisture. The apparatus shall not be exposed to dripping or splashing and that no objects filled with
liquids, such as vases, shall not be placed on apparatus.
3. W
ARNING: The battery (battery or batteries or battery pack) shall not be exposed to excessive heat
such as sunshine, fire or the like.
4. WARNING: The mains plug is used as disconnect device, the disconnect device shall remain
readily operable.
5. Invisible laser radiation when open and interlocks defeated. Avoid exposure to beam of laser.
6. Correct Disposal of this product. This marking indicates that this product should not be disposed
with other household wastes throughout the
EU. To prevent possible harm to the environment or
human health from uncontrolled waste disposal, recycle it responsibly to promote the sustainable
reuse of material resources. To return your used device, please use the return and collection systems
or contact the retailer where the product was purchased. They can take this product for environmental
safe recycling.
7. No naked flame sources, such as lighte
d candles, should be placed on the apparatus.
8. Attention should be drawn to environmental aspects of battery disposal.
9. Use of the apparatus in moderate climates.
10. The rating and marking information are located at the bottom of the unit.
11. Excessive sound pressure from earphone and headphones can cause hearing loss.
12. The mains plug of unit should be obstructed or should be easily accessed during intended use.
13. To be completely disconnect the power input, the
mains plug of apparatus shall be disconnected from the mains.
Danger of explosion if battery is incorrectly replaced.
Replace only with the same or equivalent type
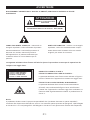
CAUTION

WARNING
E-1
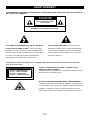
TO PREVENT FIRE OR SHOCK HAZARD DO NOT EXPOSE THIS APPLIANCE TO RAIN OR MOISTURE.
WARNING : SHOCK HAZARD-DO NOT OPEN
RISK OF ELECTRIC SHOCK
DO NOT OPEN
CAUTION
LIGHTNING FLASH WITH ARROWHEAD SYMBOL -
within an equilateral triangle, is intended to alert the
user to the presence of uninsulated dangerous
voltage within the products enclosure that may be of
sufficient magnitude to constitude a risk of electric
shock to persons.
EXCLAMATION POINT -
within an equilateral triangle,
is used to indicate that a specific component shall be
replaced only by the component specified in that
documentation for safety reason.
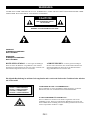
The following label has been affixed to the unit, listing the proper procedure for working with the laser beam:
CLASS 1 LASER PRODUCT LABEL -
This label is attached to the place as illustrated to inform that the
apparatus contains a laser component.
WARNING LABEL INFORMING OF RADIATION -
This label is placed inside the unit. As shown in the illustration. To
warn against further measures on the unit. The equipment contains
a laser radiating laser rays according to the limit of laser product of
class 1.
CLASS 1 LASER PRODUCT
KLASS 1 LASER APPARAT
LUOKEN 1 LAISERLAITE
KLASSE 1 LASER PRODUKT

SAFETY INSTRUCTIONS
E-2
1. READ INSTRUCTIONS - All the safety and operating instructions should be read before the appliance is operated.
2. RETAIN INSTRUCTIONS - The safety and operating instruction should be retained for future reference.
3. HEED WARNINGS - All warnings on the appliance and in the operating instructions should be adhered to.
4. FOLLOW INSTRUCTIONS - All operating instructions should be followed.
5. WATER AND MOISTURE - The appliance should not be used near water, for example, near a bathtub, washbowl,
.tnemesab tew a ni ro loop gnimmiws ,butyrdnual ,knis nehctik
6. VENTILATION - The appliance should be situated so that its location or position does not interfere with its proper
ventilation. Do not place on bed, sofa, rug or similar surface that may block the ventilation openings, in a built-in
installation, such as a bookcase or cabinet that may impede the flow of air through the ven
tilation openings.
7. HEAT - The appliance should be situated away from heat sources such as radiators, stoves, or other appliances
(including amplifiers) that produce heat.
8. POWER SOURCE - The appliance should be connected to power supply only of the type described in the
operating instructions or as marked on the appliance.
9. POWER CORD PROTECTION - Power supply cords should be routed so that they are not likely to be walked
on or pinched by items placed upon or against them.
10. POWER LINES - An outdoor antenna should be located away from power lines.
11. OBJECT and LIQUID ENTRY - Care should be taken so that objects do not fall and liquids are not spilled into
the enclosure through openings.
12. ESD WARNING - The display does not function properly or no reaction to operation of any the control may due
to the electrostatic discharge. Switch off and unplug the set. Reconnect after a few seconds.
13. DAMAGE REQUIRING SERVICE - The appliance should be serviced by qualified service personnel when:
a. The power-supply cord or plug has been damaged.
b. Objects have fallen into, or liquid has been spilled into the appliance enclosure.
c. The appliance has been exposed to rain.
d. The appliance has been dropped, or the enclosure damaged.
e. The appliance does not appear to operate normally.
14. SERVICING - The user should not attempt to service the appliance beyond that described in the user operating
instructions. All other servicing should be referred to qualified service personnel.
Notes:
a. Dirty or scratched CD may cause a skipping problem. Clean or replace the CD.
b. If an error display or malfunction occurs, disconncet the AC cord and remove all the batteries. Then turn the power
back on.
BEFORE OPERATION
Notes: CONCERNING COMPACT DISCS.
Since dirty, damaged or warped discs may damage the appliance,
care should be taken of the followings items:
a. Usable compact discs. Use only compact disc with the mark shown below.
b. CD compact disc only with digital audio signals.

BATTERY POWER
Insert 8 x “C” size batteries into the battery compartment. Be sure that the batteries are inserted
correctly to avoid damage to the appliance. Always remove the batteries when appliance will not be
used for a long period of time, as this will cause leakage to the batteries and subsequently damage
to your set.
Notes:
- Use batteries of the same type. Never use different types of batteries together.
- To use the appliance with batteries, disconnect the AC power cord from it.
POWER SOURCES
E-3
AC POWER
You can power your portable system by plugging the detachable AC power cord into the AC inlet at
the back of the unit and into a wall AC power outlet. Check that the rated voltage of your appliance
matches your local voltage. Make sure that the AC power cord is fully inserted into the appliance.
Insert 8 x “C” size batteries
into the battery compartment
to AC IN to a wall outlet

E-4
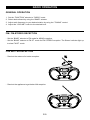
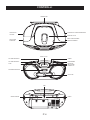
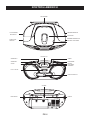
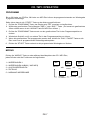
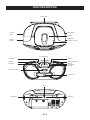
CD DOOR
TUNING CONTROL
OPEN / CLOSE
BAND SELECTOR
LCD DISPLAY
FM STEREO
INDICATOR
VOLUME
CONTROL
FUNCTION
SELECTOR
LOCATION OF CONTROL
USB SLOT
MINUTE
FM ANTENNA
HOUR
PROGRAM
MODE
ALBUM
PLAY / PAUSE
SET
SKIP +
SKIP -
STOP

GENERAL OPERATION
1. Set the “FUNCTION” selector to “RADIO” mode.
2. Select desired band by using the “BAND” selector.
3. Adjust radio frequency to your desired station by using the “TUNING” control.
4. Adjust the “VOLUME” control to the desired level.
FM / FM-STEREO RECEPTION
- Set the “BAND” selector to FM mode for MONO reception.
- Set the “BAND” selector to FM ST. mode for FM STEREO reception. The Stereo indicator light up
to show FM ST. mode.
RADIO OPERATION
E-5
FOR BETTER RECEPTION
- Reorient the antenna for better reception.
- Reorient the appliance to get better AM reception.

CD / MP3 OPERATION
E-6
GENERAL OPERATION
PLAY / PAUSE
Press to start playing CD / MP3 disc.
Press again to stop playing CD / MP3 operation temporarily.
Press again to resume playback.
SKIP + & Press to go to the next track or back to the previous track.
SKIP - Press and hold while playing until you find the point of the sound.
STOP Press to stop all CD / MP3 operation.
PLAYBACK
1. Set the “FUNCTION” selector to “CD / MP3 / USB” mode.
2. Open the CD door and place a CD / MP3 disc with the label up on the CD compartment.
3. Close the CD door.
4. Focus search is performed if disc is inside. Total number of tracks is read and appears on the display.
5. Playback will start automatically from the first track.
6. Adjust the “VOLUME” control to the desired level.
7. Press the “PLAY / PAUSE” button again when you want to stop playback temporarily.
8. Press the “STOP” button when finished.

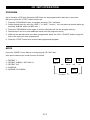
MODE
Press the “MODE” button before or during playing CD / MP3 disc,
each press switches the mode function as follows:
1 - REPEAT 1
2 - REPEAT ALBUM ( *MP3 ONLY )
3 - REPEAT ALL
4 - RANDOM
5 - NORMAL PLAYBACK
REPEAT 1
REP
REP
ALBUM
REP
ALL
REPEAT
ALBUM
REPEAT
ALL
NORMAL
PLAYBACK
RAND
RANDOM
CD / MP3 OPERATION
E-7
PROGRAM
Up to 20 tracks of CD disk, 99 tracks of MP3 disc can be programmed for disc play in any order.
Be sure to press the “STOP” button before use.
1. Press the “PROGRAM” button, the display will show “P01” and flash.
2. Select desired track by using the “SKIP +” or “SKIP -” button. ( You may select a desired album by
pressing “ALBUM” button for MP3 disc. )
3. Press the “PROGRAM” button again to confirm desired track into the program memory.
4. Repeat step 2 and 3 to enter additional tracks into the program memory.
5. When all the desired tracks have been programmed, press the “PLAY / PAUSE” button to play the
disc in the order you have programmed.
6. Press the “STOP” button twice to terminate programmed playback.

PROGRAM, MODE
The operation of PROGRAM, MODE are as the same as that of CD / MP3. Please refer to CD / MP3
OPERATION.
USB OPERATION
E-8
GENERAL OPERATION
PLAY / PAUSE
Press to start playing tracks from the USB.
Press again to stop playing USB operation temporarily.
Press again to resume playback.
SKIP + & Press to go to the next track or back to the previous track.
SKIP - Press and hold while playing until you find the point of the sound.
STOP Press to stop all USB operation.
PLAYBACK
1. Plug or slot in USB device to the port.
2. Set the “FUNCTION” selector to “CD / MP3 / USB” mode.
3. It will read and automatic playing USB, if no disc on disc tray.
4. It will read and automatic playing DISC, if have disc on disc tray.
5. Press and hold the “PLAY / PAUSE” button for a few seconds to entry USB mode.
6. Playback will start automatically from the first track.
7. Press the “STOP” button when finished.

OTHER FEATURES
E-9
CLOCK SETTING
To adjust clock setting, make sure in CD mode.
1. Press the “SET” button. (Do not release “SET” button during time setting)
2. Press the “HOUR” button to set hour.
3. Press the “MIN” button to set minute.
4. Release all button to confirm setting. Confirmed setting will appear on the display.
You can help protect the environment!
Please remember to respect the local regulations: hand in the non-working electrical
equipments to an appropriate waste disposal center.
www.mpmaneurope.com

Lecteur Portable
USB/MP3/CD/Radio
MANUEL D’INSTRUCTIONS
CS-U52

AVERTISSEMENT
1. AVERTISSEMENT: Avant tout branchement ou utilisation de cet appareil,
veuillez en premier lieu vous référer aux informations situées sur
l’enceinte externe du bas concernant les détails sur l’électricité et la
sécurité.
2. AVERTISSEMENT : Afin de réduire le risque d’incendie ou de choc
électrique, ne pas exposer cet appareil à la pluie ou à l’humidité. Cet
appareil ne doit pas non plus être exposé aux ruissellements ou
éclaboussures, et aucun objet rempli d’un
liquide, à l’instar des vases par
exemple, ne doit être placé sur l’appareil.
3. AVERTISSEMENT : La batterie/pile (batterie ou piles ou ensemble
batterie) ne doit pas être exposée à une source de chaleur excessive
comme la lumière du soleil, le feu ou autres.
4. AVERTISSEMENT : La prise de courant principale est utilisée pour
déconnecter l’appareil, l’appareil déconnecté reste facilement actionnable.
5. Il y a des radiations lasers invisibles lorsque les loquets sont défait
s et
ouverts. Evitez tout contact avec les rayons lasers.
6. Se débarrasser correctement de ce produit. Ce marquage indique que ce
produit ne doit pas être évacué avec les autres déchets ménagers selon
les normes de l’Union Européenne. Afin d’éviter des effets nuisibles pour
l’environnement ou pour la santé des personnes du fait d’une évacuation
non contrôlée des déchets, il faut recycler ce produit de manière
responsable afin d’encourager la réutilisation efficace des ressour
ces
matérielles. Pour renvoyer votre appareil usagé, veuillez utiliser les
systèmes de retour et collecte ou contacter le revendeur chez qui le
produit a été acheté. Par ce moyen, le produit sera collecté pour un
recyclage garantissant le respect de l’environnement.
7. Aucune source de flamme nue, une bougie allumée par exemple, ne doit
être placée sur l’appareil.
8. Il faut aussi accorder une attention particulière au respect de
l’environnement lors de l’évacuation des piles.
9. U
tiliser cet appareil dans un climat modéré.
10. Les informations de taux et de marquage se situent au bas de l’appareil.
11. Une pression sonore excessive depuis les écouteurs ou les haut-parleurs
peut entraîner une perte d’audition.
12. La prise de courant principale de l’appareil doit être cachée, mais doit
rester accessible en cas de nécessité.
13. Pour être totalement déconnectée de l’alimentation électrique, la prise de
courant principale doit être déconnectée des sorties de cour
ant.
ATTENTION
Il y a danger d’explosion si les piles ou la batterie sont remplacées de façon
incorrecte. N’effectuer le remplacement qu’avec le même modèle ou
équivalent.

AVERTISSEMENT
POUR DIMINUER LES RISQUES D’INCENDIE OU D´ÉLECTROCUTION, N’EXPOSEZ PAS CET APPAREIL À
LA PLUIE OU À L'HUMIDITÉ.
WARNING : SHOCK HAZARD-DO NOT OPEN
RISK OF ELECTRIC SHOCK
DO NOT OPEN
CAUTION
L’étiquette suivante a été apposée sur l’appareil. Elle décrit la procédure adéquate pour travailler
avec le faisceau laser :
CLASS 1 LASER PRODUCT LABEL – (ÉTIQUETTE DE
PRODUIT LASER CLASSE 1)
Cette étiquette est apposée sur l’appareil afin d’informer de la
présence d’un composant laser
ÉTIQUETTE D’AVERTISSEMENT SUR LE RAYONNEMENT -
CLASS 1 LASER PRODUCT
KLASS 1 LASER APPARAT
LUOKEN 1 LAISERLAITE
KLASSE 1 LASER PRODUKT
L'étiquette est placée à l'intérieur de l'appareil comme illustré
ici. Avertissement concernant les mesures supplémentaires sur
l'appareil. L’appareil contient un laser émettant des rayons
lasers dans le respect de la limite du produit laser de classe 1.
LE SYMBOLE REPRÉSENTANT UN ÉCLAIR MUNI
D'UNE FLÈCHE VERS LE BAS – dans un triangle
équilatéral, a pour fonction d’avertir l’utilisateur de la
présence d’une tension dangereuse non isolée dans
le boîtier du produit qui peut être suffisamment
importante pour électrocuter une personne.
POINT D’EXCLAMATION – dans un triangle
équilatéral, indique qu’un composant spécifique
ne pourra être remplacé que par le composant
spécifié dans la documentation et ce, pour des
raisons de sécurité.
FR-1

MESURES DE SÉCURITÉ
1. LISEZ LES INSTRUCTIONS – Toutes les mesures de sécurité et instructions d’utilisation doivent être lues avant de
faire fonctionner l’appareil.
2. CONSERVEZ LES INSTRUCTIONS – les mesures de sécurité et les instructions devront être conservées en vue
d’une consultation ultérieure.
3. TENEZ COMPTE DES AVERTISSEMENTS - .Tous les avertissements et instructions d’utilisation relatifs à
l’appareil devront être respectés.
4. SUIVEZ LES INSTRUCTIONS – Toutes les instructions d’utilisation devront être suivies.
5. EAU ET HUMIDITÉ – L’appareil ne doit pas être utilisé près d’une source d’eau, (par exemple, près d’une baignoire,
d’un lavabo, d’un évier de cuisine, d’une cuve de lessivage, d’une piscine ou dans une cave humide).
6. VENTILATION – L’appareil devra être disposé de sorte que sa position n’interfère pas avec son système de
ventilation. N'obstruez pas les ouvertures de ventilation en plaçant l'appareil sur un lit, un canapé, un tapis ou toute
autre surface similaire. Ce produit ne doit pas non plus être placé dans une installation intégrée, comme une
bibliothèque ou un meuble qui empêcherait une bonne ventilation.
7. CHALEUR - N'installez pas l'appareil à proximité de sources de chaleur, telles qu'un radiateur, une grille de diffusion
de chaleur, un poêle ou tout autre appareil (y compris des amplificateurs) générant de la chaleur.
8. SOURCE D’ALIMENTATION – L’appareil ne doit être relié qu’au type de source d’alimentation décrit dans les
instructions d’utilisation ou mentionné sur l’appareil.
9. MISE À LA TERRE – des précautions doivent être prises afin d’assurer que les systèmes de mise à la terre de
l’appareil ne sont pas défectueux.
10. PROTECTION DU CORDON D’ALIMENTATION – Les cordons d’alimentation doivent être agencés de manière à
ne pas être piétinés ou coincés par des objets placés sur ou contre ceux-ci.
11. LIGNE D’ÉNERGIE ÉLECTRIQUE – Si vous utilisez une antenne extérieure, veillez à la maintenir à une distance
suffisante des lignes électriques.
12. INTRUSION D’OBJET ET DE LIQUIDE – Prenez soin à ce qu'aucun objet ou liquide ne s'introduise dans le boîtier
via les ouvertures.
13. AVERTISSEMENT CONCERNANT LES DÉCHARGES ÉLECTROSTATIQUES - .un problème au niveau du
fonctionnement de l'affichage ou encore l'inactivité des commandes peut être dû à une décharge électrostatique.
Mettez l’appareil hors tension et débranchez-le. Rebranchez-le après quelques secondes.
14. DÉGÂTS NÉCESSITANT UNE RÉVISION – L’appareil devra être révisé par un technicien qualifié lorsque :
a. Le cordon d'alimentation ou la fiche est endommagé(e).
b. Des objets ou des liquides ont été projetés dans le boîtier de l’appareil.
c. L’appareil a été exposé à la pluie.
c. L’appareil a subi une chute ou le boîtier est endommagé.
e. L’appareil ne semble pas fonctionner normalement.
15. DÉPANNAGE – L’utilisateur ne doit en aucun cas essayer de réparer l’appareil. Il s'en tiendra à ce qui est décrit
dans les instructions d’utilisation. Pour toute réparation, veuillez vous adresser à un technicien qualifié.
Remarques :
a. Un CD sale ou rayé peut entraîner des problèmes de saut de plage. Nettoyez le CD ou remplacez-le.
b. En cas de disfonctionnement ou de message d’erreur, débranchez le cordon d’alimentation de l’appareil et enlevez
toutes les piles puis rebranchez-le.
AVANT L’UTILISATION
Remarques : CONCERNANT LES DISQUES COMPACT
Puisqu’un CD sale ou rayé peut endommager l’appareil, soyez attentif aux éléments suivants :
a. Disques compact utilisables. N’utilisez que les CD portant la marque mentionnée ci-dessous.
b. N’utilisez que des signaux audio numériques.
FR-2

Insérer 8 piles de taille “C”
dans le compartiment à piles
ALIMENTATION AC
SOURCES D’ALIMENTATION
vers AC IN
Vers la prise murale
Vous pouvez recharger votre système portable en branchant le cordon d’alimentation AC dans la
sortie AC située à l’arrière de l’unité et dans la prise d’alimentation murale AC. Vérifier que le taux
de voltage de votre appareil soit adapté à votre niveau de voltage local. Assurez-vous que le cordon
d’alimentation AC soit complètement inséré dans l’appareil.
ALIMENTATION PAR PILES
Insérer 8 piles de taille « C » dans le compartiment à piles. Assurez-vous que les piles soient insérées
correctement afin d’éviter d’endommager l’appareil. Toujours retirer les piles lorsque vous prévoyez
que l’appareil ne sera pas utilisé durant une longue période, cela pouvant sinon causer une fuite des
piles et entraîner des dommages conséquents pour votre appareil.
Notes:
-
Utiliser des piles de même type. Ne jamais utiliser des piles de différents types ensemble.
- Pour utiliser cet appareil avec des piles, veuillez déconnecter le cordon d’alimentation AC de celui-ci.
FR-3

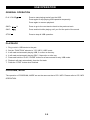
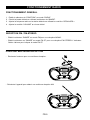
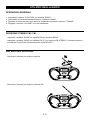
CONTROLE VOLUME
SELECTEUR
DE FONCTION
SAUT +
SAUT -
STOP
LECTURE / PAUSE
REGLER
LOCACTIONS DE CONTROLE
ANTENNE FM
AFFICHAGE LCD
HEURES
CONTROLE REGLAGES
PANNEAU CD
SELECTEUR DE BANDE
OUVRIR / FERMER
ALBUM
PROGRAMME
MODE
INDICATEUR
STEREO FM
PORT USB
MINUTES
FR-4

FONCTIONNEMENT GENERAL
FONCTIONNEMENT RADIO
1. Etablir le sélecteur de “FONCTION” sur mode “RADIO”.
2. Choisir la bande désirée en utilisant le sélecteur de “BANDE”.
3. Ajuster la fréquence radio sur la station désirée en utilisant le contrôle « REGLAGES ».
4. Ajuster le contrôle “VOLUME” au niveau désiré.
RECEPTION FM / FM-STEREO
- Etablir le sélecteur “BANDE” sur mode FM pour une réception MONO.
- Etablir le sélecteur sur “BANDE” sur mode FM ST. pour une réception FM STEREO. L’indicateur
Stéréo s’allumepour indiquer le mode FM ST.
POUR UNE MEILLEURE RECEPTION
- Réorienter l’antenne pour une meilleure réception.
- Réorienter l’appareil pour obtenir une meilleure réception AM.
FR-5

FONCTIONNEMENT GENERAL
FONCTIONNEMENT CD / MP3
LECTURE / PAUSE
SAUT + &
SAUT-
STOP
LECTURE
Presser pour démarrer la lecture du disque CD / MP3.
Presser de nouveau pour interrompre la lecture du CD / MP3
temporairement.
Presser de nouveau pour reprendre la lecture.
Presser pour aller à la piste suivante ou revenir à la piste précédente.
Presser et maintenir durant la lecture jusqu’à ce que vous ayez atteint le
point d’écoute désiré.
Presser pour stopper tout fonctionnement CD / MP3.
1. Etablir le sélecteur de “FONCTION” sur le mode “CD / MP3 / USB”.
2. Ouvrir le panneau CD et placer le disque CD / MP3 avec la face imprimée vers le haut dans le
compartiment CD.
3. Fermer le panneau CD.
4. Une recherche focalisée s’effectuera s’il y a un disque inséré. Le nombre total de piste apparaît à
l’écran.
5. La lecture démarrera automatiquement à la première piste.
6. Ajuster le contrôle du “VOLUME” au niveau désiré.
7. Presser à nouveau la touche “LECTURE / PAUSE” si vous souhaitez interrompre la lecture
momentanément.
8. Presser le bouton “STOP” pour terminer.
FR-6

PROGRAMME
FONCTIONNEMENT CD / MP3
Pour une lecture de disque, jusqu’à 20 pistes de disques CD, 99 pistes de disques MP3 peuvent être
programmées dans n’importe quel ordre
Assurez-vous de presser la touche « STOP » avant toute utilisation.
1. Presser la touche “PROGRAMME”, l’écran affichera “P01” et clignotera.
2. Choisir la piste désirée en utilisant les touches “SAUT +” ou “SAUT -”. ( Vous pouvez sélectionner
un album désiré en pressant sur la touche “ALBUM” pour les disques MP3. )
3. Presser la touche “PROGRAMME” de nouveau pour confirmer la piste désirée dans la mémoire
de programme.
4. Répéter les étapes 2 et 3 pour entrer des pistes additionnelles dans la mémoire de programme.
5. Lorsque toutes les pistes désirées ont été programmées, presser la touche “LECTURE / PAUSE”
pour lire le disque dans l’ordre que vous avez programmé.
6. Presser la touche “STOP” deux fois pour terminer la lecture de la liste de lecture programmée.
MODE
Presser la touche “MODE” avant et durant la lecture d’un disque CD / MP3,
chaque pression changeant le mode de fonction comme suit:
1 – REPETER 1
2 – REPETER ALBUM (*MP3 UNIQUEMENT)
3 REPETER TOUT
4 ALEATOIRE
5 –
–
–
LECTURE NORMALE
REP
REPETER 1
LECTURE
NORMALE
REP
ALBUM
REPETER
ALBUM
ALEATOIRE
RAND
REP
ALL
REPETER
TOUT
FR-7
La pagina si sta caricando...
La pagina si sta caricando...
La pagina si sta caricando...
La pagina si sta caricando...
La pagina si sta caricando...
La pagina si sta caricando...
La pagina si sta caricando...
La pagina si sta caricando...
La pagina si sta caricando...
La pagina si sta caricando...
La pagina si sta caricando...
La pagina si sta caricando...
La pagina si sta caricando...
La pagina si sta caricando...
La pagina si sta caricando...
La pagina si sta caricando...
La pagina si sta caricando...
La pagina si sta caricando...
La pagina si sta caricando...
La pagina si sta caricando...
La pagina si sta caricando...
La pagina si sta caricando...
La pagina si sta caricando...
La pagina si sta caricando...
La pagina si sta caricando...
La pagina si sta caricando...
La pagina si sta caricando...
La pagina si sta caricando...
La pagina si sta caricando...
La pagina si sta caricando...
La pagina si sta caricando...
La pagina si sta caricando...
La pagina si sta caricando...
La pagina si sta caricando...
La pagina si sta caricando...
-
 1
1
-
 2
2
-
 3
3
-
 4
4
-
 5
5
-
 6
6
-
 7
7
-
 8
8
-
 9
9
-
 10
10
-
 11
11
-
 12
12
-
 13
13
-
 14
14
-
 15
15
-
 16
16
-
 17
17
-
 18
18
-
 19
19
-
 20
20
-
 21
21
-
 22
22
-
 23
23
-
 24
24
-
 25
25
-
 26
26
-
 27
27
-
 28
28
-
 29
29
-
 30
30
-
 31
31
-
 32
32
-
 33
33
-
 34
34
-
 35
35
-
 36
36
-
 37
37
-
 38
38
-
 39
39
-
 40
40
-
 41
41
-
 42
42
-
 43
43
-
 44
44
-
 45
45
-
 46
46
-
 47
47
-
 48
48
-
 49
49
-
 50
50
-
 51
51
-
 52
52
-
 53
53
-
 54
54
-
 55
55


MPMan CS-U52 Manuale del proprietario
- Categoria
- Lettore CD
- Tipo
- Manuale del proprietario
- Questo manuale è adatto anche per
in altre lingue
- English: MPMan CS-U52 Owner's manual
- français: MPMan CS-U52 Le manuel du propriétaire
- Deutsch: MPMan CS-U52 Bedienungsanleitung
- Nederlands: MPMan CS-U52 de handleiding
Documenti correlati
Altri documenti
-
Tristar HF-1253 Manuale del proprietario
-
Seg Boombox BB 1210 (rt) Manuale del proprietario
-
Roadstar RCR-4950US/RD Manuale del proprietario
-
Roadstar RCR-4650USMPR Manuale utente
-
Roadstar CDR-265U Manuale del proprietario
-
Roadstar PCD-495MP Manuale utente
-
Roadstar CDR-4200MP Manuale del proprietario
-
Thomson RK300CD Manuale del proprietario
-
Roadstar CDR-485US/BK Manuale del proprietario
-
Roadstar CDR-4550U/RD Manuale del proprietario