
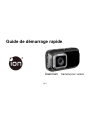
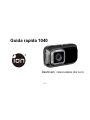
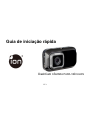
Quick Start Guide
DashCam
IN-CAR CAMERA

EN-2
Quick Start Guide
DashCam
IN-CAR CAMERA

EN-3
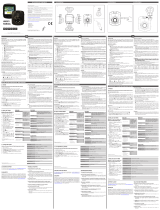
1. Key Features
y Car DashCam with 135
o
Wide Angle Lens.
y 2.7" Color LCD for real-time monitoring and video playback.
y Automatic Event Video Recording for sudden external impact.
y Continuous loop recording of scenery capture for unexpected incidents.
y Geo-information capture in photo or video files with the built-in GPS sensor.
y High quality video recording up to 1296p high quality videos in extreme low light environment.
y Photo capture during recording.

EN-4
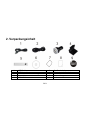
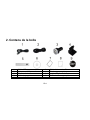
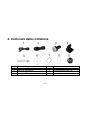
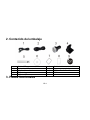
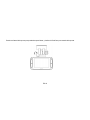
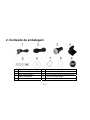
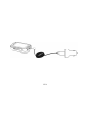
2. Package Contents
1 USB Cable 2 5M Power Cable
3 USB Car Adapter 4 Windshield Mount
5 Sensormatic Tag 6 DashCam Software CD
7 Warranty Card 8 QSG
9 iON label

EN-5
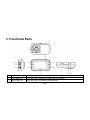
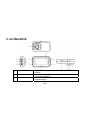
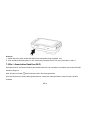
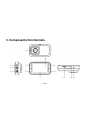
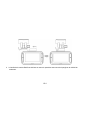
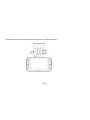
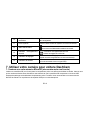
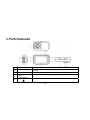
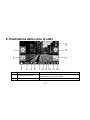
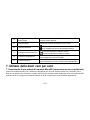
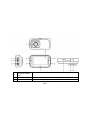
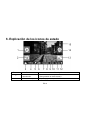
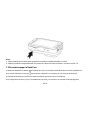
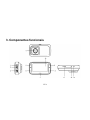
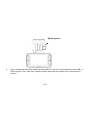
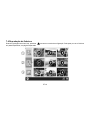
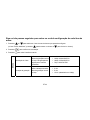
3. Functional Parts
1 DC in Port Connect to the provided DC in to USB cable for charging.
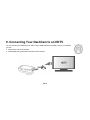
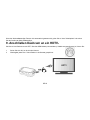
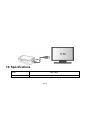
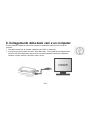
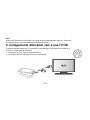
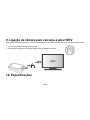
2 Mini HDMI Port Connect to the TV through mini HDMI cable (not supplied).
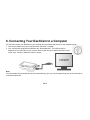
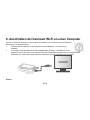
3 Micro USB Port Connect to PC for file browsing and file transfer.

EN-6
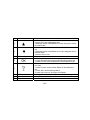
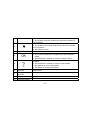
4 Wide Angle Lens Capture a wide angle view.
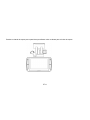
5
1. Select the top-left on-screen command.
2. Enter the playback mode.
3. Move up the selection bar or move to former file.
6
1. Select the bottom-left on-screen command.
2. Move down the selection bar or move to next file.
3. Take a photo.
7 LED Indicator Operation status indication.
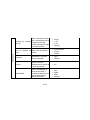
8
1. Confirm your selection.
2. Manually trigger an Event Protection Video Recording.
3. Select the bottom-right on-screen command.
9
1. Turn on or off the DashCam by pressing and holding the button.
2. Select the top-right on-screen command.
3. Enter the setup menu.
4. Go back to previous interface.
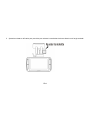
10 Display Sharp panel for live view, playback and function indications.
11 MicroSD Slot MicroSD card storage location.
12 Reset Button Reset the DashCam.
13 Speaker Vent Output the sound.

EN-7
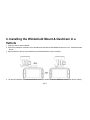
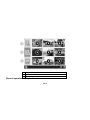
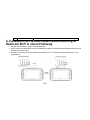
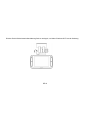
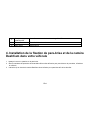
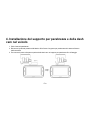
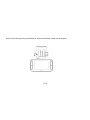
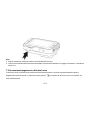
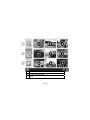
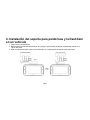
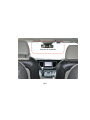
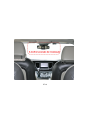
4. Installing the Windshield Mount & DashCam in a
Vehicle
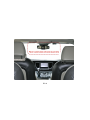
1. Clean the area on the windshield.
2. Peel off the protective membrane of the 3M adhesive and stick the Windshield Mount to the front windshield inside
the car.
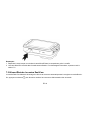
3. Slip the socket on the top of the DashCam into Windshield Mount until it is latched.
4. The lens of DashCam should be at the center of the front windshield and be aware not to block the driver’s visibility.

EN-8
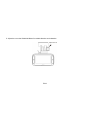
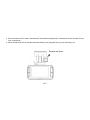
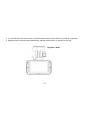
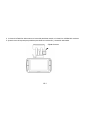
5.Adjust the nut on the Windshield Mount for suitable direction and orientation.

EN-9
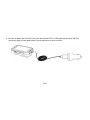
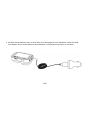
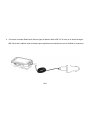
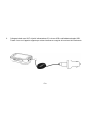
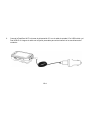
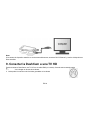
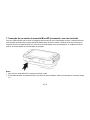
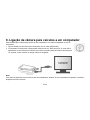
6. Connect the DashCam to the DC Power jack with included DC in to USB cable and the Dual USB CLA.
Secure the cable with the cable holder to avoid interference of driver's motion.

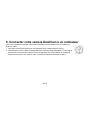
EN-10
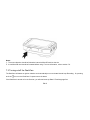
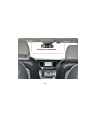
Press the Windshield Mount side to release and slide the DashCam off the mount.

EN-11
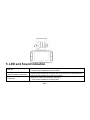
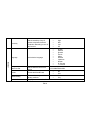
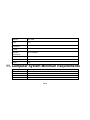
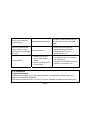
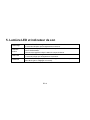
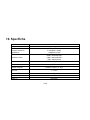
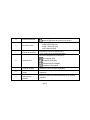
5. LED and Sound Indication
Red LED
DashCam is under Normal Loop Recording
2 chimes sound indicates the recording starts
Red LED flashes continuously
Counting down to DashCam shut down due to the power source being removed.
Periodic sound indicates the counting down status
Purple LED
DashCam is under Event Protection Recording
1 chime sound indicates the recording starts

EN-12
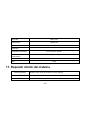
Blue LED DashCam is not recording but other status (e.g. setting or playback)
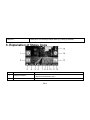
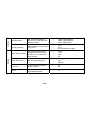
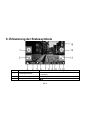
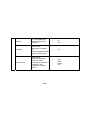
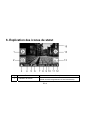
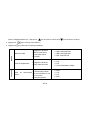
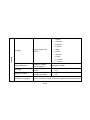
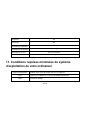
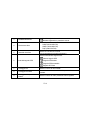
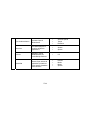
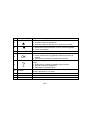
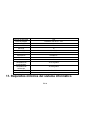
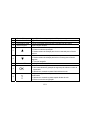
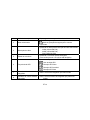
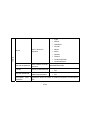
6. Explanation of Status Icons
Item Function Description
1 Playback Indicator
Enter playback mode.
(Normal Loop Recording only.)
2 Screenshot Indicator Capture and save a screenshot of the video.

EN-13
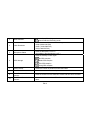
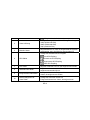
3 Mode Selected
Normal Loop Recording mode.
Event Protection Recording mode.
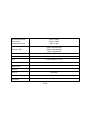
4 Video Resolution
Show the selected video resolution setting.
1296p (2304x1296 P30)
1080p ( 1920x1080 P30)
720p (1280x720 P30)
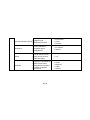
5 Microphone Status
Show the Microphone if it is on.
(Icon hidden if the Microphone is “off”.)
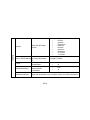
6 GPS Strength
Show the intensity of GPS signal.
No GPS reception
Weak GPS reception
Fair GPS reception
Strong GPS reception
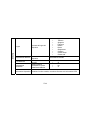
7 Photo Counter Shows the number of photos that have been taken.
8 Total Photo Counter Shows the maximum number of photos that can be taken.
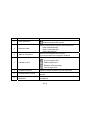
9
Event Protection Video
Counter
Show the number of Event Protection Videos that have been recorded.
10
Total Event Protection Video
Counter
Show the maximum number of Event Protection Videos that can be
taken.

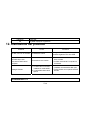
EN-14
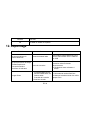
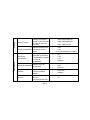
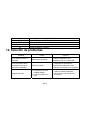
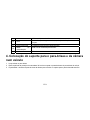
11 System Time Show current system time in Hour and Minute.
12 Power Status
An external power supply is connected.
External power supply not connected.
13 Event Protection Indicator
Start Event Protection Recording.
Stop Event Protection Recording.
14 Setup Indicator
Enter the Setup menu.
(Normal Loop Recording only.)
15 Compass Indicator
Show the direction going ahead.
(Icon hidden if no GPS signal is received.)
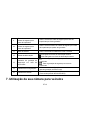
7. Using Your Car DashCam
7.1 Inserting a MicroSD Memory Card (required but not included)
Insert a MicroSD card (not included) to the slot before using the DashCam. Assure that the DashCam power is turned
OFF before inserting the card. Make sure a MicroSD card with minimum 8GB free space has been installed into the card
slot. A 32GB or above Class 6 card is recommended for recording features.

EN-15
Notes:
1. The correct direction should be followed to insert the MicroSD card into the slot.
2. A new MicroSD card should be formatted before using. For more information, refer to section 7.6.
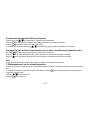
7.2 Turning on/off the DashCam
The DashCam will detect car ignition vibration and automatically turn on and start Normal Loop Recording.. Or, pressing
and hold to turn on the DashCam if a power source is absent.
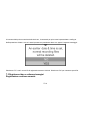
If the DashCam is turned on for the first time, you will need to set up Date & Time/Language first.

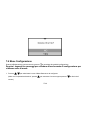
EN-16
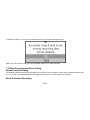
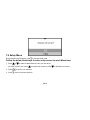
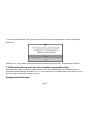
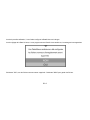
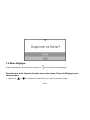
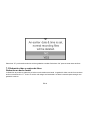
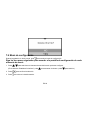
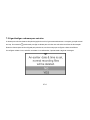
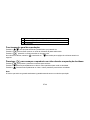
In Date & Time setup, if you have set an earlier Date & Time, the below message pops up:
Select “Yes”, all normal recording files will be deleted. Select “No” to keep these files.
7.3 Video Recording and Photo Taking
Normal Loop Recording
The DashCam will start Normal Loop Recording once turned on. Video recording is continuously creating successive files
of 3 / 5 / 10 min. The most outdated file will be replaced if the memory is full for continuous recording.
Event Protection Recording

EN-17
Files will be protected from the auto deletion if an impact is detected. The sensitivity of impact detection can be adjusted
through the setup menu (refer to section 7.6).
By pressing
during normal recording can also enter the Event Protection Recording mode to protect your video files.
You can store up to 10 Event protection videos to the DashCam.
Photo Taking
Press once during recording for taking a photo. You can store up to 500 photos to the DashCam.
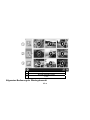
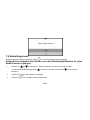
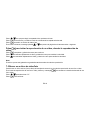
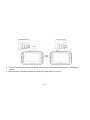
7.4 Playing Back Files
During Normal Loop Recording, press to enter the playback mode. You can choose to view the files in specific folders
on separate pages.

EN-18
1 Event Protection Videos
2 Normal Loop Videos
3 Photos
General operation of playback:

EN-19
Press and once to select the folder/file you want to view.
Press
to confirm and enter the thumbnail mode of the selected folder.
Press to open a single Video or Photo file
During the thumbnail mode, long press the
or to switch to previous or next thumbnail page.
Press to start playing back a video, during video playback:
Press to pause and press it again to continue.
Press to fast forward the video and press it again to change the speed.
Press
to fast rewind the video and press it again to change the speed.
Note:
The file currently being recorded will be saved before entering the Playback mode.
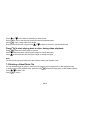
7.5 Deleting a Video/Photo File
You can delete a single file (photo or video) from the memory card in single photo or video playback mode.
In single photo or video playback mode, press and hold to enter the single photo or video delete interface.
Press or to select “Yes”;
Press to confirm.

EN-20
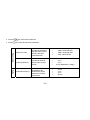
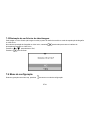
7.6 Setup Menu
During Normal Loop Recording, press to enter the setup mode.
Follow the below three steps to enter setup screen for each Menu item:
1. Press or to select the Menu/Submenu item you want to set.
(In “Date/Time set” item, press to increase the number or press to decrease the number.)
2. Press to confirm your selection.
3. Press to return to previous interface.
La pagina si sta caricando...
La pagina si sta caricando...
La pagina si sta caricando...
La pagina si sta caricando...
La pagina si sta caricando...
La pagina si sta caricando...
La pagina si sta caricando...
La pagina si sta caricando...
La pagina si sta caricando...
La pagina si sta caricando...
La pagina si sta caricando...
La pagina si sta caricando...
La pagina si sta caricando...
La pagina si sta caricando...
La pagina si sta caricando...
La pagina si sta caricando...
La pagina si sta caricando...
La pagina si sta caricando...
La pagina si sta caricando...
La pagina si sta caricando...
La pagina si sta caricando...
La pagina si sta caricando...
La pagina si sta caricando...
La pagina si sta caricando...
La pagina si sta caricando...
La pagina si sta caricando...
La pagina si sta caricando...
La pagina si sta caricando...
La pagina si sta caricando...
La pagina si sta caricando...
La pagina si sta caricando...
La pagina si sta caricando...
La pagina si sta caricando...
La pagina si sta caricando...
La pagina si sta caricando...
La pagina si sta caricando...
La pagina si sta caricando...
La pagina si sta caricando...
La pagina si sta caricando...
La pagina si sta caricando...
La pagina si sta caricando...
La pagina si sta caricando...
La pagina si sta caricando...
La pagina si sta caricando...
La pagina si sta caricando...
La pagina si sta caricando...
La pagina si sta caricando...
La pagina si sta caricando...
La pagina si sta caricando...
La pagina si sta caricando...
La pagina si sta caricando...
La pagina si sta caricando...
La pagina si sta caricando...
La pagina si sta caricando...
La pagina si sta caricando...
La pagina si sta caricando...
La pagina si sta caricando...
La pagina si sta caricando...
La pagina si sta caricando...
La pagina si sta caricando...
La pagina si sta caricando...
La pagina si sta caricando...
La pagina si sta caricando...
La pagina si sta caricando...
La pagina si sta caricando...
La pagina si sta caricando...
La pagina si sta caricando...
La pagina si sta caricando...
La pagina si sta caricando...
La pagina si sta caricando...
La pagina si sta caricando...
La pagina si sta caricando...
La pagina si sta caricando...
La pagina si sta caricando...
La pagina si sta caricando...
La pagina si sta caricando...
La pagina si sta caricando...
La pagina si sta caricando...
La pagina si sta caricando...
La pagina si sta caricando...
La pagina si sta caricando...
La pagina si sta caricando...
La pagina si sta caricando...
La pagina si sta caricando...
La pagina si sta caricando...
La pagina si sta caricando...
La pagina si sta caricando...
La pagina si sta caricando...
La pagina si sta caricando...
La pagina si sta caricando...
La pagina si sta caricando...
La pagina si sta caricando...
La pagina si sta caricando...
La pagina si sta caricando...
La pagina si sta caricando...
La pagina si sta caricando...
La pagina si sta caricando...
La pagina si sta caricando...
La pagina si sta caricando...
La pagina si sta caricando...
La pagina si sta caricando...
La pagina si sta caricando...
La pagina si sta caricando...
La pagina si sta caricando...
La pagina si sta caricando...
La pagina si sta caricando...
La pagina si sta caricando...
La pagina si sta caricando...
La pagina si sta caricando...
La pagina si sta caricando...
La pagina si sta caricando...
La pagina si sta caricando...
La pagina si sta caricando...
La pagina si sta caricando...
La pagina si sta caricando...
La pagina si sta caricando...
La pagina si sta caricando...
La pagina si sta caricando...
La pagina si sta caricando...
La pagina si sta caricando...
La pagina si sta caricando...
La pagina si sta caricando...
La pagina si sta caricando...
La pagina si sta caricando...
La pagina si sta caricando...
La pagina si sta caricando...
La pagina si sta caricando...
La pagina si sta caricando...
La pagina si sta caricando...
La pagina si sta caricando...
La pagina si sta caricando...
La pagina si sta caricando...
La pagina si sta caricando...
La pagina si sta caricando...
La pagina si sta caricando...
La pagina si sta caricando...
La pagina si sta caricando...
La pagina si sta caricando...
La pagina si sta caricando...
La pagina si sta caricando...
La pagina si sta caricando...
La pagina si sta caricando...
La pagina si sta caricando...
La pagina si sta caricando...
La pagina si sta caricando...
La pagina si sta caricando...
La pagina si sta caricando...
La pagina si sta caricando...
La pagina si sta caricando...
La pagina si sta caricando...
La pagina si sta caricando...
La pagina si sta caricando...
La pagina si sta caricando...
La pagina si sta caricando...
La pagina si sta caricando...
La pagina si sta caricando...
La pagina si sta caricando...
La pagina si sta caricando...
La pagina si sta caricando...
La pagina si sta caricando...
La pagina si sta caricando...
La pagina si sta caricando...
-
 1
1
-
 2
2
-
 3
3
-
 4
4
-
 5
5
-
 6
6
-
 7
7
-
 8
8
-
 9
9
-
 10
10
-
 11
11
-
 12
12
-
 13
13
-
 14
14
-
 15
15
-
 16
16
-
 17
17
-
 18
18
-
 19
19
-
 20
20
-
 21
21
-
 22
22
-
 23
23
-
 24
24
-
 25
25
-
 26
26
-
 27
27
-
 28
28
-
 29
29
-
 30
30
-
 31
31
-
 32
32
-
 33
33
-
 34
34
-
 35
35
-
 36
36
-
 37
37
-
 38
38
-
 39
39
-
 40
40
-
 41
41
-
 42
42
-
 43
43
-
 44
44
-
 45
45
-
 46
46
-
 47
47
-
 48
48
-
 49
49
-
 50
50
-
 51
51
-
 52
52
-
 53
53
-
 54
54
-
 55
55
-
 56
56
-
 57
57
-
 58
58
-
 59
59
-
 60
60
-
 61
61
-
 62
62
-
 63
63
-
 64
64
-
 65
65
-
 66
66
-
 67
67
-
 68
68
-
 69
69
-
 70
70
-
 71
71
-
 72
72
-
 73
73
-
 74
74
-
 75
75
-
 76
76
-
 77
77
-
 78
78
-
 79
79
-
 80
80
-
 81
81
-
 82
82
-
 83
83
-
 84
84
-
 85
85
-
 86
86
-
 87
87
-
 88
88
-
 89
89
-
 90
90
-
 91
91
-
 92
92
-
 93
93
-
 94
94
-
 95
95
-
 96
96
-
 97
97
-
 98
98
-
 99
99
-
 100
100
-
 101
101
-
 102
102
-
 103
103
-
 104
104
-
 105
105
-
 106
106
-
 107
107
-
 108
108
-
 109
109
-
 110
110
-
 111
111
-
 112
112
-
 113
113
-
 114
114
-
 115
115
-
 116
116
-
 117
117
-
 118
118
-
 119
119
-
 120
120
-
 121
121
-
 122
122
-
 123
123
-
 124
124
-
 125
125
-
 126
126
-
 127
127
-
 128
128
-
 129
129
-
 130
130
-
 131
131
-
 132
132
-
 133
133
-
 134
134
-
 135
135
-
 136
136
-
 137
137
-
 138
138
-
 139
139
-
 140
140
-
 141
141
-
 142
142
-
 143
143
-
 144
144
-
 145
145
-
 146
146
-
 147
147
-
 148
148
-
 149
149
-
 150
150
-
 151
151
-
 152
152
-
 153
153
-
 154
154
-
 155
155
-
 156
156
-
 157
157
-
 158
158
-
 159
159
-
 160
160
-
 161
161
-
 162
162
-
 163
163
-
 164
164
-
 165
165
-
 166
166
-
 167
167
-
 168
168
-
 169
169
-
 170
170
-
 171
171
-
 172
172
-
 173
173
-
 174
174
-
 175
175
-
 176
176
-
 177
177
-
 178
178
-
 179
179
-
 180
180
-
 181
181
-
 182
182


in altre lingue
- English: iON DashCam Quick start guide
- français: iON DashCam Guide de démarrage rapide
- español: iON DashCam Guía de inicio rápido
- Deutsch: iON DashCam Schnellstartanleitung
- português: iON DashCam Guia rápido
Documenti correlati
Altri documenti
-
Ring RDC1000 Guida utente
-
AUKEY DR02 J Manuale utente
-
Ring RSDC4000 Guida utente
-
Midland Street Guardian + Manuale utente
-
AIPTEK GS 200 Manuale del proprietario
-
Motorola MDC500GW Guida Rapida
-
 Mr Handsfree Dashcam 1080P HD DC-100 Manuale del proprietario
-
-
KINGSLIM D5 Manuale utente
-
Quintezz HD 720P Manuale utente
