AEG HD634170NB Manuale utente
- Categoria
- Piani cottura
- Tipo
- Manuale utente

HD634170NB EN User manual 2
IT Istruzioni per l’uso 22

CONTENTS
1. SAFETY INFORMATION . . . . . . . . . . . . . . . . . . . . . . . . . . . . . . . . . . . . . . . . . . . . . . . . . . . . . . 3
2. SAFETY INSTRUCTIONS . . . . . . . . . . . . . . . . . . . . . . . . . . . . . . . . . . . . . . . . . . . . . . . . . . . . . . 4
3. PRODUCT DESCRIPTION . . . . . . . . . . . . . . . . . . . . . . . . . . . . . . . . . . . . . . . . . . . . . . . . . . . . . 6
4. DAILY USE . . . . . . . . . . . . . . . . . . . . . . . . . . . . . . . . . . . . . . . . . . . . . . . . . . . . . . . . . . . . . . . . . 8
5. HELPFUL HINTS AND TIPS . . . . . . . . . . . . . . . . . . . . . . . . . . . . . . . . . . . . . . . . . . . . . . . . . . . 11
6. CARE AND CLEANING . . . . . . . . . . . . . . . . . . . . . . . . . . . . . . . . . . . . . . . . . . . . . . . . . . . . . . 13
7. TROUBLESHOOTING . . . . . . . . . . . . . . . . . . . . . . . . . . . . . . . . . . . . . . . . . . . . . . . . . . . . . . . 14
8. INSTALLATION . . . . . . . . . . . . . . . . . . . . . . . . . . . . . . . . . . . . . . . . . . . . . . . . . . . . . . . . . . . . 16
9. TECHNICAL INFORMATION . . . . . . . . . . . . . . . . . . . . . . . . . . . . . . . . . . . . . . . . . . . . . . . . . 20
FOR PERFECT RESULTS
Thank you for choosing this AEG product. We have created it to give you impeccable
performance for many years, with innovative technologies that help make life simpler –
features you might not find on ordinary appliances. Please spend a few minutes reading to get
the very best from it.
Visit our website for:
Get usage advice, brochures, trouble shooter, service information:
www.aeg.com
Register your product for better service:
www.aeg.com/productregistration
Buy Accessories, Consumables and Original spare parts for your appliance:
www.aeg.com/shop
CUSTOMER CARE AND SERVICE
We recommend the use of original spare parts.
When contacting Service, ensure that you have the following data available.
The information can be found on the rating plate. Model, PNC, Serial Number.
Warning / Caution-Safety information
General information and tips
Environmental information
Subject to change without notice.
2
www.aeg.com

1. SAFETY INFORMATION
Before the installation and use of the appliance, careful-
ly read the supplied instructions. The manufacturer is
not responsible if an incorrect installation and use cau-
ses injuries and damages. Always keep the instructions
with the appliance for future reference.
1.1 Children and vulnerable people safety
WARNING!
Risk of suffocation, injury or permanent disability.
• This appliance can be used by children aged from 8
years and above and persons with reduced physical,
sensory or mental capabilities or lack of experience
and knowledge if they are supervised by an adult or a
person who is responsible for their safety.
• Do not let children play with the appliance.
• Keep all packaging away from children.
• Keep children and pets away from the appliance
when it operates or when it cools down. Accessible
parts are hot.
• If the appliance has a child safety device, we recom-
mend that you activate it.
• Cleaning and user maintenance shall not be made by
children without supervision.
1.2 General Safety
• The appliance and its accessible parts become hot
during use. Do not touch the heating elements.
• Do not operate the appliance by means of an exter-
nal timer or separate remote-control system.
• Unattended cooking on a hob with fat or oil can be
dangerous and may result in fire.
ENGLISH 3

• Never try to extinguish a fire with water, but switch off
the appliance and then cover flame e.g. with a lid or a
fire blanket.
• Do not store items on the cooking surfaces.
• Do not use a steam cleaner to clean the appliance.
• Metallic objects such as knives, forks, spoons and lids
should not be placed on the hob surface since they
can get hot.
• If the glass ceramic surface is cracked, switch off the
appliance to avoid the possibility of electric shock.
• After use, switch off the hob element by its control
and do not rely on the pan detector.
2.
SAFETY INSTRUCTIONS
This appliance is suitable for the
following markets: IT
2.1 Installation
WARNING!
Only a qualified person must in-
stall this appliance.
• Remove all the packaging.
• Do not install or use a damaged appli-
ance.
• Obey the installation instruction sup-
plied with the appliance.
• Keep the minimum distance from the
other appliances and units.
• Always be careful when you move the
appliance because it is heavy. Always
wear safety gloves.
• Seal the cut surfaces with a sealant to
prevent moisture to cause swelling.
• Protect the bottom of the appliance
from steam and moisture.
• Do not install the appliance adjacent
to a door or under a window. This pre-
vents hot cookware to fall from the ap-
pliance when the door or the window
is opened.
• If the appliance is installed above
drawers make sure that the space, be-
tween the bottom of the appliance
and the upper drawer, is sufficient for
air circulation.
• Make sure that the ventilation space of
2 mm, between the worktop and the
front of the below unit, is free. The
warranty does not cover damages
caused by the lack of an adequate
ventilation space.
• The bottom of the appliance can get
hot. We recommend to install a non-
combustile separation panel under the
appliance to prevent access to the
bottom.
Electrical connection
WARNING!
Risk of fire and electrical shock.
• All electrical connections must be
made by a qualified electrician.
• The appliance must be earthed.
• Before carrying out any operation
make sure that the appliance is dis-
connected from the power supply.
• Use the correct electricity mains cable.
• Do not let the electricity mains cable
tangle.
4
www.aeg.com

• Make sure the mains cable or plug (if
applicable) does not touch the hot ap-
pliance or hot cookware, when you
connect the appliance to the near
sockets
• Make sure the appliance is installed
correctly. Loose and incorrect electrici-
ty mains cable or plug (if applicable)
can make the terminal become too
hot.
• Make sure that a shock protection is
installed.
• Use the strain relief clamp on cable.
• Make sure not to cause damage to the
mains plug (if applicable) or to the
mains cable. Contact the Service or an
electrician to change a damaged
mains cable.
• The electrical installation must have an
isolation device which lets you discon-
nect the appliance from the mains at
all poles. The isolation device must
have a contact opening width of mini-
mum 3 mm.
• Use only correct isolation devices: line
protecting cut-outs, fuses (screw type
fuses removed from the holder), earth
leakage trips and contactors.
Gas connection
• All gas connections should be made
by a qualified person.
• Make sure that there is air circulation
around the appliance.
• The information about the gas supply
is on the rating plate.
• This appliance is not connected to a
device, which evacuates the products
of combustion. Make sure to connect
the appliance according to current in-
stallation regulations. Pay attention to
requirements regarding adequate
ventilation.
2.2 Use
WARNING!
Risk of injury, burns or electric
shock.
• Use this appliance in a household en-
vironment.
• Do not change the specification of this
appliance.
• Do not let the appliance stay unatten-
ded during operation.
• Do not operate the appliance with wet
hands or when it has contact with wa-
ter.
• Do not put cutlery or saucepan lids on
the cooking zones. They can become
hot.
• Set the cooking zone to “off” after
each use. Do not rely on the pan de-
tector.
• Do not use the appliance as a work
surface or as a storage surface.
• If the surface of the appliance is
cracked, disconnect immediately the
appliance from the power supply. This
to prevent an electrical shock.
• Users with a pacemaker must keep a
distance of minimum 30 cm from the
induction cooking zones when the ap-
pliance is in operation.
WARNING!
Risk of fire or explosion.
• Fats and oil when heated can release
flammable vapours. Keep flames or
heated objects away from fats and oils
when you cook with them.
• The vapours that very hot oil releases
can cause spontaneous combustion.
• Used oil, that can contain food rem-
nants, can cause fire at a lower tem-
perature than oil used for the first
time.
• Do not put flammable products or
items that are wet with flammable
products in, near or on the appliance.
WARNING!
Risk of damage to the appliance.
• Do not keep hot cookware on the con-
trol panel.
• Do not let cookware to boil dry.
• Be careful not let objects or cookware
fall on the appliance. The surface can
be damaged.
• Do not activate the cooking zones
with empty cookware or without cook-
ware.
• Do not put aluminium foil on the ap-
pliance.
• Cookware made of cast iron, alumini-
um or with a damaged bottom can
ENGLISH 5

cause scratches on the glass ceramic.
Always lift these objects up when you
have to move them on the cooking
surface.
• Provide good ventilation in the room
where the appliance is installed.
• Make sure that the ventilation open-
ings are not blocked.
• Use only stable cookware with the cor-
rect shape and diameter larger than
the dimensions of the burners. There
is a risk of overheating and rupture of
the glass plate (if applicable).
• Make sure the flame does not go out
when you quickly turn the knob from
the maximum to the minimum posi-
tion.
• Make sure pots are centrally posi-
tioned on the rings and do not stick
out over edges of the cooking surface.
• Use only the accessories supplied with
the appliance.
• Do not install a flame diffuser on the
burner.
2.3 Care and Cleaning
WARNING!
Risk of damage to the appliance.
• Clean regularly the appliance to pre-
vent the deterioration of the surface
material.
• Do not use water spray and steam to
clean the appliance.
• Do not clean the burners in the dish-
washer.
• Clean the appliance with a moist soft
cloth. Only use neutral detergents. Do
not use abrasive products, abrasive
cleaning pads, solvents or metal ob-
jects.
2.4 Disposal
WARNING!
Risk of injury or suffocation.
• Contact your municipal authority for
information on how to discard the ap-
pliance correctly.
• Disconnect the appliance from the
mains supply.
• Cut off the mains cable and discard it.
• Flat the external gas pipes.
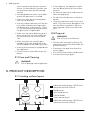
3. PRODUCT DESCRIPTION
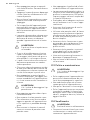
3.1 Cooking surface layout
140
mm
210
mm
1 2
3
6
5 4
1
Induction cooking zone 1400 W with
the power function 2500 W
2
Rapid burner
3
Semi-rapid burner
4
Control knobs
5
Touch control panel
6
Induction cooking zone 2300 W with
the power function 3300 W
6
www.aeg.com

3.2 Control knobs
Symbol Description
no gas supply / off po-
sition
ignition position /
maximum gas supply
minimum gas supply
3.3 Touch Controls
The hob is supplied with special Touch
Controls. To operate your hob, simply
touch the required control with a finger-
tip.
Ensure to only touch one control at a
time during use.
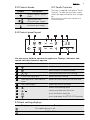
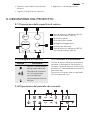
3.4 Control panel layout
1 2 4 5 63
7810 9
Use the sensor fields to operate the appliance. Displays, indicators and
sounds tell which functions operate.
sensor field function
1
starts and stops the hob
2
locks/unlocks the control panel
3
/ increase or decrease heat setting
4
a heat setting display shows the heat setting
5
cooking zones' indicators of
timer
shows for which zone you set the time
6
the timer display shows the time in minutes
7
selects the cooking zone
8
/
increase or decrease the time
9
starts the Power function
10
starts and stops the STOP+GO function
3.5 Heat setting displays
Display Description
The cooking zone is off
Keep warm/STOP+GO function is active
ENGLISH 7

Display Description
-
The cooking zone operates
Automatic heat up function is active
The induction cooking zone does not sense the cook-
ware
There is a malfunction
A cooking zone is still hot (residual heat)
Lock/Child safety device is on
Power function is active
The automatic switch off is active
3.6 Residual heat indicator
WARNING!
Risk of burns from residual
heat!
The induction cooking zones make the
heat directly in the bottom of the cook-
ware. The glass ceramic is heated by the
residual heat of the cookware.
4. DAILY USE
WARNING!
Refer to the Safety chapters.
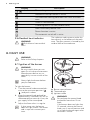
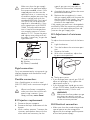
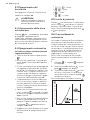
4.1 Ignition of the burner
WARNING!
Be very careful when you use
open fire in kitchen environment.
Manufacturer decline any re-
sponsibility in case misuse of the
flame
Always light the burner before
you put cookware.
To light the burner:
1.
Turn the control knob counterclock-
wise to the maximum position (
) and push it down.
2.
Keep the control knob pushed for
approximately 5 seconds; this will let
thermocouple to warm up. If not, the
gas supply will be interrupted.
3.
Adjust the flame after it is regular.
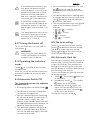
If after some tries the burner
does not light, check if the crown
and its cap are in correct posi-
tions.
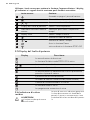
A
B
C
A)
Burner cap and crown
B)
Thermocouple
C)
Ignition candle
WARNING!
Do not keep the control knob
pushed for more than 15 sec-
onds.
If the burner does not light after
15 seconds, release the control
knob, turn it into off position and
try to light the burner again after
minimum 1 minute.
8
www.aeg.com

In the absence of electricity you
can ignite the burner without
electrical device; in this case ap-
proach the burner with a flame,
push the relevant knob down
and turn it counter-clockwise to
maximum gas release position.
If the burner accidentally goes
out, turn the control knob to the
off position and try to light the
burner again after minimum 1 mi-
nute.
The spark generator can start au-
tomatically when you switch on
the mains, after installation or a
power cut. It is normal.
4.2 Turning the burner off
To put the flame out, turn the knob to
the symbol
.
WARNING!
Always turn the flame down or
switch it off before you remove
the pans from the burner.
4.3 Operating the induction
zones
Touch for 1 second to start or stop
the appliance.
After use, switch off the hob element by
its control and do not rely on the pan
detector.
4.4 Automatic Switch Off
The function deactivates the appliance
automatically if:
•
All cooking zones are deactivated (
).
• You do not set the heat setting after
you activate the appliance.
• You spill something or put something
on the control panel for more than 10
seconds, (a pan, a cloth, etc.). An
acoustic signal sounds some time and
the appliance deactivates. Remove the
object or clean the control panel.
• The appliance becomes too hot (e.g.
when, a saucepan boils dry). Before
you use the appliance again, the cook-
ing zone must be cool.
• You use incorrect cookware. The sym-
bol
comes on and the cooking
zone deactivates automatically after 2
minutes.
• You do not deactivate a cooking zone
or change the heat setting. After some
time
comes on and the appliance
deactivates. See below.
• The relation between heat setting and
times of the Automatic Switch Off
function:
•
, - — 6 hours
•
- — 5 hours
•
— 4 hours
•
- — 1.5 hours
4.5 The heat setting
Touch to increase the heat setting.
Touch
to decrease the heat setting.
The display shows the heat setting.
Touch
and at the same time to
switch off the cooking zone.
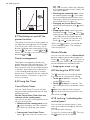
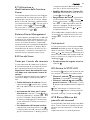
4.6 Automatic Heat Up
You can get a necessary heat setting in a
shorter time if you activate the Automat-
ic Heat Up function. This function sets
the highest heat setting for some time
(see the diagram), and then decreases to
the necessary heat setting.
To start the Automatic Heat Up function
for a cooking zone:
1.
Touch . The symbol comes on
in the display.
2.
Immediately touch . The symbol
comes on in the display.
3.
Immediately touch again and
again until the necessary heat set-
ting comes on. After 3 seconds
comes on in the display.
To stop the function, touch
.
ENGLISH 9

1
2
3
4
5
6
7
8
9
10
11
0
123456789
4.7 Switching on and off the
power function
The power function gives more power to
an induction cooking zone for no longer
than 10 minutes. After that time, the in-
duction cooking zone automatically sets
back to
. To start it , touch and
comes on. To stop it, set a heat setting
between
and .
Power management
The power management divides the
power between two cooking zones. The
power function increases the power to
the maximum level for one cooking zone
in the pair and automatically decreases
in the second cooking zone to a lower
power level. The display for the reduced
zone alternates. The priority is given to
the last set zone.
4.8 Using the Timer
Count Down Timer
Use the Count Down Timer to set how
long the cooking zone operates for one
cooking session.
Set the Count Down Timer after the
selection of the cooking zone.
You can set the heat setting before or af-
ter you set the timer.
• Selection of the cooking zone:touch
again and again until the indicator
of a necessary cooking zone comes
on.
• Starting the Count Down Timer:
touch
of the timer to set the time (
00
-
99
minutes). When the indicator
of the cooking zone flashes slower, the
time counts down.
• Checking the remaining time: select
the cooking zone with
. The indica-
tor of the cooking zone flashes faster.
The display shows the remaining time
of the zone that will stop first.
• Changing the Count Down Timer:
select the cooking zone with
touch
or .
• Stopping the timer: select the cook-
ing zone with
. Touch . The re-
maining time counts backwards to
00
. The indicator of the cooking zone
goes out. To switch off You can also
touch
and at the same time.
When the time elapses, the sound op-
erates and
00
flashes. The cooking
zone switches off.
Minute Minder
You can use the timer as a Minute Mind-
er while cooking zones do not operate.
Touch
. Touch or of the timer to
select the time. When the time elapses,
the sound operates and
00
flashes.
•
Stopping the sound: touch
4.9 Starting the STOP+GO
The function sets all cooking zones
that operate to a keep warm setting.
•
Touch
to start this function. The
symbol
comes on.
•
Touch
to stop this function. The
heat setting that you set before comes
on.
does not stop the timer function.
fully locks the control panel but not
the sensor field
.
4.10 Locking / unlocking the
control panel
You can lock the control panel. It pre-
vents an accidental change of the heat
setting.
First set the heat settings.
To start this function touch
. The sym-
bol
comes on for 4 seconds.
10
www.aeg.com

The Timer stays on.
To stop this function touch
. The heat
setting that you set before comes on.
When you stop the appliance, you also
stop this function.
4.11 The Child Safety Device
This function prevents an accidental op-
eration of the hob.
Starting the Child Safety Device
•
Start the hob with
.Do not set the
heat setting.
•
Touch
for 4 seconds. The symbol
comes on.
•
Stop the hob with .
Switching off the Child Safety Device
•
Start the hob with
.Do not set the
heat setting. Touch
for 4 seconds.
The symbol
comes on.
•
Stop the hob with .
Overriding the Child Safety Device for
one cooking session
•
Start the hob with
. The symbol
comes on.
•
Touch
for 4 seconds. Set the heat
setting in less than 10 seconds. You
can operate the hob.
•
When you stop the hob with
, the
Child Safety Device operates again.
5. HELPFUL HINTS AND TIPS
WARNING!
Refer to the Safety chapters.
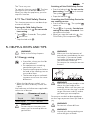
5.1 Energy saving
• If possible, always put the lids
on the cookware.
• Put cookware on a cooking
zone before you start it.
• Stop the cooking zones before
the end of the cooking time to
use residual heat.
• The bottom of pans and cook-
ing zones must have the same
dimension.
• When the liquid starts to boil, turn
down the flame to barely simmer the
liquid.
Use cookware with diameters applicable
to the size of burners.
Burner Diameters of cook-
ware
Rapid 180 - 220 mm
Semi-rapid 120 - 180 mm
WARNING!
Do not use cast iron pans, pot-
stones, grill or toaster plates on
gas burners.
WARNING!
Make sure that the bottoms of
pots do not stand above the con-
trol knobs. If the control knobs
are under the bottoms of pots,
the flame heats them up.
Do not put the same pan on two
burners.
WARNING!
Make sure that pot handles is not
above the front edge of the
cooktop. Make sure that pots are
centrally put on the rings in order
to get maximum stability and to
get lower gas consumption.
Do not put unstable or damaged pots
on the rings to prevent from spill and in-
jury.
WARNING!
Do not use a flame diffuser.
WARNING!
Liquids spilt during cooking can
cause the glass to break
ENGLISH 11

5.2 Cookware for induction
cooking zones
In induction cooking a powerful
electromagnetic field generates
an almost instant heat inside the
cookware.
Cookware material
• correct: cast iron, steel, enamelled
steel, stainless steel, a multi-layer bot-
tom (marked as correct by a manufac-
turer).
• not correct: aluminium, copper, brass,
glass, ceramic, porcelain.
Cookware is correct for an induction
hob if …
• ... some water boils very quickly on a
zone set to the highest heat setting
• ... a magnet pulls on to the bottom of
the cookware.
The bottom of the cookware
must be as thick and flat as possi-
ble.
Cookware dimensions: induction cook-
ing zones adapt to the dimension of the
bottom of the cookware automatically to
some limit. But the minimum diameter of
the magnetic part of the bottom of the
cookware is in relation to the diameter
of the cooking zone:
Cooking
zone
Minimum diameter
of cookware
Front 185 mm
Rear 120 mm
5.3 Examples of cooking
applications
The data in the table is for guidance on-
ly.
Heat
set-
ting
Use to: Time Hints
1
Keep cooked foods warm as re-
quired
Cover
1-2 Hollandaise sauce, melt: butter,
chocolate, gelatine
5-25
min
Mix occasionally
1-2 Solidify: fluffy omelettes, baked
eggs
10-40
min
Cook with a lid on
2-3 Simmer rice and milkbased
dishes, heating up ready-
cooked meals
25-50
min
Add at least twice as much
liquid as rice, stir milk dishes
part way through
3-4 Steam vegetables, fish, meat 20-45
min
Add a few tablespoons of
liquid
4-5 Steam potatoes 20-60
min
Use max. ¼ l water for 750 g
of potatoes
4-5 Cook larger quantities of food,
stews and soups
60-150
min
Up to 3 l liquid plus ingredi-
ents
6-7 Gentle fry: escalope, veal cor-
don bleu, cutlets, rissoles, saus-
ages, liver, roux, eggs, pan-
cakes, doughnuts
as re-
quired
Turn halfway through
7-8 Heavy fry, hash browns, loin
steaks, steaks
5-15
min
Turn halfway through
12
www.aeg.com

Heat
set-
ting
Use to: Time Hints
9 Boil large quantities of water, cook pasta, sear meat (goulash, pot
roast), deep fry chips
The Power function is suitable for heat-
ing large quantities of water.
5.4 Operating noises
If you can hear
• cracking noise: cookware is made of
different materials (Sandwich construc-
tion).
• whistling: you use one or more cook-
ing zones with high power levels and
the cookware is made of different ma-
terials (Sandwich construction).
• humming: you use high power levels.
• clicking: electric switching occurs.
• hissing, buzzing: the fan operates.
The noises are normal and do not re-
fer to any defects.
6. CARE AND CLEANING
WARNING!
Refer to the Safety chapters.
Clean the appliance after each use.
Always use cookware with clean bottom.
Scratches or dark stains on the
glass have no effect on how the
appliance operates.
WARNING!
For safety reasons, do not clean
the appliance with steam clean-
ers or high-pressure cleaners.
WARNING!
Do not use abrasive cleaners,
steel wool pads or acids, they
can cause damage to the appli-
ance.
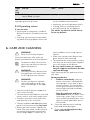
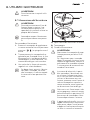
• You can remove the pan supports to
easily clean the hob.
• To clean the enamelled parts, cap and
crown, wash it with warm soapy water.
• Stainless steel parts wash with water,
and then dry with a soft cloth.
•The pan supports are not dishwasher
proof; they must be washed by hand.
• When you wash the pan supports by
hand, take care when you dry them as
the enamelling process occasionally
leaves rough edges. If necessary, re-
move stubborn stains using a paste
cleaner.
• Make sure you position the pan sup-
ports correctly after cleaning.
• To make burners work correctly, make
sure that the arms of the pan supports
are in the centre of the burner.
• Be very careful when you replace
the pan supports to prevent the hob
top from damage.
After cleaning, dry the appliance with a
soft cloth.
Removing the dirt:
1.
– Remove immediately: melting
plastic, plastic foil, and food con-
taining sugar. Use a special glass
ceramic scraper. Put the scraper
on the glass ceramic surface at an
acute angle and slide the blade
on the surface.
– Stop the appliance and let it
cool down before you clean: lime-
scale rings, water rings, fat stains,
shiny metallic discolorations. Use a
special cleaner applicable for sur-
face of hob..
2.
Clean the appliance with a damp
cloth and some detergent.
3.
At the end rub the appliance dry
with a clean cloth.
ENGLISH 13

WARNING!
Do not use knives, scrapers or
similar instruments to clean the
surface of the glass or between
the rims of the burners and the
frame (if applicable).
WARNING!
Do not slide cookware over the
glass because it could scratch
the surface. Also, do not let hard
or sharp objects fall onto the
glass or hit the edge of the hob.
6.1 Cleaning of the spark plug
This feature is obtained through a ce-
ramic ignition candle with a metal elec-
trode. Keep these components well
clean to prevent difficult lighting and
check that the burner crown holes are
not obstructed.
6.2 Periodic maintenance
Periodically speak your local Service
Force Centre to check the conditions of
the gas supply pipe and the pressure ad-
juster, if fitted.
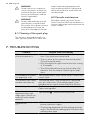
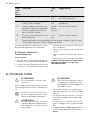
7. TROUBLESHOOTING
Problem Possible cause and remedy
You cannot start the ap-
pliance or operate it.
• You touched 2 or more sensor fields at the same
time. Only touch one sensor field.
• There is water or fat stains on the control panel.
Clean the control panel.
• Start the appliance again and set the heat setting
in 10 seconds.
• The child safety device or key lock or Stop+Go
operates. See the chapter Operating the appli-
ance.
A sound operates when
the appliance is off.
You covered one or more sensor fields. Uncover the
sensor fields.
The residual heat indica-
tor does not come on.
The cooking zone is not hot because it operated
only for a short time. If the cooking zone is sup-
posed to be hot, speak to the After Sales Service.
Heat setting alternates The Power management is active. See the section
Power management.
A sound operates and
appliance starts and
stops again. After 5 sec-
onds one more sound
operates.
You covered . Uncover the sensor field.
comes on
• The automatic switch-off operates. Stop the ap-
pliance and start it again.
• Overheating protection for the cooking zone op-
erates. Switch off the cooking zone. Switch on the
cooking zone again.
14
www.aeg.com

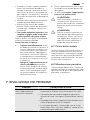
Problem Possible cause and remedy
comes on
• No cookware on the cooking zone. Put cookware
on the cooking zone.
• Not correct cookware. Use the correct cookware.
• The diameter of the bottom of the cookware is
too small for the cooking zone. Move cookware
to a smaller cooking zone.
and number come on
There is an error in the appliance.
Disconnect the appliance from the electrical supply
for some time. Disconnect the fuse from the electri-
cal system of the house. Connect again. If
comes
on again, speak to the After Sales Service.
comes on
There is an error in the appliance, because a cook-
ware boils dry or you use not correct cookware.
Overheating protection for the cooking zone oper-
ates. The automatic switch-off operates.
Switch off the appliance. Remove the hot cookware.
After approximately 30 seconds switch on the cook-
ing zone again. should disappear, residual heat indi-
cator can stay. Cool down the cookware and check
it with the section Cookware for the induction cook-
ing zone.
There is no spark when
lighting the gas.
• There is no electrical supply. Make sure that the
unit is connected and the electrical supply is
switched on. Examine the house electrical instal-
lation fuse.
• Burner cap and crown are placed uneven. Make
sure that the burner cap and crown are in correct
positions.
The flame is blow out im-
mediately after ignition.
Thermocouple is not heated sufficient. After light-
ing the flame, keep the knob pushed for approxi-
mately 5 seconds.
The gas ring burns un-
evenly.
Burner crown is blocked with food residues. Make
sure that the injector is not blocked and the burner
crown is clear of food particles.
If there is a fault, first try to find a solu-
tion to the problem yourself. If you can-
not find a solution to the problem your-
self, speak your dealer or the local Serv-
ice Force Centre.
If you operated the appliance in-
correctly, or the installation was
not carried out by a registered
engineer, the visit from the cus-
tomer service technician or deal-
er may not take place free of
charge, even during the warranty
period.
These data are necessary to help you
quickly and correctly. These data are
available on the supplied rating plate.
• Model description .................
• Product number (PNC) .................
• Serial Number (S.N.) .................
Use the original spare parts only. They
are available at Service Force Centre and
approved spare parts shops.
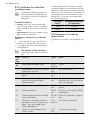
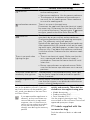
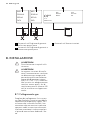
7.1 Labels supplied with the
accessories bag
Stick the adhesive labels as indicated
below:
ENGLISH 15

MOD.
PROD.NO.
SER.NO
DATA
MOD.
PROD.NO.
SER.NO
DATA
MODELMODEL
MOD.
PROD.NO.
SER.NO.
03 IT
MADE IN ITALY
TYPE
230V-50Hz
IP20
0049
1 2 3
1
Stick it on Guarantee Card and send
this part
2
Stick it on Guarantee Card and keep
this part
3
Stick it on instruction booklet
8. INSTALLATION
WARNING!
Refer to the Safety chapters.
WARNING!
The following instructions about
installation, maintenance and
ventilation must be carried out
by qualified personnel in compli-
ance with the regulation in force
(UNI-CIG 7129 - 7131). Make sure
that the kitchen is well ventilated:
keep natural ventilation holes
open (at least 100 cm²) or install a
mechanical extractor hood.
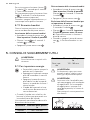
8.1 Gas Connection
Choose fixed connections or use a flexi-
ble pipe in stainless steel in compliance
with the regulation in force. If you use
flexible metallic pipes, be careful they
do not come in touch with mobile parts
or they are not squeezed. Also be care-
ful when the hob is put together with an
oven.
16
www.aeg.com

Make sure that the gas supply
pressure of the appliance obeys
the recommended values. If the
supplied pressure has not the
specified value, it is necessary to
assemble a proper pressure reg-
ulator in compliance with the
standard UNI EN 88. For Liquid
Gas (LPG) the use of pressure
regulator is allowed only if they
are in compliance with UNI EN
12864. The adjustable connec-
tion is fixed to the comprehen-
sive ramp by means of a threa-
ded nut G 1/2". Screw the parts
and tighten everything with tef-
lon tape, if necessary, to get the
right direction.
A
B
C
A)
End of shaft with nut
B)
Washer
C)
Elbow (if needed)
Rigid connection:
Carry out connection by using metal rig-
id pipes (copper with mechanical end)
(UNI-CIG 7129).
Flexible connection:
Use a flexible pipe in stainless steel
(UNI-CIG 9891) with a maximum length 2
m.
When installation is complete,
make sure that the seal of each
pipe fitting is correct. Use a
soapy solution, not a flame!
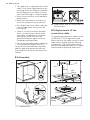
8.2 Injectors replacement
1.
Remove the pan supports.
2.
Remove the caps and crowns of the
burner.
3.
With a socket spanner 7 remove the
injectors and replace them with the
ones which are necessary for the
type of gas you use (see table in
"Technical Information" chapter).
4.
Assemble the parts, follow the same
procedure backwards.
5.
Replace the rating plate (it is near
the gas supply pipe) with the one for
the new type of gas supply. You can
find this plate in the package sup-
plied with the appliance.
If the supply gas pressure is changeable
or different from the necessary pressure,
you must fit an applicable pressure ad-
juster on the gas supply pipe.
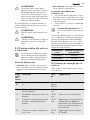
8.3 Adjustment of minimum
level
To adjust the minimum level of the burn-
ers:
1.
Light the burner.
2.
Turn the knob on the minimum posi-
tion.
3.
Remove the knob.
4.
With a thin screwdriver, adjust the
by-pass screw position.
A
A)
The by-pass screw
• If you change from natural gas G20 20
mbar to liquid gas, fully tighten the
adjustment screw in.
• If you change from liquid gas to natu-
ral gas G20 20 mbar, undo the by-pass
screw approximately 1/4 of a turn.
WARNING!
Make sure the flame does not go
out when you quickly turn the
knob from the maximum position
to the minimum position.
8.4 Electrical connection
• Make sure that the rated voltage and
type of power on the rating plate
agree with the voltage and the power
of the local power supply.
ENGLISH 17

• This appliance is supplied with a mains
cable. It has to be supplied with a cor-
rect plug which can hold the load that
the rating plate rates. Make sure that
you install the plug in a correct socket.
• Always use a correctly installed shock-
proof socket.
• Make sure that there is an access to
the mains plug after the installation.
• Do not pull the mains cable to discon-
nect the appliance. Always pull the
mains plug.
• There is a risk of fire when the appli-
ance is in connection with an exten-
sion cable, an adapter or a multiple
connection. Make sure that the
ground connection agrees with the
standards and regulations.
• Do not let the power cable to heat up
to a temperature higher than 90° C.
To prevent contact between the cable
and the appliance below the hob use
the clamps which are on the side of the
cabinet.
A
A)
Rigid copper pipe or flexible pipe of
stainless steel
8.5 Replacement of the
connection cable
To replace the connection cable use on-
ly H05V2V2-F T90 or equivalent type.
Make sure that the cable section is appli-
cable to the voltage and the working
temperature. The yellow/green earth
wire must be approximately 2 cm longer
than the brown (or black) phase wire.
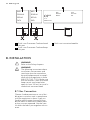
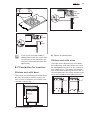
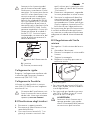
8.6 Assembly
min.
50mm
min.
500mm
min.
2mm
A
A — supplied seal
R 5mm
min.
55mm
490
+1
mm
560
+1
mm
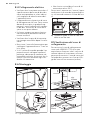
18
www.aeg.com

min.
38 mm
min.
2 mm
min.
12 mm
min.
2 mm
If you install the hob under a
hood, please see the installation
instructions of the hood for the
minimum distance between the
appliances.
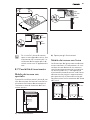
8.7 Possibilities for insertion
Kitchen unit with door
The panel installed below the hob must
be easy to remove and let an easy ac-
cess in case a technical assistance inter-
vention is necessary.
60 mm
b
a
a)
Removable panel
b)
Space for connections
Kitchen unit with oven
The hob recess dimensions must obey
the indication and the kitchen unit must
be equipped with vents to let a continu-
ous supply of air. The electrical connec-
tion of the hob and the oven must be in-
stalled separately for safety reasons and
to let easy remove oven from the unit.
50 cm
2
360 cm
2
180 cm
2
120 cm
2
ENGLISH 19

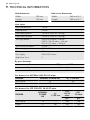
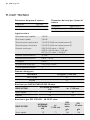
9. TECHNICAL INFORMATION
Hob dimensions
Width: 590 mm
Length: 520 mm
Hob recess dimensions
Width: 560 mm 0/+1
Length: 490 mm 0/+1
Heat input
Semi-rapid burner: 1.9 kW
Rapid burner: 2.9 kW
Rear cooking zone: 1.4 kW (2.5 kW in P setting)
Front cooking zone: 2.3 kW (3.3 kW in P setting)
Total gas power: G20 (2H) 20 mbar = 4.8 kW
G30 (3+) 28-30 mbar = 334 g/h
G31 (3+) 37 mbar = 329 g/h
Total electrical power: 3.7 kW
Electric supply: 230 V ~ 50 Hz
Category: II2H3+
Gas supply: G20 (2H) 20 mbar
Appliance class: 3
By-pass diameters
Burner Ø By-pass in 1/100 mm
Semi-rapid 32
Rapid 42
Gas burners for NATURAL GAS G20 20 mbar
BURNER NORMAL POWER kW inj. 1/100 mm
Semi-rapid 1.9 96
Rapid 2.9 119
Gas burners for LPG G30/G31 28-30/37 mbar
BURNER
NORMAL
POWER
kW
inj.
1/100 mm
G30
28–30
mbar
G31
37 mbar
g/h g/h
Semi-rapid 1.9 71 138 136
Rapid 2.7 86 196 193
20
www.aeg.com
La pagina si sta caricando...
La pagina si sta caricando...
La pagina si sta caricando...
La pagina si sta caricando...
La pagina si sta caricando...
La pagina si sta caricando...
La pagina si sta caricando...
La pagina si sta caricando...
La pagina si sta caricando...
La pagina si sta caricando...
La pagina si sta caricando...
La pagina si sta caricando...
La pagina si sta caricando...
La pagina si sta caricando...
La pagina si sta caricando...
La pagina si sta caricando...
La pagina si sta caricando...
La pagina si sta caricando...
La pagina si sta caricando...
La pagina si sta caricando...
La pagina si sta caricando...
La pagina si sta caricando...
La pagina si sta caricando...
La pagina si sta caricando...
-
 1
1
-
 2
2
-
 3
3
-
 4
4
-
 5
5
-
 6
6
-
 7
7
-
 8
8
-
 9
9
-
 10
10
-
 11
11
-
 12
12
-
 13
13
-
 14
14
-
 15
15
-
 16
16
-
 17
17
-
 18
18
-
 19
19
-
 20
20
-
 21
21
-
 22
22
-
 23
23
-
 24
24
-
 25
25
-
 26
26
-
 27
27
-
 28
28
-
 29
29
-
 30
30
-
 31
31
-
 32
32
-
 33
33
-
 34
34
-
 35
35
-
 36
36
-
 37
37
-
 38
38
-
 39
39
-
 40
40
-
 41
41
-
 42
42
-
 43
43
-
 44
44


AEG HD634170NB Manuale utente
- Categoria
- Piani cottura
- Tipo
- Manuale utente
in altre lingue
- English: AEG HD634170NB User manual