Worx WG708E Original Instructions Manual
- Categoria
- Tosa erba
- Tipo
- Original Instructions Manual

WG708E
P06
P18
P31
P43
P56
P69
P82
P95
P107
P119
P131
P143
P155
P168
EN
D
F
I
ES
PT
NL
DK
FIN
NOR
SV
TR
GR
RU
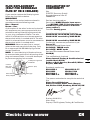
Electric lawn mower
Rasenmäher
Tondeuse à gazon
Tosatrice per giardini
Cortadora de césped
Cortador de relva
Grasmaaier
Gressklipper
Ruohonleikkuri
Plæneklipper
Gräsklippare
Çim biçme makinesi

Original instructions EN
Übersetzung der Originalanleitung D
Traduction des instructions initiales F
Traduzione delle istruzioni originali I
Traducción de las instrucciones originales ES
Tradução das instruções originais PT
Vertaling van de oorspronkelijke instructies NL
Oversættelse af de oprindelige instruktioner DK
Alkuperäisten ohjeiden käännös FIN
Oversettelse av de opprinnelige instruksjonene NOR
Översättning av originalinstruktionerna SV
TR
GR
RU

1
2
3
4
5
6
7
8
9
10
11
15

7
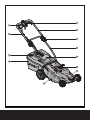
Front Part
Back Part
1
2
3
1
2
a
A1 A2 A3
A4 A5 B1
B2 B3 C1
C2 C3 C4
D1 D2 D3

14
13
15
a
b
12
E1 E2 F
G H I
J K1 K2
L

6
Electric lawn mower EN
1. SWITCH LEVER
2. CABLE CLIP
3. GRASS BAG FILLING INDICATOR
4. GRASS COLLECTION BAG
5. SAFETY BUTTON
6. UPPER HANDLE
7. LOCK CAM LEVER
8. LOWER HANDLE
9. SAFETY FLAP
10. CARRY HANDLE
11. MOTOR COVER
12. MULCH PLUG (See G)
13. BLADE BOLT (See K1)
14. BLADE (See K1)
15. WORK MODE DIAL (See I)
* Not all the accessories illustrated or described are included in standard delivery.

7
Electric lawn mower EN
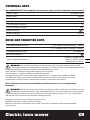
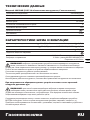
TECHNICAL DATA
Type WG708E(705-719-designation of machinery, representative of Electric rotary mower)
Rated voltage 220-240V~50Hz
Rated power 1600W
Cutting diameter 40cm
Cutting height 20-70mm
Cutting height positions 6
Grass collection capacity 50L
Protection class
/II
Machine Weight 14.5kg
NOISE AND VIBRATION DATA
A weighted sound pressure L
PA
: 82.4dB(A) TURBO mode K
PA
: 3dB(A)
L
PA
: 72.8dB(A) QUIET mode K
PA
: 3dB(A)
A weighted sound power L
WA
: 96dB(A)
Wear ear protection
Typical weighted vibration
3.16m/s
2
TURBO mode
3.32m/s
2
QUIET mode
Uncertainty K=1.5m/s
2
WARNING: The vibration emission value during actual use of the power tool can differ
from the declared value depending on the ways in which the tool is used dependant on the
following examples and other variations on how the tool is used:
How the tool is used and the materials being cut or drilled.
The tool being in good condition and well maintained
Using the correct accessory for the tool and ensuring it is sharp and in good condition.
The tightness of the grip on the handles and if any anti vibration accessories are used.
And the tool is being used as intended by its design and these instructions.
This tool may cause hand-arm vibration syndrome if its use is not adequately
managed
WARNING: To be accurate, an estimation of exposure level in the actual conditions of use
should also take account of all parts of the operating cycle such as the times when the tool
is switched off and when it is running idle but not actually doing the job. This may significantly
reduce the exposure level over the total working period.
Helping to minimise your vibration exposure risk.
ALWAYS use sharp chisels, drills and blades
Maintain this tool in accordance with these instructions and keep well lubricated (where
appropriate)

8
Electric lawn mower EN
If the tool is to be used regularly then invest in anti vibration accessories.
Avoid using tools in temperatures of 10
o
C or less
Plan your work schedule to spread any high vibration tool use across a number of days.
ACCESSORIES
Spanner 1
Grass collection bag 1
Mulch plug 1
Lock cam levers 2
Cable clips 2
We recommend that you purchase your accessories from the same store that sold you the tool.
Choose the type according to the work you intend to undertake. Refer to the accessory packaging
for further details. Store personnel can assist you and offer advice.

9
Electric lawn mower EN
PRODUCT SAFETY
GENERAL SAFETY
WARNINGS
WARNING: Read all
safety warnings and all
instructions. Failure to follow
the warnings and instructions
may result in electric shock,
fire and/or serious injury.
SAVE ALL WARNINGS
AND INSTRUCTIONS FOR
FUTURE REFERENCE.
- This appliance is not
intended for use by persons
(including children) with
reduced physical, sensory
or mental capabilities, or
lack of experience and
knowledge, unless they have
been given supervision or
instruction concerning use
of the appliance by a person
responsible for their safety.
- Children should be
supervised to ensure that
they do not play with the
appliance.
If the supply cord is damaged,
it must be replaced by the
manufacturer, its service agent
or similarly qualified persons
in order to avoid a hazard.
IMPORTANT
READ CAREFULLY BEFORE
USE.
KEEP FOR FUTURE
REFERENCE.
SAFE OPERATING
PRACTICES FOR
ELECTRICALLY POWERED
LAWNMOWERS
TRAINING
a) Read the instructions
carefully. Be familiar with the
controls and the proper use
of the machine.
b) Never allow children or
people unfamiliar with
these instructions to use
the lawnmower. Local
regulations can restrict the
age of the operator.
c) Never operate the machine
while people, especially
children, or pets are nearby.
d) Keep in mind that the
operator or user is
responsible for accidents or
hazards occurring to other
people or their property.
PREPARATION
a) While operate the machine,
always wear substantial
footwear and long trousers.
Do not operate the
equipment when barefoot
or wearing open sandals.
Avoid wearing clothing that
is loose fitting or that has
hanging cords or ties.
b) Thoroughly inspect the area
where the equipment is
to be used and remove all
objects which can be thrown
by the machine.
c) Before using, always visually
inspect to see that the blade,

10
Electric lawn mower EN
blade bolt and the blade
assembly are not worn or
damaged. Replace worn or
damaged blades and bolts
in sets to preserve balance.
Replace damaged and
unreadable labels.
d) Before use check the
supply and extension cord
for signs of damage or
aging. If the cord becomes
damaged during the use,
disconnect the cord from
the supply immediately.
DO NOT TOUCH THE CORD
BEFORE DISCONNECTING
THE SUPPLY. Do not use
the machine if the cord is
damaged or worn.
OPERATION
a) Operate the machine only in
daylight or in good artificial
light.
b) Avoid operating the machine
in wet grass.
c) Always be sure of your
footing on slopes.
d) Walk, never run.
e) Mow across the face of
slopes, never up and down.
f) Exercise extreme caution
when changing direction on
slopes.
g) Do not mow excessively
steep slopes.
h) Use extreme caution when
reversing or pulling the
lawnmower towards you.
i) Stop the blade(s) if the
lawnmower has to be tilted
for transportation when
crossing surfaces other
than grass, and when
transporting the lawnmower
to and from the area to be
mowed.
j) Never operate the
lawnmower with defective
guards, or without safety
devices, for example
deflectors and/or grass
catchers, in place.
k) Switch on the motor
carefully according to
instructions and with feet
well away from the blade(s).
l) Do not tilt the lawnmower
when switching on the
motor, except if the
lawnmower has to be tilted
for starting. In this case,
do not tilt it more than
absolutely necessary and lift
only the part which is away
from the operator.
m)Do not start the machine
when standing in front of the
discharge.
n) Do not put hands or feet
near or under rotating parts.
Keep clear of the discharge
opening at all times.
o) Do not transport the
lawnmower while the power
source is running.
p) Stop the machine and
disconnect the plug from the
mains. Make sure that all
moving parts have come to
complete stop.
- Whenever you leave the
machine;
- Before clearing blockages or

11
Electric lawn mower EN
unclogging chute;
- Before checking, cleaning or
working on the lawnmower;
- After striking a foreign
object. Inspect the
lawnmower for damage
and make repairs before
restarting and operating the
lawnmower.
If the lawnmower starts to
vibrate abnormally (check
immediately)
- Inspect for damage;
- Replace or repair any
damaged parts;
- Check for and tighten any
loose parts.
MAINTENANCE AND
STORAGE
a) Keep all nuts, bolts and
screws tight to be sure the
machine is in safe working
condition;
b) Check the grass catcher
frequently for wear or
deterioration;
c) Replace worn or damaged
parts for safety. Use only
genuine replacement parts
and accessories.
d) Be careful during adjustment
of the machine to prevent
entrapment of the fingers
between moving blades and
fixed parts of the machine.
e) On machines with multi
blade, take care as rotating
one blade can cause other
blades to rotate.
f) Always allow the machine to
cool down before storing.
g) When servicing the blades
be aware that, even though
the power source is switched
off, the blades can still be
moved.
RECOMMENDATIONS
To connect the machine only
to a supply circuit protected by
a residual current device
(RCD ) with a tripping current
of not more than 30mA.

12
Electric lawn mower EN
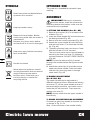
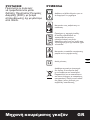
SYMBOLS INTENDED USE
This product is intended for domestic lawn
mowing.
ASSEMBLY
IMPORTANT! Before you assemble
the lawn mower, check the accessories
according above information, make sure the
accessories are completed.
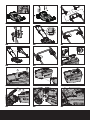
1. FITTING THE HANDLE (See A1- A5)
1) Remove the screws (X 2) on the both side
of deck. (Fig. A1)
2) Insert the lower handle (8) into the holes on
the deck provided.(Fig. A2)
3) Secure with the screws provided.(Fig. A2)
4) Attach the upper handle (6) with the bolts
and lock cam lever (7) to the lower handle
(8). (Fig. A3)
5) Tightening the two Lock cam levers. Check
that the handle is FULLY secured.
The cam lever pressure can be adjusted by
adjusting the lock cam lever (7) clockwise/
counter-clockwise. DO NOT OVER TIGHTEN.
(Fig. A4)
NOTE: Ensure the bolts are fully inserted
through the handles before fitting the handle
knobs.
6) Attach the cable clips (2) provided, to the
upper and lower handle. Insert the cable
into the clips ensuring there is enough
cable slack. (Fig. A5)
2. HANDLE ADJUSTMENT
(See B1,B2, B3)
The upper handle can be adjusted to 3
different height positions. Release the locking
cam lever (7), set the upper handle to one of
the three height positions, and make sure to
insert the pin into the hole. Then reset the
locking cam lever (7).
NOTE: Always check that the upper handle is
fixed firmly.
3. GRASS COLLECTION BAG ASSEMBLY
Connect the grass box handle to the box top
as shown in Fig. C1-C4.
Step 1. Press the front of the handle briefly.
Read instruction handbook before
operation this machine
Keep bystanders away.
Beware of sharp blades. Blades
continue to rotate after the motor is
switched off.
Remove plug from mains before
maintenance or if cord is damaged.
Keep the supply flexible cord away
form the blades.
Double Insulation
Waste electrical products should
not be disposed of with household
waste. Please recycle where
facilities exist. Check with your
Local Authority or retailer for
recycling advice.

13
Electric lawn mower EN
(Fig. C2)
Step 2. Then push it forward. (Fig. C2)
Step 3. Push down the back of the handle.
(Fig. C2)
Step 4. Finally, clip the plastic clips over the
metal frame. (Fig. C3)
WARNING: Don’t fit the handle in
reversed direction. Fit the handle as
shown in Fig C1.
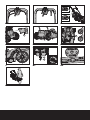
4. GRASS COLLECTION BAG FITTING
(See D1, D2, D3)
1) Unplug tool, and wait for blade to come to
a complete stop.
2) Raise the safety flap (9) and hold it up,
ensure that the mulching plug has been
removed.
3) Pick up the grass bag by the handle, and
position grass bag on the lower hooks (a)
on the mower deck (Fig. D2).
4) Release the safety guard to lock the grass
bag into position. Ensure the grass bag is
installed securely (Fig. D3).
NOTE: Depress the grass bag slightly to
ensure that it is completely installed.
5. REMOVING/EMPTYING
Hold the grass bag, lift the safety flap (9) and
hold up. Remove grass bag (4).
WARNING: Always check the safety
flap can close the discharge outlet tightly
before using. Never lift the safety flap (9)
when the lawn mower is being used without
fitted grass bag.
OPERATION
1. STARTING AND STOPPING (See E1, E2)
STARTING
Connect the plug to the mains and switch ON.
The switch box is provided with a lock-
off button to prevent accidental starting.
With one hand press and hold the safety
button (5), with the other hand squeeze the
switch lever (1) towards the handle, and
release the safety lock off button. The machine
is now started; wait until the product is at full
speed before cutting the grass. Then use both
your hands to hold the switch lever to keep it
running.
STOPPING
Release the switch lever.
2. HOW TO MOW
For cutting convenience, it may be best to start
mowing at a point close to the power supply
and to work your way away from the supply.
Mow the lawn at a right angle from the power
supply and place the power cable to side
which has already been cut.
NOTE: The motor is protected by a safety
cut out which is activated when the
blade becomes jammed or if the motor is
overloaded.
When this occurs stop, remove the plug
from the power supply.
Release the switch lever,
Clear any obstruction, then restart it.
If the mower cuts out again increase the
height of cut to reduce the load on the
motor.
WARNING! When mowing do not allow
the motor to labor particularly in heavy
conditions. When the motor labors the speed
of the motor drops and you will hear a change
in the motor sound, when this occurs, stop
mowing, release the switch lever and raise the
height of cut. Failure to do so could damage
the machine.
3. GRASS BAG FILLING INDICATOR
(See F)
To remind you immediately to empty when
the grass bag is full, the mower provides
an indicator on the top of bag to show the
collection status. And you can follow as
below:
Empty status: flap float (a)
Fully status: flap fall down (b)
4. INSTALLING MULCH PLUG (See G)
1) Unplug tool, and wait for blade to come to
a complete stop.
2) Raise the safety guard and hold it up.
3) Slide the mulching plug (12) into the

14
Electric lawn mower EN
discharge opening until it is firmly in
contact with the deck.
4) Release safety guard and ensure it is
properly closed.
5. REMOVING MULCH PLUG (See G)
To remove the mulching plug so that you can
collect the grass follow the steps listed below:
1) Unplug tool, and wait for blade to come to
a complete stop.
2) Raise the safety guard and hold it up.
3) Grasp the middle of the plug, lift and pull
out the mulching plug completely.
4) The safety guard is spring loaded. When
you release it, the guard will return to the
closed position.
6. REAR DISCHARGE (See H)
The mower provides a rear discharge function,
so that you can mower without bag collection.
The debris will be discharged from the rear
chute.
7. WORK MODE DIAL (See I)
Status1: QUIET mode
Select QUIET mode when mowing in everyday
conditions, removing approximately 20mm of
grass at a time.
Status2: TURBO mode
Set the dial to TURBO mode when cutting
dense or overgrown grass.
8. ADJUSTING THE CUTTING HEIGHT
(See J)
WARNING! STOP REALEASE THE
SWITH LEVER, UNPLUG TOOL, AND
WAIT FOR BLADE TO COME TO A COMPLETE
STOP .The blades continue to rotate after the
machine is switched off, a rotating blade can
cause injury.
CAUTION: Do not touch rotating blades.
The lawn mower can be set to 6 cutting
heights between 20mm and 70mm. For this
purpose, move the cutting height adjustment
lever outwards then adjust to the preferred
position.
9. MULCHING MOWING TIPS
While mulching, your new mower is designed
to cut the grass clippings into small pieces
and distribute them back into the lawn. Under
normal conditions, the mulched grasses will
biodegrade quickly to provide nutrients to the
lawn.
Please review the following recommendations
for optimum mulching performance.
1) Avoid mowing when the grass is wet from
rain or dew. Wet grass may form clumps
which interfere with the mulching action
and reduce runtime. The best time to mow
grass is in the late afternoon when the
grass is dry and the newly cut area will not
be exposed to direct sunlight.
2) For best mulching performance, set the
cutting height to remove about one third
of the grass blade length, ideally no more
than 38mm at one time. If the lawn is
overgrown, it may be necessary to increase
the cut height to reduce the pushing effort
and prevent overloading the motor. For
extremely heavy mulching, it is advisable
to first cut at a high cut height setting,
and then re-cut to the final cut height.
Otherwise, make narrower cuts and mow
slowly.
3) For best performance, keep the mower
housing free of built-up grass. From time
to time turn off mower and wait for the
blade to come to a complete stop. Using
an object such as a stick, wipe out any
accumulation of grass in the blade area.
Be careful of the sharp edges of the blade.
Clean often in wet, new grass, and always
after every use.
4) Certain types of grass or grass conditions
may require that an area be mulched a
second time to fully disperse the grass
throughout the lawn. If cutting a second
time, it is advisable to cut perpendicular
(across) the first cut pattern. DO NOT
CHANGE CUT PATTERN IN ANY WAY THAT
WOULD CAUSE MOWING DOWN A HILL.
5) Change your cutting pattern from week to
week. This will help prevent matting and
graining of the lawn.

15
Electric lawn mower EN
MAINTENANCE
WARNING: Stop the mower and
unplug the tool before performing
any maintenance.
NOTE: To ensure long and reliable service,
perform the following maintenance
procedures regularly. Check for obvious
defects such as a loose, dislodged or a
damaged blade, loose fittings and hardware,
and worn or damaged components. Check
that the covers and guards are all undamaged
and are correctly attached to mower. Carry
out any necessary maintenance or repairs
before operating mower. If the mower should
happen to fail despite regular maintenance,
please call our customer helpline for advice.
BLADE MAINTENANCE (See K1, K2)
WARNING: Never carry out any
assembly operations or adjustments
with the power connected to the mower.
Always ensure that the power button is in
the off position and that the power plug is
disconnected from the supply.
Always handle the blade with care-sharp
edges could cause injury use gloves.
Follow these procedures to remove and
replace the blade. You will need garden
gloves (not provided) and a spanner wrench
to remove the blade. Hold the blade (14) and
unscrew the blade bolt (13) anticlockwise
using a spanner wrench. Remove blade and
attach a new one to the blade bolt.
Ensure that the blade is properly positioned as
seen in Fig.K1, then firmly tighten the bolt.
Do not over tighten.
Renew your metal blade after 50hrs mowing
or 2 years, which ever is the sooner-regardless
of condition.
If the blade is cracked or damaged
replace it with a new one.
STORAGE: (See L )
Stop the mower and unplug the tool.
Clean the exterior of the machine thoroughly
using a soft brush and cloth. Do not use water,
solvents or polishes. Remove all grass and
debris, especially from the ventilation slots.
Turn the machine on its side and clean the
blade area. If grass cuttings are compacted
in the blade area, remove with a wooden or
plastic implement.
Store the machine in a dry place. Do not place
other objects on top of the machine.
To aid storage, release the handle cam lever,
and rotate or fold the upper handle.
You could carry the mover by carry handle
(10).
Ensure cables are not stuck or entangled when
folding or unfolding upper handles. do not
drop the handles.

16
Electric lawn mower EN
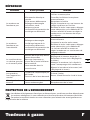
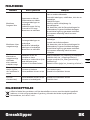
TROUBLE SHOOTING
Symptom Possible cause Remedy
Machine fails to
operate
Power turned off
Mains socket faulty
Extension cable damaged
Fuse faulty/blown
Mower in long grass
Motor protector has
activated
Turn power on
Use another socket
Inspect cable, replace if damaged
Replace fuse
Increase height of cut and tilt mower
Release the switch lever, Clear any
obstruction, increase height of cut,
then restart it
Machine functions
intermittently
Extension cable damaged
Machines internal wiring
damaged
Motor protector has
activated
Inspect cable, replace if damaged
Contact Service Agent
Release the switch lever, Clear any
obstruction, increase height of cut,
then restart it
Machine leaves
ragged
Finish or motor
labours
Height of cut too low
Cutting blade blunt
Underside of machine badly
clogged
Blade fitted upside down
Increase height of cut (see
“ADJUSTING THE CUTTING
HEIGHT ”)
Replace blade
(see “Blade Maintenance”)
Clean machine (see “Storage”)
Refit blade correctly (see “Blade
Maintenance”)
Cutting blade not
rotating
while machine
switched on
Cutting blade obstructed
Blade nut/bolt loose
Clear obstruction
Tighten blade nut/bolt
Excessive vibration/
noise
Blade nut/bolt loose
Cutting blade damaged
Tighten blade nut/bolt
Replace blade
ENVIRONMENTAL PROTECTION
Waste electrical products should not be disposed of with household waste. Please recycle
where facilities exist. Check with your Local Authority or retailer for recycling advice.

17
Electric lawn mower EN
PLUG REPLACEMENT
(ONLY FOR REWIRABLE
PLUG OF UK & IRELAND)
If you need to replace the fitted plug then
follow the instructions below.
IMPORTANT
The wires in the mains lead are colored in
accordance with the following code:
Blue – Neutral
Brown – Live
As the colors of the wires in the mains lead of
this appliance may not correspond with the
coloured markings identifying the terminals
in your plug, proceed as follows. The wire
which is coloured blue must be connected to
the terminal which is marked with N. The wire
which is coloured brown must be connected to
the terminal which is marked with L.
WARNING: Never connect live or neutral
wires to the earth terminal of the plug. Only
fit an approved 13A BS1363/A plug and the
correct rated fuse.
NOTE: If a moulded plug is fitted and has to
be removed take great care in disposing of the
plug and severed cable, it must be destroyed
to prevent engaging into a socket.
Connect
Blue to N
(neutral)
Outer sleeve
firmly clamped
Cable grip
Brown L (live)
13 Amp fuse approved
to BS1362
DECLARATION OF
CONFORMITY
We,
POSITEC Germany GmbH
Konrad-Adenauer-Ufer 37
50668 Köln
Declare that the product,
Description WORX Electric lawn mover
Type WG708E (705-719-designation of
machinery, representative of Electric
rotary mower )
Function Cutting grass
Complies with the following Directives,
2006/42/EC, 2014/30/EU, 2011/65/EU,
2000/14/EC amended by 2005/88/EC
2000/14/EC amended by 2005/88/EC
Conformity assessment procedure as per
Annex VI.
Measured Sound Power Level
94.8dB(A) TURBO mode
84.1dB(A) QUIET mode
Declared Guaranteed Sound Power Level
96dB(A)
The notified body involved
Name: Intertek Testing & Certification Ltd
(notified body 0359)
Address: Davy Avenue, Knowlhill, Milton
Keynes, MK5 8NL
Standards conform to,
EN 60335-1 EN 60335-2-77
EN 62233 EN ISO 3744
EN 55014-1 EN 55014-2
EN 61000-3-2 EN 61000-3-3
The person authorized to compile the technical
file,
Name: Russell Nicholson
Address: Positec Power Tools (Europe)
Ltd, PO Box 6242, Newbury, RG14 9LT, UK
Suzhou 2016/12/31
Allen Ding
Deputy Chief Engineer, Testing & Certification

18
Rasenmäher D
1. SCHALTBÜGEL
2. KABELKLEMMEN
3. GRASBEHÄLTERFÜLLSTANDANZEIGE
4. GRASBEHÄLTER
5. SICHERHEITSKNOPF
6. GRIFFOBERTEIL
7. HALTENOCKEN-HEBEL
8. GRIFFUNTERTEIL
9. SICHERHEITSKLAPPE
10. TRAGEGRIFF
11. MOTORABDECKUNG
12. MULCH-EINSATZ (Siehe G)
13. MESSERSCHRAUBE (Siehe K1)
14. MESSER (Siehe K1)
15. BETRIEBSMODUSWÄHLER (Siehe I)
* Abgebildetes oder beschriebenes Zubehör gehört teilweise nicht zum
Lieferumfang.

19
Rasenmäher D
TECHNISCHE DATEN
Typ WG708E(705-719-Bezeichnung der Maschine, Repräsentant Rasenmäher)
Nennspannung 220-240V~50Hz
Nennleistung 1600W
Schnittbreite 40cm
Schnitthöhe 20-70mm
Schneidehöhen-Positionen 6
Grasfangkorb 50L
Schutzisolation
/II
Gewicht 14.5kg
LÄRMPEGEL UND VIBRATIONEN
Gewichteter Schalldruck L
PA
: 82.4dB(A) Turbomodus K
PA
: 3dB(A)
L
WA
: 72.8dB(A) Leiser Modus K
PA
: 3dB(A)
Gewichtete Schallleistung L
WA
: 96dB(A)
Tragen Sie einen Gehörschutz
Typischer gewichteter Vibrationswert
3.16m/s
2
Turbomodus
3.32m/s
2
Leiser Modus
Unsicherheit K=1.5m/s
2
WARNUNG: Der Vibrationsemissionswert kann während des tatsächlichen Gebrauchs des
Elektrowerkzeugs vom angegebenen Wert abweichen, je nachdem, wie das Werkzeug
gemäß folgenden Beispielen und weiteren Verwendungsmöglichkeiten eingesetzt wird:
Die Verwendung des Werkzeugs und die Art, wie die Materialien geschnitten oder angebohrt
werden.
Der Pflege- und Wartungszustand des Werkzeugs.
Die Verwendung des richtigen Zubehörs und dessen Schärfe und Zustand.
Die Festigkeit der Handgriffe und die Benutzung von Antivibrationszubehör.
Der bestimmungsgemäß eund diesen Anweisungen entsprechende Gebrauch.
Wird dieses Werkzeug nicht angemessen gehandhabt, kann es zum Auftreten des
Hand-Arm-Vibrationssyndroms kommen.
WARNUNG: Sie sollten die tatsächlichen Arbeitsabschnitte genau ermitteln, um so den
Belastungsrad abzuschätzen. Auf diese Weise kann der Belastungsgrad während der
gesamten Arbeitszeit möglicherweise wesentlich gemindert werden.
So minimieren Sie das Risiko, dem Sie bei Vibrationen ausgesetzt sind.
Verwenden Sie IMMER scharfe Meißel, Bohrer und Sägeblätter.
Pflegen Sie dieses Werkzeug den Anweisungen entsprechend und achten Sie stets auf eine gutes
Einfetten (wo erforderlich).

20
Rasenmäher D
Bei regelmäßiger Verwendung von Elektrowerkzeug sollten Sie in Antivibrationszubehör
investieren.
Vermeiden Sie den Einsatz von Werkzeugen bei Temperaturen von 10ºC oder darunter.
Erstellen Sie einen Arbeitsplan, um die Verwendung von hochvibrierenden Werkzeugen auf
mehrere Tage zu verteilen.
ZUBEHÖRTEILE
Schraubenschlüssel 1
Grasbehälter 1
Mulch-Einsatz 1
Haltenocken-Hebel 2
Kabelklemmen 2
Wir empfehlen Ihnen, sämtliche Zubehörteile beim selben Fachhändler zu beziehen, bei dem Sie
auch Ihr Elektrowerkzeug gekauft haben. Wählen Sie den Typ entsprechend der Arbeit, die Sie
vornehmen möchten. Weitere Informationen finden Sie auf der Verpackung der Zubehörteile.
Auch Ihr Fachhändler berät Sie gerne.
La pagina si sta caricando...
La pagina si sta caricando...
La pagina si sta caricando...
La pagina si sta caricando...
La pagina si sta caricando...
La pagina si sta caricando...
La pagina si sta caricando...
La pagina si sta caricando...
La pagina si sta caricando...
La pagina si sta caricando...
La pagina si sta caricando...
La pagina si sta caricando...
La pagina si sta caricando...
La pagina si sta caricando...
La pagina si sta caricando...
La pagina si sta caricando...
La pagina si sta caricando...
La pagina si sta caricando...
La pagina si sta caricando...
La pagina si sta caricando...
La pagina si sta caricando...
La pagina si sta caricando...
La pagina si sta caricando...
La pagina si sta caricando...
La pagina si sta caricando...
La pagina si sta caricando...
La pagina si sta caricando...
La pagina si sta caricando...
La pagina si sta caricando...
La pagina si sta caricando...
La pagina si sta caricando...
La pagina si sta caricando...
La pagina si sta caricando...
La pagina si sta caricando...
La pagina si sta caricando...
La pagina si sta caricando...
La pagina si sta caricando...
La pagina si sta caricando...
La pagina si sta caricando...
La pagina si sta caricando...
La pagina si sta caricando...
La pagina si sta caricando...
La pagina si sta caricando...
La pagina si sta caricando...
La pagina si sta caricando...
La pagina si sta caricando...
La pagina si sta caricando...
La pagina si sta caricando...
La pagina si sta caricando...
La pagina si sta caricando...
La pagina si sta caricando...
La pagina si sta caricando...
La pagina si sta caricando...
La pagina si sta caricando...
La pagina si sta caricando...
La pagina si sta caricando...
La pagina si sta caricando...
La pagina si sta caricando...
La pagina si sta caricando...
La pagina si sta caricando...
La pagina si sta caricando...
La pagina si sta caricando...
La pagina si sta caricando...
La pagina si sta caricando...
La pagina si sta caricando...
La pagina si sta caricando...
La pagina si sta caricando...
La pagina si sta caricando...
La pagina si sta caricando...
La pagina si sta caricando...
La pagina si sta caricando...
La pagina si sta caricando...
La pagina si sta caricando...
La pagina si sta caricando...
La pagina si sta caricando...
La pagina si sta caricando...
La pagina si sta caricando...
La pagina si sta caricando...
La pagina si sta caricando...
La pagina si sta caricando...
La pagina si sta caricando...
La pagina si sta caricando...
La pagina si sta caricando...
La pagina si sta caricando...
La pagina si sta caricando...
La pagina si sta caricando...
La pagina si sta caricando...
La pagina si sta caricando...
La pagina si sta caricando...
La pagina si sta caricando...
La pagina si sta caricando...
La pagina si sta caricando...
La pagina si sta caricando...
La pagina si sta caricando...
La pagina si sta caricando...
La pagina si sta caricando...
La pagina si sta caricando...
La pagina si sta caricando...
La pagina si sta caricando...
La pagina si sta caricando...
La pagina si sta caricando...
La pagina si sta caricando...
La pagina si sta caricando...
La pagina si sta caricando...
La pagina si sta caricando...
La pagina si sta caricando...
La pagina si sta caricando...
La pagina si sta caricando...
La pagina si sta caricando...
La pagina si sta caricando...
La pagina si sta caricando...
La pagina si sta caricando...
La pagina si sta caricando...
La pagina si sta caricando...
La pagina si sta caricando...
La pagina si sta caricando...
La pagina si sta caricando...
La pagina si sta caricando...
La pagina si sta caricando...
La pagina si sta caricando...
La pagina si sta caricando...
La pagina si sta caricando...
La pagina si sta caricando...
La pagina si sta caricando...
La pagina si sta caricando...
La pagina si sta caricando...
La pagina si sta caricando...
La pagina si sta caricando...
La pagina si sta caricando...
La pagina si sta caricando...
La pagina si sta caricando...
La pagina si sta caricando...
La pagina si sta caricando...
La pagina si sta caricando...
La pagina si sta caricando...
La pagina si sta caricando...
La pagina si sta caricando...
La pagina si sta caricando...
La pagina si sta caricando...
La pagina si sta caricando...
La pagina si sta caricando...
La pagina si sta caricando...
La pagina si sta caricando...
La pagina si sta caricando...
La pagina si sta caricando...
La pagina si sta caricando...
La pagina si sta caricando...
La pagina si sta caricando...
La pagina si sta caricando...
La pagina si sta caricando...
La pagina si sta caricando...
La pagina si sta caricando...
La pagina si sta caricando...
La pagina si sta caricando...
La pagina si sta caricando...
La pagina si sta caricando...
La pagina si sta caricando...
La pagina si sta caricando...
La pagina si sta caricando...
La pagina si sta caricando...
La pagina si sta caricando...
La pagina si sta caricando...
La pagina si sta caricando...
La pagina si sta caricando...
-
 1
1
-
 2
2
-
 3
3
-
 4
4
-
 5
5
-
 6
6
-
 7
7
-
 8
8
-
 9
9
-
 10
10
-
 11
11
-
 12
12
-
 13
13
-
 14
14
-
 15
15
-
 16
16
-
 17
17
-
 18
18
-
 19
19
-
 20
20
-
 21
21
-
 22
22
-
 23
23
-
 24
24
-
 25
25
-
 26
26
-
 27
27
-
 28
28
-
 29
29
-
 30
30
-
 31
31
-
 32
32
-
 33
33
-
 34
34
-
 35
35
-
 36
36
-
 37
37
-
 38
38
-
 39
39
-
 40
40
-
 41
41
-
 42
42
-
 43
43
-
 44
44
-
 45
45
-
 46
46
-
 47
47
-
 48
48
-
 49
49
-
 50
50
-
 51
51
-
 52
52
-
 53
53
-
 54
54
-
 55
55
-
 56
56
-
 57
57
-
 58
58
-
 59
59
-
 60
60
-
 61
61
-
 62
62
-
 63
63
-
 64
64
-
 65
65
-
 66
66
-
 67
67
-
 68
68
-
 69
69
-
 70
70
-
 71
71
-
 72
72
-
 73
73
-
 74
74
-
 75
75
-
 76
76
-
 77
77
-
 78
78
-
 79
79
-
 80
80
-
 81
81
-
 82
82
-
 83
83
-
 84
84
-
 85
85
-
 86
86
-
 87
87
-
 88
88
-
 89
89
-
 90
90
-
 91
91
-
 92
92
-
 93
93
-
 94
94
-
 95
95
-
 96
96
-
 97
97
-
 98
98
-
 99
99
-
 100
100
-
 101
101
-
 102
102
-
 103
103
-
 104
104
-
 105
105
-
 106
106
-
 107
107
-
 108
108
-
 109
109
-
 110
110
-
 111
111
-
 112
112
-
 113
113
-
 114
114
-
 115
115
-
 116
116
-
 117
117
-
 118
118
-
 119
119
-
 120
120
-
 121
121
-
 122
122
-
 123
123
-
 124
124
-
 125
125
-
 126
126
-
 127
127
-
 128
128
-
 129
129
-
 130
130
-
 131
131
-
 132
132
-
 133
133
-
 134
134
-
 135
135
-
 136
136
-
 137
137
-
 138
138
-
 139
139
-
 140
140
-
 141
141
-
 142
142
-
 143
143
-
 144
144
-
 145
145
-
 146
146
-
 147
147
-
 148
148
-
 149
149
-
 150
150
-
 151
151
-
 152
152
-
 153
153
-
 154
154
-
 155
155
-
 156
156
-
 157
157
-
 158
158
-
 159
159
-
 160
160
-
 161
161
-
 162
162
-
 163
163
-
 164
164
-
 165
165
-
 166
166
-
 167
167
-
 168
168
-
 169
169
-
 170
170
-
 171
171
-
 172
172
-
 173
173
-
 174
174
-
 175
175
-
 176
176
-
 177
177
-
 178
178
-
 179
179
-
 180
180
-
 181
181
-
 182
182
-
 183
183
-
 184
184


Worx WG708E Original Instructions Manual
- Categoria
- Tosa erba
- Tipo
- Original Instructions Manual
in altre lingue
- français: Worx WG708E
- español: Worx WG708E
- Nederlands: Worx WG708E
- português: Worx WG708E
- dansk: Worx WG708E
- svenska: Worx WG708E
- Türkçe: Worx WG708E
Documenti correlati
Altri documenti
-
Bolens 11A-108N565 Manuale del proprietario
-
Wolf Garten HYBRID POWER 40 Manuale utente
-
-
Wolf Power Edition 37 E Manuale utente
-
-
WOLF-Garten Compact plus 40 E Manuale del proprietario
-
 John Deere JX90 Manuale del proprietario
-
Gardena 5039 Manuale utente
-
-
Skil 0715 AA Manuale del proprietario
